Christmas for a Cleaning Lady

Hello friends!  As I continue on here with my “Countdown to Christmas” sharing, I’ve also received a request for a Christmas card that I needed to work on along with my own Christmas cards! LOL!  The request was from someone that wanted me to make something special for their “cleaning lady” and here’s what I came up with:

Vicki-CAAB-Comission

I actually didn’t realize how hard it was to find  a variety of this type of occupation in a digital stamp.  (I didn’t have time to purchase anything and wait for it to get here, so I had to look up something in digital format.)  This person was requesting this type of image specifically and so I sent photos of different images I found and this is the one that was picked out for me to color.

I’ve not heard of this company before, but in searching for this type of image and the one that was ultimately picked is called Spring Cleaning-Version 1 from Cute As A Button Stamps and Design.

Because it needed to be a Christmas card, I needed to make it more “Christmas” than “Spring”…so I just tried using more traditional Christmas colors with it.  Found a nice plaid background paper with a pretty die cut to go along the edge that was cut from some silver mirror cardstock and then added the Christmas sentiment with a bow from some seam binding and then a twine bow with a glossy dot in the center.

Vicki-CAAB-Comission-close

Here’s a closer look at the coloring I’ve done on the image.  The eyes were requested to be brown, but I just took the image and again, added in the red and green colors for a Christmas themed look to it.

For the vacuum wheel, I added a silver brad in the center and the handle was colored with a gel pen as well as the “grommets” on her shoes. I used a white gel pen to create the “dots” on the bottom of her apron.  I covered the pail and the liquid in her spray bottle with a glitter brush pen.  You can also see the “foam” from her pail that was made with some liquid applique.  I just heat set it to make it “puffy”.

I used a stitched rectangle die to cut her out with and then sponged on some light green around the edges.  I did the same for the sentiment that was cut from a stitched circle die and then layered with a green piece cut from a scallop circle die.

Vicki-CAAB-Comission-flat

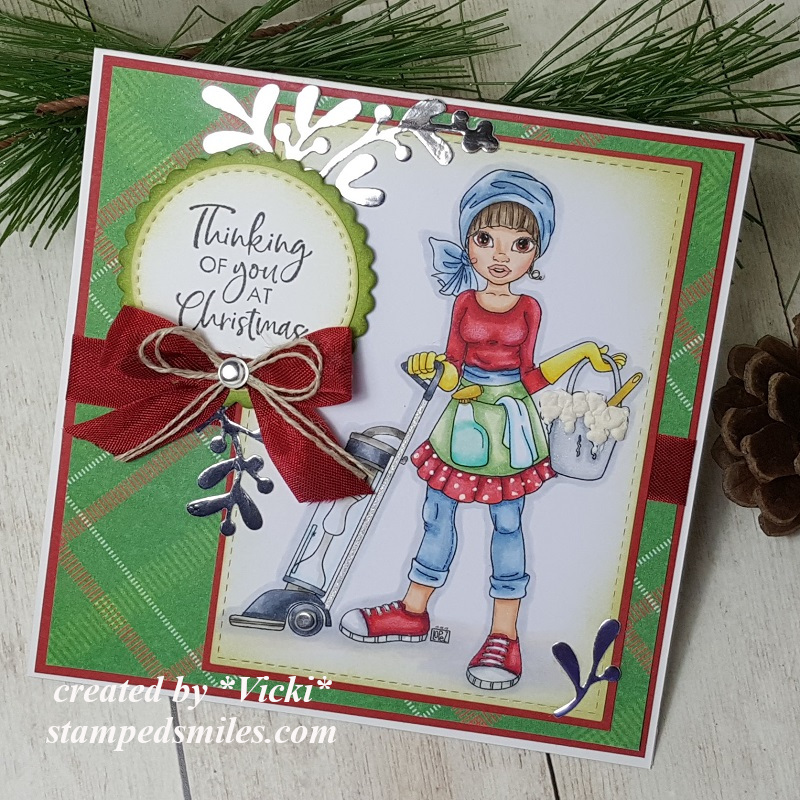
I think the colors and the silver accents really helped pull this together for a fun Christmas card tailor fit for a “Cleaning Lady”!

The person who commissioned the card has received it and was very pleased with it and even gave me an extra tip for it!  That was not necessary, but very appreciated of course!  I’m happy that it was well received and I enjoy the coloring too!

Hope you’ve enjoyed my share today and I’ll be back again tomorrow with some more Crafty Christmas sharing!  Thanks so much for stopping in!!

Challenges:

  1.  Cute As A Button Challenge – Anything Goes #51
  2. Not Just Cards – December Anything Goes
  3. QKR Stampede – Anything Goes #376
  4. A Bit More Time to Craft – Anything Goes
  5. The Creatie Crafters – Anything Goes #23
  6. Createful Heart Design – Anything Goes #15
  7. Lil Patch of Crafty Friends – Anything Goes
  8. Pammie’s Inky Pinkies – PIP1950 Anything Goes

Christmas Makes Countdown!

Hey friends!  I hope you’re having a great start to your week!  I have been in the Christmas making card mode the last few days and just finished sending out over twenty cards I believe.  I had previously made a few and already had those sent out over seas too.  I actually still have just a couple more to make for a few people close to me and I’ll be finished.

So I thought since I’ve been doing Christmas makings, I’d share some things that I’ve been working on with you!

Vicki-WS-snowglobe-KACCristmasswap

Here’s a fun “Snow Globe” shaped card that I had actually made for the Kit And Clowder Christmas card swap.  I made it in November and had actually sent it out the last week of November.  I just wanted to make sure she received it before I posted it anywhere and she did!

I have used this really sweet digital image from Whimsy Stamps called Snowman and Snowflakes by Crissy Armstrong.  I had to make it a certain size so that it would fit with my “Snow Globe” design.  So I’ve used a stitched die cut circle to cut it out with so that it could be placed on the inside of the card design.

If you would like to see how to put one of these shaped cards together for yourself, then you can check it out HERE on Splitcoast Stampers for the tutorial.

I’ve used some fun papers for the bottom and die cut a stitched scallop circle frame from some gold mirror cardstock and then used my MS “goo border punch” for the snow drip edge at the top.  I even took some white Staz On ink and stamped a few snowflakes over top of the acetate piece on the front of the card.  I added some gold ribbon and a holly sprig from Prima around the bottom.

Vicki-WS-snowglobe-KACChristmasswap-close

Here’s a closer view of the image and how I’ve got him all colored up with Copic markers.  I’ve also taken a glue pen and added some extra glitter to the snowflakes around the image as well.

Vicki-WS-snowglobe-KACChristmasswap-open

And when you open the inside of the “Snow Globe” card, this is what it looks like with the sentiment.  I have used a retired Whimsy Stamps clear stamp set called “Christmas Greetings” to stamp both the “happy” sentiment in red ink as well as the snowflakes on the piece of acetate with White Staz On ink.

I then took the Whimsy Stamps Christmas Large Word die and cut it out with a piece of gold mirror cardstock and glued that to the inside bottom of the card.  I also took some white ink and sponged around the edges of this entire inside.

I haven’t made one of these Snow Globe cards for quite a while, so that was fun to do!  I hope that you’ve enjoyed it too!  Thanks so much for stopping in today and I’ll see you again soon!

Challenges: 

  1.  Make My Monday – Anything Christmas
  2. Crafty Cardmakers – Christmas
  3. The Holly & Ivy Christmas – Anything Christmas
  4. Papercraft – Christmas
  5. Sweet Stampers – Anything Goes
  6. Try it On Tuesday – Christmas is Coming!
  7. Crafty Creations – #404 Anything Goes
  8. Cute Card Thursday – Anything Goes

DDS and PND Collaboration Blog Hop is Here!

Hello friends!  Today is the “special day” of our really fun and festive Collaboration Blog Hop!  Hope you will be joining along with us for lots of inspiration and prizes!  Woohoo!

MY HOLIDAY HOP PROJECT:

I am on the Digi Doodle Studios Design team and here is my interpretation of combining each companies’ images together to come up with this fun snow scene for the Holidays:

Vicki-DDSandPND blog hop

For my card here I have taken the Digi Doodle Studios Penguin Wobbles Special Delivery digital stamp along with the Paper Nest Dolls Holiday Friends digital stamp and printed them out over a piece of Copic Blending Card.  I’ve colored them up and fussy cut them out for my scene here.

To create the scene, I’ve used some blue cardstock for the background and splattered some watered down gesso over it and then used a die cut to create the fun frame within it.  I layered it over a piece of gold cardstock so it shows through.  I also die cut some snowy hills with white glitter cardstock and some pine trees with green cardstock.

I arranged them over my blue cardstock panel  and created the scene.  I popped up the front layer of snow hill along with the penguin image with foam tape.  I covered this snow hill layer with some texture snow paste…it’s so glittery!!  I also added some more glittery details here and there on the images too.

I white heat embossed the sentiment and placed a peppermint candy embellishment next to it and attached the strip over the blue background.  I then mounted this entire scene layer over some fun and festive foiled striped papers and then onto another blue piece which was then mounted over a top folding white 5.5″ square card base.

Vicki-DDSandPND blog hop-close

Here’s a bit of a closer look at the images and how I’ve colored them up with Copic markers.  You can see that I’ve used my white gel pen for details on the bow in the present along with the shinny look on the candy cane and the cheeks of all the images.  I’ve added a few dots on the deer’s back tail too.

I’ve used a gold gel pen to color in the sleigh runner, the band around the gift sack, the “lettering and dots” on the penguin’s sign as well as the bells the little girl is holding.  I used a red gel pen to color in the little deer’s nose.  I’ve used a green gel pen to create “dots” on the penguin’s present and the deer’s bow.

I’ve also added some glitter to the heart candies and the girl’s outfit trim.

You can also see just how puffy and dimensional that snow is too! It’s really glittery and was so fun to add to the scene!  It looks like they’re gearing up to deliver some presents and the cute little Mr. Penguin Wobbles is all loaded and ready to go! LOL!

Vicki-DDSandPND blog hop-flat

I really hope that you’ve enjoyed my card today and have been inspired with it in some way to get you into the festive Holiday spirit!

Thanks so much for stopping in today my friends!

Challenges:

  1.  Stamping Sensations– Dec Anything Goes
  2. Love to Craft – LTCCB41 – Dec Anything Goes
  3. Lil Patch of Crafty Friends – Anything Goes
  4. Shopping Our Stash– Happy Holidays!
  5. Crafting By Designs – Dec Anything goes
  6. The Paper Funday – Dec Anything Goes with optional twist:  Christmas Holiday
  7. Winter Wonderland – Anything Christmas Goes

Cute Card Thursday – Anything Goes with Reindeer Farts

LOL!  Hey friends!  Did I grab your attention with my title today?!

Today starts a brand new challenge over at Cute Card Thursday and it’s an easy ‘ANYTHING GOES!’  Since it’s the first Thursday of the month, we are being sponsored by Whimsy Stamps!  Yay!  So please be sure to remember to add whatever creation you’re working on over in our gallery this week!

*News update:  This will be my last challenge as a design team member for Cute Card Thursday.  I have really loved being apart of the team and the wonderful ladies over there for over a year and a half. I wish them all well.  I’m sure I’ll be playing along in future challenges of course!*

Here’s the card I made with products from our sponsor:

Vicki-CCT611-WSReindeerFarts

BWHAA!! HA! HA!  Yep, I’m most positive it’s probably been that cold out over my way!  LOL!  It’s supposed to get down to the teens next week! Brr!

This hilarious digital image is called Reindeer Farts by Dustin Pike from Whimsy Stamps.  It comes with the sentiment which I wouldn’t want it without that!  LOL!  This image was released back in October, but with all of the Halloween going on, it sort of didn’t get a good “spotlight” on it, so I thought now would be a good time to pull it out and perhaps send it out to my brother for Christmas…which he’ll get a kick out of!  🙂

I started out with a white cardstock panel cut with a stitched rectangle die with the printed out sentiment at the top of it.  I pulled out the Whimsy Stamps Snow Flurry clear stamp set and white heat embossed some snowflakes in the background.  I ink blended some  Distress Oxide Inks over top of them in the colors:  Salty Ocean, Wilted Violet, Mermaid Lagoon and Blueprint Sketch.  I spritzed some water over it, dapped it with a paper towel and once completely dry, I stamped out some more snowflakes in a few of the Distress Oxide Inks over that to give it a little depth.  The ink marks left over the white snowflakes were easily wiped away because the heat embossing resists the inks.  I covered this entire panel with a Shimmer Spray.  (You can see it in the photo below!)

I layered this piece onto a purple cardstock base and then layered it over a blue piece of cardstock cut from a stitched A2 sized rectangle die which was then mounted over a top folding A2 sized white card base.

I’ve used some White Glitterstock and cut a “snow hill” for the deer with a stitched hillside border die and glued that to cover the entire bottom of the card.  I also took another strip of that Glitterstock and used my MS goo border punch to create the small border above the sentiment, which generates a more “cold feeling” to the card.

Vicki-CCT611-WSReindeerFarts-close

I’ve printed out the deer image with Copic Blending Card, colored it up with Copics and then fussy cut it out…including the “fart cloud” and popped it up over the snowy hill with some foam tape.

Before attaching it to the glittery snow hill, I took a couple of Copic markers to create a bit of shading for the deer standing on the snow.  I also took a white gel pen and added some dot markings on the back of the deer.

You can also see where I’ve added some glossy accents to his eyeballs and I even took some Star dust glitter and added it to the snowflake in the “fart cloud”.

Vicki-CCT611-WSReindeerFarts-flat

Well I hope you got a giggle from my card today! LOL!  This will be a fun one to send along!

Thanks so much for stopping in today and I’ll see you soon!

Challenges:

  1.  Creatalicious – #176 Anything Goes with optional Winter
  2. Sparkles Christmas– Winter Wonderland
  3. A Bit More Time to Craft – Anything Goes
  4. Crafts Galore Encore – Anything Goes
  5. Cute As a Button – Anything Goes with optional twist:  Let it Snow!
  6. Cardz 4 Guyz – Christmas Critters
  7. Creative Inspirations – Festive Fun

Tidings of Joy with Whimsy Stamps

Hello friends!  It’s December and that means Whimsy Stamps has fun things coming out!

I have this really sweet card just perfect for this time of the year….

Vicki-WSChristmasManger-Dec3

Today I’m sharing this really sweet image called “Christmas Manger” by Crissy Armstrong.  Isn’t this just as precious as can be!  You may remember a card I did last year IN THIS POST with a penguin style manger.  Really love Crissy’s sweet images and I’m thinking I may have to start collecting her mangers she comes out with each year now! LOL!

After coloring up this image, I’ve fussy cut it out while I worked on the background design.  I started by ripping a piece of masking paper and covered the bottom portion of a square 4″ piece of cardstock.  I took a “Light Ray” stencil and ink blended some Chipped Sapphire distress ink over it.  While the stencil was still on it, I took some white watered down paint and splattered over the background.  After removing the stencil, I let that dry while cleaning up my stencil and work area.  After it was dry, I took some Scattered Straw and Mustard Seed distress inks and blended over top.  I then took a glitter brush pen and went over each of the yellow strips in the background.  (I also covered the tops portions of the images too.  You can see this all better in the photos below.)  Lastly, I’ve used the other side of the masking paper that I ripped to cover up the sponged rays and ink blended with Rusty Hinge, Walnut Stain and Ground Espresso.  I used a marker to add some shading around the image and glued it down.

For the card, I’ve used a navy 5.25″ square card base and I’ve also used it as part of a layer behind the image panel along with a piece of gold mirror cardstock.  It’s hard to completely see this, but I’ve printed out some digital papers from the Whimsy Stamps Christmas Red, Gold and Green collection as well as the Whimsy Stamps Rustic Wood and Brick Collection.  The background was sponged with the same colors that I’ve used for the bottom of the image panel.  I’ve used some twine for the center strip area and tied a bow along the side with it.  The image panel layered with the Gold Mirror cardstock was popped up with some craft foam over that.

I’ve used a wooden star that I’ve heat embossed several times with some Gold Sparkle EP which is what I’ve used to heat emboss the sentiment at the bottom of the image panel from the Whimsy Stamps Holiday Mini Sentiments.  To finish it off I’ve decided to add some Studio Katia Sparkling Crystals.

Vicki-WSChristmasManger-Dec3-close

Here you can better see the sparkle and shimmer on the yellow “light rays” as well as the tops of the images where the light might be shining on them.  I’ve got the image colored up with my go-to Copic markers.

You can also see the sparkle and shine on the wooden star and sentiment from the gold sparkle embossing powder.  Plus of course the shine from the gold mirror cardstock.

Vicki-WSChristmasManger-Dec3-flat

I hope you’ve enjoyed my card today!  I sure had fun putting it together and I know someone special that this needs to get sent to as soon as I can!  Time is running out for it to make it on time!  Oh yes…that dreaded time running out is near isn’t it?! LOL

Thanks so much for stopping by today!  I appreciate you being here!  I will be seeing you again soon my friends!

Challenges I’d like to enter this card for:

  1.  Creative Knockouts – Winter/Holidays
  2. Daring Cardmakers – Anything Crafty with theme Shining Lights
  3. Crafty Friends– Anything Goes
  4. Merry Little Christmas – December Anything Christmas Goes
  5. Country Views– Stars
  6. Crafty Animals – #33 Anything Goes

Make a Wish for Whimsy Stamps

Hello friends!  Wow!  We are getting so close to Thanksgiving now within a few days!  I know that most people have been full steam ahead with making Christmas and I have really been quite festive myself with my own creations!  Today, I wanted to suspend the ‘Merry Making’ for just a moment….

Vicki-SZPreciousPresent-Nov26

This little cutie digital stamp is appropriately named Precious Present from Whimsy Stamps and she’s another adorable fairy image by Sylvia Zet.  You could certainly change up the colors to make her more festive, but I just felt like taking a “wee” break (LOL..Wee Stamps…see what I did there?!) and make something soft and light.

After coloring her up, I used the Whimsy Stamps Notched Square Dies to cut her out with and then layer with more panels behind her.  I also took a glue pen and went along the edges of the image panel then covered with some clear glitter.  I did the same with the purple strip in the background and the layer behind the sentiment panel, but just used some pretty sparkly purple glitter.

The background papers including the sentiment panel came from a pretty paper pad called “Fairy Garden” by Kaisercraft that I had purchased earlier this past Spring.  Love how soft and light the colors and patterns are in it.  I also found the perfect Stampin’ Up! cardstock color for my card base and one of the image layers called “Certainly Celery”.  It’s an oldie but a goodie for sure!   I finished it off with some more of that clear metallic ribbon (my fave) with a bow at the edge of the sentiment panel along with some twine and a button.  I also added some flowers by Prima and a couple of pearls in the corners of the green layer behind the image.

Vicki-SZPreciousPresent-Nov26-close

Here’s a closer view of the coloring I’ve done for this image using Copic markers.  I kept things really soft and simple for this.  I did add some shimmer over her wings with a Spectrum Noir glitter brush pen and I used a pink metallic gel pen to color the “dots” above her head.

The layers were popped up with foam tape and I’ve also popped up the sentiment layer with foam tape over that as well.  (You can see the glitter in the pink layer that was die cut too!  This came from that paper pad I mentioned above.)

Vicki-SZPreciousPresent-Nov26-flat

I hope you’ve enjoyed my non-Christmas card today!  I think you could turn it into something festive and I thought about doing that, but then decided I wanted to use soft and light colors and turn it into maybe a birthday type card.  Besides, I love soft subtle colors and lots of sparkle…so it was fun to put together!  🙂

It already has me longing for Spring and winter hasn’t even really started over my way yet! LOL!!  I do have TONS of creations going on in my craft room and haven’t really been sharing them on my blog, but I hope to be getting to that very soon as we are approaching the December month and there will be so much to share!  I’m excited to be sharing things with you soon!

Thanks so much for stopping in and have a wonderful day!

Challenges I’d like to enter this card for:

  1.  The Fairy and Unicorn – November Anything Goes + fantasy themed
  2. Fab ‘n’ Funky – Add a Button(s)
  3. Little Red Wagon – Birthday Card
  4. Alphabet Challenge – ‘R’ is for Ribbon
  5. Creative Moments – Anything Goes with optional:  Ribbons and/or Bows
  6. QKR Stampede – #373 Anything Goes

Come Aboard the Penguin Polar Express!

Hello friends!  I hope that you are having a wonderful week so far!  I have a cute wintry card to share with you today:

Vicki-WSPenPolXpress-Nov19

Isn’t this the cutest little clan you’ve ever seen?!  It looked to me that the polar bear was sliding around and having fun on the ice, so the penguins decided they wanted in on the fun too and are trying to hitch a ride! LOL!!

As you may recognize the sweet penguins from artist Crissy Armstrong, this image has come out this month in digital format called Penguin Polar Express.  I really adore her sweet images.

For my card, I have followed a sketch to make my card and thought it would be nice in blue colors and sparkle.  So I printed out some papers from the Whimsy Stamps Winter’s Magic Blues digital papers and used them for my design.  I’ve also cut out some white Glitterstock for some of the layers as well as some blue cardstock for a finished top folding 5.25″ square card.  The scallop square panel was popped up with foam tape and the circle image panel was popped up with a die cut piece of craft foam.

I finished it off with some clear metallic ribbon and snowflake sequins that was dotted with some Nuvo White Blizzard Glitter Drops.

Vicki-WSPenPolXpress-Nov19-close

Here’s a closer view of the “gang” I’ve colored up with Copic markers.  I was concerned about the colors of all of the different hats the penguins were wearing, but thought the colors really make the image stand out from the card.  I dotted their cheeks with a white gel pen.

You can see where I’ve taken a glue pen and added some sparkle to the left penguin’s hat trimming.  I also took the glue pen and went around the circle of the image and added some glitter there too.  I colored the bottom of the image with Copics and covered it with a shimmer brush pen to make it look like ice.  (You can see it better below.)

Vicki-WSPenPolXpress-Nov19-flat

I hope you’ve enjoyed my card today and have been inspired in some way or at least been amused with this sweet image on my card!

I thank you so much for stopping by today!  I look forward to seeing you soon!

Challenges:

  1.  Cheerful Sketches – November sketch
  2. Try it On Tuesday – Cold, Cold, Cold!
  3. A Bit More Time to Craft – Anything Goes
  4. The Creative Crafters – Anything Goes
  5. QKR Stampede – #372 Anything Goes
  6. Creative Fingers – Anything Goes

A Special Present from Santa for Digi Doodle Studios

Hello friends!  Happy weekend!  It has warmed up slightly for us this weekend and the sun is out…for now!  It’s supposed to get below freezing again soon though and I’ll have my warm slippers ready for it!

Today I have another fun card to share with you using a Pairables set from Digi Doodle Studios:

Vicki-DDSChristmasElves-Nov16

Surprise!  This cute little girl is popping out of the gift marked:  “From Santa” and she threw open the box lid and is tossing blue ribbon around everywhere!  She seems to be so happy about celebrating in the cold!  LOL!

All of the images I’ve used for this card came from the Christmas Elves Pairables set from Digi Doodle Studios. (There are so many elements to play with in this set!)  I have actually enlarged a couple of the images from the set and sized them the way I needed them to fit with my scene and make it appear as if she was popping out of a large box.  I printed out the girl a couple of times so that I could place her behind the box with the lid and then another image to cut her out without the lid of the box and make it more dimensional.

I’ve used several layers of cardstock and more decorative papers behind her with both stitched and scallop rectangle dies.  I used my Martha Stewart “goo” border punch to add the “snow” look at the top of the layers with white Glitterstock.

I’ve added some silver metallic ribbon behind the smaller layers and placed a snowflake rhinestone in the middle of the bow.  I die cut the sentiment with a stitched tag die and added some silver twine to tuck alongside the present.  I stamped some pink snowflakes over the tag and crinkled it up a bit for dimension and movement.

Vicki-DDSChristmasElves-Nov16-close

Here’s a closer look of the coloring I did on her with Copic markers.  I’ve used a white gel pen for her cheeks as well as to help create the texture on her coat.

I’ve used some Nuvo White Blizzard Glitter Drops for the sparkle on her hat trimmings and she was popped out from the background paper with foam tape.

Vicki-DDSChristmasElves-Nov16-flat

I hope my card gave you a smile today and were inspired in some way!

Thanks so much for popping in here today my friends!  So happy you’re here!  I’ll see you again soon!

Challenges:

  1.  Addicted to Stamps – Anything Goes
  2. Pammie’s Inky Pinkies – PIP1945 Anything Goes
  3. Through the Craft Room Door – Anything Goes
  4. Fab ‘N’ Funky – Add Some Sparkle
  5. Creative Knockouts – Anything Goes
  6. Jingle Belles – Baby, It’s Cold Outside!
  7. Send a Smile 4 Kids – Happy Holidays or Anything Goes for kids

Snow One Like You for Whimsy Stamps

Hello friends!  I hope you’re having a wonderful week so far!

Today I have creation to share with you using this really sweet image from Whimsy Stamps:

Vicki-WSTawny-Nov12

I really adore this digital stamp that came out this month for Whimsy Stamps called Tawny.  It’s one that I picked to make something with as it was a bit personal to me.  That little owl with those big eyes is so sweet and really reminds me of my grandma who passed several years ago.  She was an owl lover….so she’s like a sweet little angel with me here!  There was SNOW one like her either!

To create my card, I started with some watercolor paper and Distress Oxide Inks in Seedless Preserves, Dusty Concord, Stormy Sky and Broken China (from bottom to top order.)  I spritzed it with a water bottle and soaked it up with a paper towel.  I then took some white paint watered down and splatter it with a fan brush over the panel.  I also took some shimmer spray and covered the entire panel.  You can see it better in the photo below.

I took a Lawn Fawn die to create the tree border with woodgrain paper and then die cut a snow border with glitter cardstock and glued it behind the frame.  I also took the sentiment from the Whimsy Stamps Snow Flurry clear stamp set and white heat embossed it over a strip of vellum that I’ve attached over top of these layers (with the inked background also) by using my Xyron Sticker machine.  These pieces were die cut with a stitched rectangle die, layered over a piece of white cardstock and then mounted onto a purple A2 sized top folding card base.

Lastly, I’ve added my image and some snowflakes that were cut out with some more glitter cardstock and each snowflake was dotted with some Nuvo White Blizzard Glitter drops.

Vicki-WSTawny-Nov12-close

Here’s a closer view of the image and how I’ve got her colored up with Copic markers.

If you take a good look at the top portion of the background, you can sort of see the shimmer from the spray.  It’s really sparkly in the light.

I accidentally got a piece of the “faux snow” photo prop on her skirt. LOL!  I covered the flower on her hat with a glitter brush pen and I’ve used some Nuvo Morning Dew Crystal Drops over the owl’s eyes, but it cracked.  I don’t like it as much as the glossy accents as it doesn’t crack so easily like this does.

She was fussy cut out and popped up over the snow border with foam dots.

Vicki-WSTawny-Nov12-flat

I really like how this one turned out with the colors and I hope you like it too!  The inked snowy backgrounds are really fun to play with!

Thanks so much for dropping into today and I’ll see you again soon!

Challenges:

  1.  Shopping Our Stash – Snowflakes
  2. Crafting By Designs – November Anything Goes
  3. Cardz 4 Galz – Let it Snow
  4. Moving Along With the Times – Snowflakes
  5. Creative Moments – Anything Goes with Optional:  “Baby it’s Cold Outside”
  6. Krafty Chicks – Winter
  7. QKR Stampede – #371 Anything Goes

Anything Goes at Cute Card Thursday with Holiday Wishes

Hello friends!  I hope you’re having a great week so far!  I’m trying to enjoy the warmer temps while I still am able to before it starts getting too cold out!  I wish I wasn’t feeling achy either, so hopefully that will improve too!

Today starts a new challenge for Cute Card Thursday and this week is our monthly “Anything Goes” challenge!  We’re sponsored by Whimsy Stamps and of course you know I’m using one of those images for my card today:

Vicki-WS-CCT607

How sweet is this one!  This digital stamp is by Sylvia Zet called Wintry Fairy from Whimsy Stamps.  Really love coloring up her sweet images!

For the background white layer, it’s hard to see, but I have used a snowfall embossing folder over it.  I also took a couple of the Whimsy Stamps Christmas Fun digital papers, printed them out and cut some sections for my card layout.  I layered them with some brushed gold cardstock and put them over the white embossed layer.  The piece at the bottom also has some gold ribbon wrapped around it that I added before attaching to the white layer.  These layers were mounted over a piece of red 5″ square top folding card base.

I also white heat embossed the sentiment from the Whimsy Stamps Holiday Mini Sentiments clear stamp set and then cut it out with the Whimsy Stamps Quick Strips die set.  I cut it twice so that I could get the length that I wanted and then glued it over the bottom of the layered image panel.

I then added a gold ribbon bow with some gold thread nested underneath a snowflake button that I covered with a rhinestone.  I also attached some white poinsettia flowers from my stash.

Vicki-WS-CCT607-close

Here’s a closer view of the image and how I’ve got her colored up with Copics.

I used a white gel pen for the bird’s cheeks and the berries as well as places on her coat.  You can see that I also took a gold gel pen and added details to her coat as well as her wings.  I then covered her wings and the flowers in her hair with a glitter brush pen.

For the snow t the bottom, I took a glue pen and loose clear glitter over top.

I used a square die cut to cut her out with and layered onto a piece of brushed gold cardstock and then another layer of red cardstock that was cut with a scallop square die.

Vicki-WS-CCT607-flat

I hope that you have enjoyed my card today!  It’s always great to get another Christmas card done before the rush gets going!

Please excuse me for a few days as I’m not feeling well, but hopefully will be around to visit with you soon!  Thanks so much for stopping in as I enjoy reading and smiling and sometimes giggling over your comments! 🙂   I will see you soon!

Challenges:

  1.  Love to Craft – Nov Anything Goes LTCCB40
  2. Sheepski Designs – Christmas is Coming!
  3. The Fairy and The Unicorn – Nov Anything Goes + Magical/Fairy
  4. Creative Fingers – Anything Goes
  5. Pammie’s Inky Pinkies – PIP1944 Anything Goes
  6. Unicorn – Christmas/Winter
  7. Daisy Chain – Christmas/Winter