Naughty or Nice for Digi Doodle Studios

Hello friends!  Hoping you all had a wonderful weekend!

Today I’m sharing a fun circle shaped design using a cute new Pairables set from Digi Doodle Studios:

Vicki-DDSChristmasElves-Nov4

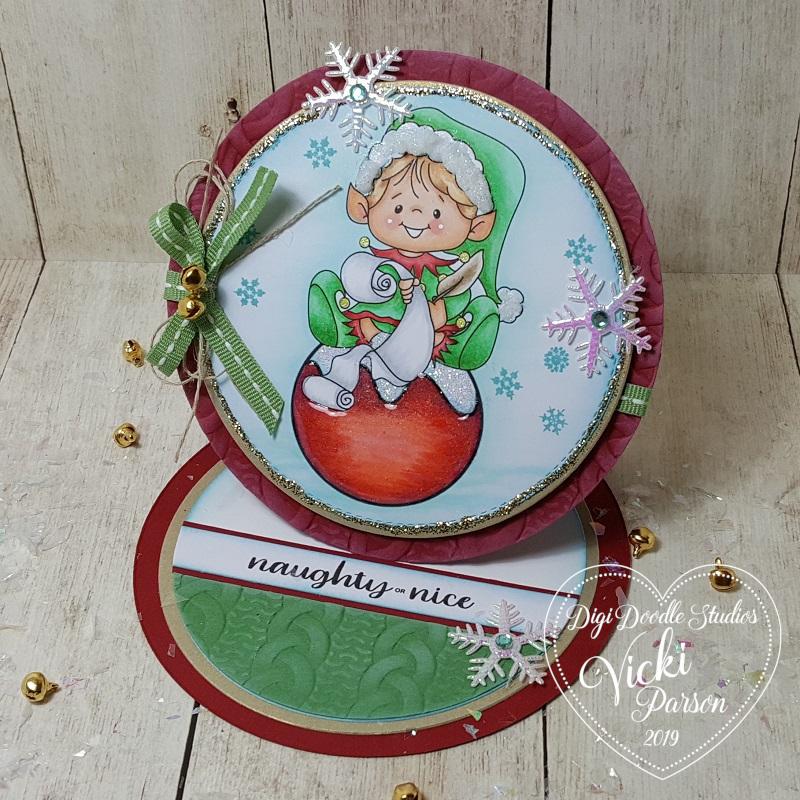
This cute little elf is sitting atop of an ornament, getting out the list for Santa and marking down who’s naughty or nice! LOL!  This image and sentiment are apart of the Christmas Elves Pairables Digi stamp set.   On my computer I actually expanded the ornament image to make it larger and then added the cute little elf from the set right on top of the ornament.  I printed it out as one image and colored it up with Copics.  I’ve also stamped some snowflakes around the image and cut him out with a circle die.  I used some Broken China distress ink to sponge around the edges.

I layered him onto a brushed gold die cut circle and added some gold stickles around the edges.  I then layered these onto a red die cut circle that was embossed with an embossing folder, which is also the same one that I used for the green piece on the inside of the card.

I made a circle easel card and then cut out the sentiment from the digi set in a strip  (also sponged with Broken China ink) and mounted it over another piece of red cardstock and attached it on the inside right above the green embossed layer.  (This strip is what helps keep the front layer propped up.)

Vicki-DDSChristmasElves-Nov4-side

Here you can see the side view of the card design.  These are very simple to make with die cut shapes and I love how they nicely display for the recipient.

I’ve add some green saddle stitch ribbon to the center of the red circle before attaching it to the easel card backing and then added a bow that I’ve tied 2 gold bells on with a piece of twine.  I then used the twine to make a double bow to go behind the green one and glued them on my card.

I added some snowflake accents and placed a blue rhinestone in the center of each.

Vicki-DDSChristmasElves-Nov4-close

Here’s a closer view of the details on this cutie.  I actually have lots of thing going on with this image.  First, I covered the bottom of his ornament with glossy accents.  It’s a fairly thick layer and you can see the details of it in the photo below, but I had to let it dry over night!

I have taken a gold gel pen and colored the “bells” on the elf’s outfit.  I then took a white gel pen for his cheeks.  On top of the ornament, I used a glue pen and covered it with some clear loose glitter.

For the trim on his hat, I took some Brutus Monroe Snow Paste and a small brush to apply it.  It’s REALLY thick stuff, so for a small area like that, I had to be a bit careful.  Love the sparkle in it and you can see, in the photo above this one, the side view of how thick it actually is!  I heat set it with my heat gun because it “puffs” up a bit when you heat it.

Vicki-DDSChristmasElves-Nov4-flat

Here’s what the card looks like when it is closed up.  I think this would also make for a really cute ornament too!  You can really see the shine on the glossy accents from this photo and why it took all night to dry! LOL!

I hope you’ve enjoyed my easel card today and gotten some inspiration and/or a smile!  Thanks so much for stopping in today!  I’ll be seeing you again soon!

Challenges:

  1.  Merry Little Christmas – November Anything Christmas Goes
  2. Pearly Sparkles – Christmas
  3. My Time to Craft – No Rectangle or Square Cards Allowed
  4. Stamping Sensations – Traditional Christmas Colors (Red, Green, Gold)
  5. A Bit More Time to Craft – Anything Goes
  6. Crafts Galore Encore – Anything Goes

Z-Fold Gift Card Holder with Digi Doodle Studios for Coffee Lovers Blog Hop + Video Tutorial

Good morning friends!  Aaah!  It sounds like a great morning for coffee, doesn’t it?!  Well it sure does to me anyway!  Today, my post is all about coffee…so grab yourself a cup, sit back and enjoy!

I’m so excited today to share my post with you because Digi Doodle Studios is a first-time sponsor for the Coffee Lovers Blog Hop!  There are lots of fun coffee themed products in the store and I’m thrilled to be sharing some with you today:

Vicki-DDS-CoffeeHop-ZfoldGiftCard

Isn’t she just adorable with coffee in hand?!  This image is called “Ginger” from Digi Doodle Studios and I’ve got her all-colored up front and center of my Z-Fold Gift Card Holder.

If you have ever made a Z-Fold card, then this is something with a little bit of extra added fun with a gift card holder pocket on the inside, plus you can see how the card nicely displays on the front which is perfect for popping into an envelope to mail out to your coffee loving friend!

The papers that I’ve used for this work perfectly with the theme today which are also from Digi Doodle Studios called Coffee Break Digi Papers.  (I love that I never have to worry about running out of my favorite pattern!!)  There are also several sentiments from Digi Doodle Studios used on my project called Coffee Anyone Sentiments.

*If you want to see a video with detailed instructions on how to make one of these Z-Fold Gift Card Holders along with a sharing of the full collection of the digital papers that I’ve used on my project, check out the video below or CLICK HERE to view it on You Tube:

This is such an easy and fun project to put together especially for the up-coming Holidays, but as you can see this is very neutral so that I could easily use it for most any time of the year.

Vicki-DDS-CoffeeHop-ZfoldGiftCard-close

Here’s a closer view of “Ginger” and how I’ve colored her up with Copic markers.  Of course, if you know me, I had to add a bit of sparkle somewhere.  I took a glitter brush pen and added some sparkle to her pink bow, the heart on her coat and the lid and flower on her coffee cup.

I die cut her out with a stitched rectangle die and then layered a piece of brown cardstock die cut with a scallop rectangle die.  For the around the edges of the image panel as well as the other sentiments I printed out, I sponged some Tea Stain Distress Ink around the edges.  The sentiment were cut out with a stitched circle die and then layered with a piece of brown cardstock cut with a scallop circle die.

To keep the image panel in place, a foam dot was used at the bottom panel so that when you pull up on the flap it opens up:

Vicki-DDS-CoffeeHop-ZfoldGiftCard-open

And this is what is so fun, is that when you flip up the front panel, you see how it opens up with the fun coffee sentiments inside and the surprise gift card holder at the top!

I have an urge to go to Starbucks now! LOL!

I hope you’ve enjoyed my fun Coffee themed project today as well as the video tutorial on how to make one yourself!  I’d love to see yours if you make one!  If you have any questions about anything, please let me know!

Now to sip on some more coffee and join in on all of the coffee inspiration today!  Thanks so much for stopping in and I’ll see you again soon!

Challenges:

  1.  Coffee Lovers Blog Hop – Anything Coffee/tea/cocoa/cider related.
  2. Watercooler Wednesday – WWC245 Anything Goes
  3. Simon Says Stamp Wednesday – Anything Goes
  4. As You Like It – Favorite Papers and Why? – Digital papers because I never have to worry about running out of my favorite pattern and I don’t have to worry about storage!

Snowman’s Birdie Friend For Whimsy Stamps

Hello friends!  I really can’t believe how COLD it’s been our way especially for October!  We even have SNOW in the forecast!  Eeek!  Now that’s scary for Halloween!

So since Christmas is on the way, I suppose it’s a good time to get into the spirit of the cold with a cute little snowman and his friend from Whimsy Stamps:

Vicki-WSSnowmanBirdie-Oct29

This guy looks so happy that his bird friend found a place to rest on his hat! 🙂  This image is called Snowman’s Birdie Friend by Crissy Armstrong for Whimsy Stamps.

I wanted to make a nice little “snowy scene” for the image, so I took out the Whimsy Stamps Snow Flurry clear stamp set and stamped some of the snowflakes from the set around the top of the image panel.  I then die cut the image out along with creating a red “frame” with the Whimsy Stamps Notched Rectangles die set.  (To do this, I just glued the red frame made with the die onto a piece of white cardstock and then glued the image panel inside the red frame.  It’s the same size, so it fit into each other.)  At this point, I added some glue to the bottom area under the snowman and sprinkled on some chunky white glitter for the snow-covered ground.

Since I was following a card sketch (see challenges below), I took out some papers from my stash and cut them on a diagonal and attached them over a piece of white cardstock and then wrapped some white organdy ribbon around it before attaching it to the top folding red 5″ square card base.

I took the Whimsy Stamps Holiday Mini Sentiments clear stamp set and white heat embossed the sentiment over the red cardstock and cut it out with a banner die from my stash.  I popped this up with foam tape over the image panel.  I also had a snowflake die and a border snowflake die that I cut with some glitter cardstock and attached around the card design and added some rhinestones in different areas.  (I thought this helped add to the wintry scene of the image too.)

Lastly, I’ve added a brown button and natural twine over top of my white organdy bow.

Vicki-WSSnowmanBirdie-Oct29-close

Here’s a closer view of how I’ve colored in the image.  As you can see, I’ve done a bit of paper piecing on the image by taking the same paper from the right edge of the card design and using it for the scarf, mittens and hat band.  (I’ve used Copics to give it a bit of shading too, which you can see details below.)

Maybe a bit hard to tell in the photo, but I’ve added just a small dot of Glossy Accents to his blue nose.  There are also highlights with a white gel pen on his nose, cheeks and the bird’s cheeks.

Here’s the Copic markers I’ve used to color the image with:

  • Snowman’s Hat – E89, E87, E84
  • Bird & Buttons – E39, E37, E35, E32 (Y17 for beak)
  • Snowman’s nose – B26, B24 (R00, R000 for cheeks)
  • Snowman’s Shadows – B00, B000, B0000
  • Scarf and Mittens Shadows – W3, W1

Vicki-WSSnowmanBirdie-Oct29-flat

Hope you’ve enjoyed my card today and it has brought you joy in some way! 🙂  I sure had lots of fun putting it together!  Thanks so much for joining me today and I’ll see you soon!

Challenges:

  1.  Sketch Saturday – Sketch #587
  2. Crafty Creations – Anything Goes #401
  3. Jingle Belles – Rudolph and Friends
  4. Crafty Catz – Anything Goes
  5. Winter Wonderland – Merry and Bright
  6. QKR Stampede – Anything Goes

Sparkles for Cute Card Thursday

Hello friends!  Today starts a new challenge for Cute Card Thursday!  The theme for this week’s challenge is “Sparkles“.  Usually when I think of sparkles, I usually think of Christmas or snow, but this time I went in a different direction for a reason…

Vicki-CCT605

Unfortunately, I needed a sympathy type of card this last weekend and it seems that I’m always making one as I need them instead of making several up at one time so that they’re ready and on hand when the time comes.

This is an older stamp set from Stampin’ Up! that I got a few years back during their Sale-a-bration time and it was a free set called “Heartfelt Blooms“.  I actually really love the floral image and how detailed the image is so that you don’t have to color it if you don’t want to.  It has been my “go-to” lately when I need something quickly.

I made it monochromatic green with the Old Olive color and Vanilla cardstock.  The “sparkle” is that beautiful glitter paper behind the strip and sentiment.  The sentiment was cut from oval dies and popped up with foam tape.

Hope you’ve enjoyed my simple card with sparkles today!

Thanks for dropping in and I’ll see you soon my friends!

Challenges:

  1.  Use Your Stuff – Tic-Tac-Toe (I used bottom row across)
  2. Creative Moments – Anything Goes with optional:  For the girls
  3. Through the Craftroom Door – Anything Goes

Oak Tree Boy Hanging Onto Fall

Hello friends!  I hope that you’ve enjoyed the weekend and having a great start to your week so far!  Right now the weather guy is saying that we could reach freezing temps on Halloween night!  About 3 weeks ago we were still in hot temps and then ran right into this cold weather!  I wish I could’ve had a couple of days to open windows and it doesn’t look like I’m going to get that!  I’m trying to hang onto the Fall Season for as long as I possibly can!

Speaking of Fall, I have this really sweet image from Whimsy Stamps to share with you today!  He’s literally hanging on a tree limb for Fall!

Vicki-WSOakTreeBoy

This adorable image is one from Syliva Zet for Whimsy Stamps called Oak Tree Boy and I have him and his little bird friend all colored up in Autumn colors!

I knew I wanted to grab the papers from the Whimsy Stamps Rustic Wood and Brick digital paper collection, so I grabbed some more plaid papers from my stash and layered it with some gold mirror cardstock that I’ve also used for the scalloped circle layer behind the image.  I attached some seam binding ribbon around these layers and added them to a 5″ square kraft card base.

I took some sparkly Prima leaves from my stash and glued them on before adding the circle image panel with some craft foam behind it.  I glued on the seam binding bow and then I took the sentiment from the Whimsy Stamps Everyday Mini Sentiments and white heat embossed it over a piece of grey cardstock.  I then cut it out with the Whimsy Stamps Quick Strips die set and attached it over top of the image panel.

Lastly, I added a few sequins and filled the centers with some Nuvo Glitter Drops.

Vicki-WSOakTreeBoy-close

Here’s a closer view of the image and how I’ve colored him in!  For the “bells” on his hat and the little bird’s hat, I colored them, but then they were covered with a glue pen and some clear loose glitter.  I took my Copic colors and did little “dots” (pointillism technique) around the image.  I did this with a gold gel pen as well.

You can view the Copic markers that I’ve used on my creation below:

  • Boy’s Outfit – YG97, YG95, W5, W3, W1, E43, E40, / Shoes & buttons:  E87, E84
  • Boy’s Hair – E47, E44, E42 / Skin:  E21, E11, E02, E00, E000, R20, R00
  • Bird – E77, E74, E70, R20 / hat: YG97, YG95, W3, W1
  • Ladybugs – R29 and black pen
  • Bells on hats – Y28, Y26
  • Leaves – YR27, YR24, YR21, Y38, Y35
  • Acorns – E35, E33, E31
  • Tree Limb – E27, E25, E23
  • Pointillism and shading – E43, E41 and gold gel pen

Vicki-WSOakTreeBoy-flat

I hope you’ve enjoyed my my little Autumn card today and were inspired or at least brought a smile your way!

Thanks so much for dropping in today!  I enjoy hearing from you, so please say hello and I’ll be seeing you again soon!

Challenges:

  1.  The House That Stamps Built – Fall Colors Inspiration Palette
  2. Stamping Sensations – October Trees/Leaves/Autumn
  3. {Cupcake Inspirations} – CIC481 Fall
  4. Crafty Catz – Anything Goes #479
  5. QKR Stampede – Anything Goes #368
  6. Creative Fingers – Anything Goes
  7. Pammie’s Inky Pinkies – PIP1942 Anything Goes

Merry and Bright for Whimsy Stamps

Hello friends!  Hope you all had a wonderful weekend!  I had another great weekend out with hubby, but this time we visited Starved Rock National Park.  Really amazing nature hike we took and I’m wore out!  I sure wish I was able to do more hiking than what we did, but what we did do was amazing.  I will share some photos soon of our last two weekends out.

For today I have a sweet image from Whimsy Stamps to share with you and another Christmas card that I was able to add to my pile which is always nice to have!

Vicki-WSPolarBearXmasTree

This little guy is so sweet trying to decorate his poor “Charlie Brown” Christmas tree here! LOL!!  This is another adorable Crissy Armstrong image called Polar Bear’s Christmas Tree.

I’ve cut out the image the whole length of the card front panel and layered it over a piece of black cardstock and then some red cardstock.  I was placed over a piece of digital paper that I printed out from the Whimsy Stamps Rustic Wood and Brick Digital Paper Collection.  I ran the edge of some scissors along the edges of it and then added some of the plaid ribbon along the left side.  I then mounted this over a 5.25″ square top folding black card base.

I die cut some pine boughs from green cardstock and arranged and glued it down over the strip of plaid ribbon.  I then added a plaid ribbon bow over top and then attached a black button with a twine bow in the center of that.

Vicki-WSPolarBearXmasTree-close

I’ve put a lot of detail into this image which is why I wanted this to be the main focus of the card.  I actually didn’t use too many different colors of Copic markers, but it took a while to get the “fur” looking the way I wanted.  (See list below.)

I started the scene by ink blending around the top edges and a bit around the sides with Weathered Wood distress ink.  After the ink blending, I took the sentiment from the Whimsy Stamps Holiday Mini Sentiments clear stamp set and white heat embossed it over the top right edge of the image panel.

For finishing details, I took some yellow chalk for around the star at the top of the tree for a glow look and then covered the star with some gold Stickles.  I brushed the red ornament with a glitter brush pen and then the “hook” was colored with a gel pen.

I covered the entire bottom of the image panel with a glue pen and then sprinkled on some clear glitter for the snow.  Lastly I’ve added some red “berries” to the garland that the polar bear is holding with some Red Nuvo Drops.

Here’s the list of Copic markers that I’ve used to color in the image with:

  •  Polar Bear – W9, W7, W5, W3, W1, W0, blender 0, R00 and white gel pen
  • Tree and Garland – E25, E23, YG67, YG63, YG61, R39, R37, R35
  • Snow Ground and Shadows – BG000

Vicki-WSPolarBearXmasTree-flat

I love the “woodsy” look to this image and I was trying to capture it in my design too.  I hope that you’ve enjoyed my Christmas card today and were inspired or helped bring you a smile!

Thank you so much for stopping in with me today and I’ll be seeing you soon!

Challenges:

  1.  Merry Little Christmas – Anything Christmas Goes
  2. Crafty Animals – Anything Goes + animal
  3. Christmas at Sweet Stampin’ – Anything Goes with optional: stars
  4. Crafty Creations – Anything Goes
  5. Simon Says Stamp Wednesday – Christmas
  6. CRAFT – Christmas
  7. Crafty Catz – Anything Goes

It’s Halloween at Cute Card Thurday!

Hello friends!  Has the weather been cooling down for you yet?  We are supposed to get much cooler than normal over my way this weekend!  Night time low around 36 degrees is a bit too chilly this time of year!  I need Fall to last! 🙂

Today starts up a new challenge this week for Cute Card Thursday!  The theme for this one is “Halloween“!!  So if you still have some more Halloween cards or treat projects, etc that you need to make, please share it with us!  We look forward to seeing what you make!

For my card, I thought it would be fun to use another Whimsy Stamps October digital stamp with a Halloween theme:

Vicki-CCT603-Witch Cinnamon-Oct10

This cute little witch is called Witch Cinnamon and I’ve used her in a little different way from the original version for my card.

First thing I did was take some black cardstock and used an embossing folder for the trees in the background.  I took a white ink pad over it so the embossing stands out a bit better over it.  I layered this onto a piece of purple cardstock and then added it over an A2 sized top folding black card base.

I took a circle die and cut it out with some yellow glitter cardstock which I then popped up with some black craft foam that I also cut out with a circle die.  I took the bat die and also die cut some bats from black glitter card stock and attached them over the design along with the witch image that is “flying” in front of the moon.  I black heat embossed (sparkly black EP) the sentiment from a Simon Says Stamp Frightful Fun set over purple card stock that I cut into a banner over the design.  I then added a thin strip of green glitter card stock at the bottom of the card.

Vicki-CCT603-Witch Cinnamon-Oct10-dark

For this photo, I tried shutting the lights off so that you can see the “green dots” in the sky that glow in the dark!  These are Nuvo Glow Drops Neon – Apple Sour that I added for the dots in the sky area.  I’ve also taken a Stampin’ Up! punch from my stash and added some purple colored stars around the area too.  If you compare this photo to the one above, you can see that with the light on, the drops are a bit more translucent.  When the lights are dimmed, you can see the glow-in-the-dark effect!

Vicki-CCT603-Witch Cinnamon-Oct10-close

I’ve zoomed in on how I’ve colored up this cutie for my card.  She’s colored with Copic markers and colored pencils.  If you take a look at the original image, you can see that I have decided to fussy cut out just the witch as I wanted her flying in front of a full bright glittery moon!  She still looks pretty cool if you were to cut her out entirely with a circle die too! 🙂

I’ve used a colored pencil to create a nice little “moon glow” on one side of her and in some areas along the top of her where I thought the moon would be glowing some light on her.

I’ve also used a white gel pen for her checks and for highlighting on her stockings.  I also used a silver gel pen to color in the buckle on her hat.  Hard to see in the photo, but behind her broom, I took a glitter pen to add a bit of shimmer where she was flying.

Vicki-CCT603-Witch Cinnamon-Oct10-flat

I hope you’ve enjoyed my card today and been inspired to create some Halloween projects soon!

Challenges this card was entered for:

  1.  Aud Sentiments – Halloween/Fall + sentiment
  2. Brown Sugar – October Anything Goes
  3. QKR Stampede – #366 Anything Goes
  4. Daisy Chain – Pink or Halloween
  5. Simply create Too – Anything Goes with optional:  Spooky/Scary
  6. Fab ‘n’ Funky – Halloween
  7. Little Red Wagon – Cut it Out!

Cheerful Sketches Guest Designer

Hello friends!  Hope you’ve had a wonderful weekend!  I just got back from a lovely weekend trip with hubby and we had such a great time visiting over in Hannibal, MO.  This was something we both really needed to just get away for a bit and it was wonderful to be able to go and do something fun!

Today I’m sharing my creation I made as a guest designer for the Cheerful Sketches challenge blog.  (I had won a spot with one of my creations I had entered.)  I was also shared the sketch and an image to work with:

Vicki-GDTCheerfulSketches-MyBesties

The was a company that I have heard of before, but this is the first time that I have actually colored one up.  This is from the My Bestie Shop in their Harvest Collection called Harvest Besties Doll 25.

I took the image and colored it up and cut it out the size I needed for my card and layered it with some dark brown cardstock.  I took some sunflower style papers from my stash and placed a piece over a 5.5″ square dark brown top folding card base.

I cut out a couple of squares for each corner of the card and layered a scallop die cut square to each one with some orange colored cardstock.  I also took a strip of this same orange cardstock and attached it diagonally across it.

Lastly, I took the image panel and wrapped some seam binding ribbon around it with a bow, twine and button.  For the seam binding ribbon, I spritzed it with water and crinkled it up a bit and let it dry before adding to my card.  I then added some Fall Prima flowers around the design.

Vicki-GDTCheerfulSketches-MyBesties-close

Here’s a closer view of the image and how I’ve colored her up with Copic markers.  For the gold glittery details in the Fall sentiment and around her (including the buttons on her shoes), I’ve taken a Quickie Glue Pen to color it in with and then added some pretty Fall gold glitter over it.

The edges of this image panel were sponged with some Tea Dye Distress Ink and then sprayed with water for the water droplet marks.

Vicki-GDTCheerfulSketches-MyBesties-flat

She has put me in the mood to go to the pumpkin patch and bring one home!

Thanks so much for stopping in today!  Hope you’ve been inspired in some way and I’ll be seeing you soon!

Challenges:

  1.  Love to Craft – LTCCB39 Oct Anything Goes
  2. Little Red Wagon – Pumpkin Party
  3. Fab ‘N’ Funky – Autumn Colors
  4. Watercooler Wednesday – WWC241 Anything Goes Feminine
  5. Crafting with an Attitude – Anything Goes
  6. Crafty Catz – Anything Goes with option of Ribbon, Bow or Flower
  7. Creative Knockouts – Lots of Layers

World Card Making Day with Whimsy Stamps-Halloween Style!

Hello friends!  Happy World Card Making Day!  Woo hoo!!  What a perfect day to celebrate for us card makers, right?!  I’m so excited to celebrate a part of this special day with you using Whimsy Stamps products… especially in a Halloween style fashion!

World Cardmaking Day is a day dedicated to celebrating the art of handmade cards – whether made with construction paper and crayons or with more sophisticated supplies. As we crafters can all agree, a store-bought card, while nice, just can’t replace the personal and thoughtful nature of one made by hand.

Vicki-WSPenguinTOT-CCT596

Here’s a fun little treat in case you forgot about my Halloween creation post back in August with this fun Whimsy Stamps Penguin Trick or Treaters digital image!  (Please click on the “Halloween creation post” for further details!)

Thanks so much for dropping in today!

Anything Goes for Cute Card Thursday!

Hello friends!  And here we are almost the first week in October coming to a close!  Wow, time goes so quickly I can’t keep up with it! LOL!

It’s Thursday and time for a brand new challenge over at the Cute Card Thursday Challenge blog!  The challenge for this week is our monthly “Anything Goes” theme with our sponsor Whimsy Stamps!

Vicki-CCT602-Oct3

Now how cute is this little Frankenstein girl?!  She could be a trick-or-treater coming around the tree with her arms out trying to walk like a Frankenstein to scare you, but I’m giggling! 🙂    This digital cutie is called, of course, Frankie by CC Designs for Whimsy Stamps.

I wanted to create a spooky scene for her (you know, to help with her trying to be scary and all!)  So I took a piece of Bristol Smooth cardstock and made a circle mask for the glowing moon and placed it where I wanted it go and began ink blending around it with some Carved Pumpkin distress ink.  I then went over that a bit with some Twisted Citron and then worked my way with Wilted Violet, Dusty Concord and Black Soot for the bottom portion.  I removed the mask and went over circle with some Squeezed Lemonade.  I wanted lots of stars in the sky, so I first sprayed the background with water and picked up the colors, then I added some “dots” with a white gel pen.  I know it won’t show up in the photos, but I sprayed the background with some shimmer spray which really makes the background so sparkly.

To finish the scene I took the Whimsy Stamps No-See All Seasons Tree die set and cut the tree out from the Whimsy stamps Rustic Wood and Brick digital papers and then sponged around the edges of it with some Black Soot distress ink.  I also took the grass die from that set and cut out 3 pieces of it with black cardstock for the ground.  I took the sentiment and spider image from the Simon Says Stamp Spook Up Some Fun stamp set and added it to the scene.  I had an older Whimsy Stamps Halloween die cut set that I cut the bat from black cardstock and added to the scene too.

Vicki-CCT602-Oct3-close

Here’s a closer look at the image and how I’ve colored it in.  I tried to capture the sparkle in the background, but it just doesn’t show up like it does in person.  You can see for the “streaks” in her hair that I’ve used a purple gel pen so it’s glittery.  I’ve also used that same gel pen for the trim on her outfit.  I used a silver gel pen for the “bolts” from her neck/face area.  She was fussy cut out and attached to the scene.  I took a glitter pen and went over her skirt too.

I’ve used Copic markers to color her in with and they’re listed below:

  • Frankie’s Hair and Shoes – C8, C7, C5, C3, C1
  • Frankie’s Skin – YG67, YG63, YG61
  • Frankie’s Outfit – V20, V17, V15, V12, YG11, C3, C1

Vicki-CCT602-Oct3-flat

Of course, I needed to make it even more spooky by adding some plastic spiders to the scene!  And yeah…. if I see a real spider…you’d be hearing a very high-pitched scream coming from me!! LOL!!  Not a fan…but pretend is just fine!  Let’s just hope I don’t drop one on the floor and see it later and scream! LOL!

I hope you’ve enjoyed my spooky Halloween card today!

Challenges I’d like to enter for this card:

  1.  Creatilicious – Anything Goes with optional: use a punch
  2. Pearly Sparkles – Spooky and/or Cute
  3. A Bit More Time to Craft – Anything Goes
  4. Addicted to Stamps and More! – Anything Goes #361
  5. Crafting by Designs – Anything Goes