Brightening A Rainy Day

Hello friends!  Are you longing for that rainy Springtime showers with lots of flowers because you’re tired of snow?  I know that I’ve been wanting Spring to get here very soon!  I thought I’d bring some of that feeling into my blog post this morning:

Vicki-SNSMayShowersBundle-Feb20-card3

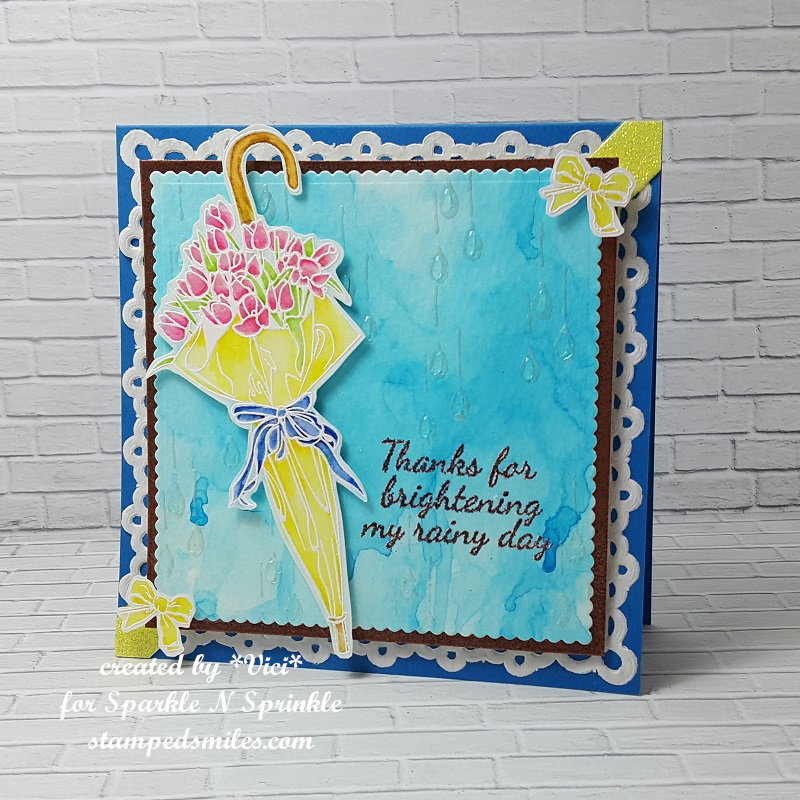
I started out with my images from these stamp sets that were released as a bundle set called May Showers Spring Bundle.

I wanted to incorporate both of these rubber stamp sets into my design, so I heat embossed the parasol image from the Showers of Tulips set and the bows from the May Showers set with White EP over some Bristol Smooth Watercolor paper.  I colored them in with my Zig Clean Color Real Brush markers and fussy cut them out with my scissors and set them aside.

Vicki-SNSMayShowersBundle-Feb20-card3-close

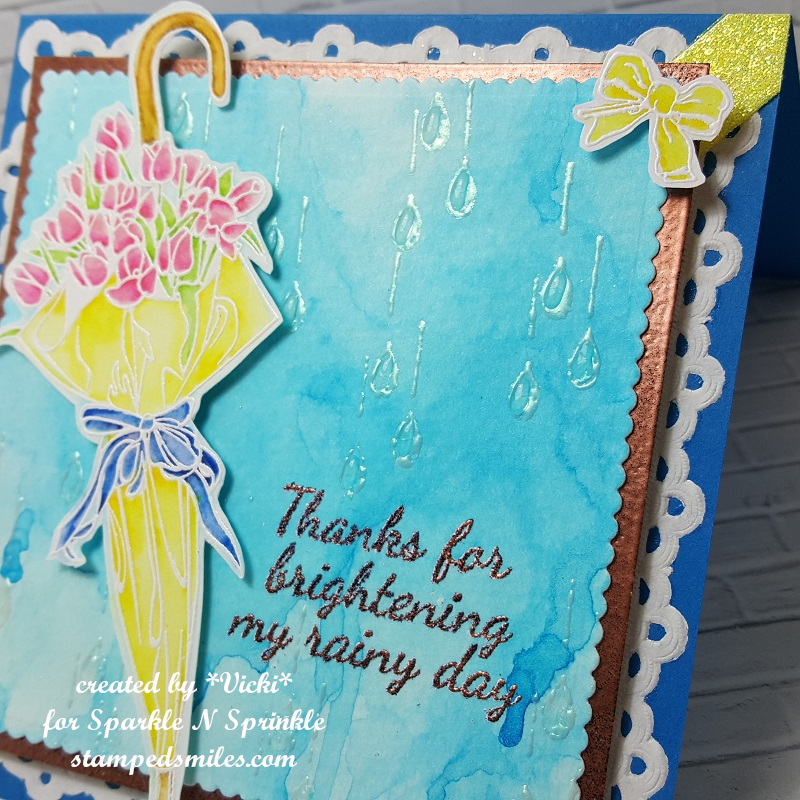
For the background panel, I took another piece of watercolor paper and spritzed it with water to get it good and wet before sprinkling on some Nuvo Blue Blitz Shimmer Powder.  I spritzed it again to really get the water moving around and manipulated the panel so that I could get the water drips going down the panel.  Once this dried, I cut it out with the Tonic Basics Scalloped Square Dies.

Using my cut-out parasol image for placement, I heat embossed the sentiment from the May Showers stamp set with the Coffee EP where I wanted it over the watercolor panel.  I then took the raindrops image from the same stamp set and stamped it with VersaMark ink repeatedly over the background and heat embossed it with that Magic Speckle EP.  I’ve also added some Nuvo Morning Dew Crystal Drops to the center of each drop for more dimension and shine to get a nice wet water look to it!  This was set aside to dry for a bit.

I took another piece of cardstock (slightly larger than the watercolor panel) and rubbed my VersaMark Ink pad along the edges to heat emboss it with the Coffee EP.  I attached these layers together and then glued some craft foam behind it for dimension.

Vicki-SNSMayShowersBundle-Feb20-card3-flat

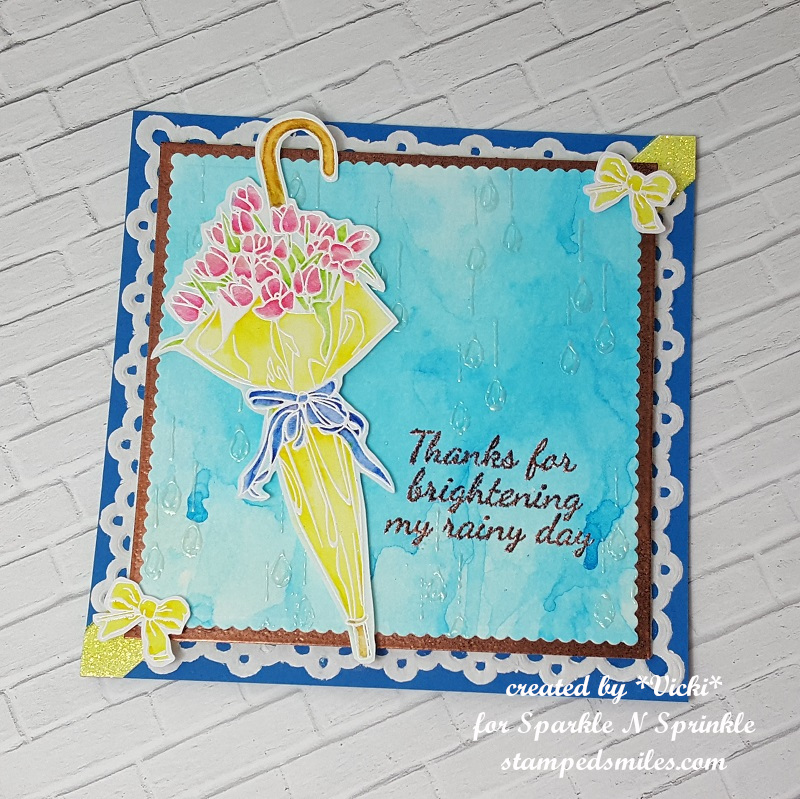
I’ve used a blue 5″ square top folding card base for my design and took a piece of white doily I had from my stash and glued it on with some Dimensional Glue.  I then added a strip of white cardstock covered with a piece of 1/2″ Tear Tape going diagonally across the card base and burnished some Sunny Daze glitter over it.

Finally, I added the watercolor and embossed layers over top of the card base and then took my fussy cut images and added them to the design with some foam dots.

I hope you’ve enjoyed my Spring Showers card today and it’s inspired you in some way!  I thank you SO MUCH for dropping in!  I appreciate all of the kind comments and a big welcome to my new followers…love meeting fellow crafty friends!!

Challenges I’d like to enter this card for:

  1.  Cardz 4 Galz – Weather (any condition)
  2. Moving Along With the Times – Little Bit ‘Shabby Chic’
  3. The Flower Challenge – Use Latest Stamp/Dies + flowers (SNS stamps)
  4. Pammie’s Inky Pinkies – (PIP1907) – Anything Goes
  5. Try it On Tuesday – “Powder Your……..” (Shimmer powder, Embossing powder)

Adopt Don’t Shop Whimsy Stamps Party!!

Hello friends!  As mentioned yesterday, I wanted to share with you a very special post today and it’s such a fantastic worthwhile cause!

And of course, it can’t be a fun party without some crafting involved, right?!!  So, since that little Doxie pup on the end was calling to my heart reminding me of my forever angel girl Mocca (on the sidebar of my blog here), I wanted to make something with that:

Vicki-WS-AdoptDon'tShop

Gosh this was SO fun to color!  That sheep dog in the background cracks me up!! 🙂

I have used the Adopt Don’t Shop DOGS clear stamp set and colored them up with my Copic Markers along with the grassy hill they’re on.  I also added some clouds behind the pups with a stencil and foam ink blending tool with blue ink.

  For the hearts paper behind them, I’ve used a left-over strip from the Hearts A Flutter Digital Paper Collection and attached this strip to the background of my white A2 top folding card base.  I layered the doggie panel onto a strip of black cardstock and mounted it over the heart background.

For the sentiment, I’ve layered it onto another piece of black cardstock and attached it in the corner of the doggie panel.  I used a circle punch to punch out the paw print and added it to the layout with a foam dot.

Vicki-WS-AdoptDon'tShop-close

Here’s a closer view of the image and how I’ve colored the pups.  Do they not make you smile or what?!

The dogs were mainly colored with the Copic ‘E’, ‘C’ and ‘W’ families.

Vicki-WS-AdoptDon'tShop-flat

To bring in some more hearts around the pups, I die cut the hearts from the Baby Animals die set and then covered them with a Wink of Stella Glitter Pen for a bit of shimmer.

Thanks so much for dropping in this evening and I know I have been very busy this week, but I will be trying to catch up with you all very soon!  Have a wonderful weekend!

Challenges I’d like to enter this card for:

  1.  Use Your Stuff – #347 Hearts, Pink and/or Red
  2. Words 2 Crafty By – (W2CB62) Best Friends                                                                              Piglet sidled up to Pooh from behind. 
    “Pooh” he whispered. 
    “Yes, Piglet?” 
    “Nothing,” said Piglet, taking Pooh’s paw. 
    “I just wanted to be sure of you.”
  3. The Creative Crafters – Anything Goes
  4. A Bit More Time to Craft – Anything Goes
  5. Sweet Stampin’ – Love Your Pet

Cute Card Thursday Has Wings!

Hello friends!  It’s Thursday already which means it’s time for a brand new challenge over at Cute Card Thursday!  This is a really fun one to play with!  This week we’d like to see your “Wings” things!  Can’t wait to see what everyone makes!!

This week we are being sponsored by All Dressed Up Stamps and I have used one of their lovely images for my card today:

Vicki-CCT569-ADUWings

Isn’t she the sweetest little thing?  I have used the Fairy Magic image that was kindly donated from our sponsor, and I have colored her up using Copic markers.  I’ve also sponged some light blue ink around the image panel before matting it onto a green sparkly layer cut with a scallop square die.  I also used some craft foam to pop up the image panel over my card for a bit of dimension.

I have just bought these gorgeous Fairy Garden papers from Kaiser Craft and used them on the background panel of my card.  I also used some gorgeous shimmery light green cardstock to go with it!  I’ve taken a thin strip of the glitter cardstock and attached it up against the butterfly papers and then attached some lace over it.  I then mounted this entire panel over a white top folding 5″ x5″ card base.

Vicki-CCT569-ADUWings-close

Here’s a closer view of the coloring and the little sparkly details I’ve added to her.   For the wings, I’ve taken a glitter brush pen over them and then used some metallic colored gel pens to add some dots to her wings as well as the butterfly wings along with some gold dots around her ribbons and the sentiment.

Here you can also see the wood veneer butterfly accent that I’ve added at the top.  I painted it with white gesso and then painted over it with some pretty pearl shimmer paint before attaching it to the card.

Vicki-CCT569-ADUWings-flat

Lastly, I’ve added three pearls at the bottom left corner of the card.  In this photo you can see the pretty shimmer on the light green background cardstock.  It was hard to capture in the photos, but the butterfly papers are sparkle embossed as well.

Thanks so much for dropping in today!

Challenges I’d like to enter this card:

  1.  All Dressed Up Challenge Anything Goes + ADU image
  2. Not Just Cards – Anything Goes
  3. Crafty Creations – Anything Goes

Fistful of Flowers From Whimsy Stamps

Hello friends!  Hope that you are having a great week so far!  There is plenty of ice and snow over my way for the next several days, so I thought I would bring a little ‘happy’ today with a “Fistful of Flowers” from Whimsy Stamps!

Vicki-WSFistfulofFlowers-Feb12

Isn’t she the cutest?!  This was originally released as a rubber stamp from Crissy Armstrong, but this month it has been released in digital format now as well!

I have to be honest and say that after I had colored in the image, I was struggling with the colors of cardstock I wanted to use, and it seemed that anything I picked out wasn’t quite working.  (You ever have this problem?)  My hubby came in to visit me and I told him I was struggling, so he took me over to my paper and picked out these colors and I liked it, so I went with it!  Did he do good? 🙂

I have cut a piece of yellow cardstock out and then took the WS Mom’s Layered Flowers clear stamp set and white heat embossed the background with one of the daisy images.  I wrapped a piece of white ribbon around the yellow embossed piece that was also mounted onto a white 4.25 x 5.5 card front piece.  After wrapping the ribbon around both pieces, I added a bow and this panel was then mounted onto a white top folding A2 sized card base.

The colored image panel was layered with a blue cardstock which I’ve also cut a piece for a fishtail banner and added some daisy accent flowers to it.

Vicki-WSFistfulofFlowers-Feb12-close

                    This cutie has been colored up with the following Copics:

  • Jeans & Bow tie on shirt – B97, B95, B93, B34
  • Shirt & Hair Bows – R85, R83, R81
  • Flower Petals & White Band on Shirt – BG000 (also around image)
  • Flowers – center:  Y17 – Leaves/Stems: YG67, YG63, YG61
  • Grass – G24, G21, G20
  • Hair – YR30, E41, E43, E44, V95
  • Skin – E21, E11, E00, E000, R20

I took a glue pen and added some clear glitter over the edge of the flower petals for a bit of sparkle.  You can see that the daisy accents also have some light touches of glitter on the edges as well.

Vicki-WSFistfulofFlowers-Feb12-flat

So I hope you’ve enjoyed my card today and thanks for dropping by!

Challenges I’d like to enter this card for:

  1.  Crafting With an Attitude – Anything Goes
  2. Creative Fingers – Anything Goes
  3. QKR Stampede – #334 Anything Goes
  4. Crafty Friends – Anything Goes
  5. Pammie’s Inky Pinkies – PIP1906 Anything Goes
  6. Shopping Our Stash – Make Your Mark (colored with markers)

Anything Goes at Cute Card Thursday!

Happy Thursday friends! 🙂  It’s Thursday and that means it’s time for a NEW Cute Card Thursday challenge this week!  So this week it’s our beginning of the month “ANYTHING GOES” challenge!  We can’t wait to see your creations!

Our sponsor for this challenge is Whimsy Stamps.

Vicki-WS-ThinkSpringBunnies-Feb7

Are YOU thinking Spring too?!  I am, but I don’t think it’s working very well with the snow, cold and ice we’ve been getting! LOL!  So I will stay warm inside and bring my thoughts of Spring to my craft room!

I am using this really sweet digital image from Whimsy Stamps called Think Spring Bunnies by Crissy Armstrong.  It was previously released as a rubber stamp, but now it’s available in digital format!  I have printed out this image and used the following Copic Markers for coloring:

  1.  Bunnies – W5, W3, W1, W0, E33, E31, E30, C3, C1, C0 (tails)-, E44, E42, E40, Blender 0 (spotted bunny)
  2. spotted bunny inside ears, nose face – R20, R00
  3. Wooden sign – E25, E23, E21 (E23 used for center of yellow flowers)
  4. flowers – Y17, Y15, Y11, V17, V12 – YG67, YG61 (leaves/stems)
  5. grass – G24, G21, G20
  6. butterfly – Y11, R00
  7. sky around image – B01, B00, B000, B0000

Vicki-WS-ThinkSpringBunnies-Feb7-close

Here’s a closer view of the colored image.  I have also used a white gel pen in the bunny’s tails as well as the spotted bunny’s cheeks.  I also took a Wink of Stella clear glitter brush pen to go over the butterfly and the flying bug’s wings.

It was so fun to color these furry bunny butts!! 🙂

Vicki-WS-ThinkSpringBunnies-Feb7-flat

I’ve used some of the digital papers released last month called Oh Boy…really loving the ginghams in this set!  So, I’ve cut out both these papers along with some solid yellow papers (from same set) and the colored bunny strip with the Whimsy Stamps Hand Stitched Nested Rectangles dies.  I also took a strip of gray colored cardstock and used an older border die from Whimsy Stamps to create the scalloped edge.

These were all layered onto a white A2 sized top folding card base.  I wrapped some twine along the edge and tied it in a bow and then lastly, I’ve added some yellow crystals from Pretty Pink Posh randomly over the card.

Challenges:

  1.  Crafty Animals – Anything Goes + animal
  2. A Bit More Time to Craft – Anything Goes
  3. Crazy 4 Challenges (C4C469) – Ground Hog or Critter
  4. Send a Smile 4 Kids – Anything Goes/Easter/Spring
  5. 613 Avenue Create – Anything Goes with optional: use a critter
  6. Crafting From the Heart – Anything Goes

May Day Floral Wreath

Hello friends!  With the cold weather and ice around my area, I thought it would be nice to turn my attention towards the month of May with my creation today:

Vicki-SNSFloralNosegayWreath-Feb

I have used this digital stamp set called May Day Floral Nosegay.  I have printed out the pre-colored floral images and fussy cut them out for this card.  The sentiment in the center of the wreath is also from this same set which I’ve printed out as well and then cut it out with the Tonic Scalloped Squares Basic die set and sponged around the edges with some blue ink.

For the wreath, I’ve used the Tonic Rococo Fern Garland die and cut it out once in green cardstock and another in white cardstock.  For the white one I cut the ribbon area only and covered this piece with VersaMark ink which was heat embossed with some Sweetheart EP.  (This is such a pretty EP with lots of sparkle!  See below!)

Vicki-SNSFloralNosegayWreath-Feb-close

I also heat embossed this same Sweetheart EP along the edges of a white cardstock that I cut out to layer behind the wreath panel.  The heat embossed bow was glued over the green wreath and then the entire wreath was centered over the sentiment panel.  I also then layered these panels onto a piece of black cardstock.  I also put some craft foam behind this panel for some dimension on my card.

Vicki-SNSFloralNosegayWreath-Feb-closer

For the tiny flowers behind a couple of the white flowers, I took my Clear Mark Embossing Pen and heat embossed the very tips with the same EP as above.  All of these cut flowers were attached with the Dimensional Glue onto the wreath with a couple popped up for dimension.  I also took some Nuvo Honey Gold Glitter Drops for the centers of the flowers as you can see in the photo above.

Vicki-SNSFloralNosegayWreath-Feb-flat

Lastly, for the base of my card, I cut a piece of A2 sized top folding card base with a light blue cardstock.  I also used this same cardstock color to cut out a couple of pieces using the Tonic Elegant Columns die set…so pretty!  I sponged some white ink around the edges of them and attached them to the card base.  I cut off the edges that were sticking out with my scissors.

Hope you’ve been inspired by my creation today and I thank you so much for stopping by!!  See you soon!

Challenges:

  1.  4 Crafty Chicks – Anything Goes
  2. CRAFT – Anything Goes
  3. Moving Along With the Times – Add a Sentiment
  4. A Perfect Time to Craft – Anything Goes
  5. Crafty Catz – Anything Goes + optional:  Lots of Layers
  6. Papercraft – Something New (new stamp set, dies, EP, flowers)

Whimsy Stamps New Digital Release – Willow

Hello friends!  So are you having a Super Bowl party today?  It’s always been sort of a little “thing” at our house each year since my kids were little….they were in it for the snacks of course!  LOL!

Today I want to share with you a card I made with one of the brand new February digital releases from Whimsy Stamps!

Vicki-WS-Willow-Feb3

I have used this darling little Willow girl on my card today!  Oh, those eyes are so catching on her!  (Had to make them a pretty blue!)  I have colored her up with the following Copic markers:

  1.  Dress, hair bows, shoe bows – R85, R83, R81, R00
  2. Flowers – Y17, Y15, Y11, V17, V12, YG63, YG61
  3. Shoes, Socks – E84, E81, BG000
  4. Hair – E27, E25, E23, E21
  5. Skin, Eyes – E21, E11, E00, E000, R20, R00, BG49, BG45
  6. Around image – C1 (white gel dots on cheeks and eyes)

First, I took the Whimsy Stamps Notched Rectangles die set and cut out the colored image.  Then I thought those yellow flowers she’s holding needed to be brought out a bit so I took the smaller flower image from the Whimsy Stamps Mom’s Layered Flowers clear stamp set and stamped it with yellow ink around the edges and die cut a scalloped rectangle layer with a suede brown cardstock to layer behind it.  I sponged around the edges with some Brushed Corduroy distress ink and ink foam blending tool.  I did the same to the left edge of the white A2 sized top folding card base.

For the right side of the card base, I took some of the Oh Boy digital papers from last month’s release and attached it.  Then I took the sentiment from the same floral clear stamp set as mentioned above and stamped it with some brown ink at the bottom right corner of the card.

Vicki-WS-Willow-Feb3-close

Here’s a closer view of the coloring on my image.  You can see the yellow glittered hearts and those piercing blue eyes!

I then took the layered image panel and attached it to some craft foam and added it to the center of the card design.  Lastly, I stamped a couple of hearts from the same stamp set mentioned above and filled them with some yellow glitter and added pearls to the corners.

Vicki-WS-Willow-Feb3-flat

Please be sure to stop by the Whimsy Stamps store to check out all of the brand-new February release.

Challenges:

  1.  City Crafter – Floral Background
  2. Addicted to Stamps & More – Anything Goes
  3. Watercooler Wednesday – WWC206 Anything Goes
  4. CCEE Stampers – CCEE1905 National ‘Thank You’ month
  5. Creative Knockouts – Flower Power

“It’s a Girl Thing” TSA Inaugural Blog Hop!

Hello friends!  So happy you are here!
Welcome to the “It’s A Girl Thing” Turner Syndrome Awareness Inaugural Blog Hop!   Before I share my project with you, here is some important information regarding what this special blog hop is all about:
Turner Syndrome is a genetic disorder where a female is born with only one X chromosome, instead of two, leaving her with life-long medical issues and learning disabilities. This condition occurs one in 2,500 female births worldwide but is more common among pregnancies that do not survive to full term. That is why Turner Syndrome Females are considered MIRACLES!

Turner Syndrome and the Butterfly

The butterfly has become the symbol for “Turner Girls”. Just like a butterfly, they are considered fragile and beautiful miracles. Turner Syndrome may also cause a myriad of health complications, such as heart defects, learning disabilities and infertility, according to the Mayo Clinic. Sept 14, 2013.

Because it represents femininity, strength, and uniqueness, the butterfly was designated by TSSUS to become the Turner Syndrome symbol. “Butterflies fly on their own which is our hope for our girls.”

Vicki-TSAbloghop-ribbonsoflove

I have used this digital stamp set called “Ribbons of Love” I think it’s awesome that you can choose to use the pre-colored versions from the set which I have for my card here.  It’s a perfect set to have on hand in multiple-colored ribbons that can be used for any cause you like to support!  It also has some fantastic sentiments to go with it too!  The butterfly was perfect to use for this particular cause!

vicki-tsabloghop-ribbonsoflove-close

I have used some papers from my stash for the background and the colors all chosen from the TS color palette!  I printed out the image and sentiment together and die cut it with a stitched circle die.  For the circle glitter layer behind it, I cut out another cardstock circle layer with some Super Adhesive Sheets over it, peeled off the backing and sprinkled some Gecko MF glitter and burnished it in.  Added some blue ribbon with a bow over the papers, attached the circle layers, flowers and pearls.  I then took a clear glitter pen and went over the butterfly with it for more shimmer.  This was all mounted over a SU! Pacific Point 5×5″ top folding card base.

I hope you’ve enjoyed my card and it has inspired you in some way!  Thanks so much for dropping by and taking part in this blog hop with us!

I am happy to be donating this card along with a few others to Lori so that she can use them to help raise funds for this cause as well.

Challenges I’d like to support with this card:

  1.  Creative Fingers – #156 Anything Goes
  2. Pammies Inky Pinkies – PIP1904 – Anything Goes
  3. Tuesday Throwdown – Anything Goes

2 Crafty Critter Crazies February Challenge is Here!

Hello friends!  Today starts our new February challenge over at 2 Crafty Critter Crazies!  Remember that this is an always ANYTHING GOES challenge, but you must include a critter somewhere on your project to enter!

Here’s what I’ve created for the challenge:

vicki-ribbonsoflove-glittercard-project4

I have used this digital stamp set called Ribbons of Love.

For this card, I’ve used the uncolored images and placed the images together how I wanted them to appear in a Word doc and then printed it out.  I printed out an extra butterfly so that I could cut it out and pop it up over the design for dimension.  All of the butterflies were colored with Copics.

For the background of my card, I took some Lace and placed it over top of a piece of cardstock that I’ve covered with a Super Adhesive Sheet.  I then sprinkled some Caspia Sea glitter and burnished it over the lace layer.  (Sometimes I use the backing from the adhesive sheet to help burnish it in.)  After I felt it was burnished in, I removed the lace layer and sprinkled on some Lemonade glitter over the rest which gave me the unique glittery lace background!  As you can see, I’ve also taken a small strip of it to add to my design.  I have layered that piece with a strip of black fishtail banner and tied a white ribbon bow to attach over it.  The butterfly image panel was cut, layered with black cardstock and attached over the middle of the glittery background which as also layered with black cardstock and attached to an A2 sized white top folding card base.

vicki-ribbonsoflove1

Looking more closely at the card, you can better see the glittery background along with the coloring on the butterflies.  The two butterflies at the top were brushed with some Glue and then I sprinkled some Diamond Dust glitter over top of their wings for a bit more sparkle.  I glued the center of the yellow butterfly down and popped up the wings with my finger for a bit of dimension.

Thanks for stopping in… stay tuned in for my next special post!!

Valentines for Cute Card Thursday

Hello friends!  It’s Thursday already!  And you know what that means….It’s time for a new Cute Card Thursday challenge!  For this week’s challenge, we’d like to see your Valentine’s projects!  (A great way to get going on your love cards!)

Our sponsor this week is Odball Art Co. and I have used one of their images on my card for this challenge today:

vicki-cct567-valentines

This cute little fellow is called Valentine Giraffe and so I thought he’s the perfect image for this challenge and he was so fun to color too!  I have used my Copic markers to color him with.  It went rather quickly, and I knew I wanted this to be a bit simple because you never know if this one need to be delivered to a male! *Wink

For the hearts sprinkling down as well as the sentiment, I’ve used an older Simon Says Stamp set from my stash and stamped the hearts with a rose-colored ink and then shifted the image slightly to do a “double generation” stamp over it.  The sentiment was stamped in black ink next to the giraffe and then I’ve added some stitch lines around the panel as well as around the “xo” papers with a black marker.

I then added the ribbon to the “xo” papers and then popped the giraffe image over some craft foam and mounted it over the papers which was then mounted onto an A2 sized top folding white card base.

vicki-cct567-valentines-close

Taking a closer look at the image, you can see how I’ve colored it in and I’ve added some white gel dots to his eyeballs and cheeks.

For a bit of shimmer, I took a clear glitter brush pen and went over the sprinkling hearts with it.  I then took some Nuvo White Blizzard glitter drops to add some extra sparkle to the heart dangling from his mouth.

vicki-cct567-valentines-flat

I think this is a great masculine style Valentine as it has the neutral color palette with the pops of bright pink/rose for the hearts.  And just a touch of shimmer thrown in!

Thanks for dropping by today!!  See you tomorrow for several projects I will be sharing!  Stay tuned!!

Challenges:

  1.  QKR Stampede – #332 Anything Goes
  2. Crafty Friends – Animals/Birds
  3. Sisterhood of Snarky Stampers (SOSS127) – ‘V’ is for Valentine
  4. Crafting By Designs – Animals