Sweet Anniversary Wishes

Hello friends!  Hope you’re having a great week so far!  It is really cold in our area right now as we are experiencing a “Polar vortex” with a high of -11 degrees F and low of -23 degrees F without wind chill for tomorrow.  Brr!  Many schools in the area as well as city workers are taking the day off due to the severe cold weather.   Please stay warm and safe wherever you are!

Not sure if you saw that Whimsy Stamps has started carrying this new adorable line of digital stamps from CC Designs in their store.  Here’s the card I’ve made today using one of those images:

vicki-pcaimeevalentino-jan29

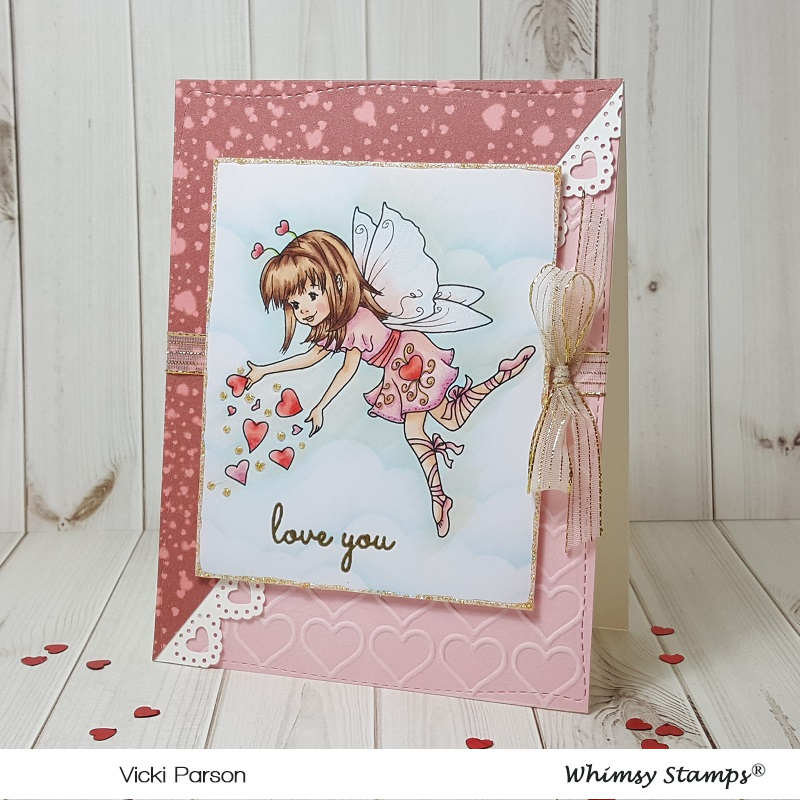
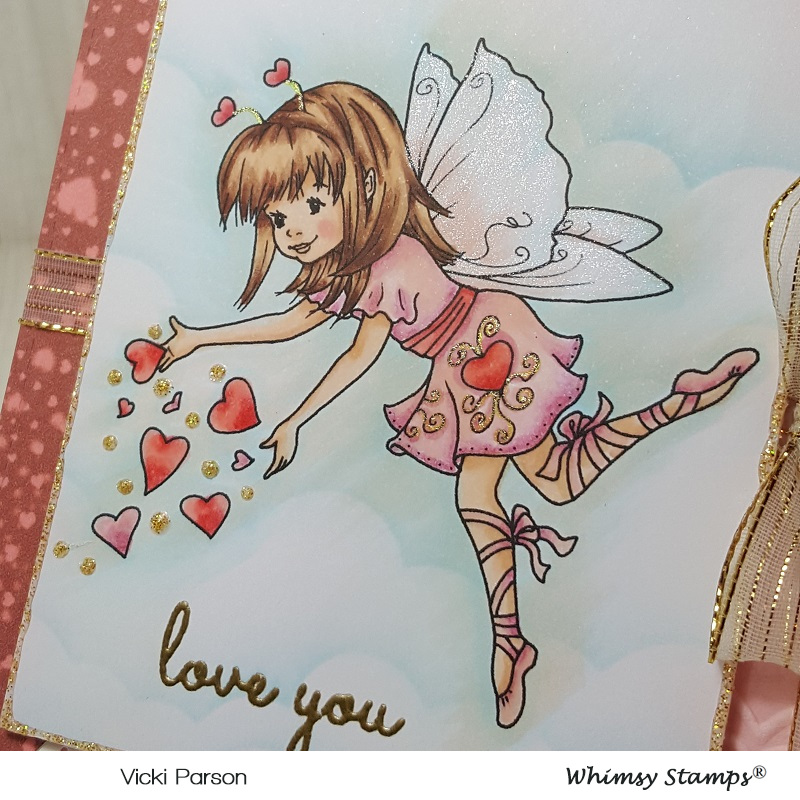
I’ve used this super cute image called Aimee & Valentino for a special anniversary card.

I decided to print it out twice so that I could cut out the balloons and pop them up over the image.  I have used the following Copic markers to color it in:

  1.  reds on outfits, boots, hair clip and balloon – R37, R35, R32
  2. Pink on outfit and balloon – R85, R83, R81 (girl stripes on dress – E53, E51, E50)
  3. Boy’s outfit, boots and hair – C8, C5, C3, C1, C0, C00 (stripes on shirt – BG000)
  4. Girl’s hair – E27, E25, E23, E21
  5. Skin tones – E21, E11, E00, E000 (cheeks – R20)
  6. Grass/shadows – G24, G21, G20, E0000 (around image – BG000)
  7. I used metallic gel pens to color in the middle of hair clip, buttons and cheeks

I cut this image out with a stitched square die cut and then used a cloud stencil with Tumbled Glass distress ink and ink foam blending tool to add clouds behind the couple.

As mentioned above, I cut out the heart balloons on the second print out of the image and heat embossed the stamped numbers on them.  I used a stylist tool on the back of them to curve them in a bit and popped them up over the image with some foam dimensional dots.  I then added some shimmer over top of them with a Wink of Stella glitter brush pen.

vicki-pcaimeevalentino-jan29-upclose

Here’s a closer look at the coloring on the image.  You can see a bit of the shimmer over the balloons and where I’ve added some metallic color on the heart hair clip.  I took this image panel and layered it over a piece of gold mirror cardstock.

vicki-pcaimeevalentino-jan29-flat

I thought that the January released Hearts a Flutter digital papers were the perfect backdrop for this cute couple, so I printed the pink with white hearts one out and cut a piece out using the Whimsy Stamps Hand Stitched Nested Rectangle dies for that.  I found some coordinating card stock and gold heat embossed the sentiment from the WS Everyday Mini Sentiments clear stamp set and cut it out with a banner strip die.  I also placed it where I wanted it to go and used the Hand Stitched rectangle die again to create the stitch marks over it.

I took some gold ribbon and wrapped it around the heart design paper card front, placed the image panel over top and then layered on the sentiment banner with foam tape.  This was mounted over an A2 top folding white card base.  Lastly I added a gold bow and some gold sequins filled with some Stickles Tinsel glitter glue.

I hope that you’ve enjoyed my card! 🙂  Thanks so much for dropping by today!  See you soon!

Here’s some challenges I’d like to enter this card for:

  1.  CCEE Stampers – CCEE1904 Gold
  2. Aud Sentiments – Anything Goes + sentiment
  3. CRAFT – Love/Valentines (it fits with this theme as it’s about love!)
  4. Crafty Catz – Anything Goes with optional twist:  ribbon/lace
  5. My Time to Craft – All You Need is Love

Hello Cute Chicks!

Hello friends!  Err…should I say “Cute Chicks”!  🙂

I have some more Whimsy Stamps inspiration to share with you today using this sweet image by Crissy Armstrong called Penguin’s Cute Chicks.  Now it may look familiar to you and that’s because it was originally made as a rubber stamp, but starting with this month’s release it has been released in digital format!  So it’s great to now have both options available to you!

vicki-ws-penguincutechicks-jan22

I am a huge penguin fan and Crissy’s penguins are so fun to color!  I have colored this image with the following Copics:

  1.  Penguin Body, Beak, Feet, Cheeks:  C8, C5, C3, C1, C0 – YR18, YR15, YR12 – R00, R000
  2.  Penguin hat & scarf:  E89, E87, E84, E81
  3.  Chicks:  Y38, Y17, Y15, Y11 – Cheeks:  R00
  4. Chick blue & purple ribbons:  B39, B37, B34 – purple:  V17, V15, V12
  5. Egg shell and around image:  BG000
  6. Grass:  YG67, YG63, YG61

(More up-close details below!)

I have also used some fun digital papers from the January digital release called “Oh Boy” digital papers collection.  (You may remember the “Crateful of Kittens” card that I had previously done which was using these same papers.  I’ve used both the striped and solid papers for my card here.  At the top of the striped papers, I used the Whimsy Stamps Pierced Border Trio dies to cut a curvy border.  I cut another piece like that in black cardstock to layer behind it.

I took the WS Painted Sayings clear stamp set and stamped the greeting in the upper left corner of the image panel and I also used the splatter images from the set and stamped some black splatters over the solid colored digital papers.  Before attaching the striped panel to the solid background, I added some white ribbon with a bow and a black button with a bow twine through it.  I attached this to the solid panel and then attached all layers to a white 5″ square top folding card base.

vicki-ws-penguincutechicks-close

Here’s a closer view of the image with my coloring.  For around the edges of the image panel, I took a glue pen and sprinkled on some clear glitter for a bit of a sparkly touch around the design.  I layered this onto a black piece of cardstock and then added some craft foam behind it for a slight dimension and attached it to the card front.

Hope you’ve enjoyed my card today!  Thanks for stopping by!!  I’ll see you back again tomorrow for another really fun project I made!

Challenges I’d like to enter this card for:

  1.  As You Like It – Pearls or Buttons? (I love to add buttons in the center of bows and with different colors it can work on any style you’re designing.)
  2. Crafting From the Heart – #235 Anything Goes

Enjoy the Changes Life Brings

Hello friends!  Back with you today to share a card I’ve made using the January release stamp set called Early Spring Nest!

vicki-earlyspringnest-cardep-project2

I had so much fun playing with this pretty Spring image and playing with some new embossing powders on this one!

To get the background, I’ve taken a piece of watercolor paper and sprinkled it with some Nuvo Blue Blitz Shimmer Powder and spritzed it with water to also move it around the paper until I got the look I was wanting for it.  I set it aside to work on the rest of my card until it was COMPLETELY dry.  After it dried, I took my Static Free Bag to rub over the area and prep for heat embossing.  I stamped the Crackle Background stamp (Really love the versatility of this image!) with VersaMark and heat set the image with the Robin’s Egg embossing powder.  (Sounded like the perfect product to use for my card!)  I also used my corner chomper to round the corners on this panel.

For the scallop layer behind this panel as well as the layer behind the sentiment, I took my VersaMark ink pad and smeared on a layer around the edges and heat embossed them with the Coffee embossing powder.  I also used this for the sentiment as well as the nest image, so this also works for a nice, detailed embossing powder!   I made the fishtail banner layer before I did the embossing with my Tim Holtz 5″ scissors.  I took some craft foam and attached the front base panel to the embossed scalloped layer which was mounted onto a white A2 sized top folding card base.

Here’s a closer look at the stamped Crackle background with the Robin’s Egg heat embossing over the watercolor background.  I just love the shimmer it has in it!  You can also see the Coffee heat embossed layers.  I love the pretty Copper sheen it has as well as the dark brown flecks in it!  You can also see how well it embossed the fine detailed stamped images too.

There are so many different things going on with the embossing powder on this design that you really need to capture all the different angles throughout the design to see it!

vicki-earlyspringnest1

For the coloring of the image, I just used some Clean Color Real Brush markers for it.  I like to heat emboss the images when I do this sort of coloring as it helps to keep the water coloring inside the lines and acts as sort of a “well” so that the colors stay where you want them.

For the eggs inside the nest, I took a VersaMarker pen and colored them in with it.  Then I took the same Robin’s Egg embossing powder and heat set the eggs with it.  It really creates a fun and unique look with the blue tint and speckle flakes in it, plus it gives it a nice embossed shine for an “egg like” appearance!

After coloring in the image, I used my scissors to fussy cut it out and then added a couple of feathers from my stash and attached this image over the card front panel with some foam tape.  I finished off my design by adding a few random drops with some Nuvo Dazzling Blue Glitter Drops.

I hope that you’ve enjoyed my card today and thank you so much for stopping in!

Challenges I’d like to enter:

  1.  Fab ‘N’ Funky – New Beginnings  MISS IT!!!
  2. Not Just Cards – Jan Anything Goes
  3. Crafty Friends – New Beginnings
  4. Stamps & Fun = Creativity – #338 Anything Goes
  5. Pammies Inky Pinkies – PIP1902 Anything Goes

Cuddle Bunny at Whimsy Stamps

Hello friends!  Hope you’ve had a great weekend!  The last time I posted I mentioned it was so nice that we could cook out on the grill, well this week it’s snow conditions and very cold!  With life in the Midwest, you never know what you’re going to get.

I thought it would be nice to turn that warm weather feeling to the inside of my craft room and create with this January released digital image from Whimsy Stamps:

vicki-wscuddlebunny-jan15

Fell in love with this darling image by Crissy Armstrong called Cuddle Bunny.  This had been a previous rubber stamp that is now available in digital format!  I think there are many advantages to getting a digital version:  1) It NEVER runs out of stock in the store because it’s a digital file, PLUS, you don’t have to wait for it to come in the mail!  2) You can size the image(s) whatever size you want it to be!  3) You can easily combine other images with it and arrange them as you’d like before printing it out.  4) You can color with Copic markers without worrying about anything getting smeared and lastly:  5) You can still feel like you’re “getting your hands crafty” by coloring and finishing out your creation with other products!  So, if you haven’t jumped on the “digital wagon”, an image like this would be a great one to try out!

vicki-wscuddlebunny-flat

For my card, I have colored my image with Copic markers, see the detail list below and then sponged some Tumbled Glass distress ink with an ink blending foam tool and a cloud stencil.  I then cut it out with the Whimsy Stamps Notched Rectangle dies and added a yellow layer behind it that I’ve notched out by hand.

For the background I’ve taken a piece of blue watercolor paper panel and lined the top and bottom of it with a strip of flower borders from my old stash.  I used a glue pen for the centers of the flowers and attached some glitter over top.  I added a strip of sheer white ribbon across it and attached it to a piece of shimmer luster paper which was mounted onto a 5″ square yellow card base.

Lastly, I used some craft foam behind the image panel and attached it over my card and then added the ribbon bow with a chipboard flower in the center.

vicki-wscuddlebunny-close

Here’s a closer look at the image where you can see how I’ve colored it.  Hard to capture in the photo, but I’ve also taken some Nuvo White Blizzard Glitter Drops and added a tiny dot in the centers of the white flowers.  I have also used the Wink of Stella Clear Glitter Brush and went over the butterfly.

I hope you’ve enjoyed my creation today and I thank you so much for stopping in!  I look forward to sharing another project with you tomorrow!  See you soon!

Here’s the list of Copic markers I’ve used:

  1.  Dress, Hair Bow & White Flowers:  Y17, Y15, Y13, Y11, B00, B000
  2. Shoes:  E87, E84, E81
  3. Hair & Skin:  E49, E47, E44, E42, E21, E11, E00, E000, R20
  4. Bunny:  C3, C1, R00
  5. Butterfly & Flowers:  V15, V12
  6. Grass & White Flower Stems/Leaves:  G24, G21, G20, YG67, YG63, YG61

Challenges I’d like to enter this card for:

  1.  Crafty Creations – Anything Goes
  2. Crafty Animals – Anything Goes #22
  3. Creative Knockouts – Anything Goes
  4. QKR Stampede – Anything Goes
  5. Use Your Stuff – Furry Friends

What’s New at Cute Card Thursday

Hello friends!  It’s Thursday time again and we have a new challenge for you over at Cute Card Thursday today!  The challenge for this week is…..”What’s New?

And remember these challenge themes are always your own interpretation!  Here’s what I’ve created for it:

vicki-cct564-adu-new

I thought this image was so TWEET!! 🙂  It is a “new to me” image from our sponsor this week by All Dressed Up Stamps called Home Sweet Home.  I thought this would be such a nice card for someone with a “new home”.

It was also nice to be able to use some older items from my stash as well!  I have colored up the image and used a heart die to cut it out with.  I’ve also sponged some color around the edges and added some stitching details with a marker.  For the patterned papers in the background, I’ve used a paper piercer tool and made stitch marks over the holes with a white gel pen.  I layered it onto a piece of white cardstock which I then layered onto a piece of 5″x5″ Sahara Sand top folding card base.  BEFORE attaching my white layer onto the base, I’ve added some twine around it.

I cut out a smaller heart from the die set I’ve used from some craft foam and attached it to the image heart panel and placed it over the twine on the front.  Lastly, I’ve added the wood veneer bird cage and flowers and twine bow.

vicki-cct564-adu-close

Taking a closer look at the image, you can see that I’ve used various colors of Copics to color it in with.  I went around the images with a W0 which matched up nicely with the colors of the main card panel.  You can also see places where I’ve added a bit of sparkle from some colored gel pens and extra “dots” around the image with a white gel pen.  It was actually a really simple and fun image to color!

vicki-cct564-adu-flat

Thanks so much for stopping by today and I wish you a wonderful day!

Challenges I’d like to enter for this card:

  1.  CRAFT – New (year/job/baby, etc.) – for me:  new home and new stash
  2. All Dressed Up Stamps challenge – Anything Goes + ADU image
  3. Cardz 4 Galz – New Year/New Stash (image and hearts dies)
  4. Alphabet Challenge – ‘U’ is for ‘Use Some Stitching:  faux or real’
  5. Crafting From the Heart – Anything Goes
  6. Try it On Tuesday – Something old/something new (new image/wood veneer, new home and old papers, old flowers, old tools!)
  7. Words 2 Craft By – HOPE (W2CB61):  “Hope is the thing with feathers that perches in the soul & sings the tunes without the words & never stops at all.” ~ Emily Dickenson                     Absolutely LOVE that!!

Rose Heart Card

Hello friends!  I’m back again to share my Rose Heart card!  I’m still “in the mood for love”, so here’s what I’ve got for you today:

vicki-roseheart-card-project1

I absolutely love this new Rose Heart stamp set!  It’s a wonderful layering stamp set, and I can see so many creative possibilities with it!  I really hope to get some time to play with it some more!

I thought this stamp set had an elegant Vintage feel to it and I wanted to create with it in that way.  There are lots of fun heat embossing, ink blending and layering going on in this design.

Thanks so much for stopping in today!  I appreciate your time and comments very much! 🙂

Challenges I’d like to enter my card for:

  1.  QKR Stampede – Anything Goes #329
  2. Simply Create Too – Anything Goes/No Twist
  3. Allsorts – Hearts and Flowers
  4. Happy Little Stampers Mixed Media – Layers
  5. Pammies Inky Pinkies (PIP1901) – Anything Goes

Spread Love at Whimsy Stamps

Hello friends!  Hope you all had a wonderful weekend!  Although it’s supposed to be VERY cold in January over my way, it has actually reached warm enough temperatures that we can cook out on the grill! I’ll take it for now as I don’t think it will last!

Have you been over to see the Digital January release at Whimsy Stamps yet?  There are SO MANY really fun and adorable images to color along with a couple of fun digital papers to help you finish up your cards!  Since Valentine’s Day is coming near, I decided to make a card with that in mind:

vicki-spreadlove-ca-jan8

I have used this darling Spread Love digital stamp by Crissy Armstrong.  I just adore her wings and “heart antlers” sprinkling hearts everywhere! 🙂

I have colored her up in Copic markers in the following:

  1.  Dress, shoes and a couple of the hearts – R85, R83, R81
  2. Heart on dress, heart antlers and other hearts – R24, R22, R21
  3. Wings – R00, BG000
  4. Hair – E27, E25, E23, E21
  5. Skin – E11, E00, E000, R20, R00 (cheeks)
  6. Around image – B000, E0000

I’ve also taken a cloud stencil to add some clouds in the background with an ink blender foam tool and Tumbled Glass Distress Ink.  I then embossed the sentiment from the Whimsy Stamps Snow Flurry clear stamp set with some gold embossing powder.  I went around the edges of the image panel and added a few “dots” around the hearts with the Nuvo Honey Gold Glitter Drops.

For the background of the card, I’ve used the new Hearts a Flutter Digital Papers and cut out a piece with the Whimsy Stamps Hand Stitched Nested Rectangles die.  I then trimmed this piece at an angle and attached it to a strip of this white punched border that I’ve made.  I’ve also cut out a piece of pink cardstock with the same die and trimmed this out an angle as well.  Both of these pieces were attached to an A2 sized white top folding card base.  The image panel was attached over a piece of craft foam and mounted to the front of the card along with the gold ribbon.

vicki-spreadlove-ca-jan8-close

Taking a closer view of this image, you can see on the wings that I’ve added some shimmer to them with a Wink of Stella clear glitter brush pen.  You can also see where I’ve taken a gold gel pen and went over the swirls in her dress as well as the “heart antler stems” on her head.  I always love to add little details like on my coloring and I hope you’ve enjoyed it today as well!

Thanks so much for dropping in and I’ll see you soon!

Challenges I’d like to enter this card for:

  1.  Creative Inspirations – Anything Goes
  2. Crafting by Designs – Anything Goes
  3. As You Like It – Anything Goes/Show Your Style
  4. Crafting With an Attitude – Anything Goes
  5. Daisy Chain – Add Some Sparkle

Whimsy Stamps + Anything Goes at Cute Card Thursday!

Hello friends! I’m not only here to share my creation for the new release at Whimsy Stamps, but also another new challenge for Cute Card Thursday which is also being sponsored by Whimsy Stamps this week!  The new challenge for Cute Card Thursday this week is another “Anything Goes“!  We look forward to seeing your creations, plus if you enter this week, you put your name into a draw for a win from our sponsor!  Don’t miss out!

Vicki-Cratefulkittens-Jan3

Now how adorable are these little cuties?!!  This is the newly released digital stamp called Crateful of Kittens from Whimsy Stamps.  I have also paired it with the newly released Oh Boy – Digital Papers.  I thought that the solid yellow and gingham would work nicely with this image to give it a happy feel!  For the sentiment I’ve used the Whimsy Stamps Bold Statements clear stamp set to stamp over some of the yellow solid paper and made my own fishtail banner with it.

I’ve added some white ribbon with a bow to go around the yellow papers and then attached it to an A2 sized white top folding card base.  For the banner, I’ve added a white daisy flower and placed a rhinestone in the center that I’ve colored yellow with a Y17 Copic Marker.

Vicki-CratefulKittens-close

Here’s a closer look for you on how I’ve colored up this image!  I’ve used a stitched square die to cut the image out with and additional die to layer some of the solid yellow digital papers behind it.  For the background of the image panel, I’ve used a cloud stencil and very lightly inked some clouds in the background.  I added some sparkle to the center of the flowers on the image with a glue pen and clear loose glitter.  I’ve also added some dots to their cheeks with a white gel pen.

Here are the Copics I’ve used to color with:

  1.  wooden crate:  E23, E25, E27, 0-blender
  2. Flowers, leaves, grass:  Y11, Y15, Y17, YG61, YG63, YG67, G20, G21, G24
  3. Kitties:  C1, C3, C5, E41, E43, E44, R20 (cheeks), W1, W3, W5

Hope you’ve enjoyed my creation today and see you soon!

Challenges:

  1.  My Time to Craft – Something NEW (New image, new papers and new friends!)
  2. Always Fun – Something NEW (ditto above!)
  3. A Bit More Time to Craft – Anything Goes
  4. Classic DT Challenge – open (Anything Goes)
  5. The Crafty Addicts – Anything Goes with optional:  “It’s a purrfect day!”
  6. Little Red Wagon – Hey Newbie! (new image, new papers and new friends!)

Celebrate for a Hoppy New Year!

Happy New Year friends!!  Here’s wishing for a very HAPPY, HEALTHY and CRAFTY 2019 to you all!!

So… to be festive and join in on the celebration everywhere, I’ve decided to make a special card just for the occasion! 🙂

Vicki-SNS-challengeblog

I’ve used this really fun digital stamp called Max and I have used my Prisma Color pencils to color him in with over some Canson Mi-Teintes Pastel paper.  I cut him out with a circle die and then ran some glue around the edges with a Nuvo Medium Tip Glue Pen and sprinkled some Copper Jewel Glitter over it.  I mounted another circle behind it that I’ve cut out with some Tonic Burnished Rose Mirror Cardstock.

For the background of my card, I’ve used some Adhesive Sheets that I’ve cut out in different sized circles and then added some of the same glitter that I’ve used for around the frog image panel.  I cut a few more circles out with the same mirror cardstock as well.

Before attaching the circles, I’ve heat embossed the sentiment over the A2 sized top folding black card base with some bronze Rose embossing powder, which I think matches up beautifully with that mirror cardstock!  Right underneath the embossed sentiment, I added some 1/4″ Tear Tape and sprinkled on some more of that pretty glitter that I’ve used all over this card.  Then I added all the circles in the background including the frog image panel and cut off the circle part sticking over the edge on the right side.

Vicki-SNS-challengeblog-close

Taking a closer look at the “party Max frog”, you can see better how he’s colored in and a few other details that I’ve added to him.  For the olive shine, I’ve used some Nuvo Morning Dew Crystals Drops and for the “liquid” glass he’s sitting in, I’ve taken the Nuvo Medium Tip Glue Pen and sprinkled some Waterscape glitter over it.  I’ve also used the Nuvo Gold Coast Glitter Drops to add a bit of sparkle around Max’s head.  (I’m assuming that it’s a bit of “champagne pops” from the glass!  Tee Hee!)

Vicki-SNS-challengeblog-flat

Just like Max here, I’m just as happy to dive right into the New Year in 2019!

Thanks so much for dropping in!!  Enjoy your first day in 2019!

Celebrating at 2 Crafty Critter Crazies With a New Challenge For 2019!

Hello friends!!  Happy New Year to you!!  I hope you’ve enjoyed the celebrating with your family and friends!  Are you excited about a brand new 2019?!  I sure am!  I’ve got lots in store to share with you this year!  Hope you’re looking forward to it as much as I am!!

Let’s start this year off with a brand-new challenge over at 2 Crafty Critter Crazies, shall we?  Every first of the month there’s a brand new “Anything Goes” challenge…BUT you must use a critter somewhere on your project is all!

Vicki-2CCC22-Bugaboo

Isn’t this guy adorable?!  I have used one of our sponsor’s image for my card today from Bugaboo.  This is the Critter Balloons – elephant digital stamp.  I have actually cut him out twice and colored him in, but I cut just his head and the balloon to pop them up with some foam tape for a little dimension.

I’ve made a Center Step Card for my design today.  I kept the dimensions at an A2 standard size when it lays flat so that it will still fit inside an A2 envelope for mailing.

I’ve used some fun birthday style papers from my old stash and then I’ve used a sentiment from My Favorite Things More Essential Sentiments and white heat embossed it over a piece of black cardstock that I cut out with the Die-namics Essential Fishtail Sentiment Strips.  Lastly, I added some silver ribbon above that.

Vicki-2CCC22-Bugaboo-close

Here’s a bit of a close-up to see the dimension over the image.  I’ve also taken a glue pen over the balloon image and added some clear sparkly glitter over it.

Hope that you’ve enjoyed my card today and I’ll be back very quickly with a second post today!

Challenges:

  1.  QKR Stampede – Anything Goes #328
  2. A Perfect Time to Craft – Anything Goes