Anything Goes for Cute Card Thursday!

Hello friends!  Hope you had an amazing Christmas and Santa brought you everything you’ve wished for!  It’s always a fun time of year to celebrate with family and friends!

Today is Thursday which means a brand new challenge over at Cute Card Thursday!  Another easy theme of “Anything Goes” for this week!  Looking forward to seeing what you’ve been crafting through the Holiday Season!

Sometimes I like to try out working with different media that I don’t normally always use on my creations, so for this one I’ve pulled out my watercolor:

Vicki-CCT562-watercolor winter hats

I have used one of the prints from Simon Says Stamp Suzy’s Winter Warmth Watercolor Prints.  I’ve decided to use my Kuretake Gansia Tambi Watercolor set with a and #8 Silver Brushes to color the complete panel.

For a little bit of “snow splatter”, I took some white Folk Art Mixed Media acrylic paint spray around the edges of the dried watercolor piece. (Something new and fun for me to try out with this too!)

To finish up the design, I added some doodling in a couple of areas with my white gel pen and then attached the entire panel onto a white A2 sized top folding card base and rounded the corners of it with a corner chomper.

It was simple, but a fun card to make.  Because SOMETIMES, you just need to take time to chill and have fun coloring or playing around with different media, right?! 🙂

Challenges I’d like to enter:

  1.  SSS Work It Wednesday – Try Something NEW (Mixed Media acrylic spray is new!)
  2. QKR Stampede – Anything Goes #327
  3. Crafty Creations – Anything Goes
  4. The House that Stamps Built (D6218) – Anything Goes
  5. Simon Says Stamp Wednesday – Anything Goes

I Woof You!

Hello friends!!  Sheesh!  It’s almost Christmas!  How did it get here SO fast?!  Today I am actually preparing for my own family dinner gathering, so I will be very busy with cooking and spending time with my family today.  But I have scheduled a post to share with you using a darling Puppy Love digital stamp:

Vicki-SnS-Puppy Love-

I thought this little pup was SO CUTE!  I love the little shirt with the hearts on it!  So, if you are moving past your Christmas creations now, here’s some inspiration to share with a Valentine/Love theme! 🙂

For the image, I’ve printed it out and added the sentiment from the digital set underneath him.  I’ve used a scallop rectangle die to make an “Out of the Box” technique by cutting out the top of the heart balloon.  I colored the image with Copics.  I layered the image panel onto a piece of Chrome Silver Mirror Cardstock.

For the red layer behind that, I’ve taken a larger piece of white cardstock and added some 1/2″ Tear Tape around the edges.  I then used a larger sized scalloped rectangle die to cut it out with.  I peeled the release paper and added the Cherry Sparkle Flocking.  I’ve also added this to the tiny hearts on the shirt as well as the Pink Spirit Flocking but using the Nuvo Precision Glue Pen for the adhesive.  I’ve attached all of these layers onto a white A2 sized top folding card base.

Vicki-SnS-Puppy Love4

Upon a closer look at the image, you can see where I’ve added the flocking on the hearts in his shirt as well as the flocking at the top over the scallop rectangle panel.

For the balloons, I have covered them with some Nuvo Crystal Drops Morning Dew.  It dries clear, but while it was still wet, I’ve sprinkled on some Ultrafine Waterscape Glitter very carefully and lightly and let it dry.  I think it adds a bit more sparkle to the shiny balloons!  After it dried, I used some silver ribbon to make bows and then attached them with some glue.  I also decided to add some more of the Crystal Drops on his nose!

Vicki-SnS-Puppy Love6

I love how this turned out with the flocking and glittery shine!  Hope you’ve enjoyed my card too!!  I thank you so much for stopping in today and I wanted to take the time here to wish you all a VERY HAPPY HOLIDAY SEASON!!!   See you soon!

Challenges I’d like to enter:

  1.  Pammie’s Inky Pinkies (PIP1850) – Anything Goes
  2. Crafting From the Heart – Anything Goes
  3. Watercooler Wednesday (WWC201) – Anything Goes
  4. Crafty Gals Corner – Anything Goes
  5. As You Like It – Anything Goes – Your Style

Celebrating 10 Years of Whimsy Stamps!

Today kicks off a weekend of fun to celebrate Whimsy Stamps 10th birthday! Yay!!!  If you’ve been following along with me for a while, then you know that I have been a design team member at a few different times throughout the 10 years and I’m honored to be a part of the team again to help celebrate their 10th birthday!

I also wanted to share my birthday card inspiration:

Vicki-WS-IGhop-DoggieIcecream

So what could be more fun than this little Doggie Ice Cream digital stamp to help celebrate with!  I have printed him out twice (I’ll explain below) and colored him up in the following Copic markers:

  1.  Doggie body:  E27, E25, E23, E21, R20 (cheeks) and white gel pen
  2. Doggie bib:  BG78, BG75, BG72
  3. Ice Cream bowl:  C8, C5, C3 (Used C3 for ground shadow under image)
  4. Ice Cream/bottom scoop:  R85, R83, R81
  5. Ice Cream/top scoop:  E53, E51
  6. Cherry on top:  R39, R37, R35

I have taken some older Whimsy Stamps paper packs (this one no longer available called “It’s a Party”) to use for the background of my card design…he has to have a party scene after all, right?!

I then took a thin strip of black card stock to go along the edge of the paper to give it a nice finishing touch.  I also took another piece of black cardstock and white heat embossed the fun sentiment from the Whimsy Stamps Bold Statements clear stamp set and then cut a banner and attached it alongside the black strip.  Lastly, I’ve added some fun matching Whimsy Stamps “It’s a Party” enamel dots to finish off the design.

A closer look at my image, you can see that I’ve added some glossy accents to the cherry on top of the ice cream as well as the pup’s nose.  I’ve used a Spectrum Noir glitter brush pen to over the ice cream scoops and then I took a liquid glue pen and sprinkled some more glitter under the pup image before attaching him to the paper.

The reason I printed out this pup twice is because I wanted to add some dimension to it.  I colored and fussy cut out the entire image and attached him over the glitter ground.  I took the second image and only colored his head/bib and the ice cream images.  I fussy cut those out, then turned them over to rub a tool over which make it curl around the edges a bit.  I used some foam tape to attach them directly over the image and it gives a nice dimension to it.

Vicki-WS-IGHop-Doggieicecream-dimension

Here’s a peek of what that dimension looks like underneath.  Because the edges curl, you don’t see much sticking out, but it gives a nice dimension to your image.

Vicki-WS-IGhop-DoggieIcecream-flat

Hope you’ve enjoyed my card today and I hope you take part in the celebration with us at Whimsy Stamps in any way you can!   I also wanted to thank each of you for the kind support you’ve given me with my Whimsy Stamps creations, it means so much!

Enjoy your celebration weekend and I’ll see you soon!

Challenges I’d like to enter this card for:

  1.  Addicted to Stamps & More – Make Your Mark
  2. Crafty Creations – Anything Goes
  3. Tuesday Throwdown – Anything Goes
  4. Watercooler Wednesday (WWC200) – Occasions
  5. CRAFT – Anything Goes

Embossing at Cute Card Thursday

Hello friends!  It’s time for another Cute Card Thursday challenge this week!  We would like to see some “embossing” on your creations this week!  You can make it heat embossed, dry embossed or I would say embossing paste would work too!  Or you could challenge yourself and try to combine more than one kind! 🙂

We are sponsored this week by All Dressed Up Stamps, so be sure to enter the gallery for your chance to win a prize!!  Here’s what I’ve created for this week’s challenge:

Vicki-CCT560-ADU-embossing

This is such a cute and fun image!    I thought it would make a really fun “New Year’s” type of card, so I created with that in mind.  This image from All Dressed Up is called Season to Sparkle.  I colored her up with Copic markers and then used a gold gel pen to color in her crown.  I’ve also taken the Spectrum Noir clear glitter brush pen and colored her dress with it.  The sparkle on her wings are liquid glue and loose glitter.

I’ve cut the image out with a Zig Zag circle die and then layered a piece of gold mirror cardstock cut with a circle behind it.  I attached the circle image panel over a dry embossed black card front panel that I’ve also wrapped some gold ribbon around and attached the bow to the front.

I also heat embossed the sentiment with some gold EP and cut out a banner strip to pop up over the circle image panel.  I cut the tail end to match the card front.  This card front panel was layered onto an A2 sized white top folding card base.

Vicki-CCT560-ADU-embossing-close

Here I wanted to show you a closer look at the image panel and the close-up details of the frantage embossing powder over it.  (This is such a fun embossing powder to play with!  You have to heat it up from underneath.)  You can also see the gold embossed sentiment too.  I did take some gold tinsel Stickles and added a few drops around the image for more sparkle.

Vicki-CCT560-ADU-embossing-sec

I hope you’ve enjoyed my card today and thanks so much for stopping by and I’ll see you soon!

Challenges I’d like to enter this card for:

  1.  All Dressed Up – Anything Goes + All Dressed Up image
  2. Creative Fingers – Anything Goes
  3. Pammie’s Inky Pinkes – Anything Goes (PIP1849)
  4. Crafting From the Heart – Anything Goes (232)
  5. Little Red Wagon – Black & White + one additional color (GOLD)

Kitty Celebrates Up in the Air!

Hello friends! I’m excited to start with this cute one for today:

Vicki-SnS-Kitty clouds

Tee hee!  Kitty got a little “carried away” with celebrating, I think!  I have used the NEW Kitty Celebrates rubber stamp set for my card.  I’ve stamped him over Copic Blending Card paper and colored him in with Copic markers and then fussy cut him out.

So before attaching him to my card, I thought it would be fun to add some Nuvo Crystal Drops in Morning Dew (Gloss-dries clear) and apply a layer over my balloons to give them a shiny balloon look!  I then set kitty aside while I worked on the rest of the card.

For the background of my card, I made a nice “blue sky” by taking some Watercolor Paper and sprinkling some Nuvo Blue Blitz Shimmer Powder over it and then spritzing some water over it and letting it run all over the panel until I achieved the look I was going for.  (LOVE the subtle shimmer over it too!) and then set it aside to let it dry.

The next thing for me to do was to create some “fluffy clouds” for the kitty to be among:

So, I took some cloud dies from my stash and cut them out with some Sticker Paper.

These sheets are sticky on one side, so I carefully peeled the release paper and handled them with some tweezers and applied some of the Twinkling Clouds Flocking over top of the sticky side, rubbed them with my finger to secure and tapped off the excess.  I now have some really cool soft and fuzzy clouds to attach to my blue sky!

So now all I have left to do is assemble everything for my card!  I started by taking the clouds and adhering them to my background with some dimensional Glue.   I then cut down the watercolor blue-sky panel with a rectangle stitched die that fit the size of my card.   Then I needed to add my sentiment, so I took the sentiment from the same stamp set and stamped it with a black pigment ink and added some Sparkle EP and heat embossed it.  I layered this die cut sky panel over a piece of black cardstock which was then layered over an A2 sized top folding white card base.  Lastly, I’ve added the fussy cut kitty over top of the sky background panel with some foam dots and then randomly added some drops with the Nuvo White Blizzard Glitter Drops over the sky panel.

Vicki-SnS-Kitty Clouds5

I think this turned out really cute and I sure had fun making it!  Here I’ve laid it down so the light catches the details of the sparkle in the clouds, the sentiment and the glitter drops in the background as well as the shine over the balloons too!

Hope you’ve enjoyed my card for you today!  Thanks for dropping in!

Here’s some challenges I’d like to enter this card for:

  1. Simon Says Stamp Monday – ‘B’ is for:  Balloons, Blue Sky, “Best Day ever”
  2. Tuesday Throwdown – Anything Goes
  3. Addicted to Stamps & More – Anything Goes
  4. The Male Room – Celebrate
  5. Little Red Wagon – House Pets

Anything Goes for Cute Card Thursday

Well can you believe the first week in December is almost already done?!  Yikes!  Christmas is coming very quickly, so I’m happy to be making up some more Christmas cards as I post along here! 🙂

Today starts another new challenge over at Cute Card Thursday and this week it is an easy “Anything Goes“!  So play, create and have fun to your heart’s content and share it with us in the gallery over there!  We look forward to seeing what you’re working on!

Vicki-WS-Christmas Unicorn-CCT559-Dec6

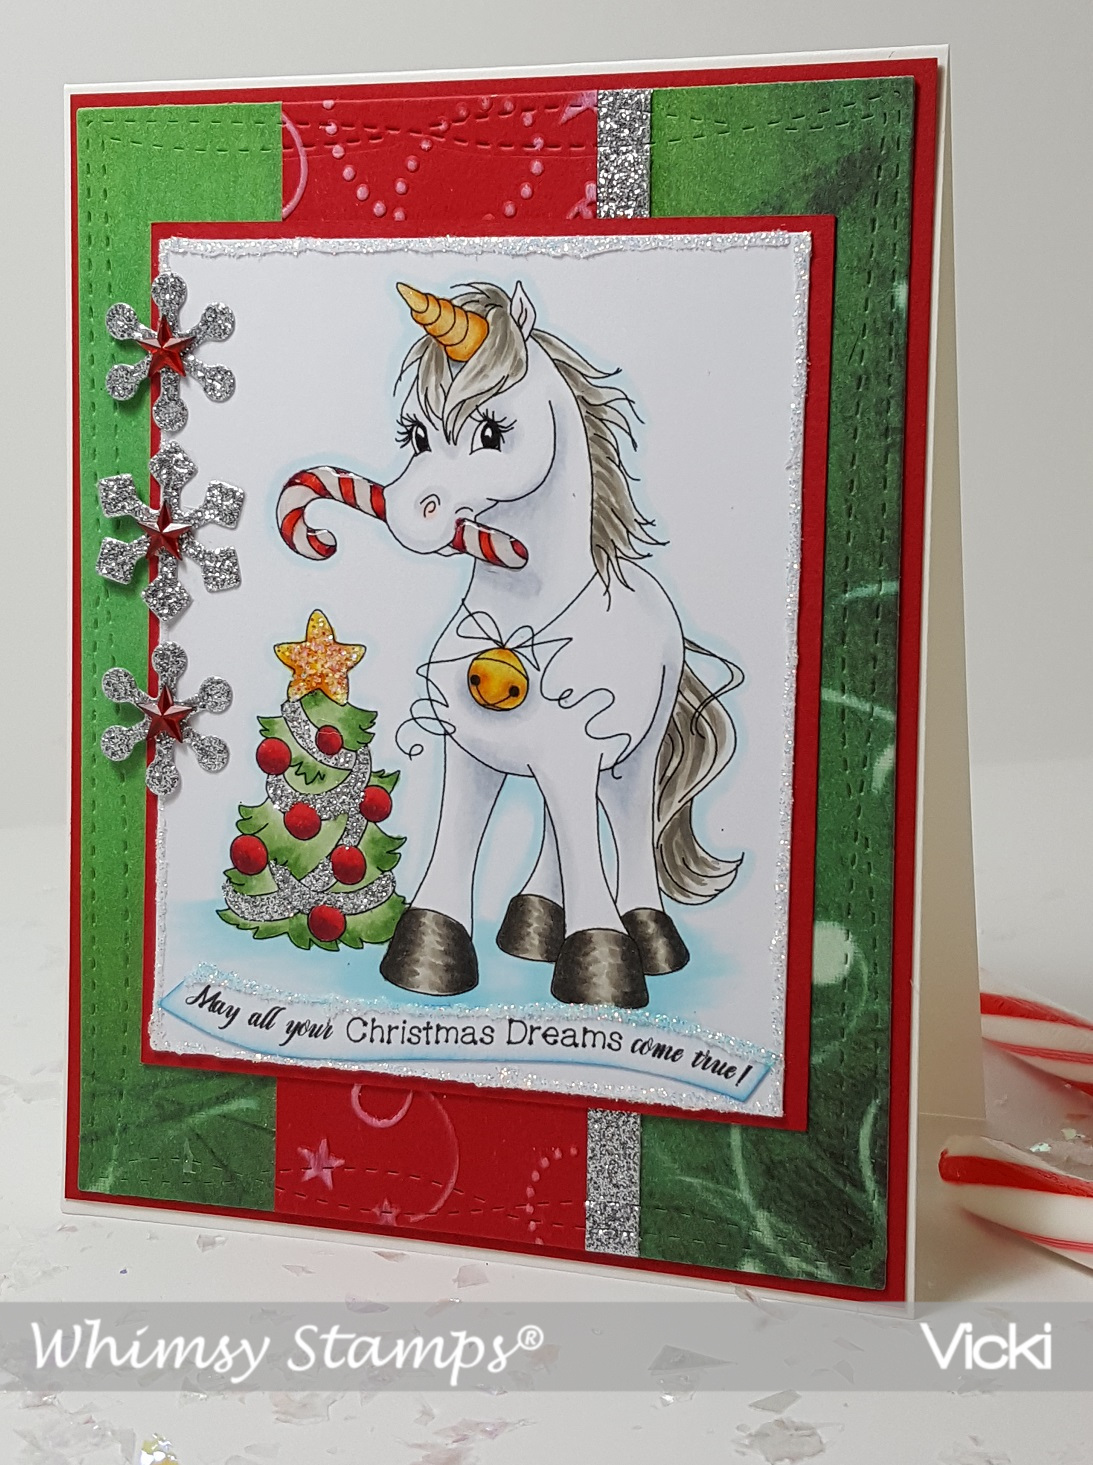
Now I don’t know about you, but I think a unicorn for Christmas would be a “yes please”!  I have used the new December image by Crissy Armstrong called A Christmas Unicorn.  I thought there was lots of opportunity to really bling up this fun image!

First, I have colored up this image with the following Copic markers:

  1.  Unicorn mane/tail/hooves: W9, W7, W5, W3, W1, W0
  2. Unicorn body:  C3, C1, C0, R00 (nostril/ear)
  3. Unicorn horn:  YR24, Y23, Y21
  4. Candy Cane/Ornaments:  R39, R37, R35, C1 (white areas)
  5. Tree:  YG67, YG63, YG61
  6. Star/Bell:  YR24, Y17, Y15, Y13
  7. Ground/Around entire image:  B00, B000

Then I thought one of the sentiments from the Whimsy Stamps Penguins Christmas Sentiments 1 digital set fit perfect with this image.  I fussy cut it out by hand as to capture the curve in the design and then I used a sponge dauber to apply a bit of ink around the edges of it and glued it right underneath the image.  (I think it makes it look sort of like a little ‘snow drift’ in front of the unicorn.)

For the card front base, I’ve picked out some papers to use from the Whimsy Stamps Christmas Red, Gold & Green digital collection and then added a silver glitter strip as well as a red cardstock strip that I ran through an embossing folder and then rubbed some white ink over the raised areas.  I glued these pieces to the green paper and then cut it out with a stitched rectangle die.  I mounted this piece over a piece of red cardstock that I attached to an A2 sized top folding white card base.

Vicki-WS-Christmas Unicorn-CCT559-close

Now for the details of my image, I’ve used a Spectrum Noir clear glitter brush pen to go over the unicorn horn and bell around his chest.  I then covered the candy cane with some glossy accents.

For the garland around the tree, I took a Nuvo Precision Glue Pen and sprinkled on some Sassy Silver Glitter.  For the star, I used Diamond Dust Glitter, and then, for on top of the sentiment as well as along the edges of the image panel, I ran some Nuvo Liquid Glue over it and then sprinkled on some Waterscape Glitter.  (You can see the difference in the glitters next to each other.  The Waterscape is finer than the one I used on the star.)

Vicki-WS-Christmas Unicorn-CCT559-1

I’ve then mounted the image panel onto a piece of red cardstock and attached it to the front of the card front.  I took some silver sparkle cardstock and die cut three snowflakes and attached them to the left side of the image panel and added a red star rhinestone to the center of each one.

Really had fun with the festive colors and details on this one!  Hope you’ve enjoyed my card today!

Here are some challenges I’d like to enter my card for:

  1.  Tuesday Morning Sketches – TMS482 (I flipped the sketch around)
  2. Fussy and Fancy Friday – Winter/Christmas
  3. Inkspirational – Anything Christmas
  4. Crafty Animals – Anything Goes + animal
  5. Crafty Friends – Christmas
  6. Crafty Calendar – It’s Christmas Time

Whimsy Stamps New Release Snowman Couple

Hello friends!  I’m thinking after the several inches of snow we received last week; this is a really “time appropriate” creation to share with you!! LOL!  The first of the month is always a brand-new release for Whimsy Stamps.

Vicki-WS-SnowmanCouple-Dec3

For my card today, I’m using this darling new image called Snow Couple for my design!  Super quick and easy image to color up, so adding more details to it is always something fun! 🙂  I’ve taken the Whimsy Stamps Notched Rectangle dies to cut it out with.  I’ve also cut out a separate navy cardstock layer to mount behind it.

For my card front base, I’ve used the Whimsy Stamps Christmas Azure digital papers and cut it out with the Whimsy Stamps Hand Stitched Nested Rectangles die for the background and then mounted this over a navy A2 sized top folding card base.  Then I’ve also cut a strip of the musical papers from the Whimsy Stamps Christmas Traditions digital paper collection and then ripped each side of it.  I took some distress ink and sponged around the edges of it and mounted it over the card front base along with some white ribbon.

I took the image panel and navy layer and added some craft foam to the back of it and attached it to the front of my card base layer.  I took some more of the white ribbon and made a bow to attach to the side of the image panel.  I’ve also taken a sentiment from the Whimsy Stamps Penguin Christmas Sentiments 1 digital set and cut it out with a banner die that I then placed over the Hand Stitched Nested Rectangle die to make the stitch lines in it.  I then took some foam tape and attached it on the bottom corner.  For the sentiment, I’ve taken a Copic marker to go around the “cold” word and added some glitter for the snow details on it.

Lastly, I’ve taken an old Whimsy Stamps Snowflake die and cut out a piece from white card stock to attach at the top as an accent.  I put a rhinestone in the center of it.

Vicki-WS-SnowmanCouple-Dec3-close

For coloring up this image, I’ve used the following Copic markers:

  1.  Snowman top hat/coal buttons:  C8, C5, C3
  2. Snowmen bodies/arms:  BG000, R00 (cheeks), E33, E31 (arms), YR24, YR15 (noses)
  3. Snowman top hat trim/scarf:  B39, B37, B34
  4. Snowwoman hat/scarf:  V17, V15, V12, C1, C0
  5. Background Sky/Ground:  B01, B00, B000

After coloring this image, I’ve taken a snowflake stencil and then added some Nuvo Glimmer Paste Moonstone over top of it with a palette knife which created these cool glittery snowflakes over top of the image.  You can still see through to the image which is exactly what I was looking for.

I then took some glitter and added it to the ground, the snow around the snow couple as well as the letters on the word “cold” within the sentiment with both a Nuvo Medium Tip Glue Pen (for the ground), as well as a Nuvo Precision Glue Pen for the snow on the lettering.

Hope you’ve got inspired with my creation with the new Whimsy Stamps digital release this month!  Be sure to come back for more inspiration later on in the week!  Thanks for stopping by!

Here are some challenges that I’d like to enter my card for:

  1.  Try it On Tuesday – Winter Wonderland
  2. Crafty Catz – Anything Goes with optional twist:  Too cute
  3. A Perfect Time to Craft – Anything Goes
  4. Sisterhood of Snarky Stampers (SOSS124) – ‘W’ is for Winter
  5. That’s Crafty! – Winter Wonderland
  6. Stamps & Fun = Creativity – White/Blue

Whimsy Stamps Christmas Mouse!

Hello friends!  I’m back to share with you a very special treat from Whimsy Stamps!

I have used this special image to share some inspiration with you as I am a Whimsy Stamps fan myself! 🙂

Vicki-WS-MouseFreebie-Dec1

Isn’t this darling?!  Crissy Armstrong has created this adorable “Christmas Mouse” digital stamp as a special treat in appreciation for loyal fans of Whimsy Stamps!  How cool is that?!

I have colored up this cutie with Copic markers in the following colors:

  1.  mouse body:  W9, W7, W5, W3 Ear/tummy/cheeks:  R20, R00, W3, W1, W0
  2. hat:  R59, R29, R27, R24 (same as ornament), YG67, YG63, YG61
  3. Shading/Ground:  C3, C1, E0000

I have also printed out this image an additional time to color up the ornament, fussy cut it out and then covered it with some Diamond Dust Glitter using the Nuvo Medium Glue Pen to adhere it.  I then popped it up over the original image with some foam tape for dimension.

I cut the image out with a stitched circle die and added a gold cardstock circle layer behind it.  I found some cool papers to represent the “night sky” that I was looking for.  (I think these are Stampin’ Up! papers.)  I’ve cut a piece out using the Whimsy Stamps Hand Stitched Nested Rectangles die and then I attached this piece to a white A2 sized top folding card base and off set it along the right side of my card.  I then cut a thin strip of that gold cardstock to place alongside of the papers.

The circle was attached to the card with part of it sticking off the right which I cut off to align with the card.  I thought this sentiment from the Whimsy Stamps Penguin Christmas Sentiments 1 digital set fit perfectly with this image.  I cut it out to form the banner, sponged some light grey ink over the edges and attached it to the top of the card.  Lastly, I’ve added some sequins with some Nuvo White Blizzard Glitter Drops in the center of each one.

Here’s a closer look at the design:

Vicki-WS-MouseFreebie-Dec1-close

Here you can see the glittery details of the ornament…. love these types of ornaments on my Christmas tree!!  I’ve also colored the ornament cap with a gold gel pen and added some ‘dots’ with a white gel pen for his cheeks.  Looking at this, I’m thinking some glossy accents for his nose would be cute too but didn’t do that for this one!

Thanks for dropping in!  I’ll see you soon!

Challenges I’d like to enter this card for:

  1.  Watercooler Wednesday -“All About Holidays” WWC198
  2. Simon Says Stamp Wednesday – Anything Goes
  3. 4 Crafty Chicks – “Crazy Egg” Anything Goes
  4. Jingle Belles – Christmas Cards

A Christmas Pig for 2 Crafty Critter Crazies Challenge

Hello friends!  Here we are in December already!  Christmas will be here before you know it!  I think this is a great time to remember to pull out your critter supplies and have some fun with them while you make up your Christmas projects too!  The first of the month brings us a new challenge over at the 2 Crafty Critter Crazies blog!  So come play along with us this month!  It’s ALWAYS anything goes as long as you use a critter(s) somewhere on your project!  We look forward to seeing what you come up with!

Here’s what I’ve made for the challenge this month:

Vicki-2CCC-QKR

This month our lovely sponsor is QKR Stampede, and they were kind enough to allow our design team to choose an image to play with!  I have to tell you that this image made me literally *snort* when I saw it!!  LOL!  I have used the Christmas Pig image for my card.  I think this piggy is too cute with his present all neatly wrapped next to the decorated tree while he gets sleepy waiting for Santa to come! 🙂  I do recall growing up in the country and having a couple of pigs.  I always wondered about them in the cold, but we had a place they could come inside the barn to stay warm.  They were funny to listen to, but I always thought they were too stinky to get too close! LOL

I decided to color the image with my Copics and then I fussy cut it out and layered it over a piece of red cardstock.  For the base of my card, I took an A2 top folding red cardstock and then layered a piece of decorative paper from DCWV and then also attached a strip of white glitter paper on each side of it.  I then took some woodgrain cardstock that I’ve previously made and die cut a fence border out with it and placed it across my design.

I then took the layered image panel and attached it over the card with craft foam and then added the ribbon with some red jingle bells attached to the bow and attached the die cut greeting below that with red cardstock.

Vicki-2CCC-QKR-close

Upon a closer look at the image panel, you can see that I’ve added some Nuvo Crystal Drops Morning Dew to each red ornament on the tree and then I’ve taken a gold gel pen to color the star on top of the tree along with a clear gel pen to color the star outside the window.  For the snow-covered ground in the window, I’ve used some glitter attached with a Nuvo Smooth Precision glue pen.  I’ve also used this pen to attach some Twinkling Clouds Flocking to the piggy’s hat trimmings!  It makes the area so soft and fuzzy plus it has a bit of sparkle added to it too!

Thanks for stopping by!  Please come back a bit later as I have something very special for you!

Challenges I’d like to enter:

  1.  QKR Stampede – Anything Goes
  2. {Cupcake Inspirations} CIC459 – The Holidays (theme challenge)
  3. Crafty Creations – Anything Goes
  4. The House That Stamps Built (N2818) – Anything Goes
  5. Mod Squad – Use a Critter on your Holiday card

A Snowy Shaker

Hello friends!  I’m back again today to share a shaker card I’ve made using the CUTE digital stamp from Whimsy Stamps called “Snowy“!

Vicki-WS-Snowy Shaker-Nov25-blog

I had “snow” much fun making this shaker card!  Hope you’ve enjoyed it for inspiration as well!

Thanks so much for stopping in at my blog today!  I appreciate your kind thoughts and encouragement more than you know!  I’ll see you soon!

Challenges I’d like to enter this card for:

  1.  Simon Says Stamp Monday – “Let it Snow”
  2. Creative Moments – Anything Goes optional twist:  put sentiment on creation.
  3. Simon Says Stamp Wednesday – “Baby It’s Cold Outside!”
  4. Aud Sentiments – Winter or Christmas Sentiment
  5. Creative Knockouts – Snow Much Fun
  6. Winter Wonderland – Christmas or Winter Characters (people only)
  7. Crafty Catz – Anything Goes with optional twist:  “All Wrapped Up”