Snow One Like You

Hello friends!  Stopping in to share a card I’ve made with an adorable Whimsy Stamps image and to remind you of the December challenge going on over on the Whimsy Stamps Inspiration Facebook Group.  If you are creating with any of your Whimsy Stamps products, I hope you will stop by and add your creation to the gallery!

Vicki-WS-CoffeePenguin-Nov20

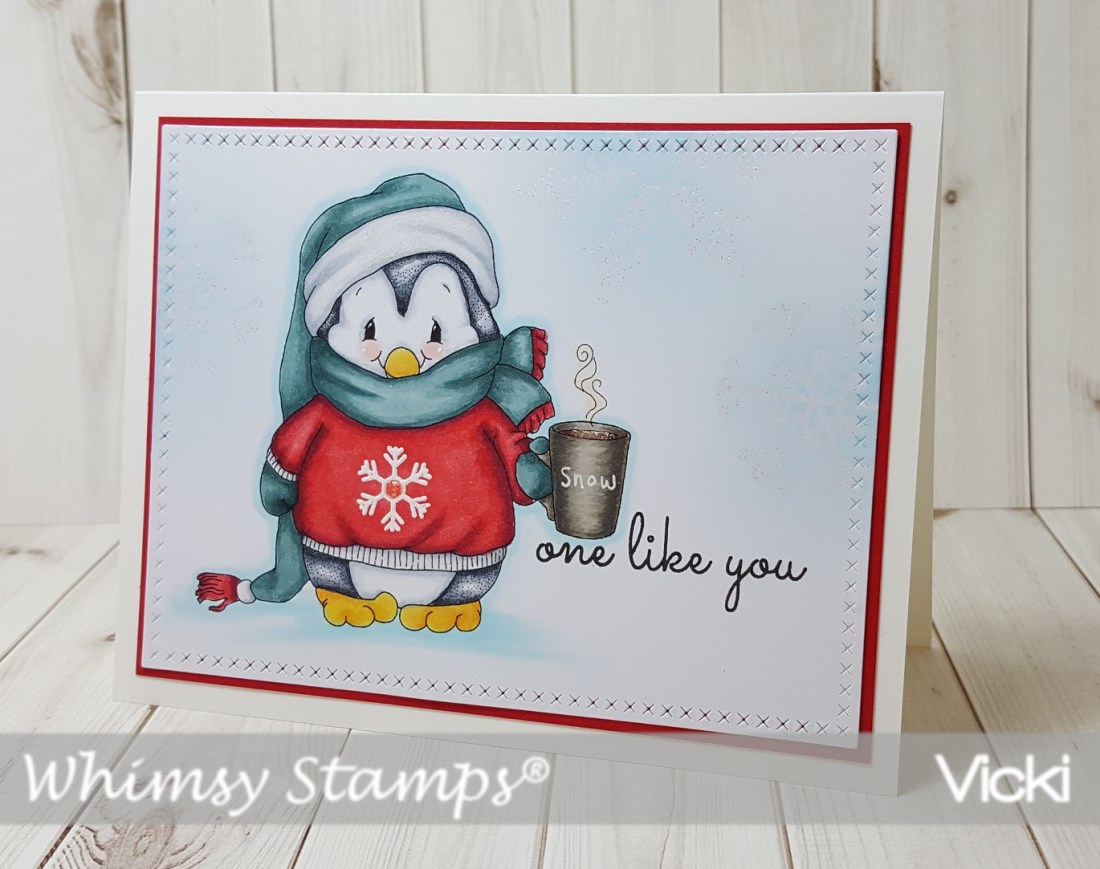
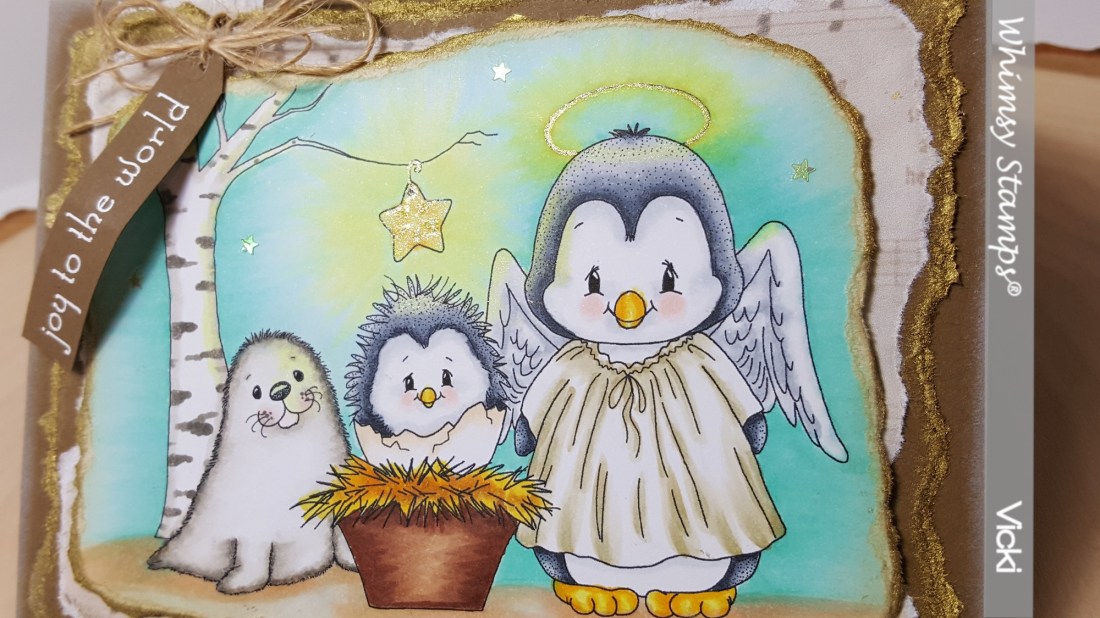
This is the really adorable Penguin Coffee Break Digital stamp set by Crissy Armstrong…always LOVE using her adorable penguin images! 🙂  You actually get THREE digital images within this set.  You get the penguin alone like I’ve used on my card here, you also get one with the winter scene background behind him as well as just the scene by itself!  Pretty nice deal for one low price if you ask me!

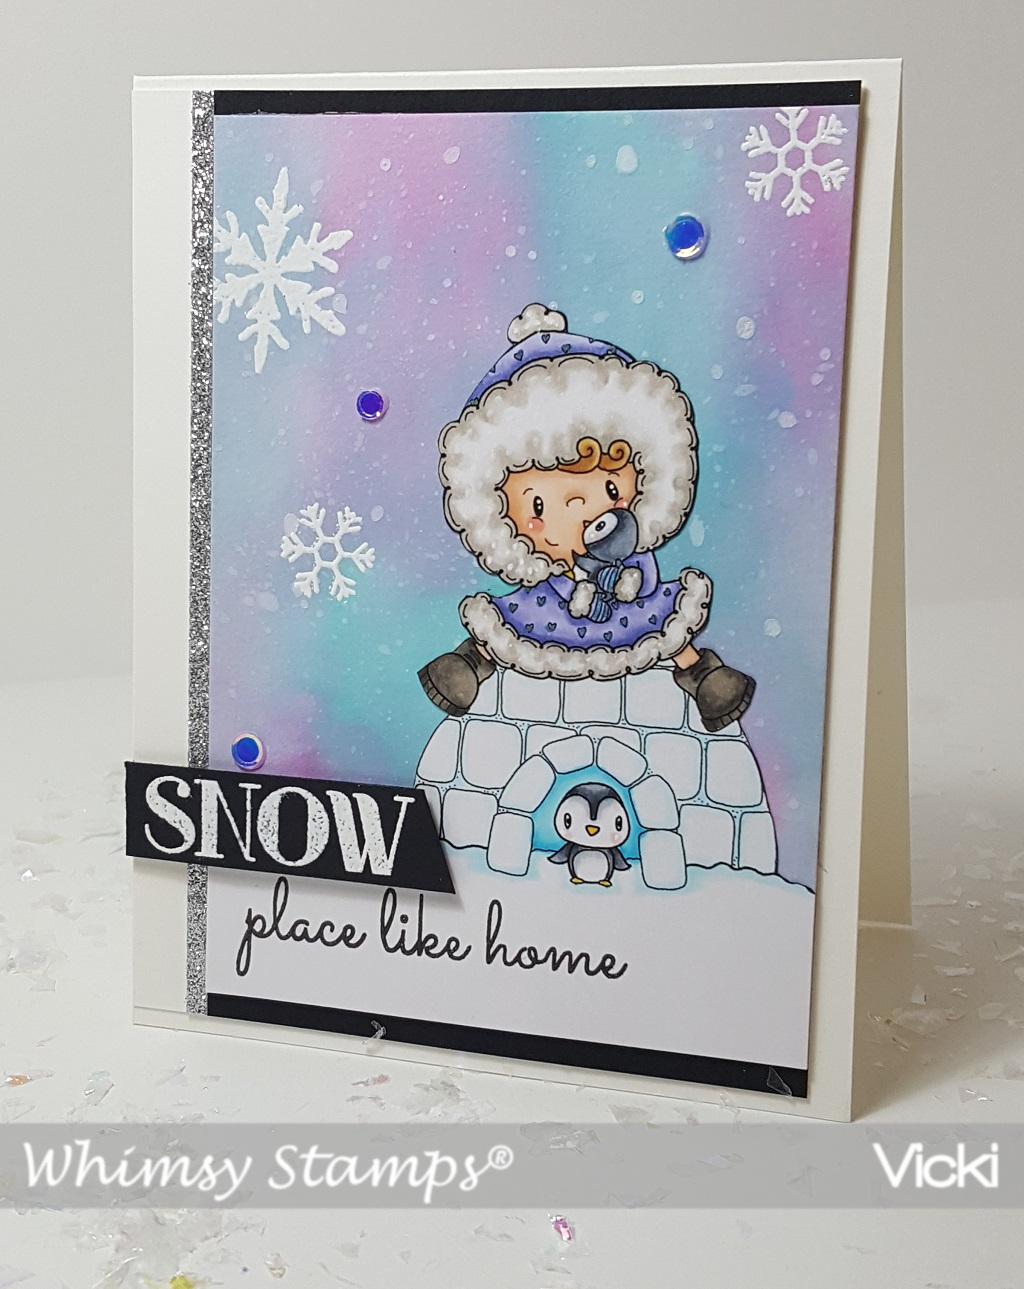
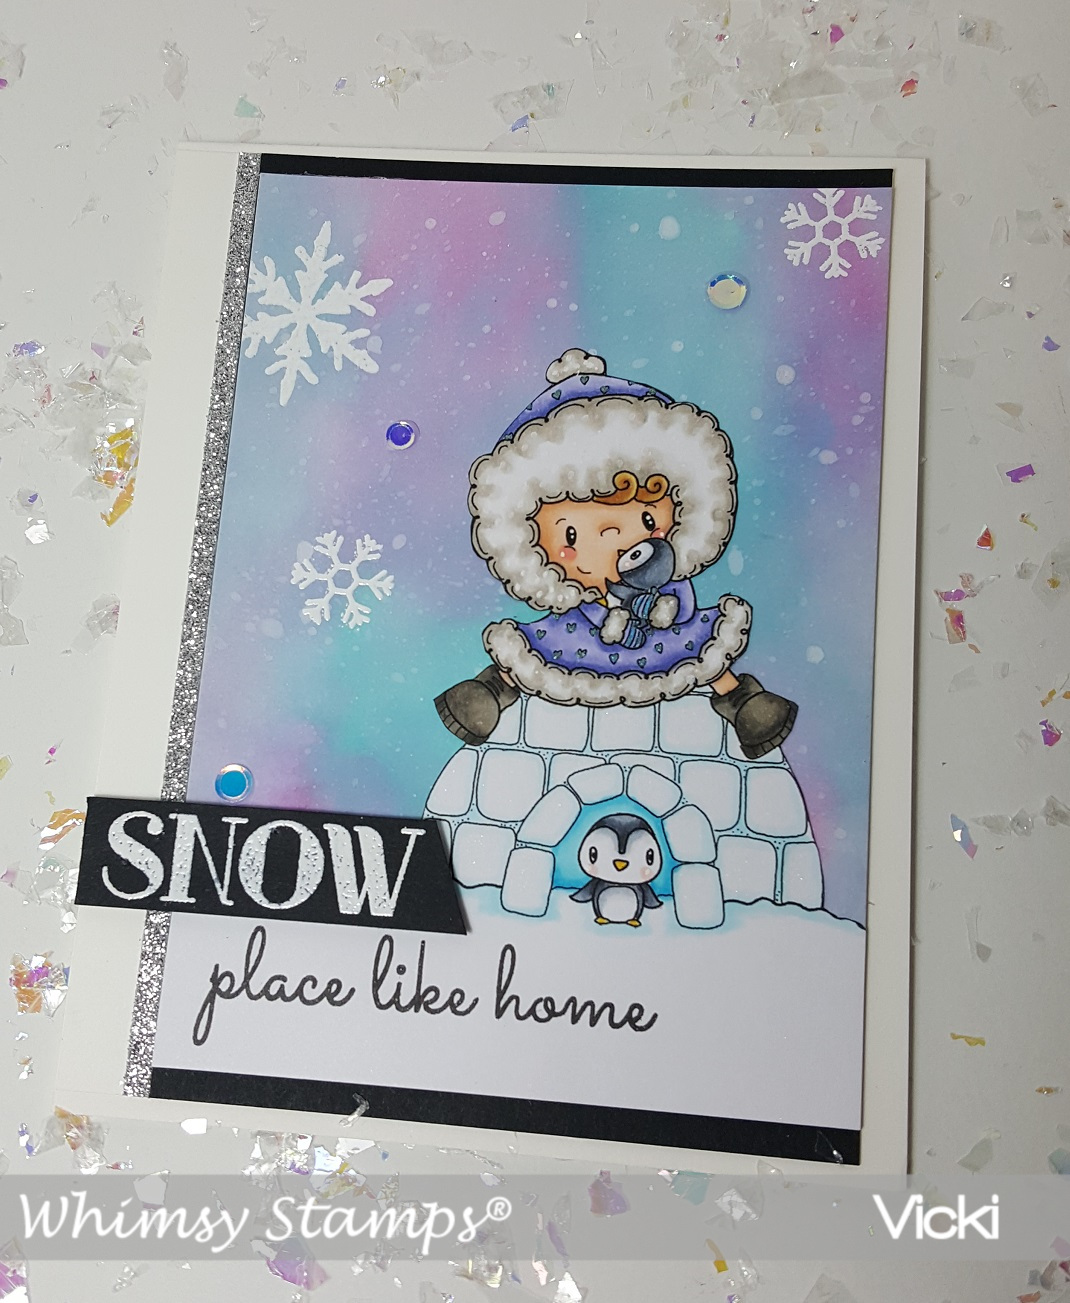
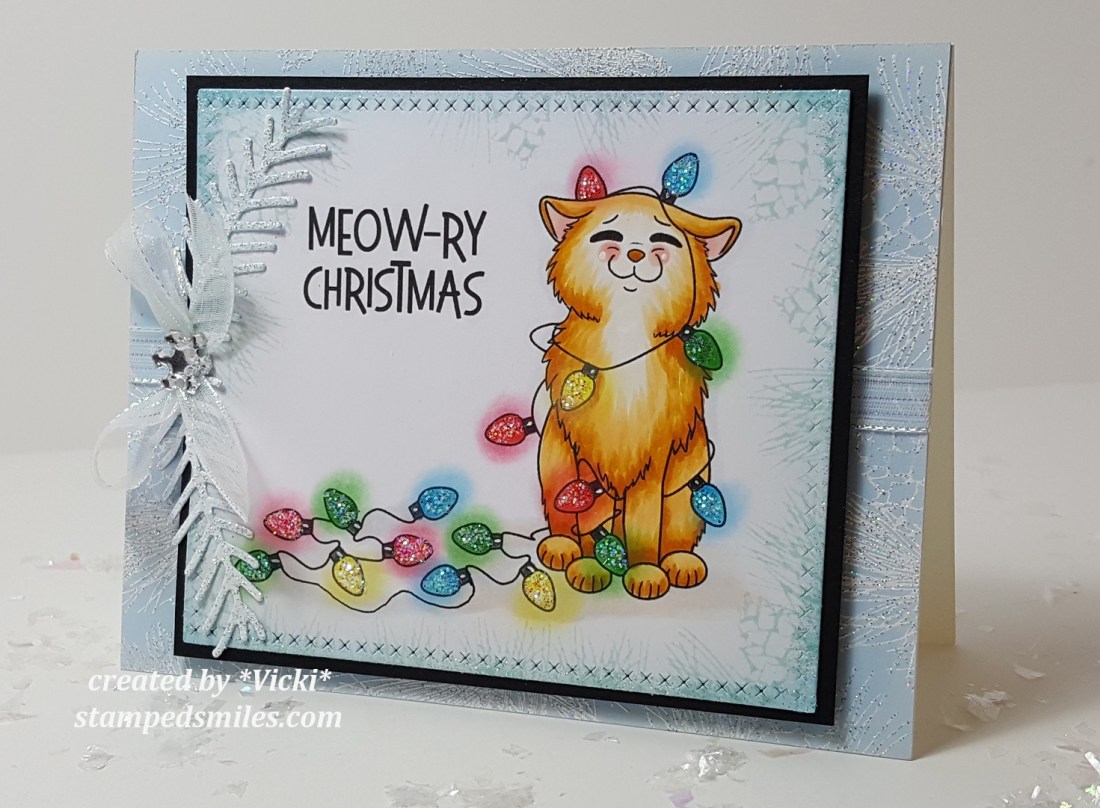
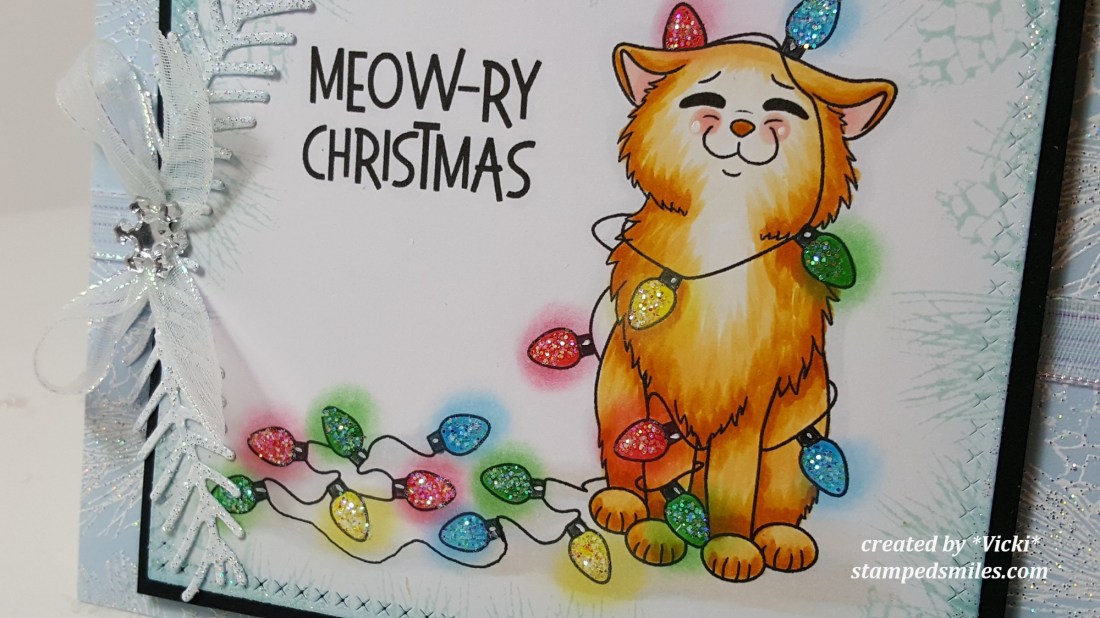
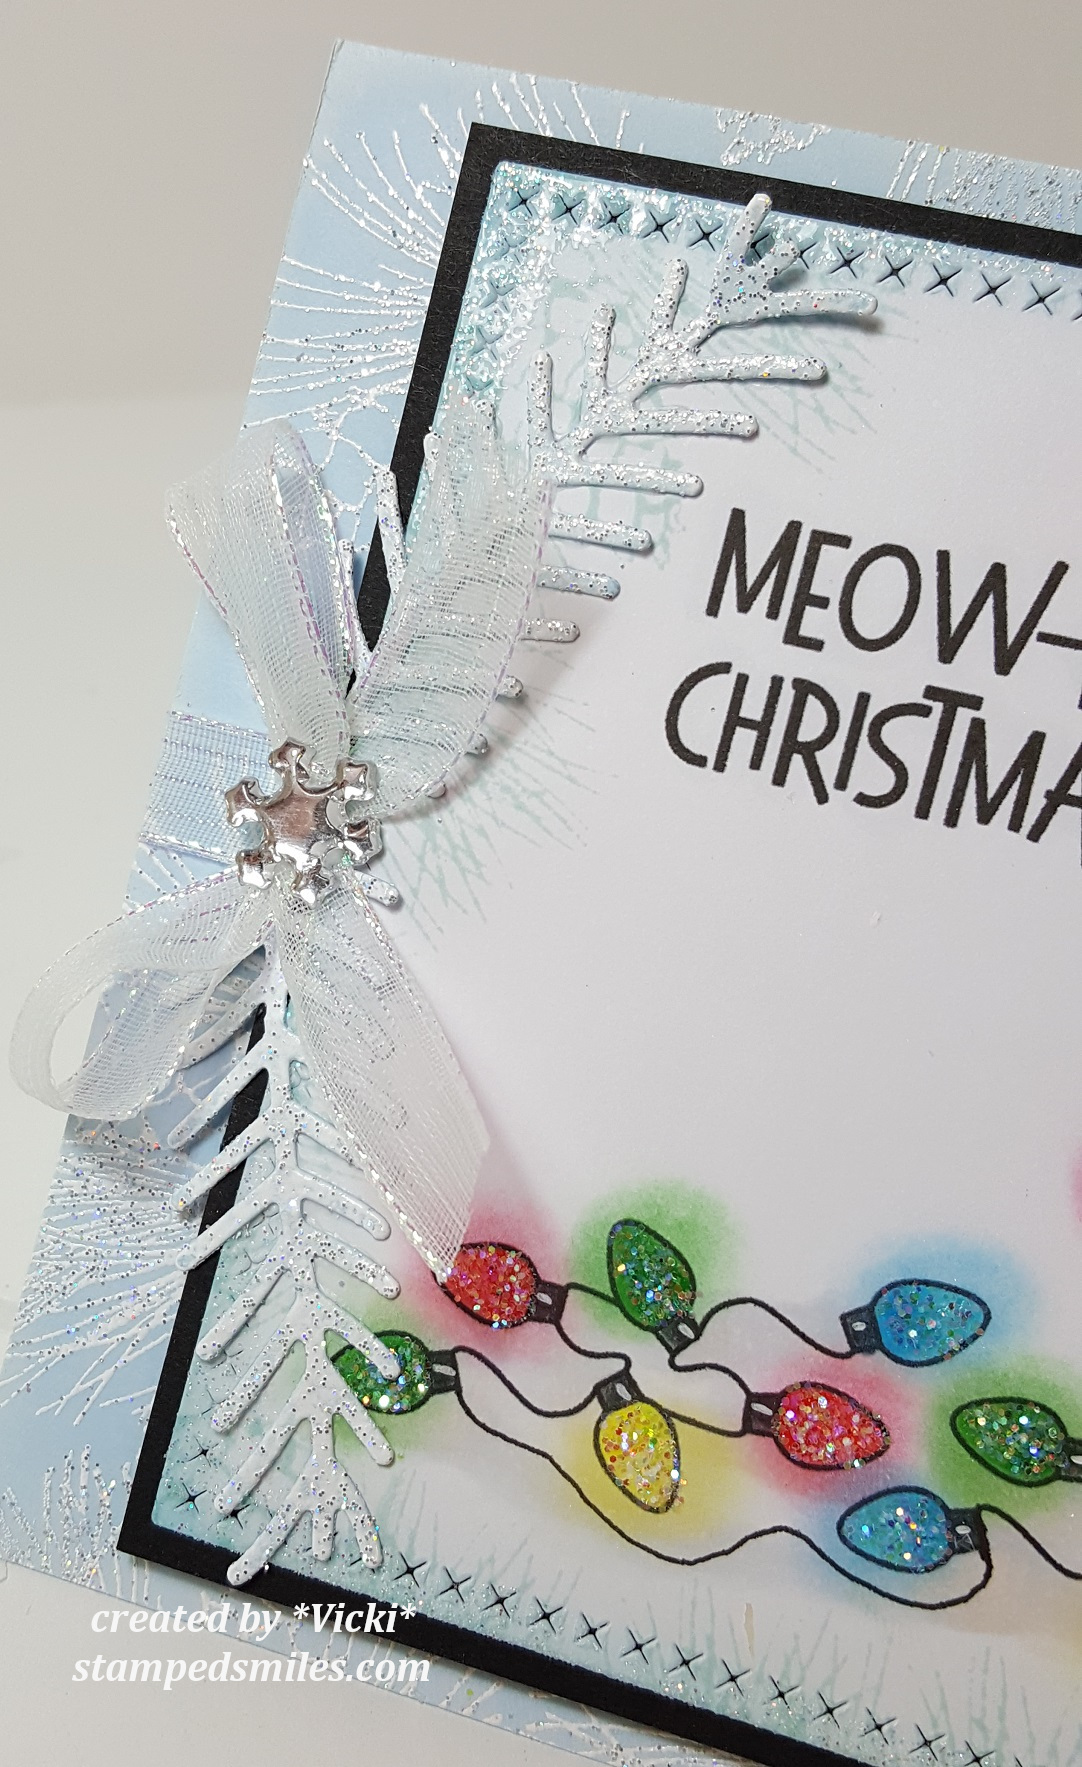
I’ve made this a pretty simple card by printing out the image, coloring it up with Copics and then for the “snowflake” on the penguin’s shirt as well as the sentiment and the sparkly snowflakes in the background, I’ve pulled out the Whimsy Stamps Snow Flurry Clear Stamp Set.  I have heat embossed the smallest snowflake on the penguin’s shirt with white embossing powder and then I heat embossed the snowflakes in the background with some Sprinkle Embossing Powder and lightly ink blended some Tumbled Glass distress ink over top of it.  I wrote the “snow” letters over the cup with a white gel pen and then stamped the sentiment from the Snow Flurry stamp set underneath the cup.  I’ve cut this panel out with a cross-stitch rectangle die and then layered it over some red cardstock and then mounted this onto a top folding A2 sized white card base.

Vicki-WS-CoffeePenguin-Nov20-close

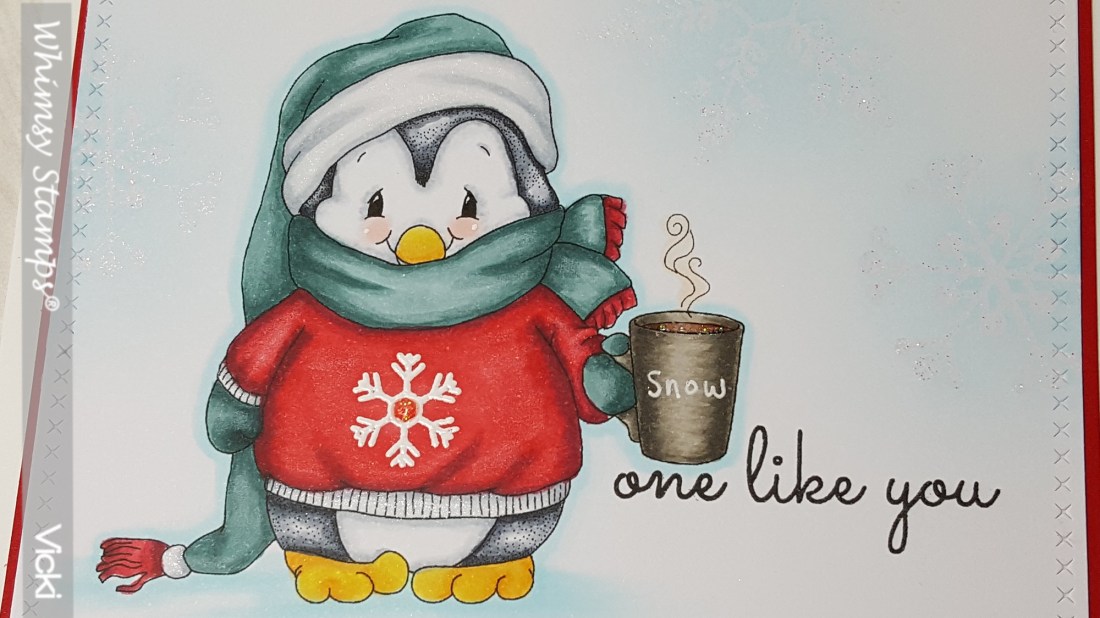
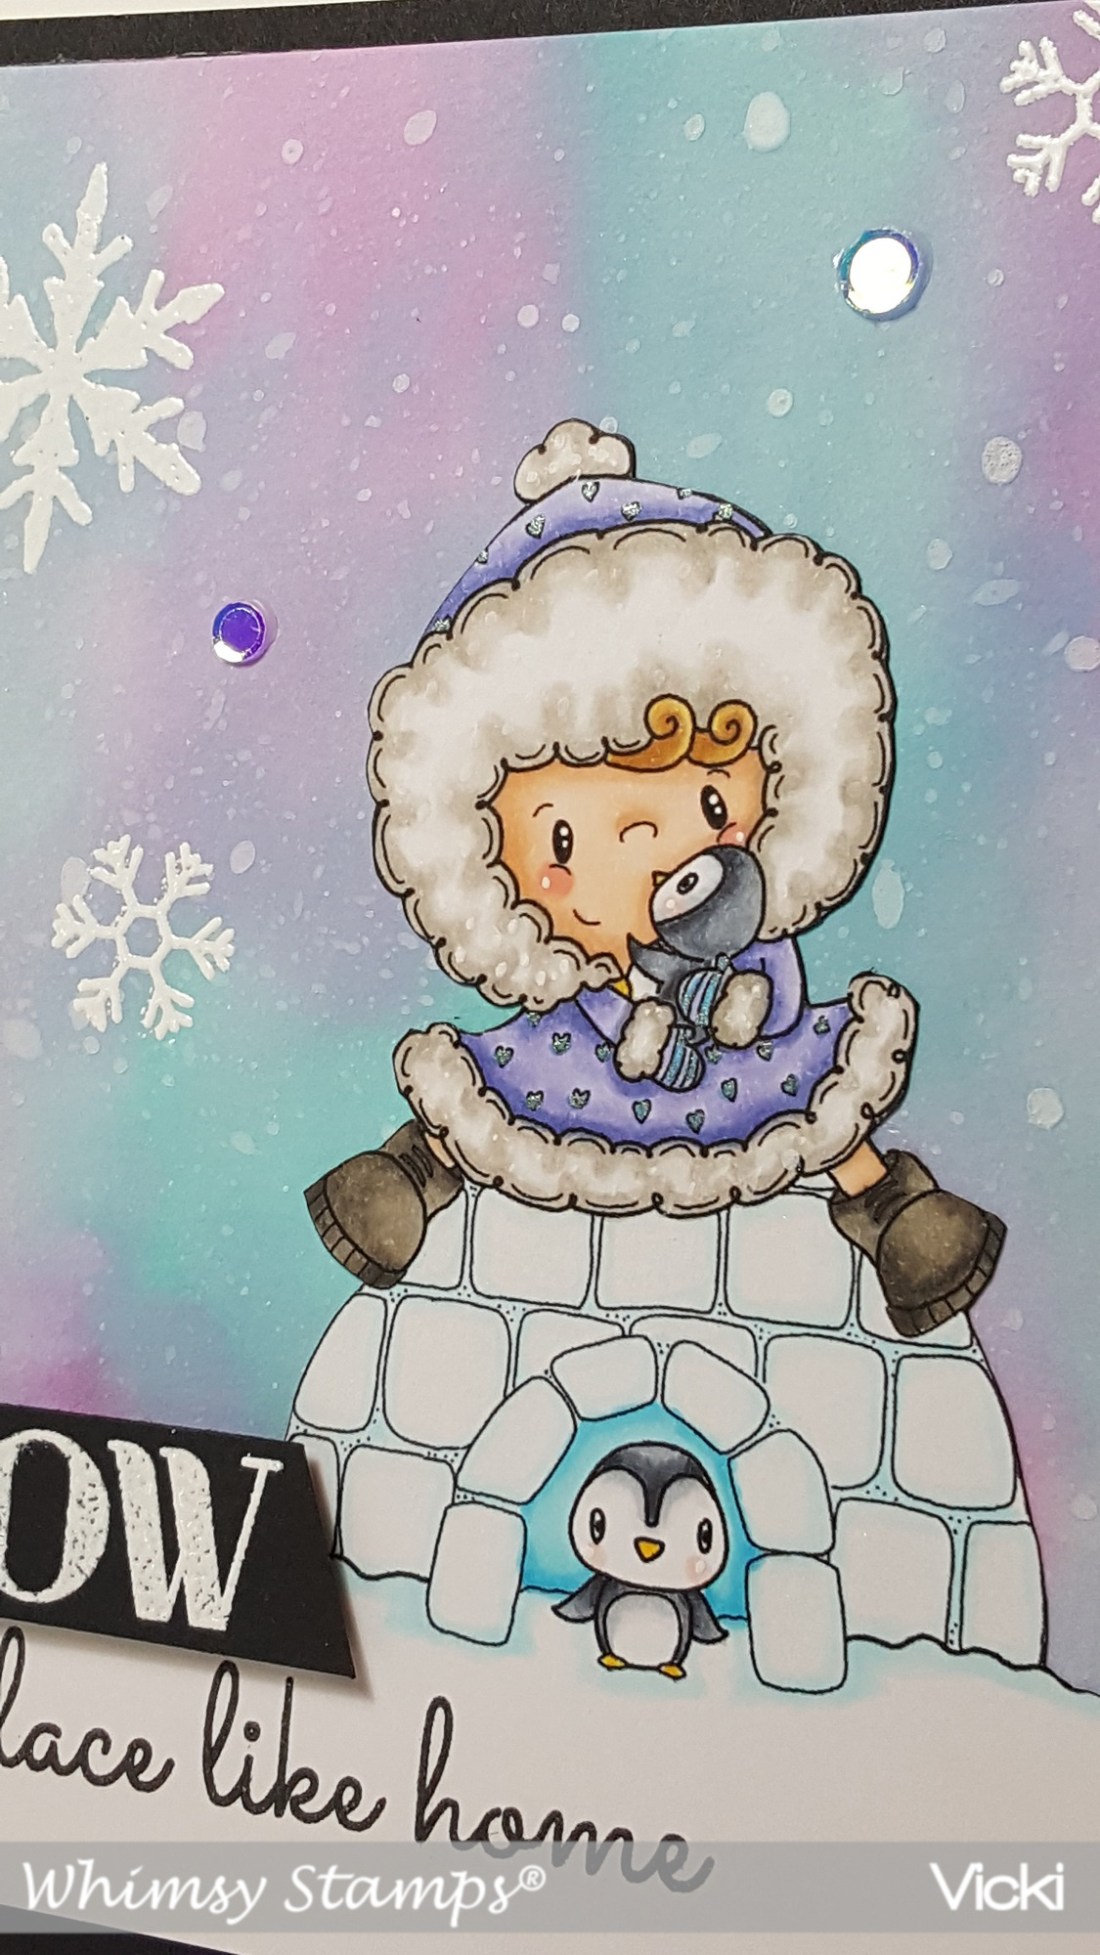
Upon a closer view, you can sort of see the sparkly embossed snowflakes in the background as well as the coloring details.  For coloring up my penguin, here’s the Copics that I’ve used:

  1.  hat/scarf/mittens:  BG78, BG75, BG72
  2. sweatshirt/hat & scarf trimmings:  R39, R37, R35 for trimming: C3, C1, blender 0
  3. Penguin Body:  C8, C7, C5, C3, C1 for feet/beak:  Y35, Y21, Y11 cheeks:  R00, R000
  4. Cup:  W9, W7, W5, W3 liquid/steam:  E29, E25, E50
  5. Snow/shadow around and under penguin:  B00, B000, B0000

I’ve also covered the trim on his hat along with the trim on shirt with a Spectrum Noir glitter brush pen.  I added a dot of Nuvo White Blizzard Glitter Drops to the center of the snowflake on his shirt as well as the liquid in his cup.

Vicki-WS-CoffeePenguin-Nov20-flat

It’s hard to capture the shimmer on his white hat trimmings, but you can see the sparkle in his cup and the center of his snowflake.   I was thinking of all of the things that you could add to his shirt besides a snowflake…so that would be fun to play with too!

Hope you’ve enjoyed my card today!  Thanks for dropping in!  I’ll be back soon!

Here are some challenges I’d like to enter this card for:

  1.  CAS Colors & Sketches – color challenge:
  2. Fab ‘N’ Funky – With an Animal
  3. 4 Crafty Chicks – Snowflakes
  4. QKR Stampede – Anything Goes

Feeling Young at Heart

Hello friends!  Stopping in to share another guest design creation that I’ve made!   Here’s another I’ve made using the very sweet digital set Doctor at Heart:

Vicki-SnSNov-YoungatHeart

Isn’t this image darling?!  My first thought on this set was to try and go a little “vintage” with my design.  I opened up a Word doc. to insert the image and sentiment and sized and arranged it how I wanted it to look.  I printed it out on some cream-colored card stock and then cut it out with the Tonic Studios Follow Your Heart die using the frame portion only.

I wasn’t sure I wanted the image to look “vintage” so in asking hubby, he told me that I needed to color him up with blue shorts, brown/tan shoes, orange top and blond hair!  He was very specific about that!! LOL!  So I colored this cute image up with my Copic markers and gave some “outlining” shadows around the sentiment too.  I took a gel Stardust Pen and colored in the ‘metal parts’ of the stethoscope and then added some Nuvo Crystal Drops Morning Dew (Gloss-clear) to the heart circle the boy is holding and let it dry.  I then used some distress inks and sponged around the edges of the heart image panel and spritzed it with water, waited a few seconds and dabbed it up with a paper towel.  I love the watermark look it gives to add that vintage flair and tie it all in together.

Vicki-SnSNov-YoungatHeart3

So when you tilt the card, you notice that the background looks like I’ve used some special glitter paper, but I did NOT!  I made my own glitter paper for the background!  I took another piece of black cardstock and covered the entire panel with VersaMark Ink and sprinkled it with some Black Magic embossing powder. Stunning sparkle!

Vicki-SnSNov-YoungatHeart2

For the look on the ribbon, I took some cream-colored seam binding ribbon and sprayed it with some water and rubbed it in some ink that I smeared onto my TH Glass Media Mat and crinkled it up and then let it dry.  I wrapped it around the embossed glitter background panel and added a bow with a button and natural twine for the center of it.  I mounted this glitter panel onto a 5 1/2″ squared cream-colored card base that I’ve ink blended around the edges in the same colors that I’ve used on the heart.  The heart image panel was then popped up over the ribbon strip and glitter background with craft foam and then the seam binding bow was attached along the edge of the heart.

Vicki-SnSNov-YoungatHeart1

For the corners of my card, I had a very old corner punch that I punched out from black card stock and attached them to the corners of the card.  I then used the  Nuvo Crystal Drops Ripened Pumpkin to add some “dot” in the middle of each punched corner piece to finish it off.  I think that the tiny bit of orange color ties in nicely with the glitter background and his orange shirt.

I really hope that you’ve enjoyed my fun ‘vintage charm’ creation as well!  Thanks so much for stopping in today and I’ll see you soon!

Challenges I’d like o enter my card for:

  1.  Little Red Wagon – “Remember When” (used Crystal Nuvo Drops – Rippened Pumpkin – meant to be for Halloween)
  2. Crafty Creations – Anything Goes
  3. The Creatie Crafters – Anything Goes
  4. Fussy and Fancy Friday – Anything Goes

Seeing Stars at Cute Card Thursday

Hello friends and welcome to Thursday already!  It seems like the weeks are quickly going by faster and faster as we close in on the end of the year!  It’s the “crazy crafting season” for sure! LOL!

Today brings up another Cute Card Thursday Challenge and for this week’s challenge, we’d like to see “STARS” on your creations!  I think this is a good one for whatever it is you’re crafting even if it’s Christmas…or not!   I have decided to make mine non-Christmasy this time:

Vicki-CCT556-MFTStarShaker

I am pretty much “out-numbered” with males in my family, so most of my birthday cards are for men and I have a couple more birthdays to celebrate next month, so I thought this was a great opportunity to sneak one into my Christmas card-making time!

All the stamps and dies used on my card today come from My Favorite Things.  (I have recently purchased some Christmas items and look forward to getting my hands crafty with some of it soon!)

I started my card out with the Blueprints 27 scallop rectangle die.  I took some star images from a retired MFT stamp set called “Totally Happy” and randomly stamped them with VersaMark on this card front panel and then heat embossed them with clear embossing powder.  I taped off the scalloped edges so that they wouldn’t get inked.  I’ve used the Blueprint Sketch, Peacock Feathers, Tumbled Glass and Twisted Citron Distress Oxide inks and blended them over the stars for an ink resist effect.  I also spritzed this panel and dabbed it with a paper towel for the water drop look.

I thought it would be fun to make a shaker card, so I die cut a star from this ink blended panel with the MFT Star Shaker Window and Frame Die-namics set and then cut the frame out from some black card stock.

Vicki-CCT556-MFTStarShaker-close

What makes this such an easy shaker card is that MFT also has these Star Shaker Pouches that coordinate with the die!  So I’ve taken this and fit it through the die cut star area on my card front panel and then filled it from the back with some confetti stars, I found some matching-colored seed beads and pretty sparkly silver glitter chunks to fit inside and then covered the back with some white cardstock.  Just love the sound when it shakes because you can hear the seed beads! 🙂

Vicki-CCT556-MFTStarShaker-1

I then took a strip of black card stock and white heat embossed the sentiment (same stamp set mentioned above.) to stamp the greeting.  I first layered the scallop inked panel over a black piece of cardstock and then attached the sentiment strip and cut off the edges to match that layer.  I then mounted this panel over an A2 sized top folding white card base.  I finished it off by adding some silver star sequins filled with some Silver Stickles in the centers of each one.

Sometimes you wonder about “adding too much bling” for a guy, but I think this is a fun shaker birthday card that a male would enjoy too!  Hope you’ve had some fun on my blog today!  I thank you so much for stopping by!  I will see you soon!

Challenges I’d like to enter this card for:

  1.  Challenge Up Your Life – Celebrate/Anniversary, etc.  (Happy 100th Challenge!)
  2. Use Your Stuff – Stars
  3. Crafty Cardmakers – Lots of Layers
  4. Shopping Our Stash – (SOS 380) Tic Tac Toe (I used the middle row going down:  stamps, glitter was handed from my grandma to my mom and then to me..so yeah, older than 5 years probably! LOL & Happy Birthday)
  5. Watercooler Wednesday – WWC196 – “All About Occasions”

SNOW Place Like Home

Hello friends!  Hope you are having a great week so far!  Well I have to say that this card certainly does feel like home where I’m at right now as it’s pretty cold and a bit snowy over my way!  I tried to hold onto Fall for as long as possible!

Whimsy Stamps has come out with another line of really cute digital stamps from CC Designs and this is the first time that I’ve colored one from the new line and I think they’re really cute!  Check out this card I’ve made for you today:

Vicki-WS-Iggy-Nov13

This darling image is called “Iggy” and I just love these sweet little penguins with her! 🙂  Here are the Copics that I’ve used to color her with:

  1.  Coat/fur trimming – BV04, BV02, BV01/W3, W1, W0, blender, white gel pen for dots, blue gel pen to color hearts
  2. boots – W9, W7, W5
  3. Penguins – C8, C5, C3, C1, Y17, R00
  4. Skin/Hair – E23, E21, E11, E00, E000, R20, R00, white gel pen for cheeks
  5. Igloo/Snow – B04, B01, B00, B000

I fussy cut the image long with the ‘ground snow’ and left a spot at the bottom for the sentiment.  I outlined the image with a black marker and attached it to my winter snow background that I’ve made.

To make the background, I took the Stormy Sky, Peacock Feathers and Dusty Concord Oxide inks and a water brush to swirl a pretty winter sky pattern.  I dried it and then took a toothbrush to flick some white paint over it for the snow.  I then took a couple of the snowflake images from the Whimsy Stamps Snow Flurry clear stamp set and white heat embossed them in places on the background.  I’ve also used this same set to heat emboss the “snow” sentiment over a piece of black cardstock that was popped up with foam tape over the image panel and then the rest of the sentiment was stamped in black ink right below the image.

Vicki-WS-Iggy-Nov13-close

Here you can better see a closer look at the details of the coloring.  I’ve also put some shimmer over the entire igloo with a Spectrum Noir glitter brush pen.    Thought I could see it when I took the photo, but of course it’s not showing up!

Vicki-WS-Iggy-Nov13-2

I took the snowy image panel and mounted it over a piece of black cardstock and then took a very thin strip of silver glitter cardstock to lay right next to it over a piece of white card stock.  I took this white card front base and attached it to the left side of a top folding A2 card base.  Lastly, I’ve taken some sequins and attached them to the snowy background for a bit more sparkle.

I hope you’ve enjoyed my card today!  Thanks for dropping in!

Here are the challenges I’d like to enter this card for:

  1.  Creative Inspirations – November Chill
  2. That’s Crafty – Winter Wonderland
  3. QKR Stampede – #321 Anything Goes
  4. Crafting From the Heart – Anything Goes
  5. Artistic Inspirations – Anything Goes

Grateful We Are Friends

Hello friends!  Stopping in today to share my card using the Koi Pond Friends rubber stamp set.

Vicki-SnSNov-KoiPondFriends

I started out with a piece of watercolor paper and sprinkled three different colors of Nuvo Shimmer Powders on it:  Atlantis Burst, Green Parade and Blue Blitz.  I sprinkled all the colors at once before applying any water to it.  I sprinkled VERY little and just added a bit more here and there as I spritzed it with water.  I saturated the paper and moved it around until it was covered how I wanted it to look.  I dabbed it up with a paper towel and used a heat gun to dry it up a bit.  I just love the beautiful shimmer on this background!

Vicki-SnSNov-KoiPondFriends2

Also, for the background, I took the bubbles image from the same stamp set and stamped them in VersaMark ink around the right corner and bottom over the watercolor piece.  I heat embossed the bubbles with some Frosted Juniper and Sparkle (Semi-transparent) embossing powders.  I then mounted this watercolor background panel onto the top edge of a black A2 Sized top folding card base.

With the close-up view of the fish, I heat embossed them with the Copper Embossing Powder over some Bristol paper.  For the flower image, I just stamped it with black waterproof ink in the same Bristol paper.  Below I will share how I went about coloring both the fish and the flower.

After heat embossing the fish and stamping the flower, I took the Nuvo Glitter Markers in the following colors:  Midnight Shadows, Ember Glow and Urban Graphite and pressed the pens down onto my Tim Holtz Glass Media Mat to get a “pool” of it and then used my Water brush to blend and color the images. It leaves a beautiful shimmer and blends the colors together so nicely!

Vicki-SnSNov-KoiPondFriends3

Here’s a closer view of the colored flower with the shimmer.  I fussy cut all the colored images and glued them on the card base with glue.  For the flower image, I decided to off-set it and trim off the edges with scissors.

For the greeting, using the same rubber stamp set, I stamped it with a black pigment ink and then sprinkled it with some Sparkle (semi-transparent) and heat embossed it to give it a nice sparkly look!

Vicki-SnSNov-KoiPondFriends1

For the bottom portion of my card, I cut out a strip of cardstock the width that I wanted to go across the bottom and underneath the watercolor panel.  I covered the entire strip with Glue and then covered that up with these stunning Bronze Mica Flakes and let it dry.  After it was dried, I pressed and burnished them into the strip with my finger and bone folder.  The extra pieces will come off the sides as you rub it around or you could also trim it off if you prefer, but I found it to not be necessary.  You can see how big the flakes are in the photo as I scattered a few of them around my card in the photos.  This was by far my favorite thing to play with on my card! 🙂

I hope you’ve enjoyed my creation today and I thank you so much for stopping in!

Birthday Wishes for Hubby

Hello friends!  Happy Friday!  I wanted to share a few things from my husband’s birthday we celebrated last night along with the card I made for him.

Vicki-MFTDeer-Bday

I was going for a masculine look of course and I know that he likes nature, wildlife, etc. and with his birthday being in November, I thought a Fall scheme would work out nicely.  Besides, I had gotten some My Favorite Things products and wanted to have a play with them, so I used the current color challenge when making this one.  (See challenges list below)

For my design, I went with a Natural cardstock base, rounded the corners with a corner chomper and ink blended along the edges with some Vintage Photo distress ink.  I got a little more carried away with the inking than what I wanted, but then went over it by spritzing some water and dabbing it up with a paper towel for the water marks.  (I’ve also cut out some leaves with the Falling Leaves Die-namics die set and then sponged some colors around the edges for them as well.  These were added as accents on the over-all design.)

Vicki-MFTDeer-Bday1

I was so excited about using this Delightful Deer Die-namics set.  There are some T-I-N-Y bits in there to cut out and attach! LOL!  I sponged around the edges and bottom of legs with a brown ink.  I die cut some white dots and the piece for tail as well as cut out a couple of brown dots for eye and nose as well as cutting out his antlers.  I also added a few extra “dots” with my white gel pen on the deer.  It was popped up over the scene with some foam tape.  The main deer was cut from Persimmon cardstock which is also what I’ve used to cut out a banner (from the Essential Fishtail Sentiment Strips die-namics) that I white heat embossed the sentiment from the Essential Sentiments stamp set.

Vicki-MFTDeer-Bday2

For my scene, I took some of the MFT Candy Land Paper Pack and use the dotted “Sour Apple” color piece and die cut a panel of it with the Stitched Rounded Rectangle STAX die-namics and placed it over my ink blended natural card front base.  I then used the Stitched Valley die-namics and cut some pieces from brown cardstock and lightly sponged some white ink over top of the “hills”.  I placed those over top of my natural card front base and also cut out some trees from one of the FREE die-namics dies that I received with an order from some Sour Apple card stock and attached them over the “hills”.

Lastly, I wrapped some twine around the card front base, added my die cut leaves where I wanted them, attached this panel to a top folding A2 sized white card base that I’ve also rounded the corners on with a corner chomper.  Lastly, I’ve added some clear crystal drops in random places.

I enjoyed creating this one using mainly die cuts and minimal stamping!  I hope you’ve enjoyed my masculine card design as well! 🙂

Here’s the challenges that I’d like to enter this card for:

  1.  MFT Color Challenge – Persimmon, Sour Apple, Milk Chocolate, Neutral
  2. Happy Little Stampers Anything Goes with Dies –
  3. City Crafter – #437 Woodland Animals
  4. Crafting By Designs – Anything Goes
  5. Creative Moments – Anything Goes

If you happen to follow along with me on FB, then you may have seen where I’ve had the talented lady Dina Kowal create a portrait for me using a past photo from our beloved family member Mocca that passed away this last February.  Dina is extremely talented with her pencils!  My hubby was amazed and here is a photo of him with it last night after he opened it up for his birthday present:

BertBday-11-08-2018-gift

He said, “Oh wow!” when he opened it and wanted me to tell her that she did an amazing job, it looks just like her!   I went through the photos with hubby (he’s not on social media) that Dina had shared of her on-going creative process with the portrait, and this was one from the beginning:

Mocca drawing photo 1

And this was the photo that she used for her creative process:

OLYMPUS DIGITAL CAMERA

We are thrilled and honored to have this stunning work of ‘Mocca’ art in our home and look forward to getting it framed and put up!  Thank you to Dina for sharing her talents with all of us! 🙂

Thanks for dropping by my friends!  See you soon!

Snowflakes at Cute Card Thursday

Hello friends!  It’s time already for a new challenge over at Cute Card Thursday and as I can feel it growing even cooler by the day outside, I find that this challenge is very fitting and a great way to keep going on my Christmas pile!  We would like to see some “Snowflakes” on your creations this week!  We look forward to seeing what you come up with!

Our sponsor for this challenge is All Dressed Up Stamps.  They’re kind enough to provide an image to use for this challenge, so here’s what I’ve come up with:

Vicki-CCT555-ADU-Snowflakes

This image is so sweet with the pup and kitty delivering their letters to Santa for Christmas is coming soon! 🙂  The image I’ve used is called Christmas Post from All Dressed Up Stamps and it already had some snowflakes within the image, but I always feel that snowflakes are big, small and fall everywhere, so I decided to add a few more with items from my stash.

I’ve colored my image with Copic markers and used some gel pens for the eyes, cheeks, parts of the mailbox lettering, center of snowflakes as well as adding some adding some random dots in the background for tiny snowfall flakes.  I’ve also had this Christmas Postmark stamp set in my stash and thought it was perfect to use as a sentiment for my card.  I stamped the circle, punched it out and layered it with another scallop circle that was punched from red cardstock.  I stamped the wavy lines post mark image behind that on the image panel.  The image panel was cut with a Wonky Stitched rectangle die.

Vicki-CCT555-ADU-Snowflakes1

Here’s a closer look at the image and how I’ve colored it.  For the top of the mailbox, the snowflake on the circle postmark and for the snow-covered ground, I used some glue in those areas and then sprinkled some Diamond Dust glitter over top of it for some nice sparkling snow coverage.  (I love using that stuff for snowfall!)

You can also see the silver snowflake sequins that I’ve attached and then I’ve added some silver Stickles to the centers of each one.  I’ve layered this image panel to a red cardstock layer and then added some foam tape to the back of it and mounted it over my card front.

Vicki-CCT555-ADU-Snowflakes2

So, for the card front panel, I took a white piece of cardstock measuring 4″ x 5-1/4″ and ran it through my die cut machine with a snowfall embossing folder and then I mounted this to a white top folding A2 sized card base and added the layered image panel over top.

Thanks for stopping by and have a fabulous day!

Here’s the challenges I’d like to enter this card for:

  1.  Daisy Chain – Christmas/Winter
  2. Crafting From the Heart – Anything Goes
  3. The Holly & Ivy Christmas Challenge – Anything Goes Christmas
  4. Shopping Our Stash (SOS379) – Raining Cats and Dogs
  5. Creative Craft Cottage – Christmas is Coming
  6. All Dressed Up Challenge –  Oct Anything Goes + must use ADU image

Joy to the World a Penguin is Born

Hello friends!  I hope that you’ve had a great weekend and a great start to your week so far!  I’m back to share another image from the November digital release at Whimsy Stamps.

Vicki-WSPenguinNativity-Nov6

This one is so sweet and makes me smile!  This image is called Penguin Nativity by Crissy Armstrong.  I really enjoyed coloring up this cute image for my card!  I’ve used several Copic markers to fill the entire panel:

  1.  Penguins’ bodies:  C8, C5, C3, C1, C0, Y00, R00, Y17, Y15, Y11 (wings:  C3, C1), (Halo: Y17, Y11, Y00 and finished with gold gel pen), (Gown:  E84, E81)
  2. seal:  W7, W5, W3, W1, W0, R00
  3. tree:  W7, W5, W1, W0
  4. eggshell:  E53, E51 (straw:  YR24, YR21, Y15), (manger:  E29, E27, E25, E23)
  5. Star:  Y17, Y15, Y13 (finished with shimmer brush pen and gold gel pen)
  6. Ground:  E21, E00, E000
  7. Sky:  BG000, BG10, BG13, Y11, Y00, 0 blender

After I was finished with the coloring, I ripped it out along the edges and then went over the edges with some distress ink and swiped it with a gold ink pad.

I’ve also taken some digital papers from the November release called Christmas Traditions (namely the musical sheet paper) and printed it out and the also ripped along the edges and attached that to another piece of ripped up brown cardstock that was also swiped with a gold ink pad.  I attached these panels to an A2 sized top folding brown cardstock base and then took an additional strip of the musical sheet paper to add to the base of the card and took a white ink pad and sponged around the edges of the card base.

I took some natural twine and wrapped it around the musical sheet and ripped cardstock pieces before attaching it to the card base.  I took an additional strip of brown cardstock and white heat embossed the sentiment from the Whimsy Stamps Holiday Mini Sentiments clear stamp set and made a tag with it by punching a hole at the top and threading the twine through it.  I made a bow and attached it to the card front panel.  I then used my fingers to bend the tag a bit for a more natural feel of the design.

Lastly, I took some foam tape and added my colored image panel to the front of the card.  I took some tiny confetti stars and glued them to random places in the sky.

Vicki-WSPenguinNativity-Nov6-close

Here in the close-up details of the image, you can see where I’ve added some shimmer touches with a gold gel pen and then the places where the animals are ‘glowing’ as well as the side of the tree, I’ve added some shimmer with a clear glitter brush pen.  (Still not sure I was able to fully capture this in my photo.)  I think the ‘glowing’ feature turned out nicely.

Hope you’ve enjoyed my card today and I’ll see you again soon!  Thanks so much for stopping in!

Challenges:

  1.  Crafty Catz – Anything Goes with an Optional Twist:  “Must Have a Sentiment”
  2. QKR Stampede Anything Goes
  3. Papercraft – Anything Goes with optional:  “Christmas Animals.”
  4. Just Us Girls – Word Week:  Music
  5. 613 Avenue Create – Anything Goes with optional twist:  “Christmas/Winter”

Merry & Bright Kitty

Hello friends!  Hope you’re having a great weekend so far!  I’m back to share another creation that I’ve made using the adorable Christmas Kitty Digital Stamp Set:

Vicki-SnS-ChristmasKitty-OctGDT

I wanted this kitty to be the main focus of my card along with the lights and I wanted them to pop out on my design.  I also wanted to add my panel complete with the “extra” light string and greeting.  So I opened up a blank Word doc. to add my images.  I sized and arranged the kitty where I wanted him, then next to him I’ve added the additional “extra” lights and then positioned my greeting from the set where I wanted it, printed it out and colored in the lights and kitty with Copic markers.  To make the lights appear as one continuous string of lights, I took an alcohol friendly fine line marker to draw a line to the existing lights on the kitty.  I just love the look on his face as he was so much fun to color! 🙂

Vicki-SnS-ChristmasKitty-OctGDT1

To get the glowing look on the lights, I added some color around each light with the same color of chalk.  Then I took the Diamond Dust Glitter and added it over the light bulbs with the Nuvo Smooth Precision Glue pen.

I then cut this panel out with a rectangle cross stitch die cut from my stash.  After it was cut, I took some blue colored ink and stamped the pinecone image from the Holiday Greetings Rubber stamp set to frame in the kitty panel.

I decided to cut out some pine leaves with the same light blue card stock with a die cut from my stash and then I covered them with VersaMark ink and heat embossed them with the Vanilla Ice embossing powder.  You will also notice a bit of sparkle around the kitty panel edge too.  I took the panel and pressed the edges into the VersaMark ink pad and then heat embossed the edges with the Sparkle embossing powder.

Vicki-SnS-ChristmasKitty-OctGDT2

Here you can see the design on my light blue card front as well.  This is where I took the same pinecone rubber stamp image and stamped randomly along the edges of the card front and heat embossed it with the Vanilla Ice embossing powder.  The heat embossed pinecone leaves were attached to the edge of the kitty panel along with a sparkly ribbon bow and a snowflake accent.  I layered a piece of black cardstock around the image panel and popped it up with some craft foam and mounted that over the front of the heat embossed light blue card front which was wrapped with some more of the sparkly ribbon.  This was mounted over an A2 sized top folding white card base.

I hope you’ve enjoyed my sparkly cute card today!


Challenges I’d like to enter:

  1.  Crazy 4 Challenges (C4C458) – Card with Cat or Halloween themed
  2. Crafting By Designs – Get Ready for Christmas
  3. 4 Crafty Chicks (4CC427) – Christmas
  4. Craft Rocket – Christmas is Coming
  5. Crafting With an Attitude – Anything Goes

Whimsy Stamps Seal On Ice

Hello friends!  Back with you today to share another image from the November brand new digital release from Whimsy Stamps!  Check it out:

Vicki-WSSealonIce-Nov2

These seals by Crissy Armstrong have stolen my heart!  I had to create with this Seal on Ice digital image too and share it with you today!

I started with my image by coloring it up with the following Copic marker colors:

seal:  C5, C3, C1, C0 W1, W0, R00 – Hat/scarf:  BG49, BG45, E53, E51, E50

I fussy cut him/her out and went along the edges with a black Copic friendly marker.

For the card design, I found some matching cardstock to go with the seal’s outfit and used it as the 5×5 Top folding card base as well as a mat layer behind the image panel.  I took the Whimsy Stamps Pierced Border Trio Dies to cut some pieces for the snow with some glitter paper.  I put one strip at the bottom of the card base and another on the bottom of the woodgrain paper I’ve used to place the seal on.

Before adding the seal to the snow border with foam tape, I took the Whimsy Stamps Snow Flurry clear stamp set and stamped some of the snowflakes with pink ink over the woodgrain paper.  I added this layered panel onto a piece of the new digital papers this month called Christmas Roses & Snowflakes which I’ve cut out with a square stitched die along with the woodgrain paper.  I took a sentiment from the Whimsy Stamps Holiday Mini Sentiments clear set and white heat embossed it and cut it out with a portion of the square stitched die as well and attached it to the design.

I’ve finished it off by adding a bow to the corner of the woodgrain paper panel with some clear sparkly ribbon and added another one of those snowflake gems to the center of it!

Vicki-WSSealonIce-Nov2-close

Here’s closer look at the coloring details.  Isn’t this a cutie?!  I love the feminine look to it by adding in the pink snowflake digital papers and sparkly ribbon.

Thanks so much for stopping by today!!  See you soon!

challenges:

  1.  Cardz 4 Galz – Let’s Go Digital
  2. Addicted to Stamps and More! – Anything Goes
  3. Watercooler Wednesday (WWC194) – Anything Goes
  4. Crafty Animals – Anything Goes + animal/teddy bear
  5. CRAFT – Winter