Mix It Up with Paper Piecing!

This is my second post for today, please scroll down to see the Pearly Sparkles Guest Challenge details or click HERE.


Hello again my friends and Happy May Day to you!  I think I’m so ready for May so that I can start being outside with hopefully better weather than what April gave us!  

Today also brings us to a new challenge over at the Mix It Up Challenge Blog.    The challenges always run for 6 weeks so there is plenty of time to enter.  The theme given for us this time is: Paper Piecing or you can always do the ‘Anything Goes” too.  Here’s the card that I came up with for the challenge using the theme:

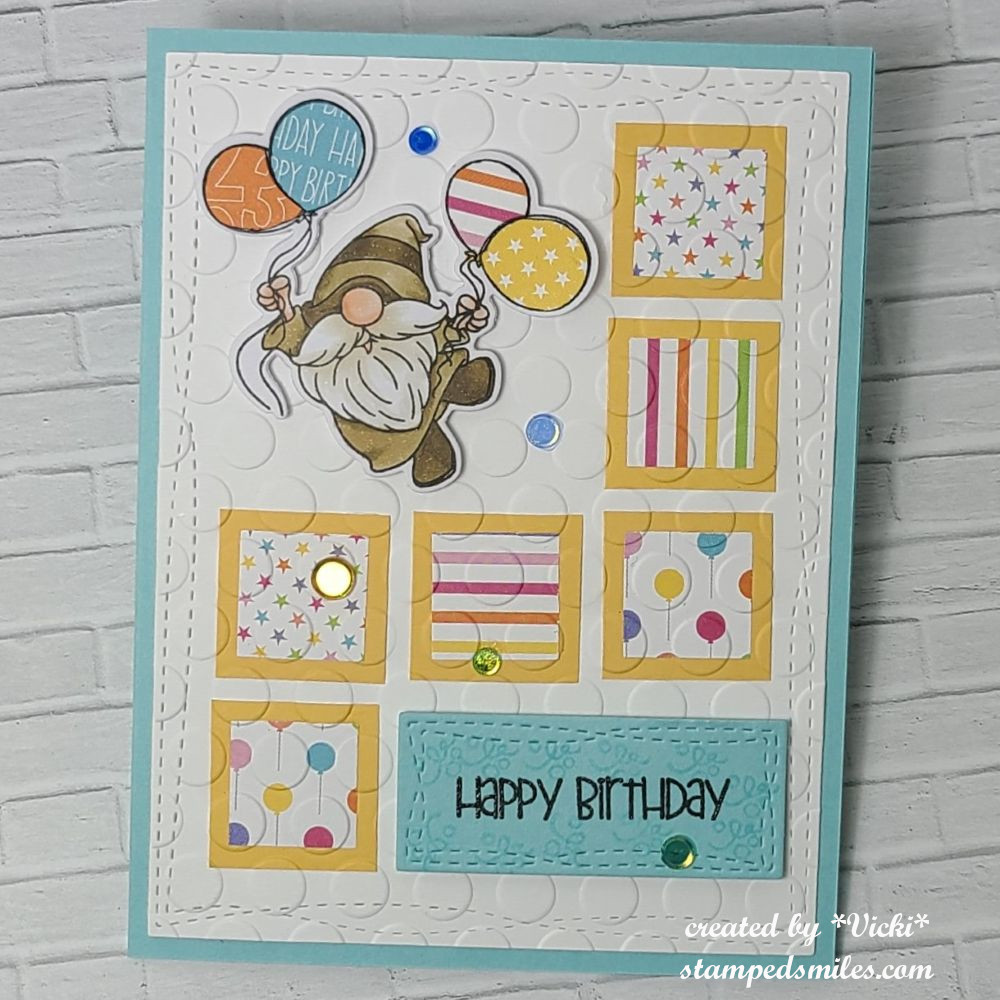
Look at this darling little gnome holding on tight to his balloons!  I got this adorable stamp from Ink ‘n’ Splatter a while back, but this is the first time I’m using it.  He’s called Party Gnome Celebration.  *Today is also the start of this company merging back up again with Digi Doodle Studios!  Dina has some cute artwork with her digital and clear stamps both!  You can see some past creations I made on my blog here under the category:  Digi Doodle Studios.* 

I’ve stamped the party gnome, colored him and then used some pattern paper from my stash to paper piece onto the balloons.  I just stamped the same image over different pattern papers, fussy cut each balloon out and glued each balloon in place.

For the background, I thought it would be fun to use some more of the pattern papers to create inchie squares and make a layout with them.  I attached the squares to the card front and then I embossed over top of it with a very old “Dotted Cuttlebug” embossing folder.  (If you’ve been a crafter for a while, then you know it’s old! LOL)  I black heat embossed the sentiment from the Party Gnome stamp set and cut it out with the same wonky stitched rectangle die set I’ve used for the front panel and popped that and the gnome up with foam tape.  I also stamped a few of the confetti image around the sentiment and then topped the card off with sequins.

I hope you’ve enjoyed my card today and I hope you find some time to create for our Mix It Up Challenge as well!  Hop on over to the see the inspiration!  Thanks for dropping in!

Challenges:

  1. Tic Tac Toe – #269 ( I used straight across middle row)
  2. Can You Handle the Pressure? – Anything Goes with embossing folder with optional: weather twist 
  3. Pammie’s Inky Pinkies – PIP2517 Anything Goes
  4. Penny’s Paper-Crafty – #595 Anything Goes Using Paper

Pearly Sparkles Guest

Hello friends again!  I have two posts going up for today, so please see my post for the Mix It Up Challenge details in the above post when it goes live or click HERE.


I’m so excited to have been asked to be a guest for this month’s Pearly Sparkles Challenge!  I always love playing along in challenges and supporting them when I can as I always find inspiration in using my supplies when I play!

So for May’s Challenge, they would like to see:  BLACK, WHITE PLUS ONE OTHER COLOR in your project(s).  Here’s the card I made for this theme to inspire you:

I wasn’t sure what I wanted to do for this, but I thought you couldn’t go wrong with some flowers.  I pulled out a long forgotten stamp set from Taylored Expressions called “Picked Posies” (no longer available) and black heat embossed the images over watercolor paper and used one pink watercolor brushed over the petals.  I die cut each flower with the coordinating die.

I made the rest of the card layout with all black and white elements.  I stamped the TE Checking In Background stamp in black ink over a white panel, placed this over an A2 sized top folding black card base.  I also used the TE More Easy Edgers die to cut an additional piece of white cardstock and placed it over the stamped checkered background.  I also used some more of the elements from the flower stamp set and stamped some more black images on that background before I attached the watercolor flowers on it.  I centered each flower with a black rhinestone.

For the sentiment, I white heat embossed over black cardstock using the TE Hello Friend Stamp & Die set.

  • Thanks so much for stopping in today and I hope you’ll check out this challenge to see what the rest of the team has to inspire you with so you can play along too!

See you again tomorrow!

Challenges:

  1. Creative Fingers – Anything Goes
  2. 613 Avenue Create – Anything Goes with optional: splash of color
  3. Lil’ Patch of Crafty Friends – Anything Goes
  4. Ally’s Angels – Anything Goes
  5. Crafter’s Cafe – Anything Goes optional: Female
  6. Double D – Springtime Flowers

A is for Alphabet

Hello and happy Friday!  It’s not only “Good Friday”, but it’s Easter weekend here for us, so plans to enjoy the time we have together with food and laughter.  At least that’s the plan anyway!  I hope that whatever plans you have that you enjoy yourself.

Today starts up a new challenge over at the Alphabet Challenge Blog!  We have finished up the entire alphabet round and starting back up again for the 14th round which began in 2011! WOW! So beginning with the alphabet, the hostess has chosen “A” is for Alphabet (choose your own letter of the alphabet and a theme that begins with that chosen letter.)  *Remember that this is a bi-weekly challenge, so you have two weeks to enter*  I hope you will find some time to join us in the gallery!  Here’s what I’ve created:

The alphabet letter that I have chosen is “C” is for Chickens!  I needed a card for someone and so I thought of these Spring Chickens Stencil from Taylored Expressions.  I used that, plus the coordinating die to cut out the chickens. Along with that, I used the Yard House die set, Chicken Wire BG and the Just Chicken In sentiment set.

The quirky chickens and for an inside joke were sent to help cheer someone up not feeling well.

I started with a separate panel to stamp and stencil the chickens on.  I cut them out from the stenciled panel.  On another piece of cardstock, I stamped the Wire BG and ink blended around the edges.  I placed this onto a top folding A2 sized gray panel.  I wanted the area with the chickens to be the focus, so I took the TE Rounded Rectangle Stacklets and cut a piece of vellum that I used to create my scene on with the Yard House die set.  I centered the “hen house” and then used the placement of that to adhere the vellum panel to the center of the card front.

Lastly, I added the other chickens to the scene and the stamped/die cut sentiment which was popped up with foam tape at the bottom right of card.

Thanks so much for stopping by today!  I hope you’ve enjoyed my card and it gave you a smile! 😊  Have a wonderful Easter weekend my friends!

Challenges:

  1. Creative Friday – #383 Humorous 
  2. Allsorts – #821 Stencils & Masks/AG (chicken stencils/die cut bundle)
  3. Pammie’s Inky Pinkies – PIP2515 Anything Goes
  4. Ally’s Angels – #93 Anything Goes
  5. The Creative Crafters – #87 Anything Goes
  6. Dragonfly Dreams – Animals

Weather Related at Sparkles Monthly

Hello friends!  When I read about the weather from other areas, it always amazes me how different and even to extremes the weather gets especially during this time of the year!  I hear everything from rain, sun, snow, tornadoes, flooding, cold, warm, hot, etc.  So where do you find your own weather to be at right now?  In my area, we have reached past the snow, but it’s still pretty cool at night…so I know that Spring and the rain is here for us with a bright spot of flowers/sprouts starting to come out in the Midwest U.S.

With this in mind, we have a new challenge over at Sparkles Monthly and we have a very fitting theme of “Weather Related  (rain, wind, sun, etc.) this month.  Would love to see lots of different varieties of weather related projects, so I hope you’ll join us.  Here’s what I came up with:

I was so happy to finally get a chance to use this adorable set by Lawn Fawn called Beary Rainy Day as I’ve had it for a while, but never used it until now.  

I started with a kraft A2 sized top folding card base and stenciled some white clouds over it.  I then splattered some navy watercolor paint over it.

While that was drying, I worked on my scene.  For the background, I took some blue oxide inks in Blueprint Sketch and Salty Ocean and ink blended them on the stitched die cut panel.  I used some water to spritz over it for a watermark look.  While that was drying, I took another stitched panel and ink blended some Mowed Lawn and Rustic Wilderness Oxide inks for the grass area and die cut a hill to place at the bottom.  Before I attached it, I also die cut a white picket fence to go behind it.  I placed this scene onto a piece of navy cardstock and attached to the card base.

To complete the scene, I’ve stamped, colored with Copics and die cut the critters, rain puddles and clouds.  I used the coordinating raindrop die with the set and just die cut a few raindrops in silver glitter paper to add to the scene.  Lastly, I white heat embossed part of the sentiment on navy cardstock, cut out with a banner die and then just stamped the sentiment at the bottom in navy ink.  Also hard to see in the photo, but I’ve added some shimmer to the puddles with a glitter brush pen.

  • That’s all from me today!  Hope you’ll stop by the Sparkles Monthly blog is see what the team has come up with using this theme and join us in the challenge!  Thanks so much for stopping in as I love to read your comments!

Challenges:

  1. Craft Rocket – #124 Layer it Up 
  2. Addicted to Stamps & More – #490 Die cuts and/or stencils (clouds stenciled and variety of die cuts used)
  3. Penny’s Paper-crafty – #594 Anything Goes Using Paper
  4. Crafty Gals Corner – #266 Fill in the Blank:  “Adorable puddle jumping!”
  5. Time Out – #286 Pick 2 from list:  I picked Stencil & Water + Spots ( I was inspired to stencil some clouds and add some spots (splatter) to go with the colors/clouds of my scene and I was inspired by the water with the rain, puddles and watermark for ink blending)
  • Thank you to all the challenge blogs for keeping us all inspired to create and play along with our supplies!  I try to play along as much as I can.

Z is for ZOOM!

Hello there friends and welcome to April already!  I do not know if this year seems to be flying by because I’ve been busy with life or it’s just flying by anyway!  Speaking of things flying by…

Today starts up a new challenge over at the Alphabet Challenge Blog!  We are on the last letter of the alphabet this time and the hostess has chosen “Z” is for ZOOM (anything that goes fast) for the theme.  *Remember that this is a bi-weekly challenge, so you have two weeks to enter*  I hope you will find some time to join us in the gallery!  Here’s what I’ve created:

How cute is that pup standing on the bike seat to look over his bird friend perched on the basket!  The name of these adorable animal friends are called “Gus & Gertie” which are a set of characters designed by Taylored Expressions. (If you click on the link, you can see the full line of them.)  The set I’ve chosen is called Gus & Gertie Best Buds.  I like these animals because they’re very easy to color!

I could’ve chosen the airplane from the set, but I kept thinking of those electric bikes & scooters you can rent from cities and they seem to go really fast when I see kids whizzing by on them! LOL

I kept my scene in a circle and added some clouds in the background that I stenciled in and then layered some hills/slopes and a grass border on the front.  I just popped the “ride or die” sentiment at the top and attached the die cut image with foam tape.  I layered the scene onto a black circle base that was attached to a red brick embossed background.  All was attached to a top folding A2 white card base.

That’s all for me today!  Thanks so much for checking in with me as I enjoy reading what you have to say!  Enjoy your weekend and I’ll see you soon!

Challenges:

  1. Critter Crazy – #97 Anything Goes with a Featured Creature
  2. Unicorn – #108 Use Dies
  3. Crafty Animals – #93 Anything Goes with Animal(s)
  4. Crafts Galore Encore – #134 Anything Goes
  5. Just Us Girls – #769 Die Week (no flowers)

Y is for YUMMY!

Hello and happy Spring!  Hope you’re having a great March so far.  We just received about an inch of snow on Spring day, so I hope it starts getting warmed up from here!  I’m ready for warmer weather so I can cook out on the grill….YUM!  Speaking of that….

Today starts a new letter over at the Alphabet Challenge Blog and our lovely hostess would like to use “Y” is for YUMMY as the theme this time.  How fun is that!  Remember you have two weeks to join in the gallery to play with us.  Here’s my creation for this challenge:

I couldn’t resist getting out this fun “Food Truck” set from Riley and Company to color up!  I also paired it with the BBQ Riley to complete the scene full of yummy goodies!  The images were both stamped and colored up with Copics.  I used the coordinating die to cut out the Food Truck and I just fussy cut with scissors for the BBQ Riley.

Before attaching the images, I used a cloud stencil and blended the background and then took a piece of green cardstock to cut out a grass border for the bottom.  I ink blended the edges of the blades and then used a green Copic marker to add some shadowing for the stamped images before placing them down on the scene.  BBQ Riley was popped up with foam tape.

Here’s a closer view of the images.  I used a liner pen to draw “yum items” under the menu board on the truck with a drawing of a balloon.  I also used a silver gel pen to color in parts of the truck, the lights above the “food” word along with the utensils on BBQ Riley and parts of the grill.

I found a speech bubble and sentiment from my stash that I thought would be perfect for this card and stamped it above Riley’s head as he’s holding up a hot dog.

Do you like to stop and eat at food trucks?  What’s your favorite?  Last summer we went to a small town festival and they served some lemon shake ups at one place along with some BBQ shredded pork and it was so yummy!  We also like to grab some kettle corn to take home too.

Did I make you hungry now?!  Hope you’ve enjoyed my card today and I hope you’ll stop by the Alphabet Challenge Blog to come play along too!  We’d love to see your yummy creations!  Thanks so much for taking the time to stop by!  I enjoy reading your thoughts!  Have a great weekend!

Challenges:

  1. AAA Birthday – #71 Masculine
  2. Love to Craft – #85 Anything Goes
  3. 613 Avenue Create – Anything Goes with optional: Any Occasion
  4. Unicorn – #107 Boys/Men
  5. Passion for Markers – #780 Add a Sentiment (colored with Copic markers)
  6. Pammie’s Inky Pinkies – PIP2511 Anything Goes
  7. Lil’ Patch of Crafty Friends – #250 Anything Goes

It’s Easter at Sparkles Monthly!

Hello friends!  Hope your March is going along well and you’re starting to see some signs of Spring coming!  We even have a few flowers trying to pop up out of the ground which is so fun to see!  I hope they can hold out for a few cold days ahead.

Today I’m stopping in to share my card for the new challenge over at Sparkles Monthly and we have a very fitting theme of “Easter” this month.  I think I’m more than ready to start some Spring related projects, so I look forward to seeing the gallery.  Here’s the card I came up with:

How sweet is that bunny passing out his colorful eggs!  I pull out an older card kit (2019) and it had this adorable Simon Says Stamp set called “Bunny Wishes” (no longer available) mixed in with the kit which I don’t think came with it, but I wanted to use it with some of the other items that were in the kit like the papers.  It was like getting a brand new order and forgetting what I purchased! 😆 

I also used this beautiful oval die (not available) from SSS that cuts the oval, the flowers and the stitching marks around it.  I added a border of grass to place at the bottom and then I stamped the sentiment from the set and also stamped the “Easter” greeting on another piece of light blue cardstock cut with a banner die.  The gingham background was cut with a double stitched rectangle die and then I used the oval die to cut an opening for the bunny scene.  I added foam tape around the edges to pop up the panel on an A2 top folding pink card base.

Here’s a close-up view of the cute images that I’ve colored with Copic markers, cut out with the coordinating dies and then popped up over the floral oval scene with foam tape.  The extra Easter egg behind the basket was just glued to the scene.  It’s hard to see in a photo, but I’ve covered each egg with a glitter brush pen.  It’s sparkly IRL.

I did recently get this pretty Iridescent White Cord from SSS and took two strands of it to create a bow and then I attached it to the top of the oval.  It gives it a nice sheen and I might be using it again soon!

Thank you for stopping in today!  Hope you enjoyed my card and will join us for the challenge this month!  Have a great weekend!

Challenges:

  1. Pammie’s Inky Pinkies – PIP2510 Anything Goes
  2. Make My Monday – #247 Use a Die/Punch 
  3. Passion for Markers – #779 Dies &/or Punches + markers (used dies and Copics)
  4. Little Red Wagon – #798 Start Easter Projects
  5. Penny’s – #592 Anything Goes Using Paper
  6. Tic Tac Toe – #tttc266 I used 3rd down or middle across
  7. Four Seasons – Spring/Easter

X is for X’s and O’s

Hello friends and happy Friday!  The weekend starts and we’ve had some snow blowing around over our way with wind and colder weather, BUT next week it’s supposed to be warmer with Spring-like temps…but that’s the Midwestern climate!   It will level out later in the month.

Today is another new challenge over at the Alphabet Challenge Blog!  Our theme for the next two weeks is “X is for X’s and O’s (as in hugs & kisses)“.  We look forward to your entries!  I had some fun with this one:

I’ve had this Tic Tac Toe set for years and never even broke it out to use!  It was from the My Favorite Things “X’s and O’s card kit (obviously no longer available).  I also used those adorable My Favorite Things Bitty Bears (retired) to help with the hugs and kisses part.  I’m so happy to be using something from my stash and especially something that I haven’t used at all!

The card was pretty simple as the die cuts for the tic tac toe square were cut in different colors, found some polka dotted papers to match and also used those same papers to paper piece the heart on the top bear.  I stamped the sentiment from the kit, popped up the colored and die cut bears with foam tape and added a few purple gems.

Before attaching all of the elements, I applied the polka-dot striped paper to a white front card base that was cut with a double-stitched rectangle die also from MFT, and then attached to an A2 top folding white card base.

  • Thanks for stopping in today and I hope you’ll join in the X’s and O’s with us over on the challenge blog!  Have a great weekend and I’ll see you soon!

Challenges:

  1. Crafty Animals – #92 Anything Goes with animal(s)
  2. Critter Crazy – #96 Anything Goes with Featured Critter(s)
  3. The Divas That Cut…Paper! – Critters plus a die cut
  4. Pammie’s Inky Pinkies – PIP2509 Anything Goes
  5. The Neglected Stuff – Anything Goes with neglected item (my neglected item is that MFT X’s and O’s card kit that was never used circa 2017!) About time, huh?!
  6. Crafts Galore Encore – #133 Anything Goes

Mixing It Up With Layers!

Hello friends!  WOW!  That last month went by really fast!  I think it’s because I was busier than usual on my blog, but that’s great that all of the crafting got me through the cold month quickly!  I know it will still feel cold in March, but hopefully it will start warming up little by little!  Until then, I still need to wear some layers!

Speaking of LAYERS… That brings us to a new challenge over at the Mix It Up Challenge Blog.    The challenges always run for 6 weeks so there is plenty of time to enter.  The theme given this time around is: LAYERS or you can do the ‘Anything Goes” too.  Here’s the card that I came up with for the challenge using the theme:

Aren’t these hedgies cute!  I’ve had this stencil set for a while and haven’t had a chance to use it until now and I thought it would be fun to try out the Triple Time Stamping technique.  (If you don’t know what I’m referring to, check out this video on You Tube HERE.)  I thought this would be a great way to insure several layers on my card.

The cute hedgehogs come from the Taylored Expressions Hedgehugs Stamp & Stencil Combo.  I used the technique to layer the panels together and then stamped and stenciled the hedgehogs and then layered each panel with the Spearmint cardstock.  The smallest layer on top was popped up with foam tape.  (I added the white shimmer ribbon around the middle and front panels before attaching to the card.)

I used the coordinating die to cut out some extra hedgehogs and I popped them up with foam tape over a white metallic heart.  I also white heat embossed the sentiment from the TE To the Point stamp set and cut it out to pop up under the “kissing hedgehogs”.  I’ve also added a few more tiny die cut hearts from the white metallic paper.

I THINK I’ve got about 7 layers all together not including the card base.

  • I hope you’ve enjoyed my card today and will stop by the challenge blog to see all of the inspiration from the team over there!  I would love to see your creation in the gallery too!

Thanks for dropping in and I’ll see you soon!

Challenges:

  1. Gem of a challenge – Anything Goes
  2. Pammie’s Inky Pinkies – PIP2508 Anything Goes
  3. Little Red Wagon – #796 “Tiny Dancer” (tiny things)  I used tiny white hearts
  4. Penny’s – #591 Anything Goes Using Paper
  5. Simon Wednesday – Anything Goes
  6. Just Us Girls – #764 Stencil Week

“W” is for WINGS

Hello friends and happy Friday!  It has been very cold over our way and I’m staying indoors as much as I can which means some crafting time is happening!  I do like looking from my window and seeing the chickadee birds along with the squirrels in the feeders!  I enjoy seeing those bright red cardinals, but I don’t get to see those as often.

Today is a new challenge over at the Alphabet Challenge and we are on the letter “W”.  The hostess has went with the theme “W is for “WINGS“.  You will have 2 weeks to join us, so I hope to see your creations in the gallery!  Here’s my card using this theme:

Since it’s so cold out, I decided to skip on over through winter and go straight to warm spring/summer with a dragonfly!  We usually don’t see dragonflies over my way until it gets pretty warmed up.  (It has to be above 60 degrees Fahrenheit, on average, for them to come out.)  I also was happy to finally pull out a stamp set that I got from STAMPtember of last year created by Kitchen Sink Stamps.  Unfortunately, this company is no longer operating.  There are a couple of stamp sets available for purchase on the Simon Says Stamp website I see.  But this particular stamp set called “All Aflutter” was only available during the STAMPtember event.  I’m happy to get it even though I didn’t make it in time to grab the die set before it sold out, but it’s a beautiful set.  It’s actually the only Kitchen Sink Stamps I own.

I started out with the green flower stems at the bottom.  This is a layering stamp set, so they very cleverly put the numbers in order to stamp.  I then added three purple colors for the flowers to go on top of the green stems.  I stamped the sentiment from the set with the “Hi” done in purple ink.  I ink blended like colors around the card panel.

I stamped the dragonfly body onto the card panel BEFORE stamping the sentiment for the placement of the design.  I attached the card front to a purple A2 top folding card base.

Dragonflies have to have that shimmer on their wings!  It’s so hard to take a photo of the shimmer from the glitter pen and I wanted that to come through for my dragonfly wings!

The dragonfly was stamped in the corresponding layers for his body and wings on a separate piece of cardstock.  The lightest grey was the wings.  I used my scissors to fussy cut him out and blended some light blue ink around his wings.  I glued the middle section of him only so that I could pop up the wings a bit.  

Lastly, I added some shimmer to his wings with the glitter pen and attached some gems.

  • I hope you’ve enjoyed my card today and you’ve been inspired to join in the challenge with us!    Be sure to check out the rest of the inspiration from the team!
  • Thanks for stopping in and I’ll be back tomorrow with my AJ collaboration with Carol!

Challenges:

  1. Ally’s Angels – Anything Goes
  2. Creatalicious – #286 Anything Goes + optional:  use green
  3. Lil Patch of Crafty Friends – #248 Anything Goes
  4. Pammie’s Inky Pinkies – PIP2507 Anything Goes
  5. Moving Along With the Times – #175 Things With Wings
  6. A Place to Start – #020325 Anything Goes + optional:  Things in the Sky