Hello friends! I hope you’ve had a great week so far! It’s a rainy day, but I have some errands to do as it will be a busy weekend so I wanted to get some things done. I also have some more catching up to share with you at the end of the post too!
I made a card using some older Newton’s Nook products I have and played along in a few challenges as well:
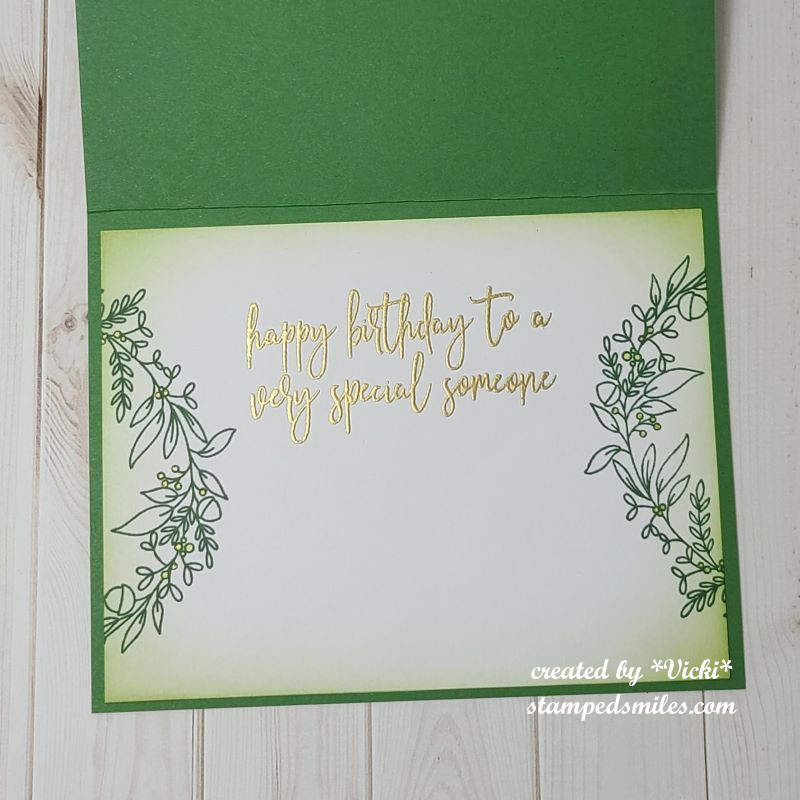
I am not sure if I used this stamp set or not before that I received a few years back from Newton’s Nook called Versatile Vases (retired), but I think it’s a great set with lots of versatility.
I stamped the flowers, then stamped the vase over top of it to make it look like the flowers are inside the vase. I colored with my Copic markers and cut out the panel with the Newton’s Nook Framework Die Setand then cut another panel with pink cardstock for the frame around it. I then stamped the hello sentiment at the top right corner of the panel.
I followed along with the sketch (see below) for the Inky Paws challenge and used some pink ink to stamp the solid flower image from the Versatile Vases set and layered it over a pink cardstock layer. The purple dotted paper came from the Newton’s Nook Birthday Woofs Paper Pad. I arranged each panel over a white top folding A2 card base, but before attaching the purple dotted strip going horizontally behind the flower panel, I wrapped some white twine around it and added a bow with it.
I used some foam tape to pop up the flower panel and then added some purple rhinestones to the center of each flower.
It’s a very simple and sweet card perfect for sending a smile!
I’m still catching up with some projects that I had been working on earlier this year and never had a chance to post each thing I was doing at the time.
You may remember the “Stamp Joy Virtual Event” that I did back in March and I shared those in my post here. During the exact same time I was doing that, there was another event going on through Scrapbook.com called SBC Fest which was recorded so I watched it later and participated in the classes as I had time. I finally finished what I wanted out of it in May and so here are the things I made except for the scrapbooking classes as I wasn’t interested in those projects. (I used items mostly from my stash.)
*If you’re on my website, click on each photo to enlarge*
Day 1 – Sparkle and Shine classDay 1 – Mixed Media TagsDay 1 – Birthday Mini AlbumDay 1 – Conrad ClassDay 1 – Laura’s ClassDay 2 – Whale ClassDay 2 – MM Tag with my own spin using Tim Holtz tag board medium sizeDay 2 – masculine classDay 2 – Highlighting Class
I’m getting closer and closer to posting my “catch-up” projects! I have one more event that I attended this Spring and a class that I haven’t shared yet, but will post soon!
Thank you so much for taking the time to stop by, for leaving me a comment or just catching the photos of what I’m doing. I hope you enjoy my sharing as much as I’m enjoying creating.
Hello friends! I hope you’ve had a nice weekend. I spent mine doing house chores which is fine as there has been a heat advisory here for a couple of days, so I thought I’d stay indoors!
I’m here today to share my project(s) for the new challenge over at Sparkles Monthly with the theme of “One for the Boys“. I’m always needing masculine cards, so this worked for me!
Cheers! I’ve pulled out the Taylored Expressions Hoppy Days stamp set for this card. I like the pun sentiments that go with it. I stamped the “bubble pops” image above the beer in yellow ink and added some sparkle with Stickles. I also used some liquid applique and heated it up for the “foam” on the beer stein. The die set cuts out the beer stein as well as that oval platform underneath. I cut off the excess on the side of the card after I popped it up with foam squares.
I stamped the pun sentiment in navy ink on the top left of the card.
I trimmed two thin strips of copper mirror cardstock then attached on each side of the pattern design before popping up the beer stein.
For the pattern details on the card, I used the Taylored Expressions Create-in-Quads Mod stencil set which actually makes 4 different card panels at once. (this particular one is retired, but click here for other sets.) These are all of the four cards I completed:
I had the beer theme in mind when creating a card in the first place, but then I thought it would be fun to pull out one of these create-in-quads stencils to make a pattern and have four cards completed at the same time.
I was thinking of masculine colors to use and I came up with the Taylored Expressions colors: Blue Corn, Mushroom, Pineapple and Salt Water Taffy. I used a full sheet of white cardstock and after the stenciling was finished, they were cut into 4 sections for card fronts. All the card fronts were attached to Blue Corn A2 side folding card bases.
To continue with the masculine look of the cards, I’ve added some touches of Copper metallic with mirror cardstock and other details. Each card was done a bit different and you can see the others in the gallery below with details.
If you’re on my website, click on each photo below to enlarge:
I used copper watercolor to make splatters and die cut sentiment with copper and blue corn.I die cut a frame and sentiment plus added copper sequins.I heat embossed with copper embossing powder and added copper mirror strip and sequins.
I hope you’ve enjoyed my set of masculine cards today! Please be sure to stop by the Sparkles Monthly challenge blog to see the inspiration from the team and I hope you’ll play along!
Thanks so much for stopping in! I appreciate you taking the time to join me here!
Hello friends! For those that celebrate the July 4th holiday, I hope you had/ having a great weekend! We usually do a cookout and later watch fireworks. It was a bit hot and humid so we didn’t stay outdoors very long and watched a movie instead.
WARNING: PHOTO HEAVY POST!!!!
I think I may have posted about this before, but last year I was introduced to Craft Roulette (a papercraft game show on You Tube) by Chelsea from Inky Stamperwhen she was a guest on there last year. I quickly became addicted to it and have been playing quite regularly. In fact, this is Chelsea’s third time as a guest on there and I wanted to share what I’ve made for episode #222 that aired on You Tube Friday July 5th, 2024.
The parameters this week are…
PROJECT – Dutch Door (create a card/project with dutch door)
COLORS – Gnomes (whatever inspires those colors to you)
ELEMENT – Movie
RANDOM – Building Blocks
If you’re interested in playing along, check out the Craft Roulette website on how to enter and watch the episode! You can watch/play along on You Tube with them every Friday evening. (Check what time zone you’re in compared to the Central US time zone used for Craft Roulette live shows.) You have until Sunday evening to play. If you enter the Craft Roulette #222 episode by then, you can also enter your card over at Inky Stamper Inkspiration Group on FB for a chance to win a prize from her as well. So check it out!
I think this one turned out cool using the Inky Stamper Alien stamp set! I have my alien (which is my “movie” element parameter) colored up with pencils and cut out with the die. I stamped the molecule (which is my “building blocks” random parameter in red ink over a piece of Doodlebug graph paper. I sponged the edges of this piece with some grey ink before attaching it to the bottom portion of the card. The sentiment also came from the same stamp set that was white heat embossed over black and cut out with a banner die and popped up with foam squares.
To create the “Dutch Door” card for the project parameter, I just used a black A2 card base and cut the front in half so that only the bottom portion of the card opens up. For the torn hole behind the alien, I used the Lisa Horton Torn Aperture 3D embossing folder and die. I used some silver mirror for the outer edges and black for the back along with a piece of white for the background details. I finished it off with some Pinkfresh Studio Ice clear drops.
Here’s the inside of my Dutch door card. I took a white piece of cardstock for the inside of the card along with the white piece from behind the torn aperture on the front and ink blended a galaxy background with reds, blues, greens, yellows and black which works with the “gnomes colors” for the colors parameter. I sprayed the background with water, let it dry and then I white heat embossed the sentiment from the alien stamp set and then I used silver watercolor to splatter over top of both pieces.
I attached the insert for the aperture back in with the silver frame and attached it to the front bottom portion with half of it sticking up above it. (As you can see in the photo above.) The alien was attached over the aperture with foam squares.
Had a lot of fun making this one and playing along using the parameters!
Obviously, I don’t post the cards I make every week for Craft Roulette on my blog, but I thought I’d share all the creations that I made last year since my very first contribution that I’ve done. I thought I’d save the cards for posting at the end of each year to look back on them. I started in January of last year and only skipped a couple of them. This card today will be my 72nd contribution!
So here’s a gallery of cards that I’ve contributed since I first discovered Craft Roulette in January of 2023 up to December 2023: (I will post the cards for this year in December!)
If you’re on my website, click on the photos to see enlarged
Wow! That was ALOT of cards! I placed the episode #s on each one for reference on what the parameters would’ve been. So this is what happens when I don’t post!
I have fun trying out the parameters each week and entering. I did win a prize one week from The Paper Insider which was a box of gorgeous papers. They’re all so gorgeous that I seem to be hoarding them and not used any of it!🙄 That will be a goal for one of these weeks for sure!
Hope you’ve been inspired with my post today and maybe I’ll see you over at Craft Roulette sometime! Thanks so much for stopping in today!
Hello friends! Happy July! I can’t believe that June is gone and the 4th of July Holiday is gearing up now! I’m looking forward to some happy times ahead through the Summer and I hope you are too!
Today begins a new challenge over at the Mix It Up Challenge Blog and it’s always “Anything Goes with an optional theme“. For the optional theme this time, we’d like to see some “Veggie Stamping“! (In other words: use vegetables as your source for stamping with!) I’ve never done it before, but I gave it a try! Here’s what I came up with:
Now I’ve heard of people carving food as art, but I don’t think I’ve ever really seen anybody actually use vegetables/food as a stamp! Have you ever tried this? I encourage you to give it a try and join in the challenge with it because it was so much fun to play!
For my vegetable stamping, I didn’t want to use ink pads in fear of contaminating/ruining it, so I decided to use some acrylic paints instead. I grabbed some veggies from the fridge along with a plate to hold the paints and cut the veggies to dip into the paint piles. My husband decided to come around and snap a photo of what I was doing, so I thought I’d share my mess:
I was actually in the process of cutting out the “veggie flowers” when he took the photo, but I started with some acrylic paper because I was using paints and cut the paper large so I had plenty of room to play around. It was a bit of trial to figure out how each veggie would look. I thought it worked best to dry out the veggies as much as possible on a paper towel. The coral large flower came from the red pepper. I found that using a paint brush to apply it to the veggie was a better look. Then I dipped the celery end to make the purple flowers. The shallot was used to create the teal flower (the shallot was applied the same as the pepper) and I used the end of the carrot for the center of the flowers with yellow paint and then I used a broccoli to dab on the center of the flowers as well with some dark grey paint.
I then tried to arrange the flower bouquet how I wanted on my card base after cutting out the flowers. I took a paint brush with (no kidding) celery green colored paint and painted the stems coming from each flower. For the “leaves”, I used the same paint and dabbed the celery end around the stems.
I finished out my card by stenciling the brick background before attaching the cut out flowers. I popped some of the flowers up with foam tape and then I white heat embossed a sentiment over dark grey cardstock and popped that up over the bottom of the bouquet. This was attached to another panel of grey cardstock that I attached to a top folding white A2 card base. I topped it off with a few gems.
So what do you think? First time trying it out and just playing around having fun is all! A little abstract for sure, but hopefully they do look like flowers on here🏵️! I’m really looking forward to seeing what everyone does with this! Hope you can play along too! (Remember you have 6 weeks to enter! So plenty of time to play!)
THANKS SO MUCH FOR POPPING BY TODAY! HAVE A GOOD ONE & I’LL SEE YOU SOON!
Hello friends! I hope that you’re enjoying your week so far! Summer is now in full swing over my way and it certainly is feeling that way too!
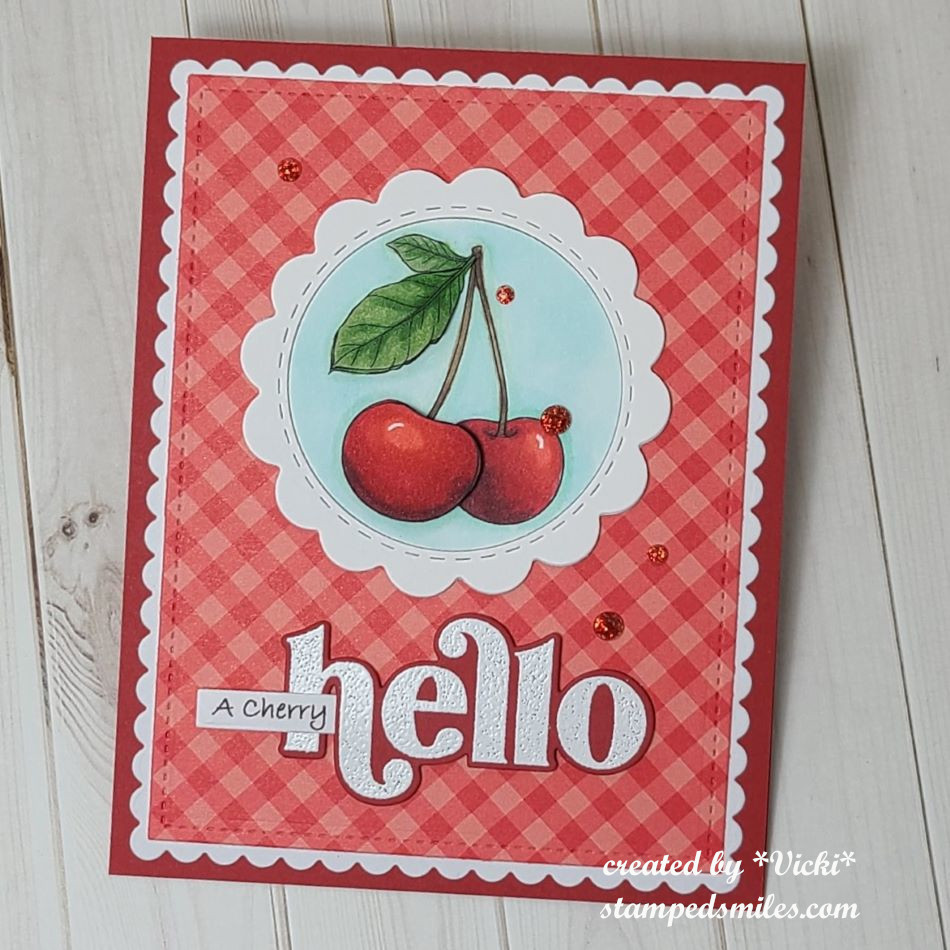
Where I live, June is also a time of year when the blooming cherry trees from May now turn into the cherries ready to be picked! If you’ve never tried a cherry jam, I highly recommend it! With the freebie image over at Beccy’s Place, it seemed like a great idea to make a card with it:
Without the sugar, cherries can be extremely tart and so it’s never something I would pick from a tree and eat especially with a pit in it! I do love a good cherry pie though!
Coloring cherries is also fun! I opted to use the non-colored version of the image and I printed it out twice because I cut out the front cherry and front leaf on the image to pop up with foam tape for dimension. I used Copics to color it in along with the background circle it’s on. I also added a white highlight with a gel pen.
I thought it would be fun to make a punny sentiment to print out “A Cherry” on my computer and then cut it out to weave into my white heat embossed “hello” cut from red cardstock.
I die cut the scallop circle which also cuts out the center that the cherry image is on. I layered it onto the Doodlebug gingham paper and attached it to the white scallop rectangle that is all attached to a red A2 top folding card base. I finished it with a couple of red rhinestones.
FOR THE CATCHING UP: The last several months/year, it seemed like my blog posts were really random and sometimes I would go a few weeks before posting the next time. I seem to struggle on and off with having no motivation to get crafting or even go into my craft room at all. I know this happens from time to time, but it seemed to be up and down and all over the place which is why I took on joining a few challenge design teams. It helped to get me a routine of at least getting motivated to get into my room on a regular basis anyway. I didn’t want anything that was too strenuous, or I felt that I would give up completely. This is also the reason why I do art journaling…it helped with “no pressure” on what I could create and use whatever I wanted. After looking at things I’ve created, I still have things that I’ve made but never posted about! So I thought I’d try to catch up with some of the things I’ve done and finally post it. There will have to be some more posts to catch up with it too!
So here is the start of some of my catching up towards the end of last year…
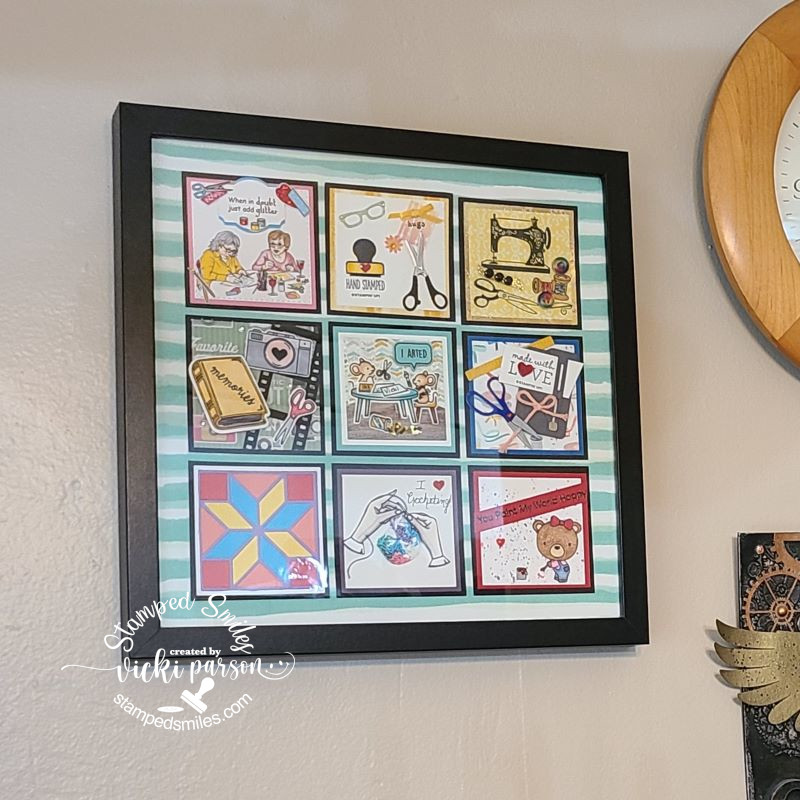
Do you remember the 12×12 Sampler SWAPS that I was doing with my blog buddy group? (Patti, Shirley and Donna) We would swap out the squares and then finish it ourselves by adding the background papers and placing into 12×12 shadow box frames. We had completed one for each season, but for this last one we decided to make one about our “favorite craft”. Here’s all of the squares that is still hanging up on my wall right above my computer and next to a clock and other craft items I made. I enjoy looking at it and seeing all of the squares from fellow crafting friends. This was fun to participate in and it really helped me with struggling motivation as well, so I’m glad I did it! Plus, it is cool to have it for inspiration in my room!
I actually had this done AND photographed last June! I forgot to get it posted on my blog.🙄
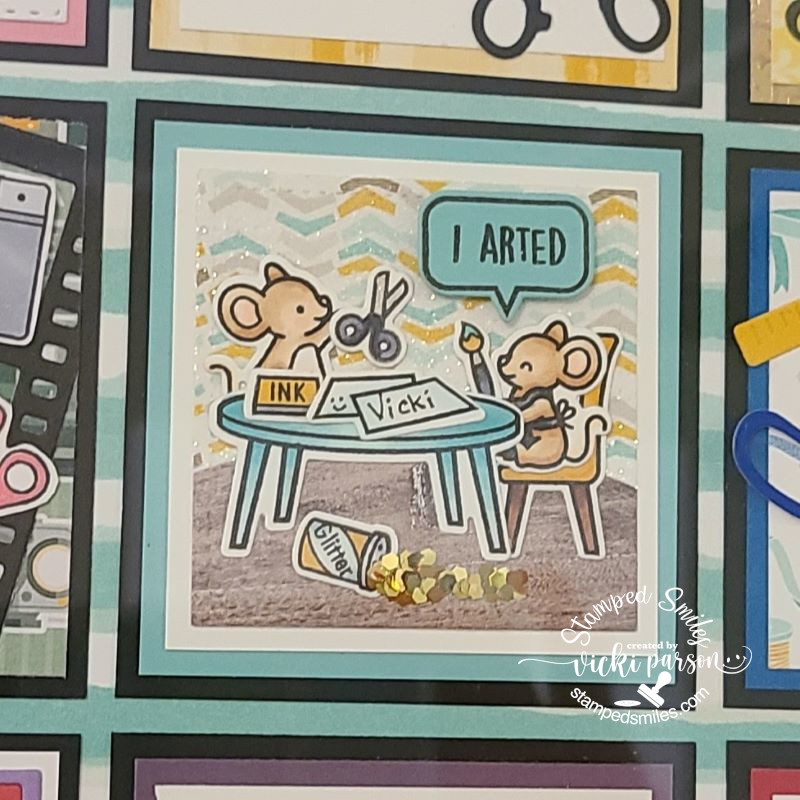
This is the square that I decided to do for this swap. I do love lots of glitter, so of course there is glitter on the floor spilled over along with glitter on the “walls”. If you don’t recognize these cute mice, they’re from Lawn Fawn Just Add Glitter stamp set. For each square, I wrote each person’s name on the paper from the table. Of course my name is on this one.
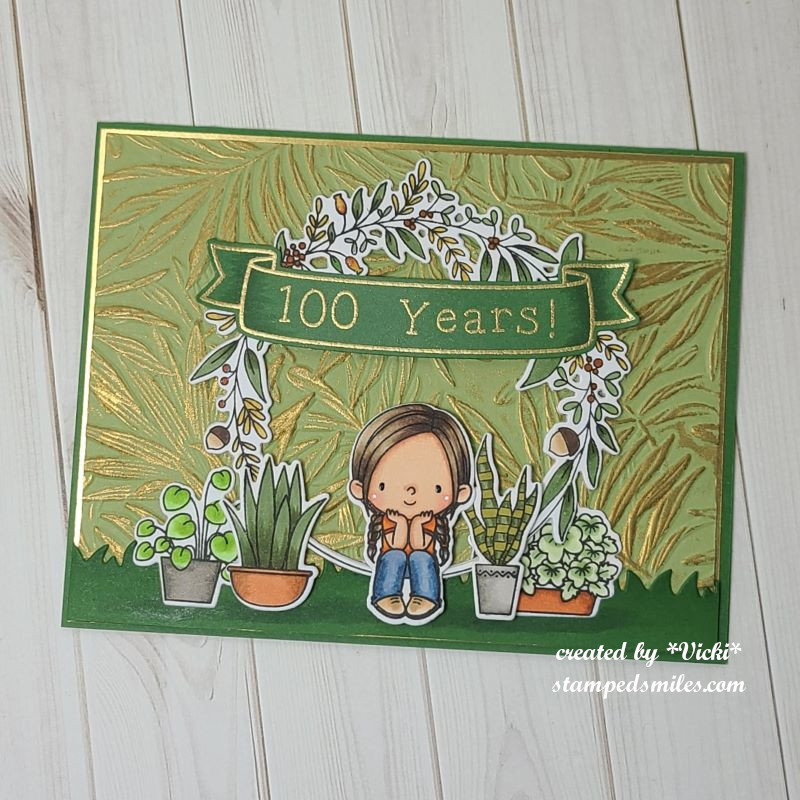
I was also asked to commission a card for someone’s very special birthday in November last year and forgot to post it as well:
I thought this one turned out so cute! I was told this card was to be for a special lady’s birthday who turned 100 and that she really liked plants.
Of course my first thought turned to plants and green colors. Then I thought, I don’t think I have any “plant” style stamps! The only thing that I thought of at the time was this darling My Favorite Things Sittin’ Prettystamp set from my stash. I also thought it would be fun to have a banner going across a wreath with the special number over it. I found the My Favorite Things “Fall Wreath” stamp set (not in store) and the banner came from an older (retired) Lawn Fawn set.
I also had a fern embossing folder that I embossed over green cardstock and then rubbed some gold wax over it to bring it out. I gold heat embossed the banner and popped it up over the wreath. I was just going to place the colored plants around it, but decided it would be cute to add the girl sitting on the wreath. She’s there to wish the special lady happy 100 with all of those plants around her! I added a border of grass at the bottom to help ground everything, added some gold foil for a layer and attached it to a green A2 card base.
Here’s what I did for the inside of the card: I stamped the wreath off the edge on each side of the panel with green ink and then sponged around the edges with the lighter green ink. I gold heat embossed the sentiment.
I hope you’ve enjoyed my new “Cherry Hello” card today as well as the projects that I am catching up with posting about! There will be more coming!
THANK YOU FOR STOPPING IN! I’M GRATEFUL FOR YOUR TIME AND THOUGHTS!
Challenges: (For Cherry Hello card ONLY)
Beccy’s Place – June Freebie image (THANK YOU!) optional: Food
Hello friends! I hope you had a great weekend! It’s been record heat and continuing to be all this week over my way and it’s way too hot to be outdoors for any length of time! So I thought it would be nice to bring the outdoors to my craft room instead.
I wanted to share the card I made for my husband for Father’s Day:
My husband is an outdoor type and where he prefers to be most of the time. We really have fun going hiking and visiting parks whenever we can and this seemed like a great start for making a card for him.
For the background: I stamped the Wood Slice stamp over kraft cardstock (along with the envelopes to match) and then I splattered some black and cream color paints over them. I took the panel cut the Ridged Circle Stacklets into the background. I wrapped some twine around it and attached them to an A2 side folding black card base.
The stencil creates four different scenes all at once by layering the stencils with colors you choose and then you cut each one out. I layered mine over black cardstock and attached to the kraft card front panels. I stamped the trees and sentiments and also added those to each card with some of them being popped up with foam tape.
Here’s what the rest of the cards look like using the same products. I changed up the scenes for each one but using the same colors for each stencil layer. I changed the sentiment so that I have a masculine card for several different occasions too. There are lots of males in my family to send cards to and I always seem to run out of them.
Thanks so much for stopping in today! I appreciate your kind words and taking the time out of your day! See you soon!
Hello friends! Happy weekend! Wow, it’s been very warm outside and I’ve been spending my time indoors. I hope to be sharing some more posts with lots of things very soon, so stay tuned in! Today starts another challenge over at the Sparkles Monthly Challenge blog!
This time was my turn to choose a theme and I thought with Father’s Day, masculine cards are a good way to use those “FUNNNY and/or a PUN” on our cards! To make someone laugh or at least smile, is the main reason why I love to make cards! If you feel like having a chuckle with your cards, make one and enter this month! I can’t wait to see what you come up with!
Here’s my card for the challenge:
Nothing better than a hot French fry, but a French fry with a smile and bow tie is too fun!😆 (This is an American term for this food, but I know they’re called “chips” in Britain…either way, delicious and fun!)
For this challenge, I knew I wanted to pull out a large card kit I had gotten back in 2018 from Simon Says Stamp partnered with Doodlebugto create the I Chews You kit. (Most of the items are not available any more other than the stamp set that I’ve linked.) I fell in love with all of the cute images and puns from the Doodlebug So Pun Friends collection! In this card kit, there was a die that cut out the box and fries. The sentiments came from some “Chit-Chat Clippings“.
I first took a piece of white cardstock for the front panel and cut it with a wonky stitched rectangle die and placed it over a side folded A2 red card base. I then took a wonky stitched circle die and cut a circle from the Doodlebug So Much Pun paper pad. I placed it in the lower right and cut off part of the edge of the circle sticking out past the white panel.
I took the die cut fry box and cut it out in red and white. I used the white strip to make the band at the top of the box. I cut out the fries and sponged around the edges and arranged them behind the box and attached it to the circle panel.
The sentiment bubble was inked around the edges and placed in the top left above the fries. I added a black layer behind the box sentiment strip and cut off the edge sticking out. Lastly, I thought it would be fun to add a smile face to the fry and then I stamped, colored and die cut a bow tie from my stash to add on the one fry. I finished it with some Doodlebug Heart Sprinkles.
I really had a great time putting this one together and I hope you’ve enjoyed it too! Hoping to pull out this card kit again and make several cards with it as there is still so many things in this kit that I never got a chance to play with! (I have so many things I need to do this with!)😉
Please be sure to check out the challenge blog to see the inspiration from the team and I hope you will take some time to have fun and play along with us!
Enjoy your weekend and thanks for stopping by! I’ll catch you soon!
As You Like It – With or Without Words and Why? (I feel like this is the main reason to send a card to someone that includes a sentiment. I especially like the fun and/or pun for sending smiles.)
Tic Tac Toe – TTTC249 (I used first row down: layers, die cut, pattern paper)
Hello friends! Happy June! Hope you’ve been enjoying your month so far! It’s going to start warming up at the end of this week which means I’ll probably start spending more time indoors with the air conditioning and hopefully have some time crafting! Yay!
I’m super excited to share my post with you today as I’ve been asked to be a guest designer for this challenge at Try It On Tuesday! Always happy to be apart of the challenges and support them as much as I can as they help to inspire creativity!
I’m loving the challenge theme for this one which is “BOOK PAGES”! There are several different ways to go with it, but here’s my take with the challenge:
I am an avid reader and I do love turning the pages of a good book, but sometimes you can come across an old book that is in bad shape or even a book that has no meaning to you and that you might normally throw away. I don’t do that, but I keep it instead for purposes of using in my crafts! I do the same with magazines, etc. Sometimes I use the illustrations for art journaling, etc. I’ve even kept some for the purpose of gift wrapping. How about you? Do you keep things like this for anything? If you do, then this challenge would be a great for using it up! I’ve even seen some decorative papers that have a “book page look” which would be suitable, I think, for the challenge as well!
For my card: I’ve used a cover plate die (unknown) and cut the pieces from a book page and then cut it again in black cardstock so that I could use the frames. I took some brown ink to sponge around the edges and in the center randomly, so that it wasn’t so stark white. I then splattered it with both black and white paints, wrapped some twine with a bow around and placed it on a side folding A2 black card base.
The flower image: I took another book page and stamped/heat embossed the Bursting Blooms stamp from Taylored Expressions(retired/not in store) and cut it out with the coordinating die. I had some fun watercoloring the image with some Daniel Smith watercolor samples and than I sponged around the edges with some more of the brown ink before attaching to the card with thin foam squares. (I also cut an additional piece of white cardstock for added thickness as some book pages can be thin.)
To Finish: I’ve taken the Taylored Expressions Sundry Sentiments and white heat embossed the sentiment over black cardstock and cut it out with the coordinating die. I attached it to the card along with some black rhinestones.
I love how this one turned out and I hope you do too! Please be sure to pop on over to the challenge blog and check out all of the inspiration from the team! I look forward to seeing your creation in the gallery as well!
Thank you for stopping in today and I’ll be sharing more with you soon!
Hello friends! I hope you’re having a wonderful week so far! We’ve been getting some rain, which is great for the freshly planted flowers. I enjoy being able to sit on my covered porch and listen to it rain as long as it doesn’t get too stormy!
Today starts a new challenge theme over at the Sparkles Monthly Challenge! For this month, we’d like to see your CAS (clean & simple) creations! I look forward to seeing the inspiration in the gallery, so I hope you can join! Here’s what I’ve made for this challenge:
Sometimes I can really struggle with a clean and simple design because I always feel like I need to add something more. The end result is in the minimal embellishments and design. This one got stuck in my head and came together rather quickly and I like how it turned out.
Most everything used on my card came from My Favorite Things. I started with watercolor (Bristol Smooth) paper and the Watercolor Wash stenciland blended a rainbow of colors over it. While the stencil was still in place, I took a water bottle to spritz water droplets over it and removed the stencil. I let it dry and then clear heat embossed the sentiment that was stamped in a black pigment ink. (The key to this is to make sure the watercolor area is completely dry before you heat emboss anything over it.)
I cut out the panel with a wonky stitched rectangle die. I’ve attached it to an A2 side folding black card base. I was pulled to splatter over this, but thought I needed to keep it simple, so I took some drip drops in “cosmic” color and added them randomly to the design.
So, what do you think? Simple enough you can do it too and enter it in the challenge, right? If you need more inspiration, check out the challenge blog to see what the other design team members came up with for CAS.
Thanks so much for stopping in today! I hope you have an amazing week!
Hello friends! Sending a happy Mother’s Day to all of the celebrating moms this weekend! It’s a beautiful day out today and tomorrow will be too, so I’m going out to plant some flowers that I’ve been wanting to do! I hope that you’re having a nice weekend in whatever you’re doing.
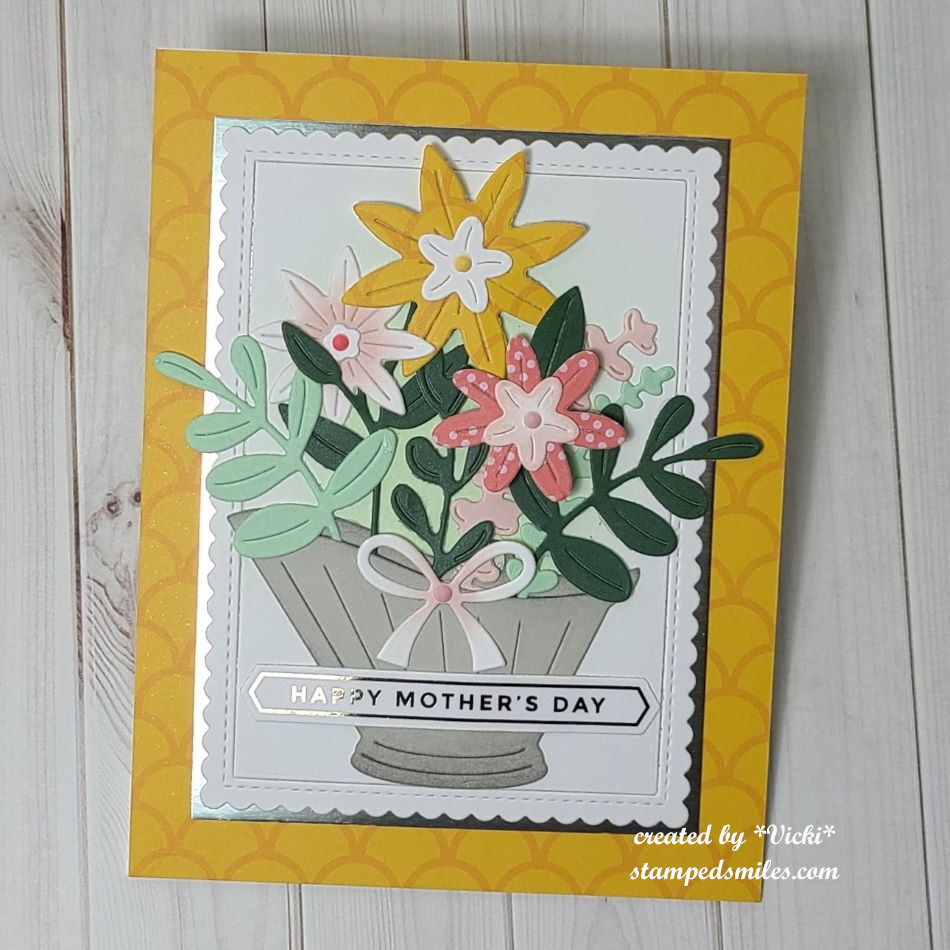
I just wanted to share a card that I had made just for Mother’s Day:
I love how this turned out with all of those blooms bursting out from the antique pail! I’m in the middle of going back over some classes that I’m doing, and this was one of them that I’ve switched up to fit this occasion. The original card had carrots as a base and I didn’t have the flower dies they used, so I made my own version with what I had.
The antique pail, flowers, leaves, bow and foiled sentiment dies all came from Taylored Expressions. The scallop rectangle frame came from My Favorite Things and some of the design papers I’ve used came from Scrapbook.com.
The background papers and large flower came from the same pattern papers as a couple of other flowers and dark green leaves. I used some light pink ink to sponge some of the other flowers and center of bow. The center of the scallop frame has some light green blending, so that it wasn’t so stark white behind the flowers. I also sponged around the antique pail.
I arranged the flowers inside the pail and turned it over to attach with glue over the center of the scallop panel. I popped up the front flower and added some colored gem dots to the center of the flowers and bow. I attached some mirror cardstock to the back of the scallop frame panel to match the foiled sentiment. The sentiment was attached over the pail at the bottom.
It took a little bit of time to cut and arrange all of it, but it was fun to fiddle with.
Thanks for taking some time to stop by and I hope you’ve enjoyed this pail of flowers for Mother’s Day! Have a fabulous weekend whatever you do! 🌼🏵️