New Beginnings at Sparkles Monthly Challenge!

Hello friends!  With January comes a new year and every year people are thinking about everything “NEW” like resolutions, out with old, in with new sort of things.  It seems with cold and snow winter outside; I’ve been doing a majority of my time organizing and figuring out what to toss or keep!  I’m thinking I need a new “for sale page” here on my blog!  I will need to figure that out and update later!

Today brings a new challenge for the start of the year at the Sparkles Monthly Challenge Blog!  For the start of the year and this month’s challenge, we have the theme: NEW BEGINNINGS!  I received a Lawn Fawn gift last year and this is my first time using it for my card today:

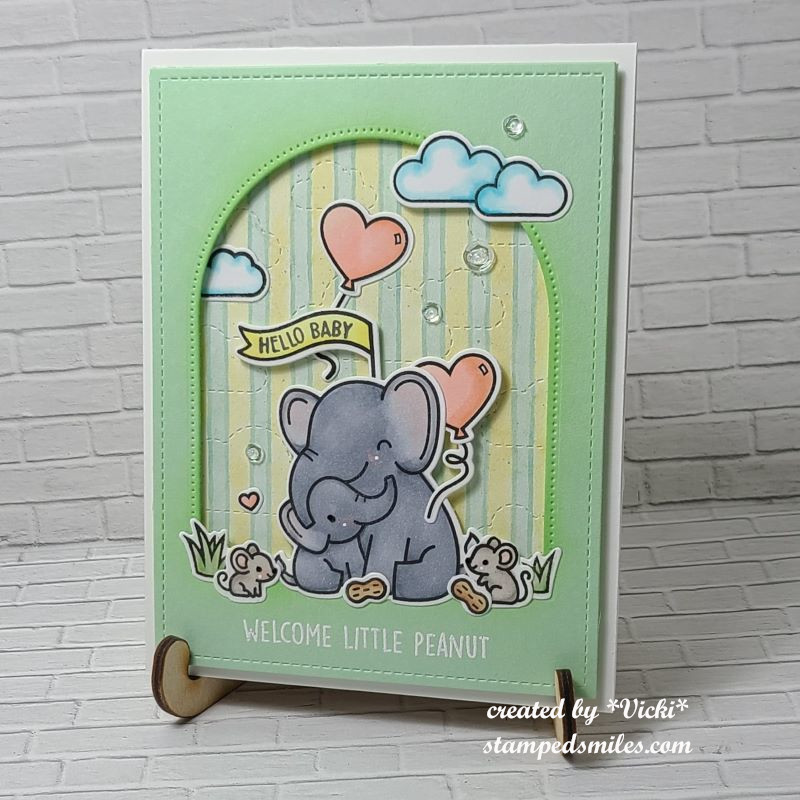
Of course, a baby is a wonderful “new beginning”, and I was inspired to use this darling Lawn Fawn stamp set called Elephant Parade plus the Add-On.  I stamped, colored and die cut all of the images to arrange a scene over the arch opening of my card front made with the Lawn Fawn Secret Garden Window die set.

I wanted to keep the colors gender neutral, so I went with mint and yellow type colors.  I blended around the inside edge and white heat embossed the sentiment at the bottom.  I found a very old scrap of decorative paper and ran a stitched cloud background plate die over it.  (I think it’s been retired) This was the background for my window opening.  I added foam tape to the back of the mint card front and attached it to the decorative paper.  Some of the images were glued directly onto the background and some were popped up with foam tape. I’ve added this panel onto a top folding A2 white card base.

I finished out the design with some clear sparkling sequins filled with Stardust Stickles and a few white and black dots with gel pens.

I hope you’ve enjoyed my card today and have been inspired to come join us this month to enter your creation!  I look forward to seeing what you make!  Thanks so much for stopping by as I appreciate you taking the time!  Have a great day!

CHALLENGES:

  1. Simon Says Stamp – Cute Critters
  2. Critter Crazy – Anything Goes featuring a Critter
  3. Time Out – NEW
  4. CRAFT – NEW
  5. My Time to Craft – New in Your Stash (stamps/dies – first used for this card from gift given October 2023)

Happy New Year! Mixing Up with Mixed Media!

Hello friends and welcome to 2024!🎉  I’m looking forward to a year filled with many happy memories and fun!  I’m wishing these things for you as well!  So to get the year started, I’m inviting you to a fun challenge to play along with at the Mix It Up Challenge!

The theme is always ANYTHING GOES with an optional theme of MIXED MEDIA!  With these challenges, you have plenty of time to enter as they run for 6 weeks!  I look forward to seeing what you come up with!  

I know that mixed media can seem a bit intimidating, but it’s only using more than 1 extra medium of any kind on your creation.  I usually do that anyway!  Here’s the card that I came up with for this challenge using the Mixed Media option:

I’m really loving how this turned out!  I’ve used another fun card kit from Taylored Expressions with the Snow Crystals card kit. (no longer available)

Background:  I started by white heat embossing the Swirling Snow Background Stamp over watercolor cardstock.  I used different shades of blue watercolor with a bit of turquoise in there as well.  I spritzed it with water to get the “watermark” look and let it dry.  I then used some Copic opaque white mixed with water and splattered some over top for another layer of snow.  After it was dry, I also filled in the circles with a glitter brush pen.

I die cut the snowflake die in navy and again in white cardstock 3 times.  I layered the navy at the bottom over the background.  The three snowflakes cut out with white were glued together and then I took 2 layers of sparkle silver embossing powder to heat set.  I layered the embossed snowflake slightly tilted from the navy snowflake and attached over top.  I also silver embossed the sentiment over a navy strip and added some “dash marks” with a white gel pen before attaching to the background.

Finished off the card by running the edges of the background panel with liquid glue and then attaching some chunky glitter to the edges.  I also attached a silver rhinestone in the center of the snowflake.  It’s so glittery and shiny in person!

Thanks so much for stopping in today and I hope that you will take the time to play along with us!  Be sure to check out the Mix It Up Challenge Blog for the design team inspiration!  

Challenges:

  1. Creative Fingers – Anything Goes
  2. Crafting From the Heart – Anything Goes
  3. Allsorts – Cold & Ice
  4. Crafting Happiness – Anything Goes
  5. Gem of a Craft – Anything Goes
  6. Four Seasons – Winter Season

Lots of Joy Mailed Out!

Hello friends!  I hope that you’re having a great start to your week!  We’re almost there as Christmas approaches us quickly!  I’ve been enjoying the Season and having fun keeping busy.  Currently baking cookies and decided to take a break from that to sit and make a post about all of things that I’ve been doing besides posting!😆

This is just one of the several similar cards that I created for my Christmas cards this year.  It came from a Christmas in July card kit from Taylored Expressions.  It mainly used the Wreathed in Joy Stamp & Stencil Combo set.  There are dies you can cut them out with as well as foilable panels which is shown on this one.

I do not like to make several of the “same thing”, so I’ve changed them up to different colors, layouts, etc.  So you can see the different versions I’ve done below.  (If you are visiting my web page, just click on each photo to see it enlarged.)

 *Apologies for the messy stack for photo taking…it was a lot to do all at once!

I thought these would be enough for all of the Christmas cards to send out, but I realized going back through my list that I wasn’t going to quite have enough. 

So I’m glad that at the beginning of this month I took a Hero Arts Stamp-a-Long and made several different types of Christmas cards.  Here are the results of these below:  (Again, if you’re looking on my web page, just click on the photos to enlarge them.)

So some of these were also taken and used for sending out more Christmas cards.  I’m glad that I did the projects for this class or I probably would not have had enough cards.

BUT WAIT!  That’s not all!  I’ve also made a few other Christmas items that I’ve also sent out.  I’m also sharing some gifts and gift tags that I’ve made from a Taylored Expressions Advent Calendar that I got this year.  I made some more cards and tags.  (I tried out wax melting which is something I’ve never done…it was fun)  Others are from classes I took or participated in Craft Roulette for.

If you’re on my web page, just click on the photos below to enlarge each one.

Wow, so that was a lot!  I know that my blog has been pretty sparse with posts lately and I am finally getting around to posting the things that I’ve been working on, so I hope you’ll get that and you’re able to take some time for yourself this season and enjoy the peaceful quiet moments!

I will be sure to take a moment and catch up with everyone before Christmas arrives.  In the meantime, it’s back to cookie making!  Thanks so much for stopping in today!❤️

Guest Design for Try it On Tuesday

Hello friends!  I hope that you’ve had a great start to your December month!  I promise I haven’t been hiding, but it’s a busy time of the year and I’ve been doing all of the Holiday things, so my time has been limited.  I’m glad to have just now finished up some Christmas cards!😉

Speaking of Christmas cards, I have something fun to share with you today!

TioT Guest Designer 2023

Last month I had won a top 5 in a challenge and was asked to be a guest designer for this Try it on Tuesday challenge!  I really enjoy playing along in the challenges to keep motivated, so I was thrilled!   For THIS challenge, the theme is “Santa Claus is Coming to Town” which inspired me to pull out this fun Santa stamp for a chuckle:

So, this is Santa’s excuse for being late!  Like me, he’s NOT hiding…just delayed!😆

The stamps and die cuts came from an older My Favorite Things card kit I had called “Stuffed Santa“.  I had fun putting this one together and was the beginning of the cards made to send out this year. (It was my plan to be early, but you know how THAT goes!)

For the background:  I ink blended in a couple of blue oxide colors with the center panel fading to the lightest color.  I sprayed the panel with some shimmer spray for that cold frosty shimmer sky.  I then splattered some white opaque Copic mixed with water for the snowfall.

The Santa, hands, sentiment bubble, and lights around the chimney were all stamped and colored with Copic markers.  I die cut them out along with the chimney, snow and rooftop pieces.  I die cut the pieces with white and used my Copic markers to color in the chimney, roof, window and lights around the roof line.  For the sentiment panel on the house at the bottom, I cut it to size and used my Copic markers to color the same as the roof peek.   I added the sentiment to it, and made this the “base” for the house.

To finish it off, I added some chunky glitter to the die cut snow on the chimney and roof.  I also used a glitter pen to add some sparkle to the inside window panels and the Christmas lights.  I also used some foam squares to pop up the sentiment bubble and Santa’s mittens.

Hope you’ve enjoyed my card today and that you’ll play along with this fun challenge over at Try it on Tuesday as well!  Thanks so much for dropping by!

Challenges:

  1. Pammie’s Inky Pinkies – 2349 Anything Goes
  2. Ally’s Angels – Anything Goes
  3. Crafty Catz – #662 Anything Goes
  4. Daring Cardmakers – One Word Prompt: LIGHT (Christmas lights and window light)
  5. Gem of a Challenge – Anything Goes
  6. Inkspirational – Designer’s Choice: Add Glitter
  7. Krafty Chicks – Stamp Act

Grateful & Encouraged

Hello friends!  It’s Thanksgiving tomorrow for us in the United States and I’d like to send a heartfelt Thanksgiving greeting to you all!  I would also like to say a huge thank you to everyone for your kindness and friendship.  I’m very grateful for you and encouraged by your support!

I’ve been working on several things and haven’t spent the time to photograph and share everything yet, but I will be sharing soon.  In the meantime, I’d like to share a few projects that I’ve made in lieu of the Thanksgiving holiday:

I don’t normally send Thanksgiving cards, but it’s a great way to say thank you to someone that hosted a dinner or brought something to share or just spend time with you!  That is the ONLY turkey stamp I own!  The stamp set is called “Sassy Thanksgiving” by CZ Designs at Simon Says Stamp.  I thought the sentiments in it were too cute and funny.  You certainly could make this any type of thank you as well.

This is also a fancy/fun fold card called a “Swing Easel Card”.  I found a tutorial using a vertical style on You Tube here – SWING EASEL TUTORIAL (I also used the same detail of embossing an additional panel with leaves and went over the texture with some gold paste.)

I made another panel for the center area and ink blended some blue that faded out and then splattered some gold paint over it.  I then layered it over a piece of gold that fits in the center panel of the easel.  I gold heat embossed the large sentiment and cut it out with the die.  It was popped up over the leaves.  I also cut an additional strip with the gold for the “catcher” of the front panel of the easel card.  I added the turkey and leaves along with the stamped sentiment on the inside bottom.


Autumn is my favorite time of the year and I enjoy using the colors and images in the cards I make, so here’s more that I’ve made:

I’ve made a couple of encouragement cards to send out to some people and I’ve used a favorite card kit from my stash by Taylored Expressions.  The images come from the stamp set Wheatfield Dreams.  I’ve used an oval die and oval mask to do some ink blending and just cut out the colored image to pop them over top.  Both sentiments were copper heat embossed.

I kept the backgrounds simple with the one on the left stamped with a background stamp from TE and the other was cut out with a wonky stitch die and layered over a green card base.

Hope you’ve enjoyed my creations, and I am so grateful you’ve chosen to stop by!❤️

Challenges:

  1. Creative Fingers – Anything Goes
  2. Lil Patch of Crafty Friends – Anything Goes
  3. Pammie’s Inky Pinkies – Anything Goes
  4. Crafting Happiness – Thanksgiving/Harvest #148
  5. Four Seasons – Fall Season
  6. The Crafty Addicts – Anything Goes
  7. Crafts Galore Encore – Anything Goes

Winter Animals for Sparkles Monthly Challenge

Hello friends!  I hope you’ve had a great start to your November so far!  It’s been a few minutes since I’ve posted, but I have to say that I’ve been pretty busy in the background!  Hoping to share what I’ve been up to soon!

Today begins a new challenge over at the Sparkles Monthly Challenge!  This month, we’re looking to see some WINTER ANIMALS!  I hope you can join in the fun with us!  A reminder that this will be the final challenge for the year as we’ll be on Holiday break until January.  Here’s my take on the theme:

My first thought of a winter animal is a penguin of course!  I’m a huge fan of them and have so many in my collection…including other than stamp related!  These guys are really enjoying winter on this scene!  I’m using the My Favorite Things Playful Penguins stamp set and I started with a stencil from MFT that has “pond” shapes and lightly stenciled the soft blue for a place for my “ice platform” to be.

After creating the “ice pond”, I used some tape to mask off the bottom portion so that I could ink blend a sky at the top.  I used some White Opaque Copic and splattered it over the sky area.  I then used another MFT stencil to create some snow drifts in the background.

The two penguins, igloo, ice pad and sign were stamped, colored with Copic markers and die cut out to be placed over the scene.  I added the flattened penguin to the ice pad and then had the igloo in the background while the sign and penguin are waiting at the side of the pond.  I used a pen and wrote “FREE RIDES” on the sign.

I finished it off with a glitter pen over the “ice pad” and igloo and then used some Stardust Stickles over the snow on the sign.  I thought it needed some more snow falling down, so I took some sequins and added it to the scene.

If I were on that scene, I would probably be more like the flattened penguin on the “ice pad”!😆  How about you?  Do you like the snow?

Thanks so much for joining me here!  I hope you like my penguin card and will sharing your favorite winter animal in the challenge too!  Have a great day!

Challenges I’d like to enter this card for:

  1. Pearly Sparkles Christmas/Winter
  2. Craft Rocket – #109 Wintertime (No Christmas)
  3. Crafty Animals – Anything Goes with animal(s)
  4. Critter Crazy – Anything Goes featuring a critter(s)
  5. Love to Scrap – #164 Anything Goes
  6. Crafty Calendar – Anything Goes
  7. Creative Moments – Winter
  8. Penny’s Paper-Crafty – Anything Goes

Mixing It Up with a New DT!

Hello friends!  Happy November!  The time is getting closer and closer for Christmas to arrive and so the Christmas cardmaking ramps up!  Have you started on yours or have them done?

new-miucb-designer-badge

I’m very excited to announce that I’ve joined up as design team member over at the MIX IT UP CHALLENGE BLOG!  Woot! 🎉 Really happy to be supporting a fellow blog friend Leslie with one of the many challenges she runs!  Thanks for having me along!  So, I hope you’ll go check it out and play along with us!  The challenges run for 6 weeks which is plenty of time to enter and these challenges are always “Anything Goes” with an optional twist involving a technique of some sorts.  Sounds fun to me!  And I can use any products I like!  Count me in!

For the November challenge this month, we have “Anything Goes with optional stamping (use clear or rubber – no digis)” This is my first creation with the team, and I look forward to seeing what you come up with for the challenges too, so I hope you can join!

Of course, I love to stamp!  I have SO many and why not use them?!  I was lucky enough to have gotten the STAMPtember Trinity Stamps set called: “Sledding Gnomes” (no longer available) and it was so fun to play with for this card.  I also decided to make it a slimline card which I haven’t made in quite a while.

For the background:  I white heat embossed some snowflakes from the Simon Says Stamp “Frozen Fractals” stamp set (no longer available).  Then I took some Oxide Inks in Mermaid Lagoon, Blueprint Sketch and Chipped Sapphire to ink blend over the embossed snowflakes for an embossed resist technique.  Lastly, I’ve splattered some Copic Opaque white with water and a fan brush.  This panel was cut out from the Trinity Stamps Stitched Card Panels & Window Slimline dies.

I stamped, colored and die cut the characters and cut out some white cardstock using a Lawn Fawn Stitched Hillside Borders die set.  I arranged the slopes and tucked in the trees behind each layer and popped up the characters with foam tape.  I also white heat embossed the sentiment with red cardstock and die cut it out, which was popped with foam tape.

Here’s a closer look at the coloring: (using Copic markers)

Before attaching the stitched slopes to the bottom of the heat resist snowflake panel, I sprayed some shimmer spray to give it a snow look.  I attached this panel to a red piece that was cut from the Trinity Stamps Scalloped Card Panels & Banners Slimline die set.  I then layered both of these panels to a white side folding slimline card base measuring 8.5″ x 3.5″.

Lastly, I’ve added some Stickles Stardust glitter to the gnome hat ends and the hat on the reindeer.  You can see where I’ve added some white highlights with a gel pen and then I took some gold glitter gems and attached randomly.

I hope you’ve enjoyed my project today and will stop by the Mix It Up challenge blog to check out the rest of the inspiration and play along with us this month!  Remember you have 6 weeks!

Thanks for stopping in today!

Challenges:

  1. Crafty Catz – Anything Goes optional: 4-legged critter (reindeer)
  2. Daring Cardmakers – A Bit of Bling (shimmer spray, Stardust Stickles, and gold glitter gems)
  3. Allsorts – Embossing Heat/Dry (heat embossed snowflakes & sentiment)
  4. ABC Christmas – ‘U’ is for “Use it Up” & ‘V’ is for “Vertical” (I made a vertical slimline card and I used up my supplies of sprays, glitters and gems!)

It’s Halloween!

Hello friends!  Tomorrow is Halloween and so I thought I’d share some cards that I’ve made that were sent out to people. 

The dog and cat ghosts are too cute from Newton’s Nook!  I love their “howling”!  Not much to color and I’ve used the dies to cut them out and pop over the background with the paper pad from NN as well.  I heat embossed the sentiment over a die cut banner and then added a frame around the edges with some holographic paper.

I made this for someone who loves Halloween almost as much as I do and also has both a dog and cat.  The cat’s name is Spooky! LOL

And here’s another card I’ve made using some Taylored Expressions products.  I first ink blended the background in a couple of blue tones with dark blue around the edges and then splattered some silver watercolor for the stars.  I used a layered moon stencil to the moon effect and then die cut the witch in glitter black cardstock.  The sentiment was white heat embossed and cut out with a banner die.  I’ve also used another frame of the holographic cardstock.

And last but not least, I’ve made this card and not necessarily for Halloween, but this was made for my husband’s anniversary card.  We’ve been married 24 years and we both feel the same about Halloween/spooky things! LOL  I found these fun digital images from Etsy to print out and then I fussy cut part of one to add to another.  I stamped the background with a background stamp I had covered with roses and blended some inks around the heart.  I also added some black gems around it and covered the rose “Jack” is holding with a glitter pen.


Hope you’ve enjoyed my post today!  Thanks for dropping in and I hope you all have a wonderfully fun and spooky Halloween!👻

Challenges:

  1. Little Red Wagon – Trick or Treat
  2. Papercraft – Happy Halloween
  3. Creative Crafting Uncles – Halloween
  4. Penny’s Paper-Crafty – Anything Goes using paper
  5. Simon Says Stamp Wednesday – Anything Goes
  6. Krafty Chicks – All Occasions (bottom card anniversary)
  7. Sweet Stampin’ – All Hallow’s Eve

Things That go ‘BUMP’ in the Night for Sparkles Monthly

Hello friends!  I hope you’re having a great weekend!  Did you have “good luck” on Friday the 13th?  It’s getting closer to Halloween!  I don’t send out very many Halloween things, but it’s something that I share with friends and my adult kids because it holds some special memories of just having fun.

Today begins our October challenge at Sparkles Monthly with a theme that was my turn to pick: Things That go ‘BUMP’ in the Night (Does not HAVE to be Halloween!)  So, if you’re not a Halloween person, this theme is open-ended.  Try nocturnal animals, Santa on the roof, etc.  Just have some fun crafting!

Of course, I love Halloween and had fun making my card:

I thought these mice were just too cute!  They were out bumping around in the night trying to be scary but scared each other instead! LOL

The mice came from the STAMPtember collaboration with Whimsy Stamps and the set is called Spooky & Mice.  I colored them with Copic markers and die cut them out with the coordinating dies.  They were popped up with foam tape over the background.

For my background:  I used a cloud stencil on a white piece of cardstock and blended some clouds with purple ink and then blended around the edges with black and grey ink.  I then took the SSS Spook Up Some Fun stamp set and stamped black stars over the background and I also white heat embossed the oval sentiment panel that was in that stamp set over black cardstock and set it aside.  I’ve also splattered the background with black, white and silver acrylic paints.

While that panel was drying, I heat embossed the Whimsy Stamps Spider Web Frame with a white sparkle EP and then cut the middle of it out with scissors so the cloud background would show.  I stamped the spider hanging down onto the background while sizing it up with the frame and then drew a black string with a marker for it. Glued on the frame, attached my oval sentiment panel, and attached it to a top folding A2 sized grey card base. (Then added the mice with foam squares.)

Lastly, I’ve added some silver gems on each side of the sentiment oval and attached a few clear sequins over the night sky background.

Thanks so much for stopping by today!  I hope you’ll be able to join along in the fun with us this month!  I’ll be seeing you soon!

Challenges:

  1. Two Old Bats Halloween – Anything Goes Halloween
  2. Crafty Animals – Anything Goes with an animal
  3. Critter Crazy – Anything Goes with a featured critter
  4. Creative Inspirations – Autumn or Halloween
  5. Craft Rocket – Autumn and/or Halloween
  6. As You Like It – Favorite Halloween or Fairies & why? (I love to make Halloween theme because it’s so fun with cute, scary or fun characters and I love the colors too!)
  7. Most Magical Time of the Year – Anything Halloween or Christmas
  8. Creative Moments – “It’s Alive!”

Rainbow of Strength

Hello friends!  Hope you had a great weekend and maybe did some crafting?  Did you participate in the World Card Making Day events?  There were so many things going on, so I basically opened up the You Tube video marathons and watched while I did a bit of crafting.

I was inspired by the Craft Roulette WCMD event with several crafters showcasing their version of the parameters they were to use for that event.  It was several hours long!

Here’s the card that I made with the Craft Roulette World Card Making Day parameters of – PROJECT: A2 card, COLORS: rainbow, ELEMENT: nature, and RANDOM: black dots

I also combined my card using one of the sponsor’s products which I’m entering for this week’s sketch challenge from My Favorite Things.

I’ve had these stamps in my collection for quite a while and it was nice to pull them out for this card.  I actually needed a card for an elderly woman who recently fell and broke her hip, so she’ll be recovering with therapy for a while. 

For my card, I used the MFT Watercolor flowers and stamped them in red-, orange- and yellow-colored layers and cut them out (This was my nature element parameter).  The middle was cut with the MFT Stitched Hexagon dies that I ink blended with green and blue inks (These colors make up the rainbow parameter).  I splattered the shape with white and black. *Before I splattered, I stamped the sentiment from the MFT Essential Sentiments set with black pigment ink and heat embossed it with clear EP.  (The sentiment was cut in portion to fit my design.)

For the A2 sized card base (makes up project parameter), I used a MFT Triangle background stamp (retired) in the same kraft color that I inked the centers of the flowers with.  I also used this color to ink around the edges of the card.  I than layered two more cut out shapes for the ink blended sentiment panel for dimension and attached to the stamped card base.  I used foam tape to pop up the flowers and lastly added some black gemstones (for the black dots parameter).

Thanks so much for stopping by today!  Hope you’ve enjoyed my inspiration!  See you soon!

Challenges:

  1. My Favorite Things Wednesday Sketch – MFTWSC666
  2. Aud Sentiments – Ink Blending &/OR Fall Colors + sentiment
  3. The Crafty Addicts – Anything Goes
  4. The Flower Challenge – Anything Goes with Flowers – Happy 7 years!
  5. Krafty Chicks – #684 Stamp Act
  6. Alphabet – ‘N’ is for Nature