It’s Time For Tags!

Hello friends!  I thought I’d take some time for making up some tags which is something that I really enjoy doing, but don’t do it very often.  They’re so nice to have a batch made up ahead of time so that you can pull one out as you need it instead of trying to hurry through making something.  It’s always better to have fun instead of rushing! 

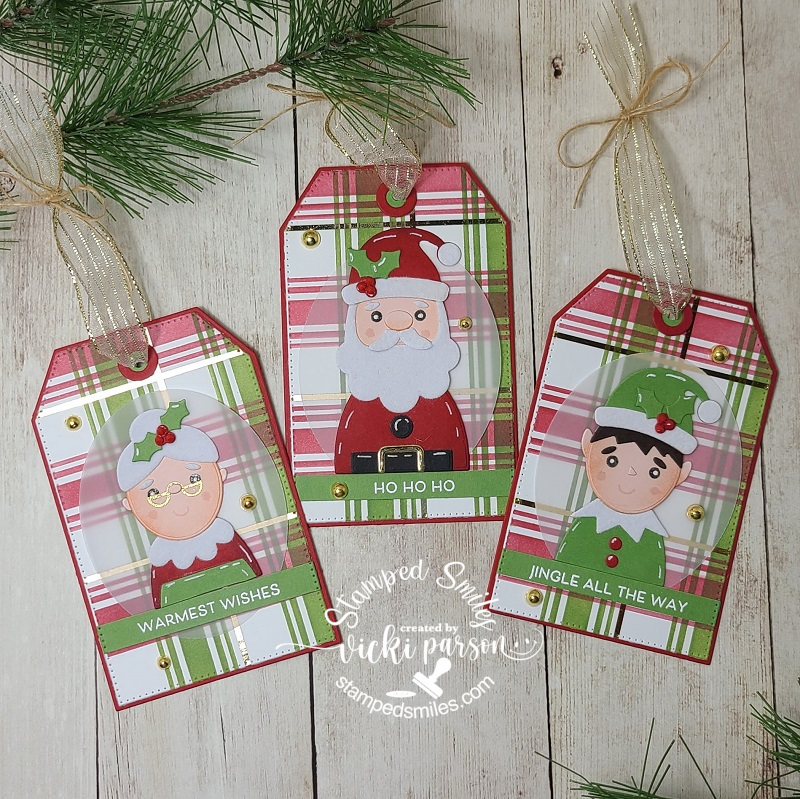
This trio of tags was a bit time consuming, but it was nice to finally pull out some things that I’ve been wanting to play with and use without being in a hurry.  The characters are from the Taylored Expressions Holiday Squad die set.  The tags themselves were cut from the TE Pierced Stacklets dies, the TE Tag Stacklets 2 dies and the TE Tag Reinforcements dies. The background for the tags was made with the TE Foil It-Plaid Layering Panels that I foiled in gold along with the stenciling from the TE Plaid Layering Stencil set.  The sentiments were white heat embossed from the TE Just Saying-Christmas stamps.  I’ve used various colors of Taylored Expressions papers and inks and then finished the embellishments for the “holly berries” using the red from TE Tiny Diamonds-Bold set and then I also used the TE Gold Drip Drops in the background.  The ribbon and twine from my stash at the top.


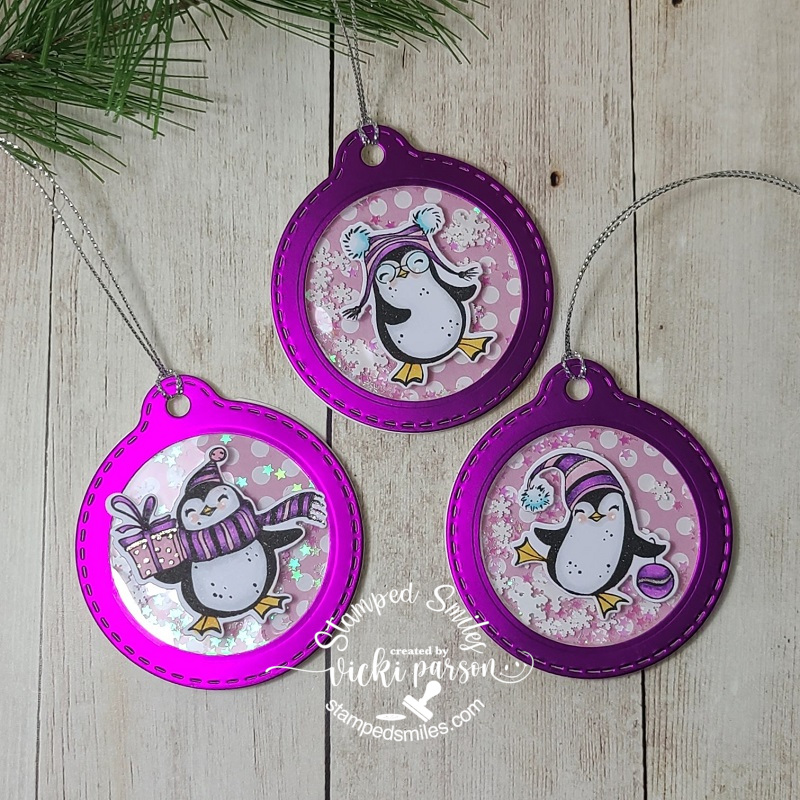
My next trio of tags here was really fun with these adorable penguins from Taylored Expressions Dancing Through the Snow stamp set and dies.  I placed them over top of the transparency that was used to create a shaker tag behind the penguins.  I used the TE Tag Stacklets 3 dies and also used some pink polka dotted papers from a free paper pad I received with an order.  The bright shinny purple paper came from my stash I’ve had for quite a while and thought it would be a fun non-traditional color to use with these.  I filled the shaker tags with the TE Bits & Pieces-Snowflakes and the TE Bits & Pieces-Sparkly Stars


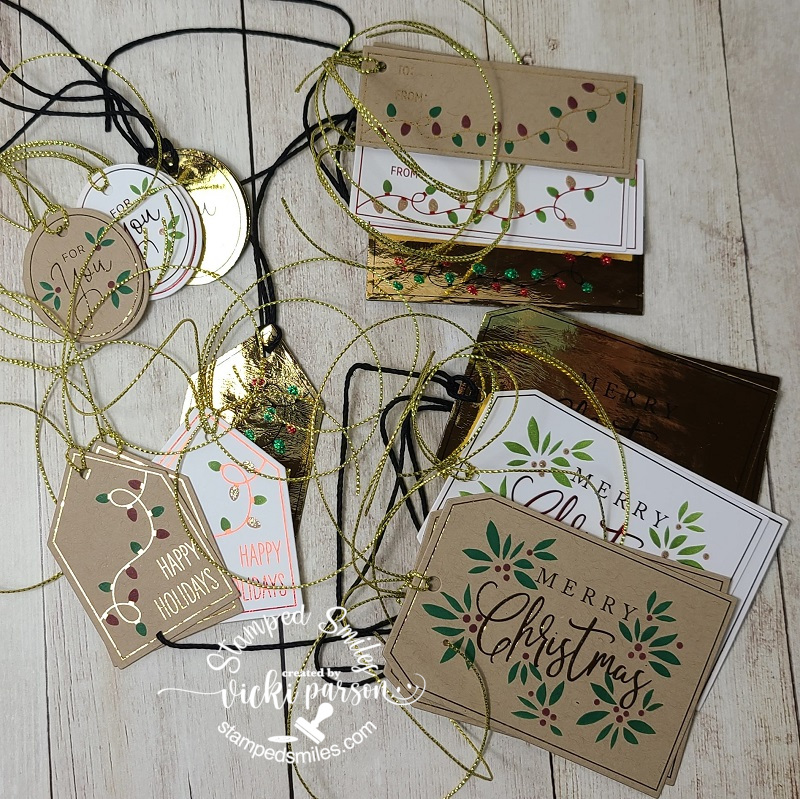
And these tags were a little hard to photograph with all of that cording in the way! (pardon my photograph skills! LOL)  They’re smaller than the tags above, but they work great for different packaging sizes!  These were easy and fun as I’ve done mostly foiling with these using the Taylored Expressions Foil It-Simple Tags Holidays panels and the stencil to go with it.  I cut them all out at the same time with the coordinating dies. The tags with the black cording are the negatives from foiling the toffee colored tags and are mostly completely foiled.  I just used different colored Stickles glitter to create the Christmas lights on those.  (Really been having fun with the foiling this year!)
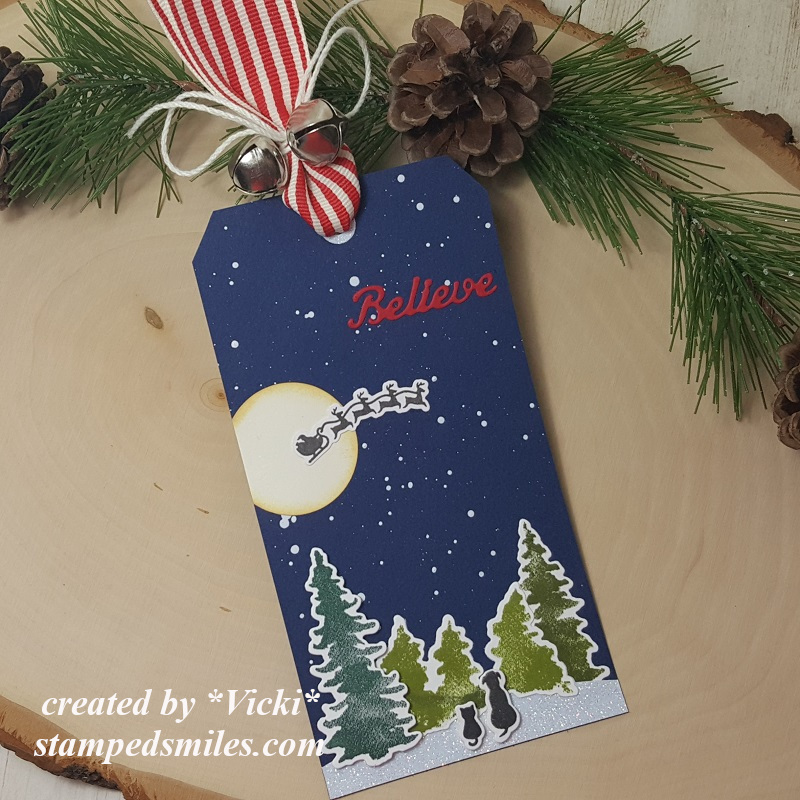
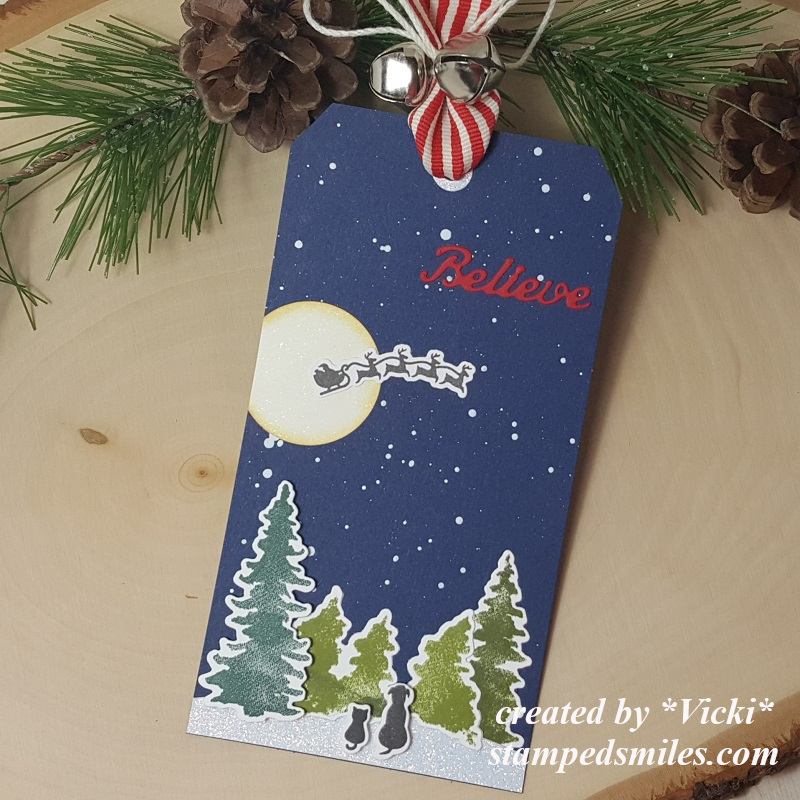
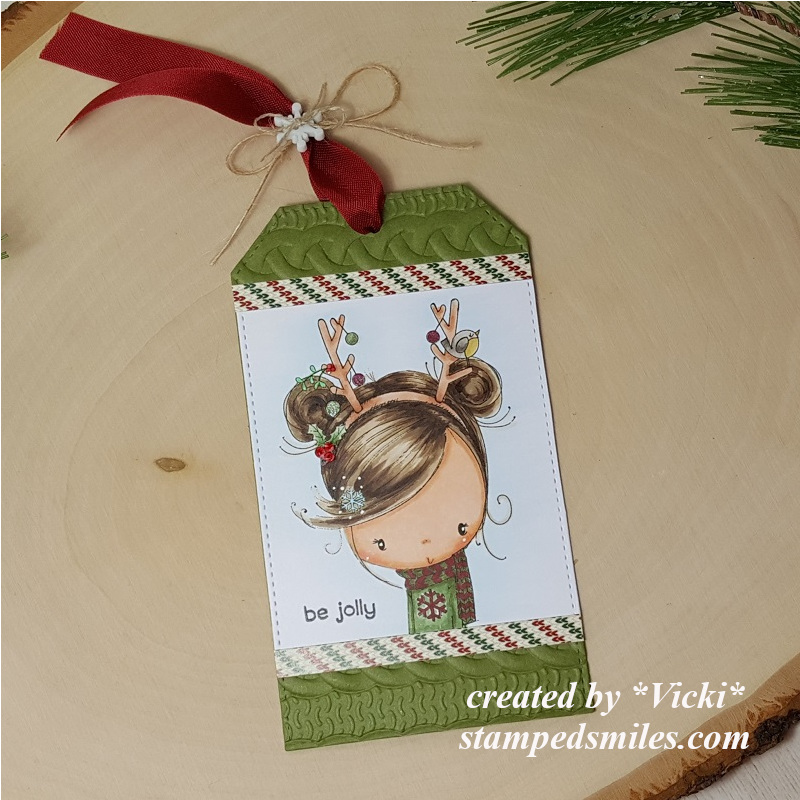
 

And lastly I wanted to share a set of tags that I’ve made using various Inky Stamper sets!  I decided to go through all of the different Christmas sets that I have from them and pull out the ones that I either haven’t used or barely used to play with them.  The tag at the top was made with the Inky Stamper Fox set that I really enjoyed coloring.  The presents at the bottom and the Santa hat were colored and fussy cut from the same stamp set.  I made the background of that one with the Falling Snowflake Stencil with white ink and heat embossing over it with sparkly white embossing powder. 

The tag on the bottom left is another fun shaker tag!  I pulled out the Inky Stamper Nutcracker set to color him up and cut out with the coordinating die.  He was placed over the acetate on the shaker tag.  I used a scallop circle tag die with gold foil cardstock that I cut out the center with a circle die, added some papers for the background from the Doodlebug Buffalo Check/Woodgrain paper pack.  The shaker bits inside are the Shaker Garnish which is really lightweight and still make a great shaker sound too!

The bottom right tag was cut from an Infinity Tree die set.  I sponged the edges with some white ink and punched a hole at the top to make it a tag.  That cute little truck is from the Inky Stamper Vintage Truck set that I colored and cut out with the coordinating dies.  I used a fun Lawn Fawn road die to place him over and then stamped the sentiment from the stamp set with white ink.  I also added some snowflake sequins above him with the Icicles sequins mix.  And both blue and red Doodlebug Twine was used for two of the tags.  The other ribbons/cord from my stash.

  • Thanks so much for stopping in today!  Hope you’ve been inspired and enjoying the Season!

Challenges:

  1. Country View – Christmas
  2. Ally’s Angels – Anything Goes
  3. Cupcake Inspirations – Happy Holidays
  4. Pammie’s Inky Pinkies – Anything Goes
  5. Simon Says Stamp Mon – Tag It
  6. Tag Tuesday – Winter Holidays
  7. Crafter’s Café – Anything Goes

It’s the Handmade For Holidays Release at Taylored Expressions🎄

Hello friends!  I’m so excited to share the “Handmade for the Holidays” release at Taylored Expressions today!  You can go check out all the things right now in the store!  I’m extra excited that I get to be apart of this special release with them as a guest designer too!  (This was for my win during the TE 13th birthday celebration challenges I had entered from last month!🎉 Yay!)  There will also be a huge post about it on the Taylored Expressions Blog too!  I really hope that you enjoy the projects I’ve made to share with you and if you stop by the store, please let Taylor know that I sent you! 

For my first set of projects, I’ve made a fun Christmas décor item that you can gift for the Holidays, use as a center piece for your table setting, etc.  I’ve taken the Taylored Expressions (new) Accordion Tree die and used it to make a trio of trees with the “poinsettia style” attached to the accompanying TE Tree Stumps (sold separately) to go with this die and another two trees without the stumps.  For the trio of trees, I’ve used the  Merry Blooms Stamps, Stencil & Clear Combo set to create a background over a Toffee cardstock base inking and blending with Sweet Basil, Cherry Pop and Mulled Wine inks.  I’ve also used the same products to make the tag as well.  I’ve gold heat embossed the centers for the poinsettias in the background.  I’ve also taken the TE (new) Itty Bitty Sentiments Holiday stamp set and used the tiny images from the set to create backgrounds for the other two trees.  I’ve splattered the tree backgrounds as well as the tag background with acrylic white and gold paints. These die cut trees were glued back to back with the score line in the center as a guide which makes them 3D looking.  I’ll explain each item below:

This was such a fun 3D project to create!  I wanted all the trees together in one piece, so I thought it would be fun to grab one of these wood slices I’ve been hoarding forever and glue the trees to this base.  There is an accordion star that comes with the accordion tree die, but I thought it would be fun to take the TE Perfect Poinsettia die and cut out several of the smallest bloom to make that the “star topper” for the poinsettia tree.  I’ve used the coordinating stamps to stamp the “veins” and gold heat embossed the centers for them.  I folded them in half and glued it to the top of the tree.  I also attached some TE Gold Drip Drops for the “ornaments” over the tree (TE Drip Drops make perfect “ornaments” for these trees!) and added some gold twine bows front and back.  I’ve ink blended the edges of the poinsettia tree with Toffee ink and gold paint sponged on the poinsettia topper.

This is what the other side (back) of this piece looks like…so it’s visible from all angles.  Here you can better see the other two trees and how the backgrounds were made.  I’ve also added some thick white paint to the edges of them to make it look more like “snowed over” trees especially since they were splattered with white paint.  For the wood slice that the trees are attached to, I’ve used some Ranger Mica Flakes for a bit of sparkle attaching it with Multi-Medium Matte glue.

For the tag, I’ve die cut the background explained above with the TE Stacklets 2 die and wrapped some gold twine around it with the TE (new) Itty Bitty Sentiments & Tags Holiday set for the little tree with the gold heat embossed sentiment over it.  I’ve also gold heat embossed the large sentiment from the Joyful Season stamp set & dies that I’ve popped with my favorite product TE Sticky Strips.  I’ve cut out another layering piece behind the tag with Sweet Basil cardstock, punched a hole and added more gold twine.

And how stinkin’ CUTE are these guys?!  This is my second set of projects for this release using the NEW TE Snow Squad Dies & Clear Stamp Combo set.  As you can see, the cute die cut critters are made to perfectly fit the Tag Stacklet dies!  I’ve the Tag Stacklet 2 die set for my sweet penguin!  The critters are so easy to cut out and decorate them as you like!  I like that the clear stamp set comes with it to stamp in the eyes as those tiny dots can be so hard to deal with and loose!  You get a penguin, a polar bear and a snowman with this die set!

Again, I thought it would be fun to create a background for my card and tag set, so this time, I’ve taken the TE Let It Snow Layering Stencil set for a snowy background.  I’ve started with a Mint Julep cardstock base, blended the same color ink for the first layer, Sugar Cube ink for the second layer and for the third layer, I’ve used some TE Glitter Grab and immediately covered it with some TE Silver Glitter.  Love how it turned out with the subtle color! 

Starting with my card details, I’ve decided to give the snow squad critters soft colors with their scarves.  The clear stamp set with the dies also come with a two line image for adding details to the scarf, so I silver heat embossed those and then added some matching TE Tiny Diamonds Pastel in between those lines.  They matched up perfectly!  I inked around the edges of each die cut piece for the critters and stamped the face images including the cheeks which I off-stamped first to keep them light.  I used a white gel pen for highlight details.

I thought it would be fun to have these Snow Squad critters pop out from a snow drift, so I took some TE Sugar Cube Glitter Cardstock and cut out a “snow drift” with a piece of the their scarves over it and popped them up over the snowy background I’ve created using a TE Diagonal Stitch Rectangle Stacklets for the stitching details behind them which was layered over an A2 sized Sugar Cube top folding card base.  For the sentiment, I silver heat embossed it from the TE Winter Wishes clear stamp set over a Mint Julep cardstock that was cut out using the TE Stitched Banner Stacklets die

And of course I had to use the penguin again for my coordinating tag!  I’ve used part of the same background I’ve made for the card and cut it out using the TE Tag Stacklets 2 die set with another Sugar Cube cut out for the layering base.

I did the same thing for this tag that I did for the card above with the snow drift, but I also added a tiny tag that he’s holding with some Doodlebug Gray Twine.  The tag was created with the same TE (new) Itty Bitty Sentiments & Tag Holiday sets.  I’ve stamped the row of tiny trees from the set with the Mint Julep ink and then silver heat embossed the sentiment above it.  I’ve also used more of the TE Tiny Diamonds Pastel for the center of the bow on the present along with the penguin’s scarf.  I’ve punched a hole at the top and added more of the same twine at the top.

So how about you?!  Are you ready for the up-coming Holiday Season?  I sure hope that I was able to bring you some inspiration with your handmade projects for the Holidays!  Again, you can check out all of the brand new Taylored Expressions products in the store as it’s now been released!  Be sure to check out all of the wonderful inspiration on her blog HERE too!

Thanks so much for stopping in today!  I appreciate all of your kind support friends!  Have a great day!

Challenges:

  1. Happy Little Stampers – OCT Anything Goes with Dies (all projects are using dies!)
  2. Simon Says Stamps Wednesday – NOT a card
  3. Penny’s Paper-Crafty – Anything Goes using paper
  4. Krafty Chicks – Christmas
  5. Creative Knockouts – Embossing (I used heat embossing)
  6. The Crafter’s Cafe – Use a Stencil (used on all projects)
  7. Creative Fingers – #217 Anything Goes
  8. Lil Patch of Crafty Friends – Anything Goes

Wintertime Penguin Tags

Hello friends!  I’m on a roll with the tags and back again to share some more fun tags that I’ve been working on!

Vicki-DDSWintertimePenguins-tags
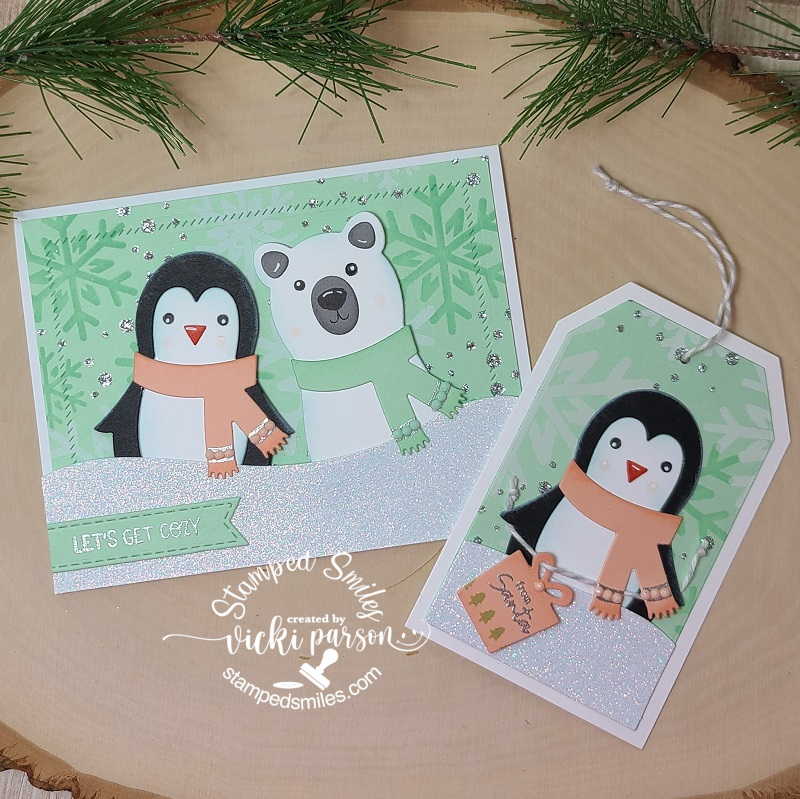
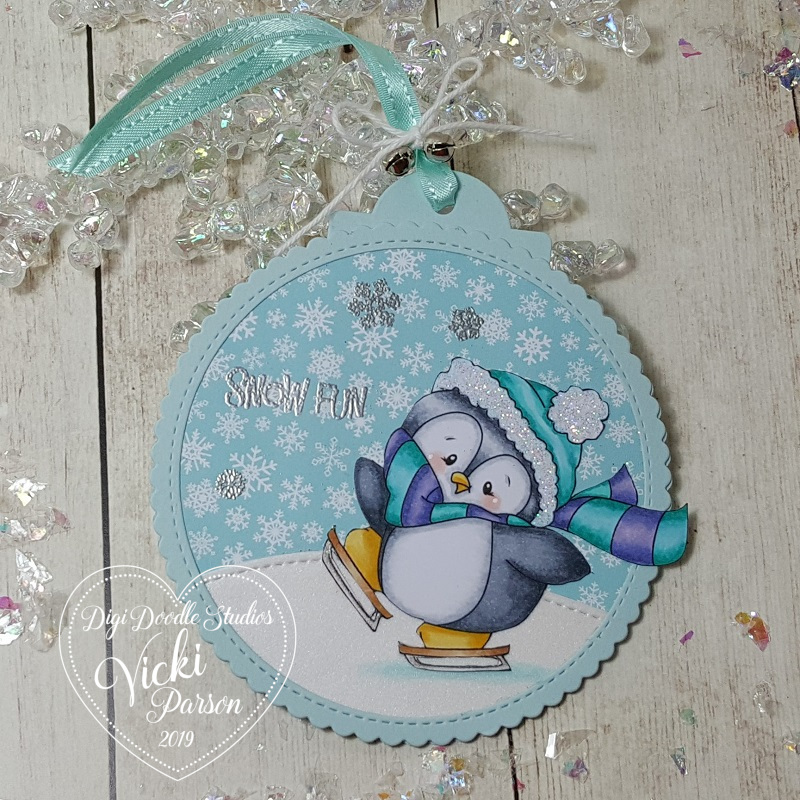
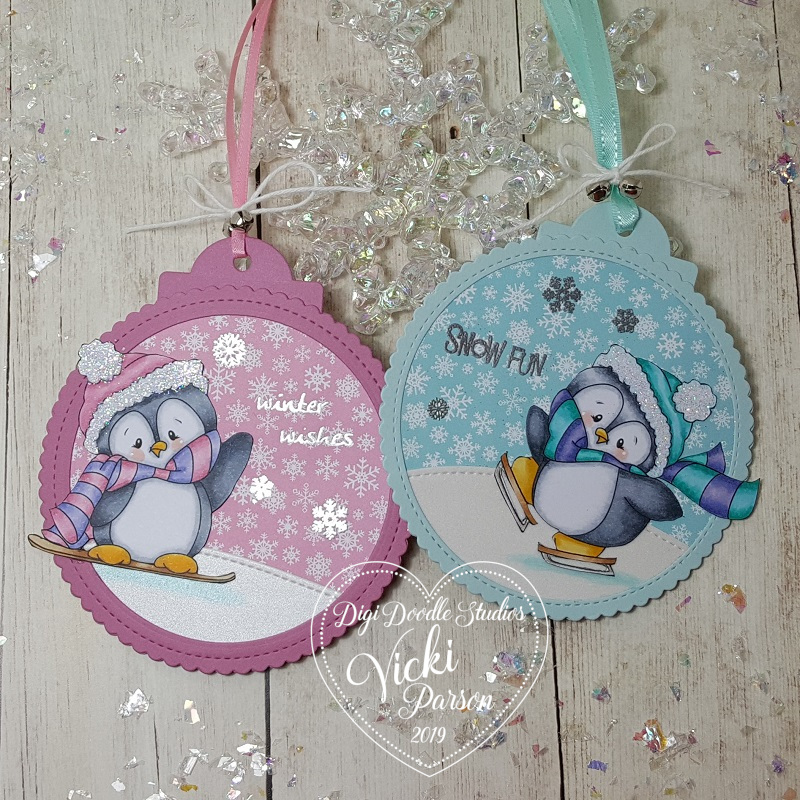
Check out these adorable penguins having some fun doing winter activities!  Penguins are probably one of the top animals that I love!  I have SO many penguin stamps in my stash and seem to keep on collecting more of them…so of course I was super excited to be able to add this Wintertime Penguins Pairables set from Digi Doodle Studios to my collection as well!  🙂

There is seriously so much fun you can have playing with this digital set and if you like penguins as much as I do, then stay tuned in as I will be sharing even more creations using this same set in December!  You will see what I mean by all the different things you can do!

For both of the tags, I’ve used several dies from my stash to create my own tags.  I took a stitched scallop circle die (MFT) and cut two of them out in the blue and pink colors along with a small tag cut with the same colors for the very top.

On one of the scallop circles, I used a circle die (Hero Arts) to cut out the center to create the “frame” for the front.  I then took some snowflake papers (MFT) and cut out another circle that was slightly larger than the opening to attach behind it.  I also took some pretty shimmer white paper and cut a “snow slope” for both penguins with a stiched border die (Lawn Fawn) and then cut it out with the same circle die as the snowflake papers.

I silver heat embossed the sentiments along with some snowflakes and then added my colored penguins over top.  Then when I flip it on the back side I can put my “To: and From:” on it.

Vicki-DDSWintertimePenguins-tag-pink
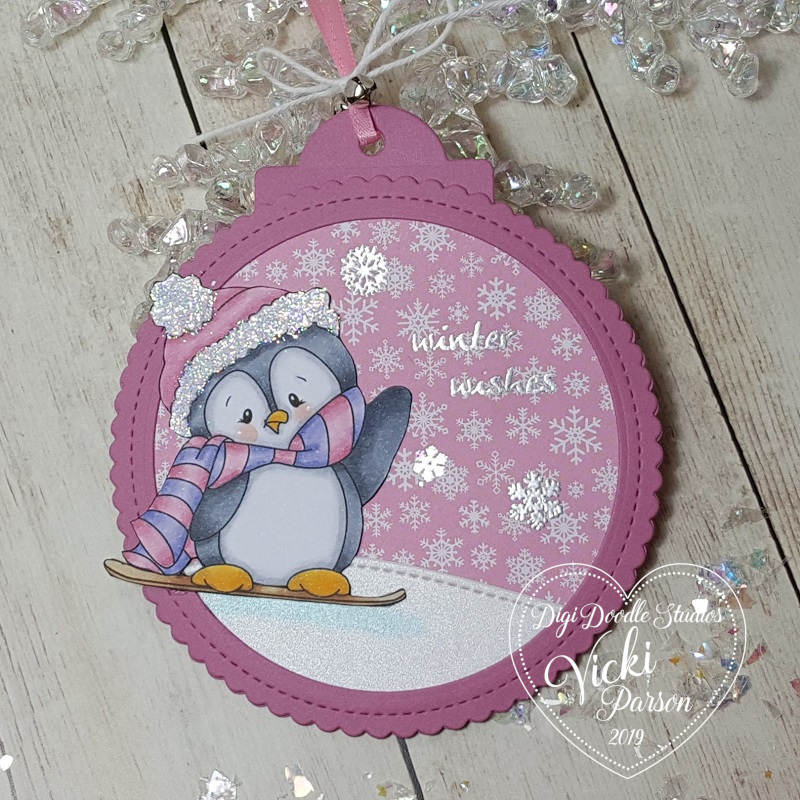
Here’s a closer view of the pink tag.  For the digital image, I used Word on my computer to add the penguin and place it over one of the “ski” images from the set and enlarged it to make it look like a snow board instead of a ski!  Then printed it out.

I’ve used my Copics to color her up and fussy cut her out.  I even added some shadow on the snow hill for her.  I took a glue pen and covered her hat trim with glitter.

Lastly, I found some more pink ribbon and tied some silver bells over it with some white twine in a bow.

Vicki-DDSWintertimePenguins-tag-blue

And for this little guy…he cracks me up….I made him using Word again, but this time I actually took the “sled” image and sized it down so that it would fit on the penguin’s feet to make it appear as if he is ice skating!  I did it for each foot.  LOL!

I’ve colored him up with the Copics again only using more blue tones instead of the pinks and did the similar traits to it like the other one.  I did use a clear metallic gel pen to color the “blades” of the ice skates.

Hope you’ve been enjoying my tags so far!  Thanks so much for dropping by and I’ll see you again tomorrow for a new challenge!

I’m adding this to the “25 Days of Christmas Tags” event and my inspiration for these tags came from Cassie’s tags on the Day 24 Heffy Doodle Post.

Challenges:

  1.  Digi Choosday Crafting – Anything Goes
  2. The House That Stamps Built – Anything Goes N2719
  3. Simon Says Stamp Wednesday – Anything Goes
  4. Aud Sentiments – Christmas or Winter Sentiment
  5. Krafty Chicks aka 4 Crafty Chicks – #483 Monochrome

Believe Tag

Hello friends!  I hope you all had a wonderful Thanksgiving and maybe even took advantage of some great Black Friday deals today?!  I was happy about shopping a little bit this morning and almost forgot to post about my tag here! LOL!

Vicki-NNTag-Day3

The scene on this tag was always a fun vision in my head from a child!  I would imagine Santa in his sleigh flying over the moon under a snowy night sky.  I love the peace and magic of it all with even little critters stopping to watch and listen to the magical sleigh bells ringing in the night.

I constructed my own tag the size I wanted and snipped off the top edges to make it look like a tag.  It was made with Navy cardsock.  I punched a hole at the top and made a reinforcer with white Glitterstock.  I then took some white watered down paint and splattered it over the background for a snow fall effect.

I bought this set a few years back from Newton’s Nook called Whispering Pines and I’ve used the coordinating dies to create the scene at the bottom.  I took some white Glitterstock for the snow the critters are sitting on.

For the “moon” I punched out a circle from vanilla cardstock and sponged around the edges of it.  I took a glitter brush pen to go over it.  The Santa’s sleigh was given to me from a fellow blog friend that I’ve attached over the tag.  I die cut the sentment from red cardstock.

Lastly, I’ve added some red striped ribbon from my stash and tied on a couple of silver bells with white twine around it.  Those bells make a fun jingle sound like I imagine from my scene! 🙂

Vicki-NNTag-Day3-closer

Here’s a tad bit closer view of the tag.  Here you can some what see the shimmer on the moon and the sparkle on the snow ground where the critters are.

Have a great evening my friends!  I’ll see you soon!

25DaysTagsRedChristmas

This is of course another tag for the “25 Days of Christmas Tags” going on.  This one was inspired by Kim’s tag on Newton’s Nook Day 3 post.

Challenges:

  1.  Crafty Creations – Anything Goes
  2. Little Red Wagon – Snow
  3. The Sisterhood of Crafters – Trees
  4. My Time to Craft– Christmas Scene

It’s Festive at Cute Card Thursday!

Hello friends!  Hoping you’re having a great week so far and a happy Thursday too!

We’re starting a brand new challenge over at Cute Card Thursday today!  Woo hoo!  The challenge for this week is “FESTIVE“!  With the Holiday Season upon us, I think this is a great idea to get more creations done!

We’re sponsored by All Dressed Up Stamps this week and I have been feeling festive myself and decided to make a fun tag with one of their images today:

Vicki-CCT608

Now isn’t she just the cutest?!  The image is called “Christmas Hair Do” from All Dressed up Stamps.  When I’m feeling particularly festive, I like to wear fun holiday sweaters and such, but I don’t believe I’ve ever had a hair do like this one before.  LOL!

I’ve used my favorite Stitched Traditional Tag dies from My Favorite Things and cut the largest out from Jurassic cardstock from Brutus Monroe.  The two decorative paper strips on each end of the image are from the Sweater Weather paper pad by Brutus Monroe as well.

I took the die cut tag and ran the “cable knit” embossing folder (from Stampin’ Up!) over it and then added my image panel over top that was also cut with the stitched tag die on the sides.  Then I glued the strips on each end and stamped the “be jolly” sentiment in the corner.  I punched a hole at the top of the tag and added the red seam binding ribbon that was tied up with twine along with a snowflake button threaded with linen thread over top.

Vicki-CCT608-close

Here’s a closer look at the image on the tag and my coloring with Copic markers.  I was trying to match up the colors on her outfit with the papers that I was using as I liked the sweater knit print and thought it would be fun to use with this image.

I’ve added some dots with a white gel pen on her cheeks, eyes and around the snowflake in her hair.  I covered the berries in her hair with glossy accents and took a shimmer glitter pen over the round ornaments hanging from her antler head band.

I hope you’ve enjoyed my festive tag today and that you’ll come join us this week over at Cute Card Thursday too!

Thanks so much for stopping in today friends!

Challenges:

  1.  All Dressed Up Stamps – #98 Anything Goes + ADU image
  2. In My Creative Opinion – 25 Days of Christmas Tags (my tag inspired by Kim’s tag  on day 2)25DaysTagsRedChristmas
  3. Just Us Girls – Anything but a CardScreen Shot 2019-09-10 at 4.06.37 PM
  4. The Holly & Ivy Christmas – Anytihng Christmas Goes
  5. Not Just Cards – November Anything Goes
  6. Crafty Creations – Anything Goes


A Beary Sweet Christmas Tag for 2 Crafty Critter Crazies (2nd Post of 3 today)

Hello friends!  I’m back with another new challenge for you today!

It’s the first of the month, so that means it’s time for a new monthly challenge over at 2 Crafty Critter Crazies!  As always the challenge will last for 1 whole month and all you need to remember is to add a critter to your creation!  We look forward to seeing your critter makes this month!

Our sponsor for the challenge this month is Sparkle N Sprinkle!  They were kind enough to supply our team with some darling images to use for our creations!  Here’s what I’ve decided to make for my design:

Vicki-2CCC-SnS-tag

I have used this darling digital stamp set called A Peppermint Christmas  [DIGI3148M] from Sparkle N Sprinkle.  They offer colored versions with this digital set, but I opted to use this  cute polar bear and place the frame around him along with adding the sentiment above his head so I could color it.  I used a Word doc. to design it before printing it out.  Once printed out, I cut it down to size for my black tag and rounded the corners with a corner chomper.

I’ve been trying to develop my skills a bit with colored pencils and invested in a large set of them recently.  So this is what I have used to color in the images of my tag.  After coloring it all in, I thought…. I couldn’t use a Sparkle N Sprinkle image with no sparkle!! So I took out my Quicky Glue Pen [quicky] and then sprinkled some SnS Waterscape Glitter (Semi-Transparent) [G1108] over the snowflakes and dark gold star bursts.  For the stars, I’ve sprinkled the SnS Lemonade Ultrafine Glitter (Semi-Transparent) [G1091] over it for a bit more brighter sparkle!  I’ve also covered the peppermint candies with the Nuvo Aqua Shimmer Glitter Gloss Pen [888N] for some shimmer.  AND…if that wasn’t enough, I took the Quickly Glue Pen again and went along the edges of the white image panel and added the Waterscape Glitter to the edges.

For the assembly of my tag, I’ve used a pre-made tag from Graphic 45 and sponged around the edges of it with white ink.  I took some green colored glitter paper from my stash and added a strip of it across the center of the black tag.  I then added some pink silk ribbon strips on each side of the glitter paper.  I then used some craft foam to pop up the image panel and placed it on the tag.

I finished it off with a pink silk ribbon bow and added some more of it to the tag hole for a hanging element and tied that together with a piece of white twine.  Decided for a finishing touch to add a sparkly snowflake gem in the center of the bow.

I hope that you have enjoyed my critter project and be sure to check out the rest of the inspiration from the design team over at the 2 Crafty Critter Crazies Challenge Blog and come and join in the fun with us!

I have some REALLY exciting news coming up shortly after this post!!!  TEE HEE!!

Thanks for hanging in there with me!

Challenges:

  1. QKR Stampede – Anything Goes (319)
  2. Sunny Day Crafting – Animal
  3. The Holly and Ivy Christmas Challenge – Anything Christmas Goes
  4. The Merry Christmas Challenge – Anything Christmas Goes

Gingerbread Christmas Tag

Hello friends!  It seems like it’s been a while since my last post!  I have been feeling a little under the weather for a few days and I’m trying to get myself back on track…so hopefully I’m getting there!  Thank you to all who’ve left comments and a big welcome to my new followers!  So happy to have you here and hope you enjoy the postings!

I have a cute Christmas tag to share with you today using an oldie but a goodie Whimsy Stamps digital image:

Vicki-Oct24-Gingerbreadman Tag

This sweet little Gingerbread Man was so much fun to color and “bling up” a bit with some accents!  I have him colored up with Copic markers in the following:

  1.  Body:  E39, E37, E35, E15, E13 (Cheeks 0blender, R20 and frosting BG000 in certain areas.)
  2. Candy Cane and circle candy:  R39, R37, R35, R32, C3, C1, C0
  3. Nose and arm accents:  G16, G09
  4. Outter Edge of image:  BG10, BG000

I used a manila tag and got out a zig zag image from an older Whimsy Stamps clear set called Basic Backgrounds & Borders (retired) and stamped it on the tag with Rusty Hinge Oxide Ink.  I also used that color along with Tea Stain and Vintage Photo Oxide inks to sponge around the edges of the tag.  I used a water spritzer to add some drops and then blotted it with a towel to get the watermark look.

The gingerbread man panel was cut to fit the tag and I used some Tumbled Glass Oxide ink to stamp a few snowflakes around the gingerbread man from the Whimsy Stamps Snow Flurry stamp set and then sponged around the edges of this panel with the same brown oxide inks listed above.   I also stamped a sentiment at the bottom of the tag from the Whimsy Stamps Penguins Winter Adventure stamp set with Archival Jet Black ink.  I then added a strip of black washi tape from Tim Holtz Ideaology Christmas collection and then added some “faux snow” flakes at the bottom of the gingerbread man panel with some liquid glue.

For the ribbon, I used some seam binding ribbon and sprayed it with distress ink sprays in the same brown colors as inks that I’ve used, crinkled up and let it dry.  I added that to the top of the tag along with some tinsel ribbon.  I thought it went well with the snow!

Vicki-WS-Oct24-gingerbread-close

A closer view of the gingerbread man and you can see the added extra details that I’ve added to him.  For the candy cane and circle candy on his head, I covered them with a Spectrum Noir Glitter Brush Pen.  I’ve added some Nuvo White Blizzard Glitter Drops to the green dots and then some Nuvo Clear Crystal Drops to the frosting lines.  (You can see how it sines in the photo!)

Thank so much for stopping in today!  Hope you’ve enjoyed my tag and I’ll be seeing you very soon!! 🙂

Whismy Stamps Products Used:

gingerbread_man_color_display_1024x1024

Penguins_20Winter_20Adventure_20display_wm_1024x1024

Snow_Flurry_display_1024x1024

Challenges:

  1.  The Holly & Ivy Christmas Challenge – Anything Christmas Goes
  2. QKR Stampede – Anything Goes #318
  3. Sweet Stampin’ – Chevrons or Stripes
  4. Crafting From the Heart – Anything Goes
  5. Little Red Wagon – distressing (Distress Oxide inks)