Mix It Up by Keeping it Simple!

Hello friends!  Happy November!  It seems like I was just thinking about Autumn with cooler temps…and now we’re getting REAL close to Christmas and the end of the year! Time is going so quickly!  Are you getting your Christmas cards started yet?

So let’s take a moment for ourselves and work on keeping life simple!  This brings me to a new challenge over at the Mix It Up Challenge Blog.    The challenges always run for 6 weeks so there is plenty of time to enter.  The theme given for us this time is: KIS (Keep It Simple) or you can always do the ‘Anything Goes” too.  Here’s the card that I came up with for the challenge using the theme:

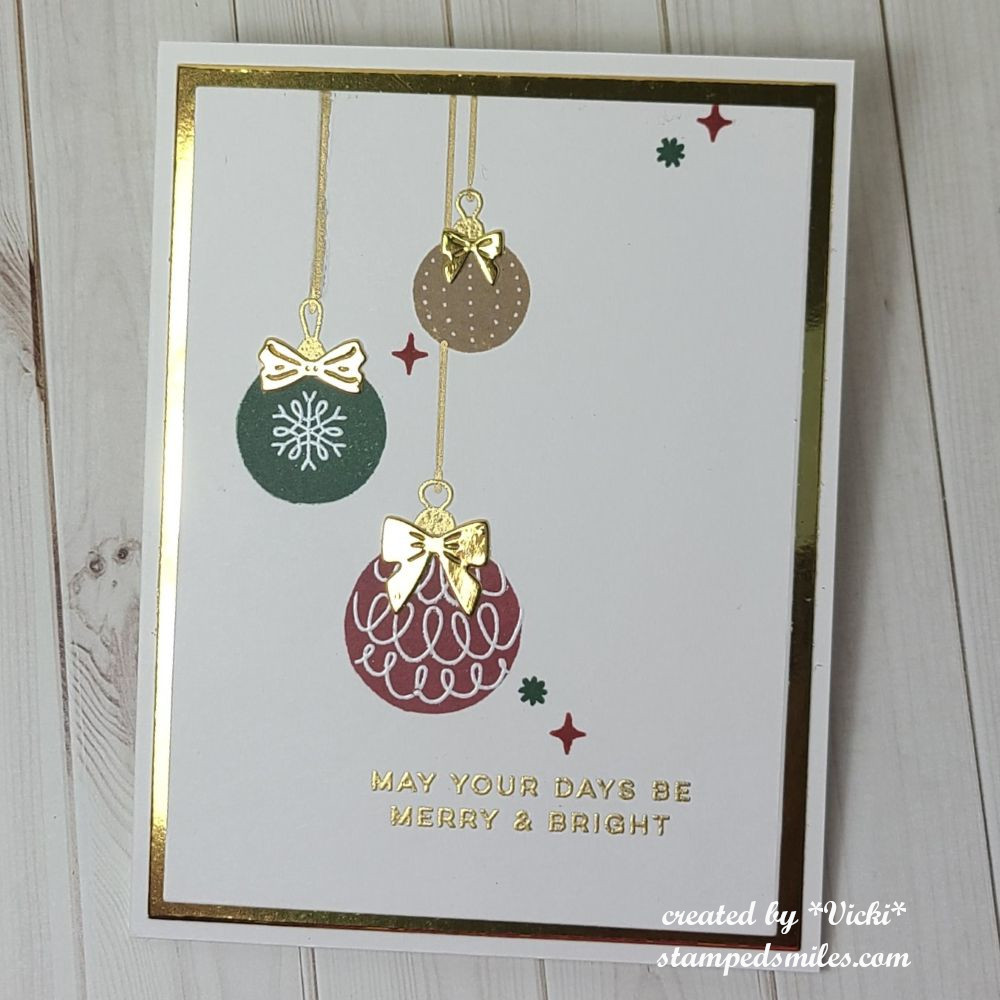
I thought that “keeping it simple” for Christmas cards and getting down to the wire for making them and sending out would be a good thought for this challenge!

I pulled out this cute Scrapbook.com stamp set called “Holiday” to create a simple design with the solid bauble images and added a few heat embossed elements over two of them and then heat embossed a hook for each.  I heat embossed the sentiment in gold to match the hooks and then just stamped a couple of doo-dads around the panel and drew lines from the ornament hooks coming off the edge with a gold fine line pen.  That’s pretty much it!  I did die cut a few “Mini Bows” from Taylored Expressions for each ornament.  Then I layered the ornament panel onto gold and then onto a white A2 card base.

This would certainly be a very easy design to mass produce using the MISTI tool.

I hope you like my card and will stop by the challenge blog to see what the rest of the design team has created too!  *NOTE* This is the last project that I’m making for this challenge blog as I have decided to step down from the design team.  Thank you to Tina for having me as part of the challenge team this year and keeping the blog running.  Best wishes for the coming year!

Thanks so much for dropping in today!  Wishing you a wonderful weekend!

Challenges:

  1. Ally’s Angels Anything Goes
  2. Crafter’s Cafe Anything Goes with optional: Christmas
  3. ABC Christmas -‘U’ is for Uncluttered (CAS) & ‘V’ is for Vertical
  4. CRAFT Christmas

A Single Flower at Sparkles Monthly

Hello friends!  Welcome to the start of a new week for mid-September!  I think Summer actually DID come back to us as we’ve set record high heats for this time of the year!  I think I’m ready for those cooler temps to come back! Ugh!  I know it won’t be long now and we can start enjoying trips outdoors as we look forward to picking apples and all Autumn festivities that we do!

Today is time to share a new challenge over at Sparkles Monthly and we have the theme of “USE A SNGLE FLOWER (floral image)  this month.  Flowers seem to be everyone’s favorite.  Here’s what I came up with: 

Mine is a single sunflower image.  My husband planting them in our backyard this year and they were so pretty!  Of course, I forgot to take a photo of one before they died off.

The items I’ve used came from an older card kit from Simon Says Stamp including the stamp set called Sunflower Fields.  There is a single sunflower image that I thought would be perfect for this challenge, plus I can use more items from my stash!

For the size of the flower image, I wanted it to stand out, so I used a tag and twine from the kit and decided to make this a mini slim card size.

For the background:  I used a piece of watercolor cardstock and gold heat embossed the “Romantic Script” background stamp (retired) from My Favorite Things and then used some oxide inks swiped on glass with spritzed water to make a “smooshed” background.  I also used these same colors to watercolor my flower with. (except the green, I only used that for the flower)  I also used some gold watercolor to splatter over the tag.  I only splattered the tag because I didn’t think it would show very much over the card background.

I cut the smooshed watercolor panel to fit over a kraft side folding mini slimline card base.  I die cut the flower and the sentiment to attach over the tag, added some twine and then used foam tape to pop it up over the ink smooshed background.  Lastly, I’ve added some yellow sequins to finish it off.

I hope you will take some time to pull out a single flower and join us in the challenge this month!  Looking forward to seeing your creations!  Thanks so much for dropping by!

Challenges:

  1. Creative Inspirations Anything Goes
  2. Ellibelle’s Garden Party Anything In or From a Garden
  3. Creative Fingers Anything Goes
  4. Lil’ Patch of Crafty Friends Anything Goes
  5. Penny’s Anything Goes Using Paper
  6. Love to Craft Anything Goes
  7. Crafts Galore Encore Anything Goes

F is for Feather(s)

Hello friends and happy Friday to you!  It’s been so crazy warm over my way and I’m hoping this day finds us with a bit of a break in temperatures.

Today starts a new challenge over at the Alphabet Challenge Blog!   Our next letter is F and it was my turn to choose a theme for this letter, so I  have chosen “F” is for Feather(s)  *Remember that this is a bi-weekly challenge, so you have two weeks to enter*  I hope you will find some time to play along!  Here’s what I’ve created:

I thought this would be a fun theme to play around with as you could just add a bird or anything with feathers.  I look forward to seeing the projects for this one!  I was happy to have this chance to pull out some things in my stash that I hadn’t used yet.

I’ve used the Taylored Expressions “The Thing With Feathers” stamp set and long with the “Wings of Love” stamp set for this card.

I started with a kraft colored cardstock cut with a scallop rectangle die and masked off the edges to ink blend and stamp a smaller feather around the edges with brown ink.  I then took the flying birds image from the “Wings of Love” stamp set and stamped it in white ink.  I also decided to add some white splatter over that.  This panel was then attached to an A2 top folding white card base.

For the large feather at the bottom: I used my VersaMark ink pad to just ink up the edges of the feather, then I silver heat embossed just the edges of the feather.  Without removing the feather stamp from my MISTI, I inked up the entire feather with VersaMark ink and then used a white opal embossing powder over the entire image.  Since this embossing powder is translucent, the silver edges that I embossed still showed through.  I die cut it out with the coordinating die and popped it up with foam tape at the bottom of the card.

The sentiment was stamped with grey ink and cut out with a coordinating die that I attached with thin foam tape at the top of the kraft panel.  I added some clear sequins to finish it off.

Thanks so much for stopping in today!  I hope you will grab your feather(s) and play along with us!  I’ll see you tomorrow for a new Art Journal Page!

Challenges:

  1. Gem of a Craft Challenge Anything Goes
  2. Ally’s Angels Anything Goes
  3. The Creative Crafters Anything Goes
  4. Crafter’s Cafe Anything Goes optional: masculine
  5. Pammie’s Inky Pinkies – PIP2525 Anything Goes

E is for Embossing

Hello and happy Friday!  Thank you so much for the congrats from my last post about the baby!  I look forward to meeting our new family member soon!  It’s starting to get really warm over my way, so it’s a great time to be indoors with the cool air and craft.

Today starts a new challenge over at the Alphabet Challenge Blog!   Our next letter is E and the hostess has chosen “E” is for Embossing (heat or dry)  *Remember that this is a bi-weekly challenge, so you have two weeks to enter*  I hope you will find some time to play along!  Here’s what I’ve created:

I absolutely love to emboss!  I first fell in love with stamping because of the magic of heat embossing and then fell in love again when those embossing folders came out!  So I’ve decided to do both versions for my card.

I haven’t had a chance to use this Drifting Flowers embossing folder from Simon Says Stamp.  I thought it was so pretty!  I wanted to emboss in black and try out my Lisa Horton Interference Inks with it, so after I embossed it, I used my finger to rub white ink over the raised areas.  I then used the LH Interference Inks over that once it dried.  (I can’t remember exactly what colors I used, but it basically started as an experiment and I had several pads open!)  I also used a silver ink pad to rub the centers of each flower minus the large one.

I should also mention that some of the white ink was very slightly rubbed over the open areas as well because I got a white streak on it…so I just continued to rub all over those areas until blended in.  I didn’t mind the look.

While the inks were drying, I silver heat embossed the sentiment and cut out it with the coordinating die.  I additionally cut out two more for added thickness and attached to the panel.  I layered this embossed panel onto a mirror silver layer with both of these layers getting rounded on two ends with my corner chomper.  I added these onto a chomped top folding A2 black card base.  Lastly, I added some silver sequins.

Please be sure to stop by the challenge blog to see the inspiration from team as well!  I look forward to seeing your embossed projects in the gallery.  Thanks so much for stopping by today and I hope you like my card.  See you soon!

Challenges:

  1. Crafty Calendar – Add a Sentiment
  2. Pammie’s Inky Pinkies – PIP2523 Anything Goes
  3. Simon Says Stamp Wednesday – Fur, Feather and/or Flowers
  4. As You Like It – Favorite: to add a sentiment or not and why?  (I most always have sentiments on my cards because I feel it’s important when sending a greeting card to someone and it’s hard for me to leave it blank.)
  5. The Flower Challenge Embossing (heat/dry)

B is for Butterflies!

Happy Friday my friends!  Are you ready for the weekend?  I know that I don’t have a regularly scheduled workday every day, but I can still always feel a weekend ahead! LOL  Hopefully I can enjoy some time doing some fun projects that I’ve been wanting to get to and go outdoors!  

Today starts up a new challenge over at the Alphabet Challenge Blog!   We are now onto the letter “B” and the hostess has chosen “B” is for Butterflies (use more than TWO of them.)  *Remember that this is a bi-weekly challenge, so you have two weeks to enter*  I hope you will find some time to join us in the gallery!  Here’s what I’ve created:

I do love me some butterflies!  I love using soft pastel colors for the Spring months too!  I have used this set before, but I have gotten it back out again for my mini slimline card today.  I’ve used the Taylored Expressions Beautiful Butterfly Wings & Coordinating dies to complete this.

I white heat embossed the three wings onto vellum and die cut them out.  I also used the die cut to cut out the colored cardstock butterflies for each one along with their center antennas.  Glued them together and set aside to work on the layout.

The base of the card is mini slim size of 3.5″ x 6″ side folded.  I die cut a white layer with the TE Pettie Scallop Mini Slim dies and then layered another white piece using the Stitched Mini Slim dies.  Before I attached it, I splattered some black paint over it.

I then attached each assembled butterfly to the layout design and added the white heat embossed sentiments between them with foam tape.  The sentiment came from the TE Fluttering By Mini Strips & a coordinating strip die.  I finished by added a rhinestone in the center of each butterfly.

**Just a special attention to the tab pages I’ve added at the top of my blog that shows I now have information about purchasing a handmade card from me as well as another page of craft supplies I have available for purchase if interested.  I will regularly update so check back often to see what’s there!**

  • Thank you for taking the time to stop in and share your support!  It really means a lot and I enjoy hearing from you!  Whatever your weekend brings, I hope there’s some good in there somewhere!

Challenges:

  1. Simon Says Stamp Wednesday – Anything Goes
  2. Krafty Chicks Birthday
  3. AAA Birthday – Anything Birthday Goes (Happy 6th birthday!)
  4. Crafts Galore Encore Anything Goes
  5. As You Like It – Soft or Bold Colors? Why? (I prefer soft tones with calm colors as they seem more pleasing to me)
  6. Love to Craft Anything Goes

Anniversary Gnomes

Hello friends!  I hope you’re having a great start to your week!  I’m just popping in to share the card I made my husband for our 25th wedding anniversary…he’ll be getting it this morning and then we’re off to a date night (afternoon as we’ve gotten older)!😆 

I think this turned out pretty cute!  I dug into my Whimsy Stamps stash and colored up these cute gnomes and fussy cut them by hand to add to the scene.  I cut off the string and heart in the center of their hats and stamped the image over the green cardstock with the cut out image layered over top of it.

For the background:  I blended some Autumn colored inks in various places and then stenciled in the leaves with a light brown ink.  I die cut the mountains and attached them to the background by sizing it up with the green die cut tree border for placement.  I stamped the “love you” sentiment all over the green background and then layered the colored image over top of the other.  I added some silver sparkle on the heart in the center of the hats.

I also took a die cut silver cardstock frame to go around it and then I silver heat embossed the “happy anniversary” sentiment at the top of the scene.

All the layers were cut with a scallop rectangle die and placed over a side folding A2 grey card base.

And here’s what I put on the inside of the card.  I thought it up myself and printed it out on the computer.  It was cut out with the same scalloped rectangle die and attached.  I still need to sign it as I’m typing this up!

Here’s the inspiration that I used to help me create this card:

These are some more photos that we took while we were in Alaska last month.  After our cruise, we took a land tour and went on a train ride that took us up to Denali Park.  We had a good day to take a 3 mile hike one day and ran into someone that took our photo and we took their photo too!

I will be back later to share some photos of the stamp retreat I just came back from!  Always lots of fun and great to see my crafty friends!  Thanks for stopping by today!

Challenges:

  1. Retro Rubber – #rrcb242 Fall by the Lake (all products are at least 3 yrs old)RRCB #242
  2. Little Red Wagon Emboss it! (sentiment)
  3. Penny’s Challenge – #583 Anything Goes Using Paper
  4. Krafty Chicks – #739 All Occasions (Anniversary)
  5. CRAFT – #738 Anything Goes
  6. Just Us Girls – #750 Stencil Week (leaves)
  7. Creative Knockouts – #533 Halloween or Fall (Fall)
  8. Crafty Catz – #681 Anything Goes with optional: dies/punches (I used dies)

Halloween Hauntings

Hello friends!  It seems like this month has really flown by as I now realize that Halloween will be here next week and I wanted to get some cards sent out that I’ve made!

So here are my Halloween cards for this year….I had so much fun!

This one was so much fun putting together and it wouldn’t have been put together if it weren’t for the parameters on Craft Roulette #237 this week!  The four parameters consisted of these – 1. Project: Pop Up Card, 2. Colors: Trick-or-Treat, 3. Element: Boutique and 4. Random: jewelry

I used the Lawn Fawn Platform pop-up die and the build a house die with the Halloween add on plus a few other dies and stamp sets all from Lawn Fawn.  The front “welcome” sentiment was printed out from my computer and I made up the “Bougie BOO-tique” language to fit with the parameters of the challenge.😆  These ghosts are all blinged up and hanging out around their favorite “BOO-tique” to catch up on all of the latest trends in style!  One is wearing a necklace, another a tierra, another carrying a purse, another styling glasses with bling and the front ghost has earrings and a sparkle wand.

The background was done with the Lawn Fawn Platform Pop Up Add On around the back of the pop up.  I ink blended and then splattered with white Copic Opaque White mixed with water to get the starry night background.  This card went to my husband because he really enjoyed it and said that it wasn’t going anywhere, but it does lay flat for mailing.


This card was done for an Inky Inkspiration Challenge over on FB for September and they were asking for a slimline card.  I’m more into making the mini slimline size rather than a full size, so that’s what I went with!  I’ve used the cute Bat stamp set for all of the images, except for the background panel, which you’ll notice it looks like a BINGO card and it is!  It was the game that we played in a Zoom class that I took with Inky Stamper and we actually used this Bat stamp set for the projects we made and the BINGO card was included.  I decided instead of throwing it away, that I would use it as background paper for my card.  I just stenciled in some gray clouds over top and stamped some bats from the set with it.  The rest were just cut out and placed on the card with the bat being popped out with foam tape.

(I would’ve showed photos from the class, but I forgot to take photos of them!)

And here’s another card I made for World Card Making Day using the fun sketch from the Inky Stamper Inkspiration Group on FB.  I’ve used this really CUTE Zombie stamp set from Inky Stamper for this card.  I had so much fun coloring him up!


And this last card I made for someone who loves the spookiness of the season almost as much as I do!  I pulled this really cool image from an older paper pack by Whimsy Stamps.  In fact, all of the images on this card came from this store.  

I die cut the image out with the WS ATC Antique Frames including the sentiment that was white heat embossed.  The background was black heat embossed with the WS Vintage Wallpaper stamp over kraft cardstock.  I sponged some black ink around the edges which was also cut out with the WS Wavy Pieced Rectangle dies.  I cut out a few ghosts from white cardstock using the WS Boo die set and sponged some green ink at the very bottom edges.

I thought it would be fun to make the eyeballs of the skeleton and the edges of the ghosts glow in the dark, so I used some glow-in-the-dark embossing powder over them and finished off the sentiment panel with green gems.  (It’s too hard to take a photo of the glow-in-the-dark!)


Well that’s it for me today with all of the Halloween cards!  I hope you’ve enjoyed them or have been inspired in some way!  Thanks so much for stopping in and I’ll see you again on Saturday with another Art Journal Page for the month! 

Challenges:

  1. Creative Fingers – #287 Anything Goes
  2. Sisterhood of Snarky Stampers ‘H’ is for Halloween
  3. Lil’ Patch of Crafty Friends – #240 Anything Goes
  4. Pammie’s Inky Pinkies – #PIP2442 Anything Goes
  5. Make My Monday – #237 A Spooky Halloween
  6. Two Old Bats – Anything Goes Halloween
  7. Crazy for Stencils – Anything Goes using stencils + Halloween (2nd bat card)
  8. Unicorn Autumn/Halloween

Try It On Tuesday GDT-Book Pages

Hello friends!  Happy June!  Hope you’ve been enjoying your month so far!  It’s going to start warming up at the end of this week which means I’ll probably start spending more time indoors with the air conditioning and hopefully have some time crafting!  Yay!

save guest tiot 24

I’m super excited to share my post with you today as I’ve been asked to be a guest designer for this challenge at Try It On Tuesday!  Always happy to be apart of the challenges and support them as much as I can as they help to inspire creativity!  

I’m loving the challenge theme for this one which is “BOOK PAGES”!  There are several different ways to go with it, but here’s my take with the challenge:

I am an avid reader and I do love turning the pages of a good book, but sometimes you can come across an old book that is in bad shape or even a book that has no meaning to you and that you might normally throw away.  I don’t do that, but I keep it instead for purposes of using in my crafts!  I do the same with magazines, etc.  Sometimes I use the illustrations for art journaling, etc.  I’ve even kept some for the purpose of gift wrapping.  How about you?  Do you keep things like this for anything?  If you do, then this challenge would be a great for using it up!  I’ve even seen some decorative papers that have a “book page look” which would be suitable, I think, for the challenge as well!

For my card:  I’ve used a cover plate die (unknown) and cut the pieces from a book page and then cut it again in black cardstock so that I could use the frames.   I took some brown ink to sponge around the edges and in the center randomly, so that it wasn’t so stark white.  I then splattered it with both black and white paints, wrapped some twine with a bow around and placed it on a side folding A2 black card base.

The flower image:  I took another book page and stamped/heat embossed the Bursting Blooms stamp from Taylored Expressions(retired/not in store) and cut it out with the coordinating die.  I had some fun watercoloring the image with some Daniel Smith watercolor samples and than I sponged around the edges with some more of the brown ink before attaching to the card with thin foam squares. (I also cut an additional piece of white cardstock for added thickness as some book pages can be thin.)

To Finish:  I’ve taken the Taylored Expressions Sundry Sentiments and white heat embossed the sentiment over black cardstock and cut it out with the coordinating die.  I attached it to the card along with some black rhinestones.

I love how this one turned out and I hope you do too!  Please be sure to pop on over to the challenge blog and check out all of the inspiration from the team!  I look forward to seeing your creation in the gallery as well!

Thank you for stopping in today and I’ll be sharing more with you soon!

Challenges:

  1. Allsorts – #784 Flowers Galore or Anything Goes
  2. Creative Fingers – #279 Anything Goes
  3. Alphabet – ‘E’ is for embossing wet or dry (heat embossed flower and sentiment)
  4. Krafty Chicks – #719 Stamps
  5. Time Out Inspired by a Quote from Henri Matisse: “There are always flowers for those who want to see them.”

Clean & Simple at Sparkles Monthly

Hello friends!  I hope you’re having a wonderful week so far!  We’ve been getting some rain, which is great for the freshly planted flowers.  I enjoy being able to sit on my covered porch and listen to it rain as long as it doesn’t get too stormy!

Today starts a new challenge theme over at the Sparkles Monthly Challenge!  For this month, we’d like to see your CAS (clean & simple) creations!  I look forward to seeing the inspiration in the gallery, so I hope you can join!  Here’s what I’ve made for this challenge:

Sometimes I can really struggle with a clean and simple design because I always feel like I need to add something more.  The end result is in the minimal embellishments and design.  This one got stuck in my head and came together rather quickly and I like how it turned out.

Most everything used on my card came from My Favorite Things.  I started with watercolor (Bristol Smooth) paper and the Watercolor Wash stencil and blended a rainbow of colors over it.  While the stencil was still in place, I took a water bottle to spritz water droplets over it and removed the stencil.  I let it dry and then clear heat embossed the sentiment that was stamped in a black pigment ink.  (The key to this is to make sure the watercolor area is completely dry before you heat emboss anything over it.)

I cut out the panel with a wonky stitched rectangle die.  I’ve attached it to an A2 side folding black card base.  I was pulled to splatter over this, but thought I needed to keep it simple, so I took some drip drops in “cosmic” color and added them randomly to the design.  

  • So, what do you think?  Simple enough you can do it too and enter it in the challenge, right?  If you need more inspiration, check out the challenge blog to see what the other design team members came up with for CAS.

Thanks so much for stopping in today!  I hope you have an amazing week!

Challenges:

  1. AAA Birthday – #61 CAS birthday card
  2. CRAFT – Birthday (Happy 15th birthday!)
  3. AAA Cards Anything Goes Birthday (Happy 10th birthday!) 
  4. Pammie’s Inky Pinkies – PIP2419 Anything Goes

April Showers Bring May Flowers at Sparkles Monthly

Hello friends!  I’m so very happy to see April come as well as the warmer weather it has brought our way!  I’ve actually been taking sometime outside to see some blooms with daffodils, tulips and other buds popping out everywhere!  We are expected to get some rain tomorrow, but that is exactly what April is all about…and then the May flowers to follow!

This is exactly what it’s all about for this month’s challenge over at Sparkles Monthly too!  We hope you can share your “April Showers-May Flowers” projects with us this month!  Here’s what I’ve chosen to make:

I always love a good Spring rain with a little bit of sunshine peeking through that causes rainbows!  I never get a good photo of one, so I just enjoy it while it lasts! 

I’ve used a fairly new product from Taylored Expressions with my card today called “Create-in-quads ROYGBV” which creates 4 different card panels at one layered stencil session.  (I now have 3 other panels to make cards with too.)  I used the “Create-in-quads ROYGBV vase die” to cut it out and then another one in black cardstock for a slightly off shadow effect behind it.

For the background card panel, I had a DCWV rain drops stencil (that I’ve had for a long time) and blended some blue ink over it.  I’ve also cut a piece of blue/teal colored glitter paper for a thin border behind it to attach over an A2 white top folding card base.  I then took another piece of blue cardstock strip to make a “landing/grounding” for the vase to sit on.  Before popping up the ROYGBV vase, I took a marker to create a blue shadow underneath where the vase would be positioned.  I was going for a “rain puddle” look.  Popped it up with foam tape and added a white enamel dot in the center of one of the flowers.  I also took a glitter pen to cover over the raindrops and “rain puddle” under the ROYGBV vase.

The sentiment came from the Taylored Expressions Mini Strips-Rainbow stamp that I’ve white heat embossed over black cardstock and cut it out with the Mini Strips-Asymmetrical die and chose the ones that I wanted to use for this card to attach over top of the vase.  (I also have extra sentiments to use on other projects.)

Hope you’ve enjoyed my card today!  I also hope that you will take some time to stop in and join in the challenge with us this month!  I have several projects finished that I’d like to share, but I find it so hard to come and sit at a computer when the sunshine and happy weather is calling my name!  Maybe when it rains tomorrow, I will post more things! 

Have a great day and thanks for stopping by!

Challenges:

  1. Just Us Girls – Word Week: RAIN
  2. A Place to Start – One or More Flowers
  3. Crafts Galore Encore – #122 Anything Goes
  4. Try it On Tuesday – Rainbow Colors
  5. Addicted to Stamps & More – #465 Die Cut and/or Stencil
  6. Crafting Happiness – #170 Rainy Weather