O is for Oval with One Word

Hello friends!  Happy Friday and happy Halloween too!🎃  I might be having a few treats tonight, but hopefully without any tricks involved! 😉 

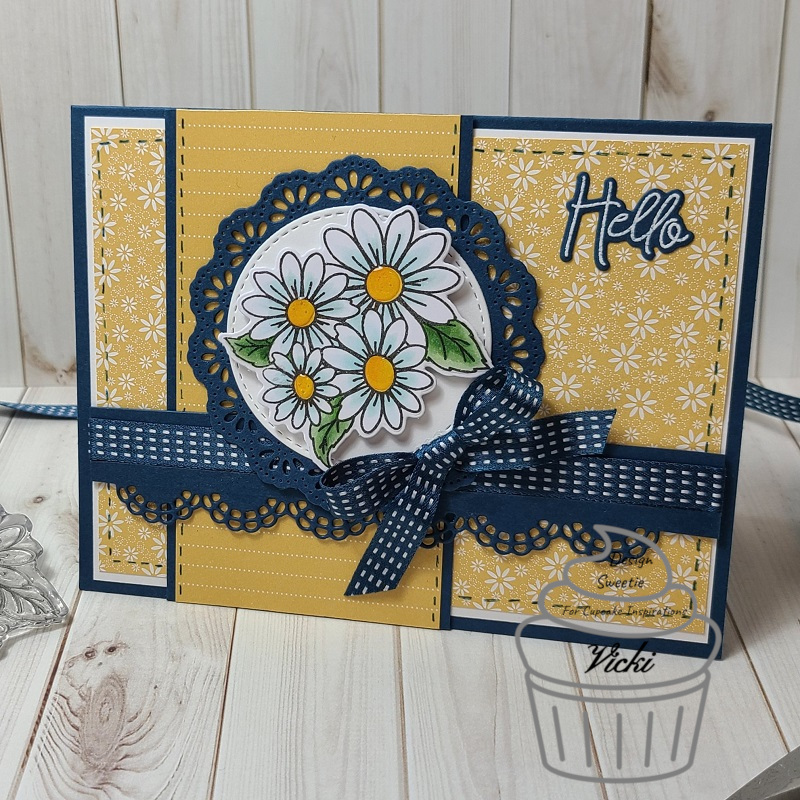
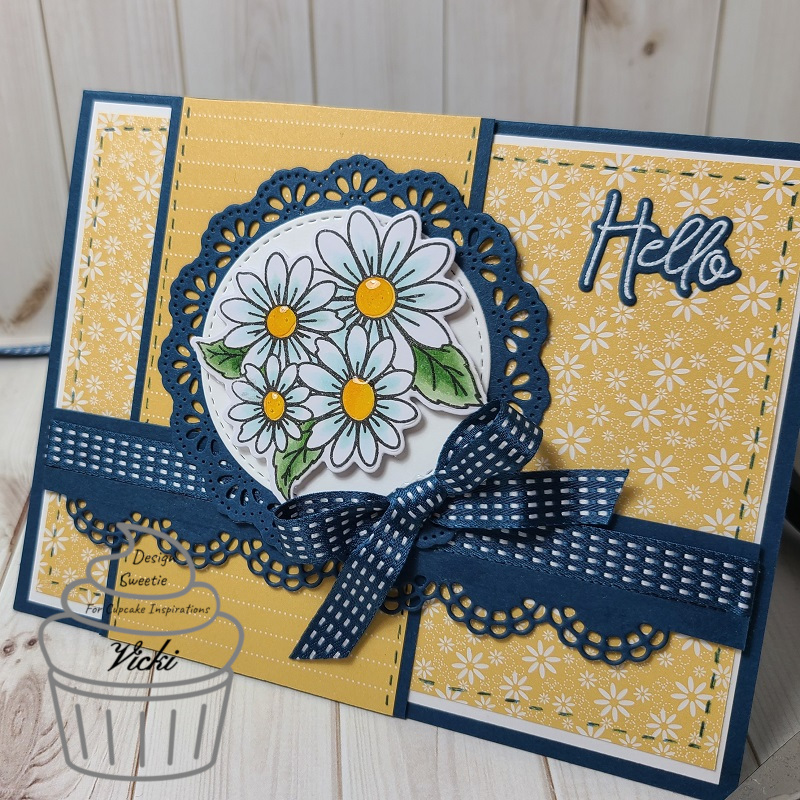
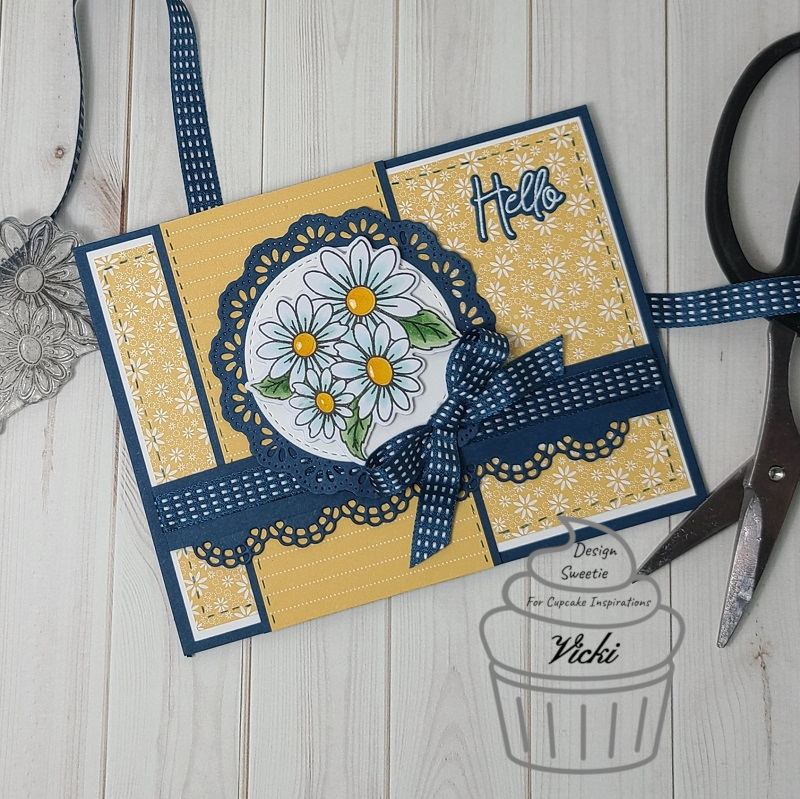
Today is a new challenge over at the Alphabet Challenge Blog!  Our next letter is “O”, and our hostess, Helen, has chosen “Oval with One Word Sentiment”   I hope you will join in the fun with us!  *Please remember that this is a bi-weekly challenge, so you have two weeks to enter.*  Here’s the project I’ve made for this challenge:

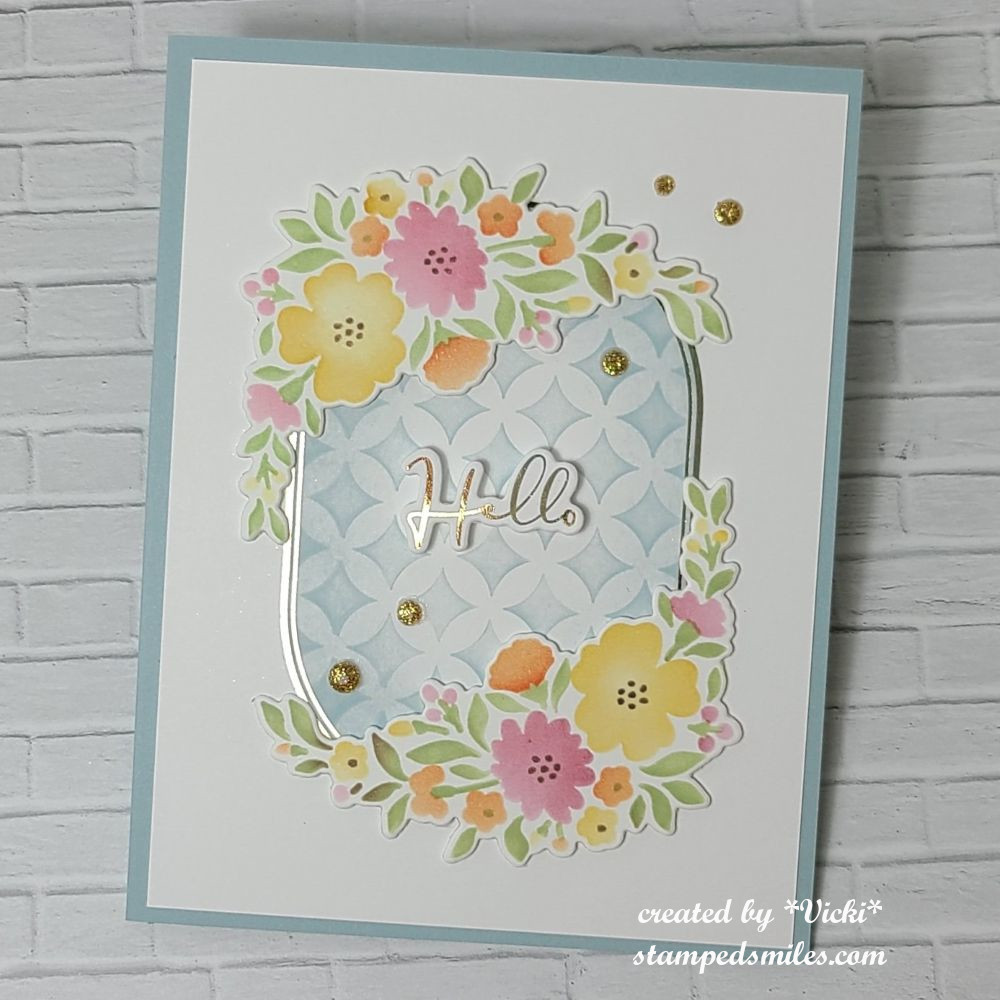
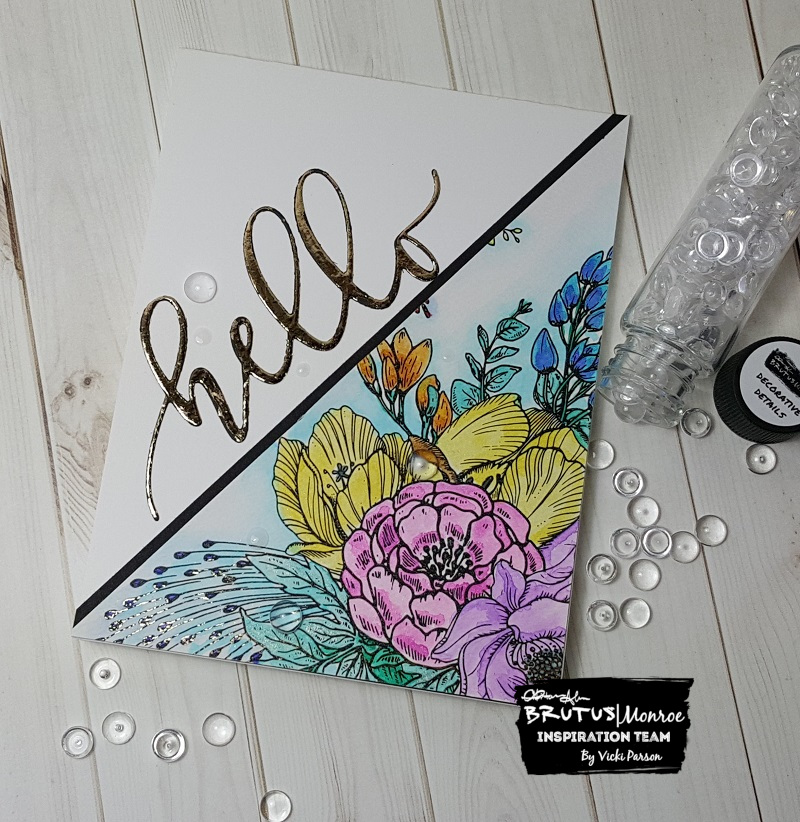
I usually make cards with a specific theme, but I rarely make cards with just an “any occasion” involving a simple sentiment like “hello”, so I went with this in mind for the challenge.

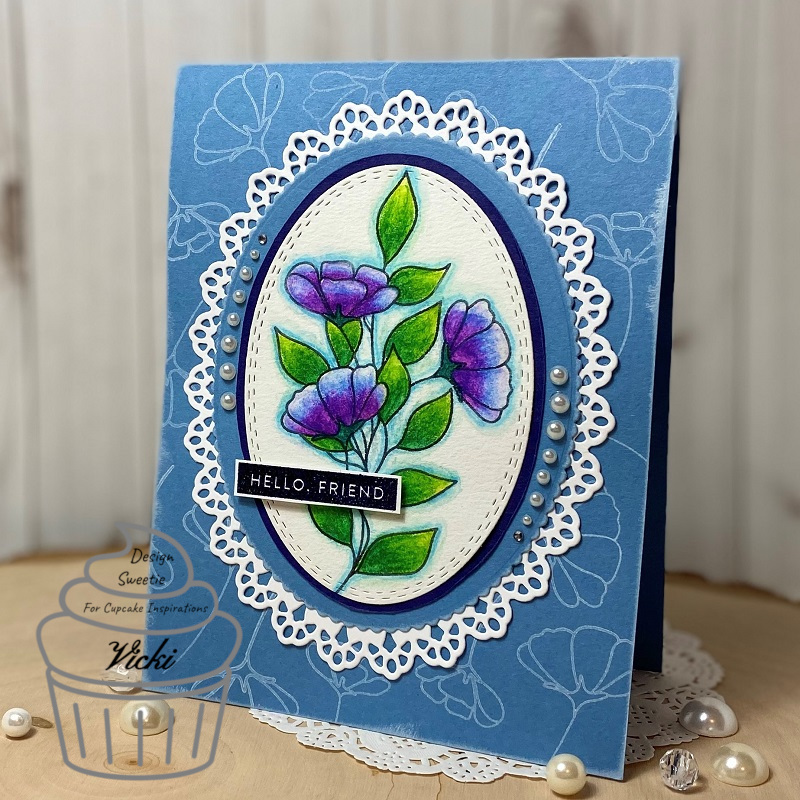
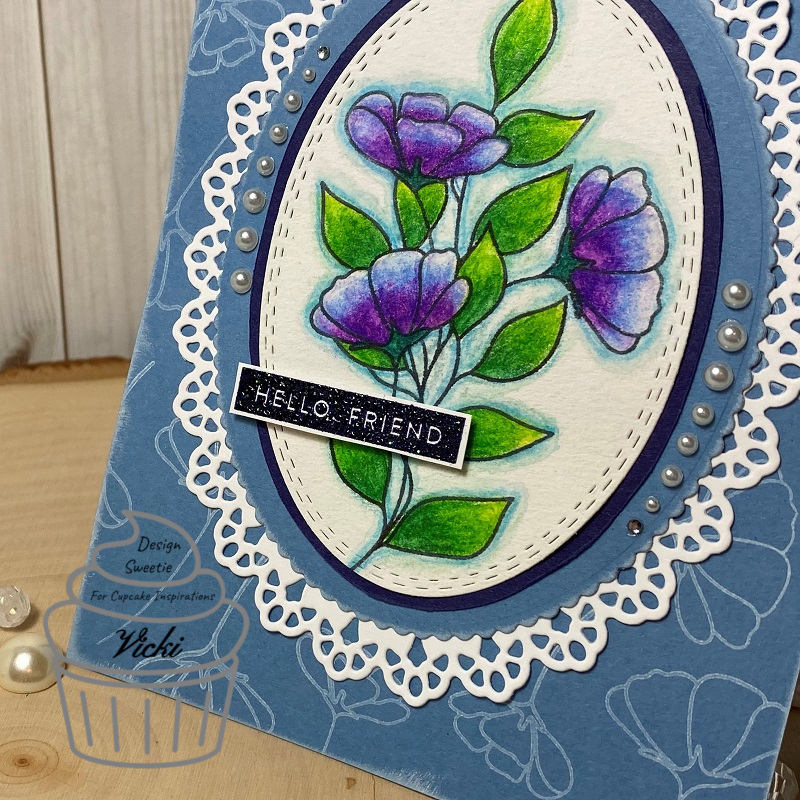
I started with a Taylored Expressions Foil It-Framework panel (one of the panels had a nice oval shape), and foiled it with a gold foil.  While I was foiling, I also decided to foil the sentiment from the TE Foil It-Timeless Greetings and cut it out with the coordinating die.

After foiling, I pulled out the TE Masking Stencil-Framework (coordinates with the foil panel) and used it to stencil the center oval with the TE Mini Slim Stencil-Trellis in light blue ink.  I then took the left over ink from the blending brush and lightly went over the entire inside oval shape.  On a separate piece of white cardstock, I stenciled the TE Cottage Charm Stencil & Die Combo and attached the floral spray on each opposite ends of the foil oval.  I was trying to go for Autumn style colors for the flowers, but the red tone looks a bit more pink in the photo now that I’m looking at it.  I still like it though.

I attached this panel onto a light blue A2 side folding card base, popped up the gold foil sentiment in the center with foam tape and added a couple of gold gems.

  • I hope you like my card today and you will pop on over to the challenge blog to see the inspiration from the rest of the design team.  Looking forward to seeing what everyone comes up with!

Thanks so much for dropping in and I’ll be back tomorrow with another post and challenge!

Challenges:

  1. Pammie’s Inky Pinkies – PIP2543 Anything Goes
  2. Simon Says Stamp Wednesday Challenge – Anything Goes
  3. Krafty Chicks Anything Goes
  4. Triple B – Birds, Butterflies, Blooms (must use at least 1)
  5. The Creative Crafters Anything Goes

Sheetload of Cards With Flashback Card Kit

Hello friends!  I hope you’ve had a good week and looking forward to a great weekend ahead!  The weather has been unseasonably cool for this time of the year and I’m able to get my windows open the last few days and enjoying it!  Unfortunately, it’s going to warm up again, so I know that the air will come back on.

Today I’m sharing something that is a bit different and new to me, but I think it will come in very handy for the future as my “goal for next year” is to use up those old card kits that have been stored in my stash for WAY too long!  I’m hoping to start this on my blog next year each month and focus on a card kit each month so I can clear things out from my stash!  Stay tuned!

I found a fellow crafter Call Me Crafty Al and I decided to give her Sheetload of Cards a try for this month and see how it goes!  It would probably have been much easier to do it the way she did, but I challenged myself to use my card kit items instead:

Here’s the set of all eight cards using the same sketch from Crafty Al’s Sheetload for this month.  You may not recognize the card kit that I’ve used as it’s an old one from Simon Says Stamp.  The box had November 2015 written on it, and the paper inside had “Here’s Looking at You” card kit on it.  I know that I have pulled it out and used a few things out of it, but there was still plenty to use!

I was looking to make some uplifting/inspirational cards so this all worked out great.

Click on the photos above if you’re on my website so you can get a closer view of them.

I’ve used all of the cardstock except one sheet of kraft, all of the 6×6 papers were used except two sheets and I’ve also used up some of the journaling cards that were included as well as the stamp set and thread.  The reason why some of the edges are rounded is because the journaling card inside the kit had rounded edges.  I just decided to incorporate that into the design and I think it worked out okay.

Honestly, I don’t know weather to be proud of myself for using up my extremely old card kit or feel embarrassed for having such an old card kit still in my stash!😂

Regardless, I hope you’ve enjoyed my play with the “Sheetload of Cards” for August 2024 utilizing a very old card kit!  How about you?  Do you still have some card kits or stashes of something from 2015…er older?  Would you like to use them up too?  Follow along with me next year each month as I attempt to use up those old old old stash items and have a session of “Crafting to the Oldies“!  This is me holding myself accountable!  Let’s do this!

  • Thanks so much for dropping in today and have a great weekend!❤️

Hello Flowers & Catch Up

Hello friends!  I hope you’ve had a great week so far!  It’s a rainy day, but I have some errands to do as it will be a busy weekend so I wanted to get some things done.  I also have some more catching up to share with you at the end of the post too!

I made a card using some older Newton’s Nook products I have and played along in a few challenges as well:

I am not sure if I used this stamp set or not before that I received a few years back from Newton’s Nook called Versatile Vases (retired), but I think it’s a great set with lots of versatility.

I stamped the flowers, then stamped the vase over top of it to make it look like the flowers are inside the vase.  I colored with my Copic markers and cut out the panel with the Newton’s Nook Framework Die Set and then cut another panel with pink cardstock for the frame around it.  I then stamped the hello sentiment at the top right corner of the panel.

I followed along with the sketch (see below) for the Inky Paws challenge and used some pink ink to stamp the solid flower image from the Versatile Vases set and layered it over a pink cardstock layer.  The purple dotted paper came from the Newton’s Nook Birthday Woofs Paper Pad.  I arranged each panel over a white top folding A2 card base, but before attaching the purple dotted strip going horizontally behind the flower panel, I wrapped some white twine around it and added a bow with it.  

I used some foam tape to pop up the flower panel and then added some purple rhinestones to the center of each flower.

It’s a very simple and sweet card perfect for sending a smile!


I’m still catching up with some projects that I had been working on earlier this year and never had a chance to post each thing I was doing at the time.

You may remember the “Stamp Joy Virtual Event” that I did back in March and I shared those in my post here.   During the exact same time I was doing that, there was another event going on through Scrapbook.com called SBC Fest which was recorded so I watched it later and participated in the classes as I had time.  I finally finished what I wanted out of it in May and so here are the things I made except for the scrapbooking classes as I wasn’t interested in those projects.  (I used items mostly from my stash.)

*If you’re on my website, click on each photo to enlarge*

I’m getting closer and closer to posting my “catch-up” projects!  I have one more event that I attended this Spring and a class that I haven’t shared yet, but will post soon!  

Thank you so much for taking the time to stop by, for leaving me a comment or just catching the photos of what I’m doing.  I hope you enjoy my sharing as much as I’m enjoying creating.

Have a wonderful day!

Challenges: (Top card only)

  1. Inky Paws – #228 sketch
  2. Cupcake Inspirations – #599 Pink & Purple
  3. Pammie’s Inky Pinkies – PIP2430 Flowers
  4. Lil’ Patch of Crafty Friends – Anything Goes

{Cupcake Inspirations} Color Challenge Reminder

Hello there friends!  Hoping you’ve had a wonderful weekend!  It’s gotten pretty warm again over my way after enjoying the slightly cooler and beautiful weather for a while!  I’ve been enjoying the flowers while they’re still around!

I’m sharing some more inspiration with you today for a reminder on our current color challenge for {Cupcake Inspirations}, so if you haven’t played along with us yet, you still have another week to join us!

For some reason this color challenge still had me thinking of daisy flowers…so I went with that again for my design this week as well:

Vicki-CIC498-week2

I’ve pulled out a Pink and Main stamp set called Daisy Bugs and colored up the bundle of flowers image with Copic markers and then used the coordinating dies to cu it out with which was popped up over my design with foam tape.

I used the sentiment from the same stamp set as well and white heat embossed it over Navy cardstock and used the coordinating die to cut that out with as well which was glued over the card.

The yellow decorative papers were pulled out from my older Stampin’ Up! stash as I thought it fit with the theme and I was super happy to use some more papers up!  I’ve used a stitched circle die to cut out the white layer behind the flowers and then another fancy circle die from Gina Marie cut out with Navy to layer behind that as well.  I also die cut a border strip with a Crafter’s Companion die to place across my design and I wrapped some stitched navy ribbon (SU!) over it before attaching to the design.

I glued the bow over top of the circle image panel and then I used a navy marker to create the stitch lines around the edges to finish it off.

Vicki-CIC498-week2-close

Here’s a closer look at the flowers popped up on the design.  You can see in the centers of the flowers that I’ve added some glossy accents.

I think it really makes the flowers pop off the design!

Vicki-CIC498-week2-flat

I hope you’ve enjoyed my card today and has brought you some inspiration!

Thanks so much for joining me here today and I’ll see you again soon!

Challenges:

  1.  The House That Stamps Built – JL2220 Anything Goes
  2. Krafty Chicks – #517 All Occasions
  3. Creative Knockouts – #360 Flora and Fauna
  4. Watercooler Wednesday – WWC281 All About Occasions

{Cupcake Inspirations} New DT!🧁

Hello friends!  I’m so excited to announce that I’ve been asked to join the {Cupcake Inspirations} Challenge design team!!

What could be better than crafting AND cupcakes, right?!  So be sure to join me here every Monday for new challenge and reminder inspiration!  I do hope you’ll check out the challenges and join us over there to play along!  (And maybe enjoy yourself a cupcake treat while you’re at it!😁)…if you’ve followed along with me for a while, you may have remembered about 5 years back that I used to be on this team before!  So I’m excited to be joining with them once again!

So here we go with the brand new challenge and a really fun theme to play with:

The theme for this challenge is “Flowers with Pearls/Sequins

**The challenges will last for 2 weeks, so you will have that long to play for each challenge!  There is a theme challenge and then a color challenge for every other one.  There will be a reminder week in between each one as well…so be sure to subscribe and follow the blog so you can see the inspiration and play along with us!**

**We are also partnering with the Double Trouble Paper Crafting Challenge Blog with their challenge of a tic-tac-toe board!  So be sure to check out all of the up-coming details and play along with them too!**

Here’s my take on the challenge:

Vicki-CIC497

I was really inspired with the flowers and pearl theme and I’ve been wanting to play around with a past card kit I had to color with pencils, which I hardly ever do!

The flower images come from the Simon Says Stamp Stronger Together stamp set and kit.  The kit had some colored pencils with it that I used to color the image and then I just used some dies from my stash to add the layers.  I took an additional floral image from the set and white ink to stamp the background and swiped the ink pad around the edges.

To fit with the challenge theme, I thought it would be fun to add several sizes of pearls along the edges of the oval panel.

Vicki-CIC497-close

Here’s a closer view of the coloring on the flowers.  I’ve also taken a sentiment from the stamp set and inked it up with some eggplant ink using my MISTI tool.  I inked it up again with some embossing ink and then added some clear sparkle EP over top of it to heat set.  The sparkle shows up so much better in person, of course!  I cut it out with my scissors and popped it up over the image with foam tape.

Vicki-CIC497-flat

Really hope that you’ve been inspired with my creation today!

I will be back next week with more inspiration for this challenge!  Thanks so much for dropping by!

Other Challenges I’d like to enter this card for:

  1.  Crafty Creations – #411 Anything Goes
  2. A Bit More Time to Craft – #119 Anything Goes
  3. Crafts Galore Encore – #77 Anything Goes
  4. QKR Stampede – #401 Anything Goes
  5. Love to Craft – LTCCB48 Anything Goes
  6. Love to Scrap – LTSCB135 Anything Goes
  7. Watercooler Wednesday – WWC278 Anything Goes Feminine

Floral Watercolor Foiled Hello

Hello friends!

Here’s what I made for today:

Vicki-BMhop-Aug28ATG

I’ve been wanting to do some coloring… so I got out several of my Aqua Pigments and Watercolor Brushes and went to town with one of these floral panels!  What I love about these card panels is not only are they all gorgeous, but I love that the lines on the images are a bit raised as if embossed which helps with the watercolor process.

Vicki-BMhop-Aug28-panels

As you can see, I’ve only used half of my card panel cut diagonally on my card.  So after coloring up the panel, I thought it was a nice way to cut the panel in half and then still have another panel left over to create another card with later!    So there’s a tip for extended more life out of your card panels!

Vicki-BMhop-Aug28-ATG-close

Here’s a closer view of my watercolor and the pretty shimmer from the Aqua Pigments!  So as you can see, I also did some foiling!  I wasn’t sure if these panels would foil correctly or not, but as you can see only a portion of the image foiled.  I was fine with that as it still adds a pretty sparkle to my card.

I did take the “hello” die and cut that from cardstock and then added some glue over it with the Deco Foil adhesive pen and then foiled over it in my laminator with some Deco Foil Rose Gold Transfer Sheets.  Love the look of the foiling and how it turned out!

Vicki-BMhop-Aug28ATG-flat

For my card, I attached the watercolor cut panel over a piece of black cardstock that I also cut diagonally with the panel and then attached it over a piece of very heavyweight white cardstock.  Then I attached my foil die cut sentiment across the card and added some Acrylic Bubbles randomly over the card. I finished it with some Nuvo Dew Drop accents as well.

I hope you’ve enjoyed my card today!  I appreciate you stopping by!

Challenges for my card:

  1.  Simon Says Stamp Wednesday – Clean and Simple
  2. Allsorts – Feminine
  3. Pammie’s Inky Pinkies – PIP1934 Anything Goes

It’s CAS at Cute Card Thursday!

Hello friends!  I hope you’re having a great week so far!!  I had forgotten to give updates on the “bird nest” situation, but actually the last time we had checked, the baby bird hopped onto the roof next door and the mother bird was chirping at us and then the baby took off and flew away!  We never were able to get any more photos.  I think there was just that one baby bird that survived.  Now we have the empty nest in the tree.  We think another bird may be trying to build on it, but we don’t see anything.

Today is Thursday which means it’s time for a brand new Cute Card Thursday Challenge!!  The theme for this week is CAS (clean & simple)  Our sponsor is All Dressed Up, so be sure to play along for your chance to win!

Here’s my take on the challenge:

Vicki-CCT586-ADU

I have used this really cute image kindly donated by our sponsor called Dreaming of Summer.  I love the “dreamy” pose she has!  I thought she would look so cute propped up over a fence, so I made one for her!

**Sometimes, CAS puzzles me as to the “definition” of what it TRULY is.  To me, it is a bit different to some than others.  I feel it to be more like an “art term” where everything is subjective in it’s form and if I have to think about it TOO much, I’m not being “me” and having my fun with it…so I just create weather it is considered simple or not.  🙂  For me, this seemed like a CAS design.**

First, I colored up the image and then stenciled on some clouds behind her.  I took a craft knife and cut out just the bottoms of her elbows.  I stamped another panel with a woodgrain stamp in gray colored ink and then used a punch with a sharp point to create the “planks” for the fence.  I sponged around the edges with more gray ink and then I tucked the fence panel underneath her elbows and attached it to the image panel.  I cut out these pieces with a stitched rectangle die and layered that onto a piece of black cardstock that was layered over an A2 top folding white card base.  Lastly, I added the die cut “hello” with black cardstock in the corner.

Vicki-CCT586-ADU-close

Here’s a closer look at the coloring I’ve done on this image.  I’ve colored her in with Copic markers and then for the tiny butterflies, bees and flowers around her, I’ve used some metallic gel pens to color them with.  You can see the shimmer on them.

I’ve also taken some liquid pearls to place some dots around her as well.  I thought it made her look a bit more whimsical.

You can also see where her elbows are lifted up over the fence panel too.

Vicki-CCT586-ADU-flat

Thanks so much for stopping by!!  See you soon!!

Challenges for this card:

  1.  All Dressed Up Challenge – Anything Goes + ADU image
  2. Craft Rocket – Summer is Coming
  3. Happy Little Stampers – Anything Goes with Dies
  4. Crafting From the Heart – Anything Goes
  5. Crafty Creations – #392 Anything Goes

It’s the April Anything Goes for Cute Card Thursday!

Hello friends!  This week has completely flown by me so very fast!!  I can’t believe how quickly it went and I’m thinking being outside in the warmer weather will make it go even quicker!  Summer will be here soon, right?!

Today is Thursday and also the first Thursday of the month, which means it’s time for our regular “Anything Goes” theme at Cute Card Thursday!  We are also sponsored by our regular monthly sponsor Whimsy Stamps!  So of course, you know I’m going to be using one of those for my creation today:

Vicki-CCT576-WSElfie

Isn’t she just a cutie?!  This newly released digital image is called Elfie from Whimsy Stamps.  I’ve been starting to see a few lady bugs here and there around my area, but I actually don’t like it when they are everywhere!  Otherwise, I can take them on a card and think they’re so cute!

After coloring her up, I cut her out with a stitched circle die and layered another circle with black cardstock behind her.  I also cut out the Whimsy Stamps Friend Word die set with black cardstock and set it aside to work on the rest of my card.

I pulled out this embossing folder with lady bugs (by Darice) and embossed a piece of red cardstock with it.  I took some white ink to lightly go over it to highlight the texture a bit.  I layered this piece onto a piece of black and then layered these over a white A2 sized top folding card base.  The circle image was place towards the right of the card and then I just cut off the excess circle with scissors.

I stamped the “hello” from the Whimsy Stamps Painted Sayings clear stamp set with black ink next to the image.  The “friend” die cut piece was glued at the bottom of the card.  I also took the WS Quick Strips die set to cut out a couple of stitched banners from some shimmer paper and added them to the side of the circle.  Lastly, I’ve put the black gingham ribbon bow over the banner strips and added the lady bugs and sequins to the design.  I filled the sequins with some Nuvo White Blizzard Glitter Drops.

Vicki-CCT576-WSElfie-close

Here’s a closer look at the coloring of this cutie.  I’ve used some Copic markers to color her in and then I’ve used a Wink of Stella Clear Glitter pen to add some shimmer over her wings and the wings on the butterfly.  Here’s the list of Copics I’ve used:

  • Hat, skirt, shoes and ladybug – R39, R37, R35, R32, C8, C5, C3
  • Shirt, leaves – G24, G21, G20
  • Hair – E49, E47, E44, E43
  • Skin – E21, E13, E00, E000, R20

Vicki-CCT576-WSElfie-flat

I think there are so many different ways you could color up this image, but I saw her holding this little ladybug and so I just went with that theme when coloring.  Hope you’ve enjoyed my card today and got inspired!

Challenges I’d like to enter this card for:

  1.  Sketch Saturday – #557 Choose a Sketch
  2. QKR Stampede – Anything Goes #341
  3. Just Us Girls – Wild Card Week – embossing folders
  4. Artistic Inspirations –  #214 Just for Fun (Anything Goes)
  5. Crafting From the Heart – #240 Anything Goes
  6. A Bit More Time to Craft Anything Goes

Hello Cute Chicks!

Hello friends!  Err…should I say “Cute Chicks”!  🙂

I have some more Whimsy Stamps inspiration to share with you today using this sweet image by Crissy Armstrong called Penguin’s Cute Chicks.  Now it may look familiar to you and that’s because it was originally made as a rubber stamp, but starting with this month’s release it has been released in digital format!  So it’s great to now have both options available to you!

vicki-ws-penguincutechicks-jan22

I am a huge penguin fan and Crissy’s penguins are so fun to color!  I have colored this image with the following Copics:

  1.  Penguin Body, Beak, Feet, Cheeks:  C8, C5, C3, C1, C0 – YR18, YR15, YR12 – R00, R000
  2.  Penguin hat & scarf:  E89, E87, E84, E81
  3.  Chicks:  Y38, Y17, Y15, Y11 – Cheeks:  R00
  4. Chick blue & purple ribbons:  B39, B37, B34 – purple:  V17, V15, V12
  5. Egg shell and around image:  BG000
  6. Grass:  YG67, YG63, YG61

(More up-close details below!)

I have also used some fun digital papers from the January digital release called “Oh Boy” digital papers collection.  (You may remember the “Crateful of Kittens” card that I had previously done which was using these same papers.  I’ve used both the striped and solid papers for my card here.  At the top of the striped papers, I used the Whimsy Stamps Pierced Border Trio dies to cut a curvy border.  I cut another piece like that in black cardstock to layer behind it.

I took the WS Painted Sayings clear stamp set and stamped the greeting in the upper left corner of the image panel and I also used the splatter images from the set and stamped some black splatters over the solid colored digital papers.  Before attaching the striped panel to the solid background, I added some white ribbon with a bow and a black button with a bow twine through it.  I attached this to the solid panel and then attached all layers to a white 5″ square top folding card base.

vicki-ws-penguincutechicks-close

Here’s a closer view of the image with my coloring.  For around the edges of the image panel, I took a glue pen and sprinkled on some clear glitter for a bit of a sparkly touch around the design.  I layered this onto a black piece of cardstock and then added some craft foam behind it for a slight dimension and attached it to the card front.

Hope you’ve enjoyed my card today!  Thanks for stopping by!!  I’ll see you back again tomorrow for another really fun project I made!

Challenges I’d like to enter this card for:

  1.  As You Like It – Pearls or Buttons? (I love to add buttons in the center of bows and with different colors it can work on any style you’re designing.)
  2. Crafting From the Heart – #235 Anything Goes

Whimsy Stamps + Anything Goes at Cute Card Thursday!

Hello friends! I’m not only here to share my creation for the new release at Whimsy Stamps, but also another new challenge for Cute Card Thursday which is also being sponsored by Whimsy Stamps this week!  The new challenge for Cute Card Thursday this week is another “Anything Goes“!  We look forward to seeing your creations, plus if you enter this week, you put your name into a draw for a win from our sponsor!  Don’t miss out!

Vicki-Cratefulkittens-Jan3

Now how adorable are these little cuties?!!  This is the newly released digital stamp called Crateful of Kittens from Whimsy Stamps.  I have also paired it with the newly released Oh Boy – Digital Papers.  I thought that the solid yellow and gingham would work nicely with this image to give it a happy feel!  For the sentiment I’ve used the Whimsy Stamps Bold Statements clear stamp set to stamp over some of the yellow solid paper and made my own fishtail banner with it.

I’ve added some white ribbon with a bow to go around the yellow papers and then attached it to an A2 sized white top folding card base.  For the banner, I’ve added a white daisy flower and placed a rhinestone in the center that I’ve colored yellow with a Y17 Copic Marker.

Vicki-CratefulKittens-close

Here’s a closer look for you on how I’ve colored up this image!  I’ve used a stitched square die to cut the image out with and additional die to layer some of the solid yellow digital papers behind it.  For the background of the image panel, I’ve used a cloud stencil and very lightly inked some clouds in the background.  I added some sparkle to the center of the flowers on the image with a glue pen and clear loose glitter.  I’ve also added some dots to their cheeks with a white gel pen.

Here are the Copics I’ve used to color with:

  1.  wooden crate:  E23, E25, E27, 0-blender
  2. Flowers, leaves, grass:  Y11, Y15, Y17, YG61, YG63, YG67, G20, G21, G24
  3. Kitties:  C1, C3, C5, E41, E43, E44, R20 (cheeks), W1, W3, W5

Hope you’ve enjoyed my creation today and see you soon!

Challenges:

  1.  My Time to Craft – Something NEW (New image, new papers and new friends!)
  2. Always Fun – Something NEW (ditto above!)
  3. A Bit More Time to Craft – Anything Goes
  4. Classic DT Challenge – open (Anything Goes)
  5. The Crafty Addicts – Anything Goes with optional:  “It’s a purrfect day!”
  6. Little Red Wagon – Hey Newbie! (new image, new papers and new friends!)