Vivienne on the Beach with Video Tutorial!

Hello friends!  Summer is in full swing over my way and the temperature is typical for August which is hot!  So of course who wouldn’t love a nice relaxing sit at the beach with a cool iced drink on hand!  Happily continuing with my guest design spot, I have another fun creation for you today using this really cute Summer image from Digi Doodle Studios:

Vicki-DDSVivienne-Augvideo

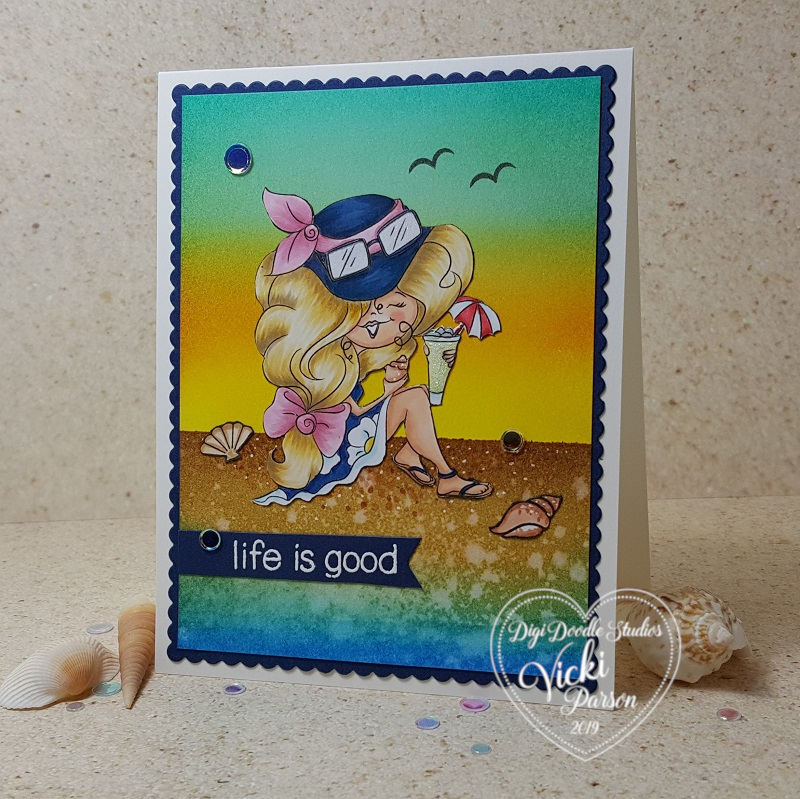
Vivienne Beach Girl is all decked out in her cute navy blue beach outfit holding a sea shell in one hand and a cold drink in the other!  Sounds like a great idea to me!  I had so much fun coloring her in!

I have been asked by several people how I go about doing the ink blending on certain cards that I’ve made in the past.  It’s somewhat difficult to type up exactly what I’m doing when I blend and sometimes it tends to be a bit different depending upon what background and colors I’m creating with as well as the type of scene that I’m making.  So I thought it would just be easiest to create a video tutorial on how I’ve achieved this particular beach scene background:

(To view the video on You Tube, CLICK HERE or watch below)

I didn’t show the coloring of this image in the video, but let me know if this is something you’d like to see in a video from me by leaving me a comment or message somewhere.   It always helps if you let me know that you are interested in something!

Vicki-DDSVivienne-Augvideo-close

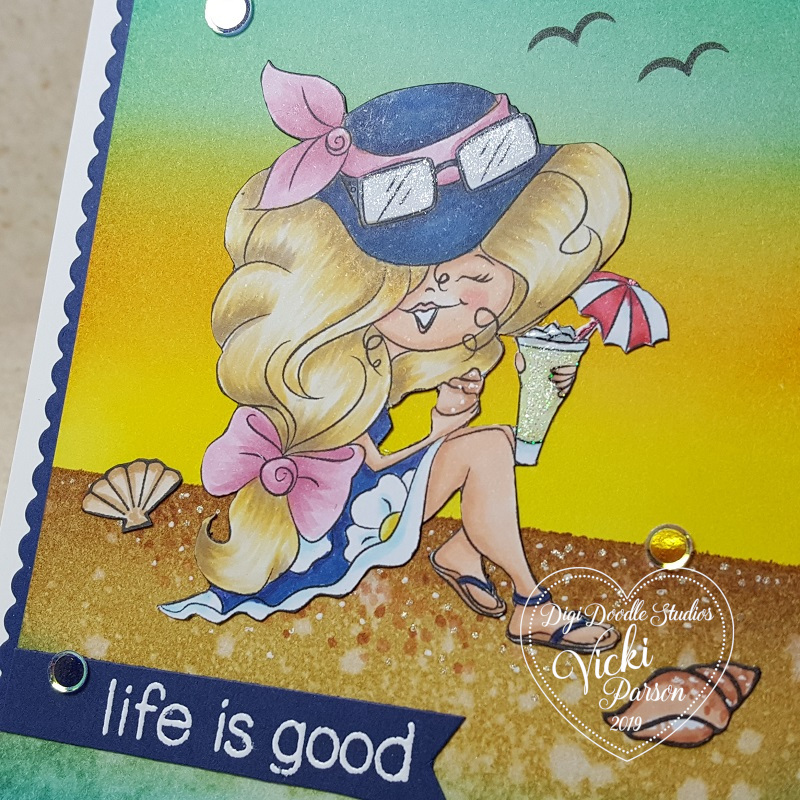
So here’s a closer look at this adorable image and how I’ve colored her with my Copics.  I fussy cut her out and went around the edges with a black marker to hide any imperfections I may have had.  As seen in the video, I’ve attached her to the background and added some shimmer to her sunglasses with a glitter pen, added some liquid glitter glue to her cup and glossy accents on her ice.

Vicki-DDSVivienne-Augvideo-flat

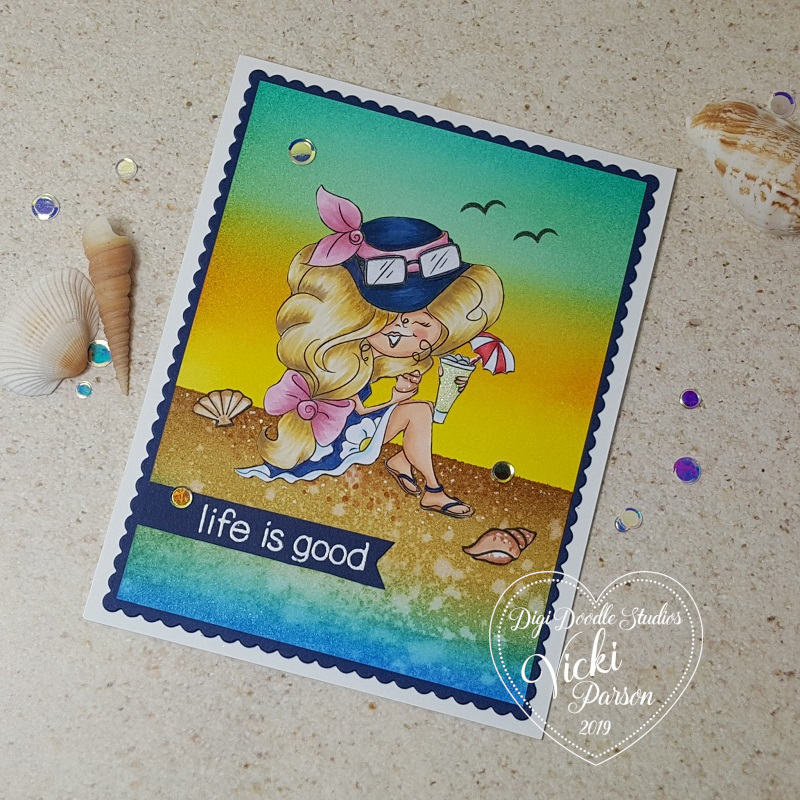
To add details to the card, I’ve used the Lawn Fawn stamp set Life is Good by stamping a couple of sea shells, coloring them in, fussy cutting them out and attaching to the scene. I took a sentiment from the set and white heat embossed it over a navy strip and cut it into a banner. I also took a bird and stamped it in the sky twice with black ink.  I’ve layered the beach scene onto a piece of navy cardstock that was cut with the MFT Blueprints 27 Die-namics die.  I then attached these layers onto a white top folding A2 sized card base.

Lastly, I’ve added some Crystal Clear Confetti from Studio Katia with liquid glue.

Thanks for dropping in and I’ll see you soon!

Challenges I’d like to enter this card for:

  1.  Crafty Friends – Summer Colors
  2. Through the Craftroom Door – Anything Goes
  3. Creatalicious – Anything Goes with optional “Distress It”
  4. TIME OUT – Relaxation with optional 1 layer card
  5. Cardz 4 Galz – Summer fun
  6. Pearly Sparkles – Something beginning with ‘B’ (beach)

Anything Goes at Cute Card Thursday With Curly

Hello friends!  I hope you’re all having a wonderful week so far!!  It’s really starting to feel like Summer now with the warmer temps!

Today is a new challenge this week over at Cute Card Thursday!  This week we have our “Anything Goes” challenge with our sponsor Whimsy Stamps!  So of course, I am using a cute image from Whimsy Stamps for my card today:

Vicki-WSCurly-June6

Tee hee!  This little guy holding the tiny “sea creature” makes me smile and giggle!  I’m not really sure what reaction he has about it!  His name is just as cute too!  This is Curly from Whimsy Stamps.  I thought he needed a scene, so I made one for him.

I started with some Bristol Smooth watercolor paper and masked off the line between the sky and the sand.  I used my Distress Inks to blend in the colors.  After doing the sky, I thought that it was a bit too dark, so what I did was take a baby wipe and swiped it across which lightened up the colors the way I wanted them for the sky.  The bottom “sand” portion was also masked, and I blended the bottom blue color into the sandy colors which created a nice shoreline.  I then took a water bottle and spritzed some water droplets over it to create “texture” for the sand.  I also took some Copic markers to create more texture with the pointillism technique, plus added some white ones with a gel pen.  the water at the bottom was covered with a glitter pen.  (You can see better details in the photos/description below.)

Vicki-WSCurly-June6-close

So, I’ve got him all colored up in the following Copic markers:

  • Flippers/water gear – B32, B34, B37, Y11
  • Swim Trunks – R32, R35, R37, Y11, Y15
  • Sea Creature – BV23, BV29
  • Hair – E41, E43, E44, E47
  • Skin – E000, E00, E02, E11, E21, R20
  • I used gel pens to color lines on trunks and cheeks, I’ve used a glitter pen over the “sea creature” and his flippers along with the bottom water area.

I fussy cut this image and used some liquid glue to attach over my scene.

Vicki-WSCurly-June6-flat

For the scene, I stamped the birds in the sky and a star fish image from an older Whimsy Stamps clear stamp set. I then took the sentiment from the WS Everyday Mini Sentiments and white heat embossed it over a black strip of cardstock and then used my scissors to cut out a banner to attach over the scene.  I layered this over another piece of black cardstock that was attached to an A2 sized top folding white card base.

Lastly, I’ve taken some WS It’s a Party enamel dots and added them to the card.

Hope you’ve enjoyed my card today! Thanks for stopping in!  I’ll be seeing you tomorrow for some fun news!

Challenges for this card:

  1.  A Bit More Time to Craft – Anything Goes
  2. Crafty Friends – Men/Boys
  3. Sweet Stampin’ – World Ocean’s Day/Anything Goes
  4. Use Your Stuff – Summer Fun
  5. Always Fun – Summer Fun
  6. Unicorn – For the Men/Boys

Bubble Bath Beauty

Hello friends!  Yes, I’m still here! LOTS of fun stuff to share!

Today, I have a silly kitty card to share with you today:

Vicki-Bath Cat-May7

Oh my, that face just really cracks me up!!  It’s been several years since I have ever had to give a cat a bath, but I believe that’s pretty much how they feel about water in general.  I have used this Whimsy Stamps digital image called Bath Cat by Crissy Armstong.  (It was previously released as a rubber cling stamp, but now you can also get it in digital format if you prefer that!)

I started out my card with a piece of white cardstock and clear heat embossed several of the solid circle images from the Whimsy Stamps Circles Circles Circles clear stamp set.  I then took a few of the distress ink colors and blended them over the heat embossed circles.  The ink resisted those and then I spritzed it with some water and dapped it with a paper towel for water droplets.  I heat embossed the sentiment with white EP and cut it out in a banner to attach over my background.

The circle inked background was corner chomped on two of the corners and then I placed it over a blue A2 sized top folding card base which I also corner chomped the same two corners on that as well.  I then added the image panel and popped it up over some craft foam to attach to the front of the card.  I then cut off the edge of the circle with my scissors and lastly added some clear sequins to the design.

Vicki-Bath Cat-close-May7

Here’s a closer look at the coloring I’ve done on the kitty.  I’ve used the following Copics to color him in with:

  • Kitty – W7, W5, W3, W1, R11, R00
  • Bathtub – B24, B21
  • Bubbles – BG000
  • Duckie – Y17, Y15, Y13

After I cut the image out with a circle die, I sponged around the edges of it with some of the distress ink I used on the background.  I used a Wink of Stella glitter pen on some of the bubbles and then used some Nuvo White Blizzard Glitter Drops on the water drops.

Vicki-Bath Cat-flat-May7

This one gave me a chuckle and sometimes even when you are feeling yucky, you just want someone to tell you that you are beautiful!

Thanks for dropping in today!  I’ll see you again soon!

Challenges:

  1.  Simply Create Too – Anything Goes (no twist)
  2. Daisy Chain – Anything Goes
  3. Pammie’s Inky Pinkies – PIP1918 Anything Goes
  4. Get Creative – Anything Goes (no twist)
  5. Crafty Animals – Anything Goes + animal

Seeing Stars at Cute Card Thursday

Hello friends and welcome to Thursday already!  It seems like the weeks are quickly going by faster and faster as we close in on the end of the year!  It’s the “crazy crafting season” for sure! LOL!

Today brings up another Cute Card Thursday Challenge and for this week’s challenge, we’d like to see “STARS” on your creations!  I think this is a good one for whatever it is you’re crafting even if it’s Christmas…or not!   I have decided to make mine non-Christmasy this time:

Vicki-CCT556-MFTStarShaker

I am pretty much “out-numbered” with males in my family, so most of my birthday cards are for men and I have a couple more birthdays to celebrate next month, so I thought this was a great opportunity to sneak one into my Christmas card-making time!

All the stamps and dies used on my card today come from My Favorite Things.  (I have recently purchased some Christmas items and look forward to getting my hands crafty with some of it soon!)

I started my card out with the Blueprints 27 scallop rectangle die.  I took some star images from a retired MFT stamp set called “Totally Happy” and randomly stamped them with VersaMark on this card front panel and then heat embossed them with clear embossing powder.  I taped off the scalloped edges so that they wouldn’t get inked.  I’ve used the Blueprint Sketch, Peacock Feathers, Tumbled Glass and Twisted Citron Distress Oxide inks and blended them over the stars for an ink resist effect.  I also spritzed this panel and dabbed it with a paper towel for the water drop look.

I thought it would be fun to make a shaker card, so I die cut a star from this ink blended panel with the MFT Star Shaker Window and Frame Die-namics set and then cut the frame out from some black card stock.

Vicki-CCT556-MFTStarShaker-close

What makes this such an easy shaker card is that MFT also has these Star Shaker Pouches that coordinate with the die!  So I’ve taken this and fit it through the die cut star area on my card front panel and then filled it from the back with some confetti stars, I found some matching-colored seed beads and pretty sparkly silver glitter chunks to fit inside and then covered the back with some white cardstock.  Just love the sound when it shakes because you can hear the seed beads! 🙂

Vicki-CCT556-MFTStarShaker-1

I then took a strip of black card stock and white heat embossed the sentiment (same stamp set mentioned above.) to stamp the greeting.  I first layered the scallop inked panel over a black piece of cardstock and then attached the sentiment strip and cut off the edges to match that layer.  I then mounted this panel over an A2 sized top folding white card base.  I finished it off by adding some silver star sequins filled with some Silver Stickles in the centers of each one.

Sometimes you wonder about “adding too much bling” for a guy, but I think this is a fun shaker birthday card that a male would enjoy too!  Hope you’ve had some fun on my blog today!  I thank you so much for stopping by!  I will see you soon!

Challenges I’d like to enter this card for:

  1.  Challenge Up Your Life – Celebrate/Anniversary, etc.  (Happy 100th Challenge!)
  2. Use Your Stuff – Stars
  3. Crafty Cardmakers – Lots of Layers
  4. Shopping Our Stash – (SOS 380) Tic Tac Toe (I used the middle row going down:  stamps, glitter was handed from my grandma to my mom and then to me..so yeah, older than 5 years probably! LOL & Happy Birthday)
  5. Watercooler Wednesday – WWC196 – “All About Occasions”

SNOW Place Like Home

Hello friends!  Hope you are having a great week so far!  Well I have to say that this card certainly does feel like home where I’m at right now as it’s pretty cold and a bit snowy over my way!  I tried to hold onto Fall for as long as possible!

Whimsy Stamps has come out with another line of really cute digital stamps from CC Designs and this is the first time that I’ve colored one from the new line and I think they’re really cute!  Check out this card I’ve made for you today:

Vicki-WS-Iggy-Nov13

This darling image is called “Iggy” and I just love these sweet little penguins with her! 🙂  Here are the Copics that I’ve used to color her with:

  1.  Coat/fur trimming – BV04, BV02, BV01/W3, W1, W0, blender, white gel pen for dots, blue gel pen to color hearts
  2. boots – W9, W7, W5
  3. Penguins – C8, C5, C3, C1, Y17, R00
  4. Skin/Hair – E23, E21, E11, E00, E000, R20, R00, white gel pen for cheeks
  5. Igloo/Snow – B04, B01, B00, B000

I fussy cut the image long with the ‘ground snow’ and left a spot at the bottom for the sentiment.  I outlined the image with a black marker and attached it to my winter snow background that I’ve made.

To make the background, I took the Stormy Sky, Peacock Feathers and Dusty Concord Oxide inks and a water brush to swirl a pretty winter sky pattern.  I dried it and then took a toothbrush to flick some white paint over it for the snow.  I then took a couple of the snowflake images from the Whimsy Stamps Snow Flurry clear stamp set and white heat embossed them in places on the background.  I’ve also used this same set to heat emboss the “snow” sentiment over a piece of black cardstock that was popped up with foam tape over the image panel and then the rest of the sentiment was stamped in black ink right below the image.

Vicki-WS-Iggy-Nov13-close

Here you can better see a closer look at the details of the coloring.  I’ve also put some shimmer over the entire igloo with a Spectrum Noir glitter brush pen.    Thought I could see it when I took the photo, but of course it’s not showing up!

Vicki-WS-Iggy-Nov13-2

I took the snowy image panel and mounted it over a piece of black cardstock and then took a very thin strip of silver glitter cardstock to lay right next to it over a piece of white card stock.  I took this white card front base and attached it to the left side of a top folding A2 #110 card base.  Lastly, I’ve taken some sequins and attached them to the snowy background for a bit more sparkle.

I hope you’ve enjoyed my card today!  Thanks for dropping in!

Here are the challenges I’d like to enter this card for:

  1.  Creative Inspirations – November Chill
  2. That’s Crafty – Winter Wonderland
  3. QKR Stampede – #321 Anything Goes
  4. Crafting From the Heart – Anything Goes
  5. Artistic Inspirations – Anything Goes

Happy Halloween – All Treats & No Tricks! :)

Hello friends!  I want to thank you thank you thank you from the bottom of my heart for everyone of you that has left such sweet comments full of birthday wishes and lots of kindness that you’ve shared through something we have in common which is creating and sharing smiles!  I so enjoyed the stories that you’ve left about how you share your handmade creations with others.  PLEASE continue to create doing what you love and share those smiles with as many people as you can!  It really makes the world a much better place when we can serve one another in kindness.

I have always loved Halloween as a child and have so many fond memories dressing up each year and thinking about what I would be.  I tried to pass that tradition onto my children, and I dressed up right along with them!  For me, Halloween is full of lots of fun things besides just treats!  I wanted to celebrate those memories with a card today:

Vicki-BM-HalloweenBox

I’ve stamped the trick-or-treaters and bat and then colored them up with my Copic markers and fussy cut them all out and put them aside while I worked on the rest of the card.

For the background of the card, that “tree branch” panel came in the kit, so I ran it through my laminator to foil it…it turned out awesome!  (See photo below!)  I then took my distress inks and blended in a night sky over it.  I spritzed it with water and dried it off with a towel to get the water drop look.

I took this awesome border silhouette die from Impression Obsession and attached to the bottom of the scene for the trick-or-treaters to stand on.  I sponged the bottom edge with white ink.  Speaking of white ink, this is what I used to stamp the sentiment on a piece of black cardstock as well as sponge around the edges with it.  I used the glow-in-the-dark embossing powder over top of it.  (Unfortunately, I couldn’t get a good photo of it glowing in the dark…. but it does, and it looks cool!)  I made a banner with that strip and attached it to the left side of the card and then popped the bat up over it with foam tape.

Vicki-BM-HalloweenBox-foiled

Here you can capture a better look at the foiled tree branch in the background as well as the heat embossed sentiment.  I glued down the mummy girl and then I took foam tape to pop up the Frankenstein for dimension and depth.  I also added some yellow Stickles to the eyes and mouths on the pumpkins.

This card was so fun to do!  Hope you’ve enjoyed it as well!

Wishing you all a very fun Halloween however you choose to spend it!  I think I will be watching some scary movies and eating some popcorn which is something I enjoy doing with hubby!

Challenges I’d like to enter:

  1.  Creative Moments – Anything Goes with optional twist: Spooktacular
  2. Crafty Gals Corner – Halloween Colors
  3. Simon Says Stamp Wednesday – Halloween/Spooky
  4. The House That Stamps Built (O2418) – Anything Goes
  5. Moving Along With the Times – Halloween
  6. Crafty Catz – Anything Goes with an Optional Twist:  Halloween
  7. Always Fun – Halloween

Animal Star Gazers

Good evening friends!  Just swinging by to share a card I made with some cute animal star gazers! 🙂  I thought evening would be an appropriate time to post it:

Vicki-LFUponaStar-Com

When this set first came out from Lawn Fawn called Upon a Star, I knew I had to get it as I fell in love with it.  I really hadn’t used it all that much, so it was great to get it out for a play as I needed to make a commissioned card.  I have created a scene for these critters using masks that I made with my circle die set and some ink blending with my distress inks.  For the stars, I took a brush and splattered some “Super Sparkle Lumiere Paint” watered down a bit while masking off the moon and hill.  The moon was created with some watered-down distress inks and a brush.

I then stamped the critters sitting on top of the grassy hill where I wanted them and colored them in with my Copics.  I took a brush filled with clear water to “take out” the inks on the critters before I did that.  I also took a gray Copic marker to create shadows on the animals as well as draw in my own shadows on the hill.  I took a white gel pen to add some highlights on the animals where I thought the moon would be shining on them.  I also put dots in the center of the bunny’s eyes to make it appear as if a star is reflected in them.

To cut out the image panel, I have used a rectangle frame die which was used to cut out some watercolor cardstock.  I then used the same die and cut out a piece of this gorgeous black glitter cardstock and popped the frame up with foam tape to go around the edges of the image panel design.  I mounted everything over a black A2 sized top folding card base.

Vicki-LFUopnaStar-Com-close

Here’s a closer look at the details.  Here you can better see the shimmer on the moon.  As always you have to get just the right angle for the photograph, but I covered the moon with a Spectrum Noir Glitter Brush Pen.

I took a couple of the tiny solid stars from the stamp set and heat embossed them with Sparkle N Sprinkle Vanilla Ice EP.  Love the way it gives a bit of extra sparkle!  I think the stars really show up beautifully and it always looks better in person of course! 🙂

I do not have a sentiment on this as waiting for instruction on how to proceed with that if necessary.  I’m happy with the way this turned out and look forward to playing with more starry sky creations!

Thanks so much for stopping by this evening and I wish you a wonderful weekend my friends!

Challenges:

  1.  Lawn Fawnatics – Bling It Out!
  2. AAA Cards – Moonlight
  3. Sunny Day Crafting – Animals
  4. The Creative Crafter – Anything Goes
  5. Simon Says Stamp Monday – Starry Night
  6. Simon Says Stamp Wednesday – Animal Antics

Watch Out for Crabs!

Hello friends!  I hope that you’ve had a wonderful 4th of July celebration yesterday!

It’s been a while since I’ve posted!  I have had MANY crafty things going on “behind the scenes” and I will be sharing all with you at another time, so please excuse the gaps in my postings until then.  Hopefully in a few weeks it will calm down a bit and I can post about what I’ve been working on! 🙂

It is already time for another CUTE CARD THURSDAY challenge again!  Where in the world did that week go?!  Really easy peasy “ANYTHING GOES” challenge for you this week, so I hope you will consider adding whatever you’re working on this week to the gallery over there.  The team has plenty of inspiration and there is a wonderful prize from our sponsor, Whimsy Stamps!  I have used one of their images on my card for today…check it out!

Vicki-CCT537-WhimsyCrab

Tee hee!  This crab is just too funny and cute!  I have used the Whimsy Stamps digital image called Crabby Cranston.  I colored him with Copic markers and fussy cut him out and attached him to my beach background with foam tape.

To create the background, I have masked off the top portion, blended some distress ink and then spritzed it with water to give it some texture for the beach sand look.  I’ve also taken a few markers and gel pens to add even more texture to it.  I then masked off the bottom portion and blended some more distress inks for the sky.  I had an old beach sign image (given to me by a friend) that I stamped over top of the sand before I attached the crab.

I cut out the beach scene with a MFT Wonky Stitch rectangle die and printed out my own sentiment that was cut with a MFT banner die to attach at the top of the scene panel.  I then mounted this to an A2 sized top folding white card base.  I then added some Pretty Pink Posh sparkling clear sequins and added some clear Stickles to the centers of each.

Hope you’ve enjoyed my “Life Lesson” for today! 🙂  Thanks so much for dropping in and I will be back again tomorrow with another week of ICAD and another fun creation I’ve been working on!

challenges I would like to enter:

  1.  Creative Fingers – Anything Goes
  2. Just Us Girls (JUGS447) – Wild Card Week Anything Goes
  3. 613 Avenue Create – Anything Goes w/optional twist:  create your own background
  4. Paper Craft Crew (PCC297) – By the Sea