Mix It Up with Inlaid Die Cutting!

Hello friends and happy May!  I hope you are having a wonderful week and have been enjoying your Spring season with lots of sunshine and flowers!  There’s always lots of things to do when the weather turns warmer, but that’s a good thing!

Today starts a new challenge over at the Mix It Up Challenge Blog!  There is always lots of wonderful inspiration from the team, so please go check it out and play along!  The challenges are always ANYTHING GOES with an optional themeThis month’s optional theme is Inlaid Die Cut (flat or raised)!  For these challenges, you have plenty of time to enter as they run for 6 weeks!  I look forward to seeing what you come up with!   Here’s the project I made:

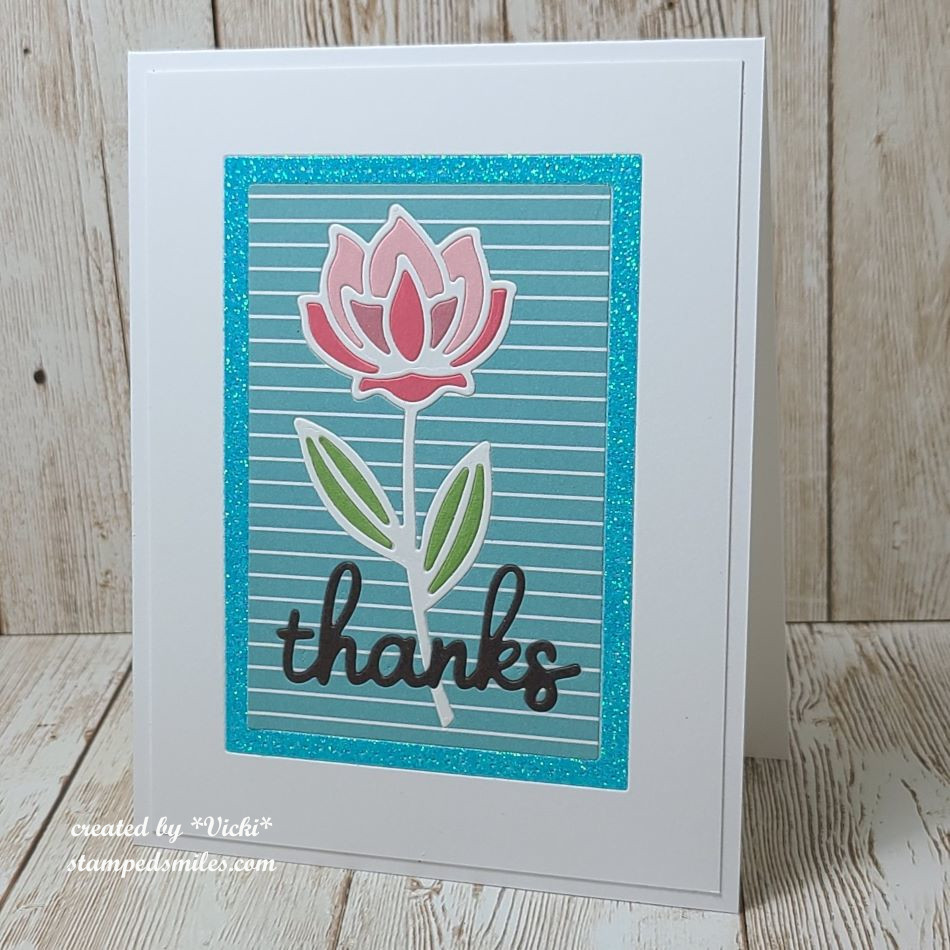
I think this card turned out very well using the inlay die cutting technique!  I found the perfect dies, but of course you can use almost ANY dies you want to try this including your regular shaped die cuts!  I always find those frame style dies to be very easy to work with for this.

I received this cool freebie die from Taylored Expressions called “Simple Stems” and thought it would be perfect for this technique.  I also inlaid a sentiment die from my stash over top of the flower and inlaid that too.  I used the Taylored Expressions Frame in Frame 3 die set to create the middle pattern and glitter frame around the flower.  These were also inlaid into the white card front panel.  

It’s a little tricky at first to figure out in what order to die cut all of your pieces so that it looks right.  Mine is very flat which I find helpful for mailing out and with the cost of postage stamps going up again this Summer, I need to rethink the type of cards I make any more.  Here’s a photo so you can see that everything lays flat to the card front:

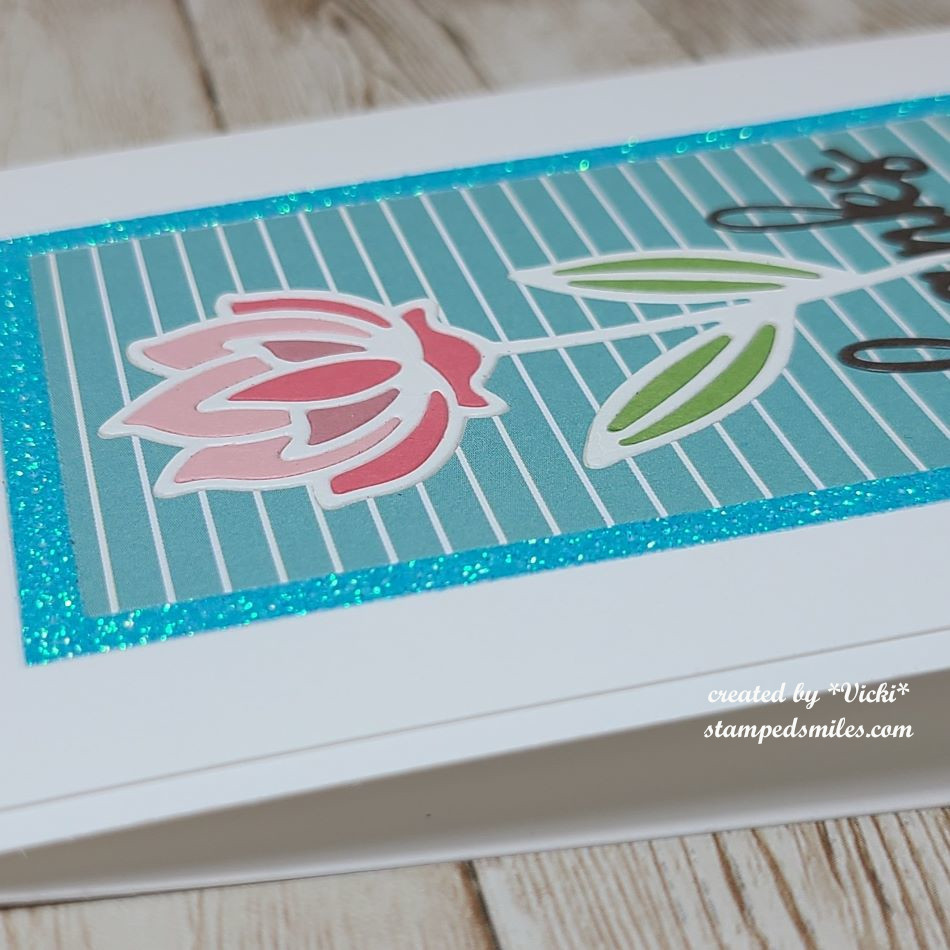
For the inlaid die cutting, I also find sticky sheets very helpful.  I took a piece of double-sided sticky sheet and placed it on the back of the white card front panel AFTER I had cut out the frame from it.  This makes the inside of the panel sticky so that I could lay all of my pieces on top and also keep it flush with the white card front panel.  Once I laid all of the die cut pieces, I took the backing off the sticky sheet and attached it the A2 top folding white card base with everything in place.  You also don’t have to worry about liquid glue oozing out.

It’s a simple CAS card, but it was so fun to do!  Hope you’ve enjoyed my card and take some time to check out the challenge this month!  Thanks so much for dropping in!  See you soon!

Challenges:

  1. Daring Cardmakers – “Something Old, Something New” (old glitter paper and new die cut + I used blue paper)
  2. Simon Says Stamp Monday – Feminine
  3. Moving Along With the Times – #166 Flowers

Occasional Blooms

Hello friends!  I hope that you’re having a wonderful week!  I’m excited about the changes I’m seeing outside with the weather!  Looking forward to that cooler temperature and pretty colors!

  • I wanted to do a bit of “house keeping” regarding my blog.  I apologize if you’re having problems trying to leave a comment.  I’ve had a few people contact me about this and I noticed that when I cleared the “cookies/cache” from my end…it somehow changed the appearance of my blog comment area…I don’t know why!?  I did find out that if you start typing in the comment box, buttons above the box will appear in which you can choose how to login.  I suggest that if you don’t have a WordPress/Gravatar account, to choose the envelope button to leave your name and e-mail address that way. (The Facebook login does not work.)  Then you can hit the reply button below the box to publish it.  I tried letting the commenter leave an anonymous reply (without having to type in name and e-mail), but then I’ll have NO idea who it is unless a name is given within the comment, so I had to re-engage that again.  I have also contacted a support person to help me navigate what’s going on and maybe I can get it back the way it was before.  I do apologize if it’s giving you a problem.  You can also go to gravatar.com to create an account which will work with ANY WordPress platform blog….but you don’t have to unless you want to do that!  You should still be able to leave a comment regardless.  Thank you for taking the time to care enough to share your support with me…I deeply appreciate it!

So now to get on with some crafting projects!  I’ve had to change gears on the seasonal makes and create some cards that I needed to send out to some people and they all happen to be in blooms:

First up is a “thinking of you” card creating for a friend using several Lisa Horton products.  These particular LH products all came from Inky Stamper.

I started with the craft background and embossed it with the LH Variegated Leaf 3D embossing folder and went over the texture with white ink.  I then used the LH Hydrangea Stencil/Die/Embossing Folder to create the blooms…love how it turned out!  I took some gold ink on the last layer of the stencil to go over the centers of the flowers.  I popped the bloom up over the embossed craft background and white heat embossed the sentiment from the IS Pig Cause stamp set and cut it out in a banner to place over the blooms.  I finished it with some gold gems.

My next card is a sympathy card needed for a craft friend who lost a loved one.  This person likes to cross-stitch and quilt, so I thought this MFT stitched quilt die (this one retired) would be fun to do over some pretty floral papers.  I had to die cut several white frames with it and lay the centers of the paper cut pieces on the first frame and then I layered two more of the white frames over top with the last pattern paper over that to give it that 3D look.  (Not sure where the paper came from other my stash!)

I cut the sentiment from the Whimsy Stamps Sympathy/Heartfelt/Condolences die set and layered it in the same way I did the quilt frame die.  I also white heat embossed the sentiment from the WS Deepest Sympathy stamp set and cut it out from a banner to attach right underneath the “p” in the die cut word.  I finished this one off with some clear gems.

And on a happier note, I’ve made another bloom card to wish someone turning 75 years young a happy birthday!  This is the first chance I’ve had to use this fun die set from Taylored Expressions!  The bottom container came from the TE Antique Pails die set.   I stamped the TE Burlap Background over it with the same color ink as the cardstock as well as Butter Cream ink to give it some texture.  The flower arrangement was cut out from the TE Garden Variety die set in various colors.  I also brushed some of the same colors in the centers of the flowers.  The centers of the flowers have a silver metallic enamel dot.

For the frame, I’ve used the TE Diagonal Stitch Rectangle die that only leaves the marks but doesn’t cut anything out.  The sentiment was stamped and cut out with the TE All Together-Occasions 2 set/die and popped up with foam squares over the panel.

I think the most fun was arranging the flowers in the container!

I hope you’ve enjoyed my cards today and you’ve been inspired!  Thank you so much for stopping by!  I appreciate you!  Have a wonderful weekend!

Challenges:

  1. Addicted to Stamps & More – Any Occasion
  2. The Sisterhood of Crafters – Die Cuts/Anything Goes
  3. Lil’ Patch of Crafty Friends – Anything Goes
  4. Pammie’s Inky Pinkies – Anything Goes
  5. Cardz 4 Galz – Use a Stencil, a Sentiment, an Image (top card only)
  6. Crafts Galore Encore – Anything Goes
  7. 613 Avenue Create – Anything Goes no twist
  8. The Corrosive – Anything Goes