June Art Journal Page-Positive Thoughts and Positive News!

Hello friends and welcome to the weekend!  June has seemed to go by so very fast and I don’t know how time seems to keep flying by, but I think keeping busy is the best thing to do to stay in a positive mind set.  I also have some positive news at the bottom of this post!

Speaking of positive….it’s our monthly AJ page with my crafty friend Carol (from Crafty-Stamper) who is collaborating with me to “SMASH OUR STASH”! We get creative trying to use up our never-ending stash piles along with a prompt for each month.  I know she always has great inspiration to share, so please check out her blog too! Here’s my AJ page with the “SMASH OUR STASH” JUNE prompt of “ABSTRACT FIGURE(S) or SHAPE(S)”: 

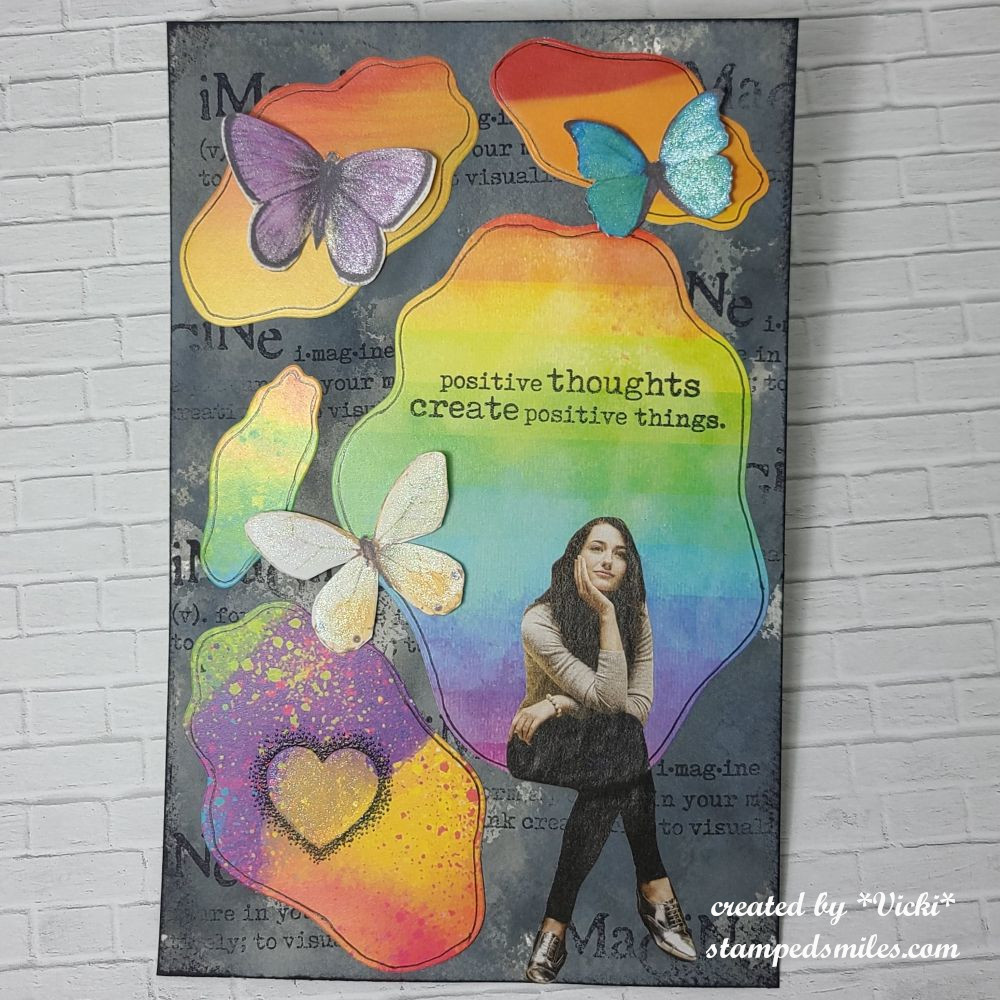
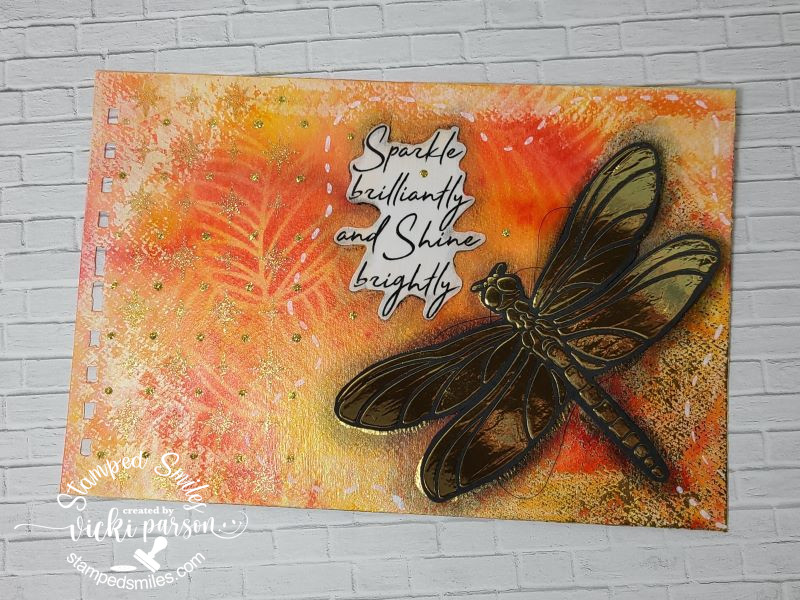
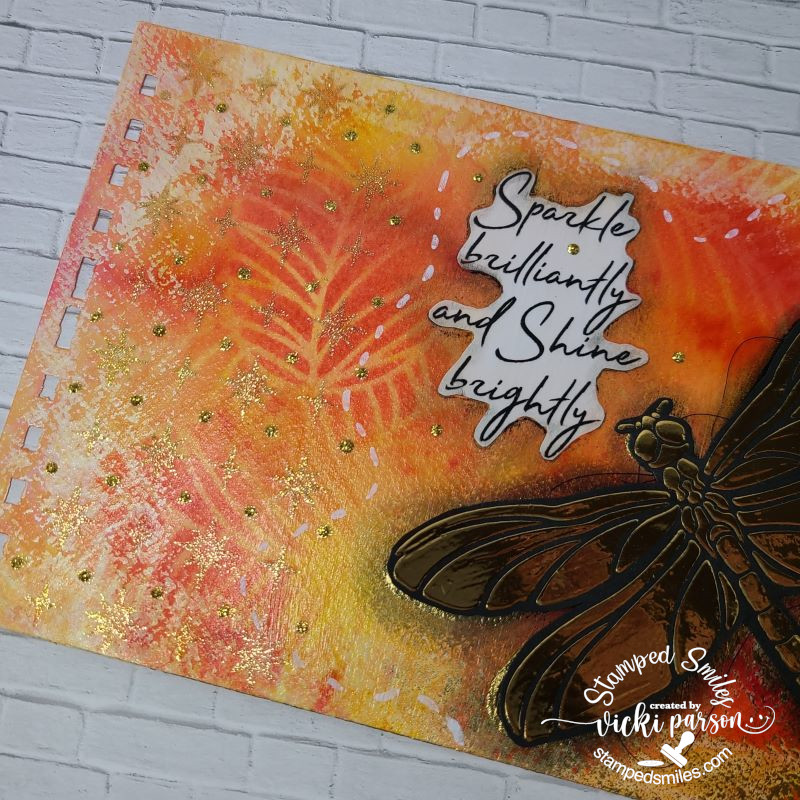
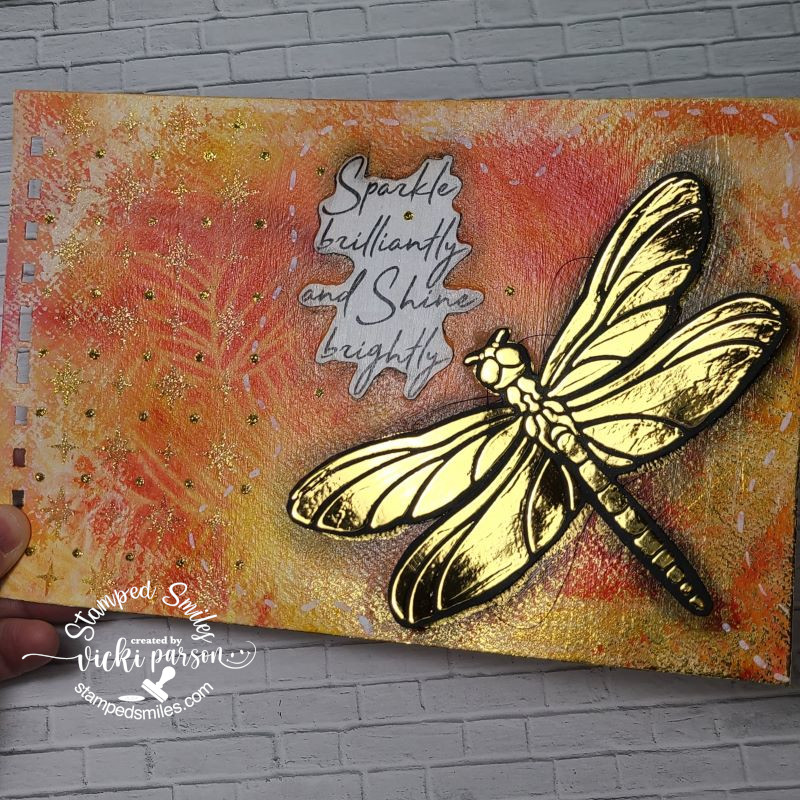
I didn’t really have a plan in place when starting my page.  I happened to remember these fun nesting dies that I had which remind me of a body of water/pond, but I thought they would work great for the “ABSTRACT SHAPE” prompt for this month.  I started thinking of a rock or cave with these holes or crevasses where a rainbow light is coming through and a girl is in deep positive thought where butterflies are floating above her.

For the background:  I started with a 8.5″x5.5″ watercolor cardstock and the oxide inks in Black Soot, Hickory Smoke and Pumice Stone.  I rubbed the ink pads onto a glass surface, sprayed with water and “smooshed” the paper multiple times after drying with a heat tool in a process of about three times.  I then stamped the “IMAGINE” definition text all over the background and went around the edges with black ink.

Each die cut shape was cut from a rainbow paper pad that I lined around the edges with a black marker.  I black heat embossed the heart and the sentiment above the girl.  The girl was cut from a magazine and placed on the largest rainbow shape so that her feet were dangling off.  The butterflies were cut from a printed file and attached randomly over the page.  Lastly, I covered each butterfly and the center of the heart with a glitter brush pen.  You may be able to see some of the shimmer in the photo.

I hope that you’ve enjoyed my AJ page today!  Thank you so much for checking out what I’m doing over here!  I appreciate your kind thoughts!  I’ll be seeing you soon!

Challenges:

  1. Art Journal Journey – People
  2. Try It On Tuesday – Add Some Text (not one word/greeting)
  3. Simon Says Stamp Wednesday challenge – Anything Goes
  4. Creative Artiste Anything Goes Mixed Media
  5. Anything Goes in a Card Free Zone – No cards

Positive news!  My first grandson was born this week!  He’s the most precious thing I’ve ever seen!  I didn’t want to leave, so I hope I can come back very soon to see him again!❤️

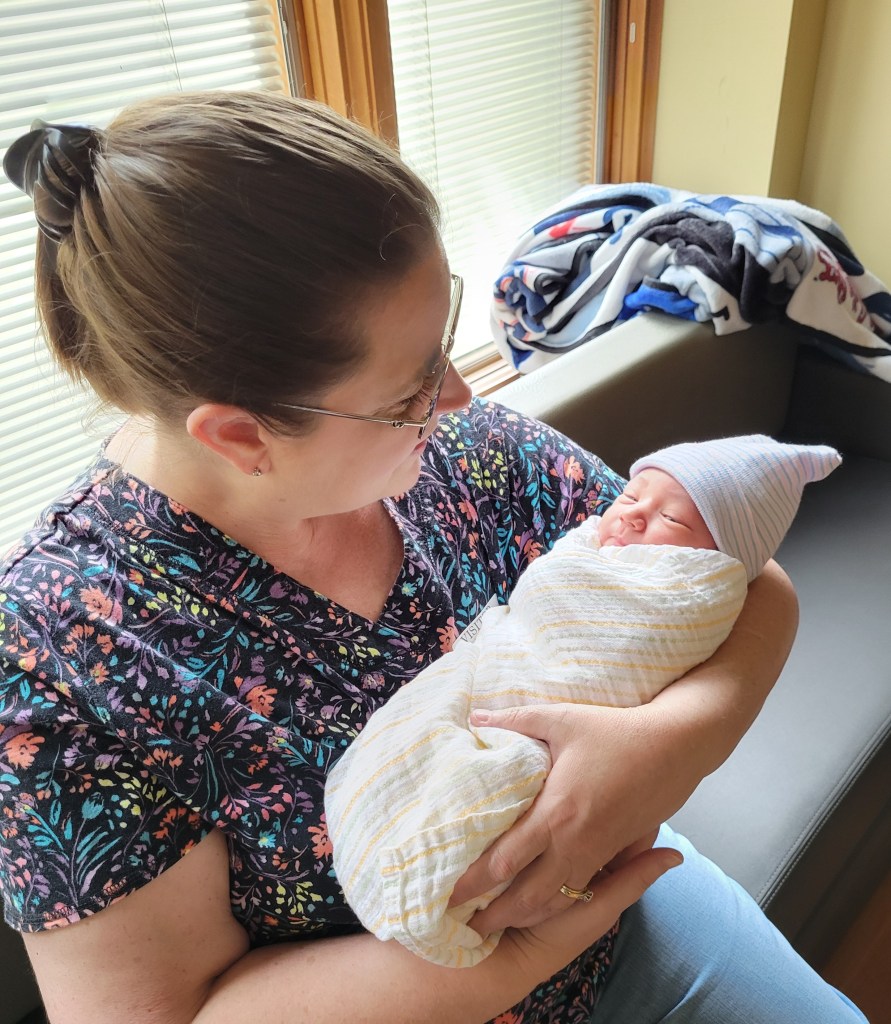
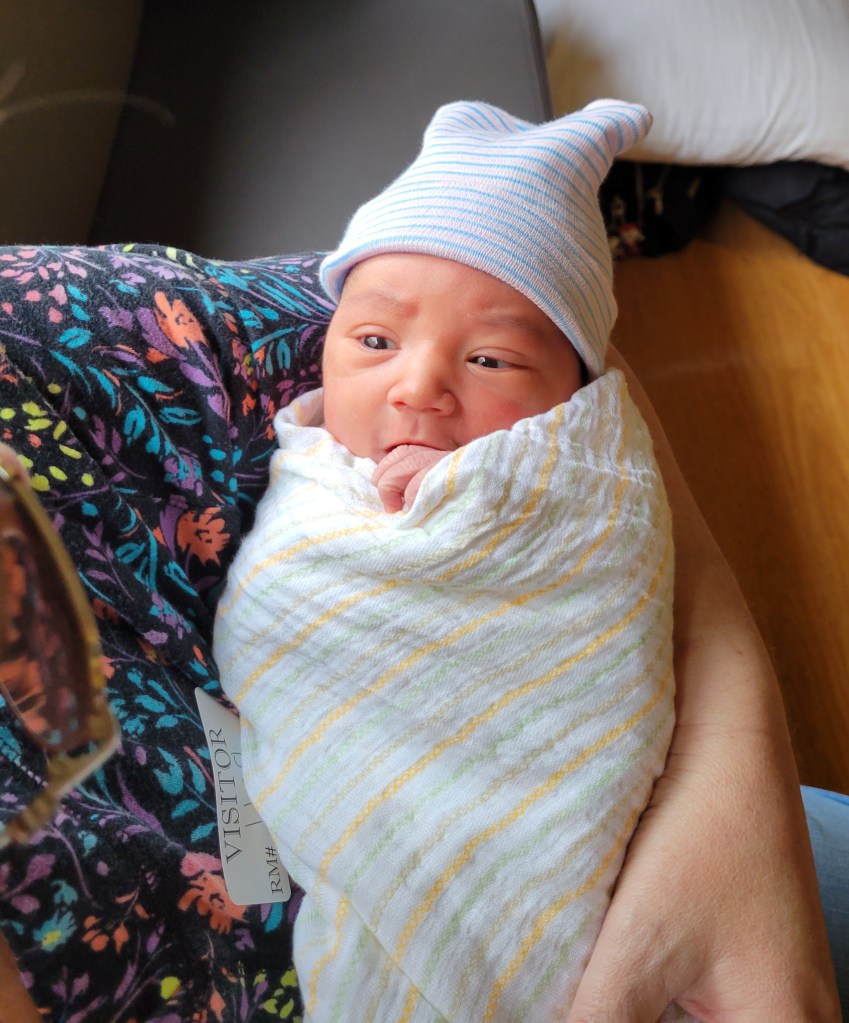
This is me having a lovely conversation with him.  LOL

May Art Journal Page-BEE YOU

Hello friends!  Here we are at the end of another month for the year!  It seems like we’ve only just barely started the year and now it’s almost at the halfway point?  Time seems to fly away!  Which reminds me that today is our monthly art journal page!

Yes, it’s our monthly AJ page with my crafty friend Carol (from Crafty-Stamper) who is collaborating with me to “SMASH OUR STASH”! We get creative trying to use up our never-ending stash piles along with a prompt for each month.  I know she always has great inspiration to share, so please check out her blog too! Here’s my AJ page with the “SMASH OUR STASH” MAY prompt of “WINGS”: 

There happens to be wings on many things, but my attention has been focused on bees lately.  I have been working on several projects and this was one of the things that I had used on something, so I thought I’d print me out an additional one to use on this month’s page!  (This image is a digital file that I printed out and hand cut with scissors.)

For the background:  I started with 8.5″x 5.5″Bristol Smooth Watercolor paper that I chomped the corners to get a rounded edge.  I used a Dina Wakley Media Stencil along with yellow tones Oxide Distress inks to blend over it.  While the stencil was still in place, I used a text stamp to go over it with brown ink. (water proof).  Lifted off the stencil and added some more bright yellow ink in various places and then spritzed it with water to blend a bit.  Since the text ink was water proof…it didn’t run.  I then went around the edges with brown ink and then splattered the entire page with gold watercolor.

I die cut the hexagon and drip corner with gold mirror cardstock and attached to page.  I used a black marker to make the “bee lines” and “bee antennas”.  I took the fussy cut bee and popped him up with foam tape over the marker lines.  I then used some glitter paint to paint over his wings.  (I’m glad it shows up nicely in the photo.)

Lastly, I cut out the letters for the sentiment in “BEE”.  for the “you”, I white heat embossed a sentiment that originally says “you are” and then die cut it out with a coordinating die.  I cut off the “are” portion so that I could use just the “you” to place under my “BEE” lettering.

Thanks so much for checking in today!  I hope you’ve enjoyed my page!  I will be back next week to share some items that I’ve been working on!  Have a great weekend!

Challenges:

  1. Art Journal Journey – Must Have Wings
  2. Simon Says Stamp Monday – Emboss It (embossed “you”)
  3. Try it On Tuesday – Things with Wings
  4. Anything Goes in a Card Free Zone – May Anything Goes- no cards
  5. Creative Artiste Anything Goes Mixed Media

Art Journal Inspiration-Fireflies and Gallery full of card classes!

Hello friends!  I hope that your week has been going great!  I had planned on posting earlier in the week, but I got so focused on completing my classes that I ran out of time!  (Check out the gallery below…LOTS of cards!)  I thought while I’m working on laundry today, I’d make a post sharing some things I’ve been doing…so grab yourself a beverage and take some time to enjoy!  First up is my art journal page:

  • Remember that I’m a guest host over at Art Journal Journey this month and the theme that I’ve chosen is “LIGHT“.  I hope you’ll stop over to see all of the wonderful inspiration that everyone has been creating with this theme and join in the fun!  

This so reminds me of Summer!  Remember as a child going outside in the dark and seeing tons of those flashing lights going off?!  I was always amazed that when I ran over to chase that flashing light, it disappeared on me and I was forever trying to capture those lights!

For the background:  I’ve chosen some Bristol Smooth cardstock in 5.5″x8.5″ pre-punched holes at the top cut with my Zutter machine.  I have started with stamping the jar and placing it where I thought it needed to be and then stamped those fireflies around it.  Starting with the fireflies, I dabbed on some yellow where they emit light and then used some soft blue around them working out with darker shades of blues as I reached the edges.  Bristol cardstock works great for ink blending with Distress Oxides.  To make sure that the yellow light was showing over the dark ink (without smudging it), I took some yellow paint and the end of my paint brush to make various sized yellow dots for the look of those fireflies in the distance.

I decided to take a leaf branch to generation stamp it along the edge for the illusion of a tree being there.  Although it looks black, I die cut a grass border in very dark green cardstock for the bottom portion of the page.  I also added another firefly at the bottom that was die cut and popped up with foam tape.  I used yellow ink for underneath his light glow.  The firefly wings have been covered with a glitter brush pen.

For the bottom lettering:  I printed it off my computer and then cut out each word, added some color with inks over them and then doodled around each word with a pen.  These words and this AJ page was totally inspired from a song called “Fireflies” by Owl City.  If you’re interested in listening to the song, check out the video below:

I learned that this song artist has insomnia and came up with this song during one of those times he had trouble sleeping.  I can relate and so it inspired my light page.


Next, I would like to share with you a card class event that I took part in called “Celebrations Delivered” provided by Scrapbook & Cards Today magazine.   It was a one day event with virtual live learning class videos and each instructor provided at least 3 different projects.  I have listed below each photo who the class instructor was.  

  • If you are on my website, just click on each photo to enlarge it and see the details about each one underneath the photo.  I have made 15 total cards from this:

Really had fun making these and using the products provided to us.  This also reminds me that I have more classes coming soon that I’ll be doing and that I’ve also forgotten to share some things that I had done last year, but hadn’t posted!  If anything else, you can hopefully enjoy or be inspired in some way as I post!  But more will come soon if my arms don’t fall off!😉

Thank you so much for stopping in today and I’m happy you’re here!  I will be dropping around to see what everyone is up to and I will be back on Saturday for our “Smash Your Stash” AJ inspiration!  Have a wonderful day!

Challenges:

  1. Art Journal Journey – LIGHT/KEEPING IT LIGHT 
  2. Simon Says Stamp Monday – NOT a card (art journal page at top)
  3. Try It On Tuesday – Spotlight It!  (Fireflies are spotlighted with yellow dots)  Hopefully this works for the challenge!

Bugging Out With Sketches

Hello friends!  I hope you’re having a good week so far and staying safe wherever you are in the world.  Sending hugs to all experiencing a troubled time.  I hope that my post can bring a smile to you today.

I needed to create some get well type of cards and so I thought I’d try to incorporate some challenges while working on them which helps me to concentrate more in what I’m doing and maybe think outside the box a bit.

My first card is made with the Beccy’s Place Challenge freebie this month and she also challenged us with a sketch which I’ve decided to use for my card. (see sketch below)  I was really happy to use up some more pattern papers with it and I also decided to add a tiny dragonfly at the top to enter another challenge and to adhere to my “bug” theme today!

I printed the image in black and white and colored with Copics.  The dragonfly and the center pink strip were stamps that I cut out and added to the design.  The rest is pattern paper from my stash except the scalloped kraft border in the center that I cut out with a die.  I stamped the sentiment and cut it out to go with my twine around it. *You will notice in ALL of these cards that I’ve used some sparkly gems.  I wasn’t aware until posting them!  I must be on a kick of wanting to use them!*

Challenges for 1st card:

  1. Beccy’s Place – August challenge + sketch
  2. Paper Dragonfly Creative – Anything Flies (Goes) or Party
  3. Kreativ-Tanten – Anything Goes
  4. The Crafty Addicts – Anything Goes
  5. Crafty Calendar – Anything Goes
  6. Dragonfly Dreams – Dragonflies

And for this next card, I’ve played with a large bug:

Around my area this time of year, you can hear the sound of these cicada bugs with their distinct noise throughout the trees.  My husband likes the sound when a bird catches one! EEW!  This bug is a cute one from Inky Stamper called Cicada and I’ve colored it up with pencils this time.  Hard to see, but I’ve also added some shimmer with a glitter pen on his wings.

I’ve used the Picket Fence Tree Bark stencil over kraft on the background and then splattered it with brown and white paint. The leaves under the bug and the accent came from the Lisa Horton Variegated Leaf EF+die that I cut over light green cardstock.  I used some metallic green wax to go over the details in them.  I also used some gel pens to make some doodles around the strip, the circle and under the sentiment along with following a sketch. (details below) You will also notice more sparkly gems!  I’m also entering this in the Inky Stamper FB challenge this month which is using an IS bug image.

Challenges for card

  1. Sketch Saturday – #732 sketch + twist: add a doodle
  2. Creative Knockouts – #501 Anything Goes
  3. We Love Stamping – Masculine
  4. Lil’ Patch of Crafty Friends – Anything Goes
  5. Pammie’s Inky Pinkies – Anything Goes
  6. A Place to Start – Anything Goes optional: leaves/trees
  7. The Corrosive – Anything Goes

For my last card I decided to keep this one simple’ish’:

So, I know these aren’t real bugs because I’m not squealing, but these guys are too cute! They’re popping up out of the dirt for a special greeting!  I mixed in both a new and older stamp set from Lawn Fawn on this one. I’ve used another sketch for this one and decided to keep it very simple.  The hardest part of this was the coloring which honestly wasn’t all that difficult either because they’re small images.  I’ve also added some shimmer with a glitter pen on the wings and of course, there’s those sparkly gems again!

Challenges for card

  1. Sunday Stamps – SSC316 in the corner sketch
  2. The Paper Players – CAS using any Bug
  3. Simon Says Stamp Wednesday – Clean and Simple
  4. Krafty Chicks – CAS (Clean and Simple)

Thanks so much for stopping by today!  I appreciate your time and thoughts!  I’ll be seeing you again on Saturday with another AJ page!

April AJ Page Sparkle and Shine

Hello friends!  I can’t believe that it’s already at the end of the month!  I feel like this month went by very quickly, but as the weather gets warmer, it seems the more I want to be out.  Spring is always a great time to start seeing those pretty flowers which also means more weeds to pull too!

It’s time for the monthly Art Journal Page collaboration with my crafty friend, Carol (from Crafty-Stamper)! We get creative trying to use up our never-ending stash piles along with a prompt for each month.  I know she will have some wonderful inspiration to share, so please check out her blog too! Here’s my AJ page with the “SMASH OUR STASH” April prompt of “SHINNY/SPARKLY” :

I am a sucker for anything that shines or sparkles!  So of course I had so many things to choose from in my stash to play with!  I really had loads of fun making this one and the photos do not look quite as “wow” as it does in person of course, but you can probably guess what it may seem like once you know all what I’ve done.

For the background:  I used my normal pre-punched holes on a 6″x9″ watercolor paper and covered it with water spritzing and Brushos Crystal Color media in lemon, orange and brilliant red.  Once dried, I went around the edges with a scrapper and white gesso.  (I didn’t use a ton of it, just enough to make a scant frame.  Once that was dried, I took a leafy stencil with coordinating colored Distress Oxide inks and sponged over the page randomly.  I then spritzed with large water drops, once dry, I sprayed the whole page with shimmer spray.

On the dragonfly, you can see directly on the page a bit of a shinny gold shadow under the wings.  I have this dragonfly stencil that I used Deco Stencil Paste over that when dry, you can foil over it.  I did that directly on the page where I wanted the dragonfly and then again on a black piece of cardstock that was cut out.  I added some black string (This was a stray piece of string from a project that I did not use, so I decided to re-use it for this project) around the dragonfly, glued the center down over top the one on the page and then used black foam tape over the wings to give them a bit of a lift.  Before gluing down the cut out dragonfly, I used a gray Big Brush marker to create more shadows around it.  I also used a white Big Brush marker to create the dash lines around the page.

The sentiment was a piece that was cut out from a magazine that I recycled to use for this page and attached it with media paste.  I used the grey Big Brush marker to add some shadows around it as well.

On the left side of the page, you can see some gold sparkles which were created with another Tim Holtz Christmas stencil that I had which looked like fun sparkle images.  I used some gold glitter paste to go over that and then I took some gold Stickles glue to add some details with dots in various places.

And this is just one more photo of trying to capture that shine and sparkle:

Perhaps you can see more of the shine and sparkles in there.  I just had to move the page around in the light to get it in just the “right spot” to capture it better, so pardon my fingers in there.

Really hope you’ve enjoyed my AJ page today and gotten some inspiration!  Thanks so much for stopping in!  I’ll be seeing you again soon!

Challenges:

  1. Country View – Things with Wings
  2. Art Journal Journey – Recycle, Reuse, Repurpose (black string & sentiment)
  3. Creative Moments – Wings and Things
  4. Arty Divas – Anything Goes
  5. Crafting From the Heart – Anything Goes-no cards *First challenge*

Pray Until Something Happens With Inky Stamper

Hello friends!  How is your Summer going?  It seems like it is really flying by for me!  After getting back from the wedding, I have a PILE of things to get finished up, literally!  I signed up for classes knowing that I couldn’t participate during the class time, but figured I would finish them up on my own, so along with doing that I’ve decided to also throw in a current challenge project as well and share that today:

So, this cute little fella came from Inky Stamper called Praying Mantis, of course.  The challenge for the month of July in the Inky Stamper Inkspiration FB Group calls for “watercolor” of any kind and so I pulled out my Zig CC Real Brush markers to color him with, cut him out with the coordinating die and even added a bit of the Liquid Pixie Dust on his wing.

For the watercolor on the background, I’ve used an Inky Stamper Watercolor Panel and ran a few different colored Distress Oxide ink pads over it without touching the colors.  I then spritzed it with water to saturate and let the colors run together over it.  I picked up any extras on my glass mat to completely cover the panel and then I took the Picket Fence Geo Squares Stencil and laid it over top while it was wet, pressed it in and let it just sit until it was dry. I picked up the stencil that had dried ink on it, spritzed it with water and turned the stencil the other way with the ink on it and pressed it onto the panel again and let it dry.  This is how the darker ink color showed up on the lighter end.  I took some green and black watercolor to spritz over top.  Really fun background to play with!

I then white heat embossed a sentiment over a black strip and attached it to the bottom portion of the background and then die cut the panel with a double-stitched rectangle die.  I used foam squares to pop up the bug and wrapped some Doodlebug Limeade Twine under the sentiment.  This panel was layered over a black piece which was attached to a top folding A2 white card base.  I finished it with some Doodlebug rhinestones.

And continuing on with my “Inky Stamper projects”, There was an OOAK event a few days before I left.  I didn’t have time to do my projects during the time but finished them up when I returned.  We made this fun and unique fold design with a gorgeous butterfly and then of course the mini card to go along with it. 

For mine, I colored the butterfly with Copics, popped up the wings with foam tape and added some of that Liquid Pixie Dust which is hard to see in the photo.  Then for the mini card, I used some watercolor to color the hydrangea with.  The sentiment was white heat embossed.

Super fun projects as always! (I usually make my “mini card” into TWO ATCs, I just did the one so far here.)

And for my last set of “Inky Stamper projects”, this was for a special class Chelsea held during the time that I was gone.  Even though I wasn’t able to attend the fun and games with them live, I went ahead and purchased the kit anyway so I could watch the video at a later date to make all of these fun projects centered around this ADORABLE Sloth!

I pretty much followed along with the way the class projects were made.  I added some gold thread on the card in the back with the clocks so that it could hang from the sloth’s claw.  I added a glittery heart for the treat container for the sloth to hold as well.  The candy inside the container are slow pokes!! 😂   Super cute and fun projects to make!  I sort of treated myself to the candy while I was creating!

I also think that there were a few days where I could relate to the sloth too, but glad to get things done!

Really hope you’ve enjoyed my projects that I’ve shared today and are inspired in some way too!  Thanks so much for stopping in today…I’ll be sharing more soon! 😉

Challenges: (For top card only)

  1. Happy Little Stamper Watercolour – Anything Goes + watercolor
  2. Happy Little Stamper Stencil – Anything Goes + stencil
  3. Aud Sentiments – Anything Goes + sentiment
  4. As You Like It – Favorite warm/cool colors and why? (Always been attracted to the cool tones even as a child!)
  5. Krafty Chicks – Week 1: Stamp Act
  6. Crafty Catz Anything Goes
  7. Creative Fingers – #235 Anything Goes
  8. Colour Crazy Craft – Week 27: Anything Goes + coloring
  9. Pammie’s Inky Pinkies – PIP2228 Anything Goes