Foxy Skater Spinner Card in Action With Video Tutorial!

Hello friends!  Really feeling the cold air around here, so I’m still thinking in winter mode and have another interactive winter card to share with you again today!  (Please be sure to check out THIS POST to see another interactive winter card and video tutorial if you’ve missed my last posting!)

What’s a better way to embrace the cold than to create interactive cards in your nice warm crafty space, right?!  So sit back, have a warm sip and get creative with me today!

Vicki-DDS-Spinner Fox Card video

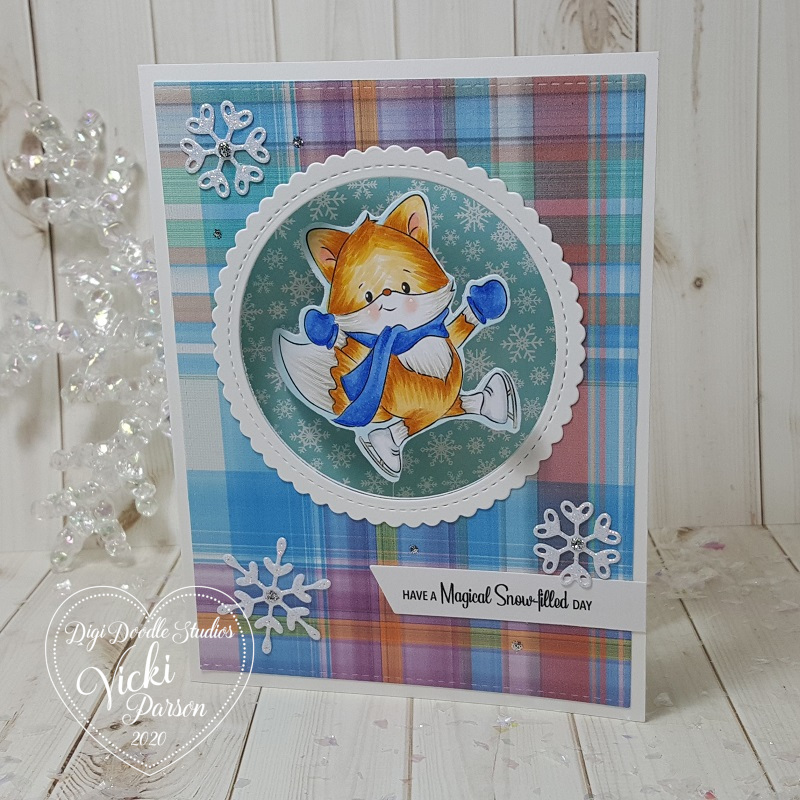
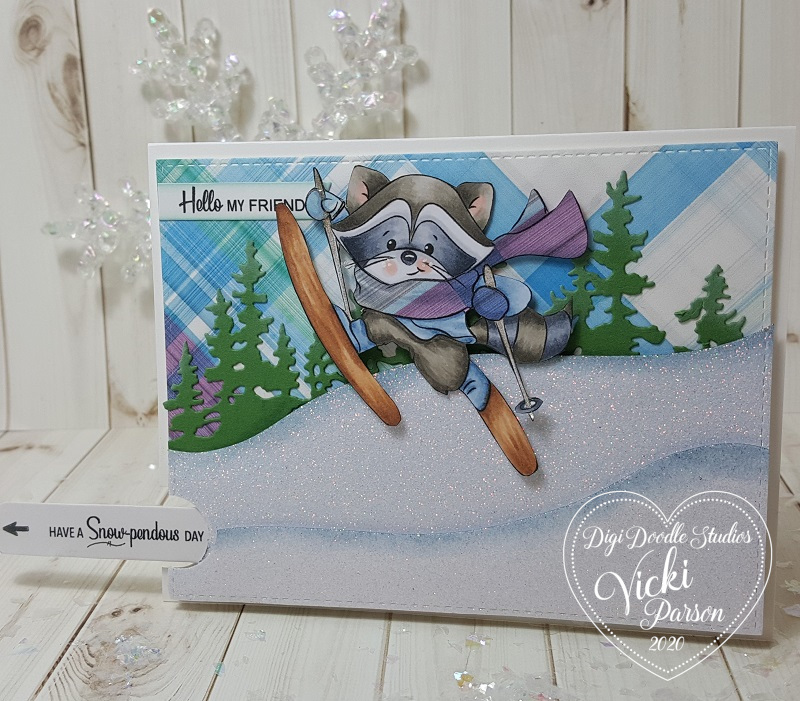
This cute little guy is so fun to watch him spin around doing his cool ice skating trick!  I’ve used the Foxy Skater image from Digi Doodle Studios for my card here along with the Winter Plaids N’ Patterns Digi Paper Pack and Snow Days Sentiments set as well!

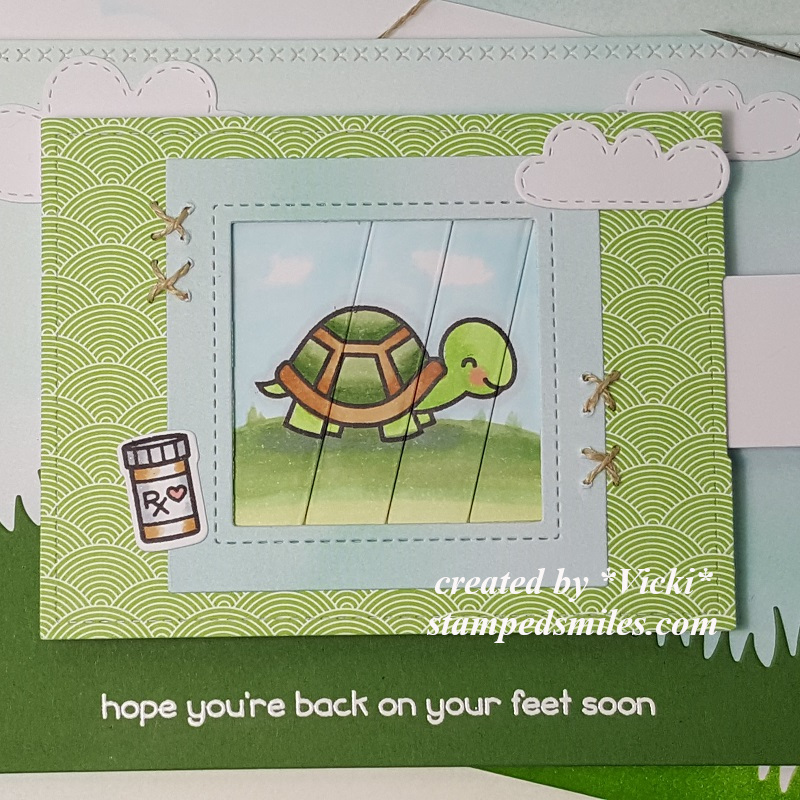
I’ve used several dies from My Favorite Things for the front of the card!  I’ve cut out the plaid papers with the A2 Stiched Rectangle die and mounted it over an A2 sized side folding white card base.  The spinner “window” was cut out with a Circle die that was also used to cut the center for the Scallop Stitched Circle frame around the opening.  The sentiment was printed out and cut with the MFT Slanted Banners die (not finding link in store).  I’ve also used MFT dies for the snowflakes (also not shown in store), that was cut from some Brutus Monroe Fallen Snow Glitterstock.  I’ve added some silver Stickles to the centers of the snowflakes and dotted around the front of the card.

I’ve also used some snowflake papers for the inside area of the card from the Candy Land Paper Pack from MFT as well!

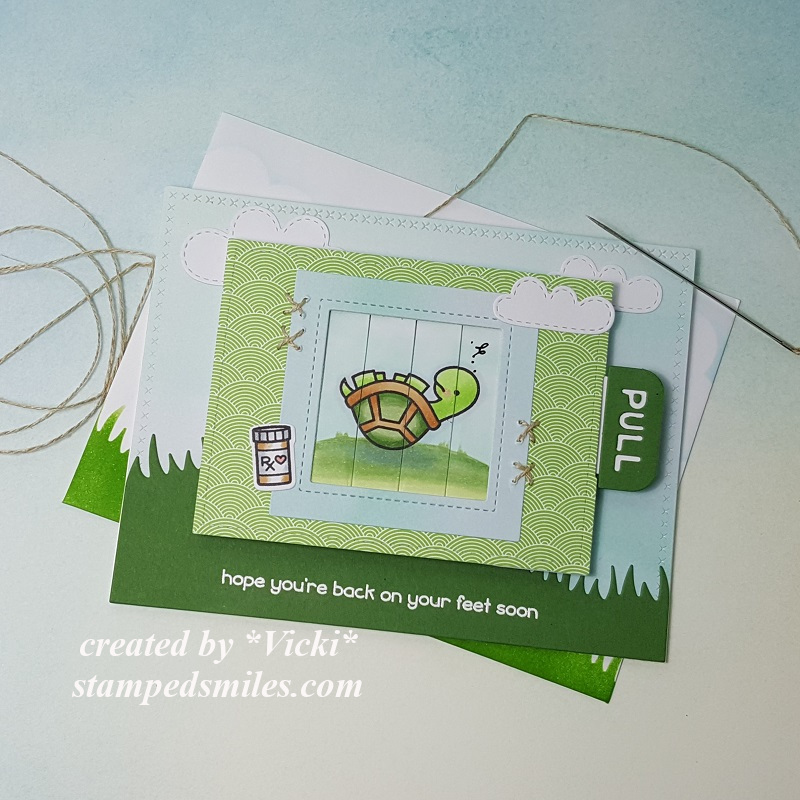
Check him out below as he spins around:

What’s different about this particular spinner card is how I’ve used a single digital image to create the front AND back of this Foxy Skater guy!

To see how I’ve put together this card for the spinner action, check it out in my video below or you can watch it on You Tube HERE:

I still have this card along with the other interactive card from my last post sitting here on my desk playing around with them! Not sure I can give them up quite yet as I’m having fun!! LOL!

Vicki-DDS-Spinner Fox Card video-close

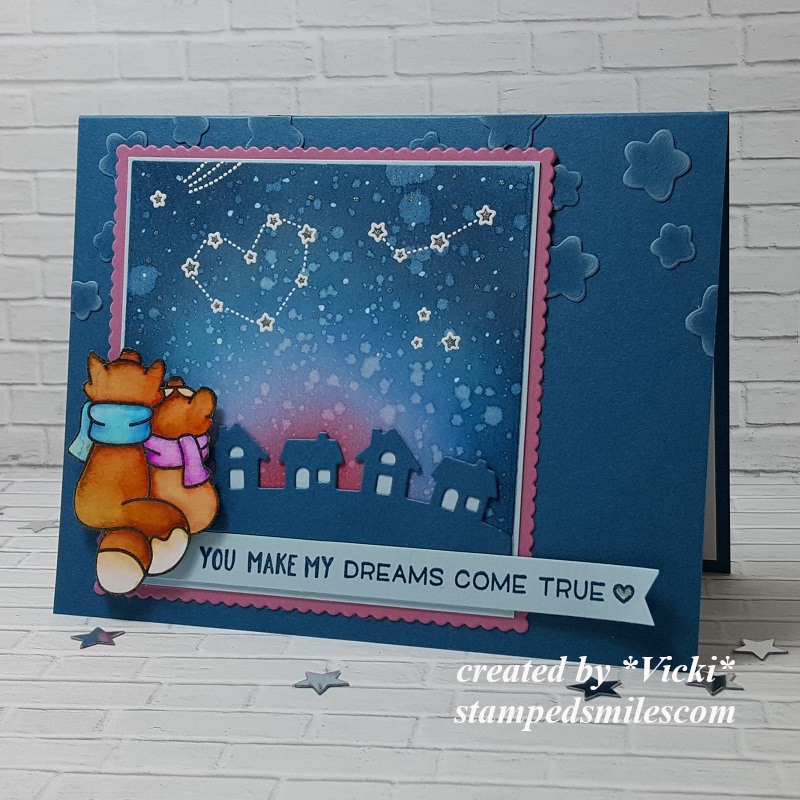
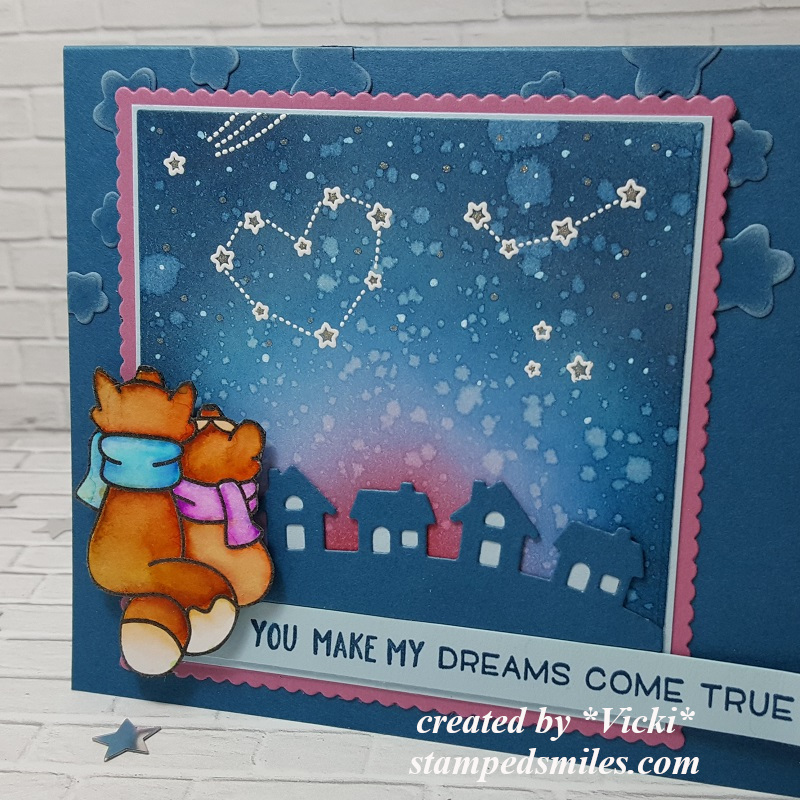
Here’s a closer look at the cute “Foxy Skater” guy that twirls around on the card.  I was going for a bit of a textured look on his fur, so I also used a white gel pen to mix in some white fur on his cheeks, chest and tail areas. I’ve also used a gel pen for the cheeks and a metallic gel pen for his skate blades.   It was a little more time consuming to color in two fox images, but as you can see, it’s totally worth having both sides for this spinner action design! 🙂

To flip the image in the opposite direction, I used Word doc. on my computer, copied the original image so that it was the exact size, pasted him again and then used the “rotate” setting to flip him in the opposite direction.

Check out the video to see how I was able to fussy cut him down for my card design.

Vicki-DDS-Spinner Fox Card video-flat

I hope you’ve enjoyed my spinner card today and that the video is helpful for you to create your own fun version during the wintry cold months ahead of us!

Thanks so much for stopping in today my friend and I’ll be seeing you soon!

Challenges I’d like to enter this card for:

  1.  Shopping Our Stash – Winter blues
  2. Through the Craft Room Door – Anything Goes
  3. The Male Room – It’s Snowing!
  4. Creative Moments – Anything Goes
  5. Penny’s Paper-Crafty – Anything Goes #463
  6. CCEE Stampers– CCEE2004 “Ice, Ice Baby!
  7. Aud Sentiments – Anything Goes + sentiment

The Skiing Bandit Raccoon in Action with Video!

Hello friends!  I hope you’re having a great week!

As I mentioned in my last post, it’s really cold and snowy over my way so I thought I’d join in with the winter season and have a little interactive fun in my craft room!  (Where it’s much warmer inside! LOL!)

I have used some Digi Doodle Studios products to create this really fun interactive card design:

Vicki-DDS-Pull Tab Slider Racoon

This cute little critter is just having a blast! 🙂  This card was so fun to play with and I couldn’t put it down!  This cute critter is the Skiing Bandit Raccoon digital stamp from Digi Doodle Studios.

I’ve colored him up with my Copic markers and used a glitter silver gel pen to color up his skiing poles.  He was fussy cut out with scissors. You will notice that his scarf and mittens resemble the background papers too, which were paper pieced from the Digi Doodle Studios Winter Plaids N’ Patterns Digi Paper Pack.

To create the scene, I’ve die cut some ‘hill slopes’ with a die cut, but you could use just scissors to cut one yourself.  I die cut a set of trees for the background  and ended up inking up the edges of the snow hills along with the banner sentiment at the top.

What’s fun about this card is that when you grab that little arrow at the bottom left of the card, this little skiing bandit starts flying down the glittery snow hills!

If you’d like to see how this card moves along and how to create one for yourself, be sure to check out the video below or watch on You Tube HERE!

I thought that the invisible way he flies over the hills along with the idea of how to create your own slider mechanics with scraps is something fun that anyone can put together with items they have on hand!

Vicki-DDS-Pull Tab Slider Racoon-close

And of course here’s the view of him flying down the hill as the arrow slider tab gets pulled from the card!  The pull tab slider sentiment comes from the Digi Doodle Studios Snow Days Sentiments set, which is what I’ve also used at the top front of the card.

For the sentiment on the pull-tab slider, I’ve taken a marker and underlined part of the sentiment and added an explanation mark on the end.

I also decided to stamp a black arrow at the end of this slider so that when it’s tucked inside, you can see that arrow so the recipient knows what to do!  You could of course just use a pen to draw your own arrow as well.

Vicki-DDS-Pull Tab Slider Racoon-flat

I hope you’ve enjoyed my interactive slider card today!  I’m still having fun pulling that skiing raccoon over the snowy hills! LOL!  I think this would be a really fun card to send along to a friend for a smile during these cold months, don’t you?

Thanks so much for stopping in!  I’ll be seeing you again very soon!

Challenges I’d like to enter for this card:

  1.  Sparkles Monthly – Winter Blues
  2. QKR Stampede – #381 Anything Goes
  3. Allsorts – More Than a Single Word
  4. Crafty Friends – Anything Goes
  5. Lil’ Patch of Crafty Friends – Anything Goes
  6. Pammie’s Inky Pinkies – Anything Goes #2003
  7. The Paper Girls – Winter Color Palette

Cards From My Heart

Hello friends!  With this not cooler, but COLDER weather we’ve been having, it looks like it may be a hard winter ahead and I’m already feeling it in my body unfortunately.  So with the heating pad and warm slippers,  I’m still crafting!

Today I’d like to share some cards that I have made for my hubby using some of the adorable stamps from Lawn Fawn …which I love:

Vicki-LF-Anniversary

At the end of October hubby and I celebrated our 20-year anniversary, and I made this card for him to let him know how I feel about him after all these years.  This would be something that we would certainly do where we live!  We always enjoy looking at the night sky together.

I started with some watercolor paper and blended some distress inks for the background and spritzed it with water.  I then made sure it was completely dry before white heat embossing the stars that I colored in the centers with a gel pen.  I then took a white gel pen and added more “dots” in the sky.

I’ve used Upon a Star and the Winter Skies stamp sets for both the images and sentiment. I took the Little Town border die to add over top of the starry sky and layered it onto a navy card base that has some more die cut stars (from Upon a star coordinating dies) at the top sponged with white ink.

For the sentiment, I had to piece together a couple of words from different sets to get it to say what I wanted it to.  I cut it out with a long banner die from My Favorite Things.

Vicki-LF-Anniversary-close

Here’s a closer view of the sky and the images.  For the fox couple, I black heat embossed it and then used my Zig Clean Color Real Brush markers to color them with and then popped them up over the corner of the scene with foam dots.

I actually used a color palette and sketch from a challenge blog, but missed the deadline to post it, but I think it turned out great and hubby enjoyed it.  He said, “Yes, this is something we would do!”  He also likes the color blue.

Here’s another card I made for hubby as his birthday was this last Friday:

Vicki-LF-LightUpCard

Although this one is a bit simple, it has a really fun interactive element to it!  If you’ve known me for a while, then you may know that my husband is an electrician, so this card was very fitting for him!

I have used the Lawn Fawn Turn Me On stamp set and coordinating dies along with the Life is Good stamp set for the sentiment and the Push Here stamp set to make this card.  I also have a large stash of Lawn Fawn papers that I’ve used for this which I don’t think are available any longer.

I used vellum for the light bulb that was heat embossed over it and then I colored it yellow on the backside of the vellum to place behind the die cut opening from the blue panel.  That was die cut with the coordinating dies.  I stamped and colored the light switch as well and also die cut it out over the blue panel.  I then white heat embossed the sentiment and cut it out with a sentiment banner die from MFT.  It was sponged with white ink and glued over the blue panel.

Vicki-LF-LightUpCard-alight

The best part of this design is that when you push on the light switch, the light bulb turns on!  I’ve used the Chibitronics to create this feature.

You can see here what it looks like when you push on the light switch!

You can also check out this quick few second video to see it in action below:  (CLICK HERE if you want to see it on You Tube.)

Although this looks like a pretty simple card, mechanically it had its difficulties with the light up interior portion of it and it was met with some challenges and patience as I had to keep testing it to make sure it worked right!  At one point I had to tear it apart because the battery accidentally flipped over!  I also had to use like 4 layers of foam tape so that the light wouldn’t continuously be on all the time! LOL!

Vicki-LF-LightUpCard-flat

It was all worth it though as it was for the love of my life, and he really did appreciate the efforts that went into making it as he even took it to work with him so that he could show it to his fellow co-workers!  LOL!  They seemed to be pretty impressed with it and even offered some advice on how much to charge for something like this!  LOL

The card was thick due to the amount of foam on it, so it didn’t fit into a regular envelope. Since it went to hubby, I just hand delivered it to him! 🙂

Hope you’ve enjoyed my share of creations today that I made for hubby!  I will be seeing you again soon!  Thanks for dropping in friends…I will be visiting soon!

Challenges:

  1.  Lawn Fawnatics – Cards for Guys
  2. Creatalicious – Anything Goes with optional:  For a Man
  3. Crafty Friends – Anything Goes
  4. Cardz 4 Guyz – All Wrapped Up (top card with scarves)
  5.  Get Creative – Anything Goes
  6. Through the Craft Room Door – Anything Goes
  7. Retro Rubber – Anything Goes + stamps older than 1 year (ALL listed are at least 1 year or older!)

Z-Fold Gift Card Holder with Digi Doodle Studios for Coffee Lovers Blog Hop + Video Tutorial

Good morning friends!  Aaah!  It sounds like a great morning for coffee, doesn’t it?!  Well it sure does to me anyway!  Today, my post is all about coffee…so grab yourself a cup, sit back and enjoy!

I’m so excited today to share my post with you because Digi Doodle Studios is a first-time sponsor for the Coffee Lovers Blog Hop!  There are lots of fun coffee themed products in the store and I’m thrilled to be sharing some with you today:

Vicki-DDS-CoffeeHop-ZfoldGiftCard

Isn’t she just adorable with coffee in hand?!  This image is called “Ginger” from Digi Doodle Studios and I’ve got her all-colored up front and center of my Z-Fold Gift Card Holder.

If you have ever made a Z-Fold card, then this is something with a little bit of extra added fun with a gift card holder pocket on the inside, plus you can see how the card nicely displays on the front which is perfect for popping into an envelope to mail out to your coffee loving friend!

The papers that I’ve used for this work perfectly with the theme today which are also from Digi Doodle Studios called Coffee Break Digi Papers.  (I love that I never have to worry about running out of my favorite pattern!!)  There are also several sentiments from Digi Doodle Studios used on my project called Coffee Anyone Sentiments.

*If you want to see a video with detailed instructions on how to make one of these Z-Fold Gift Card Holders along with a sharing of the full collection of the digital papers that I’ve used on my project, check out the video below or CLICK HERE to view it on You Tube:

This is such an easy and fun project to put together especially for the up-coming Holidays, but as you can see this is very neutral so that I could easily use it for most any time of the year.

Vicki-DDS-CoffeeHop-ZfoldGiftCard-close

Here’s a closer view of “Ginger” and how I’ve colored her up with Copic markers.  Of course, if you know me, I had to add a bit of sparkle somewhere.  I took a glitter brush pen and added some sparkle to her pink bow, the heart on her coat and the lid and flower on her coffee cup.

I die cut her out with a stitched rectangle die and then layered a piece of brown cardstock die cut with a scallop rectangle die.  For the around the edges of the image panel as well as the other sentiments I printed out, I sponged some Tea Stain Distress Ink around the edges.  The sentiment were cut out with a stitched circle die and then layered with a piece of brown cardstock cut with a scallop circle die.

To keep the image panel in place, a foam dot was used at the bottom panel so that when you pull up on the flap it opens up:

Vicki-DDS-CoffeeHop-ZfoldGiftCard-open

And this is what is so fun, is that when you flip up the front panel, you see how it opens up with the fun coffee sentiments inside and the surprise gift card holder at the top!

I have an urge to go to Starbucks now! LOL!

I hope you’ve enjoyed my fun Coffee themed project today as well as the video tutorial on how to make one yourself!  I’d love to see yours if you make one!  If you have any questions about anything, please let me know!

Now to sip on some more coffee and join in on all of the coffee inspiration today!  Thanks so much for stopping in and I’ll see you again soon!

Challenges:

  1.  Coffee Lovers Blog Hop – Anything Coffee/tea/cocoa/cider related.
  2. Watercooler Wednesday – WWC245 Anything Goes
  3. Simon Says Stamp Wednesday – Anything Goes
  4. As You Like It – Favorite Papers and Why? – Digital papers because I never have to worry about running out of my favorite pattern and I don’t have to worry about storage!

Dies & Punches for Cute Card Thursday

Hello friends!  It’s time for a new Cute Card Thursday challenge!  This week we’d like to see those “Dies &/or Punches” on your creations this week!  These are some of my favorite tools to use in my craft room and we’re looking forward to seeing your take on this challenge!

Here’s what I’ve made for it:

Vicki-CCT600

Nothing says “Fall” to me like those ripe apples ready to be picked and specially to make a yummy caramel apple with as well!  I had so much fun pulling out several of my Lawn Fawn stamps and dies to make this interactive card design!  I haven’t played with my Lawn Fawn stuff for quite a while, so it was time! 🙂

For the interactive pull tab mechanism, I’ve used the Lawn Fawn Magic Color Slider dies along with the Caramel Apple, Thanks a Bushel and Jump for Joy stamp sets to put together this card.  I’ve also used the Jump for Joy and Thanks a Bushel dies to cut out some of the images on my card.  For the pull tab at the top, I took a sentiment from the Push Here stamp set to stamp the “pull here”.

For part of the layers in the card, I took an older Scallop rectangle die no longer available from Lawn Fawn for the white layer.  I’ve also used some Woodgrain cardstock that I’ve sponged with Vintage Photo Distress ink along the edges of it and the plaid paper which is no longer available from LF.  For the layer behind the apple panel and the base of the card I’ve used the LF Sunflower cardstock.

Vicki-CCT600-close

Here’s a closer look at the image that I’ve got colored up with Copic markers.  I just stamped them over some Copic blending card.  For the inside slider where the caramel apple is, I didn’t want to add any layers to it so that it would slide freely.

Vicki-CCT600-upright

Here’s what the card looks like with the slider hidden inside.  I just added some twine to the end of the pull tab at the top.

Hope you’ve enjoyed my interactive card design today using lots of fun dies!

Thanks so much for dropping in today and I’ll be seeing you soon!!

Challenges:

  1.  Lawn Fawnatics – Awesome Autumn
  2. Simon Says Stamp Wednesday – Interactive
  3. Simon Says Stamp STAMPtember Lawn Fawn Collaboration – LF products
  4. Double Trouble – Thing 1:  Mad for Plaid, Thing 2:  Use Your Stuff Challenge entry (see below), Thing 3:  Tag &/or Frame
  5. Use Your Stuff – Tag &/or Frame
  6. Sheepski Designs – Die Cuts &/or Punches
  7. Little Red Wagon – Fruit

Triangle Corner Pop Up Card + video tutorial!

Today I’m sharing the Triangle Corner Pop Up Card.  I have actually received several messages and comments that people wanted to see a video tutorial on how to make one.  So I thought I would come up with a version that I could share to show the many different variations that you can come up with and the fun you can have with it!

Vcki-BMBeHappy-TriCornerPop-opened

This style is a much more elegant approach which is much different than a past creation I put together.  I love that you can change the look and have fun playing with different stamps and elements to fit inside the design!

For this one, I have taken the Rose and Butterfly stamp sets to stamp and Copic color.  I fussy cut out the images on my design.  I’ve used Jurassic 100# and White 100# cardstock.  The decorative paper is from the Rustic Florals paper pad.  I stenciled the bottom of the Jurassic panel with a stencil using some Unicorn Horn Glitter Glaze.  Both of the rose images along with the small heart circle on the easel card were popped up with some foam tape.

For the circle easel design, I’ve cut out a scallop circle with the white cardstock in the size that I thought would fit within the design.  Then cut the body of the card with other circle dies in the Jurassic cardstock and then the front with some more of that Rustic Florals paper that I’ve used in the background.  The sentiment below the butterfly and the hearts on the small circle were stamped from same stamp set.  All of the white panels (with the exception of the scallop circle) was ink foam blending with some grey distress ink.  To keep the card “locked” in this position, I’ve used the Mini Disc Magnets.

If you are interested in learning how to create one of these cards for yourself, then please be sure to check out my video below.  CLICK HERE to view on You Tube.

These cards can look really intimidating, but once you see the measurements of how to put one together, they’re really easy and fun to make!

Vicki-BMBeHappy-TriCornerPop-unfolded

Here’s what the card looks like completely opened up.  You can see on the left bottom panel that I’ve taken that rose from the stamp set again and stamped it in the corner with some grey ink after ink foam blending around the edges of it.  This will be the area that I’m leaving for a personal message.

To fold it down to a 4″ square card that’s close you will start by folding down on the top and then fold it over from the right side to the left.  This will completely close it up.

Vicki-BMBeHappy-TriCornerPop-front

Here you can see that the card is completely closed to a 4″ square size minus the rose leaves sticking out which I don’t mind.

I took another panel of the Jurassic cardstock for the front of the card and sponged around the edges of it with the white Ink and then also stamped the rose again in the corner of it.  Because I had several dimensional and extra layers on this card, I had to use a ribbon to tie it together to help it stay closed up.  You might need an envelope that is slightly larger than an A2 envelope, but if you use less layers and dimension, it should fit in an A2 size envelope.

Hope you’ve enjoyed my interactive card and tutorial today!  Thanks so much for dropping in with me! 

Challenges I’d like to enter this card for:

  1.  Cardz 4 Galz Wings
  2. Crafty Cardmakers – It’s a Bug’s Life
  3. Through the Craftroom Door – Anything Goes
  4. Try it On Tuesday – In my Garden there is….

In Stitches for Cute Card Thursday

Hello friends!  Wow, this week has really been flying by!  I seem to think this almost every week, but I know when the weather starts getting warm, I seem to get more busy outside and perhaps that’s why with the weather being so nice, warm and sunny.  I am enjoying it!

Today starts a brand new challenge over at Cute Card Thursday this week and the theme is “Stitching (faux or real)“.  There are all types of ways to incorporate stitching into your paper crafting and I enjoy adding it to my creations.  So here’s how I’ve added it to my card for today.  I thought this would be such a cute idea for a get well card.

Vicki-CCT582

To make the slider for my card design, I have used the Lawn Fawn Magic Picture Changer and the Magic Picture Changer Add-On dies.  It looks pretty intimidating, but it actually wasn’t that bad to put together as the measuring and cutting is done with the die.  I’ve used the adorable Get Well Before ‘n Afters stamp set to create this and I know I’ll be making another one with the whale to make another card as I’m in need of one.  The turtles were colored with Copic markers and I’ve used them to also create the grass and sky background behind the turtle as he needed something to “ground” him and not be up in the air.  I took a water-proof pen and added a scribble above his head as he’s not happy being up-side-down!

I’ve cut the “add-on” pieces and the background of the card with the Lawn Fawn Watercolor Wishes and Really Rainbow paper packs.  But before attaching the “add-on” papers to the turtle frame, I took a needle and some linen thread and added a few cross-stitch marks around the blue frame.  I’ve also cut a few clouds from a retired LF die set and added the die cut “bottle” that I colored from the same “Get Well” stamp set.

Before I attached the turtle mechanism onto the card, I also die cut a strip of grass with the Grassy Hillside Pop-Up Add-On die in some green cardstock.  I then took one of the sentiments from the same “Get Well” stamp set and white heat embossed it at the bottom of this piece.  The turtle mechanism was popped up over the card front base with some foam tape which was all mounted to an A2 sized top folding card base.

I thought it would be fun to decorate the envelope too, so I die cut a piece of the grass again and used it as a stencil to sponge in some grass along the bottom of the envelope and then I also stenciled some clouds over it.

Vicki-CCT582-A

And here’s what the turtle looks like when you pull the tab out.  He is much happier now that he’s back on his feet again!  I think I played with this card and pulled that tab to watch that turtle get on his feet over and over! LOL!  I hope it will have the same effect on the person who receives it too!

Vicki-CCT582-close

Here’s a closer view of the coloring that I’ve done.  It was a small image and so I’ve kept the coloring pretty simple.  For the “happy” turtle I’ve made a few clouds in the sky.  To make the slider part work, you don’t want to add anything other than the coloring so that it slides smoothly.

Vicki-CCT582-flat

Here you can sort of get a better look at the coordinating envelope that I’ve made to go with the card.  Although I have made some hand stitched marks on my card, the dies themselves already have lots of cool stitch details in them when you cut it out, so I think it just helped add to the design.  This card is going to a male, so I didn’t want to create anything that was too over done.  I think this might bring a smile, what do you think?

P.S.  If you remembered my post the other day, I shared a photo of the Robin’s nest with one egg in it.  Well, since I’ve last checked, there are a couple more in there now:

3 robin eggs

Every time we go out there, the mother watches for us to leave as she wants to sit on her eggs!  This is why we can’t get a photo of her actually sitting on it.  But we will see if anything happens in a few weeks! 🙂

Thanks so much for dropping by today!  I hope you are enjoying your week and I’ll see you soon!!

Challenges:

  1.  Sweet Stampers – Animals
  2. Pammies Inky Pinkies – PIP1919 Anything Goes
  3. Crafting From the Heart – Anything Goes
  4. A Bit More Time to Craft – Anything Goes
  5. Simon Says Stamp Wednesday – Stitches
  6. Watercooler Wednesday – masculine anything goes WWC221

April New Release for Whimsy Stamps with Interactive Card!

I’m excited to be sharing this really fun and unique interactive design that I’ve made with one of the cute images called Stretchy Giraffe digital stamp from the new release!

Vicki-Giraffe Flies extended neck-April 2nd

This giraffe is so sweet and was fun to color up with Copic markers!  (See below for the full list of the markers I’ve used.)

I took the extended neck version of the giraffe and made some fold marks in his neck so that when folded, it looks like the “regular neck” version of the image, but when you pull up on the purple balloon at the top, the neck extends up with it! LOL!

Check out this 18 second video below to see how it works:

I’ve used the Whimsy Stamps No-See Kinetic Basics die set along with the Kinetic Straight Basics die set to make the straight track behind the large cloud that is under the flying giraffe.  This way there’s no track behind the giraffe to move the neck which I think is pretty cool with these special WS Kinetic No-See dies!

Because this was a giraffe with a long neck, I wanted to make a tall skinny type of card for this design.  (It measures 3″ x 6″ when closed.)  I’ve used a cloud die cut to hide the interactive track behind the giraffe and then I used a cloud stencil to sponge on some Wilted Violet and Tumbled Glass Distress Oxide inks on the cloud die cut as well as the background white panel and the interactive pull behind the balloon so it all matches.  I thought it would be fun to add some stars, so I took the star from the Snappy Birthday clear stamp set and stamped them with the Wilted Violet Distress Oxide ink.  I also took the sentiment from the Dachshund Balloon rubber stamp set and stamped it on the bottom of the white card front panel.  (I thought it was the perfect sentiment to go along with this image!  LOL!)  I’ve rounded the corners of the white panel and cloud panel with a corner chomper.

The giraffe was popped up with the black string wrapped around his left “antler” and then secured on the back.  The other end of the black string was tied around the balloon which is attached to the pull tab underneath the cloud area.  I covered the stars with a clear glitter brush and added some sequins filled with some Nuvo White Blizzard Glitter Drops.  I’ve used foam dots to pop up the giraffe over the design.

Vicki-Giraffe flies extended neck-April 2nd-close

Here’s a closer view of the extended neck and the coloring I’ve done.  Here is the Copic list that I’ve used:

  • giraffe body – YR24, YR21
  • spots, muzzle, mail & tail end – E15, E13, E11
  • Hooves & horns – E49, E47, E44
  • ears & belly – R20, R11, R00, R000
  • balloon – V17, V15, V12

I fussy cut the giraffe and the balloon separately from the image so that I could add my own string and make this an interactive card design.

Vicki-GiraffeFliesExtendedNeck-April 2nd-pulled tab

Really enjoyed creating this fun interactive card in a unique way with this adorable new stamp!  I hope you’ve been inspired with it too!  Would love to see what you come up with if you purchase this image!!

Thanks so much for popping in today!!  I’ll see you soon!

Challenges I’d like to enter this card for:

  1.  TGIF Challenge – Balloons (TGIFC205)
  2. Alphabet Challenge – ‘A’ is for Animals
  3. Crazy 4 Challenges – C4C477 “Trick Card”
  4. Pammies Inky Pinkies – ATG (PIP1913)
  5. Crafty Animals – Anything Goes + animal
  6. 613 Avenue Create – Anything Goes with optional:  create a kinetic card

Turtley Impossible

Hello friends!  I really wanted to post earlier this week, but life sometimes gets in the way of all of the crafty fun that you want to do as I’m sure you know! 🙂

If you remember earlier this Summer my post about the fun stamp convention I went to in Collinsville, I shared a photo of the TONS of things I got while I was there.  I still haven’t been able to play with all of it…yet, but there are a couple of companies that I fell in love with, so I decided to place an order for some things that I wished I had gotten while I was there! LOL!

This “new to me” company called Pink & Main was a booth that I went to and bought some items from.  I had seen a video last year of something that I fell in love with and was determined to purchase that while I was there.  I started following along with them and fell in love with these sweet turtles that I’ve used on my card today:

Vicki-Impossible Card-PM

Before I get to the details of this card, I wanted to explain what type of card this is.  There are many challenge blogs I like to follow because I enjoy challenging myself while paper crafting as many of us like to do.  So I came across this challenge that was asking us to make an “Impossible Card“.  (I have linked a tutorial that I found on Splitcoaststampers if you want to learn how to make one for yourself.  Just click on the card name.)  I had not seen nor heard of one of these before, so naturally I had to play along!  What I like about this card (NOT impossible at all…so easy!), is that the center panel naturally pops up like that AND you can fold it down to lay flat in a regular A2 sized envelope!  (You can create different sizes and such, but I kept mine simple.)

To decorate this card, I’ve taken the very cute Pink & Main Turtely Amazing stamp set with the coordinating dies to color with my Copic markers and cut them out.  I’ve also used the Pink & Main Sunset paper pad as well as the Waves Border Dies to decorate the background scene.  The white strips that I’ve used for stability on the card was stamped with the sentiment from the same set and then layered with the blue polka-dotted paper around it.  I added the cut elements and layered them on top of the strip.  For the main popped up panel, I’ve taken the cut out turtle and layered him among the cut wave border at the bottom.  I then took some of the Pink & Main Silver Glossy Dots to embellish the upper corner.  I also took some ribbon and added a bow just below the turtle.  For the light blue polka-dotted papers, I sponged some blue distress ink along the edges for a bit more color.

And since you can completely turn this card around, I wanted to decorate the other side as well:

Vicki-Impossible Card2-PM

For this side, I took a different turtle from the same stamp set, colored and cut him out along with the other elements to arrange on my card scene.  I took some brown card stock and cut a strip with a stitched border die and inked up one edge for a sandy beach for the turtle to sit on.  I also tucked the shell behind the border and added the star fish on the strip with foam tape.  I also added some more silver glossy dots to the strip.

There would still be room to write a personal message on the bottom portion of the card if someone wanted to.  You could also easily write something on the back somewhere on the lighter blue spots.

Super easy and fun to make which is something that I needed right now, so I’m glad I decided to give this a try!

Here are the challenges I’d like to enter this card for:

  1.   CCEE Stampers (CCEE1827) – The Impossible Card
  2. Brown Sugar – Two patterned papers on project
  3. Artistic Inspirations (204) – Anything Goes
  4. Crafty Creations (#370) – Anything Goes
  5. Crafting by Designs – Anything Goes