Bubble Bath Beauty

Hello friends!  Yes, I’m still here! LOTS of fun stuff to share!

Today, I have a silly kitty card to share with you today:

Vicki-Bath Cat-May7

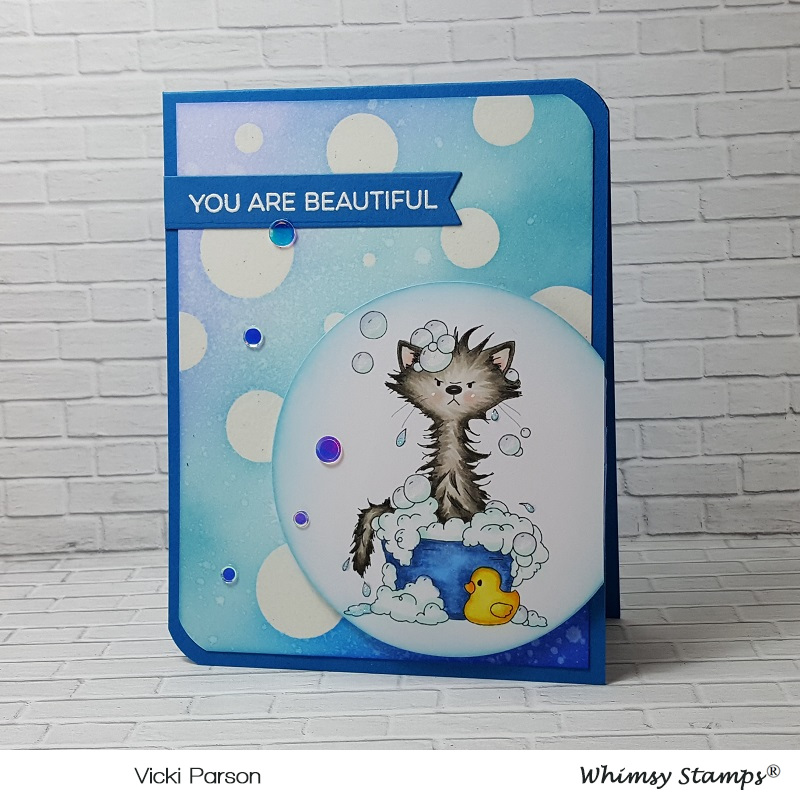
Oh my, that face just really cracks me up!!  It’s been several years since I have ever had to give a cat a bath, but I believe that’s pretty much how they feel about water in general.  I have used this Whimsy Stamps digital image called Bath Cat by Crissy Armstong.  (It was previously released as a rubber cling stamp, but now you can also get it in digital format if you prefer that!)

I started out my card with a piece of white cardstock and clear heat embossed several of the solid circle images from the Whimsy Stamps Circles Circles Circles clear stamp set.  I then took a few of the distress ink colors and blended them over the heat embossed circles.  The ink resisted those and then I spritzed it with some water and dapped it with a paper towel for water droplets.  I heat embossed the sentiment with white EP and cut it out in a banner to attach over my background.

The circle inked background was corner chomped on two of the corners and then I placed it over a blue A2 sized top folding card base which I also corner chomped the same two corners on that as well.  I then added the image panel and popped it up over some craft foam to attach to the front of the card.  I then cut off the edge of the circle with my scissors and lastly added some clear sequins to the design.

Vicki-Bath Cat-close-May7

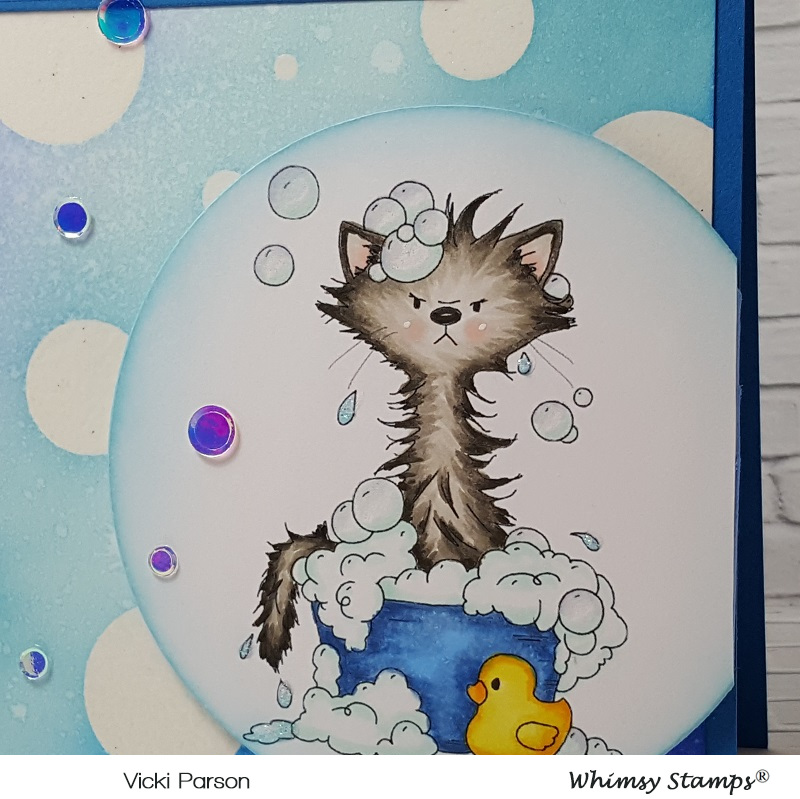
Here’s a closer look at the coloring I’ve done on the kitty.  I’ve used the following Copics to color him in with:

  • Kitty – W7, W5, W3, W1, R11, R00
  • Bathtub – B24, B21
  • Bubbles – BG000
  • Duckie – Y17, Y15, Y13

After I cut the image out with a circle die, I sponged around the edges of it with some of the distress ink I used on the background.  I used a Wink of Stella glitter pen on some of the bubbles and then used some Nuvo White Blizzard Glitter Drops on the water drops.

Vicki-Bath Cat-flat-May7

This one gave me a chuckle and sometimes even when you are feeling yucky, you just want someone to tell you that you are beautiful!

Thanks for dropping in today!  I’ll see you again soon!

Challenges:

  1.  Simply Create Too – Anything Goes (no twist)
  2. Daisy Chain – Anything Goes
  3. Pammie’s Inky Pinkies – PIP1918 Anything Goes
  4. Get Creative – Anything Goes (no twist)
  5. Crafty Animals – Anything Goes + animal

Kitty Celebrates Up in the Air!

Hello friends! I’m excited to start with this cute one for today:

Vicki-SnS-Kitty clouds

Tee hee!  Kitty got a little “carried away” with celebrating, I think!  I have used the NEW Kitty Celebrates rubber stamp set for my card.  I’ve stamped him over Copic Blending Card paper and colored him in with Copic markers and then fussy cut him out.

So before attaching him to my card, I thought it would be fun to add some Nuvo Crystal Drops in Morning Dew (Gloss-dries clear) and apply a layer over my balloons to give them a shiny balloon look!  I then set kitty aside while I worked on the rest of the card.

For the background of my card, I made a nice “blue sky” by taking some Watercolor Paper and sprinkling some Nuvo Blue Blitz Shimmer Powder over it and then spritzing some water over it and letting it run all over the panel until I achieved the look I was going for.  (LOVE the subtle shimmer over it too!) and then set it aside to let it dry.

The next thing for me to do was to create some “fluffy clouds” for the kitty to be among:

So, I took some cloud dies from my stash and cut them out with some Sticker Paper.

These sheets are sticky on one side, so I carefully peeled the release paper and handled them with some tweezers and applied some of the Twinkling Clouds Flocking over top of the sticky side, rubbed them with my finger to secure and tapped off the excess.  I now have some really cool soft and fuzzy clouds to attach to my blue sky!

So now all I have left to do is assemble everything for my card!  I started by taking the clouds and adhering them to my background with some dimensional Glue.   I then cut down the watercolor blue-sky panel with a rectangle stitched die that fit the size of my card.   Then I needed to add my sentiment, so I took the sentiment from the same stamp set and stamped it with a black pigment ink and added some Sparkle EP and heat embossed it.  I layered this die cut sky panel over a piece of black cardstock which was then layered over an A2 sized top folding white card base.  Lastly, I’ve added the fussy cut kitty over top of the sky background panel with some foam dots and then randomly added some drops with the Nuvo White Blizzard Glitter Drops over the sky panel.

Vicki-SnS-Kitty Clouds5

I think this turned out really cute and I sure had fun making it!  Here I’ve laid it down so the light catches the details of the sparkle in the clouds, the sentiment and the glitter drops in the background as well as the shine over the balloons too!

Hope you’ve enjoyed my card for you today!  Thanks for dropping in!

Here’s some challenges I’d like to enter this card for:

  1. Simon Says Stamp Monday – ‘B’ is for:  Balloons, Blue Sky, “Best Day ever”
  2. Tuesday Throwdown – Anything Goes
  3. Addicted to Stamps & More – Anything Goes
  4. The Male Room – Celebrate
  5. Little Red Wagon – House Pets

Merry & Bright Kitty

Hello friends!  Hope you’re having a great weekend so far!  I’m back to share another creation that I’ve made using the adorable Christmas Kitty Digital Stamp Set:

Vicki-SnS-ChristmasKitty-OctGDT

I wanted this kitty to be the main focus of my card along with the lights and I wanted them to pop out on my design.  I also wanted to add my panel complete with the “extra” light string and greeting.  So I opened up a blank Word doc. to add my images.  I sized and arranged the kitty where I wanted him, then next to him I’ve added the additional “extra” lights and then positioned my greeting from the set where I wanted it, printed it out and colored in the lights and kitty with Copic markers.  To make the lights appear as one continuous string of lights, I took an alcohol friendly fine line marker to draw a line to the existing lights on the kitty.  I just love the look on his face as he was so much fun to color! 🙂

Vicki-SnS-ChristmasKitty-OctGDT1

To get the glowing look on the lights, I added some color around each light with the same color of chalk.  Then I took the Diamond Dust Glitter and added it over the light bulbs with the Nuvo Smooth Precision Glue pen.

I then cut this panel out with a rectangle cross stitch die cut from my stash.  After it was cut, I took some blue colored ink and stamped the pinecone image from the Holiday Greetings Rubber stamp set to frame in the kitty panel.

I decided to cut out some pine leaves with the same light blue card stock with a die cut from my stash and then I covered them with VersaMark ink and heat embossed them with the Vanilla Ice embossing powder.  You will also notice a bit of sparkle around the kitty panel edge too.  I took the panel and pressed the edges into the VersaMark ink pad and then heat embossed the edges with the Sparkle embossing powder.

Vicki-SnS-ChristmasKitty-OctGDT2

Here you can see the design on my light blue card front as well.  This is where I took the same pinecone rubber stamp image and stamped randomly along the edges of the card front and heat embossed it with the Vanilla Ice embossing powder.  The heat embossed pinecone leaves were attached to the edge of the kitty panel along with a sparkly ribbon bow and a snowflake accent.  I layered a piece of black cardstock around the image panel and popped it up with some craft foam and mounted that over the front of the heat embossed light blue card front which was wrapped with some more of the sparkly ribbon.  This was mounted over an A2 sized top folding white card base.

I hope you’ve enjoyed my sparkly cute card today!


Challenges I’d like to enter:

  1.  Crazy 4 Challenges (C4C458) – Card with Cat or Halloween themed
  2. Crafting By Designs – Get Ready for Christmas
  3. 4 Crafty Chicks (4CC427) – Christmas
  4. Craft Rocket – Christmas is Coming
  5. Crafting With an Attitude – Anything Goes