Art Journal Journey Host for February

Hello friends!  I have some really exciting news to share today!🎉  I’m so honored to have been asked to host this month’s challenge for  ART JOURNAL JOURNEY!  The winter months can be not only very cold over my way, but dark days with less sunlight hours can really take a toll sometimes.  I’m always searching for something at this time of the year and so I thought it only appropriate to help with that for this month…

The theme that I have chosen for this month is “LIGHT“.  Light can have so many different meanings and so many different ways to interpret it.  Here are a few examples to get you thinking:
1. sun, moon, stars, candle. lantern, bulb, illuminate
2. colors (subtle or subdued tones or shades)
3. an idea (‘shedding some bright light on a subject’)
4. interpretations (light as a feather, light snowflakes, let your heart be light, let your light shine, etc)

* Please be sure to catch the rules to enter on the left sidebar of the challenge blog* 

Here is my starting inspiration for this month’s theme:

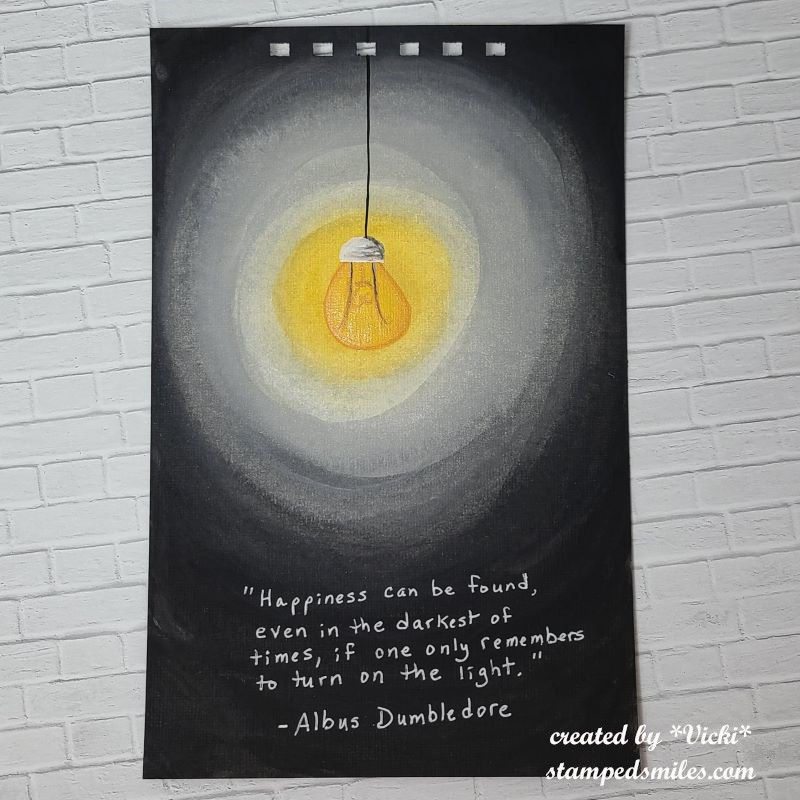
I’ve started my page with a 5.5″x8.5″ canvas paper with pre-punched holes at the top using a Zutter machine. 

For the background:  Pulling out a white, black, grey, yellow and light yellow acrylic paints, I found the center point where I wanted it and painted my yellow spot.  I worked with each color while it was still wet to help it blend together.  I worked outward with the light yellow, then white, then grey and finally the black.  Some of it needed to blended in with the next color, so I just worked it back and forth until I got the look I wanted. 

After the blends were dry, I used the detail brushes to create the light bulb and cord.  I drew/painted the lightbulb in the center of the yellow and worked around from there and lastly added my black cord hanging down.  It’s hard to tell in the photo, but I covered the bulb with a glitter brush pen application to give it sparkle.  (I have never done a page that was completely hand painted…so this was a challenge for sure!)

The Dumbledore quote was added with a white gel pen.  One of my favorite quotes.

  • I hope you enjoyed my approach to the “LIGHT” theme and you’ve been inspired to create something in your art journal today!  I can’t wait to see how everyone interprets it!
  • I will be posting several art journal pages throughout the month with this theme, so please be sure to stay tuned in to see more inspiration with it!

I’m sure you’re used to seeing only one monthly art journal page from me, but this month will be filled with several of them throughout and I hope it helps inspire you to bring some LIGHT to your creation in some way.  

Hope you have a brightly filled day!  Thanks for dropping by!

Challenges:

  1. Crafting from the Heart – Anything Goes
  2. We Love to Create – Anything Mixed Media/Paper Goes
  3. Creative Fingers – Anything Goes
  4. Penny’s Paper-Crafty- Anything Goes

Bright Birthday and More Whimsy Retreat Projects!💡

Hello friends!  Hope that you’re having a great week so far!  Hubby and I are trying to figure out how this “retirement thing” goes together! LOL!  I think we’ll be having so much fun and we’re just really excited about the future and what we’ll be doing.

Speaking of which, this past Sunday he also celebrated a birthday and of course I had to make him a card that was suited for an electrician.  I had to add a bit of humor about his age on the inside, but this is what I came up with:

I’ve had this Stampin’ Up! Sunburst die and stamp set and haven’t used it that much since I bought it. (Quite a while ago! Not quite sure how old. LOL) I thought it would make a great light beam for my VERY old Simon Says Stamp ‘Watts Up’ stamp set that was from a past card kit. (circa 2014/2015) …yep, all old!

I die cut the sunburst from some yellow and gold glitter stock that I glued together slightly off-set and then attached it over a side folding A2 sized black card base.  I stamped the sentiments over a couple of the yellow strips with black ink taking care to make room for the circle panel.

I then stamped the lightbulb over a white piece of cardstock and colored the base with Copics and used a marker draw a line above it for the string.  I took a solid heart from the stamp set and heat embossed it with some Gold Metallic Gilded EP and then sponged some yellow ink over the bulb for some glow.  I die cut it out with a circle die and then layered over another die cut circle black piece and popped it up over the sunburst layers with foam tape.

I tied a bow with some black twine and glued it to the light bulb base.  I also stamped the bulb in a lighter gray ink over the envelope and added a string to that as well with a gray marker. (The inside of the card said:  “Old is the new black.” 😆)

———————————————————————————————————–

And I also wanted to share that I’m still plugging away on the several kits that I received from the Whimsy Stamps Virtual Retreat last month!  These are really amazing projects and I’m having lots of fun putting them together still! (Christmas will be coming next. So, stay tuned for those!):

This is a fun interactive card with a pull tab at the top where this cut little dragon slides upwards towards the sky! This kit 9 came with an A2 sized envelope, but I had to make my own envelope slightly larger to accommodate for the pull tab sticking above the card. I’ve added doodle lines around the edges and shadow stamped a sentiment at the bottom for my own added details.
This set was from kit 14. The hexagon shaped box was super fun and even came with the candy! There was also an extra stamped and cut out bee, so I used it to make another card… shaker style! I used the left over honeycomb die cut piece as a stencil on the card as well. I used the envelope that was provided in the kit above and decorated it for this A2 sized card instead. (I know someone that loves these candies…so they might get a surprise at some point! 😉)
And lastly, this was from kit 15 and TOTALLY different than what was photographed in the booklet! First of all, I received a plant image with a die cut speech bubble sentiments and thought it might be cool for a Halloween card on another project, so I saved those to use later. I received an EXTRA stamped sunflower image from kit 22 that I had posted earlier and decided to use it for this card here. I colored it similar to that one and cut it out, but cut off a portion of it on this design. I also changed up the background ink blended colors and splattered some gold paint on this one. Love how it turned out. This will be for an Autumn anniversary card for someone coming soon.

Hope you’ve enjoyed all of my projects today!  Thanks so much for stopping by and I’ll be seeing you soon!

Challenges (For the Birthday Lightbulb card ONLY):

  1.  Retro Rubber – Anything Goes + stamps older than one year
  2. Cardz 4 Guys – Birthday for adult male
  3. Creative Moments – Anything Goes
  4. Crafty Calendar – Anything Goes
  5. Pammie’s Inky Pinkies – Anything Goes
  6. Shopping Our Stash – Tic Tac Toe (I used middle across: String/twine, 5 year old stamp, bright colors)
  7. Watercooler Wednesday – All About Occasions (birthday)