HEY! “C” is for Circles!

Hello and happy Friday my friends!  After things got heated up the last couple of days, I think I’m ready for a couple of days of cooler weather!  I don’t want to skip Spring by going straight into a hot Summer!  Hope you have some great things planned this weekend!

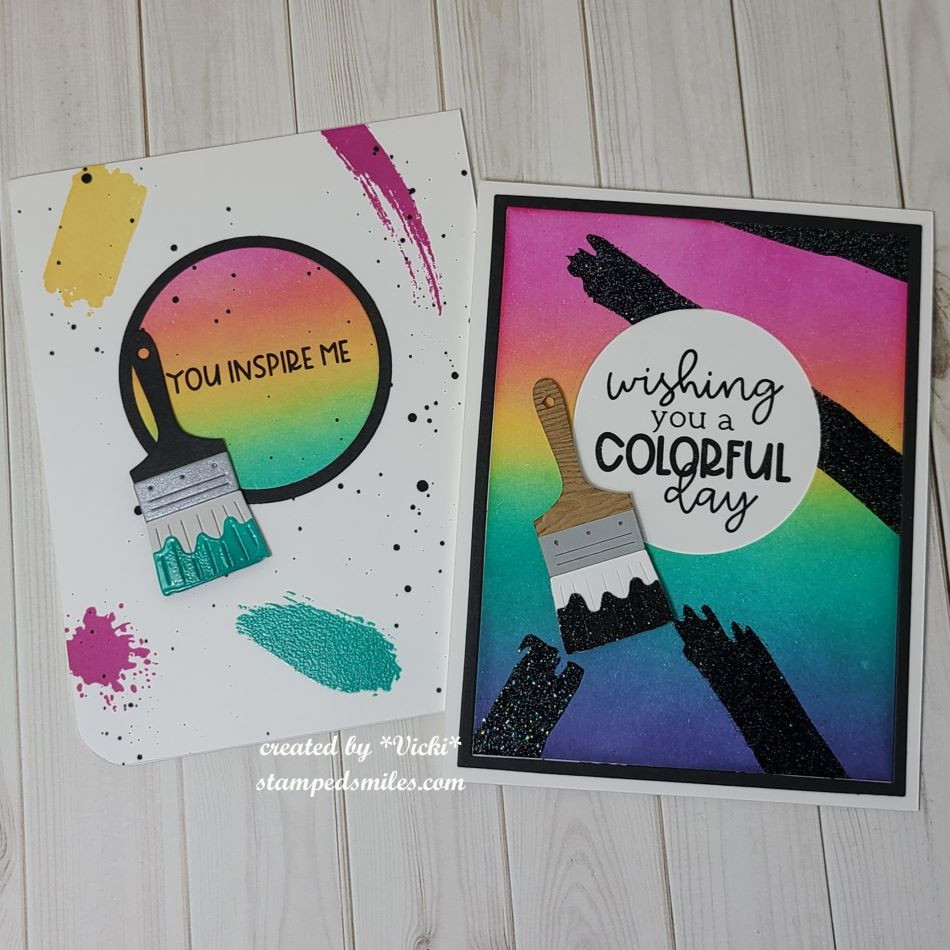
Today starts a new challenge over at the Alphabet Challenge Blog!   We are now onto the letter “C” and the hostess has chosen “C” is for Circles  *Remember that this is a bi-weekly challenge, so you have two weeks to enter*  I hope you will find some time to play along!  Here’s what I’ve created:

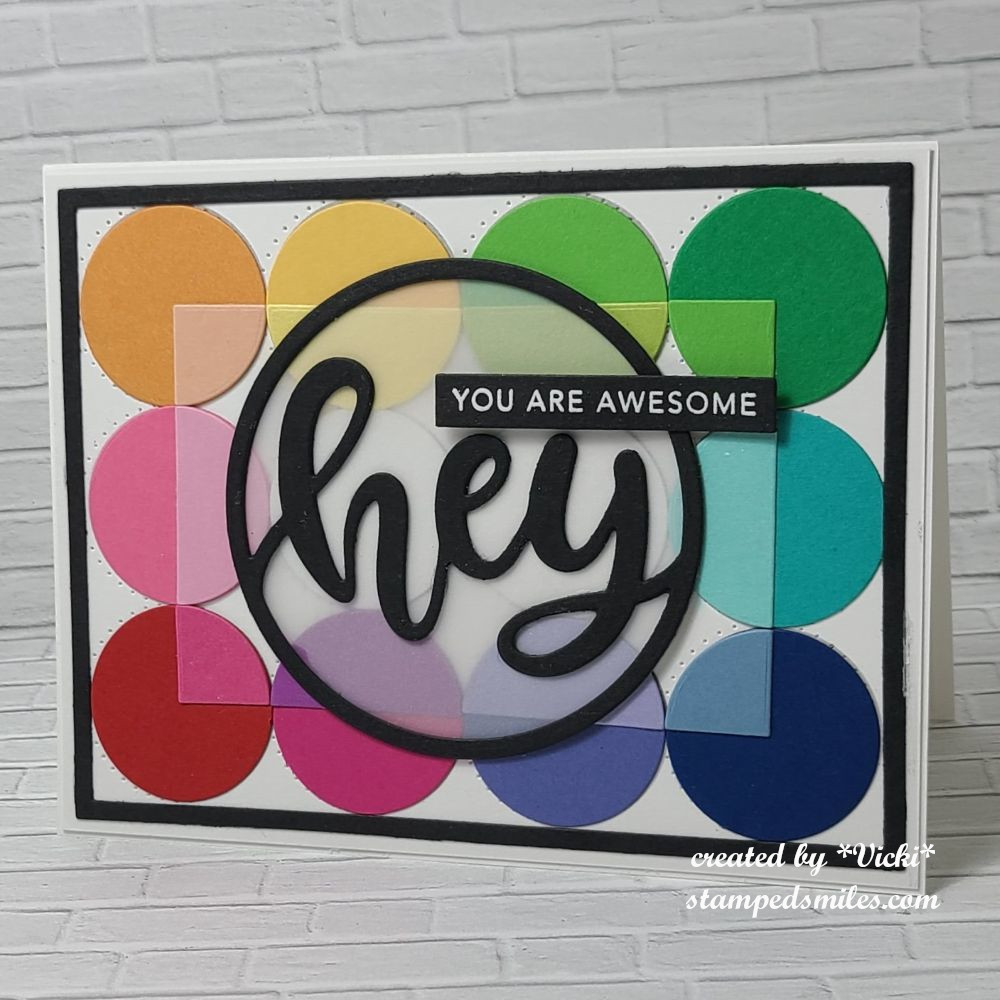
I do love me some circles and I thought I would just use them all over the place for this challenge!  I pulled out my Taylored Expressions “Talking in Circles card kit” that came out earlier in the year and no longer available.  However, the panel that I’ve used to create this design are still available in the store called “Talking in Circles A2 Sugar Cube Maps“.  They make it easy to follow where placements need to be and lined up.

I used the TE A2 Thin Frame Cutting Plate for the black frame around the circles.  I thought I would try and use another cutting plate, but the design pretty much covered it up.  I layered this whole panel over a top folding A2 white card base.

For the sentiment in the center, I used another circle die from the TE, but I don’t think it’s in the store any longer.  I cut the “HEY” circle out from black cardstock and layered some vellum behind it.  I white heat embossed the “You are awesome” sentiment over black and cut that out with a Simply Strip die.  This was popped up with a foam strip over the design.

Thanks so much for stopping over today!  I hope you’ve enjoyed my card and you will take a hop on over to the challenge blog to see what the rest of the team has come up with.  

See you soon!  In case you need to know…you are awesome!

Challenges:

  1. Love to Scrap Anything Goes
  2. Allsorts Paper Piecing or Anything Goes (Not sure if this is considered paper piecing)
  3. Ally’s Angels Anything Goes
  4. CRAFT Anything Goes
  5. The Creative Crafters Anything Goes
  6. Crafter’s Cafe Anything Goes optional: no squares

Y is for YUMMY!

Hello and happy Spring!  Hope you’re having a great March so far.  We just received about an inch of snow on Spring day, so I hope it starts getting warmed up from here!  I’m ready for warmer weather so I can cook out on the grill….YUM!  Speaking of that….

Today starts a new letter over at the Alphabet Challenge Blog and our lovely hostess would like to use “Y” is for YUMMY as the theme this time.  How fun is that!  Remember you have two weeks to join in the gallery to play with us.  Here’s my creation for this challenge:

I couldn’t resist getting out this fun “Food Truck” set from Riley and Company to color up!  I also paired it with the BBQ Riley to complete the scene full of yummy goodies!  The images were both stamped and colored up with Copics.  I used the coordinating die to cut out the Food Truck and I just fussy cut with scissors for the BBQ Riley.

Before attaching the images, I used a cloud stencil and blended the background and then took a piece of green cardstock to cut out a grass border for the bottom.  I ink blended the edges of the blades and then used a green Copic marker to add some shadowing for the stamped images before placing them down on the scene.  BBQ Riley was popped up with foam tape.

Here’s a closer view of the images.  I used a liner pen to draw “yum items” under the menu board on the truck with a drawing of a balloon.  I also used a silver gel pen to color in parts of the truck, the lights above the “food” word along with the utensils on BBQ Riley and parts of the grill.

I found a speech bubble and sentiment from my stash that I thought would be perfect for this card and stamped it above Riley’s head as he’s holding up a hot dog.

Do you like to stop and eat at food trucks?  What’s your favorite?  Last summer we went to a small town festival and they served some lemon shake ups at one place along with some BBQ shredded pork and it was so yummy!  We also like to grab some kettle corn to take home too.

Did I make you hungry now?!  Hope you’ve enjoyed my card today and I hope you’ll stop by the Alphabet Challenge Blog to come play along too!  We’d love to see your yummy creations!  Thanks so much for taking the time to stop by!  I enjoy reading your thoughts!  Have a great weekend!

Challenges:

  1. AAA Birthday Masculine
  2. Love to Craft Anything Goes
  3. 613 Avenue Create – Anything Goes with optional: Any Occasion
  4. Unicorn Boys/Men
  5. Passion for Markers Add a Sentiment (colored with Copic markers)
  6. Pammie’s Inky Pinkies – PIP2511 Anything Goes
  7. Lil’ Patch of Crafty Friends Anything Goes

One for the Boys at Sparkles Monthly

Hello friends!  I hope you’ve had a nice weekend.  I spent mine doing house chores which is fine as there has been a heat advisory here for a couple of days, so I thought I’d stay indoors!

I’m here today to share my project(s) for the new challenge over at Sparkles Monthly with the theme of “One for the Boys“.  I’m always needing masculine cards, so this worked for me!

Cheers!  I’ve pulled out the Taylored Expressions Hoppy Days stamp set for this card.  I like the pun sentiments that go with it.  I stamped the “bubble pops” image above the beer in yellow ink and added some sparkle with Stickles.  I also used some liquid applique and heated it up for the “foam” on the beer stein.  The die set cuts out the beer stein as well as that oval platform underneath.  I cut off the excess on the side of the card after I popped it up with foam squares.

I stamped the pun sentiment in navy ink on the top left of the card.

I trimmed two thin strips of copper mirror cardstock then attached on each side of the pattern design before popping up the beer stein.

  • For the pattern details on the card, I used the Taylored Expressions Create-in-Quads Mod stencil set which actually makes 4 different card panels at once. (this particular one is retired, but click here for other sets.)  These are all of the four cards I completed:

I had the beer theme in mind when creating a card in the first place, but then I thought it would be fun to pull out one of these create-in-quads stencils to make a pattern and have four cards completed at the same time.

I was thinking of masculine colors to use and I came up with the Taylored Expressions colors: Blue Corn, Mushroom, Pineapple and Salt Water Taffy.  I used a full sheet of white cardstock and after the stenciling was finished, they were cut into 4 sections for card fronts.  All the card fronts were attached to Blue Corn A2 side folding card bases.

To continue with the masculine look of the cards, I’ve added some touches of Copper metallic with mirror cardstock and other details.  Each card was done a bit different and you can see the others in the gallery below with details.

If you’re on my website, click on each photo below to enlarge:

I hope you’ve enjoyed my set of masculine cards today!  Please be sure to stop by the Sparkles Monthly challenge blog to see the inspiration from the team and I hope you’ll play along!

Thanks so much for stopping in!  I appreciate you taking the time to join me here!

CHALLENGES:

  1. Daring Cardmakers – “Cheers!”(Beer card)
  2. Lil Patch of Crafty Friends – Anything Goes
  3. Creative Fingers – Anything Goes
  4. A Perfect Time to Craft – Anything Goes

Masculine Makes

Hello friends!  I hope you had a great weekend!  It’s been record heat and continuing to be all this week over my way and it’s way too hot to be outdoors for any length of time!  So I thought it would be nice to bring the outdoors to my craft room instead.

I wanted to share the card I made for my husband for Father’s Day:

My husband is an outdoor type and where he prefers to be most of the time.  We really have fun going hiking and visiting parks whenever we can and this seemed like a great start for making a card for him.

I’ve used several Taylored Expressions items for this card including:  Great Outdoors Layering Stencil & Clear Combo, Through the Woods, Wood Slice Background Stamp, and Hello Lovely sentiment set to make this card along with an entire set pictured below.

For the background:  I stamped the Wood Slice stamp over kraft cardstock (along with the envelopes to match) and then I splattered some black and cream color paints over them.  I took the panel cut the Ridged Circle Stacklets into the background.  I wrapped some twine around it and attached them to an A2 side folding black card base.

The stencil creates four different scenes all at once by layering the stencils with colors you choose and then you cut each one out.  I layered mine over black cardstock and attached to the kraft card front panels.  I stamped the trees and sentiments and also added those to each card with some of them being popped up with foam tape.

Here’s what the rest of the cards look like using the same products.  I changed up the scenes for each one but using the same colors for each stencil layer.  I changed the sentiment so that I have a masculine card for several different occasions too.  There are lots of males in my family to send cards to and I always seem to run out of them.

Thanks so much for stopping in today!  I appreciate your kind words and taking the time out of your day!  See you soon!

Challenges:

  1. Cardz 4 Guyz – Father’ Day
  2. Addicted to Stamps & More – Die Cuts & Stencils #470
  3. Crafty Catz– Make it Masculine #674
  4. Cupcake Inspirations – For the Guys #596
  5. Allsorts – Masculine or Anything Goes #785
  6. Papercraft – For the Boys

It’s Funny and/or a Pun at Sparkles Monthly Challenge!

Hello friends!  Happy weekend!  Wow, it’s been very warm outside and I’ve been spending my time indoors.  I hope to be sharing some more posts with lots of things very soon, so stay tuned in!  Today starts another challenge over at the Sparkles Monthly Challenge blog!

This time was my turn to choose a theme and I thought with Father’s Day, masculine cards are a good way to use those “FUNNNY and/or a PUN” on our cards!  To make someone laugh or at least smile, is the main reason why I love to make cards!  If you feel like having a chuckle with your cards, make one and enter this month!  I can’t wait to see what you come up with!

Here’s my card for the challenge:

Nothing better than a hot French fry, but a French fry with a smile and bow tie is too fun!😆  (This is an American term for this food, but I know they’re called “chips” in Britain…either way, delicious and fun!)

For this challenge, I knew I wanted to pull out a large card kit I had gotten back in 2018 from Simon Says Stamp partnered with Doodlebug to create the I Chews You kit.  (Most of the items are not available any more other than the stamp set that I’ve linked.)  I fell in love with all of the cute images and puns from the Doodlebug So Pun Friends collection!  In this card kit, there was a die that cut out the box and fries.  The sentiments came from some “Chit-Chat Clippings“.

I first took a piece of white cardstock for the front panel and cut it with a wonky stitched rectangle die and placed it over a side folded A2 red card base.  I then took a wonky stitched circle die and cut a circle from the Doodlebug So Much Pun paper pad.  I placed it in the lower right and cut off part of the edge of the circle sticking out past the white panel.

I took the die cut fry box and cut it out in red and white.  I used the white strip to make the band at the top of the box.  I cut out the fries and sponged around the edges and arranged them behind the box and attached it to the circle panel.

The sentiment bubble was inked around the edges and placed in the top left above the fries.  I added a black layer behind the box sentiment strip and cut off the edge sticking out.  Lastly, I thought it would be fun to add a smile face to the fry and then I stamped, colored and die cut a bow tie from my stash to add on the one fry.  I finished it with some Doodlebug Heart Sprinkles.

I really had a great time putting this one together and I hope you’ve enjoyed it too!  Hoping to pull out this card kit again and make several cards with it as there is still so many things in this kit that I never got a chance to play with!  (I have so many things I need to do this with!)😉

Please be sure to check out the challenge blog to see the inspiration from the team and I hope you will take some time to have fun and play along with us!

Enjoy your weekend and thanks for stopping by!  I’ll catch you soon!

Challenges:

  1. Crafts Galore Encore Anything Goes
  2. Pammie’s Inky Pinkies – PIP2423 Anything Goes
  3. As You Like It – With or Without Words and Why? (I feel like this is the main reason to send a card to someone that includes a sentiment.  I especially like the fun and/or pun for sending smiles.)
  4. Tic Tac Toe – TTTC249 (I used first row down:  layers, die cut, pattern paper)
  5. Penny’s Paper-Crafty – #573 Anything Goes Using Paper
  6. Aloha Friday Masculine
  7. Creative Moments – #259 optional twist: Men and Boys

Mail Carrier Birthday and Class Results

Hello friends!  I hope that this Spring weather hasn’t gotten too crazy for you.  I know that this is a season of storms and tornadoes where I live in the Midwest, and I saw Iowa get some tornadoes come through.  It’s windy here, but luckily not that bad.  So, I thought this would be a good time to catch up sharing some things I’ve been working on!

My first project is a birthday card that I made for my son last month.  He’s a mail carrier and so I thought this would be fitting for him.  The mail carrier came from a MFT Birdie Brown stamp set (retired) that was actually a female with ponytails and a dress.  So, I’ve altered it and masked off the ponytails and drew in some shorts.  The mailbox die (retired) and other postal related stamps/dies all came from MFT as well.

For the background:  I’ve used a MFT cloud stencil and cut it out with a stitched rectangle die.  After coloring the image with Copics, I cut it out with another rectangle die and placed it over the red postage stamp rectangle.  I cut out the mailbox pieces and put it together over the cloud panel and added a few postal images at the top right corner along with the envelope in the background.  I finished it out with the birthday sentiment on the mailbox (retired) and a few white gel pen details on the image.

Although he’s a mail carrier, I didn’t have to mail this card to him, and I got to see him smile when he opened it…which is better than mailing it!😊


Last month, I also participated in the Taylored Expressions Virtual Stamp Joy.  I also just realized when registering for this event that I have participated in every single one of these since she started it during the pandemic in 2020!  I think the pandemic has really changed the world in several different ways, but I’m glad that this was one of them as I have enjoyed doing these.  There’s just something about getting a class event mailed to you and attending in your PJs while having snacks and crafting that I find appealing, I guess! 😉

Of course, doing virtual, I have lots of time to finish up projects, but I think I had them all completed within a week after the event…I just had to photograph everything and now I’m finally getting them on this post to share: (IF YOU ARE ON MY WEBSITE, CLICK EACH PHOTO TO ENLARGE IT-CLASS INFO AT BOTTOM OF PHOTO)

I had a busy month for sure!  I’m also in the middle of another session of classes that I’ve been working on and having to go back in my spare time to get through each one. During the exact same time as Stamp Joy was going on, there was another freebie class weekend that was going on, so now I’m going back and watching the replays to do little bits at a time…I have a little way to get through it still, but when I finish, I will share those results too.

I hope you’ve enjoyed my catch-up post today and have been inspired to have some fun even if you can’t be outside!  I’m sure when it gets a bit warmer, I will want to enjoy it, but for now, I’m going to play in my craft room!

Thanks so much for stopping in and have a great day!

Challenges: (top card only)

  1. Pearly Sparkles – For a Man/Boy
  2. Dragonfly Dreams – Use a Die
  3. Pammie’s Inky Pinkies – PIP2415 Anything Goes
  4. Creatalicious – #276 Anything Goes with Optional: Use Something New (new postage dies/stamps from MFT)
  5. Ally’s Angels – #81 Anything Goes
  6. Simon Says Stamp Wednesday – Stencil It (stenciled cloud background)

Going CAS at Sparkles Monthly

Hello friends and happy Wednesday!  Today starts a new challenge over at the Sparkles Monthly Challenge Blog and this time we would like to see your CAS (or “clean and simple”) creations!  I hope you will hop on over to see the inspiration from the team and consider joining in the fun with us!

Here’s the DT creation that I’ve made for it:

Sometimes I feel that CAS can actually be even more difficult than regular cards and I struggle with thinking I’ve added too much, or it doesn’t look right.  I think it’s more of me over-thinking something, though!

It was my son’s birthday yesterday and I thought this would be a great opportunity to make a card for him.  He’s a postal carrier, so I thought this cute owl from the Lawn Fawn Special Delivery would work great for this.  I started with the LF Stitched Cloud Backdrop and the LF Stitched Rectangle Frames dies to create the main focal panel.  I lightly blended some blue ink in a circle before adding the Copic colored postal owl popped up with foam.

Over some red cardstock, I white heat embossed the sentiment.  (I don’t remember which LF stamp set it came from) I die cut it with a banner die and popped it up over the cloud panel.  I also had an extra die cut heart lying on my table, so I thought it would be great to add with the owl.

Thanks so much for stopping in today!  Hope you’ve enjoyed my CAS card and have been inspired to join us this month with your take on the challenge too!

Challenges:

  1. Country View – Birthday card for a man
  2. Love to Scrap – Anything Goes
  3. 613 Avenue Create – Anything Goes optional: CAS
  4. Lawn Fawnatics – All things birthday
  5. Sunday Stamps – SSC304 sketchSSC304

New DT for Sparkles Monthly Challenge!

Hello friends!  Hope that you’ve had a wonderful Valentine’s Day and a great start to this new week in February!

designer

I’m really excited to share that I’ve just been invited as a new design team member over at the Sparkles Monthly Challenge Blog!  I really like the fact that it has fun monthly themes to get you thinking and also that I can use up my never-ending piles of my own craft stash!   This fits perfectly well with me and something I can handle!😉  So I hope you’ll stop by and follow along to play with us each month!  You can find a new one on the 15th of each month.

Today starts a new monthly challenge theme which is #161 “Men Only“…so anything masculine will do!  With having sons in my family, I’m always in need of masculine style cards for sure!  Here’s my card for this month’s challenge:

Oh yes…tools!  This always seems to be a favorite in my craft supply when creating a masculine card for sure!  I made this one for my husband who’s a very handy guy, and he likes the color blue.  I always like to add lots of textures, distressing and layers when making a masculine card.  This also helps for using more of those craft supplies!

I’ve had these stamps and dies from My Favorite Things for quite a while now and only used them a couple of times.  I die cut the background panel in the pegboard cover die and stitched rectangle dies, plus, layered with a couple of different blue panels that were stapled together.  A die cut circle in woodgrain and blue papers were attached and cut off at the edge before attaching to the top folding white A2 card base.

I’ve added the die cut tool elements over top of the circle using some silver mirror and blue colored cardstocks to cut them out.  I added some sponged ink over some places and topped it with a ripped strip of silver embossed screw heads, a strip of dark blue and the stamped sentiment stapled together and placed it over top with a piece of “messy” thread.  Lastly, I added the dark blue die cut hearts and covered them with a glitter brush pen.

I hope that you will stop by the Sparkles Monthly Challenge Blog to check out the challenge and inspiration from the creative design team!  I look forward to seeing what everyone creates!

Thanks so much for stopping in and I’ll see you soon!

Challenges:

  1. Creative Inspirations – Anything Goes
  2. Pearly Sparkles – Anything Goes
  3. The Paper Funday – Anything Goes optional: Lots of Layers 
  4. Lil’ Patch of Crafty Friends – Anything Goes
  5. Creative Fingers – Anything Goes
  6. Ally’s Angels – Anything Goes
  7. Allsorts – Anything Goes optional: hearts
  8. The Corrosive – Anything Goes

Cowboy Courage and Dad Jokes

Hello friends!  Hope you’ve had a great Fourth of July weekend and staying cool through this really hot week too!  I had planned on scheduling a post or two while I was gone last month, but time just didn’t let me get there and I’m a bit behind, but I wanted to share a couple of masculine cards I made for some men in my life for Father’s Day:

Up first is this card I made for my dad.  He’s a huge John Wayne fan and so I thought it would be fun to print out one of his famous quotes for a card.  After printing it out, I stamped the large rope lasso image around it from the Whimsy Stamps Cowpoke clear stamp set.  I printed the quote over a piece of kraft cardstock and stamped with chocolate colored ink with the rope frame and colored it with Copics.  I also cut the other images from the same stamp set over White Copic Blending Card and colored it with Copics.  I just fussy cut them out with scissors and placed them over my card front with some foam squares.  I cut a section of the horseshoe out so that it “appears” as if it’s hanging around the lasso and glued it over each side of the lasso.

I thought it would be fun to add some more details to mimic the boots by die cutting the loopy stitched borders from the Whimsy Stamps Straight Edger Die Set and then I ink blended around the edges with chocolate ink.  I also did this with the envelope you see behind the card too.

He really liked this one!  I remember as a child sitting with him sometimes and watching those really old “cowboy movies”.  LOL


The next card I made was for my husband…

This card was PERFECT for him!  Most of the time, the kids would always tell him that his jokes were NOT funny, but the fact that HE thought they were so funny is what made them laugh! 😂 And then he would claim that they were laughing or smiling, so he knew they liked them!😄

So, when I saw this Dad Jokes stamp set from Lawn Fawn, I knew it would be a good one to have on hand for cards with him.  I kept this card a simple one with a grassy stitched border and then I used one of those woodgrain papers from Lawn Fawn and also die cut the LF Father’s Day Border using the same woodgrain paper for it.

I positioned the little chicks to the side with the *crickets* sentiment above them and then the other one laughing while the little chick with the tie is telling the “dad joke”.  I popped up the speech bubbles with foam squares.  You will also see that I’ve stamped another “dad joke” on the envelope with some ha ha ha next to it as well.

**Side note:  My husband’s favorite “dad joke” from the stamp set was…”What’s brown and sticky?…A stick!*He had to tell that one to the (adult)kids of course! 🙄 

Hope you’ve enjoyed my masculine cards today or had a smile!  Thanks for dropping in and I’ll see you soon!

Challenges:

  1. 7. JulyThe Male Room – Monochrome (Top card only with brown tones)
  2. Alphabet – ‘G’ is for Giggle/humorous card (Second card only)
  3. Lil’ Patch of Crafty Friends – Anything Goes
  4. Corrosive – Anything Goes
  5. Pammie’s Inky Pinkies – Anything Goes
  6. Penny’s Paper-Crafty – Anything Goes using Paper

An Electric Connection and Happy Mail Love For Valentine’s Day!

Happy Valentine’s Day friends!  Today is the day all about hearts and love!  Although I’ve already sent out my Valentine cards, I have a couple of lovely individuals who take a peek at my blog from time to time…so I have to wait until they’ve received their cards before I share them here!😉  It’s somewhat hard to “hide” my crafting since hubby’s now retired! LOL  So here’s the cards I made:

I just KNEW the minute I saw this Taylored Expressions Love Lights Stamps & Stencil Combo set that it was something perfect for making cards for my retired electrician hubby!  This set also coordinates with other products and so I started by foiling the TE Foil It-Love Lights panel and then ink blending with the stencil set.  I had to use blue as this is hubby’s favorite color.  So, I’ve used the TE Sprinkles and Potato Chip inks.  The cardstock is TE Sprinkles. (I used softer tones for the Valentine feel.)  I also used the coordinating TE Mini Strips-Watt’s Up sentiment set that was silver heat embossed over the TE Sprinkles cardstock and cut out with the TE Mini Strips-Asymmetrical Die.  I just love the punny sentiments that go with this set!

The tiny light bulb for the accent I used actually came from a TE ‘freebie’ with one of my orders, so I die cut the light bulb with white glitter cardstock and lightly sponged some yellow ink in the center.  I die cut the center and bottom of the bulb with silver brushed cardstock and glued it onto the light bulb.  I die cut a circle from some vellum and also sponged this with yellow ink and glued the light bulb on top of it and attached it to the side of the card nestled with the sentiment strips that were popped up with foam tape.  He will have gotten this one this morning.

And here’s another card that I sent to someone very special!  It’s a simple card, but wow it was so much fun to create with using the Simon Says Stamp Limited Edition Happy Mail Love card kit! (Looks like it’s still available at the time I’m writing up this post, but not sure how long it will stay available.)  I so love those CUTE Doodlebug products and there are so many of them including the stamp set that goes together in this kit!  I wanted to play some more with it, but I have so many other things to focus on, so I’ll have to come back to it later! LOL

I’ve used the Doodlebug background papers from the kit and cut it out with a Lawn Fawn Cross-Stitch die and also cut a strip of ‘grass’ with green cardstock at the bottom using the Lawn Fawn Grassy Border die.  The heart papers were attached over a red piece of cardstock from the kit and layered onto a top folding A2 white card base.  The grass border was attached over the red cardstock and heart background papers.  This gave me the room to take the CUTE Doodlebug LOTS OF LOVE Odds and Ends Ephemera die cut shapes to create my scene with!  This pack came in the kit and there are SO many pieces!  I’m sure you could go on and on making cards!  The bird and bunny die cuts were popped up with foam tape.  It’s hard to see in the photo, but I’ve taken my glitter brush pen to all of the hearts on the images and the cheeks on the cloud.

I think these cards did what was intended which was to create smiles during this cold winter season!  I sure hope that it has done the same for you as well! 😉 Wishing you a happy Valentine’s Day with all of my heart! ❤ Thanks for stopping in and I’ll be seeing you soon!

Challenges:

  1. Moving Along With the Times – Love/Anniversary/Wedding
  2. Creative Inspirations – With Love
  3. The Paper Funday – Anything Goes optional ‘Hugs & Kisses’
  4. 613 Avenue Create – Anything Goes optional ‘Whimsical Valentine’
  5. Everybody Art – Love and/or Heart
  6. Try It On Tuesday – ‘All Loved Up’
  7. Cardz 4 Guys – ‘Love’ cards
  8. Little Red Wagon – Be My Love/Valentines

Huge thank you to those that keep the challenge blogs going!