Magnificent Scene, Birthday Crap and Craft Storage

**IF YOU’RE INTERESTED IN MY GIVE AWAY OR LOOKING FOR IT, CHECK OUT MY POST BELOW OR CLICK HERE.  ENDS SEPT 22nd**

Hello friends!  Welcome to September!  Really hope that you’ve had a wonderful Labor Day weekend and have had a great start to the month so far!  I’m still trying to get my MOJO in gear as I really love this time of the year with all of the wonderful Autumn things happening both outside AND in the crafty world too!  Really love when it starts up, but as it gets closer to the end of the year…I’m ready to skip right over it! LOL!

Today I have a fun post to share with some projects I made with several Inky Stamper products!  They have a FB challenge to participate in every month and so I thought I’d share what I came up with.  (Check it out and play along if you have any Inky Stamper stamps!) *Check out the store as well because there is a brand new release that just came out!

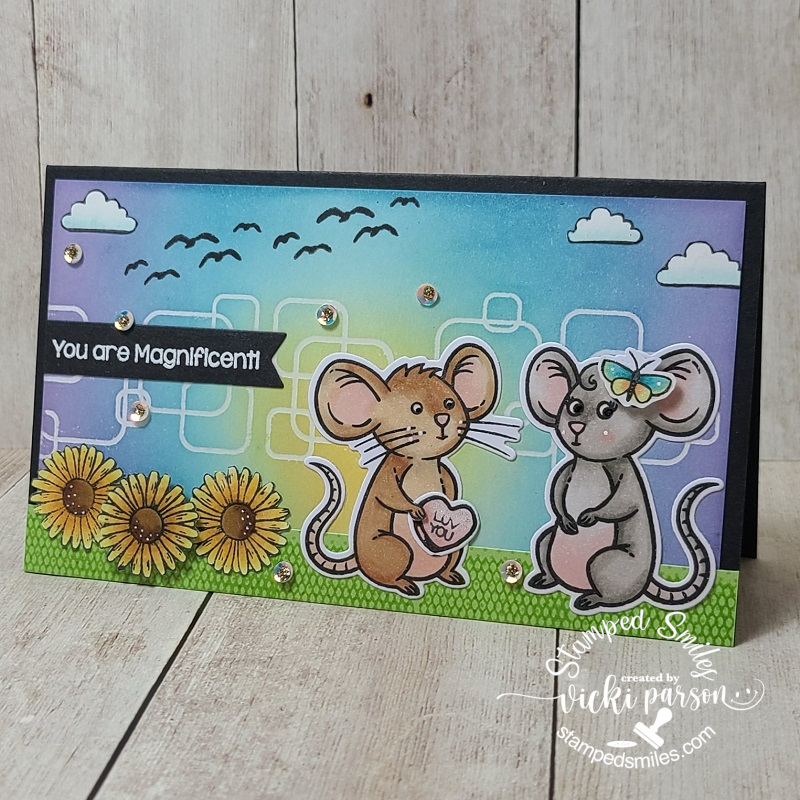
This was a fun little scene to create on a mini slimline card!  So the Inky Stamper Inkspiration FB Group challenge THIS month (Sept) is to use more than just one Inky Stamper stamp set on one design. I really liked this challenge because it got me thinking of what to use and pull out several different images and actually use them!  Looking forward to see what other people come up with too!  So for my scene, I’ve actually pulled out EIGHT different stamp sets!!!😮

To start with the background, I pulled out the *Housefly set with the squares image to clear heat emboss the background and then ink blend over top for an “emboss resist” technique. I took the *Rainy Day set and stamped the rainbow/cloud image and fussy cut the clouds to add on the background sky.  For the “flying birds” and the “pattern” at the bottom over the green strip, I’ve used the *Pelican set.  Of course the main characters are different sets from *Rosie Solo and *Ralph Solo.  For Rosie’s “hair”, I stamped the butterfly from the *Bug Catcher set to color and fussy cut it out which was then popped up over the flower she originally has. I also used this same set to white heat emboss the sentiment.  For Ralph, I pulled out the *Snail set to stamp and color a heart which he is holding.  I just made a slit around Ralph’s “hand” to help him hold the heart.  And lastly, I pulled out the *Bee set to stamp, color and fussy cut the flower image.  I cut off the stem and just attached the flowers with one of them popped up with foam tape. Lastly, I’ve added some sparkle to the butterfly on Rosie and the heart with Ralph using my glitter brush pen.  I then added some sequins from the Fall Flowers sequins mix and filled the centers with some Stickles.

So did I do it?  Did you count out the eight different sets?  I think this mouse couple is too cute…and no…they aren’t the “real” mice, these are the good ones to have!😁

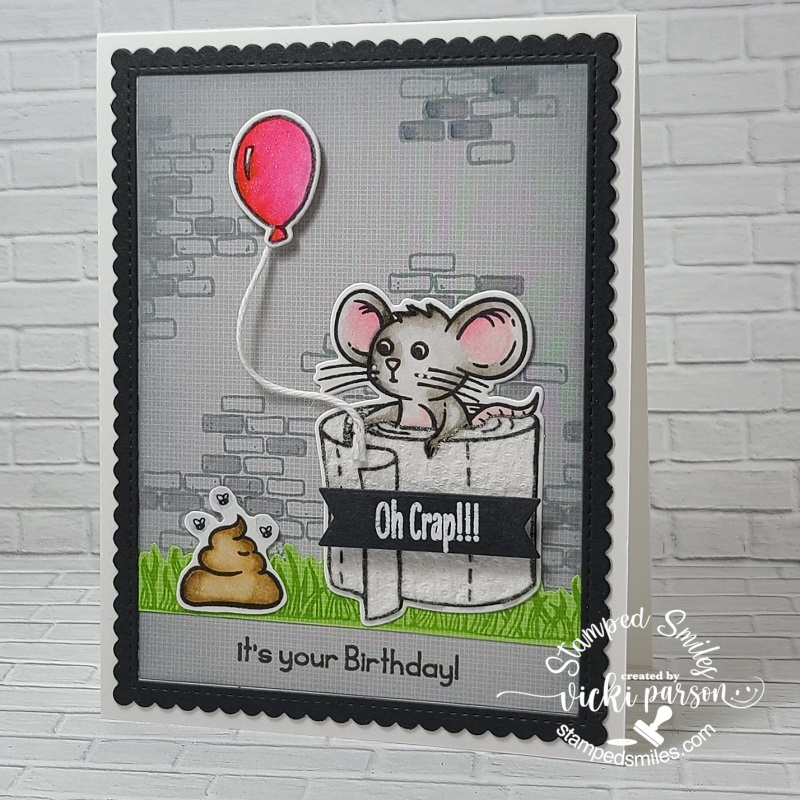
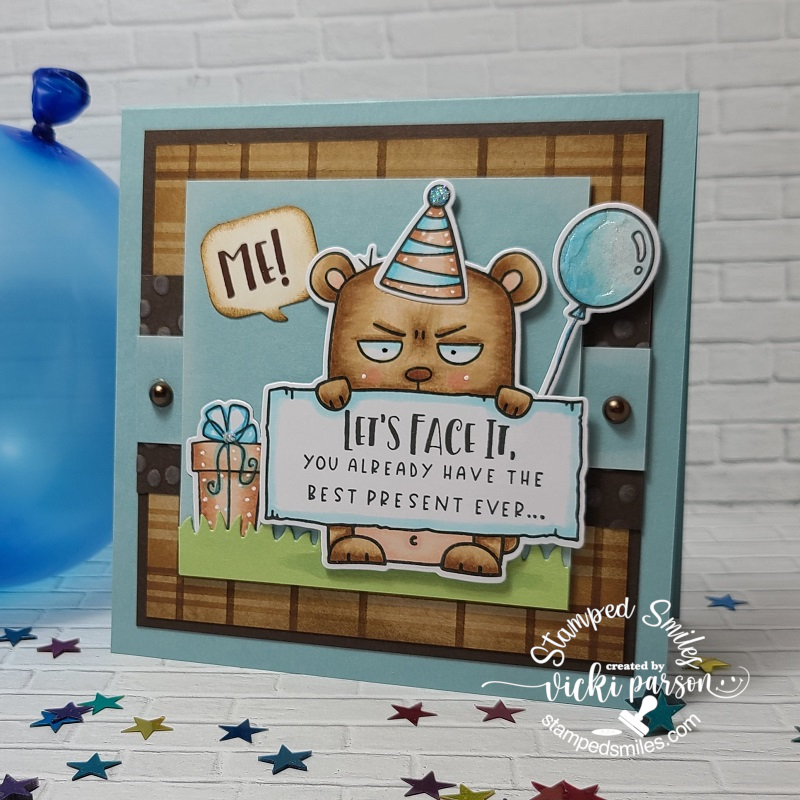
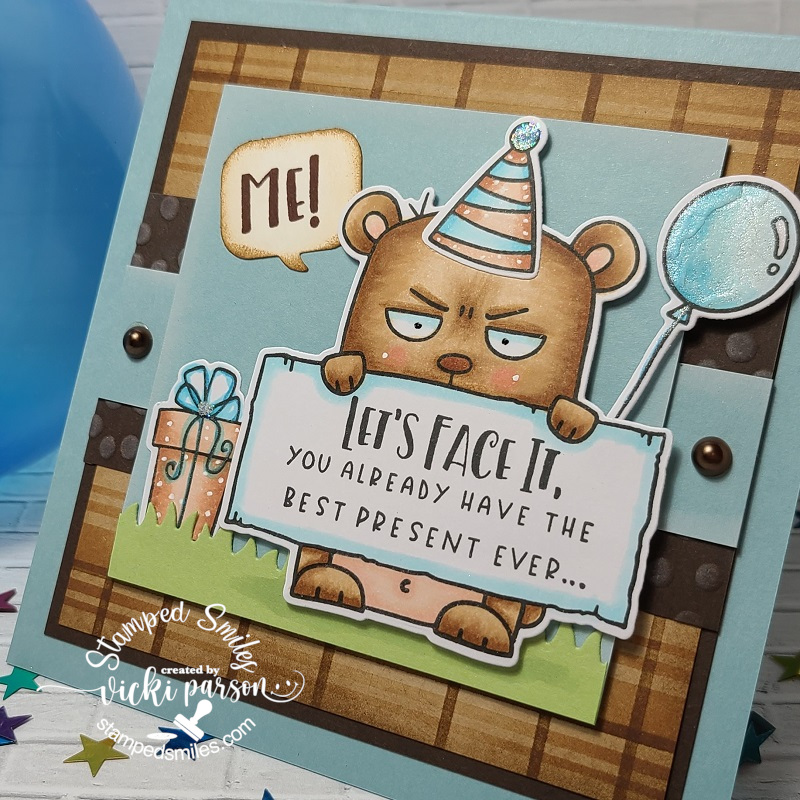
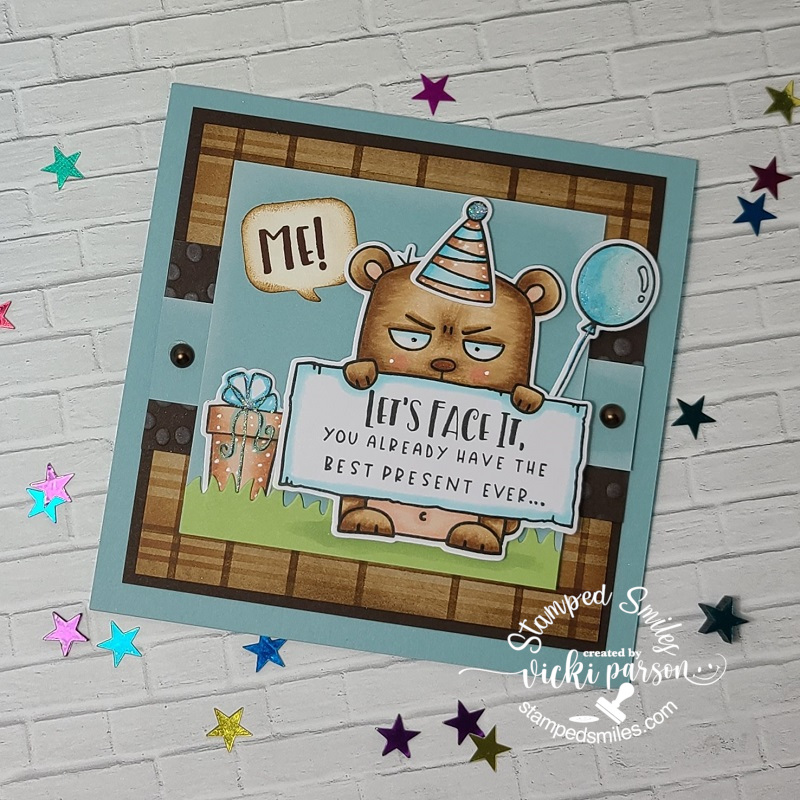
Ralph is showing up again!  I needed to make a humorous birthday card for my son and I’m sure he’ll get a kick out it!😂  This is actually the first card I made for this month’s Inky Stamper Inkspiration FB Group challenge, but I didn’t use eight different sets like I did on the one above, I only used four different sets.  However; I used REAL TP!

The background was created using some of the Doodlebug Gingham/Linen paper which the “bricks” image was stamped over with grey ink from the *Goat set.  I also used this same set to stamp the “grass” border towards the bottom with another strip of green from the same Doodlebug paper pack.  I just fussy cut the top of the grass strip to attach over the grey brick background.  Of course the Ralph inside the TP roll came from the *TP set along with the “pile of poo”💩 and the “Oh Crap!!!” sentiment that was white heat embossed over a black banner and popped up with foam tape.  The balloon image came from the *Bunny set.  I decided to attach a piece of the white Doodlebug twine and pop up the balloon with foam tape.  I attached the other end to Ralph’s “hand”.  Lastly, the forth set I used was the sentiment at the bottom from the *Iguana set.  (For that sentiment, I only used a portion of it from the stamp.)  So that makes FOUR sets used!

The images on this card were colored using my CC Real Brush markers, I stamped the Ralph image again over the TP…yep, stamped directly onto the TP and fussy cut it out to paper piece over the image.  Gives it the REAL look and feel of TP!😉 I have die cut a black scallop frame to go around the scene and lastly I’ve added some sparkle to the balloon and the tiny flies around the “poo” with a glitter brush pen.  I didn’t want to add too much as this is a masculine style birthday card.

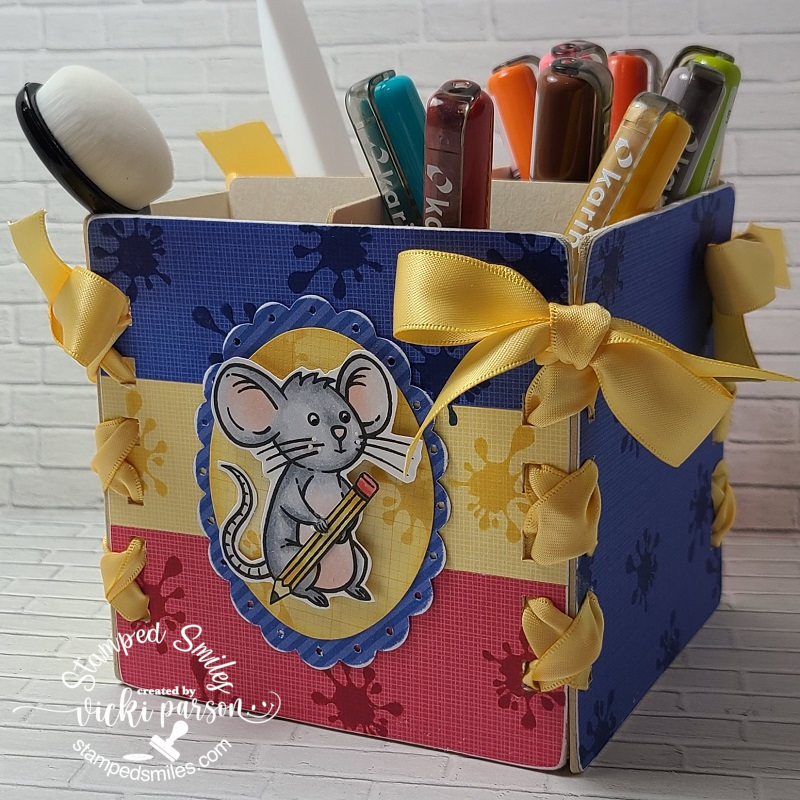
And then I have one last project to share that I actually made for last month’s challenge that I “squeaked” in just in time too!  (See what I did there?!😂) Ralph is just so popular today!  I had a plastic bag sitting around on my table that I kept moving out of my way and it was frustrating me, so I made this “container” to hold some crafty things to sit on my table!  It’s actually a REALLY old tutorial from Splitcoast Stampers using chipboard coasters!  I have SO MANY of those coasters and I was happy to use some up.  CHECK OUT THE TUTORIAL HERE (P.S. The tutorial is actually done up by Taylor from Taylored Expressions, before her store years!  That’s how old it is!)

The challenge last month was to use primary colors on your project which are the red, blue and yellow colors.  Not realizing what the challenge would be for THIS month, it would actually fit in with that too!  I used THREE different sets for this project. Again, I’ve used the *Ralph Solo set that was colored up and fussy cut out as this was done before the new die came out for him! (see top card)  I took out several of the different Doodlebug papers to cover my chipboard coaster panels being mindful of the Primary Color challenge.  Rather than leave the papers as is, I decided to pull out the *Inky Greetings set to stamp the splatter image in the coordinating colors with the papers.  I also decided Ralph needed to be holding a pencil, so I pulled out the *Owl set and stamped, colored and fussy cut the pencil image which was added to Ralph’s “hand” by making a small slit for him to hold it.

I was happy to pull out some of my old punches to create the backdrop for “pencil holding Ralph” as well as using up those old coasters and some more papers and ribbon from my stash! (I’m really hoping to be doing more of this often!)

I know this was a long worded post, but hope you enjoyed the projects and got some smiles too!  Thanks for catching up with me today!  See you soon!

Challenges:

  1. Crafty Animals – Anything Goes + animal
  2. QKR Stampede – Anything Goes
  3. Love to Scrap – Anything Goes
  4. Happy Little Stampers Birthday – Anything Goes Birthday (2nd card)
  5. Sisterhood of Snarky Stampers – ‘B’ is for Birthday
  6. We Love Stamping – Anything Goes with stamping (all are stamped!)
  7. Crafting Happiness – NOT A CARD: Anything Goes (3rd project)
  8. The Corrosive – Anything Goes
  9. Try It On Tuesdays – Animals -real or imagined

Hello! Welcome to 2022!

Hello friends!  I hope you are all doing well and looking forward to a promising year this go around!  I sure am!  I know it’s been a while since I’ve posted, but I was having a bit of a hard time with having lost my “MOJO” for a period, feeling really down and not myself at all.  Christmas came and then on top of it, I’ve gotten sick.  I am starting to feel a bit better now, so I decided that the only way to get through all of this is by doing what I’ve always felt to be therapeutic, which is to keep on creating!  I just need to get back into the mindset of it again is all, but I do enjoy it when I’m creating as I’m sure my fellow crafty friends can relate to!😉  Appreciate your kindness to me always.

Since I really haven’t created much lately other than Christmas cards (as you can see from my previous post below), I’m going to share some projects that I had done at the end of last year including some commissioned cards I was asked to do:

Last month was a birthday card for my dad, so I’ve pulled out a special birthday kit that came out sometime last year from Simon Says Stamp.  Everything I’ve used on the card including the embossing folder, stamps, sentiment strips and paper all came from the kit.  It may be hard to see in the photo, but I’ve foiled over the “super happy” sentiment strip that was included with the kit and glued it over top of the cake slice.

I’ve added some glitter over the candle flame, the yellow stars and the inside of the white embossed “birthday” strip under the cake slice.  I pulled out the blue colors from the striped paper to color the image with using Copic markers and die cut it out to glue over top of the sentiment strip and embossed oval layer.

And speaking of birthdays, I was commissioned to do a 50th birthday card for a guy that is a professional painter and enjoys grilling outdoors.  The first image that came to my mind was this really cute LOTV image.  I printed him out and thought it would be fun to incorporate the birthday number above “the painter” to make it look like he’s in the process of doing it while the paint is dripping everywhere.  So while the boy painter was printed out, I stamped and embossed the numbers above him.

My husband had the idea of the little grill along the edge going “up in smoke”.  So I created a “ground” area for the ladder and the grill to be on.  I stamped the grill image, colored it in and then a liner pen to draw the line to establish the separation.  I then ripped the corner above the grill and sponged some Black Soot distress ink around the grill and corner edging.  I didn’t want the background to be white or black, so I dug out some brick style pattern paper to place behind that corner area before attaching it to the card base.  Hopefully there were some chuckles from it!

So for the inside of the card, I thought it would be fun to take this corner border die that I received from a Halloween class and make it look like the red paint drip continued on the inside.  Then I found this really funny sentiment to go along with the grilling bit too!  I also sponged some more of that Black Soot distress ink around the edges.

These were really fun cards to do and I enjoyed the coloring process so much!  I find that coloring images really helps me get through some creative blocks…even if it’s a simple image or something that I don’t use, so I’m thankful to at least to be able to do that.  Hopefully I can get back into what I enjoy doing here.

I know people sometimes struggle with masculine style cards, so here are a few examples of cards that I came up with for men.  Hope it helped with some ideas for you too!  Thanks for stopping by today and I’m glad you did!

Challenges:

  1. 613 Avenue Create – Anything Goes
  2. Stamping Sensations – Anything Goes with stamping + use a die (top card only)
  3. Lil’ Patch of Crafty Friends – #173 Anything Goes
  4. Pammie’s Inky Pinkies – Anything Goes

Autumn Birthday For My Deer

Hello friends!  Really hope that you’re having a great week as we start to dip down into cooler temps and that means that Autumn is coming to a close (sadly) and winter is upon us along with Christmas!  Are you ready?  I’m working on things…that’s all I can say!  I need to get more motivated for sure!  Many things are already done, but it’s the double checking to make sure…and sometimes it’s not! LOL

Recently, I needed to make a birthday card for hubby, so I pulled out a card kit I had from last year and came up with this one for him:

This was a really fun one to do from the Simon Says Stamp Woodland Whimsy card kit from last year. (I linked the stamp set and dies still available.)   My husband is a huge fan of outdoor wilderness and especially deer in the Autumn season as they can be easier to spot with the falling leaves.  So it just seemed like the type of card to make suited for him.

I’ve colored in all of the images with Copic markers and die cut them out with the exception of the birch trees as there were no dies included with the set.  I placed them behind my die cut circle from the woodgrain paper included with the kit.  I backed it with another piece of the paper from the kit as well.  I even tucked in the back part of the deer’s feet along with a leaf to make it part of the scene.  I like the banner from the set which is left blank so that you can add whatever greeting you want with it.

The little heart above the deer was also fussy cut out and then I covered it with a glitter brush pen as well as some crystal effects over top for the shine. I thought about adding some sequins, but decided it wasn’t needed. The scene was layered over a piece of cardstock included with the kit and then I stamped some of the birch trees onto a coordinating envelope as well.

______________________________________________________________________________________________________________________

Also thought I’d share some other projects that I’ve been working on since my last post.  It seems that I’ve become a little addicted to taking those classes and events…honestly don’t need to be taking them, but sometimes it’s just fun to participate in the fun with fellow crafters!  I do enjoy sharing with those like-minded crafters like myself!😁

These are all projects I’ve made using products from Inky Stamper.  (I will link to the information in the descriptions below.  ***If you are on my website, just click on the photos to enlarge them to see better and the wording will also be more visible.) 

Inky Stamper has just came out with several new stamp sets this month…super cute and great for Christmas!  So be sure to check out the store’s front page to see them!

I’ve also been working on some Christmas things that I will share soon as well as some other requested commissioned cards that I’ve recently finished. I would like to get those Christmas cards finished up early for a change!  How about you?!  Are you all done creating for the Holidays yet?

Until next time, thanks for stopping in today friends!

Challenges (For deer card only)

  1. Alphabet Challenge – ‘P’ is for Patterned Paper
  2. Happy Little Stamper – Anything Goes with Diesimage
  3. Addicted to Stamps and More – Birthdaysimage (1)
  4. Pammie’s Inky Pinkies – Anything Goes
  5. {Cupcake Inspirations} – Fall Foliage#532
  6. The Crafter’s Café – Male

Reminder for the Blues at {Cupcake Inspirations}

Hello friends!  Hope that you’ve had a nice weekend as your days are growing closer to Christmas.

cic508

Today I have a reminder for you about the “Shades of Blue” challenge over at the {Cupcake Inspirations} Challenge Blog and that you still have a few days left to enter your blue shaded projects!  Hope you’ll join us!  Although thoughts of winter, Christmas and snowflakes come to mind with these colors, I’ve decided to take the colors in a different direction for this week:

Blues made me think of a masculine birthday which is something that I needed for a birthday card for my dad this last week, so my thoughts turned to him when making this card.  He’s been having some medical issues recently and I wanted to send him a happy card along with some real balloons to help try and cheer him up a bit.  My heart is heavily with him right now as he deals with many physical issues.

For my card, I first started with a piece of Bristol Smooth watercolor paper and ink blended some blue oxide inks over the panel with Chipped Saphire, Blueprint Sketch and Salty Ocean Oxide Inks.  I die cut the large sentiment die and balloon dies from this piece and then attached the sentiment to a die cut vellum shadow behind it.

I stamped some images with the same blue inks I blended with over a white panel along with doing a very light ink blending in the center of it before attaching the die cut sentiment over top.  I then attached that panel to a blue die cut panel and again over a white die cut panel and finally attaching it to an A2 sized side folding blue card base.  Lastly, I popped up and glued the die cut balloons along with the silver strings also die cut around the sentiment panel keeping in mind the placement of the strings.  I added a few blue sequins to finish it off.

In this close-up photo, you can see the details of the background more clearly along with the shimmer over the balloons which I went over with a glitter brush pen.

So I hope that you’ve enjoyed my birthday card today and were inspired to pull out your blue shaded stash and have a play with them!  Really look forward to seeing what you come up with for the challenge!  Be sure to check out the {Cupcake Inspirations} Blog and see what the Cupcake Sweeties have to inspire you with this week as well!

Thanks so much for joining with me today and I’ll be seeing you soon!

Challenges:

  1. The Divas That Cut Paper – Dec Anything Goes + die cut machine
  2. Lil’ Patch of Crafty Friends – #147 Anything Goes
  3. The Corrosive Challenge – #12 December Anything Goes
  4. AAA Birthday – #20 Twinkle#20
  5. Creative Moments – #204 Anything Goes
  6. Watercooler Wednesday – WWC301 OccasionsWWC301 - Dawn's All About Occasions Challenge
  7. Cute Card Thursday – Anything Goes

Bright Birthday and More Whimsy Retreat Projects!💡

Hello friends!  Hope that you’re having a great week so far!  Hubby and I are trying to figure out how this “retirement thing” goes together! LOL!  I think we’ll be having so much fun and we’re just really excited about the future and what we’ll be doing.

Speaking of which, this past Sunday he also celebrated a birthday and of course I had to make him a card that was suited for an electrician.  I had to add a bit of humor about his age on the inside, but this is what I came up with:

I’ve had this Stampin’ Up! Sunburst die and stamp set and haven’t used it that much since I bought it. (quite a while ago! Not quite sure how old.. LOL)  I thought it would make a great light beam for my VERY old Simon Says Stamp ‘Watts Up’ stamp set that was from a past card kit. (circa 2014/2015)…yep, all old!

I die cut the sunburst from some yellow and gold glitterstock that I glued together slightly off-set and then attached it over a side folding A2 sized black card base.  I stamped the sentiments over a couple of the yellow strips with black ink taking care to make room for the circle panel.

I then stamped the lightbulb over a white piece of cardstock and colored the base with Copics and used a marker draw a line above it for the string.  I took a solid heart from the stamp set and heat embossed it with some Gold Metallic Gilded EP and then sponged some yellow ink over the bulb for some glow.  I die cut it out with a circle die and then layered over another die cut circle black piece and popped it up over the sunburst layers with foam tape.

I tied a bow with some black twine and glued it to the light bulb base.  I also stamped the bulb in a lighter gray ink over the envelope and added a string to that as well with a gray marker. (The inside of the card said:  “Old is the new black.” 😆)

———————————————————————————————————–

And I also wanted to share that I’m still plugging away on the several kits that I received from the Whimsy Stamps Virtual Retreat last month!  These are really amazing projects and I’m having lots of fun putting them together still! (Christmas will be coming next..so stay tuned for those!):

This is a fun interactive card with a pull tab at the top where this cut little dragon slides upwards towards the sky! This kit 9 came with an A2 sized envelope, but I had to make my own envelope slightly larger to accommodate for the pull tab sticking above the card. I’ve added doodle lines around the edges and shadow stamped a sentiment at the bottom for my own added details.
This set was from kit 14. The hexagon shaped box was super fun and even came with the candy! There was also an extra stamped and cut out bee, so I used it to make another card… shaker style! I used the left over honeycomb die cut piece as a stencil on the card as well. I used the envelope that was provided in the kit above and decorated it for this A2 sized card instead. (I know someone that loves these candies…so they might get a surprise at some point! 😉)
And lastly, this was from kit 15 and TOTALLY different than what was photographed in the booklet! First of all, I received a plant image with a die cut speech bubble sentiments and thought it might be cool for a Halloween card on another project, so I saved those to use later. I received an EXTRA stamped sunflower image from kit 22 that I had posted earlier and decided to use it for this card here. I colored it similar to that one and cut it out, but cut off a portion of it on this design. I also changed up the background ink blended colors and splattered some gold paint on this one. Love how it turned out. This will be for an Autumn anniversary card for someone coming soon.

Hope you’ve enjoyed all of my projects today!  Thanks so much for stopping by and I’ll be seeing you soon!

Challenges (For the Birthday Lightbulb card ONLY):

  1.  Retro Rubber – Anything Goes + stamps older than one year
  2. Cardz 4 Guys – Birthday for adult male
  3. Creative Moments – Anything Goes
  4. Crafty Calendar – Anything Goes
  5. Pammie’s Inky Pinkies – Anything Goes
  6. Shopping Our Stash – Tic Tac Toe (I used middle across: String/twine, 5 year old stamp, bright colors)
  7. Watercooler Wednesday – All About Occasions (birthday)

The “Power of Practice” Blog Hop

Hello friends! I’m so excited to be sharing a special collaboration blog hop with my fellow crafty friends collab FB group as we share our own personal progression on how practice over time can help to increase your confidence and skills within your crafting journey. (blog hop links are at bottom of post.)

So please grab your favorite beverage and join us in this fun and informative blog hop that shows how “the power of practice” can be utilized in your own crafting! (highlights are done in red.)

  • I would like to start off by stating each person’s experience is their own journey and will run on it’s own pace which is something that we all need to be aware of and patient with.  Some particular skills will take much longer to grasp than others and you need to take it easy on yourself without harsh judgement.  Just enjoy the process and have fun with it!  (That was and still is the hardest thing for me to learn.)

Although I’ve been paper crafting for the last 20 years or so, I’ve been involved in several different crafts throughout my entire childhood or since I could hold a crayon in my hand!  My grandmother as well as my mother has passed down their experience with crafts which I learned from and picked up many others along the way including what I love today.  So some things I do may already come naturally for me without recognizing where it came from because it was taught to me long ago.  There are some things, however, that I’ve had to spend the time learning.

Now taking classes aren’t the ONLY way to learn something for sure!  Good ole “Trial and Error” are great for learning and gaining personal experience from…which I tend to learn the most from actually!😁  Another thing that helps is new tools/products to help make the process easier or look more “finished” or “professional” in nature.  When I first started with my stamps, there was not a common heat tool for instance.  I had to heat emboss over a stove!  So times have changed as well as techniques and inspiration. Inspiration is EVERYWHERE over the Internet too!  Many people have so many clever ideas…I wish I could keep up with them all!  Some things may not be of interest to you and others may intrigue or intimidate you.  Find what interests you the MOST..at the time…and work on it because you will love learning about it which means you will gain more knowledge from it.  You don’t have to share with others what you do as long as YOU enjoy what you’re doing.  Do what feels right to you and your journey.  It’s never about others, it’s about YOU!


I feel like I could write an entire book on just this matter, but since this is a visual craft, it’s better to “see” with your eyes sometimes or show how things can come together…or not!🤨

I’m starting with a photo of a card I had made back in 2007 when I had already been a year into having a blog and was still a Stampin’ Up! demonstrator at the time.  Even the technology of simply taking a photograph has improved tremendously over the years…

crafting encouragement singleNeighborhood_by_basement_stamper

I no longer have most of the products used here and I had to lift the photo from my Splitcoaststampers gallery as they have stored my oldest photos I have anywhere.  This was the first place that I shared anything I made online. (There are 124 pages of my gallery and if you look through, you will see the progression over time.)


Now I could really criticize myself and pick this all apart, but it was part of my process at the time.  And at that time, I was happy with it.  It looks like I’ve colored with ink pads and a blender pen, cut out the images with scissors as well as cut fringes of the grass border. (tools have improved since and many purchases have been made as well!😊)    As we move forward, I can share how I updated that design today:

Vicki-CraftyChefs and POPhop

What I have decided to do was to take the photo of the older card above and make an updated version of the same design, but with the mindset and techniques that I’ve learned since.  You can see that my coloring has improved as well as the different tools and items that have been updated to help with my design execution.  I still used similar colors, similar layout design as well as coloring an image, but just maybe updated the look from the practicing of not just the coloring over time, but the practice of just cutting the layers and putting things together as compared to years past.  Just meerily putting together card after card has helped me with the practice and made me better aware.  So you can see how just putting together a card in general, with practice, can help improve skills!

  • Another tip I find helpful is to join your fellow crafty friends in groups and collaborations like this blog hop as well as other groups which is what I’ve also made this card for, called “The Crafty Chefs“, where we take turns coming up with a new “recipe” to follow each month.  There’s no pressure, just a group of friends coming together, learning from each other through challenges, and inspiring one another as we enjoy our love of crafting!  For me, this is a huge deal.  Check out the link above if you’re interested in joining with us!  It’s still fun to craft, but it’s even better when it’s shared with someone.  So here’s the September Crafty Chef’s recipe that our head chef Linda has come up with for us to use:

Crafty Chefs Sept recipe

(I have used ALL of the “must do” items and then added a couple of pearls from the “can do” items.)

I have found that within the last several years, many people enjoy watching video tutorials on You Tube..which makes sense because seeing someone actually doing something or putting something together is a better way to learn rather than just seeing a finished photo of a project.  So to see how I’ve made my latest card for my son’s birthday, check it out below or CLICK HERE to view on my You Tube channel:

Hopefully through the video you were able to learn a few things that you can incorporate into your own card making.  Sometimes we can improve upon ourselves by even trying to recreate something we’ve done in the past and add some new things you’ve learned along the way.  It’s a great way to see how far you’ve come along and not be so critical of yourself to remind you that you are always learning, as I still am right now as well.


I have to chuckle at this card for my son’s birthday as he is a fun-loving jokster that will appreciate this along with the fact that it’s a bear image.  He was nicknamed “Bear” in his school years, so I thought these Big Grumpy products from Taylored Expressions would work perfectly for this!  I’ve also used the Big Grumpy Birthday stamps to go with him along with the other products used in my video above.

For the sparkle, I’ve taken some Stickles Star Dust glitter and added to the birthday hat as well as the center of the bow in the present.  I used a glitter brush pen over the balloon and bow.  I added dots to his cheeks, hat and the present with a white gel pen.  I forgot to mention in the video that I’ve added a couple of brown pearls to the blue strip so that I added something from the “can do” list for the Crafty Chefs recipe!😉

I really hope that this post was helpful as well as enjoyable for you and that you received some benefit for taking the time to read over it.  I know that I will be looking forward to seeing what my other crafty friends have to share and inspire me with!  I think there is something to learn from everyone no matter how long you’ve been doing it.  

  • The power of practice simply means, to me, being able to refine your skills into something that you want to be better at, take in more information or take it to the limits of your ability.  This is done by repeating often and over time to increase or add to your knowledge of what you’re trying to improve upon. If we are not trying new things, then we are not learning or growing as individuals.

Please be sure to check out the following crafty friends’ blogs below to see their take on this blog hop concept:

Thanks so much for stopping by my friends and I’ll be seeing you again soon!

Challenges:

  1. Inkspirational – Birthday PhotoChallenge221
  2. Crafty Friends – Anything Goes
  3. Crafty Calendar – Anything Goes
  4. Lil Patch of Crafty Friends – Anything Goes
  5. Dragonfly Dreams – Happy Birtdhay Traci!
  6. The Corrosive Challenge – #9 Sept Anything Goes
  7. Creative Moments – #198 Anything Goes optional:  Make it Funny
  8. AAA Birthday – #17 Animals & Critters#17 bottom badge
  9. Creative Craft Cottage – #133 Include and Animal
  10. Simon Says Stamp Wednesday Challenge – Humorus/Fun Card