Hello friends and happy weekend to you! As we inch closer and closer to Thanksgiving at the end of this month, I think this is a perfect time to create a few thank you style cards to use throughout the year!
This brings us to a new monthly challenge over at Sparkles Monthly and we have the theme of “Thank you Card” this month. I look forward to seeing all of the projects in the gallery for this one. Here’s what I came up with:
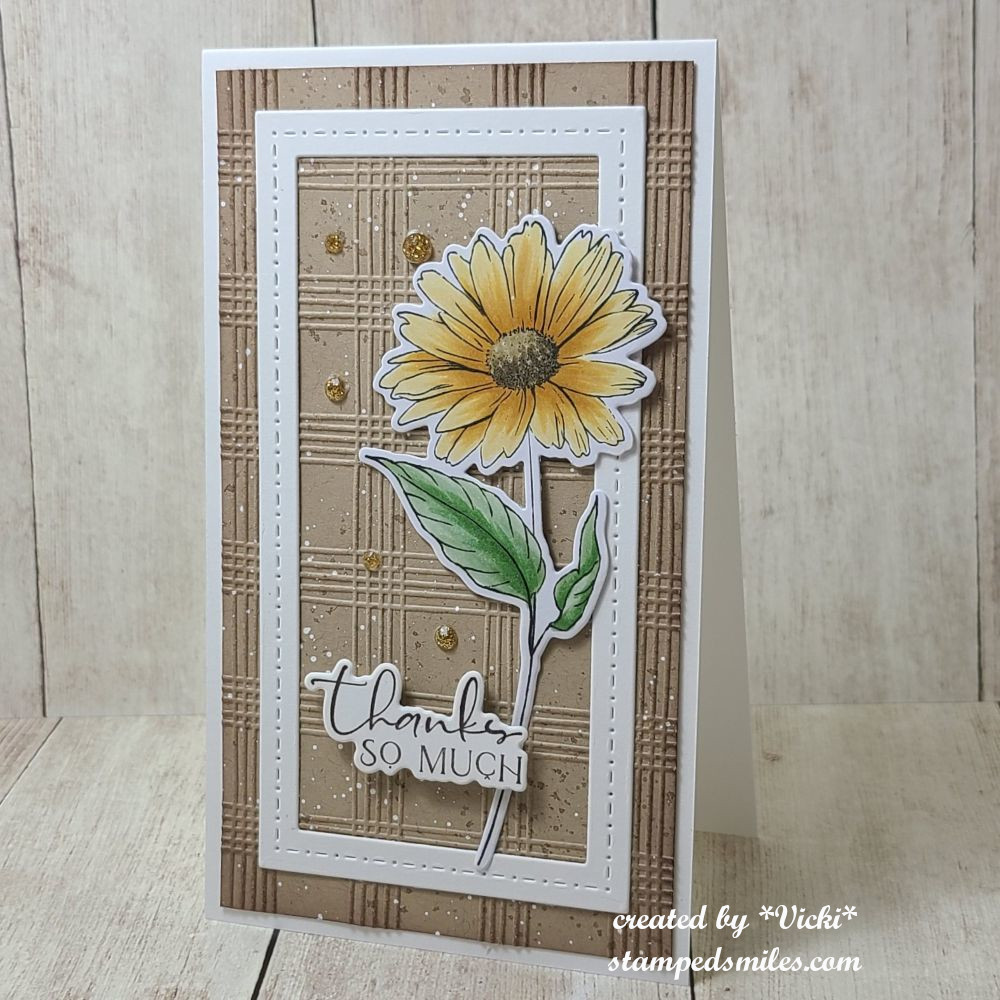
I thought I’d try out a mini slim sized card for this one and the tall larger flower was a great fit for it! I used the Taylored ExpressionsNatures Canvas Card kit (no longer available).
For the background panel, I embossed a kraft cardstock piece with the TE Sketched Plaid embossing folder and the went around the edges with the same color ink and then added some brown and white splatters before attaching it to a mini slim top folding card base. I also die cut a frame from the TE Mini Slim Frame in Frame dies out of white cardstock to place over the embossed layer.
I stamped, hand colored and die cut the flower. I used one of the greeting panels (from card kit) to gold foil and cut out the coordinating sentiment with it to pop up with foam tape over the flower stem. It was then finished off with some gold gem/rhinestones.
I hope you’ve been inspired by my thank you card and will join in the fun with us this month for the challenge! **NOTE** This will be my final project for the Sparkles Monthly Challenge as a design team member. I have enjoyed my time and wish Caz all of the best for the challenge blog in the coming year as well. Thank you!
Hello friends! Welcome to the start of a new week for mid-September! I think Summer actually DID come back to us as we’ve set record high heats for this time of the year! I think I’m ready for those cooler temps to come back! Ugh! I know it won’t be long now and we can start enjoying trips outdoors as we look forward to picking apples and all Autumn festivities that we do!
Today is time to share a new challenge over at Sparkles Monthly and we have the theme of “USE A SNGLE FLOWER (floral image)” this month. Flowers seem to be everyone’s favorite. Here’s what I came up with:
Mine is a single sunflower image. My husband planting them in our backyard this year and they were so pretty! Of course, I forgot to take a photo of one before they died off.
The items I’ve used came from an older card kit from Simon Says Stamp including the stamp set called Sunflower Fields. There is a single sunflower image that I thought would be perfect for this challenge, plus I can use more items from my stash!
For the size of the flower image, I wanted it to stand out, so I used a tag and twine from the kit and decided to make this a mini slim card size.
For the background: I used a piece of watercolor cardstock and gold heat embossed the “Romantic Script” background stamp (retired) from My Favorite Things and then used some oxide inks swiped on glass with spritzed water to make a “smooshed” background. I also used these same colors to watercolor my flower with. (except the green, I only used that for the flower) I also used some gold watercolor to splatter over the tag. I only splattered the tag because I didn’t think it would show very much over the card background.
I cut the smooshed watercolor panel to fit over a kraft side folding mini slimline card base. I die cut the flower and the sentiment to attach over the tag, added some twine and then used foam tape to pop it up over the ink smooshed background. Lastly, I’ve added some yellow sequins to finish it off.
I hope you will take some time to pull out a single flower and join us in the challenge this month! Looking forward to seeing your creations! Thanks so much for dropping by!
Hello friends! This will be a pre-scheduled post as I’m away for a bit, so this is going to be a very short and sweet post from me.
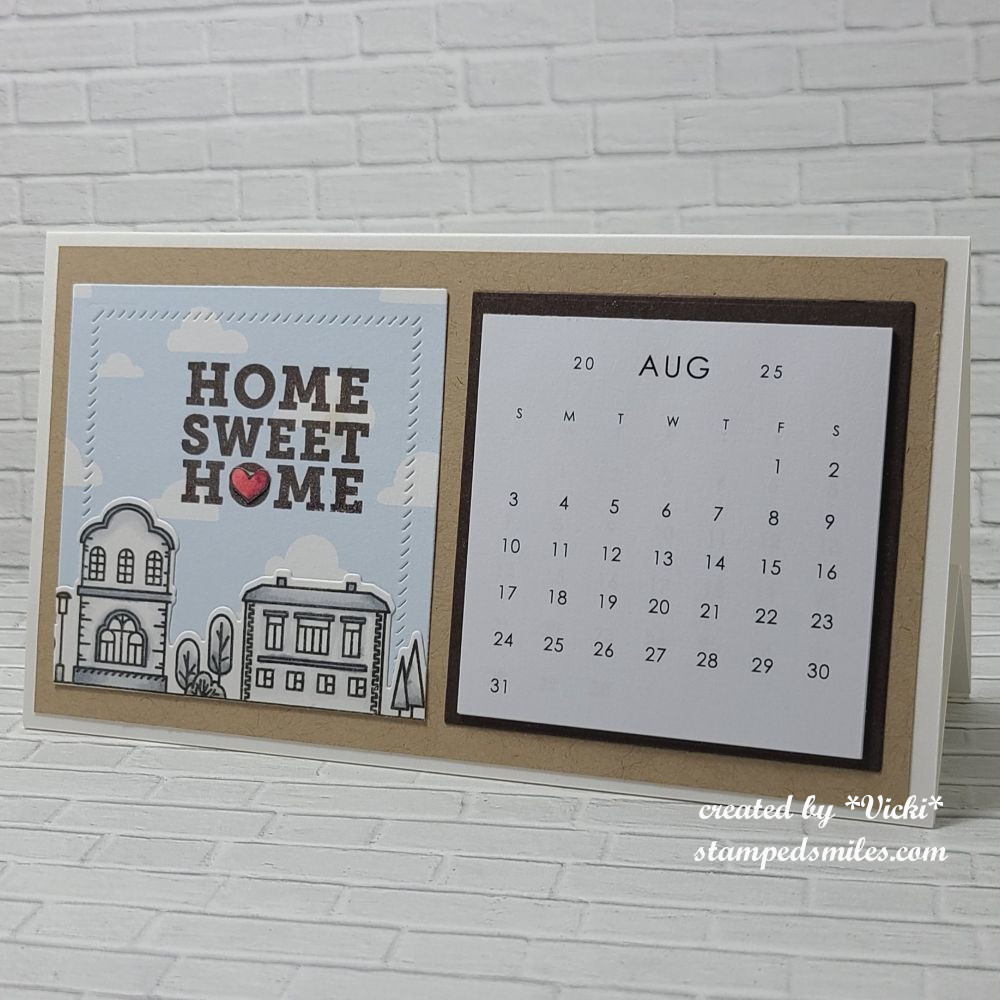
There is a new challenge today over at the Alphabet Challenge Blog! Our next letter is ‘H‘ and the hostess has chosen “H” is for HOME *Remember that this is a bi-weekly challenge, so you have two weeks to enter* I hope you will find some time to play along! Here’s what I’ve created:
I have pulled out an older card kit from Simon Says Stamp called “Home Sweet Home” and used some of the cloud papers that came in the kit along with the stamp set to make my little square on the left.
This is a mini slimline sized easel calendar. It folds flat for mailing and then sets up with a base at the bottom. (I figured a message could go on the back.) I got the Square Calendar Tear-Offs as well as the Landscape Calendar Table Tent Base from Taylored Expressions. The “slash marks” on the home sweet home square also came from the TE Square Tear Off Calendar Stacklets Die Set which is how I was able to cut out the square to fit onto the design too.
Obviously, I have August 2025, but I also have 2026 calendars that I will have to replace for the new year. I really love making these calendars every year to give as gifts and I thought it would be nice for someone moving into a new home as well.
Thanks so much for dropping in today! I hope you will take a look at what the design team has for inspiration and join in the challenge with us!
I’ll have another scheduled post for tomorrow to share my monthly Art Journal Page.
Happy Friday my friends! Are you ready for the weekend? I know that I don’t have a regularly scheduled workday every day, but I can still always feel a weekend ahead! LOL Hopefully I can enjoy some time doing some fun projects that I’ve been wanting to get to and go outdoors!
Today starts up a new challenge over at the Alphabet Challenge Blog! We are now onto the letter “B” and the hostess has chosen “B” is for Butterflies (use more than TWO of them.) *Remember that this is a bi-weekly challenge, so you have two weeks to enter* I hope you will find some time to join us in the gallery! Here’s what I’ve created:
I do love me some butterflies! I love using soft pastel colors for the Spring months too! I have used this set before, but I have gotten it back out again for my mini slimline card today. I’ve used the Taylored Expressions Beautiful Butterfly Wings & Coordinating dies to complete this.
I white heat embossed the three wings onto vellum and die cut them out. I also used the die cut to cut out the colored cardstock butterflies for each one along with their center antennas. Glued them together and set aside to work on the layout.
The base of the card is mini slim size of 3.5″ x 6″ side folded. I die cut a white layer with the TE Pettie Scallop Mini Slim dies and then layered another white piece using the Stitched Mini Slim dies. Before I attached it, I splattered some black paint over it.
I then attached each assembled butterfly to the layout design and added the white heat embossed sentiments between them with foam tape. The sentiment came from the TE Fluttering By Mini Strips & a coordinating strip die. I finished by added a rhinestone in the center of each butterfly.
**Just a special attention to the tab pages I’ve added at the top of my blog that shows I now have information about purchasing a handmade card from me as well as another page of craft supplies I have available for purchase if interested. I will regularly update so check back often to see what’s there!**
Thank you for taking the time to stop in and share your support! It really means a lot and I enjoy hearing from you! Whatever your weekend brings, I hope there’s some good in there somewhere!
Hello friends! I hope you’re having a great week so far and enjoyed a nice Valentine’s Day yesterday with some yummy sweets! We enjoyed some treats of our own! 😉
Today I have a new challenge to share with you for the Sparkles Monthly Challenge blog and this month the lovely Dawn would like to see some “Hearts & Flowers” on your creations! Although Valentine’s Day is over, I think hearts are great for adding any time of the year, so check out the inspiration from the design team and here’s what I’ve made:
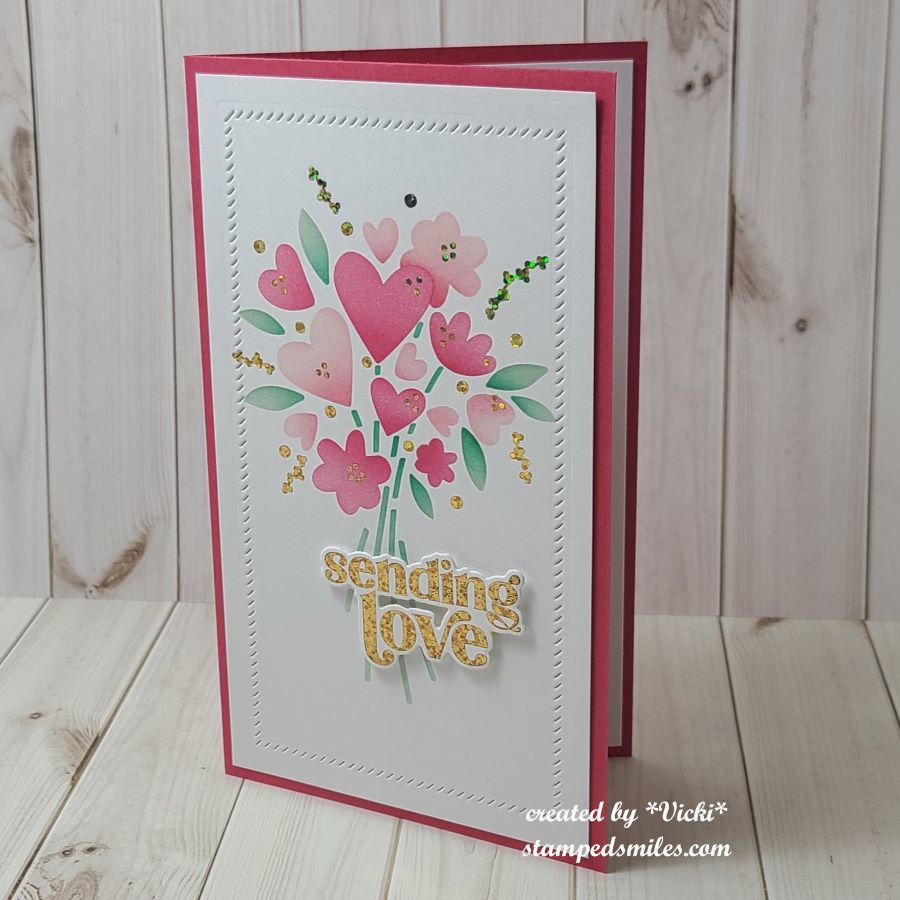
I’ve made a mini slim card using the Taylored Expressions Hearts in Bloom Layering Stencils which are so great for mass producing several cards at once. For this card and the other cards below, I decided I wanted to use the TE Hearts in Bloom Foil Panels which works with these stencils. I foiled them with gold foil. I think the foiling adds such a pretty shine and glitter. I also used the TE Love & Hugs Foil Panels for the sentiment and die cut it out with the coordinating die set.
So after foiling everything, I used the stencils to create the pretty bouquet of flowers with the hearts in it and then added a frame around the edge with a TE Diagonal Stitch Mini Slim die that doesn’t cut anything, but adds those slash marks. I used some foam tape to pop up the foiled sentiment and just attached everything to a coordinating mini slim card base.
I couldn’t just make this one to show you, so here is the whole set of cards I’ve made together:
Those stencils create all of these patterns at one time. I just lined the foil panels up at one time and then used each stencil for the colors. If you didn’t want to use the foil panels, you could also just use the stencils on one sheet of cardstock and then cut them apart to make the card fronts.
I found these sets to become very addicting! And just like that, two of them have been sent out!
I’ve been really busy with creating behind the scenes and I will be sharing more soon! I will be around to see what’s been going on with you all shortly! I really appreciate your kindness and support…it really means so much!❤️ Thanks for stopping in!
Hello friends! I hope that you are having a great week so far! After the little “heat wave” hit us, I’ve been enjoying some ‘nicer’ outdoor temperatures, finally. As you may have read in a previous post, I had been working on my son’s wedding invites as well as some thank you cards for them to send out afterwards. I will be sharing that later on, but today I have some other “mass production” that I’ve been working on in addition to those:
First up, I’d like to share a set of cards I’ve made for the Taylored Expressions Fans FB Group challenge for May which calls for “4-8 mass-produced cards. (similar or identical)” & the colors “Poblano Pepper with Confetti Cake“. I do not own the Poblano Pepper, but I do have a small cube of Confetti Cake ink.
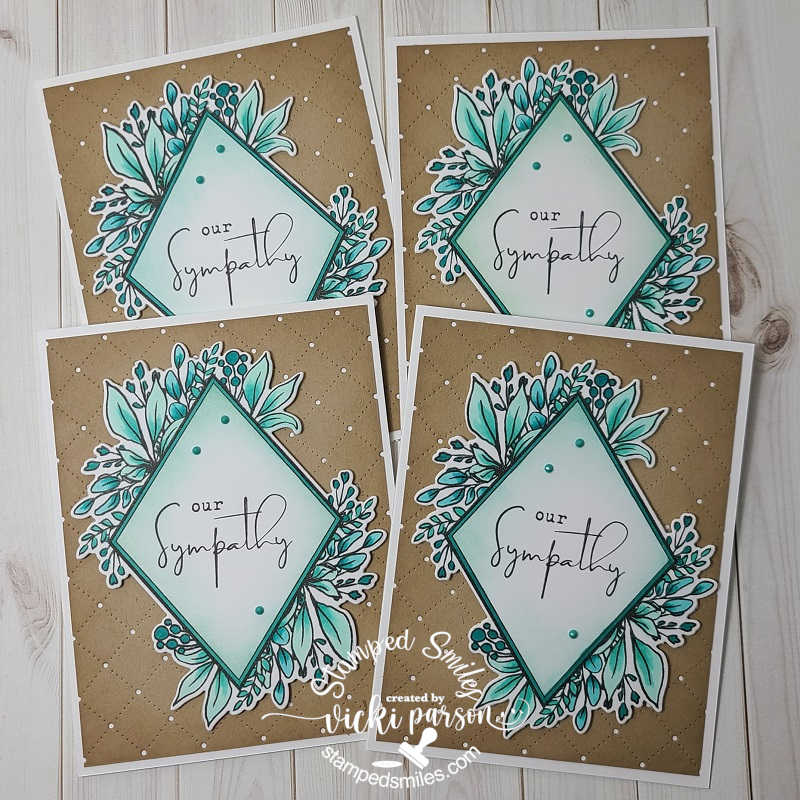
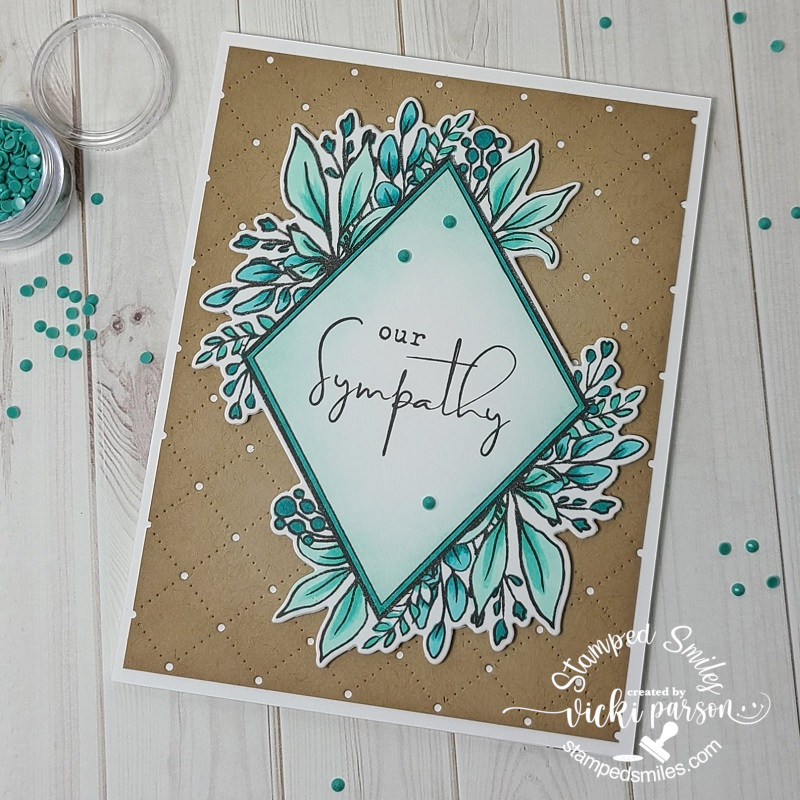
I’ve been wanting to create several sympathy cards so that I had them on hand instead of making at the last minute for one, so I was happy to get these made. I decided it was just easier to make them identical so that I didn’t have to decide how to arrange or cut my papers, etc. I’ve used the Taylored Expressions Diamond Botanicals with dies as well as the TE Diamonds Masking Stencils for the main image. The background uses the TE Pierced Lattice Cutting Plate over a piece of Toffee cardstock.
Here’s a close-up look at one of the cards. I stamped the floral image in black ink as well as the sentiment from the stamp set and then took one of the Diamonds masking stencils with some Confetti Cake Ink to softly blend around the edges of the sentiment area with it. I also used a blender brush to blend around the edges of the cut Toffee layer too.
Since I only had the Confetti Cake ink color, I matched up the coordinating colors with my Copic markers and colored in the image using only those color tones. I think it worked out great for sympathy cards. After I colored up the images, I used the coordinating die cut and popped it up over the Toffee cut panels with foam tape squares and then layered it over a side folding white A2 card base. I finished each one with some of those coordinating TE Pastel Tiny Diamonds. (Although the suggested listed coordinating colors on the website don’t have the Poblano Pepper or Confetti Cake, I thought it matched up rather nicely to this anyway.) I think these cards work out great for mailing too.
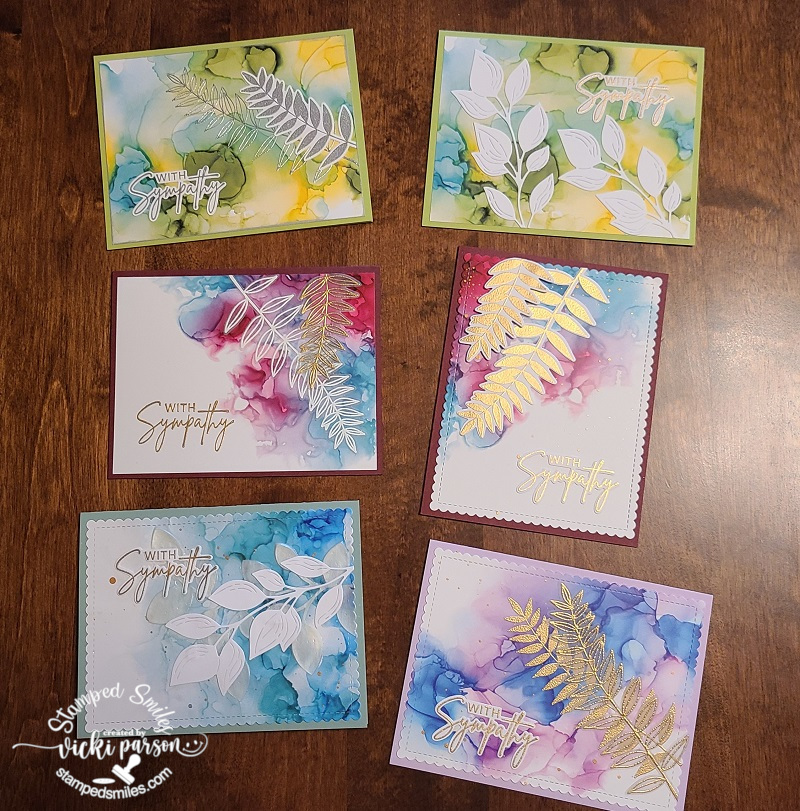
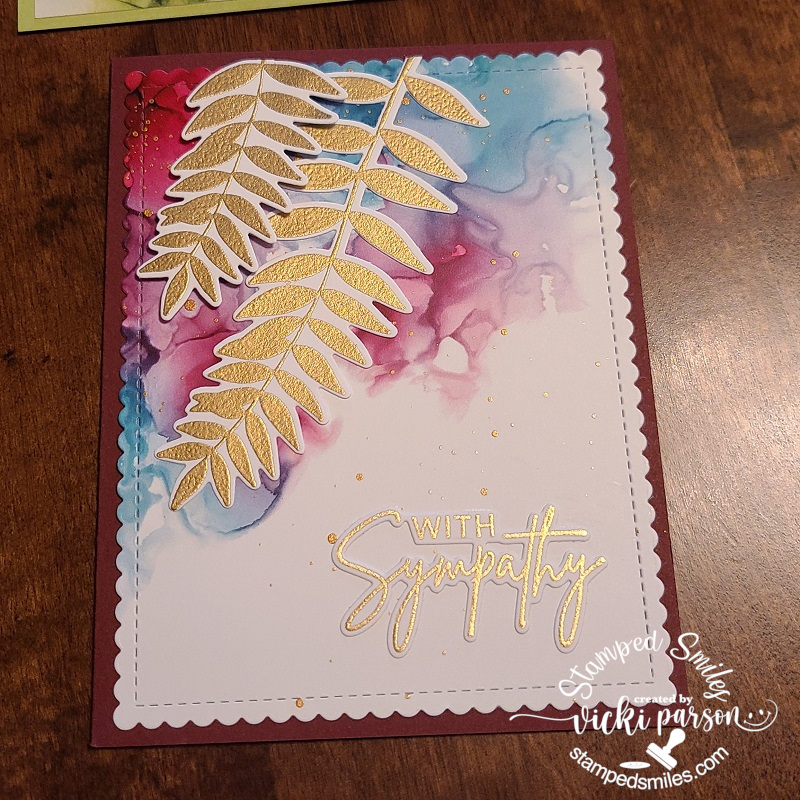
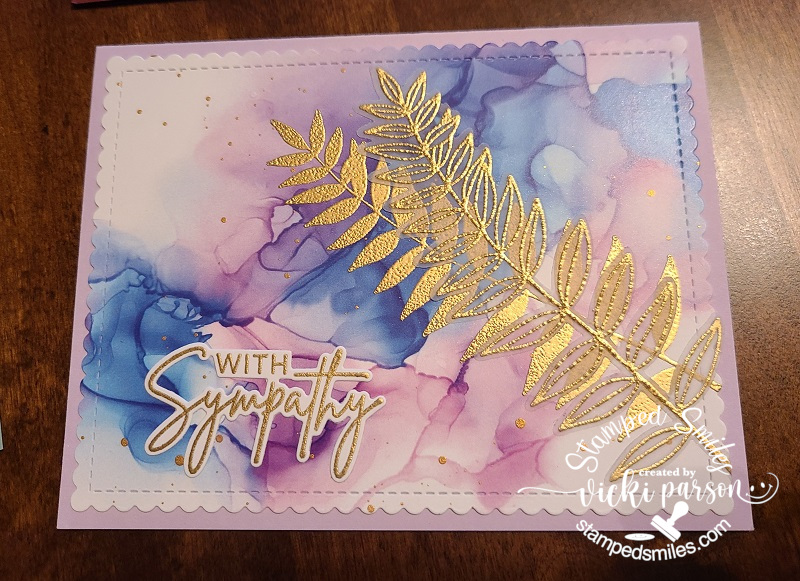
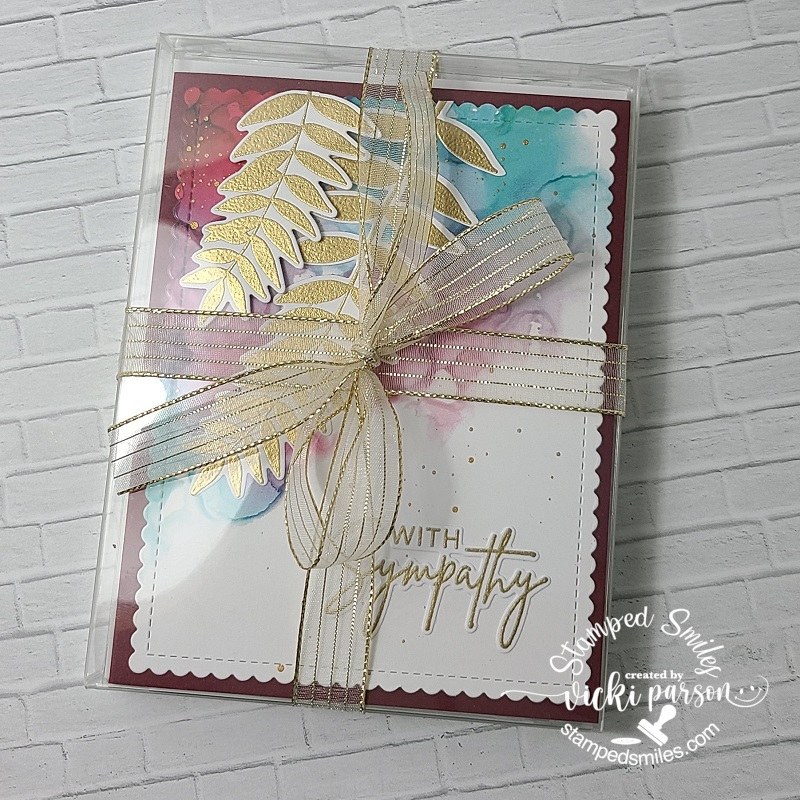
And speaking of sympathy cards and Taylored Expressions, I thought it would be great to create a nice gift set too:
If you remember one of my previous posts, you may remember where I created a greeting card gift set (CLICK HERE). I’ve went along with the same idea here and made them all sympathy related cards using my own acetate box and some Taylored Expressions products. These were all quick and easy to pull together using the Taylored Expressions Done for You Alcohol Ink Background Panels along with a previously released card kit stamp set/die.
I decided to heat emboss several of the fern images with white, gold and silver over a few of the panels, some over white and vellum and then cut out. I placed them along with the heat embossed sentiments cut out and arranged them over the panels. I matched up the cardstock that I had from my stash with the panels to create the completed cards.
Here’s a gallery of a few of the cards up close along with the finished gift box tied with a ribbon: (Just click on each photo from my website to see them enlarged.)
I think this will make a nice gift for someone as I always hear people saying they never have a sympathy card on hand when they need one or for those people that don’t make their own cards too.
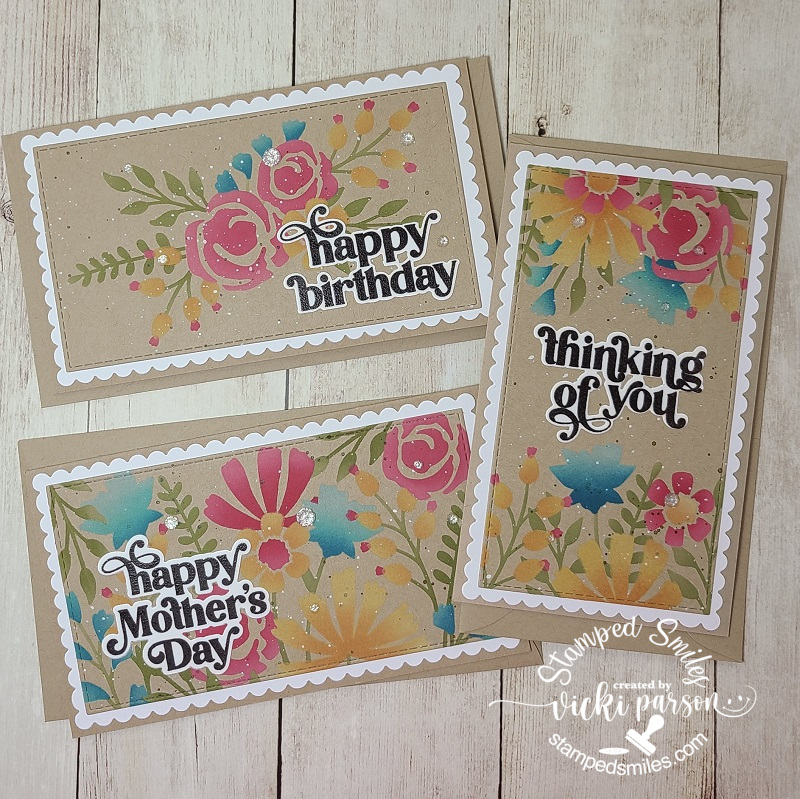
And lastly, I’ve made a couple sets of mini slimline style cards using the Taylored Expressions In the Garden-Triple Slim Layering Stencil:
I quickly fell in love with this quad type of stencils especially with these gorgeous florals! I love the way these floral panels are different from one another, and you can stencil them all up with the same color in one pass! I needed a couple of Mother’s Day cards, so making all of these at once sure came in handy for bonuses too!
Using the “craft-along” video from Taylor and Heather, I used the same, or similar colors that was used, added my black splatters and then used the TE On Occasion with dies as well as the TE Get the Word Out-Mother’s Day with dies for the sentiments where I white heat embossed over black cardstock and cut out. I just glued to the panels and attached each panel to a white mini slimline card base.
And then here’s another set of mini slimline cards using the same products as above except I used Toffee instead of the white cardstock for these. I also stamped the sentiment with dark brown ink over white cardstock and then cut them out to place over the stenciled panels.
I also used both dark brown and white paint to make the splatters over these. I also used the TE mini slimline stitched and scallop die cuts for these cards and then layered them over top of a Toffee mini slimline card base. I’ve also added a few TE white rhinestones for a bit of sparkle too.
I also think that these would make great greeting card gift sets as well! So, then it’s just a matter of which ones to keep and which ones to give away as a gift!?🤔
Hope you’ve enjoyed my mass production post today or have been inspired in some way. Thank you so much for taking the time to drop in and say hi as I enjoy hearing from you!
Challenges:
Creative Friday – No patterned paper (top set of cards only)
Colour Crazy Craft – Anything Goes with coloring (top set of cards only)
Hello friends! Really hope your week is going well. My thoughts go out to all of those that are experiencing difficulties in their life and hope things turn better for you very soon. I hope to bring a smile for you today.
I’ve really had such a fun time playing around as a guest designer this month for Inky Stamper and this will be my final project for them this month. Chelsea has some really cute stamps and I hope you’ll check them out! (I have the badge on the sidebar of this blog if you need to come back later to find it. Just click on the badge to get to the store.)
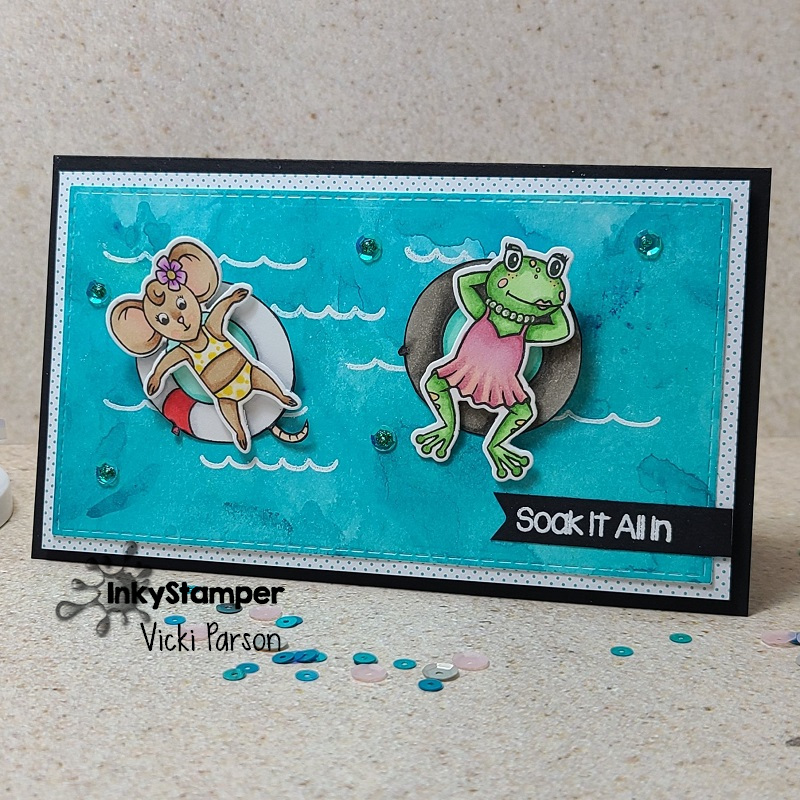
For my final project, I’ve decided to create a mini slimline card with an interactive component! If you’re not familiar with a “mini slimline” size, you take a piece of cardstock measuring 6″ x 7″ and then fold it in half on the 7″ side so that your card base is 6″ x 3.5″. I really don’t mind any size of card really as I have been known to make my own envelopes too. But I first learned about this “mini slimline” size from Taylored Expressions as she has many products in this size including the envelopes. (I have used one of the “slimline stitched dies” from TE to cut one of my panels on this card.)
I’ve used BOTH of the Chaise Lounge stamp set with “Freida the Frog” (as she is named) as well as the Splash stamp set with “Rosie” (as she is named) from Inky Stamper on my card here today! I think they’re so CUTE! Ever have those moments with a friend floating around in the swimming pool and just soaking in the sun and some secrets?!! LOL! That sounds like a fantastic summer event to me!
For the “water” background, I took some Bristol Smooth cardstock and white heat embossed the “water wave” image (both stamp sets have one of these images in it). I took out some of the Nuvo Shimmer powders from my stash and made a fun watercolor panel with them. I haven’t used these in quite some time, so it was fun to play with and I forgot how shimmery they are! Obviously, the white embossed waves resisted the watercolor.
I cut out the panel with the TE slimline stitched die and mounted it over a piece of dotted paper from the Doodlebug Swiss Dot Paper Pad. I stamped and colored the images, die cut them out and popped them up over the floaty tubes. (Remember the tip about using a white gel pen to go around the edges to get rid of those lines you see when you cut them out.) I then punched a hole on this watercolor panel where I wanted the images to be, so they weren’t too close to each other to freely spin around! Inky Stamper has these awesome interactive elements called “Clear Move-Its” and I LOVE them! They snap together and voila!
You can see bits of the shimmer from the watercolor background here too!
I popped up this panel with foam tape and then layered it over my black mini slimline card base so the spinners could move freely. I’ve also added a black sentiment banner that was white heat embossed with the Chaise Lounge stamp set.
I couldn’t resist adding a bit more “bling” so I also pulled out the Picket Fence Mermaid Water sequins being careful not to interfere with the spinners and then filled the centers with some Stickles from my stash. I could just keep spinning these all day long! LOL!
Really hope that you’ve enjoyed my projects this month as a guest designer for Inky Stamper and you’ll pop by to check them out! Super fun stuff! (Be sure to join the InkyStamper Inkspiration FB Group for more fun!) I’m sure I’ll play with their stuff again in the future!
Thanks for popping in today and finding my posts! Glad you’re here!