Lots of Love and Commissioned Wolves

Happy weekend friends!  It’s almost time for Valentine’s Day which means we share our appreciation to those that we love!  I like to make cards that are great for any time of year and hearts are versatile enough to do this without being specifically Valentines.  Here are a few cards that I’ve made with this in mind:

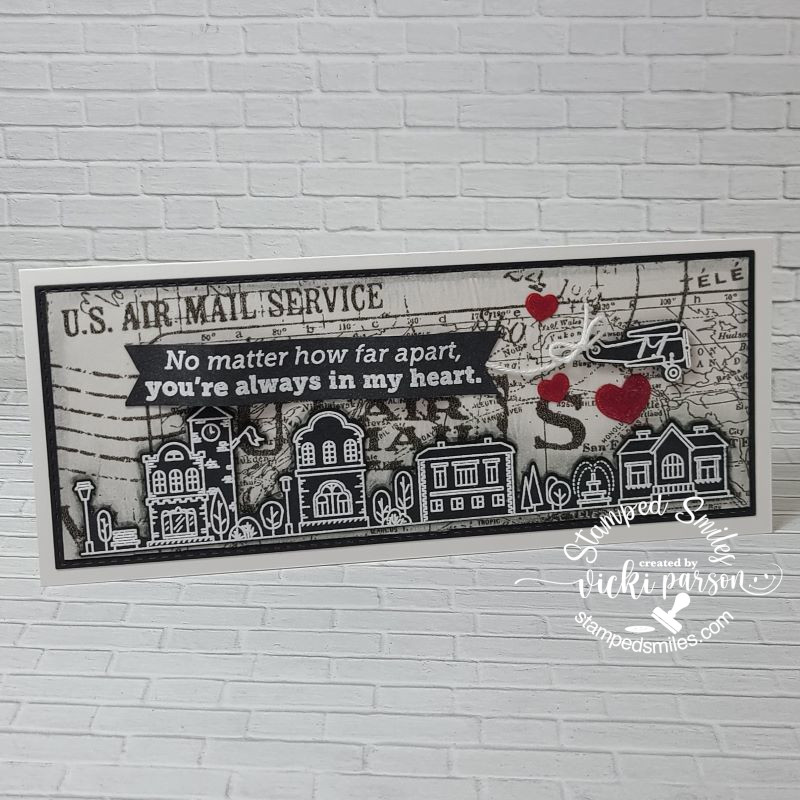
I actually participated in last week’s Craft Roulette #149 and the perimeters were: 1. tissue/vellum 2. collage 3. far away 4. three pops of red.  So…while watching, I had decided that I was going for the Tim Holtz Postale Tissue Wrap that was already collaged with images.  I decided because of the collage images, that I was going to find an airplane image to use with it and my thoughts turned to an older Simon Says Stamp card kit I had with the “Home Sweet Home” stamp set.  I white heat embossed the airplane, the long building strip and the sentiment over black cardstock. It seemed to lend itself to a slimline card design, so that’s what I went with and used collage medium to attach the tissue to the background.  Once it dried, I glued the die cut buildings strip and went around it with a Big Brush marker that I smudged to create the shadow effect.

I made a banner with the sentiment and attached a white string to the back and tied a bow with it to the airplane and popped up the plane with foam tape.  The collage background panel was layered over a black piece that was attached to a standard slimline top folding card base.

Here’s a closer view of the details so that you can see them a bit better.  My “three pops of red” came from 3 hearts that I cut out with red cardstock.  The die was from the coordinating set with the stamps.  I attached them around the airplane and covered them with a glitter brush pen.

If you’re interested in seeing what the Craft Roulette is all about, you can check them out live every Friday night around 6:00 pm CST.  I will be doing this tonight as well!  It’s just something fun to get your crafting thinking and I love that I can pull out my stash and use it up!


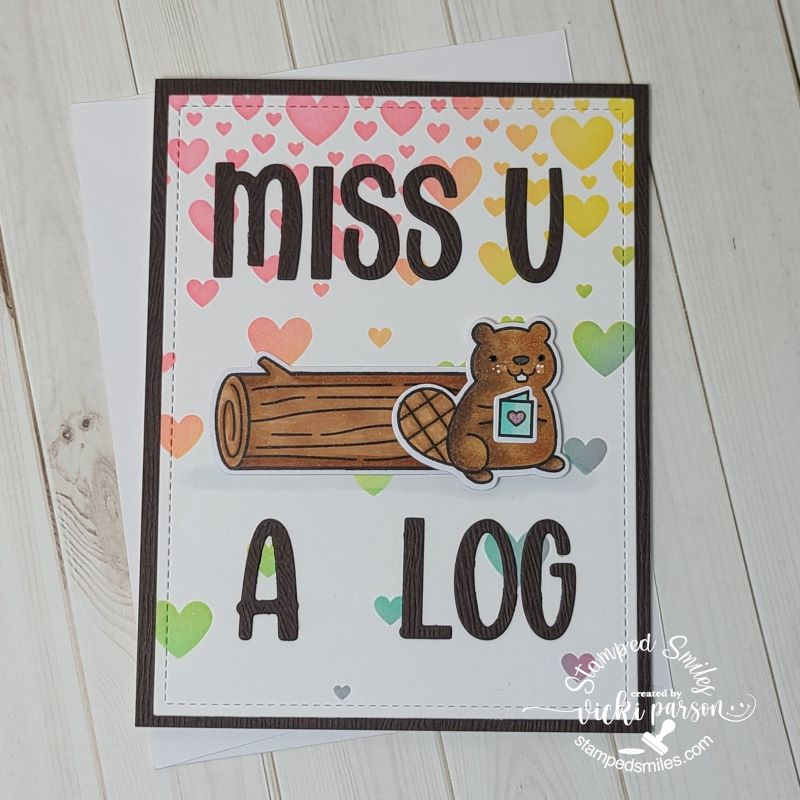
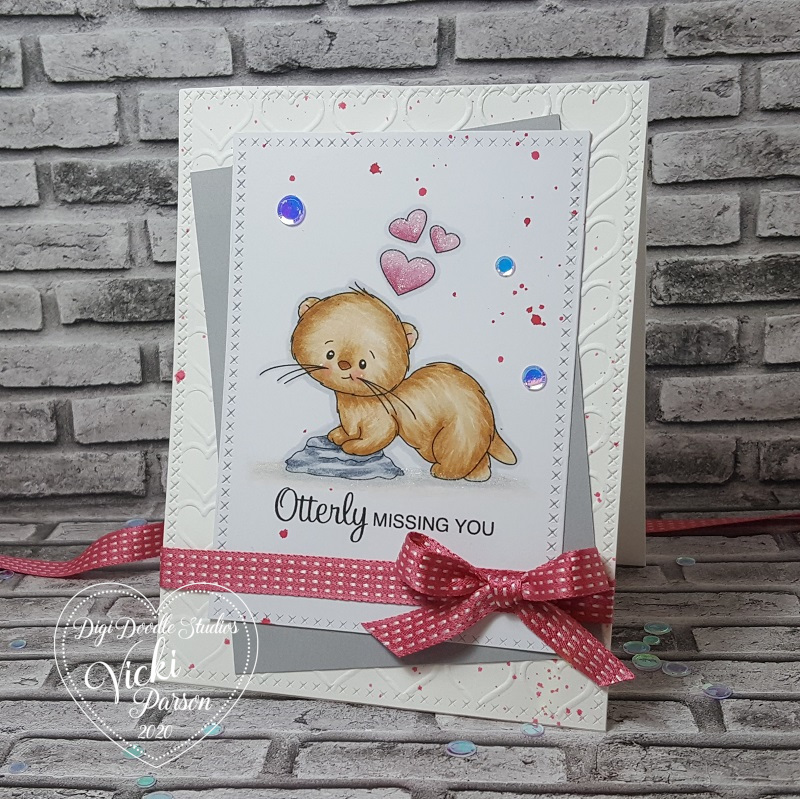
And of course I couldn’t help but follow along with the Lawn Fawn Create With Us “Wood You Be Mine?” class!  There’s a little inside joke about Woodchucks chuckin’ wood with my son and I couldn’t resist sending him one of these cards. (CLICK ON THE PHOTOS ABOVE TO SEE THEM LARGER IF YOU’RE ON MY WEBSITE)

I just pretty much followed along with the same design as they shared in class with the exception of the background stencil.  I didn’t have the same one they used, so I pulled out one from Taylored Expressions that is no longer available.  but if you’d like to follow along with the class, you can check it out here.


And lastly, I wanted to share a commissioned card that I made for someone that requested a card to give to their partner.  Not really too specific other than they liked wolves and the “What a Wonderful World” by Louis Armstrong lyrics somewhere displayed on the design.  So here’s what I came up with:

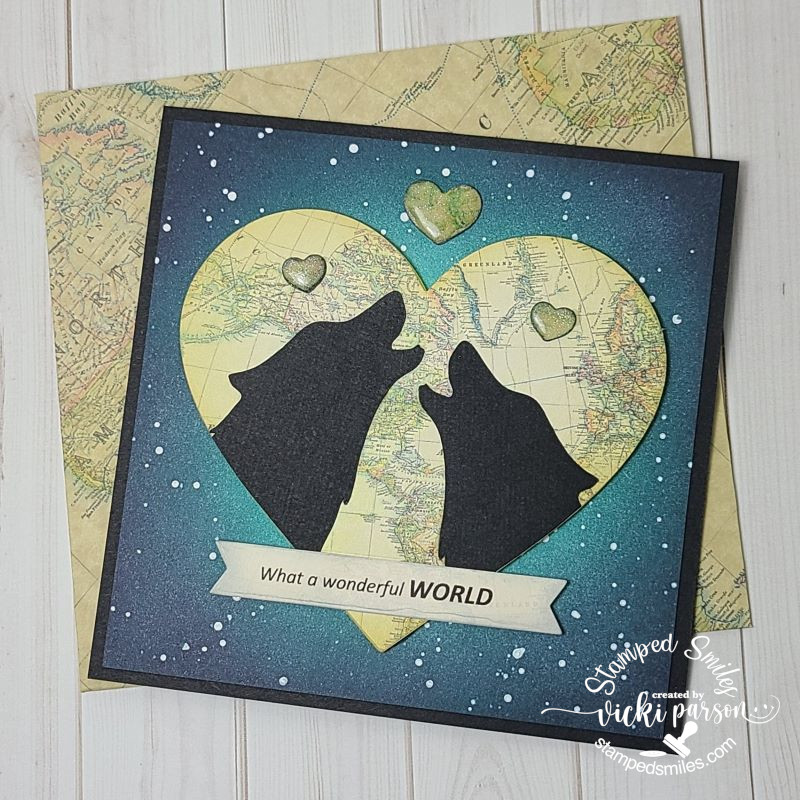
I did not own any stamps with wolves on them, so I turned to my Cricut machine to cut out a silhouette wolf and then I flipped it to cut another one so that they faced each other.  I wanted to give the appearance of the wolf couple howling together. LOL  I also had some digital map paper that I could print out to use for the hearts as well as making an envelope with it too.

The background was ink blended with the center being lighter toned in blue and then I splattered some white over top for a night sky or an “outer space” looking sky…however you’d like to interpret it, I suppose.  I cut a large heart with the map paper and arranged the two wolves over it so that, although it’s the same image flipped, I can make them look like different wolves and then cut off the bottom portions. I popped up the large heart with foam.  I also used the same papers to cut smaller hearts above them and added some glitter and covered them with crystal effects to make them shinny.  I printed out the lyrics on my computer and cut it out in a banner shape to attach below the wolves.

  • Hope you’ve enjoyed my “love” creations today and have been inspired in some way!  Thanks for stopping by!

Challenges:

  1. Sweet Stampin’– LOVE (Beavers)
  2. Simon Says Stamp Monday – Love is in the Air (slimline)
  3. Everybody Art – #529 Heart/Love
  4. Cardz 4 Guyz – Valentine for a Guy (wolves)
  5. Try it On Tuesday – All You Need is Love
  6. Fab ‘N’ Funky – Valentines or Hearts
  7. Little Red Wagon – Somebody to Love
  8. The Sisterhood of Crafters – Hearts
  9. Crafty Gals Corner – Add a Heart

Otterly Missing You!

Hello friends!  I wanted to say thank you for adding your comments from my last post about the card kits! LOL!  I see that I’m not alone!  You’ve all actually really inspired me to get them pulled out and use them despite how old/new they are!  Loved the idea about making several cards and sending them along to charities too!  Always love reading your feedback! 🙂

Today I wanted to share with you another card I made with the oh so adorable Digi Doodle Studios “Otterly Love” Pairables set that you may remember my card from last week that I’ve posted HERE.  I’ve used it again for my card below:

Vicki-DDSOtterlyLove-Jan16

His sweet little face gets me every time! 🙂   As in the previous card I made with this set, I’ve arranged the digital images from the set how I wanted them to look on my design and then just printed it out.

After coloring up my image panel, I die cut it out with a cross-stitch rectangle die and set it aside.  I cut a white A2 sized top folding card base and then layered a white heart embossed (folder from Stampin’ Up!) card front panel that was also cut with the cross-stich rectangle die.  I used some watered down ink (Strawberry Slush from Stampin’ Up!) and a fan brush to splatter some color over it.  I also CAREFULLY took the image panel and splattered some more over that panel as well.

I then arranged the rectangle layers including the gray colored cardstock (Smokey Slate from Stampin’ Up!)  panel and attached them to the embossed card front panel.  I tied some of that triple stitched ribbon (from Stampin’ Up!) around all of these layers and added a bow with it before attaching it all to the card base.  Lastly, I’ve added some clear sequins.

Vicki-DDSOtterlyLove-Jan-close

Here’s a closer view of the Copic coloring I’ve done on this cute critter posing on his little rock.  (I thought he needed a bit of ‘water’ around him.)

You can see the hearts and along the bottom of his feet where I’ve added some shimmer with a clear glitter brush pen.  I’ve also used a white gel pen for his cheeks and eyes.

Vicki-DDSOtterlyLove-Jan-flat

It’s a super simple card, but oh so much fun to color him up!  I thought it was a nice card to send for a ‘miss you’ to someone you love!

Thanks so much for joining me here today friends and I’ll be seeing you soon!

Challenges I’d like to enter this card for:

  1. Creative Fingers – Anything Goes #177
  2. QKR Stampede – Anything Goes #380
  3. Not Just Cards – Jan. Anything Goes
  4. Lil’ Patch of Crafty Friends – Anything Goes (Happy 5th!)
  5. The Cutie Pie– Cute, Clean and Simple
  6. Pammie’s Inky Pinkies – Anything Goes PIP2002
  7. Crafty Cardmakers – Anything Goes #248

Anything Goes at Cute Card Thursday With Curly

Hello friends!  I hope you’re all having a wonderful week so far!!  It’s really starting to feel like Summer now with the warmer temps!

Today is a new challenge this week over at Cute Card Thursday!  This week we have our “Anything Goes” challenge with our sponsor Whimsy Stamps!  So of course, I am using a cute image from Whimsy Stamps for my card today:

Vicki-WSCurly-June6

Tee hee!  This little guy holding the tiny “sea creature” makes me smile and giggle!  I’m not really sure what reaction he has about it!  His name is just as cute too!  This is Curly from Whimsy Stamps.  I thought he needed a scene, so I made one for him.

I started with some Bristol Smooth watercolor paper and masked off the line between the sky and the sand.  I used my Distress Inks to blend in the colors.  After doing the sky, I thought that it was a bit too dark, so what I did was take a baby wipe and swiped it across which lightened up the colors the way I wanted them for the sky.  The bottom “sand” portion was also masked, and I blended the bottom blue color into the sandy colors which created a nice shoreline.  I then took a water bottle and spritzed some water droplets over it to create “texture” for the sand.  I also took some Copic markers to create more texture with the pointillism technique, plus added some white ones with a gel pen.  the water at the bottom was covered with a glitter pen.  (You can see better details in the photos/description below.)

Vicki-WSCurly-June6-close

So, I’ve got him all colored up in the following Copic markers:

  • Flippers/water gear – B32, B34, B37, Y11
  • Swim Trunks – R32, R35, R37, Y11, Y15
  • Sea Creature – BV23, BV29
  • Hair – E41, E43, E44, E47
  • Skin – E000, E00, E02, E11, E21, R20
  • I used gel pens to color lines on trunks and cheeks, I’ve used a glitter pen over the “sea creature” and his flippers along with the bottom water area.

I fussy cut this image and used some liquid glue to attach over my scene.

Vicki-WSCurly-June6-flat

For the scene, I stamped the birds in the sky and a star fish image from an older Whimsy Stamps clear stamp set. I then took the sentiment from the WS Everyday Mini Sentiments and white heat embossed it over a black strip of cardstock and then used my scissors to cut out a banner to attach over the scene.  I layered this over another piece of black cardstock that was attached to an A2 sized top folding white card base.

Lastly, I’ve taken some WS It’s a Party enamel dots and added them to the card.

Hope you’ve enjoyed my card today! Thanks for stopping in!  I’ll be seeing you tomorrow for some fun news!

Challenges for this card:

  1.  A Bit More Time to Craft – Anything Goes
  2. Crafty Friends – Men/Boys
  3. Sweet Stampin’ – World Ocean’s Day/Anything Goes
  4. Use Your Stuff – Summer Fun
  5. Always Fun – Summer Fun
  6. Unicorn – For the Men/Boys

Anything Goes for Cute Card Thursday!

Hello friends!  It’s time for an easy peasy “ANYTHING GOES” challenge over at Cute Card Thursday this week!!  Our monthly sponsor Whimsy Stamps will be joining us this week and I’m thrilled to share some of those products on my card today:

Vicki-WS-PenguinLovesBunny-March7

I have used this really sweet digital stamp on my card called “Penguin Loves Bunny“!  He is holding him ever so tightly and not wanting to let go!! 🙂

As I’m trying to get back into the swing of things here, I wanted to be sure to join some challenges and so I’ve picked out a nice sketch to start my card with here.  (See the details below the post for all challenges.)  I’ve been wanting to get out these yummy plaid papers that I’ve had for a couple of years.  This seemed like the perfect image for that too!

So I took the panel of plaid papers and layered it with some kraft cardstock.  I took some white organdy ribbon and wrapped a piece around the left side of it and tied on a bow at the top before attaching it to the upper right of my A2 sized top folding white card base.  I’ve cut out the image with an oval die and then layered another oval piece that was cut out with the kraft cardstock.  This oval panel was layered over the plaid.

I took a sentiment from the Whimsy Stamps Everyday Mini Sentiment clear stamp set and stamped the “miss you” underneath the image.  I also used the Whimsy Stamps Friend Word & Shadow die set to cut a piece of vellum with the shadow and then cut the word out with some pink cardstock and then attached them right underneath the stamped “miss you” sentiment.  Lastly, I’ve added some of the pink enamel dots from the Whimsy Stamps It’s a Party enamel dots set.

Vicki-WS-PenguinLovesBunny-March7-close

Here’s a closer look at the coloring of this image.  I’ve colored it in with Copic markers in the following colors:

  • Penguin:  C8, C5, C3, C1, Y38, Y35, Y32, R00
  • Bunny:  E47, E44, E42, E41, W5, W3, W1, R20, R11, R00

I also used a blender 0 and a white gel pen for cheeks and bunny tail.

Vicki-WS-PenguinLovesBunny-March7-flat

I thought this image would be so fun for Easter too!!  I can see it used in so many different ways!

Hope you’ve enjoyed my card today!!  Thanks so much for dropping in!!  See you soon!

Challenges I’d like to enter my card for:

  1.  Tuesday Morning Sketches – #493
  2. Crafty Animals – Anything Goes + related to animals
  3. Creative with Stamps – Friends
  4. {Cupcake Inspirations} – Plaid CIC465
  5. QKR Stampede – Anything Goes #337

Going in Circles for Cute Card Thursday

Hello friends!  It’s another Thursday that has gone by this month already!  This Summer seems to be going very quickly and I hope you’re out enjoying it!

There is another fun challenge this week at Cute Card Thursday!  I hope you will join with us to share your “Circles” themed creations!  Here’s the creation that I’ve come up with for my card:

OLYMPUS DIGITAL CAMERA

I have decided to make a circle shaped easel style card along with using even more circles within my card design!  With the exception of the circles for the card shape, everything else I’ve used is from My Favorite Things stamps!  I thought it would be fun to take the Stitched Tripple Peek-a-Boo Window die to cut out the circle windows to fit these adorable pigs in from the Hog Heaven stamp set.  I cut out an additional circle for behind the window and sponged some different colors of distress ink behind them.  I colored and die cut the images out with the coordinating dies and popped them in various places behind the circle windows as well.  I stamped the sentiment and cut it out using some circle dies and this works as a “stopper” for my easel card design.  I popped it up with some foam tape.  I stamped the flowers from the same stamp set.

OLYMPUS DIGITAL CAMERA

And here’s a closer look at the front of my card.  I just love how the top piggy is leaning over the circle and window and the bottom piggy is peeking out with a wave from the bottom circle window!  I thought he needed a little twine bow tie too!  Finished it out with some circle sequins with a little glitter Stickles in each center.

Hope you’ve enjoyed my card today!  Please be sure to stop by the challenge blog to see the other wonderful circle creations from the team!  See you tomorrow!

challenges:

  1.  Allsorts – Use at Least 2 dies (3 circle type dies)
  2. Crafting From the Heart – Anything Goes
  3. Tuesday Throwdown – “You’re On My Mind”
  4. Addicted to Stamps & More – Make Your Mark (ink blending + Copics)
  5. Sunny Day Crafting – Any Animal on Project