Hello friends and a happy July to you! We’re celebrating July 4th Independence Day this weekend and I know it will be hot! I think we’ll be watching fireworks from our TV inside the cool air this year! Hope that whatever you’re doing this weekend that you stay cool and safe while you’re having fun.
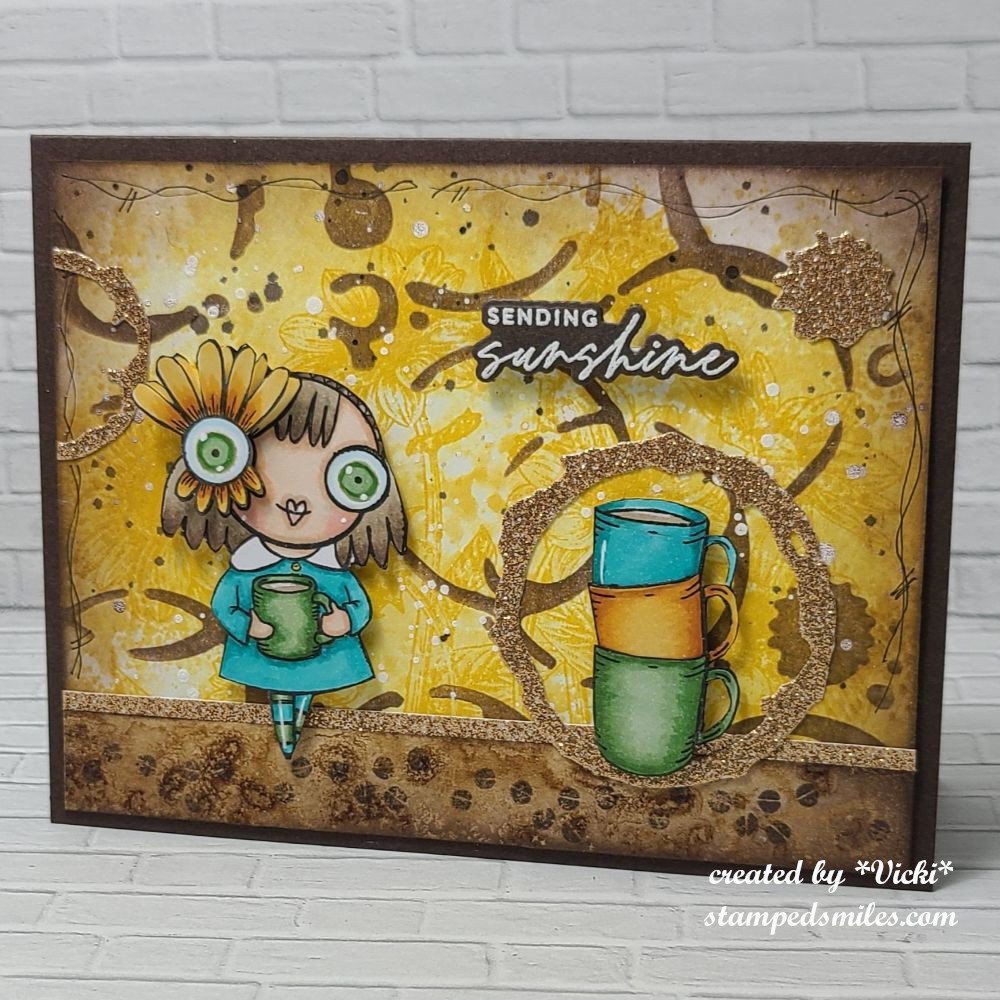
Today also brings us to a new challenge over at the Mix It Up Challenge Blog. The challenges always run for 6 weeks so there is plenty of time to enter. The theme given for us this time is: Mixed Media or you can always do the ‘Anything Goes” too. Here’s the card that I came up with for the challenge using the theme:

This was such a fun card to make! I normally do mixed media on my art journal pages or a larger/3D item, but this time I wanted to make a card for this theme. I pulled out some really fun AALL & Create products that I’ve been wanting to use and I thought this would be a good opportunity to try them out! (I don’t know what it is about these wonky characters, but I think the weird eyeballs are so cute!) I’ve used the “Coffee Time” stamp set with the girl, coffee cups and coffee beans at the bottom. I’ve also used a Simon Says Stamp “Sunflower Fields” in the background and the “Sending Sunshine” sentiment.
To create the background: I’ve stamped a very large sunflower image in yellow ink over a white card base. I’ve then used an AALL & Create “coffee stains” stencil with brown ink over top. I then ink blended some more brown inks over the edges of the panel and then splattered it with both brown and white paints. I took a pen and doodled around the edges and then attached it to an A2 top folding brown card base. I had a left over strip from a collection of coffee backgrounds that I’ve made in a previous post you can see HERE and attached that to the bottom where I stamped the coffee beans in brown ink over it. (I thought it would make for a good “grounding” for the coffee girl and cups to stand on.)
I’ve used another AALL & Create product called “Heart Nook” that I die cut some circles from, and I thought looked like coffee stains, in glitter cardstock. I also cut an additional strip of that to go along the bottom strip of the card. I then added the stack of coffee cups, the girl that I colored up with Copics and fussy cut out. I white heat embossed the sentiment, die cut and popped both that along with the girl using foam tape. I also separately cut out her eyeball and popped that up over her for extra dimension.
I hope you’ve enjoyed my coffee mixed media card today! I had fun coloring her up and very happy to use more things from my stash too! Please be sure to pop on over to the Mix It Up Challenge blog to have a look at what the rest of the team created and play along!
Have a wonderful July 4th weekend.
Challenges:
- Just Us Girls – #781 Stencil Week (coffee stains stencil)

- Crafty Catz – #697 Anything Goes
- Creative Fingers – #304 Anything Goes
- Pammie’s Inky Pinkies – PIP2526 – Sunshine (hope sentiment and yellow works!)
- Addicted to Stamps & More – Die Cut(s) and/or Stencil(s) – I used both!


