The January Blues at Sparkles Monthly

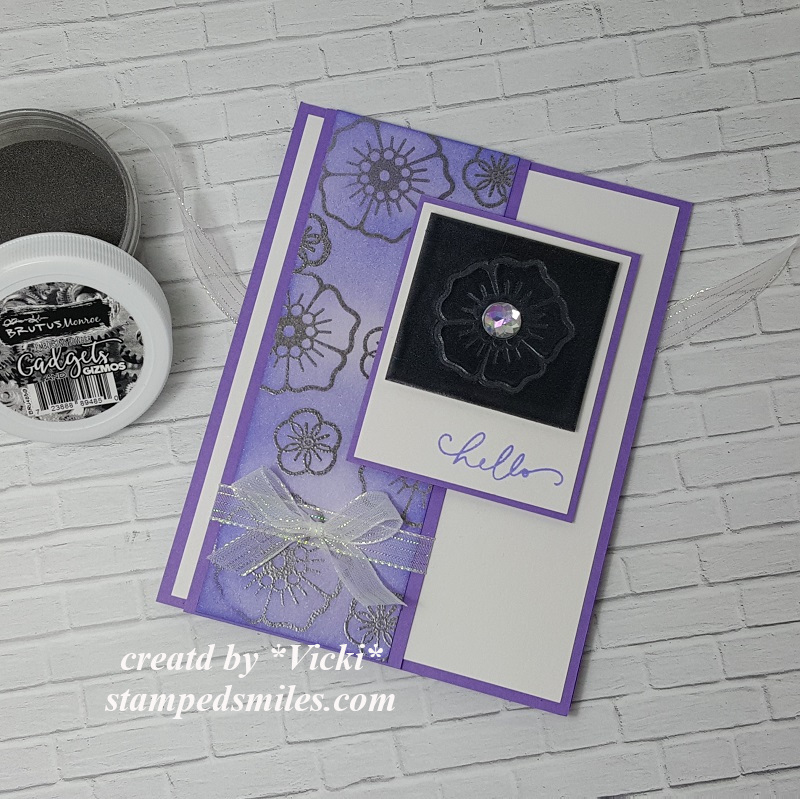
Hello friends!  For those of us that experience the cold weather season for January, I hope you’re finding ways to keep warm.  I have been wrapping myself in blankets with fluffy slippers around the house…and yes, I have the heat up too! LOL  I think I seem to feel the cold more as I get older in age!  This week will be really cold for us here. So I suppose that’s why they say “January Blues”?🥶

Anyway, that brings me to the January challenge over at Sparkles Monthly and for this month, our hostess is asking for “January Blues” (monochromatic blue) on your project.  Be sure to stop by the blog to see what the rest of the design team has created for you.  Here’s my project for this challenge:

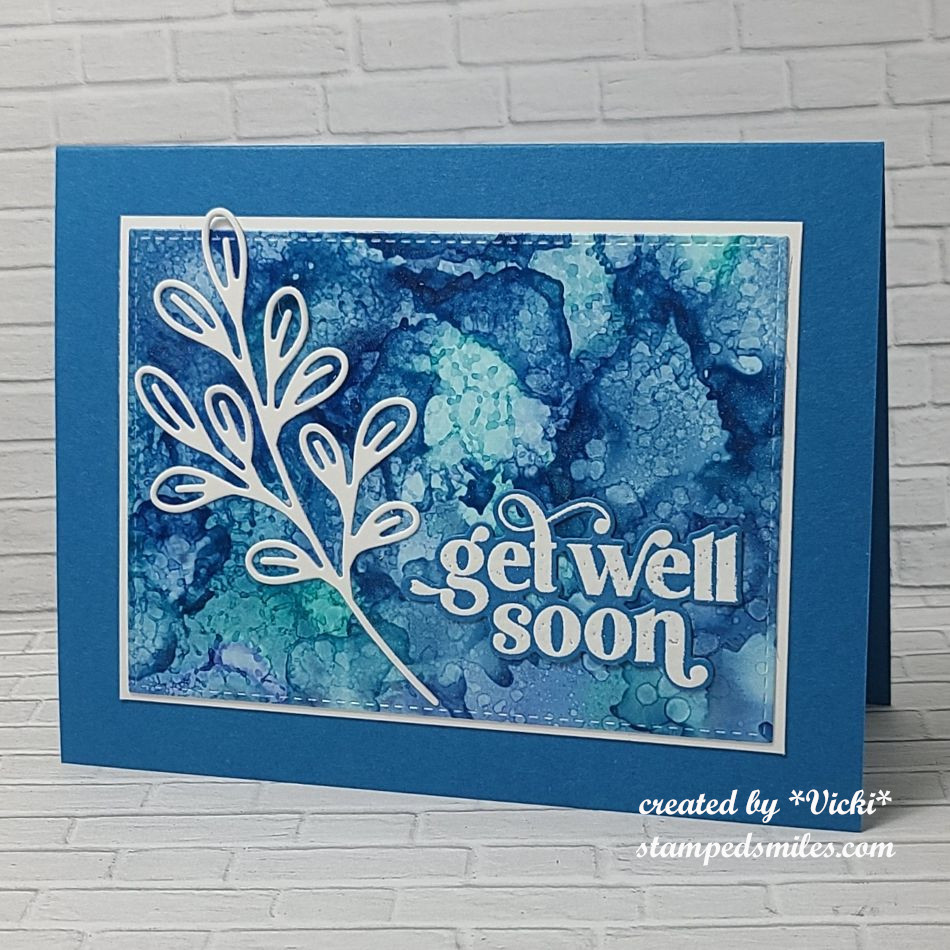
Usually, when I think of blues, especially in January, I tend to think of snowflakes.  I wanted to do something a bit different and decided to pull out my blue tone alcohol inks and make a background.  It was really fun to play around with, and of course, you make a panel and make more than one to save for other cards! Blue makes for such a great masculine card too.

I found some cardstock to match up with the background and die cut the alcohol panel with a stitched rectangle die, layered it over a piece of white to attach to an A2 sized top folding blue card base.  (I’m glad that I’m using some older items from my stash as I think this is old Stampin’ Up! paper that needs to be used!  I THINK it’s Pacific Point?)

I pulled out a leaf die from Taylored Expressions called Subtle Sprigs and cut one in white to place over top the alcohol background.  I also used the TE On Occasion stamp set by white heat embossing over blue cardstock, cutting it out with the die and placing it over the background with the sprig.

It’s a very simple card, but I wanted the alcohol background to take the stage on this one.

I hope you’ve been inspired today to play along with us this month for the challenge at Sparkles Monthly! (P.S.  This will also work with the Monochrome challenge at Mix It Up this month too!) Thanks so much for stopping in today with your kind support!  I really appreciate it!  See you soon!

Challenges:

  1. Addicted to CAS – #274 Blue
  2. Crafty Catz – #685 Anything Goes with optional: CAS
  3. Pammie’s Inky Pinkies – PIP2502 Anything Goes
  4. Try it On Tuesday – Feeling Blue
  5. C.R.A.F.T. – #746 Anything Goes 
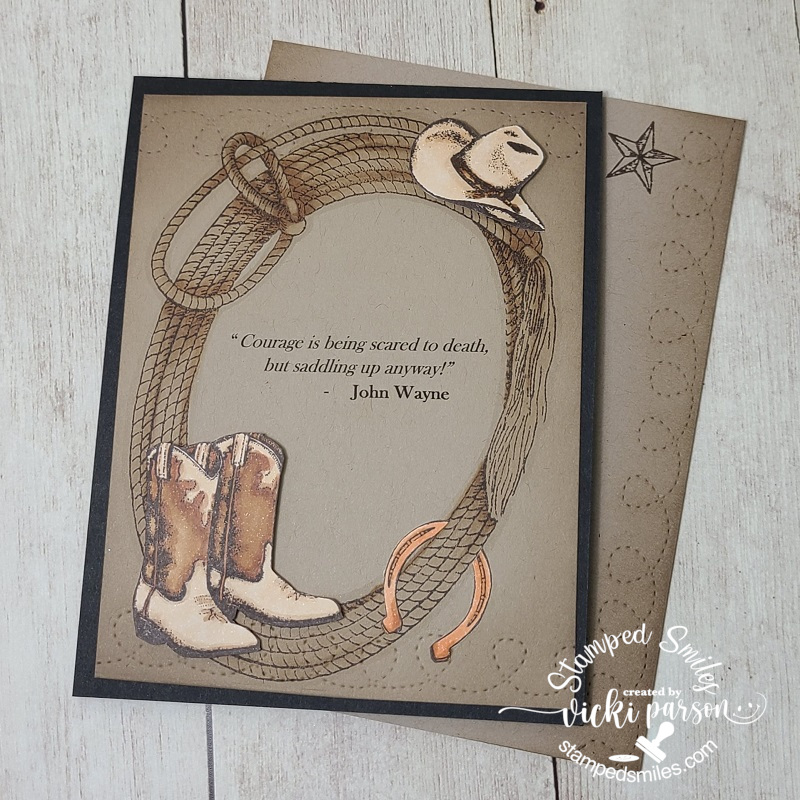
  6. The Male Room – #194 Clean & Simple

March AJ Page-FLY

Hello friends!  Officially Spring has sprung, but I’m seeing some possible snow still in the forecast!  BLAH!  I sure how as we finish up this month, that April will be a little kinder to us over here.  With all of this weird weather in all different directions, I do hope that you’re staying safe and enjoying some craft time!

Speaking of craft time- If you’re not familiar, I post an AJ page each month along with my crafty friend, Carol (from Crafty-Stamper), as we get creative trying to use up our never-ending stash piles!  We use a prompt each month and post them.  I know she will have wonderful inspiration to share, so please check out her blog for an AJ page too! Here’s my AJ page for this month with the “SMASH OUR STASH” March prompt of “Find something/anything GREEN to use on your page” :

Thinking that I was REALLY in the mood to start seeing some green, I started digging through my stash and found SO MANY green things!  I didn’t realize that all you really need is a color to have so many different items to pull from!  I’m happy with all of the green items I found as I used several of them for my layout here.  I’ve got green paint, texture paste, metallic spray, flowers, lace, button, butterfly ephemera and green glitter Stickles!  I’m thinking I don’t use green enough, so I went with a monochromatic page.

For the background:  I started with some printed vellum attached with collage medium and went over top with a soft green layer.  I used an old stencil and went over the two corners with green paste. I then sprayed some green metallic over those two colors and moved it around with water until dry.  I splattered some white ink over top and set to dry.

Vicki-AJpageMar-Flybottom

I added green lace on the right bottom along with my scallop chipboard square that I painted white and added some papers behind it.  I used those same papers to die cut a tag at the top and glued the fairy along with butterfly wings behind her over it.  I added the sentiment sticker that was lined out with a black marker and button over it and attached a string to the hole.  This was popped up with foam tape as well as the “FLY” die cut letters inside the white frame.  The ripped sentiment was computer generated and sponged with grey ink and tucked behind the white frame.  I added some green Stickles glitter to each scallop and tucked some green flowers with gold enamel dots in the center.  I also tucked more of those behind the fairy too.

Vicki-AJpageMar-Flytop

I covered the butterfly wings with a glitter brush pen and then splattered some grey ink over top of the wings before attaching them to the page with glue and foam tape… and before attaching the butterflies to the page, I covered up the fairy with a piece of scrap paper and used some gold paint to splatter over the page…and I called it done!

I enjoyed making this page with all of those GREEN things from my stash!  I hope you’ve enjoyed it too!  Thanks so much for dropping in and have a great weekend!

Challenges:

  1. Art Journal Journey – Anything Goes Art Journal
  2. Creative Artiste – Anything Goes Mixed Media
  3. Challenge Up Your Life – Monochrome
  4. Beyond the Blue – Green
  5. Ally’s Angels – Anything Goes
  6. A Place to Start – Anything Goes
  7. Through the Purple Haze – Anything Goes

Black Friday Frog at Inky Stamper!

Hello friends!  Hope that you had a wonderful Thanksgiving with grateful hearts and full tummies!  Today is another tradition after Thanksgiving which is the “Black Friday” deals!  So, I wanted to share something fun with you today and I strongly encourage you to head on over to the Inky Stamper Store to see all of the wonderful Black Friday deals that are going on! 


In honor of Black Friday, I have some inspiration using this NEW Freddy Solo:

And of course, what’s better than a good “Black Friday” deal than a black frog to go with it?!!  It was proposed to have Freddy Solo the Frog colored up in black, so I took on the challenge and made a fun monochromatic card with him.  I think he turned out cute!

I found a sketch (linked in challenges below post) and used that for inspiration in creating my card with him.  I’ve used several different patterns for my papers from the Doodlebug Buffalo Check/Woodgrain and Gingham/Linen paper pads which are also sold in the store as well. I’ve used some for the card front panel that was layered onto an A2 black top folding card base.  I’ve layered some silver foil papers with the pattern papers for the image panel that was lightly sponged with black ink.  I wrapped some silver cord around the image panel, white heat embossed the sentiment with Freddy over a piece of the pattern paper, popped up Freddy with foam squares and finished off the design with some Picket Fence Day and Night Gems.

Here’s a closer look at the Black Friday Freddy and how I’ve colored him up using Copic markers in the cool grey tones.  I’ve also added a highlight on his eyeballs with a white gel pen and then I emphasized the “dots” on him with a black gel pen.  You can see it looks a tad bit shinny and raised on the dots.

Really hope you’ve enjoyed my Black Friday card today and are able to take advantage of the fun deals this weekend!  So hop hop hop on over there and shop!  Have a great weekend and I’ll see you soon!

Challenges:

  1. Through the Purple Haze – Monochromatic
  2. Ally’s Angels – Anything Goes
  3. Crafter’s Cafe – Dies and/or punches
  4. Lil Patch of Crafty Friends – Anything Goes
  5. Pammie’s Inky Pinkies – Anything Goes
  6. Try Stampin’ On Tuesday – Paper Piecing and/or sketchNovember
  7. Double Trouble – Scrapper’s GORP teaming with TSOT aboveChallenge #126 Gorp Mix It Up copy

Cowboy Courage and Dad Jokes

Hello friends!  Hope you’ve had a great Fourth of July weekend and staying cool through this really hot week too!  I had planned on scheduling a post or two while I was gone last month, but time just didn’t let me get there and I’m a bit behind, but I wanted to share a couple of masculine cards I made for some men in my life for Father’s Day:

Up first is this card I made for my dad.  He’s a huge John Wayne fan and so I thought it would be fun to print out one of his famous quotes for a card.  After printing it out, I stamped the large rope lasso image around it from the Whimsy Stamps Cowpoke clear stamp set.  I printed the quote over a piece of kraft cardstock and stamped with chocolate colored ink with the rope frame and colored it with Copics.  I also cut the other images from the same stamp set over White Copic Blending Card and colored it with Copics.  I just fussy cut them out with scissors and placed them over my card front with some foam squares.  I cut a section of the horseshoe out so that it “appears” as if it’s hanging around the lasso and glued it over each side of the lasso.

I thought it would be fun to add some more details to mimic the boots by die cutting the loopy stitched borders from the Whimsy Stamps Straight Edger Die Set and then I ink blended around the edges with chocolate ink.  I also did this with the envelope you see behind the card too.

He really liked this one!  I remember as a child sitting with him sometimes and watching those really old “cowboy movies”.  LOL


The next card I made was for my husband…

This card was PERFECT for him!  Most of the time, the kids would always tell him that his jokes were NOT funny, but the fact that HE thought they were so funny is what made them laugh! 😂 And then he would claim that they were laughing or smiling, so he knew they liked them!😄

So, when I saw this Dad Jokes stamp set from Lawn Fawn, I knew it would be a good one to have on hand for cards with him.  I kept this card a simple one with a grassy stitched border and then I used one of those woodgrain papers from Lawn Fawn and also die cut the LF Father’s Day Border using the same woodgrain paper for it.

I positioned the little chicks to the side with the *crickets* sentiment above them and then the other one laughing while the little chick with the tie is telling the “dad joke”.  I popped up the speech bubbles with foam squares.  You will also see that I’ve stamped another “dad joke” on the envelope with some ha ha ha next to it as well.

**Side note:  My husband’s favorite “dad joke” from the stamp set was…”What’s brown and sticky?…A stick!*He had to tell that one to the (adult)kids of course! 🙄 

Hope you’ve enjoyed my masculine cards today or had a smile!  Thanks for dropping in and I’ll see you soon!

Challenges:

  1. 7. JulyThe Male Room – Monochrome (Top card only with brown tones)
  2. Alphabet – ‘G’ is for Giggle/humorous card (Second card only)
  3. Lil’ Patch of Crafty Friends – Anything Goes
  4. Corrosive – Anything Goes
  5. Pammie’s Inky Pinkies – Anything Goes
  6. Penny’s Paper-Crafty – Anything Goes using Paper

Reminder for the Blues at {Cupcake Inspirations}

Hello friends!  Hope that you’ve had a nice weekend as your days are growing closer to Christmas.


Today I have a reminder for you about the “Shades of Blue” challenge over at the {Cupcake Inspirations} Challenge Blog and that you still have a few days left to enter your blue shaded projects!  Hope you’ll join us!  Although thoughts of winter, Christmas and snowflakes come to mind with these colors, I’ve decided to take the colors in a different direction for this week:

Blues made me think of a masculine birthday which is something that I needed for a birthday card for my dad this last week, so my thoughts turned to him when making this card.  He’s been having some medical issues recently and I wanted to send him a happy card along with some real balloons to help try and cheer him up a bit.  My heart is heavily with him right now as he deals with many physical issues.

For my card, I first started with a piece of Bristol Smooth watercolor paper and ink blended some blue oxide inks over the panel with Chipped Saphire, Blueprint Sketch and Salty Ocean Oxide Inks.  I die cut the large sentiment die and balloon dies from this piece and then attached the sentiment to a die cut vellum shadow behind it.

I stamped some images with the same blue inks I blended with over a white panel along with doing a very light ink blending in the center of it before attaching the die cut sentiment over top.  I then attached that panel to a blue die cut panel and again over a white die cut panel and finally attaching it to an A2 sized side folding blue card base.  Lastly, I popped up and glued the die cut balloons along with the silver strings also die cut around the sentiment panel keeping in mind the placement of the strings.  I added a few blue sequins to finish it off.

In this close-up photo, you can see the details of the background more clearly along with the shimmer over the balloons which I went over with a glitter brush pen.

So I hope that you’ve enjoyed my birthday card today and were inspired to pull out your blue shaded stash and have a play with them!  Really look forward to seeing what you come up with for the challenge!  Be sure to check out the {Cupcake Inspirations} Blog and see what the Cupcake Sweeties have to inspire you with this week as well!

Thanks so much for joining with me today and I’ll be seeing you soon!

Challenges:

  1. The Divas That Cut Paper – Dec Anything Goes + die cut machine.
  2. Lil’ Patch of Crafty Friends – #147 Anything Goes
  3. The Corrosive Challenge – #12 December Anything Goes
  4. AAA Birthday – #20 Twinkle
  5. Creative Moments – #204 Anything Goes
  6. Watercooler Wednesday – WWC301 Occasions
  7. Cute Card Thursday – Anything Goes

Shades of Blue at {Cupcake Inspirations}

Hello friends!  Hope that you’ve had a great first weekend of December and are ready to roll on with the spirit of the Season!  I know the world is a bit different, but it’s been great to get out the Holiday decorations and try to keep things as “normal” as we can be.  We went out and drove through our local park filled with Christmas lights while sipping some Starbuks coffee and the baking of cookies always gets me in the spirit.  What do you like to do around the Holidays?

Today, I have a new challenge to share with you over at {Cupcake Inspirations}:

The new challenge for the next two weeks is a color challenge in “Shades of Blue“!  You need to be sure to use at least three different shades of blue when making your project.  So any theme or occasion you can think of just use these colors!  We look forward to seeing what you come up with for this challenge!  Here’s my project:

I think my favorite colors to decorate with for Christmas are blue and silver!  So I knew I wanted to pull out this GORGEOUS stamp set from Whimsy Stamps called Elegant Ornaments and have a play with it!

I started with a Bristol Smooth Watercolor panel and took the Whimsy Stamps Beaded Curtain Stencil and went over the top with some Blueprint Sketch, Salty Ocean and Tumbled Glass Oxide Distress Inks.  I ended with the lightest color and faded it into the white.  I took the lightest color and also went over the top of the panel too.  I then cut the panel out with the Whimsy Stamps Zig-Zag Stitched Rectangle die.

I then took a couple of the ornaments along with the sentiment from the stamp set and heat embossed them where I wanted to place them with Ranger Liquid Platinum EP.  I took my Zig CC Real Brush Markers and colored in the heat embossed ornaments and blended them together with a watercolor brush.  I then stamped the “curved beads” images in navy colored ink and then heat embossed the strings to the ornaments so that it all looked layered.

This image panel was layered over a piece of silver mirror cardstock and then layered over an A2 sized side folding navy cardbase.  Lastly, I added some blue sequins and filled the centers with some Nuvo Dazzling Blue Glitter Drops.

Here’s a closer look at the ornaments and how that pretty embossing powder looks.  I noticed that the navy beads caught some of the EP when I heat embossed the strings to the ornaments, but I don’t mind that as I think it gives a bit of shimmer over them and gives more depth to it.  The card looks very pretty and sparkly and I’m happy with how it turned out.

I hope that you’ve enjoyed my “shades of blue” creation today and it has inspired you to pull out your blue colored goodies to play along with us!  Please be sure to check out the {Cupcake Inspirations} Challenge Blog to have a look at the wonderful inspiration from the rest of the DT to help inspire you more!

Thanks so much for joining me here today and I’ll be seeing you soon!😉

Challenges:

  1. Cute Card Thursday – Anything Goes
  2. Dream Valley – #238 Christmas
  3. Winter Wonderland – Anything Christmas Goes
  4. 52 Christmas Card Throwdown – Pick a Precious 2020 Challenge – February 52CCT6-20 3 shades of blue
  5. Through the Purple Haze Holiday – Make it Blue
  6. Crazy 4 Challenges – C4C564 Elvis “A Blue Christmas”
  7. Merry Little Christmas – MLCCB29 December Anything Goes Christmas
  8. The Paper Funday – #24 December Anything Goes optional: Christmas/Holiday
  9. Crafty Calendar – December Christmas theme

Wintertime Penguin Tags

Hello friends!  I’m on a roll with the tags and back again to share some more fun tags that I’ve been working on!

Vicki-DDSWintertimePenguins-tags
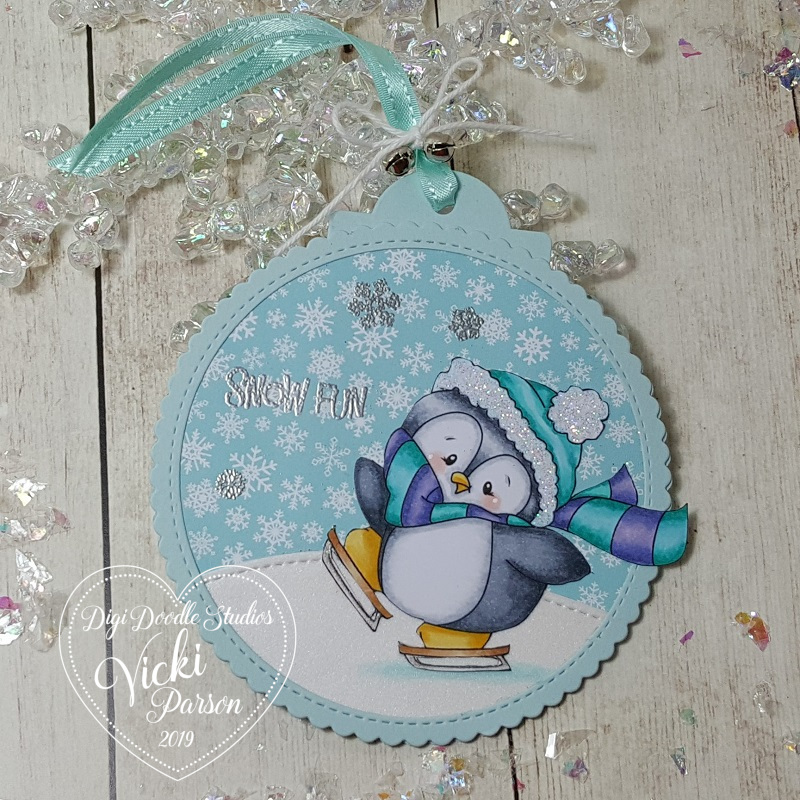
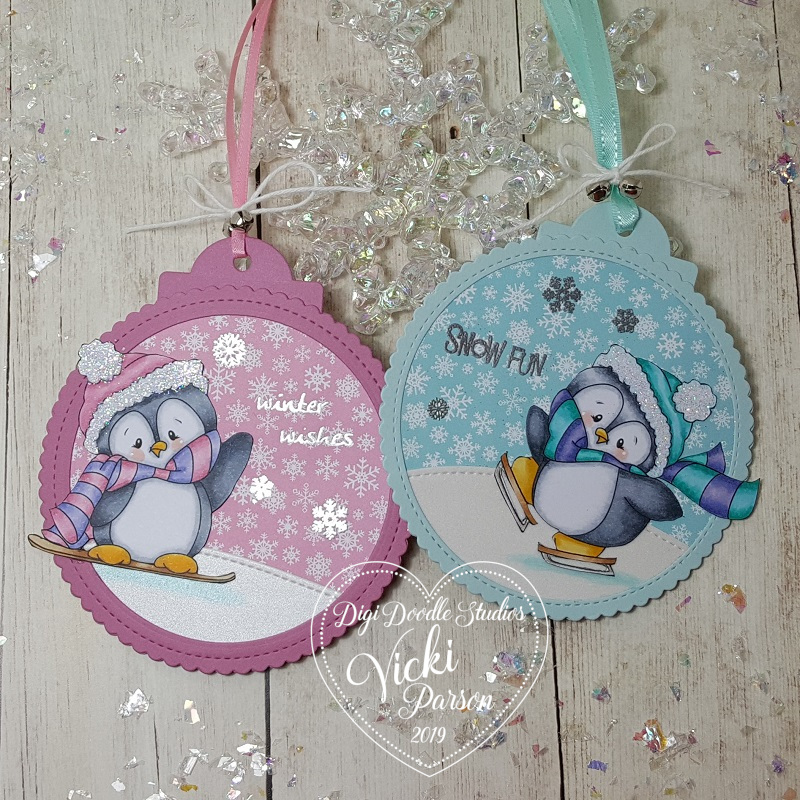
Check out these adorable penguins having some fun doing winter activities!  Penguins are probably one of the top animals that I love!  I have SO many penguin stamps in my stash and seem to keep on collecting more of them…so of course I was super excited to be able to add this Wintertime Penguins Pairables set from Digi Doodle Studios to my collection as well!  🙂

There is seriously so much fun you can have playing with this digital set and if you like penguins as much as I do, then stay tuned in as I will be sharing even more creations using this same set in December!  You will see what I mean by all the different things you can do!

For both of the tags, I’ve used several dies from my stash to create my own tags.  I took a stitched scallop circle die (MFT) and cut two of them out in the blue and pink colors along with a small tag cut with the same colors for the very top.

On one of the scallop circles, I used a circle die (Hero Arts) to cut out the center to create the “frame” for the front.  I then took some snowflake papers (MFT) and cut out another circle that was slightly larger than the opening to attach behind it.  I also took some pretty shimmer white paper and cut a “snow slope” for both penguins with a stitched border die (Lawn Fawn) and then cut it out with the same circle die as the snowflake papers.

I silver heat embossed the sentiments along with some snowflakes and then added my colored penguins over top.  Then when I flip it on the back side I can put my “To: and From:” on it.

Vicki-DDSWintertimePenguins-tag-pink
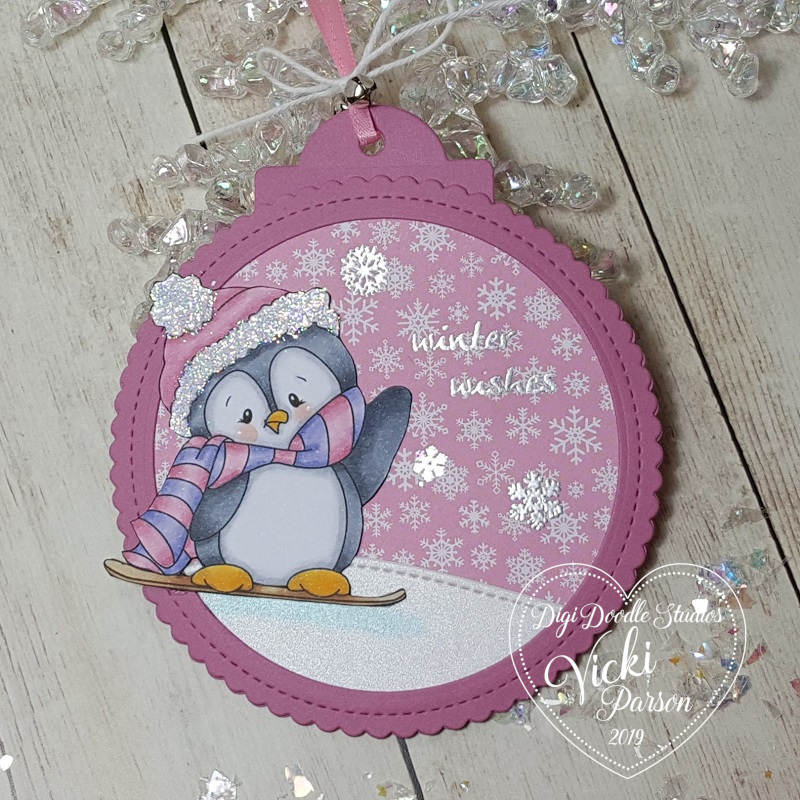
Here’s a closer view of the pink tag.  For the digital image, I used Word on my computer to add the penguin and place it over one of the “ski” images from the set and enlarged it to make it look like a snow board instead of a ski!  Then printed it out.

I’ve used my Copics to color her up and fussy cut her out.  I even added some shadow on the snow hill for her.  I took a glue pen and covered her hat trim with glitter.

Lastly, I found some more pink ribbon and tied some silver bells over it with some white twine in a bow.

Vicki-DDSWintertimePenguins-tag-blue

And for this little guy…he cracks me up….I made him using Word again, but this time I actually took the “sled” image and sized it down so that it would fit on the penguin’s feet to make it appear as if he is ice skating!  I did it for each foot.  LOL!

I’ve colored him up with the Copics again only using more blue tones instead of the pinks and did the similar traits to it like the other one.  I did use a clear metallic gel pen to color the “blades” of the ice skates.

Hope you’ve been enjoying my tags so far!  Thanks so much for dropping by.

Challenges:

  1.  Digi Choosday Crafting – Anything Goes
  2. The House That Stamps Built – Anything Goes N2719
  3. Simon Says Stamp Wednesday – Anything Goes
  4. Aud Sentiments – Christmas or Winter Sentiment
  5. Krafty Chicks aka 4 Crafty Chicks – #483 Monochrome

Sparkles for Cute Card Thursday

Hello friends!  Today starts a new challenge for Cute Card Thursday!  The theme for this week’s challenge is “Sparkles“.  Usually when I think of sparkles, I usually think of Christmas or snow, but this time I went in a different direction for a reason…

Vicki-CCT605

Unfortunately, I needed a sympathy type of card this last weekend and it seems that I’m always making one as I need them instead of making several up at one time so that they’re ready and on hand when the time comes.

This is an older stamp set from Stampin’ Up! that I got a few years back during their Sale-a-bration time and it was a free set called “Heartfelt Blooms“.  I actually really love the floral image and how detailed the image is so that you don’t have to color it if you don’t want to.  It has been my “go-to” lately when I need something quickly.

I made it monochromatic green with the Old Olive color and Vanilla cardstock.  The “sparkle” is that beautiful glitter paper behind the strip and sentiment.  The sentiment was cut from oval dies and popped up with foam tape.

Hope you’ve enjoyed my simple card with sparkles today!

Thanks for dropping in and I’ll see you soon my friends!

Challenges:

  1.  Use Your Stuff – Tic-Tac-Toe (I used bottom row across)
  2. Creative Moments – Anything Goes with optional:  For the girls
  3. Through the Craftroom Door – Anything Goes

Faux Metal Technique + video

Hello friends!!  I’m so excited to share with you this fun technique that’s not new, but a cool look to try with your embossing powders!

Vicki-BMHOP-subscriptions

I really love how this one tuned out!  I have used the “Faux Metal” technique on my card along with the “emboss resist” technique.

In order to share the steps of this card, I’ve made video so you can see how I incorporated these techniques into my design.  CLICK HERE to watch on You Tube or check it out below:

Vicki-BMHOP-subscriptions-close

Here’s a closer view of the impressed flower into the embossed panel.  It’s fun to run your fingers over the flower.  I happened to have found the perfect accent for the center of the flower too!  I think it really picks up the pretty colors in the card.

Vicki-BMHOP-subscriptions-flat

I hope you’ve enjoyed my card today!  Thanks for dropping by!

Challenges I’d like to enter this card for:

  1.  Rainbow Card – Passion for Purple
  2. Crafty Friends – Lace/Ribbon

It’s a Monochromatic Cute Card Thursday

Hello friends!  Trying to work hard on projects and getting things ready for next month.   So please excuse me if I seem a bit sporadic in my presence!

Stopping in to share a new challenge with you over at Cute Card Thursday!  This week the theme is “monochromatic” or some people say “monochrome” which simply means that your project mainly consists of one color or tone.   Stop by the challenge blog and be sure to check out the rest of the inspiration from the design team while you’re there!  Here’s my project for the challenge:

Vicki-CCT548-monochrome

I absolutely fell in love with this flower image from the My Favorite Things card kit that they came out with!  And I can’t say that I came up with this idea all on my own either, as it is very similar to one of the samples on the project sheet that comes with the kit.

It’s very simple to do, just white heat embossed the floral image and color areas in with a Copic marker and then I used a sentiment from Lawn Fawn to white heat emboss over vellum and the card stock again and then die cut the word out and attach over the vellum strip.  I had been requested to make up some wedding cards and so I’m trying to make up a few of them as this is something that I’ve completely missed in my card creating.  Taking mental notes for myself!

Thanks for stopping by friends!  See you soon!

challenges:

  1.  QKR Stampede –  #313 Anything Goes
  2. The Flower Challenge – Anything Goes + flower(s)
  3. The Creative Crafters – Anything Goes