Playing with Roulette and Colors

Hello friends!  Hope your week is getting off to a great start.  I can’t believe that January is over and we’re starting a new winter month already, but at the same time I’m already feeling like this cold weather can move along faster to Spring!

Today I have a couple of creations that I’ve made using those Inky Stamper products and playing a little “Craft Roulette” too!  Chelsea was on Craft Roulette and if you’ve never seen it play out in action, take a look at the You Tube channel to see what it’s about!  She was on episode #146 and here’s my card that I’ve made with her perimeters:

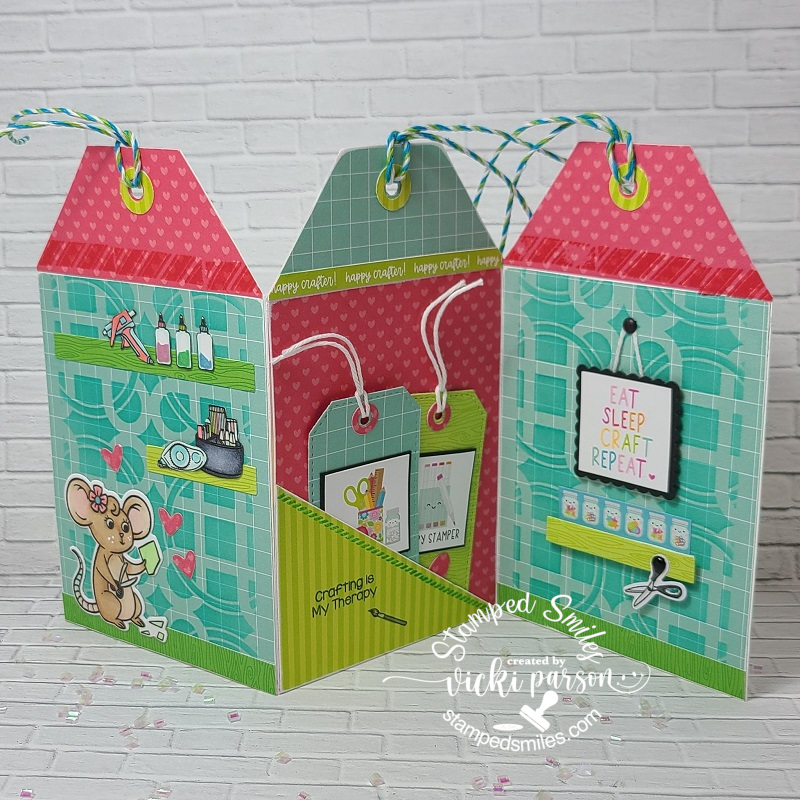
I had so much fun with this and I’ve never made a tag shaped accordion card before, but it was stuck in my head to give it a try and pull out the Inky Stamper Craft Room set to create it.  The “Roulette Wheel” spun on: Double Tags, shelf/shelves, 2 shades of green and something in the background.

The two shades of green were easy with using the Doodlebug Paper Packs and adding in a few other greens to the coloring.  I’ve also made two tags and placed them inside the pocket area in the middle of the accordion design.  I used a stencil in the background of the other two panels and of course I added some crafty goodies to the shelves in Rosie’s craft room!  The accordion card was easier than I had anticipated and just made a mini slim line size design by cutting off the edges to create the tag shape.  The hole and reinforcers were made using punches and dies.  You can see that I’ve colored up, cut out “Rosie” in her craft room where she is cutting her design going through her creative head!

When it’s all folded up and closed, this is what the card looks like.  I could always add a sentiment on the back, but I thought this would be fun to send to a fellow crafter for sure!  I just wish my shelves looked this organized!  And I always try to use another thing from my stash as I pulled out lots of twine that gets thrown in a bin, so it was nice to use for the tops of each tag area. (Maybe on the back of the card, the crafter can add items to use up on their next project and display it! LOL)


And here’s another card that I’ve done for the January challenge on the Inky Stamper Inkspiration FB Group which was to use: Black, white plus one other color:

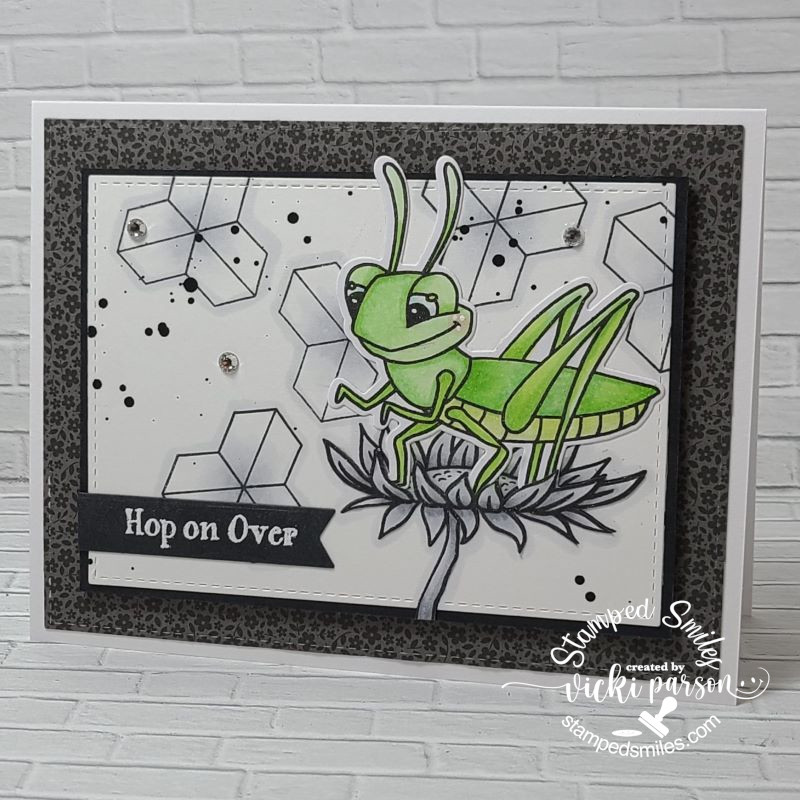
I decided to pull out the Grasshopper set and make everything in the background black and white, but just color the grasshopper in green.  All of the elements including the sentiment came from the same stamp set.  I splattered some black paint over the background and the images were colored with some cool gray Copic markers.  I white heat embossed the sentiment over black and cut it out with a banner die.

Behind the white panel, I took a piece of the black floral paper from the Doodlebug Floral & Graph Paper Pad and attached that to a white top folding A2 card base.  It was a fun and easy card to put together!

Thanks so much for “hopping” over here today!  Hope you’ve been inspired or smiled!😊

Challenges:

  1. Cardz 4 Galz – Shaped Card (top card-tag shaped)
  2. Creative Fingers – Anything Goes
  3. Passion for Markers – use die cuts (both cards use dies and are colored with Copics)
  4. Creatalicious – Anything Goes optional love &/or hearts (top card has hearts)
  5. Papercraft – Anything Goes
  6. Sparkles Monthly – Friendship (both cards evoke friendship to me!)

Apple Picking Fun

Autumn is always a favorite time of the year with the changing of the Season: cooler temps, pretty colors and being able to go out enjoy all of nature with its bounty and beauty.  There’s also nothing better than freshly picked apples from the orchid too!  It’s something that I love to do with my husband every year at our local orchid.  

So, when Lawn Fawn came out with this adorable set along with a free craft-a-long class, I knew I wanted to participate!

This is the first card we created using the LF Apple-solutely Awesome stamp set and dies.  For the class, we actually stamped, colored and cut out all of the images that we would be using for both of these cards.  I think the fun thing about this set is arranging the images to figure out where you want to place them for your scene.  Since it was a class and I didn’t have to think too much, I decided to just follow along with what I had and just enjoy the process.

I didn’t have the stencil set that they used for the class, so I had this Pink & Main Leafy Stencil that I thought would work out fine and I just blended different colors with some Oxide inks.  The white panel was cut with the LF Small Stitched Rectangle dies, popped up over the stenciled leaf panel and the sentiment was stamped at the bottom before attaching the images.

  • I’ve already sent this card to someone that gifted us some homemade applesauce…YUM!  (Already gone!)

And here’s the second card we created for the class using the same stamp set and stitched rectangle dies.  I had fun with that “cider jug” and adding a bit of sparkle to the contents inside with my glitter brush pen.

For the sentiment, I die cut it out with some LF Woodgrain Cardstock and ink blended some brown Oxide ink at the bottom of the die cut.  I used some foam strips to pop it up over the panel.  The white panel was done the same as the above card.  I used the same stencil as the above card as well but only kept the yellow tones for this one as it seemed too busy with all that was going on with the card.

So, although this was a class that I mainly followed along with except for a few minor changes, I had fun making these while getting into the Fall spirit!  I hope you’ve enjoyed them as well!  Thanks for stopping in!

Challenges:

  1. Four Seasons – Anything Goes Fall
  2. Crafty Friends – Use More Than One Die
  3. Happy Little Stampers Stencils – Anything Goes + stencil
  4. Stamping Sensations – All Things Autumn
  5. We Love Stamping – Autumn Colors
  6. Addicted to Stamps & More – Die Cuts & Stencils

{Cupcake Inspirations} Bithday Celebration Day 12 -Party Ending Soon!

Here we are friends!  This is my final day of inspiration to share with you on Day 12 of the special celebration over at {Cupcake Inspirations} for our 500th “birthday celebration” challenge!!  WHAT A PARTY IT HAS BEEN!! WOW!🧁🎉

Today, we are highlighting with our last but not least sponsor Inky Stamper – Please check out the challenge blog for more details about this sponsor.

The DT was generously given a stamp and die set to use for our creations:

Vicki-CIC500-Day12-InkyStamper

I have used this Oh so adorable Cupcake stamp and die set for my 4.5″ square card design.  So I thought it would be fun to create a fun little scene where you have the mouse coming out of his little “mouse hole” in the wall where he discovers this delicious looking cupcake with the sprinkles falling about! 😂

I started by masking off the middle of the square panel and created the “floor” by ink blending from the middle out.  I then moved my masking by covering that area up and used the negative from an oval die cut area to ink blend the “mouse hole” on the scene.  Lastly, I wanted it to look like a “wall”, so I just took a brick stencil and inked over it to go around the “mouse hole”

I stamped, colored and die cut the image and then popped him up with foam tape over the scene and stamped the sentiment underneath him.  I just glued on the sprinkles for the card.  I mounted the image panel over a die cut scallop square and then added a strip of sparkle washi tape over the card base.  (The scallop square panel was popped up with some craft foam.)  Hard to see in the photo, but I’ve brushed some glitter over the cupcake frosting!

Thank you so much for joining me here every day to check out the inspiration I’ve made from each of our sponsors.  I’m so glad that you took the time to celebrate right along with us!   I’ll be seeing you soon!

Challenges:

  1. The House That Stamps Built – A2620 Anything Goes
  2. Simon Says Stamp Wednesday – Anything Goes
  3. Cute Card Thursday – Inky! (used distress inks, masking and stencils for background)
  4. Creative Knockouts – #365 Anything Goes

Whimsy Stamps Christmas Mouse!

Hello friends!  I’m back to share with you a very special treat from Whimsy Stamps!

I have used this special image to share some inspiration with you as I am a Whimsy Stamps fan myself! 🙂

Vicki-WS-MouseFreebie-Dec1

Isn’t this darling?!  Crissy Armstrong has created this adorable “Christmas Mouse” digital stamp as a special treat in appreciation for loyal fans of Whimsy Stamps!  How cool is that?!

I have colored up this cutie with Copic markers in the following colors:

  1.  mouse body:  W9, W7, W5, W3 Ear/tummy/cheeks:  R20, R00, W3, W1, W0
  2. hat:  R59, R29, R27, R24 (same as ornament), YG67, YG63, YG61
  3. Shading/Ground:  C3, C1, E0000

I have also printed out this image an additional time to color up the ornament, fussy cut it out and then covered it with some Diamond Dust Glitter using the Nuvo Medium Glue Pen to adhere it.  I then popped it up over the original image with some foam tape for dimension.

I cut the image out with a stitched circle die and added a gold cardstock circle layer behind it.  I found some cool papers to represent the “night sky” that I was looking for.  (I think these are Stampin’ Up! papers.)  I’ve cut a piece out using the Whimsy Stamps Hand Stitched Nested Rectangles die and then I attached this piece to a white A2 sized top folding card base and off set it along the right side of my card.  I then cut a thin strip of that gold cardstock to place alongside of the papers.

The circle was attached to the card with part of it sticking off the right which I cut off to align with the card.  I thought this sentiment from the Whimsy Stamps Penguin Christmas Sentiments 1 digital set fit perfectly with this image.  I cut it out to form the banner, sponged some light grey ink over the edges and attached it to the top of the card.  Lastly, I’ve added some sequins with some Nuvo White Blizzard Glitter Drops in the center of each one.

Here’s a closer look at the design:

Vicki-WS-MouseFreebie-Dec1-close

Here you can see the glittery details of the ornament…. love these types of ornaments on my Christmas tree!!  I’ve also colored the ornament cap with a gold gel pen and added some ‘dots’ with a white gel pen for his cheeks.  Looking at this, I’m thinking some glossy accents for his nose would be cute too but didn’t do that for this one!

Thanks for dropping in!  I’ll see you soon!

Challenges I’d like to enter this card for:

  1.  Watercooler Wednesday -“All About Holidays” WWC198
  2. Simon Says Stamp Wednesday – Anything Goes
  3. 4 Crafty Chicks – “Crazy Egg” Anything Goes
  4. Jingle Belles – Christmas Cards