May Day Floral Wreath With Sparkle N Sprinkle’s February New Release!

**Please see my TURNER SYNDROME AWARENESS BLOG HOP post for details on how to enter for prizes and learn what it’s all about!** – ends Feb 7th!

Hello friends!  With the cold weather and ice around my area, I thought it would be nice to turn my attention towards the month of May with my creation today:

Vicki-SNSFloralNosegayWreath-Feb

I have used this gorgeous new February digital stamp set from Sparkle N Sprinkle called May Day Floral Nosegay.  I have printed out the pre-colored floral images and fussy cut them out for this card.  The sentiment in the center of the wreath is also from this same set which I’ve printed out as well and then cut it out with the Tonic Scalloped Squares Basic die set and sponged around the edges with some blue ink.

For the wreath, I’ve used the Tonic Rococo Fern Garland die and cut it out once in green cardstock and another in white cardstock.  For the white one I cut the ribbon area only and covered this piece with VersaMark ink which was heat embossed with some Sweetheart EP.  (This is such a pretty EP with lots of sparkle!  See below!)

Vicki-SNSFloralNosegayWreath-Feb-close

I also heat embossed this same Sweetheart EP along the edges of a white cardstock that I cut out to layer behind the wreath panel.  The heat embossed bow was glued over the green wreath and then the entire wreath was centered over the sentiment panel.  I also then layered these panels onto a piece of black cardstock.  I also put some craft foam behind this panel for some dimension on my card.

Vicki-SNSFloralNosegayWreath-Feb-closer

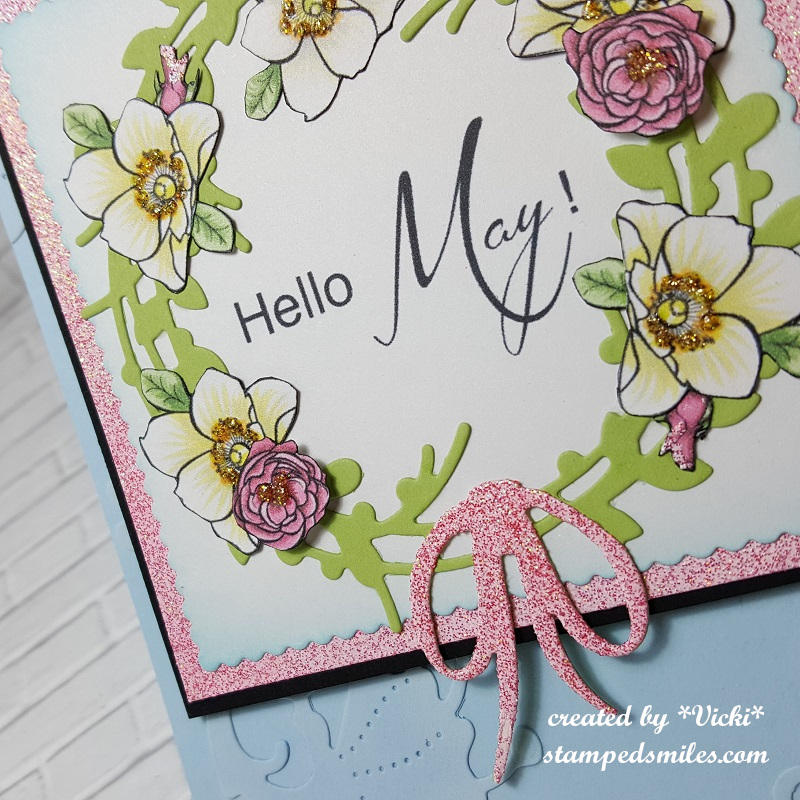
For the tiny flowers behind a couple of the white flowers, I took my Clear Mark Embossing Pen and heat embossed the very tips with the same EP as above.  All of these cut flowers were attached with the SnS Dimensional Glue onto the wreath with a couple popped up for dimension.  I also took some Nuvo Honey Gold Glitter Drops for the centers of the flowers as you can see in the photo above.

Vicki-SNSFloralNosegayWreath-Feb-flat

Lastly, for the base of my card, I cut a piece of A2 sized top folding card base with a light blue cardstock.  I also used this same cardstock color to cut out a couple of pieces using the Tonic Elegant Columns die set…so pretty!  I sponged some white ink around the edges of them and attached them to the card base.  I cut off the edges that were sticking out with my scissors.  (You can see the die I’ve used in the photo above.)

If you get a chance, hop on over to the Sparkle N Sprinkle website to check out the entire new Release for February! – CLICK HERE!  (It’s the first 8 sets shown.) Also don’t forget if you go shopping, you can get 10% off your entire order by using my special code below:

SnS discount code badge

Hope you’ve been inspired by my creation today and I thank you so much for stopping by!!  See you soon!

Challenges:

  1.  4 Crafty Chicks – Anything Goes
  2. CRAFT – Anything Goes
  3. Moving Along With the Times – Add a Sentiment
  4. A Perfect Time to Craft – Anything Goes
  5. Crafty Catz – Anyting Goes + optional:  Lots of Layers
  6. Papercraft – Something New (new stamp set, dies, EP, flowers)

Enjoy the Changes Life Brings

Hello friends!  Back with you today to share a card I’ve made using the January release stamp set from Sparkle N Sprinkle called Early Spring Nest!

vicki-earlyspringnest-cardep-project2

I had so much fun playing with this pretty Spring image and playing with some new embossing powders on this one!

To get the background, I’ve taken a piece of watercolor paper and sprinkled it with some Nuvo Blue Blitz Shimmer Powder and spritzed it with water to also move it around the paper until I got the look I was wanting for it.  I set it aside to work on the rest of my card until it was COMPLETELY dry.  After it dried, I took my Static Free Bag to rub over the area and prep for heat embossing.  I stamped the Crackle Background stamp (Really love the versatility of this image!) with VersaMark and heat set the image with the SNS Robin’s Egg embossing powder.  (Sounded like the perfect product to use for my card!)  I also used my corner chomper to round the corners on this panel.

For the scallop layer behind this panel as well as the layer behind the sentiment, I took my VersaMark ink pad and smeared on a layer around the edges and heat embossed them with the SNS Coffee embossing powder.  I also used this for the sentiment as well as the nest image, so this also works for a nice detailed embossing powder!   I made the fishtail banner layer before I did the embossing with my Tim Holtz 5″ scissors.  I took some craft foam and attached the front base panel to the embossed scalloped layer which was mounted onto a white A2 sized top folding card base.

vicki-earlyspringnest2

Here’s a closer look at the stamped Crackle background with the Robin’s Egg heat embossing over the watercolor background.  I just love the shimmer it has in it!  You can also see the Coffee heat embossed layers.  I love the pretty Copper sheen it has as well as the dark brown flecks in it!  You can also see how well it embossed the fine detailed stamped images too.

There are so many different things going on with the embossing powder on this design that you really need to capture all the different angles throughout the design to see it!

vicki-earlyspringnest1

For the coloring of the image, I just used some Clean Color Real Brush markers for it.  I like to heat emboss the images when I do this sort of coloring as it helps to keep the watercoloring inside the lines and acts as sort of a “well” so that the colors stay where you want them.

For the eggs inside the nest, I took a VersaMarker pen and colored them in with it.  Then I took the same Robin’s Egg embossing powder and heat set the eggs with it.  It really creates a fun and unique look with the blue tint and speckle flakes in it, plus it gives it a nice embossed shine for an “egg like” appearance!

After coloring in the image, I used my scissors to fussy cut it out and then added a couple of feathers from my stash and attached this image over the card front panel with some foam tape.  I finished off my design by adding a few random drops with some Nuvo Dazzling Blue Glitter Drops.

I hope that you’ve enjoyed my card today and thank you so much for stopping in!

Don’t forget to use my code below at checkout when shopping:

SnS discount code badge

Here’s quick list of Sparkle N Sprinkle products used today:

Stamps:

Embossing Powders:

Ink:

Coloring Mediums:

Embellishments:

Tools:


Challenges I’d like to enter:

  1.  Fab ‘N’ Funky – New Beginnings  MISS IT!!!
  2. Not Just Cards – Jan Anything Goes
  3. Crafty Friends – New Beginnings
  4. Stamps & Fun = Creativity – #338 Anything Goes
  5. Pammies Inky Pinkies – PIP1902 Anything Goes

Sparkle N Sprinkle New Release – Kitty Celebrates Up in the Air!

Hello friends!  Have you checked out all of the December New Release yet for Sparkle N Sprinkle?!  Do you have a favorite?  I’m not sure I can pick one!  I think they’re all fabulous really!  But I’m excited to start with this cute one for today:

Vicki-SnS-Kitty clouds

Tee hee!  Kitty got a little “carried away” with celebrating I think!  I have used the NEW Kitty Celebrates rubber stamp set [00-926P5] for my card. (There is also a wonderful digital set [DIGI926CS] if you prefer that!)  I’ve stamped him over Copic Blending Card paper and colored him in with Copic markers and then fussy cut him out.

Vicki-SnS Kitty Celebrates-Nuvo Drops

So before attaching him to my card, I thought it would be fun to add some Nuvo Crystal Drops in Morning Dew (Gloss-dries clear) [677N] and apply a layer over my balloons to give them a shinny balloon look!  I then set kitty aside while I worked on the rest of the card.

Vicki-SnS-Kitty Clouds3

For the background of my card, I made a nice “blue sky” by taking some Sparkle N Sprinkle Watercolor Paper [WC69] and sprinkling some Nuvo Blue Blitz Shimmer Powder [1208N] over it and then spritzing some water over it and letting it run all over the panel until I achieved the look I was going for.  (LOVE the subtle shimmer over it too!) and then set it aside to let it dry.

The next thing for me to do was to create some “fluffly clouds” for the kitty to be among:

Vicki-SnS-Kitty Clouds1

So I took some cloud dies from my stash and cut them out with some Sparkle N Sprinkle Sticker Paper [99558].

Vicki-SnS-Kitty Clouds2

These sheets are sticky on one side, so I carefully peeled the release paper and handled them with some tweezers and applied some of the Sparkle N Soft Twinkling Clouds Flocking [FL207] over top of the sticky side, rubbed them with my finger to secure and tapped off the excess.  I now have some really cool soft and fuzzy clouds to attach to my blue sky!

So now all I have left to do is assemble everything for my card!  I started by taking the clouds and adhering them to my background with some Sparkle N Sprinkle dimensional Glue.   I then cut down the watercolor blue sky panel with a rectangle stitched die that fit the size of my card.   Then I needed to add my sentiment, so I took the sentiment from the same stamp set and stamped it with a black pigment ink and added some Sparkle N Sprinkle Sparkle EP [EP107] and heat embossed it.  (This is a clear style embossing powder that leaves a nice little sparkle over it!)  I layered this die cut sky panel over a piece of black cardstock which was then layered over an A2 sized top folding white card base.  Lastly, I’ve added the fussy cut kitty over top of the sky background panel with some foam dots and then randomly added some drops with the Nuvo White Blizzard Glitter Drops [758N] over the sky panel.

Vicki-SnS-Kitty Clouds5

I think this turned out really cute and I sure had fun making it!  Here I’ve laid it down so the light catches the details of the sparkle in the clouds, the sentiment and the glitter drops in the background as well as the shine over the ballons too!

Hope you’ve enjoyed my card for you today!  Thanks for dropping in!

**Please be sure to stop over at the Sparkle N Sprinkle Blog to get updates and see lots of inspiration using their wonderful products!  And please don’t forget that you can add any of your Sparkle N Sprinkle creations over on their Facebook Creative Challenge Group.  (If you don’t have any of their images, check out how to grab a free one over there!)  If you’d like, you can also join us over at the Sparkle N Sprinkle Monthly Challenge Blog by following the challenge guidelines (No Sparkle N Sprinkle image is necessary to play)!  We’d love to see what you are creating!**

*Don’t forget if you go shopping over there, be sure to add my discount code when you check out to get 10% off your order:

SnS discount code badge

Here’s the full list shopping list of products from Sparkle N Sprinkle used on my creation for today:

  1.  Kitty Celebrates rubber stamp set [00-926P5] or Digital set [DIGI926CS]
  2. Nuvo Crystal Drops Morning Dew (gloss-dries clear) [677N]
  3. Sparkle N Sprinkle Watercolor Paper (6 ct.) [WC69]
  4. Nuvo Blue Blitz Shimmer Powder [1208N]
  5. Sparkle N Sprinkle Sticker Paper (10 sheets @ 5.5″ x 8.5″) [99558]
  6. Sparkle N Soft Twinkling Clouds Flocking [FL207]
  7. Sparkle N Sprinkle Sprinkle embossing powder [EP107]
  8. Nuvo White Blizzard Glitter Drops [758N]
  9. Sparkle N Sprinkle dimensional glue
  10. Tim Holtz Glass Media Mat [1914E]


Here’s some challenges I’d like to enter this card for:

  1. Simon Says Stamp Monday – ‘B’ is for:  Balloons, Blue Sky, “Best Day ever”
  2. Tuesday Throwdown – Anything Goes
  3. Addicted to Stamps & More – Anything GoesAnything Goes badge
  4. The Male Room – Celebrate#100
  5. Little Red Wagon – House Pets