Gettin’ My Halloween On + GIVE AWAY!

Hello friends!  It’s been a minute or two since my last posting as I had been sick and then totally lost my “MOJO” during that point! So I was trying to get it going again with a few Halloween projects!  I have been playing with some new Taylored Expressions goodies and I thought it would be fun to give away some TE stuff as well!😀  Stay tuned to the end of this post!

  • click on the photos below to enlarge them if you’re on my website:

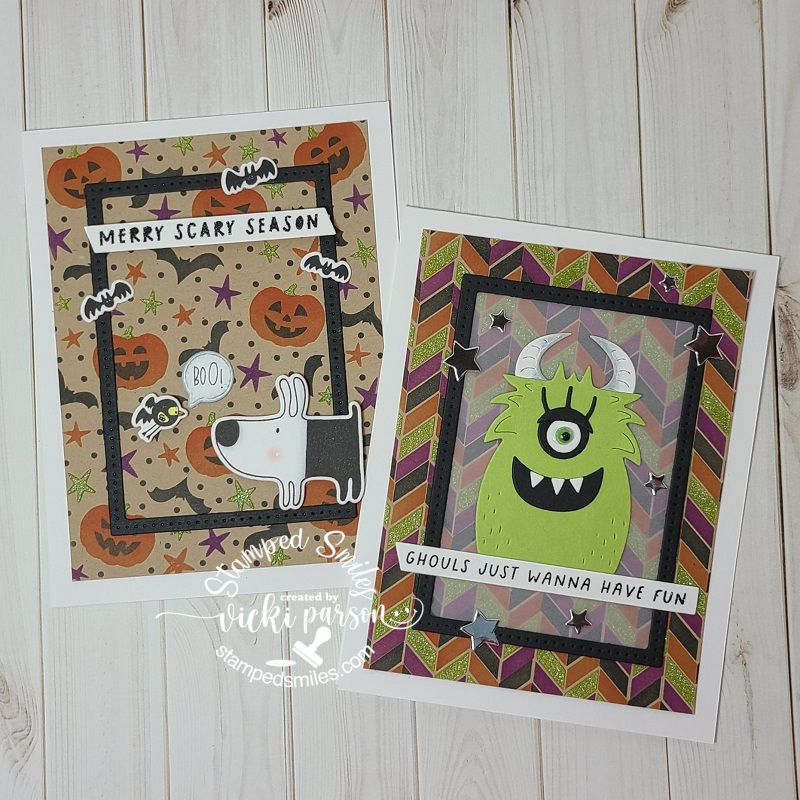
Now how cute are all of these critters, ghouls and creeps?!  As you may remember from my last post, I had been having so much fun creating with the Taylored Expressions Create-in-Quads stencils, so I had my play with the Halloween Create-in-Quads with the makes above!  I stenciled some black, candy corn, plum punch and lime zest colors, plus I went over the lime zest with some glow-in-the-dark glitter paste.  The stencil quads make two A2 sized backgrounds as well as the cat and witch cauldron too!  There is also coordinating dies to cut out the cat and witch that I used to cut out for the second set of cards.  For all of the cards, I’ve used the TE Frame in Frame 3 dies (free from an order a while back) that was cut with some black cardstock. I’ve also used the TE Simple Strips-Halloween stamped and heat embossed with some black glitter EP and cut out with the TE Asymmetrical Simple Strips Die for each card.

The set of cards on the left were created with the stenciled backgrounds and then with the black frames, I’ve added a character from a “free with purchase” Gus & Gertie Halloween stamp set.  The bird saying “boo” is in a bat costume. 😅 I popped up the sentiment strip, bird and dog with foam tape.  I die cut the “boo” sentiment with a speech bubble die from my stash.  The ghoul card was made with the awesome TE Monster Squad die set.  I placed a piece of vellum behind the black frame, so the ghoul stood out a bit more, die cut my pieces as I wanted and attached it right above the sentiment strip.  I added a green googly eye as well as a few die cut stars from silver metallic cardstock.

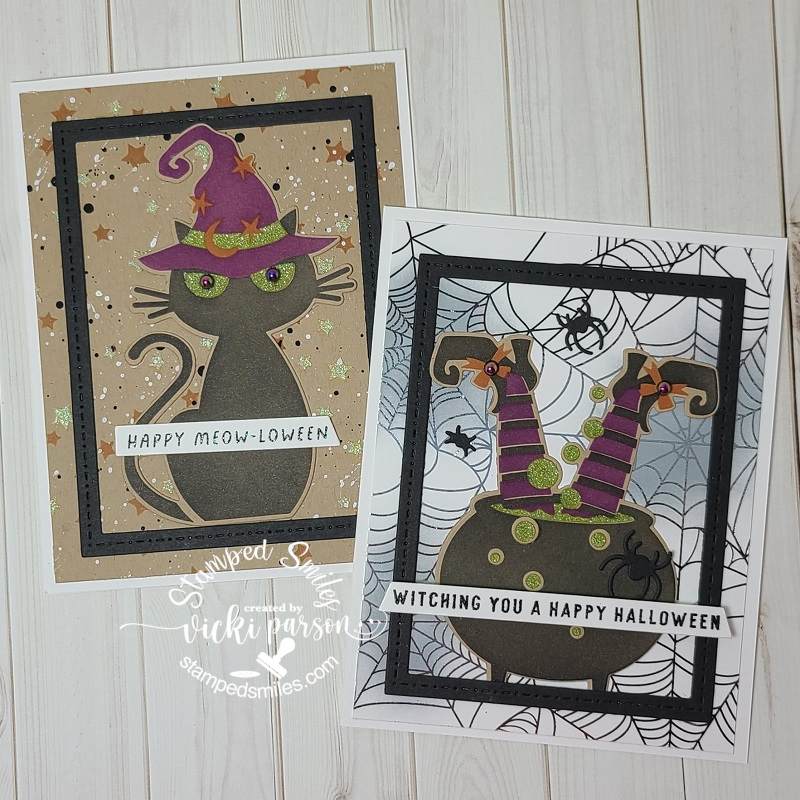
The set of cards on the right was put together with a couple of different unique backgrounds. On the black cat card, I used the TE Superstar Rotating Stencil and stenciled once with candy corn and only rotated once using the glow-in-the-dark glitter paste again.  I finished it by splattering black and white paint over it.  Topped it off with the black frame, the kitty and sentiment strip.  I also used some Cosmic Drip Drops for kitty’s eyes. (These were also used on the bows of the witch’s shoes too!)  For the witch background, I silver foiled one of the TE Foil It-Spiderweb panels and then ink blended some grey ink over a couple of the webs.  I then added the black frame, the witch and the sentiment strip. Lastly, I added a couple of spiders cut out with the TE Little Bits-Spiders die set.

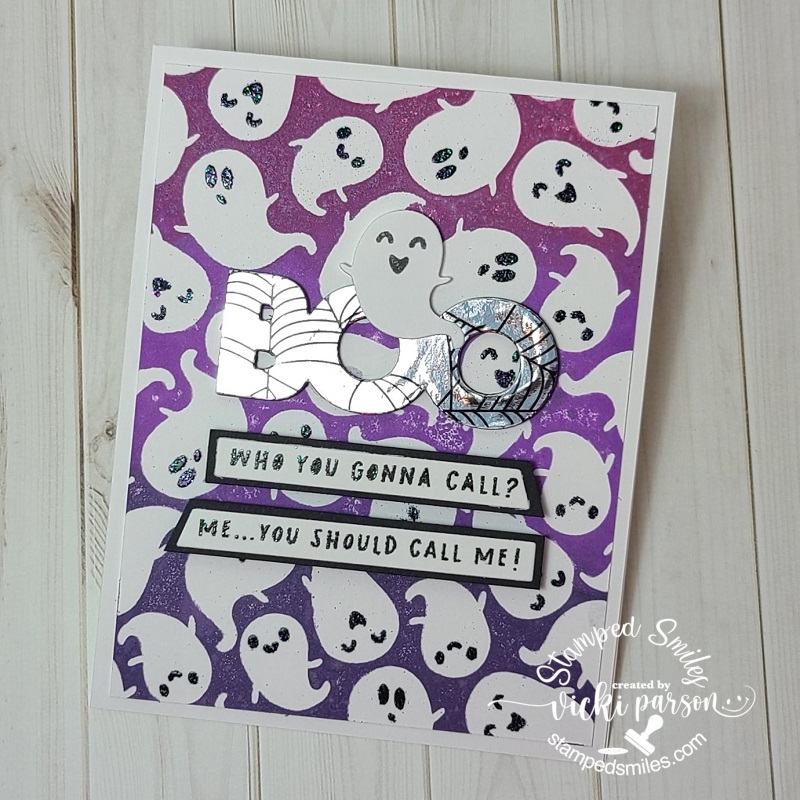
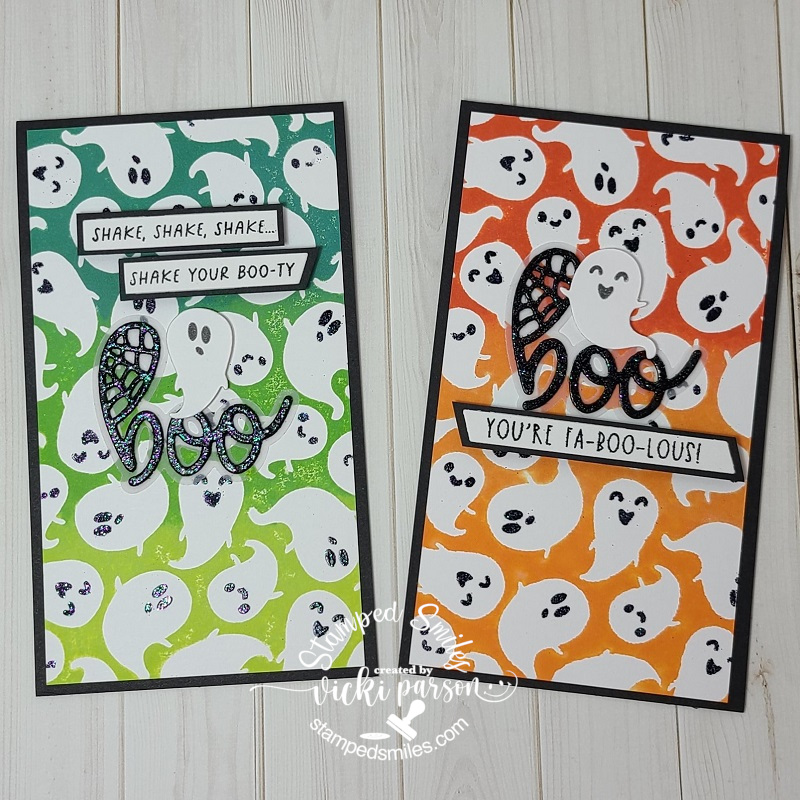
These ghosts make me smile every time I see them with those faces! 👻 For these set of cards, I pulled out the TE G-G-G-Ghost Stamp & Stencil Combo.  I didn’t used any TE inks but pulled out my oxide inks for an ombre looking color to make these different backgrounds. The stencil was used for the faces by heat embossing some black glitter EP over VersaMark ink through the stencil. The purple is A2 sized and the set of cards on the right as mini slim cards.  I continued using my sentiment strips that were previously used on the card sets above, but with these I’ve added a black layer that I just cut from cardstock.  I’ve also used TE Ghost Gang Die & Clear Combo set to cut out the ghosts popped up around the sentiments and stamped their faces. 

For the purple ghost card, I used the silver foil negative from the “witch spiderweb background” card and foiled a cut out TE On the Block-Boo Shadow die which was popped up with several layers of die cut black ones.  I popped up the die cut ghost over the foiled “boo” as well as the sentiment strips.

For the set of mini slim cards, I did pretty much the same style as the purple, but for the “boo” sentiment I used the TE Boo Script + Backer and die cut 2 of the sentiments with black cardstock and then heat embossed it with the black glitter EP.  I placed it over the vellum die cut backer and attached to the card front.  I popped up the ghosts and the sentiment strips with foam tape.


**GIVE AWAY!!!**

(CLOSED)

So, because I’ve placed some TE orders, I have gotten multiple sets (duplicates) of goodies!!  If you or someone you know would like to get one of these stamp sets, please let me know in the comments below! (Which one(s) you want!)  I have FOUR large rubber stamps to give away!!  Check it out….

  • Click on each photo below to enlarge if you’re on my website!

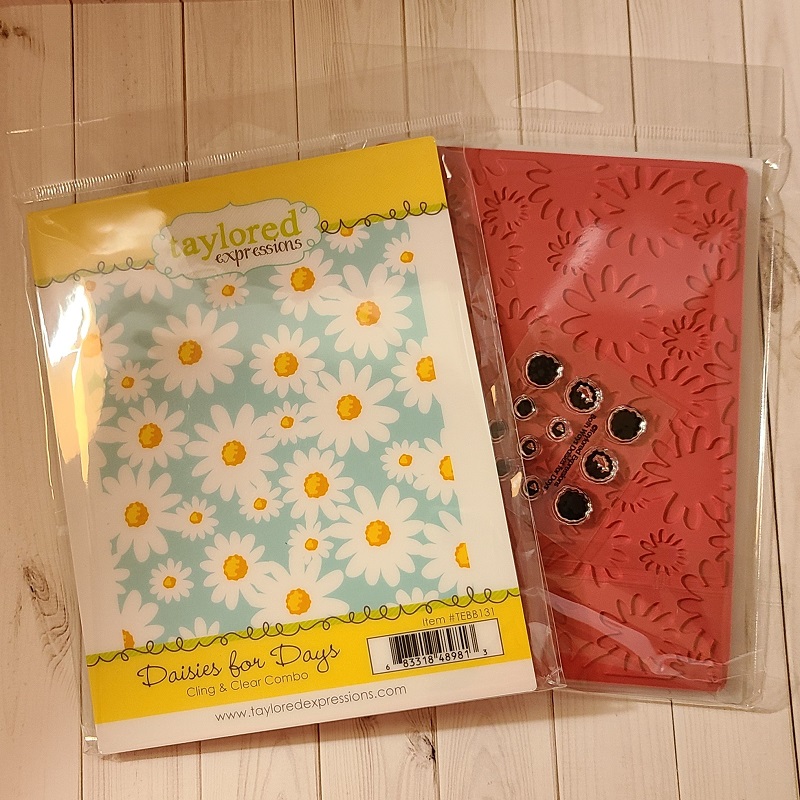
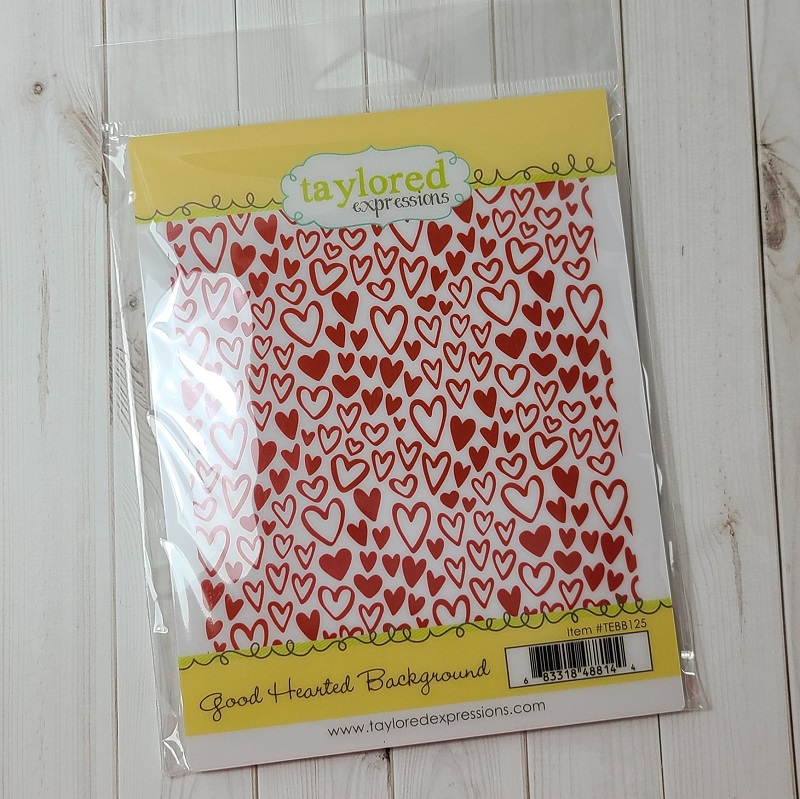
These are all background A2 sized rubber stamps. The last stamp photographed is “Winter Village Background” which measures approx. 6.25″ x 2.5″ in size. I have TWO of the “Daises for Days” to give out.  (See the photo where it shows the clear stamp set included for stamping the flower centers.)  The “Good Hearted Background” stamp is perfect for almost any occasion just by adding a quick sentiment with it!  I also have a little “extra” to go along with each one of these to accompany the package too! 

  • If you click on the names in orange above, you can see some examples using them on the TE website for ideas!

Just leave me a comment below if you’re interested in my give away and tell me which one(s) you’re interested in by September 22nd, 2022 which is the first day of Fall for us here in the U.S.  This will give everyone time to see the post and tell a friend that might be interested too! – CLOSED!!!


Thanks so much for stopping by and sharing your support and inspiration with me as it helps keep me going! 😉

Challenges:

  1.  This is Halloween – Anything Goes Halloween/Gothic
  2. Two Old Bats – Anything Goes Halloween
  3. Crafty Animals – Anything Goes + animal
  4. Show Us Your Pussycats – Anything with kitty
  5. 613 Avenue Create – Anything Goes
  6. Through the Craftroom Door – Anything Goes
  7. Lil’ Patch of Crafty Friends – Anything Goes
  8. The Corrosive – Anything Goes
  9. Arty Divas – Anything Goes

Spooky Ombre & Welcome Gnomes for Dare to Get Dirty

Hello friends!  I’m back again today to share a couple more cards that I’ve made for the Splitcoaststampers “Dare to Get Dirty” event!  They’ve released another batch of challenge over there today!  There is certainly lots of crafty fun going on lately, isn’t there?!😀

My first card was made for a challenge from the lovely Lee:

Vicki-DTGD20LuvLee-ombre

This card was so much fun to create!  I’ve used only purple shades to make this entire design!  I started out with a white piece of cardstock using the MFT Rolling Clouds stencil and ink blended them in with several Stampin’ Up! inks that I’ve had in my stash for quite a while now! LOL!  After I was done, I spritzed it with a water bottle.

I took the awesomely spooky Trick or Treat stamp set and used some SU! Elegant Eggplant ink to stamp the witch image, bat and the sentiment at the bottom.  I used my MISTI to stamp several times to darken the ink up on them.

I cut out the panel with a stitched rectangle and then cut out an additional piece of Potion Cardstock with a stitched scallop rectangle die from MFT. I layered it over an A2 sized top folding Elegant Eggplant card base.

Vicki-DTGD20LuvLee-ombre-close

I then took a glitter brush pen to “color in” the inside of the moon around the witch that gave a really cool shimmer look to it. I then started noticing that it was taking away some of the purple ink while doing this, which was really awesome as it made the moon glow even more!  (I just had to be careful around the witch because she was stamped with regular dye purple ink and I didn’t want to blur it.)

I finished the design with some Lilac Matte Sequins that I filled with some Violet Galaxy Crystal Nuvo Drops.  It’s much more sparkly in person!


My next card was made for a challenge from the lovely Kelly:

Vicki-DTGD20MiamiKel4-gnomes

This scene was really fun to put together!  I fell in the love with the little house and gnomes from the Simon Says Stamp Gnome School.  I thought it would make a nice “new home” type of card.  I colored them up and cut them out with the coordinating dies to arrange over my scene.

The scene started with a piece of kraft that was ran over with the SSS Petal Plate die for the texture in the background.  I cut out some clouds and a border of grass with dies and inked them up with some inks for shadows.  I then took this panel and cut it all out with a stitched rectangle die and mounted it over a top folding A2 sized black card base.  I also took a sentiment strip from the SSS Gnome School Sentiment Strips to place over the design while arranging the images over the scene.

Vicki-DTGD20MiamiKel4-gnomes-close

For the sign on top of the “home”, I used one of the sentiments made for that spot and white heat embossed it over my coloring.  Hard to tell in the photo, but I’ve also covered the heart on the gnome’s hat as well as the glasses on the gnome with a glitter brush pen.  I also did the same for the windows on the home.

I hope you’ve enjoyed my creations for today and I sure appreciate you stopping in to check out all of the happenings that are going on!  Hope you’re able to join in some of what’s going on too!  See you soon!

Challenges:

  1.  Simon Says Stamp Wednesday – Oh So cute (bottom card only)
  2. Stamps & Fun = Creativity – #372 Lavender or Purple (top card)
  3. Always Fun – #177 In the Sky Scene (top card)
  4. Crafting Happiness – #63 Anything Goes

Finishing Up Summer School With Cupcake Creations!🧁

Hello friends!  Hope you’ve had a great week!  Wow…it’s Finally Friday!  I’ve been SO busy “behind the scenes” and I will be getting to all of that later on, but I needed to squeak in with the final creations for the MFT Summer School!

I finished up Day 2 with my “smile rainbow” and now for Day 3, they’re asking for a “symmetry” style of creation.  I was told that basically it’s something that if you were to split it in half, it would be exactly the same on the other half…so this is what I thought of:

Vicki-MFTSummerSchool-Day3Symmetry

I was so excited about getting the My Favorite Things Cupcakes card kit, so I was determined that I was going to pull it out and use it for the rest of my Summer School cards! LOL!  It’s such a cute set with the dies and sentiment stamps!  I really had fun!

I used some papers from the kit and sponged ink around the edges of everything pretty much.  I just used the two cupcakes side by side for the symmetry class.  I just have opposite colors of sprinkles.  I added the red cherry on top, covered with the glitter brush pen and then some glossy accents.  (The glossy accents really got a work out!😮)

Vicki-MFTSummerSchool-Day4Ombre

So Day 4 class was “ombre” and that pretty much called to me to use the stencil from the card kit (sprinkles in background) and then I just heat embossed white over white and then used inks for the emboss resist technique moving the colors from lightest to darkest to get that classical “ombre effect”.  I also added a die cut cupcake that I used the same ink effect over it.  I die cut the words from the kit with the dark papers I used for the base of the card.  I finished with some sparkly crystal accents to finish it off!

Vicki-MFTSummerSchool-Day5WhiteSpace

And last but certainly not least was Day 5 “White Space” class.  I don’t often make cards like this, but I honestly love those CAS style cards, but I always want to “teeter” on the fine line between CAS and not…so I always think I’m not doing CAS.  I’m just not comfortable with the “CAS” definition or “rules” of what is or isn’t CAS.  I just feel happiest doing whatever happens to work out in my plan for a design…that’s pretty much it!    Be happy and you’re good!

I used this class to also follow along with the MFT sketch challenge going on as it looked like it was a good sketch for making a “white space” design.

I started by masking off the square and sponging lightly around it, I white heat embossed the sentiment over a black strip and added some silver ink over the stencil again and then attached the cupcake over top with the papers…and added the cherry on top with glossy accents too!

I finished it off with another little flag die from the kit and some silver sequins!  I like how it turned out!  I think I deserve a cupcake after all the creations I made!!😋

I hope you’ve enjoyed my creations today and I really appreciate you stopping in to see what’s going today!  Have a fabulous weekend!

Challenges:

  1.  MFT Summer School– Day 3 Symmetry
  2. MFT Summer School – Day 4 Ombre
  3. MFT Summer School – Day 5 White Space
  4. My Favorite Things – Wednesday Sketch Challenge MFTWSC502 (my last card and I flipped the sketch on the side)
  5.  Crafty Creations – #412 August Anything Goes
  6. Craft Rocket – #73 Birthday
  7. Creative Fingers – #191 Anything Goes
  8. Arty Divas – Bonus Birthday Challenge
  9. Crafty Friends Anything Goes

I’ve Been Schooled!

Hello friends!  Hope you are doing well and are having a great week!

I took some time over the last few days to try and follow along with all of the videos and classes going on over the My Favorite Things blog as they are doing “Session 2 of their MFT Summer School“.  I don’t know about you, but I find that there is always something new to learn and different things to try with crafting and I enjoy learning about it so that I can continue to improve in what I already enjoy doing.  Sometimes that self-doubt creeps into the skull to tell you that “you’re not good enough” and “give up”, etc.    The way for me to try and stomp out those feelings is to take classes and try something new.  I just want to enjoy the process and learning can help bring on more positive feelings.

Since there are SO MANY creations in this post, I won’t go into too many details other than share the links to the MFT Summer School links that I made each card for.  I hope you enjoy having a look at them:

Day 1 – Monochromatic (CAS)

Vicki-MFTcamp-monochromatic CAS

I used several colors of MFT purple (of course!) cardstock and stamped a background stamp with VersaMark over it.  I think the die I’ve used is from something retired.

Day 2 – Focal Point

Vicki-MFTcamp-FocalPoint

Really had fun with this sweet little bear! 🙂  I loved the layout so much from class and decided to follow that for my card here.  The balloon and die cut sentiment actually have shimmer over them which doesn’t show in the photo very well.

Day 3 – Visual Triangle

Vicki-MFTcamp-VisualTriangle

This one took me quite a bit to put together.  I think maybe part of it was all of the coloring, but I was struggling a bit with the concept…I’m hoping this was how she was going with it.  3 long strips at the bottom, 3 images at the bottom and 3 images at the top.  The purple in the background was a watercolor wash like she showed in the video, but I didn’t heat emboss any image like she did.

Day 4 – Rainbow

Vicki-MFTcamp-rainbows

I have done this before, and I really like how you can use up your paper scraps in a colorful way.  I used the same frame die here in a similar manner as I did the card above this one.  I cut the sentiment several times before laying down the top one and then I slightly off centered it to show the white slightly behind it.

Day 5 – Ombre

Vicki-MFTcamp-Ombre

And here I go with another purple card! LOL!  I actually remembered a fantastic video that I created this card based on a tutorial from Jennifer McGuire.

If you have any questions about these, please feel free to contact me or simply leave a comment below and I will be happy to reply.

Thanks so much for stopping by and I will see you again on Thursday for a new challenge! 🙂