Hello friends! I hope that you’re staying cool during these Summer days! For the most part, it’s too warm, humid or both outside, so I spend most days in the air condition. Trying to organize things is what I’m attempting, but I end up crafting instead! LOL
I’m stopping by today to share that we have a new challenge over at Sparkles Monthly and we have the theme of “SUMMER DAYS” this month. This seems rather appropriate right now, so I hope you’ll join us. Here’s what I came up with:
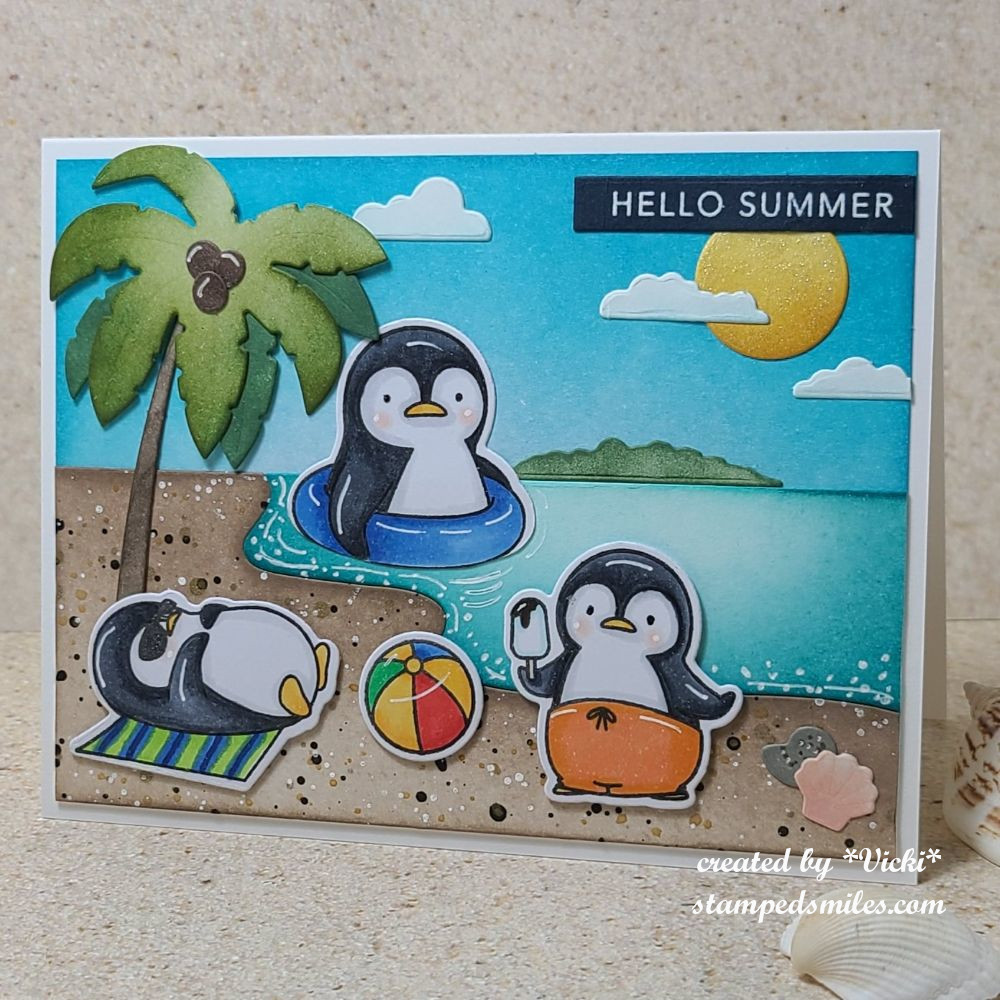
I have used these penguins many times and I just love them! This is an older set called “Penguins in Paradise” from My Favorite Things (store closed). I thought they’d be perfect to use for this theme and I wanted to make a scene for them to do all of those fun Summer things that we do!
I started with another My Favorite Things die set called “Beach Scene Starter” that cuts out the sand/water/palm tree/shells/sun/clouds/land and then I used inks to ink blend them in various colors. For the sand, I splattered several different watercolor colors and Copic Opaque White.
After placing my scene together, I stamped, colored (with Copics) and die cut the three penguins and beach ball that I added to my beach scene and popped up with thin foam tape.
I used a white gel pen to add highlights to the images as well as details to the water shore area, coconuts, beach ball and the shells. I also took a glitter brush pen and went over the sun as well as the penguin’s shades for some shimmer. The sentiment is from the Taylored Expressions Mini Strips-Hello Summer that was white heat embossed over dark blue cardstock and cut out with the mini sentiment strips die.
I hope you’ve enjoyed my card today and will join us for the challenge this month! Please be sure to stop by the blog to check out the inspiration from the rest of the team!
Hello friends! Hope you’re enjoying your day so far and staying warm! We’ve just recently survived a very cold below freezing temps in my area, so going outdoors is not that pleasant even bundled up! So with that, I stay inside and find crafting to be my happy space!
I’m very excited to be joining with my crafty friend, Carol (from Crafty-Stamper) for another year of SMASHING OUR STASH!🎉 I love the inspiration that we bring each other as well as accountability for getting those piles of stash used up! Thank you for joining me again and please be sure to check out the wonderful inspiration on her blog too! Here’s my AJ page with this month’s prompt of “COLD” (anything related to this word):
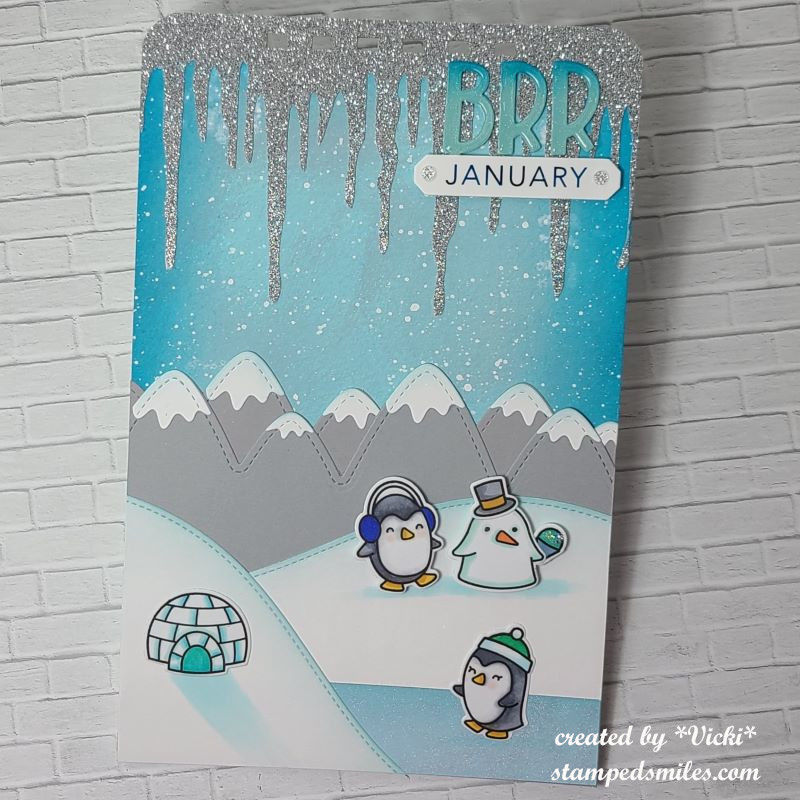
Of course when I think of cold, I think of my favorite animal…the penguin!! I pulled out some Lawn Fawn stamps to use on my page today. Lots of blues and silver and sparkle help with the feeling of cold too! I have so many sparkly items, so it was great to use some up!
For the background: I started with a piece of Canson Watercolor 140# coldpress 5.5″x8.5″ pre-punched holes at the top and covered it with blue colored acrylic paints using a baby wipe. I also went around the edges with a darker blue and then used a number stencil with white paint which you can barely see as I’ve covered most of it up. I then splattered with white paint using a fan brush for the snow.
I also found a cool icicle border and cut it out with my Cricut machine in silver glitter cardstock for the top of the page. I then used my Zutter machine to punch the holes again and used a corner chomper to round the top edges.
For the bottom: I used all Lawn Fawn border dies for the mountains and snow hills. The blue ice water the penguin is standing on is just a straight piece of blue cardstock covered with a glitter brush pen. I also used Stickles glitter to cover the snow cone that the penguin snowman is holding.
The lettering was done with a Lawn Fawn alphabet die that I ink blended in blues and covered with crystal effects. I foiled over the “January” word with blue foil and cut it out with a die and placed a couple of silver rhinestones next to it. This was popped up with foam underneath the “BRR” letters.
I hope you’ve enjoyed my AJ page today and have been inspired in some way! Thanks so much for stopping in!
Hello friends! I’m so excited to share the “Handmade for the Holidays” release at Taylored Expressions today! You can go check out all the things right now in the store! I’m extra excited that I get to be a part of this special release with them as a guest designer too! (This was for my win during the TE 13th birthday celebration challenges I had entered from last month! 🎉 Yay!) There will also be a huge post about it on the Taylored Expressions Blog too! I really hope that you enjoy the projects I’ve made to share with you and if you stop by the store, please let Taylor know that I sent you!
For my first set of projects, I’ve made a fun Christmas décor item that you can gift for the Holidays, use as a center piece for your table setting, etc. I’ve taken the Taylored Expressions (new) Accordion Tree die and used it to make a trio of trees with the “poinsettia style” attached to the accompanying TE Tree Stumps (sold separately) to go with this die and another two trees without the stumps. For the trio of trees, I’ve used the Merry Blooms Stamps, Stencil & Clear Combo set to create a background over a Toffee cardstock base inking and blending with Sweet Basil, Cherry Pop and Mulled Wine inks. I’ve also used the same products to make the tag as well. I’ve gold heat embossed the centers for the poinsettias in the background. I’ve also taken the TE (new) Itty Bitty Sentiments Holiday stamp set and used the tiny images from the set to create backgrounds for the other two trees. I’ve splattered the tree backgrounds as well as the tag background with acrylic white and gold paints. These die cut trees were glued back-to-back with the score line in the center as a guide which makes them 3D looking. I’ll explain each item below:
This was such a fun 3D project to create! I wanted all the trees together in one piece, so I thought it would be fun to grab one of these wood slices I’ve been hoarding forever and glue the trees to this base. There is an accordion star that comes with the accordion tree die, but I thought it would be fun to take the TE Perfect Poinsettia die and cut out several of the smallest bloom to make that the “star topper” for the poinsettia tree. I’ve used the coordinating stamps to stamp the “veins” and gold heat embossed the centers for them. I folded them in half and glued it to the top of the tree. I also attached some TE Gold Drip Drops for the “ornaments” over the tree (TE Drip Drops make perfect “ornaments” for these trees!) and added some gold twine bows front and back. I’ve ink blended the edges of the poinsettia tree with Toffee ink and gold paint sponged on the poinsettia topper.
This is what the other side (back) of this piece looks like…so it’s visible from all angles. Here you can better see the other two trees and how the backgrounds were made. I’ve also added some thick white paint to the edges of them to make it look more like “snowed over” trees especially since they were splattered with white paint. For the wood slice that the trees are attached to, I’ve used some Ranger Mica Flakes for a bit of sparkle attaching it with Multi-Medium Matte glue.
For the tag, I’ve die cut the background explained above with the TE Stacklets 2 die and wrapped some gold twine around it with the TE (new) Itty Bitty Sentiments & Tags Holiday set for the little tree with the gold heat embossed sentiment over it. I’ve also gold heat embossed the large sentiment from the Joyful Season stamp set & dies that I’ve popped with my favorite product TE Sticky Strips. I’ve cut out another layering piece behind the tag with Sweet Basil cardstock, punched a hole and added more gold twine.
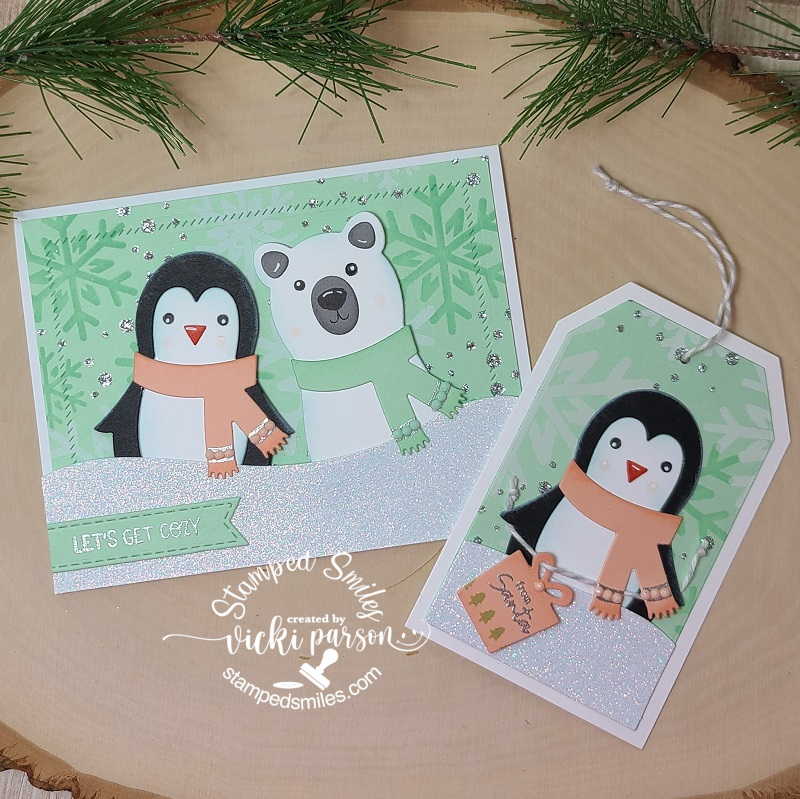
And how stinkin’ CUTE are these guys?! This is my second set of projects for this release using the NEW TE Snow Squad Dies & Clear Stamp Combo set. As you can see, the cute die cut critters are made to perfectly fit the Tag Stacklet dies! I’ve the Tag Stacklet 2 die set for my sweet penguin! The critters are so easy to cut out and decorate them as you like! I like that the clear stamp set comes with it to stamp in the eyes as those tiny dots can be so hard to deal with and loose! You get a penguin, a polar bear and a snowman with this die set!
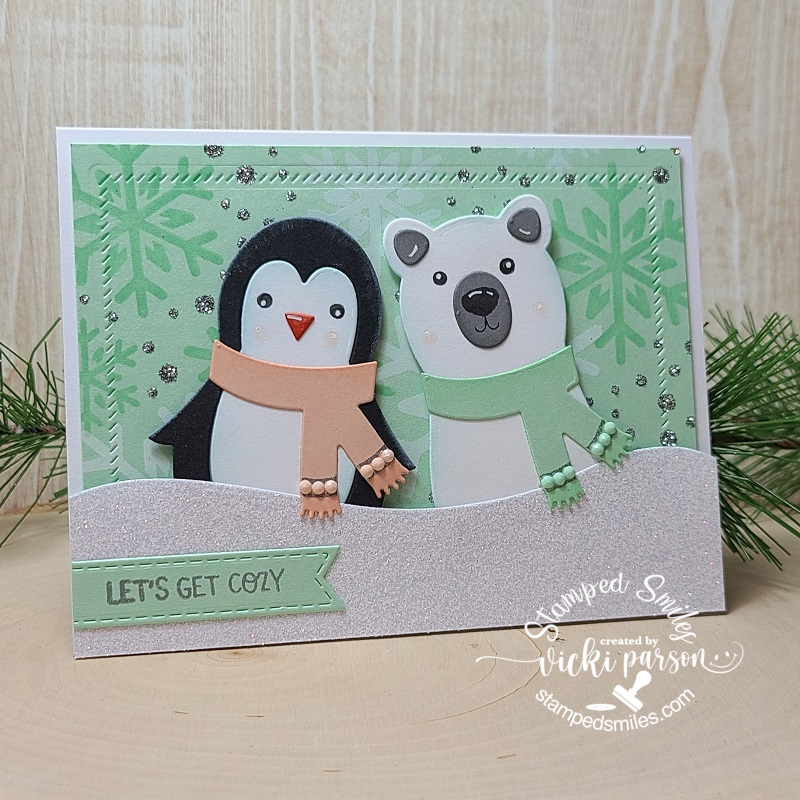
Again, I thought it would be fun to create a background for my card and tag set, so this time, I’ve taken the TE Let It Snow Layering Stencil set for a snowy background. I’ve started with a Mint Julep cardstock base, blended the same color ink for the first layer, Sugar Cube ink for the second layer and for the third layer, I’ve used some TE Glitter Grab and immediately covered it with some TE Silver Glitter. Love how it turned out with the subtle color!
Starting with my card details, I’ve decided to give the snow squad critters soft colors with their scarves. The clear stamp set with the dies also come with a two-line image for adding details to the scarf, so I silver heat embossed those and then added some matching TE Tiny Diamonds Pastel in between those lines. They matched up perfectly! I inked around the edges of each die cut piece for the critters and stamped the face images including the cheeks which I off-stamped first to keep them light. I used a white gel pen for highlight details.
I thought it would be fun to have these Snow Squad critters pop out from a snow drift, so I took some TE Sugar Cube Glitter Cardstock and cut out a “snow drift” with a piece of the their scarves over it and popped them up over the snowy background I’ve created using a TE Diagonal Stitch Rectangle Stacklets for the stitching details behind them which was layered over an A2 sized Sugar Cube top folding card base. For the sentiment, I silver heat embossed it from the TE Winter Wishes clear stamp set over a Mint Julep cardstock that was cut out using the TE Stitched Banner Stacklets die.
And of course, I had to use the penguin again for my coordinating tag! I’ve used part of the same background I’ve made for the card and cut it out using the TE Tag Stacklets 2 die set with another Sugar Cube cut out for the layering base.
I did the same thing for this tag that I did for the card above with the snow drift, but I also added a tiny tag that he’s holding with some Doodlebug Gray Twine. The tag was created with the same TE (new) Itty Bitty Sentiments & Tag Holiday sets. I’ve stamped the row of tiny trees from the set with the Mint Julep ink and then silver heat embossed the sentiment above it. I’ve also used more of the TE Tiny Diamonds Pastel for the center of the bow on the present along with the penguin’s scarf. I’ve punched a hole at the top and added more of the same twine at the top.
So how about you?! Are you ready for the up-coming Holiday Season? I sure hope that I was able to bring you some inspiration with your handmade projects for the Holidays! Again, you can check out all of the brand new Taylored Expressions products in the store as it’s now been released! Be sure to check out all of the wonderful inspiration on her blog too!
Thanks so much for stopping in today! I appreciate all of your kind support friends! Have a great day!
Hello friends! This is my second post for today, so please scroll down to see it or CLICK HERE for the {Cupcake Inspirations} Reminder post.
I have several creations to share with you today because while I’m working on trying to get some last-minute Christmas projects finished, I thought that I would join in the fun weeklong “Holiday Chaos” challenges over at the Catch the Bug Blog for Bugaboo Stamps. I’ve caught up with all of the challenges up to today and then hopefully later this week I’ll be able to post the remainder of them:
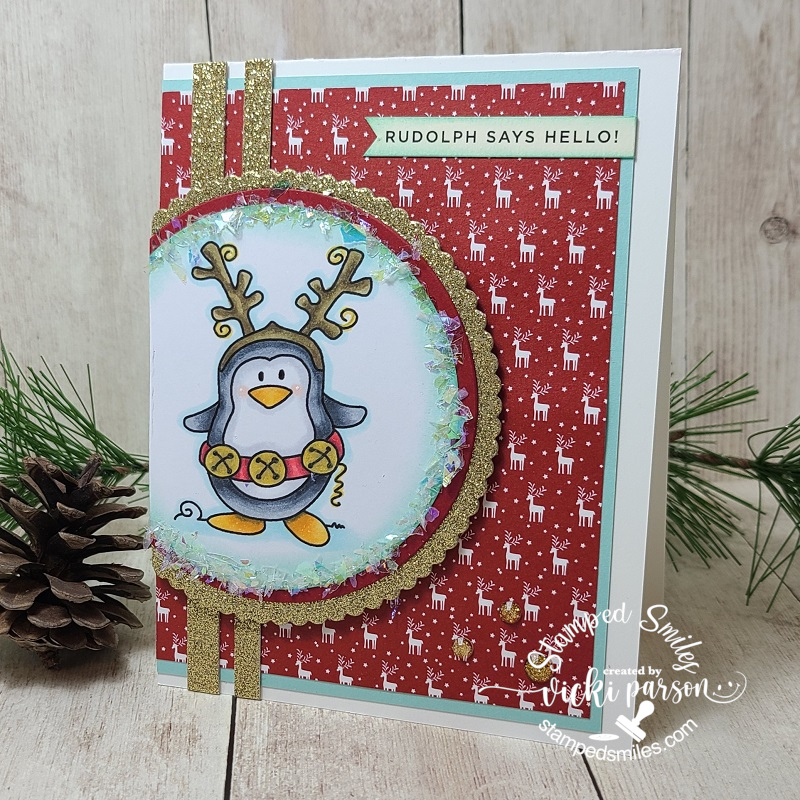
This card is for the Day 1 challenge of “Reindeer Games”, so I had this really cute Bugaboo image called Little Penguin Reindeer and colored him up for my card. I had these fun reindeer papers in my stash to pair with him and then found this fun sentiment strip to add with it as well.😂
I’ve used some gold glitter paper and added some gold glitter enamel dots in the corner. The bells on the penguin’s waist were covered with a gold glitter pen and then I added some faux snowflakes along the circle image border too.
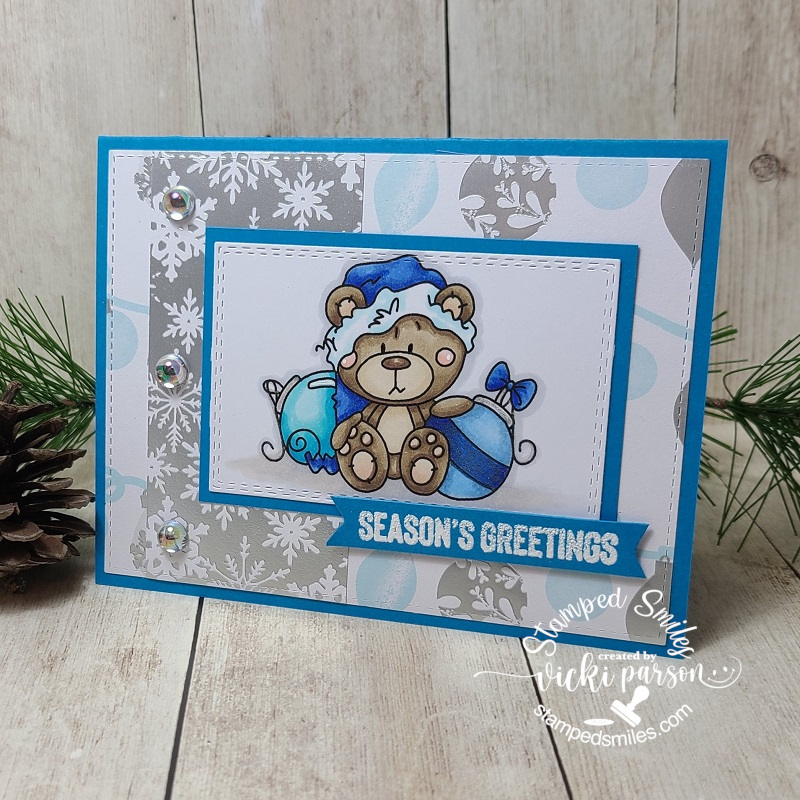
This next card was created for Day 2 Challenge of a sketch. I’ve colored up this adorable Bugaboo image called Christmas Teddy 2 Ornaments all in blue colors! Hard to tell in the photo, but I’ve used glitter gel pens to color in the stripe of the ornament and the silver tops.
I have been itching to pull out my Martha Stewart papers that have been lurking in my stash and I really love the colors in them along with the silver foil! I white heat embossed the sentiment from the Brutus Monroe “Holiday Essentials” stamp set and cut it out as a banner with my scissors and popped it up over the card with foam tape. I finished the design with some Drip Drops from Taylored Expressions.
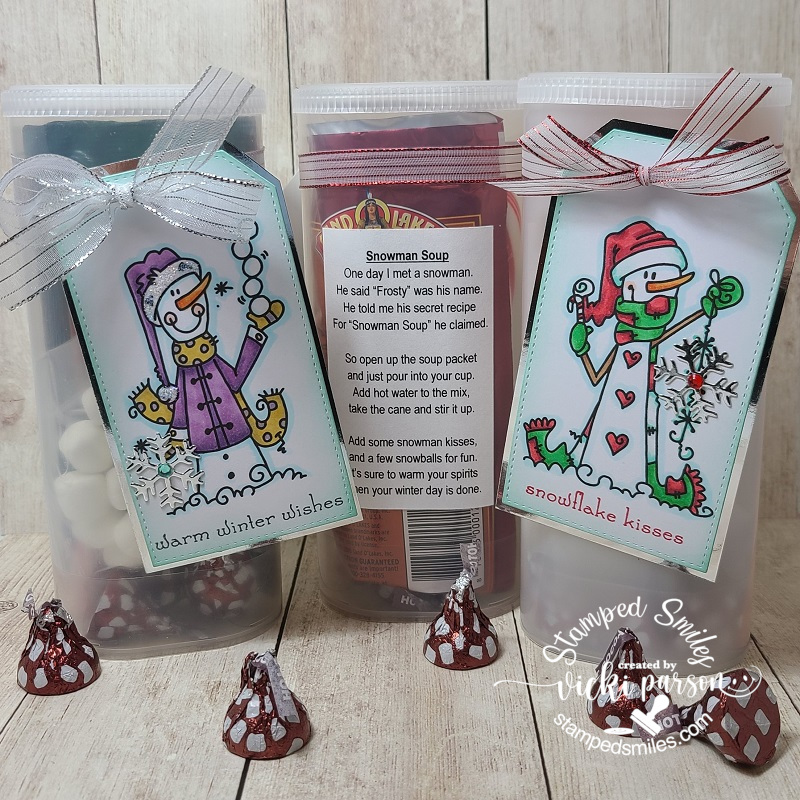
And of course, here’s my project for today’s challenge Day 3 ABC/Anything but a Card. I make these little “snowman soup” containers every year for my family and sometimes sneak in an extra “surprise” or 2 inside! You may have recalled these on my blog before, but they’re just recycled Crystal Light containers and they fit the hot cocoa, candy cane, marshmallows and a few chocolate kisses all in there perfectly together. I’ve decorated them in many different ways. CLICK HERE to see a previous post that shows another way I’ve made them in the past. This time, I just made tags to attach around the containers. I have made another set of 3 of these containers (different images) that I will show in a future post too!
I’ve used these adorable snowmen from Bugaboo Stamps called “Snowman Snowflakes” (right) and “Snowman Snowballs” (left). I colored them up with Copics and added a sentiment that was stamped at the bottom from Whimsy Stamps Holiday Mini Sentiments stamp set.
I’ve had this “snowman soup” poem for years and years and just printed it out on my computer and attached it to the back of the containers. The top of the lids are also covered with pattern papers. P.S. If you haven’t tried the “Hot Cocoa Hershey Kisses”…oh my goodness they’re so good! 😋
UPDATE:
I also wanted to share an update on the “Christmas Cards for Danny” post you may remember that I posted about a few weeks back. I’ve actually seen an update in my own hometown newspaper about all the cards he’s received and as of December 10th, he’s received 2,544 Christmas cards from ALL OVER THE WORLD! How cool is that?! This really touches my heart and uplifts me about the kindness in the human spirit. Thank you to those that took the time to send a Christmas card his way! It’s really what Christmas is all about.
Challenges:
Catch the Bug – Holiday Chaos Day 1: Reindeer Games (card 1)
Catch the Bug – Holiday Chaos Day 2: Sketch (card 2)
Catch the Bug – Holiday Chaos Day 3: ABC Anything but a Card (snowmen soup)
Hello friends! Hope you’re having a great week! I’m so glad you’ve joined me today as I have lots of fun creations to share with you!😀
This past weekend Whimsy Stamps held a “virtual craft retreat“, so I thought I’d tag along and join in on the fun! I’m glad I did because I made several cards:
The first challenge given was a tic-tac-toe challenge. I did 3 down: birthday, heat embossing and circles for mine. Almost had 2 bingos…but didn’t quite work out! Aren’t those penguin eyeballs the best?! LOL! I needed to send out a birthday card to someone so this was great timing!
The background papers, cover die, sentiment die and the penguin stamps are all from Whimsy Stamps. I even put little ice cube confetti for my shaker card!
This card was made for the second challenge given during the event which was to use a sketch and a color palette using at least 2 of the colors given. This was my take on the sketch along with using blue, green and brown from the palette.
Most all of the items used on this design came from an older card kit from Whimsy Stamps. The stamp set is still available in the store called Enjoy the Journey. For the sentiment panel, I heat embossed a sentiment from this stamp set and then used the Slimline Postage die to cut along the edges of it.
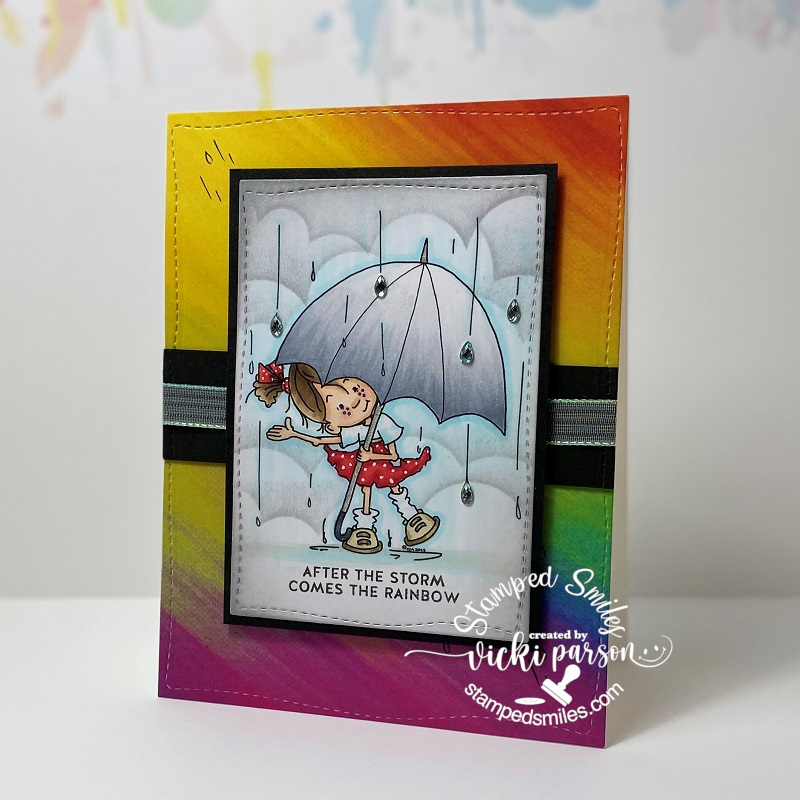
Tihs is the card that I created for the third challenge issued which was to follow a photo prompt with words: “When it rains, look for rainbows. When it’s dark, look for stars.” The first thing that came to my mind was these cool Rainbow Papers from Whimsy Stamps and so I’ve cut a panel out with an older Whimsy Stamps die along with the image panel.
This image is called Rainy Day Smiles by Sassy Cheryl’s which is what I had actually won as a prize from the event over the weekend for one of the games..so that was cool! I wanted to be sure to use it for one of my cards! I added some raindrop crystals on a few areas of the image too.
This card was made for the fourth challenge given which was simply to create a project with one of the digital freebie images that was given during the event.
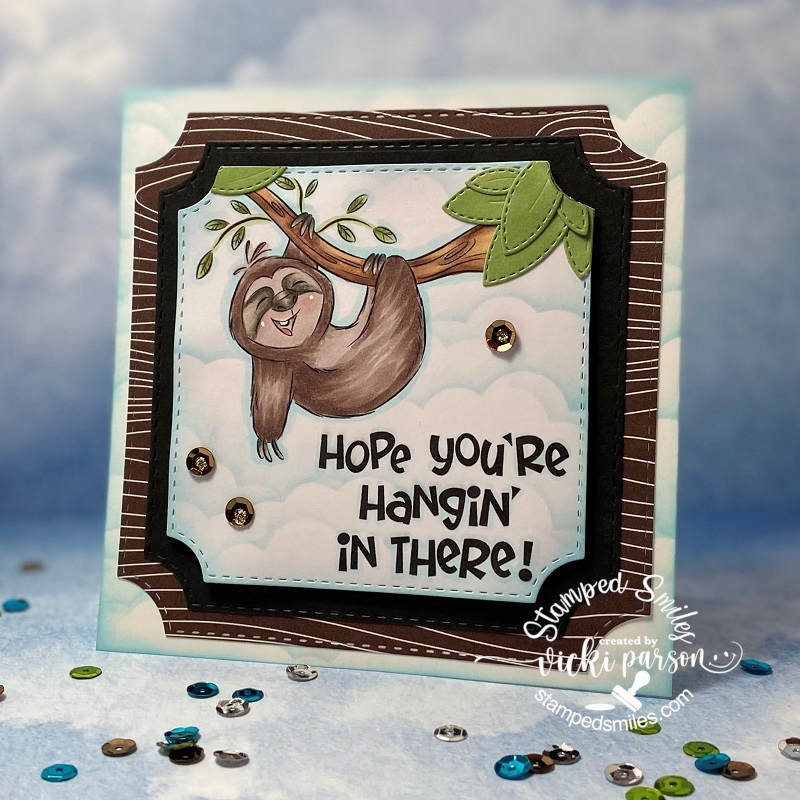
Facebook actually kicked me out of the event a few times for leaving too many comments! LOL! I was trying to participate in games and it told me that I was leaving too many comments! This was one of the cute freebie images that they gave at the event called Sloth. After all that happened…I felt that this little guy was laughing at me!🤣🤣🤣 So I wanted to laugh right along with him, and I printed him out, colored him with Copics and used the Whimsy Stamps Notched Square dies and layered him over some papers from my stash and attached to a 5″ square card base that I stenciled some clouds on along with the background of the image. I die cut some leaves from the Whimsy Stamps No-See All Seasons Tree die set to add to the top corners of the image panel.
Needless to say, I did “hang in there” right along with him!!😄
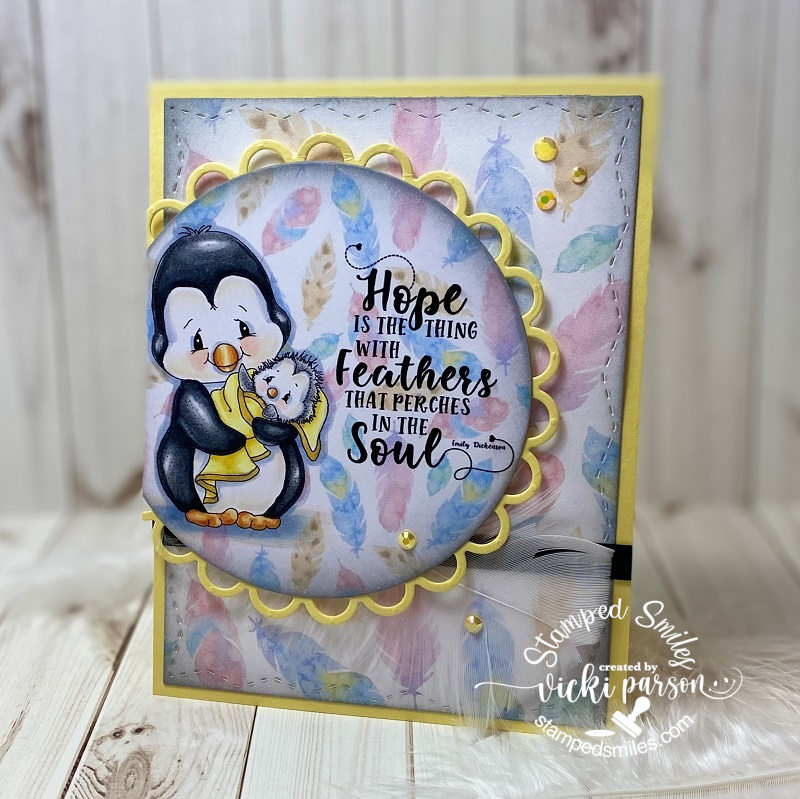
And last but not least, the fifth challenge was to make a project based on one of the video tutorials that was shown at the event. Of course, I’m always inspired by Crissy Armstrong and her coloring! This sweet little penguin called Penguin Momma was a freebie given during the event and I watched Crissy color this up and I tried my hand at her tips and tricks.
I printed out another piece of the feather background and cut it out with the Whimsy Stamps Zig Zag Stitched Rectangle dies and added my own white feather to the design. I sponged some grey ink around the edges of the printed papers and added some yellow crystals.
I had such fun creating these projects and pulling out my Whimsy Stamps stash for the challenges. And now I have a few cards for sending out to people that I already have in mind! Hope you’ve enjoyed my makes today and I’ll be seeing you again soon!! (The links in this post contain affiliate links if you want to purchase anything! Thank you!!)
I have to say thank you for your lovely comments and thoughts! Sometimes, you just never really know about something or how someone feels unless you are told or you ask! I’m really amazed that there are people I didn’t realize that actually cared if I posted something! Even if you have stats on your postings, you still don’t know who really DOES like to see what you’re posting. I’ve had some blog friends that have been around for MANY years, even before this blog platform and I’m so thankful for you guys! I am always truly inspired by you all for sure! Thanks for being around!❤ (Even if you don’t comment!!) 😉
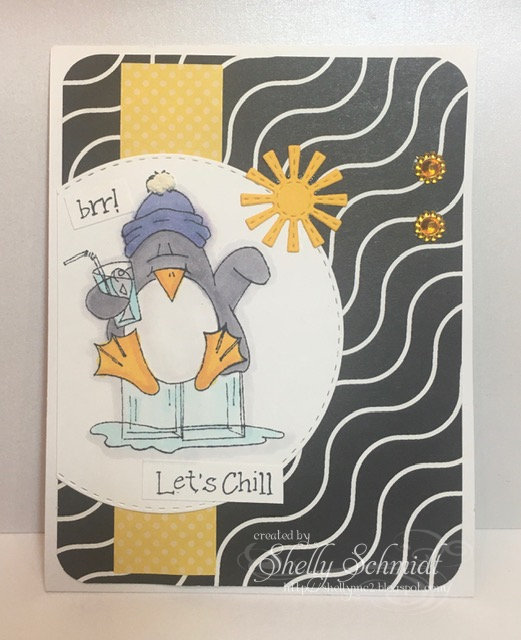
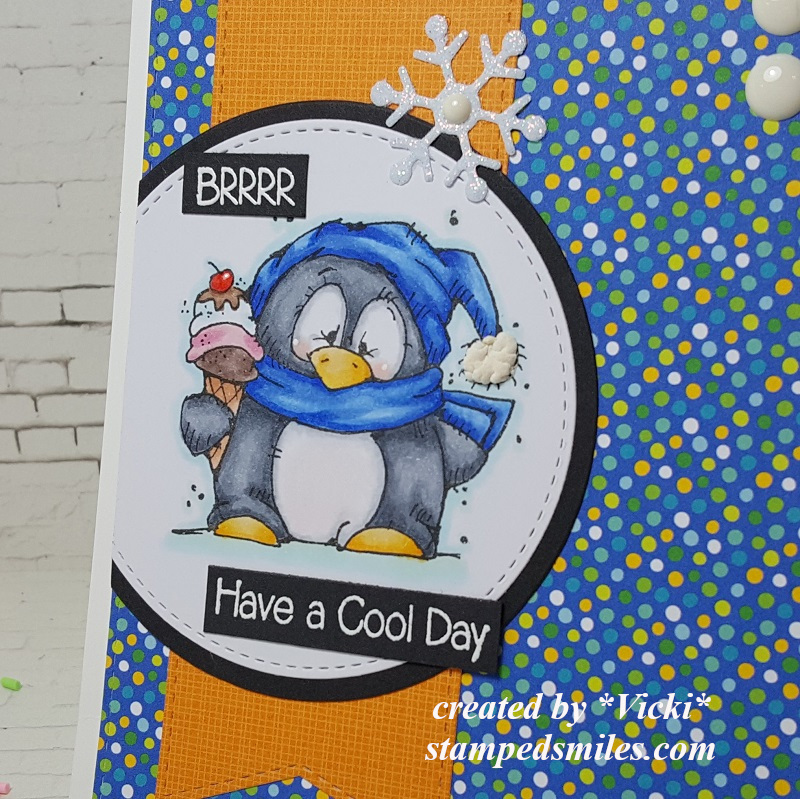
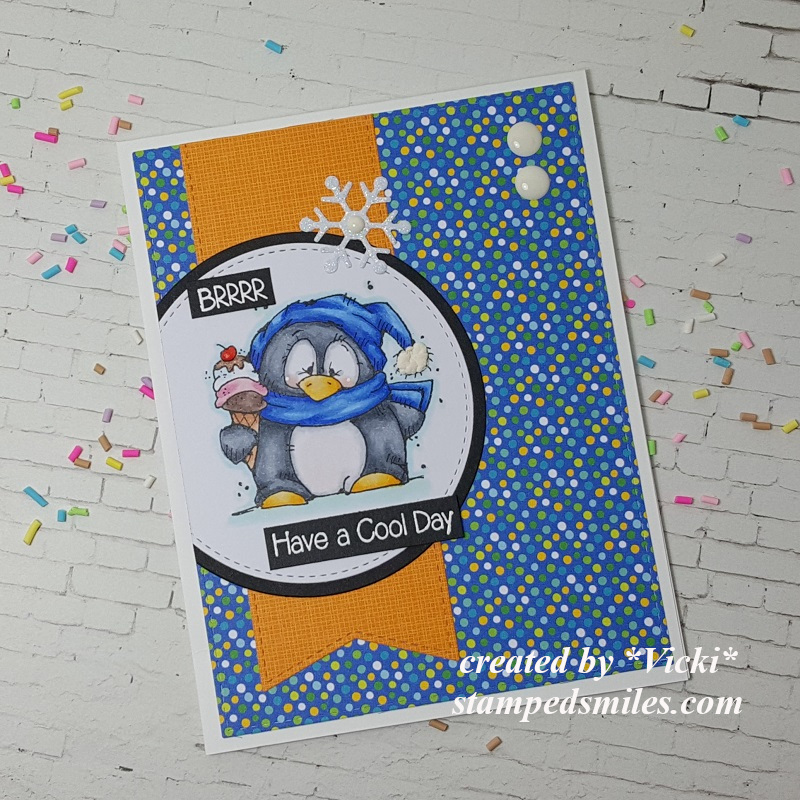
I have another card that I didn’t get a chance to share as it was created at the end of February and I never fit it in to post, but I pulled out a very old stamp to play with because I was inspired by a friend to use it:
Maybe you have heard or seen the Whipper Snapper Designs stamps? I’ve had this adorable little penguin for a while now and I think he’s long gone from the website. I don’t see him in the store, but the name on the side of the wood stamp is “Ice Cream Penguin” and no date. I have a small collection of their stamps and they’re all older as I haven’t bought anything from them in years and not sure why really. I hold them in high regard like my old Peanuts Gang/Snoopy wood rubber stamps as you can’t find those any longer either! I don’t part with them! LOL!
Anyway, inspired by my friend Shelly that was featured on Splitcoast Stampers as the FS681 “mcshmidty” Featured Stamper. This is a challenge where you find a project from their online SCS gallery and use it as inspiration to create something. Here’s the card she made that I fell in love with in her gallery:
I thought it would be fun to use an older stamp I had (I love penguins) and create a birthday style card with it. I have a few birthdays to celebrate in the colder months, so I was just trying to think ahead and I liked that this could be a masculine or feminine card to give out too! I can’t remember where I pulled the pattern paper from, but the colors really caught my eye! Instead of the strip like Shelly has on her card, I made my strip into a banner. I used a snowflake instead of a sun and two enamel dots.
I stamped and colored him up with Copic markers. I used some liquid applique for the end of his hat and dotted his cheeks with a white gel pen. I used glossy accents over top of the cherry on his ice cream cone.
The sentiment was pulled out from an older My Favorite Things stamp set that I white heat embossed over black cardstock and cut apart. I also used MFT stitched die cuts for the banner and circle image.
I must’ve been in the mood for ice cream before I took a blog break as I just realized my last post had ice cream too! LOL!! Hope you like my card as I was really inspired by my friend’s card to make it!
Thanks for dropping in and I’ll be seeing you soon!!
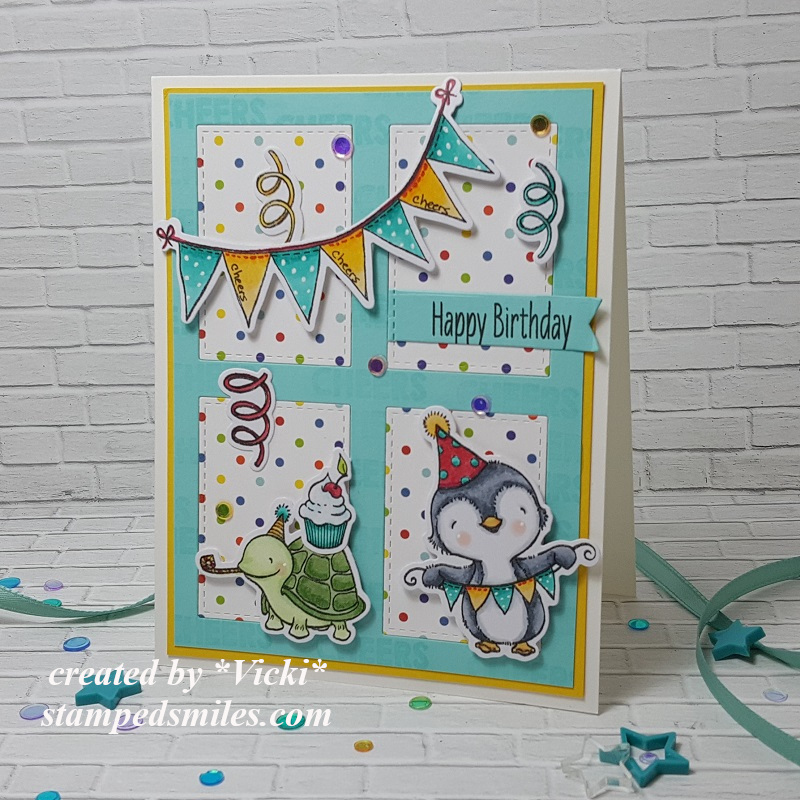
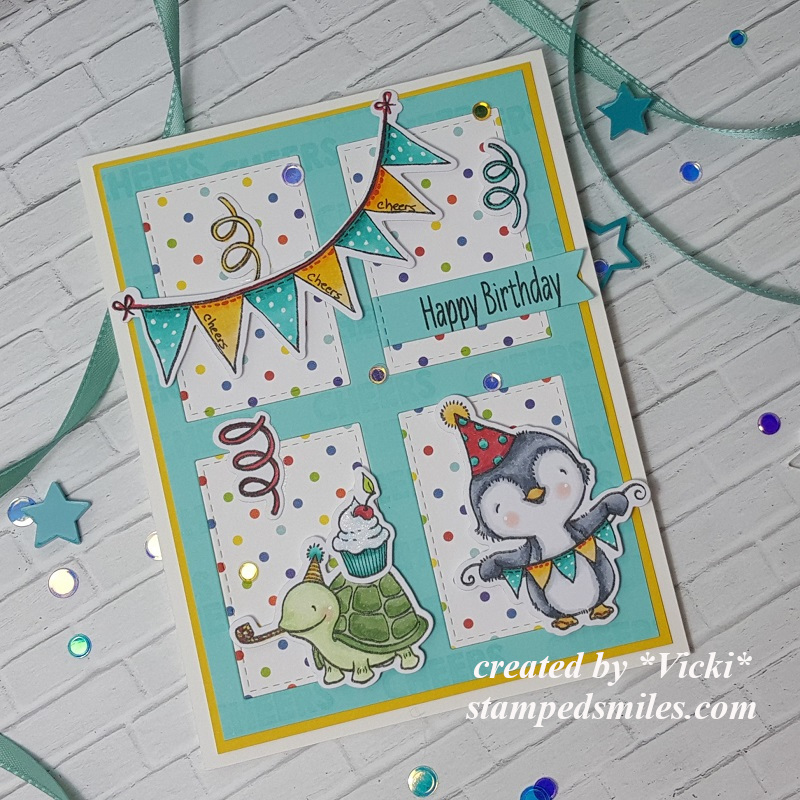
I’m very excited to share my post with you today for The Paper Girls Challenge as I’ve been invited to be a guest designer for their current challenge of “BIRHTDAY“! We all need birthday themed projects, so this is a great way to join in the fun and add to your birthday card stash too! Hope you will join us!
I wanted to pull out some stamps that I had bought a while back and never pulled out to use yet, so this was fun! Here’s my card:
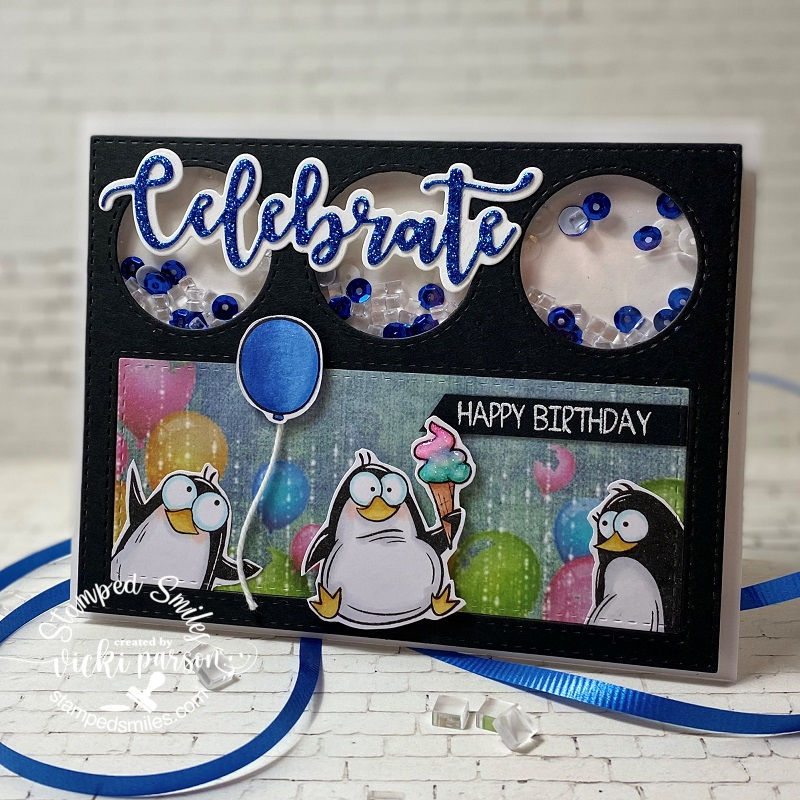
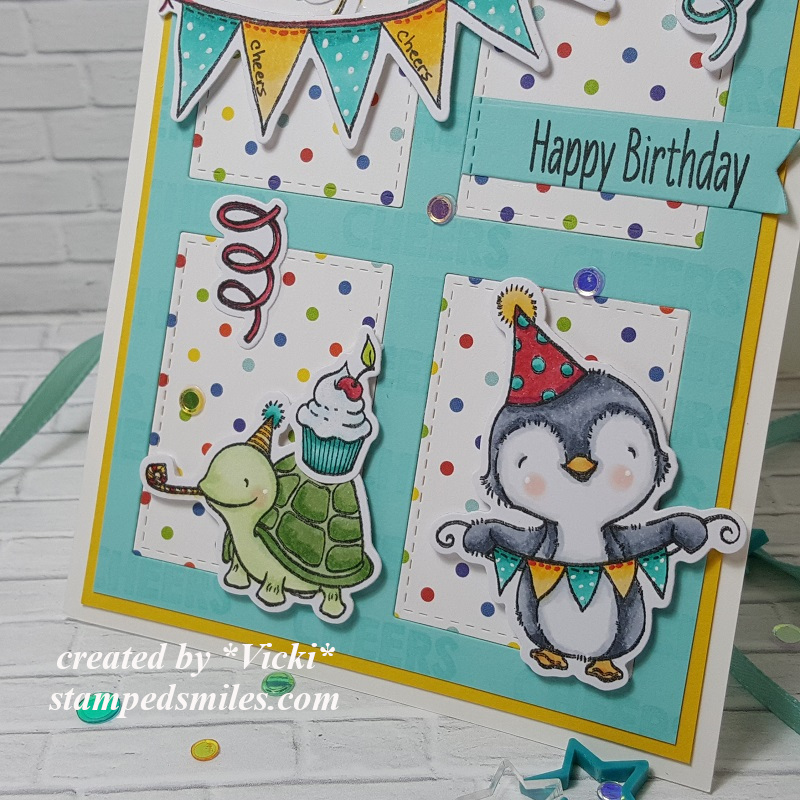
Who could resist a couple of cute party animals! LOL! I’ve pulled out this adorable “Sending Sweet Celebration Wishes” stamp set from My Favorite Things and made a fun party scene with it!
For the card front, I’ve die cut some Summer Splash cardstock with the Gift Box Cover-Up Dienamics and then used it to also cut some older MFT pattern papers to fit inside the die cut squares. I layered these pieces over a piece of MFT Daffodil cardstock (looks to be retired) and then mounted it over an A2 sized top folding white card base.
I’ve used the same Summer Splash cardstock to stamp the sentiment from the stamp set and used a banner die to cut it out with and used the Gift Box Cover die to cut the end of it to match with the upper right box area.
For the Gift Box Cover-Up “frame”, I took a sentiment from the MFT Penguins in Paradise and stamped the “cheers” image randomly with VersaMark ink all over it, but then decided that you couldn’t see it very well, so I added the word to the yellow banners with a black pen in my own writing.
I’ve used the coordinating die set for the Sending Sweet Celebration Wishes set to cut out the colored images and attached them to the card front. Some I’ve popped up with foam tape and the others were glued. I also wanted to add a little sparkle, so I’ve attached a few confetti sequins to finish it up.
Here’s a closer look at the coloring I’ve done on these cuties. I’ve used a white gel pen for their cheeks as well as adding some polka dots to the party banner.
You can see where I’ve used a marker to write the words on the banners and I also used it to create stitches along the top of each banner too.
I’ve also added some shimmer with a glitter pen over the cupcake frosting.
I hope you’ve enjoyed my birthday party animals card today and have been inspired in some way!
Thanks so much for stopping in today and I’ll be seeing you soon!!
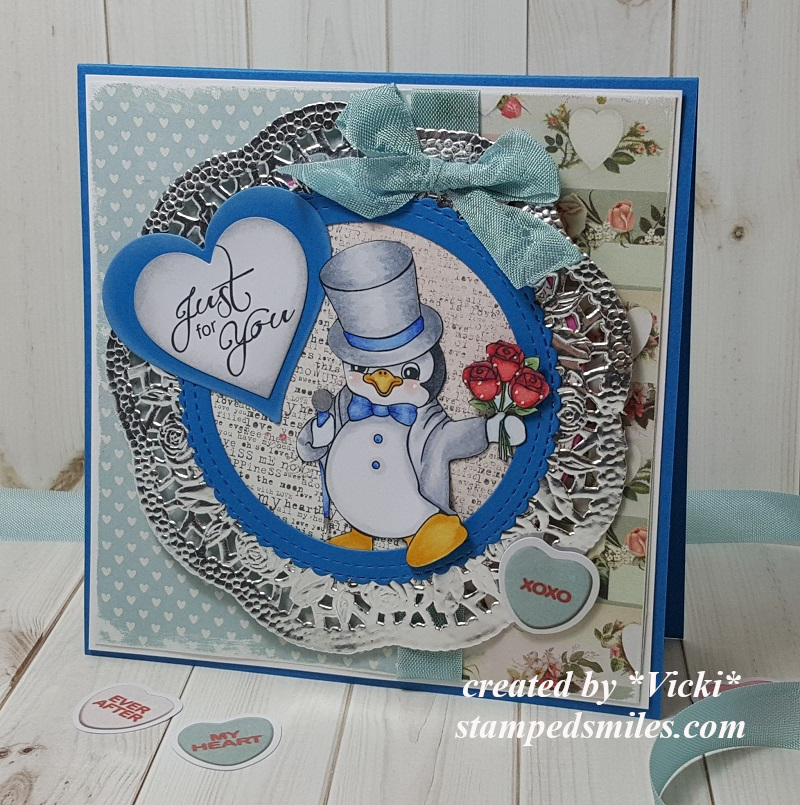
Hello friends! It’s not only the weekend, but it’s also the first of February! It’s what we call the “love dovey month”! LOL! The first of the month also brings us a new challenge starting over at the 2 Crafty Critter Crazies blog! It’s always an “ANYTHING GOES + ANIMAL” for your project each month. We look forward to seeing your creations!
For this month we’re being sponsored by Jan’s Digi Stamps and here’s what I’ve come up with for my project:
Check out this dapper little penguin stepping out to hand his loved one a bouquet of flowers! 🙂 I’ve used the adorable Puttin’ On the Ritz digital set for my card here. It had me at penguin! LOL!
I have pulled out some of those cool vintage looking papers from that SSS Valentine card kit that I had used earlier this week on my parent’s anniversary card and just loved the blue tones in them, so I went with that color scheme for my design!
The penguin was colored and fussy cut out. The way he was positioned looked like he was popping right through an opening to hand out the flowers, so I’ve used some circle die cuts with more of the vintage papers for the background and tucked him in there with his foot and flowers outside the circle frame. I’ve placed a silver doily behind him.
The base of the card measures 5″ square, I’ve taken a couple of strips of the papers and layered them over a white card panel that I’ve sanded the edges on before mounting it over the blue card base. I took some seam binding ribbon to wrap around it and then attached the circle panel to the front with a bow and candy heart accent over top.
The sentiment was printed out from the same stamp set and cut out and layered with a heart die set. I’ve also sponged around the edges of the white heart with grey ink.
Here’s a close view of the image and how I’ve got him all colored up with Copic markers. I’ve used a white gel pen for dots on his cheeks as well as dots around the flowers. Sometimes those bouquet of roses have the baby’s breath with them…for some reason I think it makes the bouquet look extra special!
For part of the penguin’s “cane” or “umbrella”…not sure, I’ve used a silver metallic gel pen to color in parts of it.
I kept his hands white as I felt like he was wearing white gloves. LOL.
I hope you’ve enjoyed my fancy little love penguin card today and have been inspired!
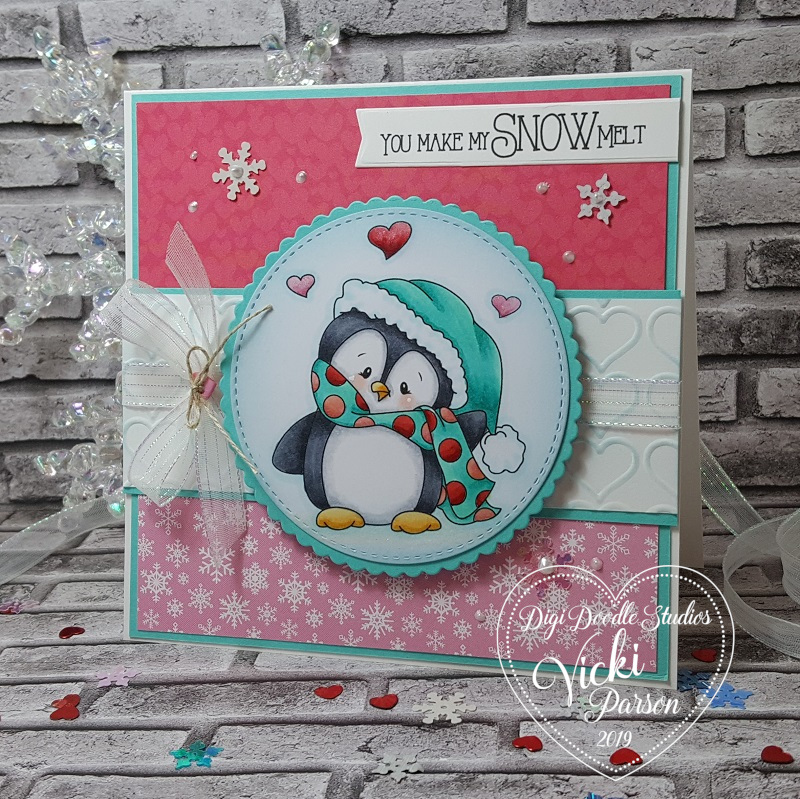
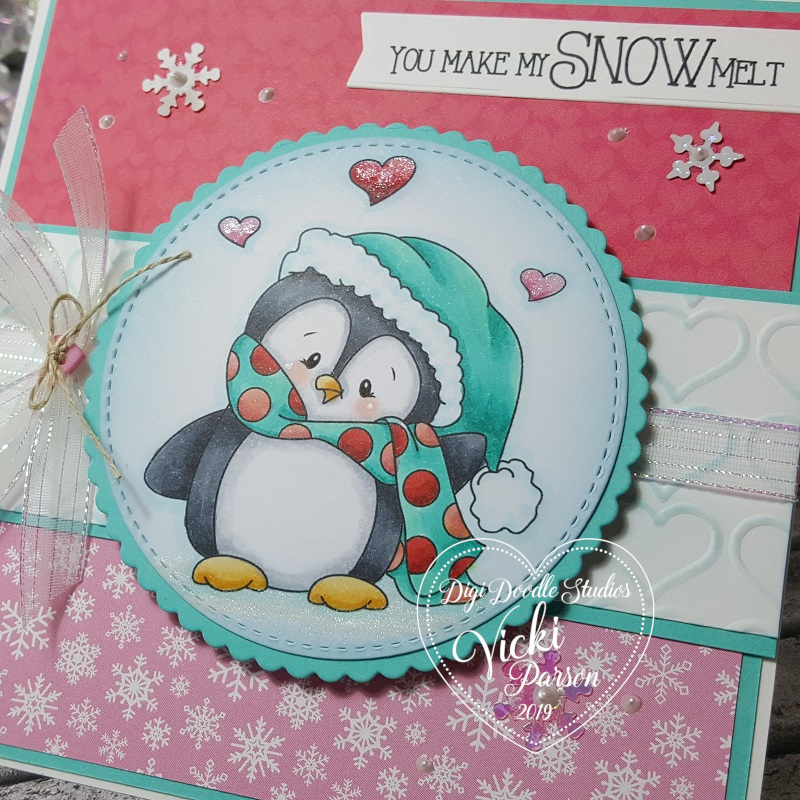
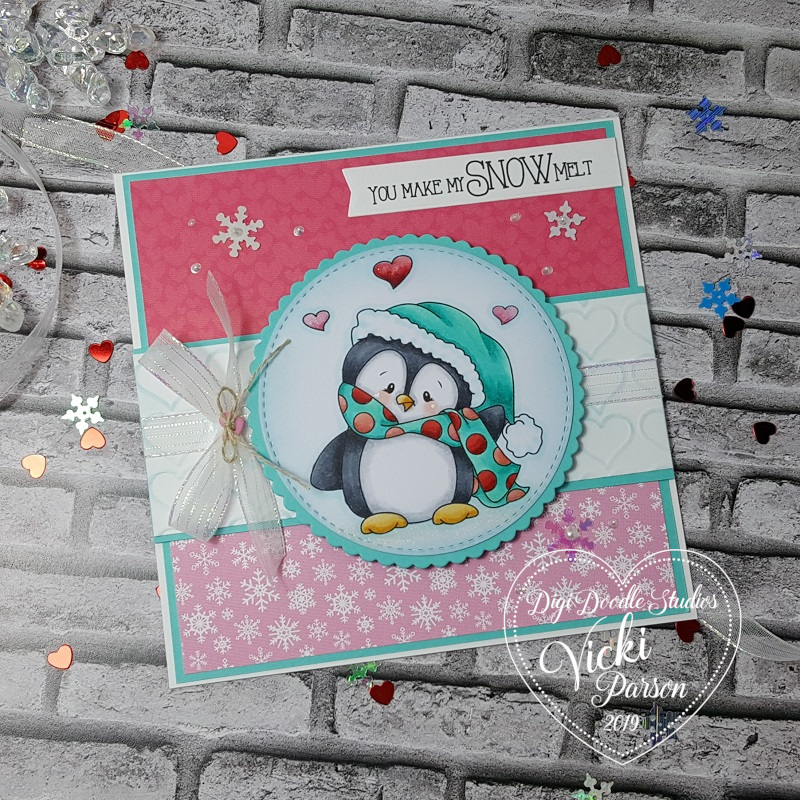
Hello friends! We are now past Christmas and getting ready for a New Year, but soon the feeling of love will be in the air! So I thought I’d start that off with something that I personally love, which you might know, are those cute penguins!
And of course you’ve already seen me use this super fun Wintertime Penguins Pairables set from Digi Doodle Studios in a couple of different ways, but this time I’ve added the hearts above his head and sentiment from the same set to make this a “lovey dovey” style card!
I kept the colors in pink and red to go with Valentine’s Day, but you could easily make this a wonderful anniversary or “any day” card for your favorite love penguin as well! LOL!
So I grabbed some fun papers from my stash with both pink snowflakes and red/pinkish hearts paper for my 5″ top folding white base card that I layered the turquoise colored cardstock over and then applied the papers to. I embossed some hearts on the middle strip with a piece of white cardstock and then rubbed some turquoise colored ink lightly over them. I layered that strip onto a piece of turquoise cardstock again and then wrapped some white/clear metallic ribbon with a bow over it before attaching it down.
The sentiment was printed out from this cute set with the penguin and then I just used a banner die to cut it out with and attach to the front of the card.
I added the penguin image that was die cut and layered with some stitched and scallop circle dies. I’ve used some craft foam to pop it up over the center, then added a heart button with twine in the center of the bow. Lastly, I’ve added a couple of snowflake sequins and some liquid pearl “dots” randomly over the card.
Here’s a closer look at this cutie and how I’ve got him colored up with my Copic markers. I’ve used a white gel pen to dot his cheeks and then I took a glitter brush pen (Spectrum Noir) and covered the hearts above his head as well as the “snowy” ground under his feet for a bit of shimmer.
I hope you’ve enjoyed my “lovey dovey” card today and have been inspired in some way! Thanks so much for joining me on my blog today!
I can’t believe that the New Year is just about to start!! I will most definitely be seeing you in 2020 my friends!
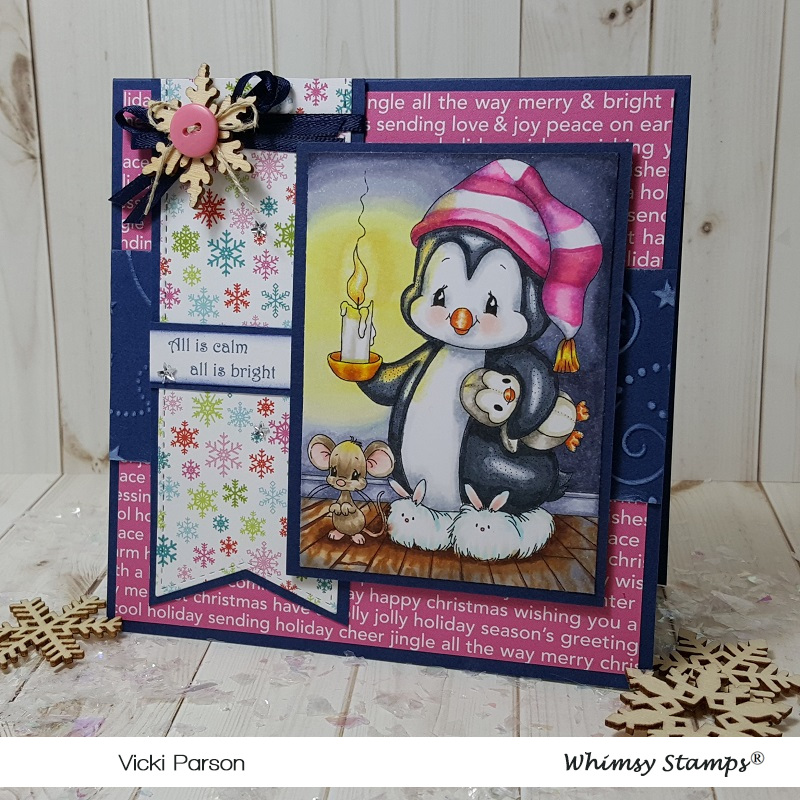
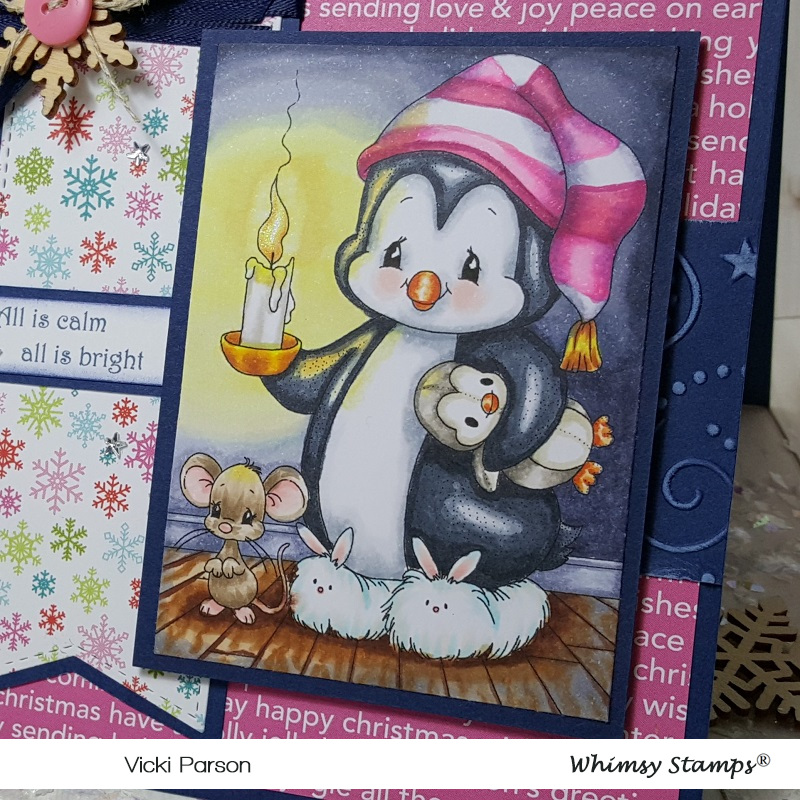
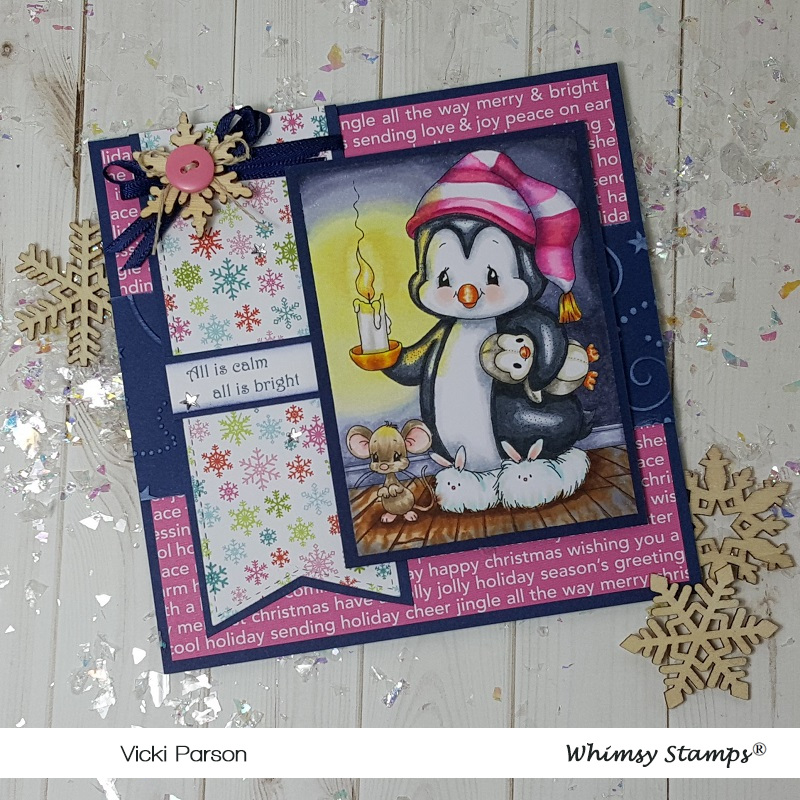
Hello friends! Are you getting ready for the big day tomorrow? It’s Christmas Eve and not a creature was stirring except for this mouse and his penguin friend….
They are up in the dark to see if they can capture a glimpse of Santa of course! LOL!
Do you remember this image from Whimsy Stamps last year? It was a special edition digital stamp especially made for a Kit and Clowder class. The name of the image was called “Penguin Candlelight“. The class isn’t available including the image with the bed scene, but this particular image is still available in the store!!
Well, I ended up getting the image which came with the entire bed scene, but there was also just this image portion as well, which I’ve used here. I had started it last year, set it aside mainly because of my confidence and decided I needed to take the time to push through the class and finish it up no matter what it ended up like. I’m glad that I did this and I plan to learn more about coloring next year to improve my skills and not only with marker, but hopefully with pencils too.
I came up with this layout for the card using pattern papers to match up with the pinks in the hat and layering it with some navy colored cardstock. I’ve used an embossing folder for the strip across the middle and highlighted with some white ink.
The sentiment was computer generated by myself. I added some ribbon, a snowflake wood veneer topped with a button and twine. I added a few tiny rhinestone stars around the snowflake banner strip.
Here’s a closer look at the coloring I’ve done on the image. The only added “extra” thing I did beyond the class tutorial was add some rosy cheeks and used a glitter brush pen over the candle flame. Everything else on the panel was colored with Copics using instruction from the class.
I hope you’ve enjoyed my calm and bright card today! 🙂
Thanks for checking in! Wishing you a very peaceful and calm evening….