Hello friends! I hope you’ve had a great start to your November so far! It’s been a few minutes since I’ve posted, but I have to say that I’ve been pretty busy in the background! Hoping to share what I’ve been up to soon!
Today begins a new challenge over at the Sparkles Monthly Challenge! This month, we’re looking to see some WINTER ANIMALS! I hope you can join in the fun with us! A reminder that this will be the final challenge for the year as we’ll be on Holiday break until January. Here’s my take on the theme:
My first thought of a winter animal is a penguin of course! I’m a huge fan of them and have so many in my collection…including other than stamp related! These guys are really enjoying winter on this scene! I’m using theMy Favorite Things Playful Penguins stamp set and I started with a stencil from MFT that has “pond” shapes and lightly stenciled the soft blue for a place for my “ice platform” to be.
After creating the “ice pond”, I used some tape to mask off the bottom portion so that I could ink blend a sky at the top. I used some White Opaque Copic and splattered it over the sky area. I then used another MFT stencil to create some snow drifts in the background.
The two penguins, igloo, ice pad and sign were stamped, colored with Copic markers and die cut out to be placed over the scene. I added the flattened penguin to the ice pad and then had the igloo in the background while the sign and penguin are waiting at the side of the pond. I used a pen and wrote “FREE RIDES” on the sign.
I finished it off with a glitter pen over the “ice pad” and igloo and then used some Stardust Stickles over the snow on the sign. I thought it needed some more snow falling down, so I took some sequins and added it to the scene.
If I were on that scene, I would probably be more like the flattened penguin on the “ice pad”!😆 How about you? Do you like the snow?
Thanks so much for joining me here! I hope you like my penguin card and will sharing your favorite winter animal in the challenge too! Have a great day!
Hello friends! There are SO many things going on this month and I’m having such a hard time keeping up with all of it! After having some computer issues and trying to figure out what’s going on…I realized how far behind I am with my crafting! I have waaay too many new things I want to play with too! Really hate it when that happens!🤨😅 Totally missed out on World Card Making Day this year…however…
..before the WCMD “Inspired By” challenge ends over on the Whimsy Stamps Inspiration Blog, I wanted to be sure to play along which is using one of the design team’s projects for inspiration to create your own project:
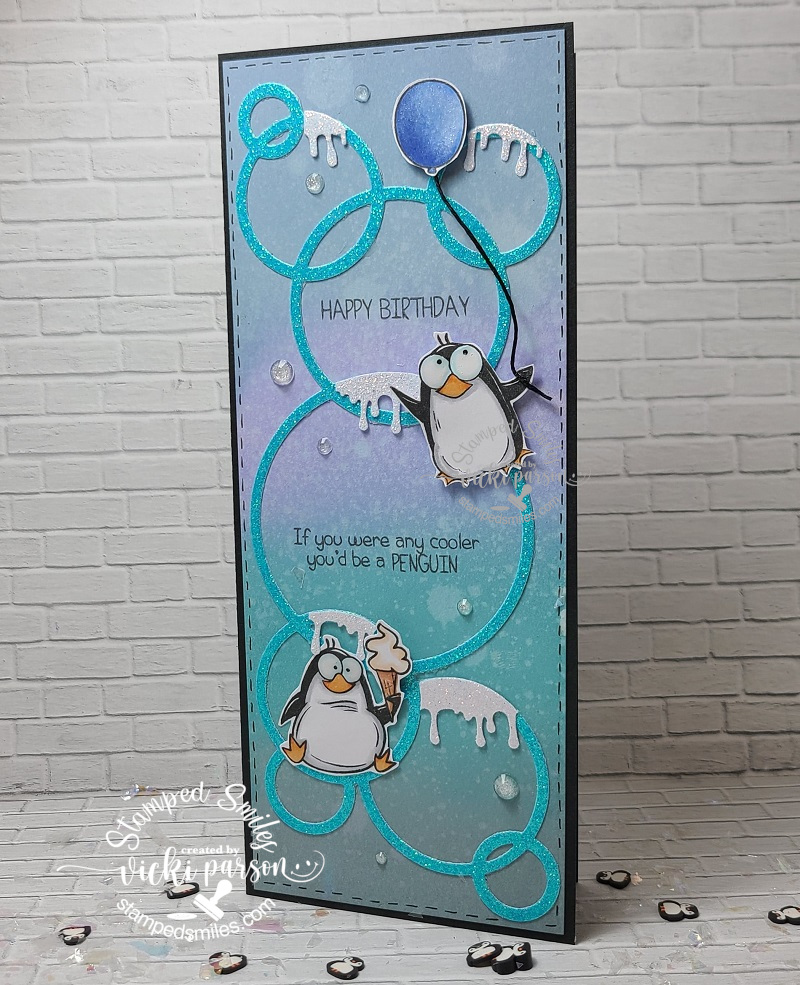
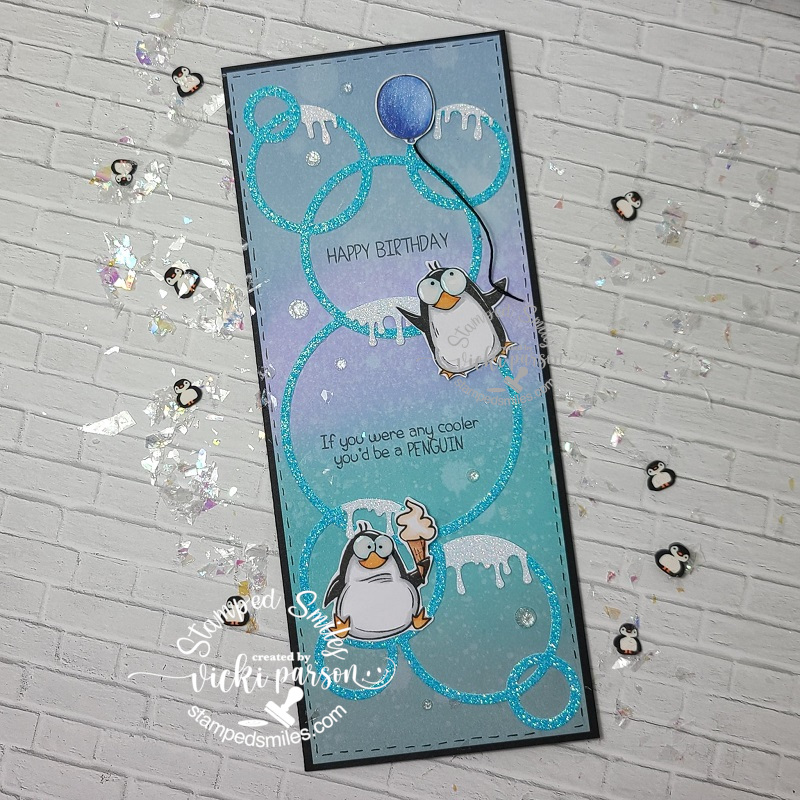
I have made this fun slimline card using the Whimsy Stamps Penguin Poop stamp set along with the Whimsy Stamps Slimline Connected Bubbles die for my card today. I am a huge penguin fan and these guys crack me up so much!
I wanted to keep the colors in a cool tone. Over a piece of Bristol Smooth watercolor paper, I’ve cut it down to fit over a black side folding 3.5″ x 8.5″ slimline card base. (I use the 8.5″ measurement because I find the size easier to use with a piece of 8.5″ x 11″ cardstock. Then I only need to cut at 7″ on the long (11″) side and score in half at 3.5″ on this same side. I am then left with another piece for layering over the slimline card if I choose.) It’s easier to remember also…which is something good for me right now! LOL! I digress…
I’ve used the Pink and Main blender brushes to ink blend Weathered Wood, Shaded Lilac, Broken China and Stormy Sky Distress Oxide inks for the background and then I used a water spritzer to make the droplet pattern over it.
I’ve cut the Slimline Connected Bubbles die from some Brutus Monroe Mermaid Glitterstock and glued it over the ink blended background. I had a left over border of a punched out goo drip from white glitterstock, so I used the die to cut out pieces to glue over top of some of the circles from the die. I stamped the sentiments inside a couple of the circles where I wanted with black ink and then used some foam dots to pop out the stamped and fussy cut penguins.
Lastly, I’ve taken a black marker to make some stitch marks along the edges of the ink blended panel and glued on some clear sparkling crystals.
Here’s closer view of one of the penguins. It was very easy to grab a couple of Copic markers to color them in with and they were pretty easy to cut out along with the balloon. I’ve used a black twine to connect the backside of the balloon and added a dab of glue to the penguin’s hand.
I used a glitter brush pen over the balloon and then added some glossy accents to both of the penguin’s big eyeballs.
This was such a fun card to create and it will be perfect for a winter birthday I will have coming up soon!🥳 The way I’ve been crafting behind, this will help out to have ready on hand when I need it!
Thanks so much for stopping in today friends! I hope you’ve enjoyed my slimline card and that it has brought you a smile! I’ll be seeing you again soon!
Merry Christmas to all of my friends here and I’m honored to be a little part of your life with you in some way…I hope you know that!
**This is a pre-scheduled post to wish you all a special happy day. I’m away spending time with my family right now, so sit back with your favorite beverage for a time out and I hope you enjoy today’s long post.**
Just wanted to share BATCHES of the cards and creations that I’ve made for the Holidays this year. I know that I make lots of creations, but for the purposes of mailing cards, I try to keep these particular cards as “mail friendly” as possible, so these are more simple in style for me, but really enjoyed making them and just had fun:
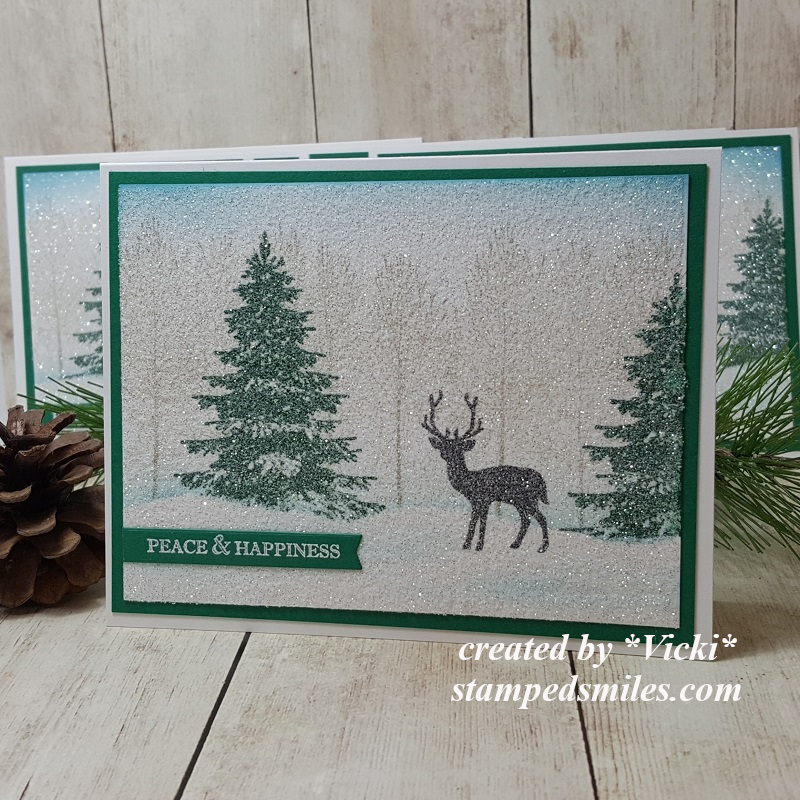
I tend to do bulk cards in a set of 4-6 so that I don’t get “bored” with it or run out of a certain supply or something! LOL! So this first set of 6 cards is using the gorgeous Stampin’ Up! stamp set “Winter Woods”. I stamped up the scene background and then covered the entire panel with double stick adhesive and then covered it with dazzling diamonds glitter. (The deer I added is from a favorite Newton’s Nook stamp set called Serene Silhouettes.) The white heat embossed greeting is from the Stampin’ Up! stamp set “Itty Bitty Christmas”. (I think this set was probably my favorite to do!)
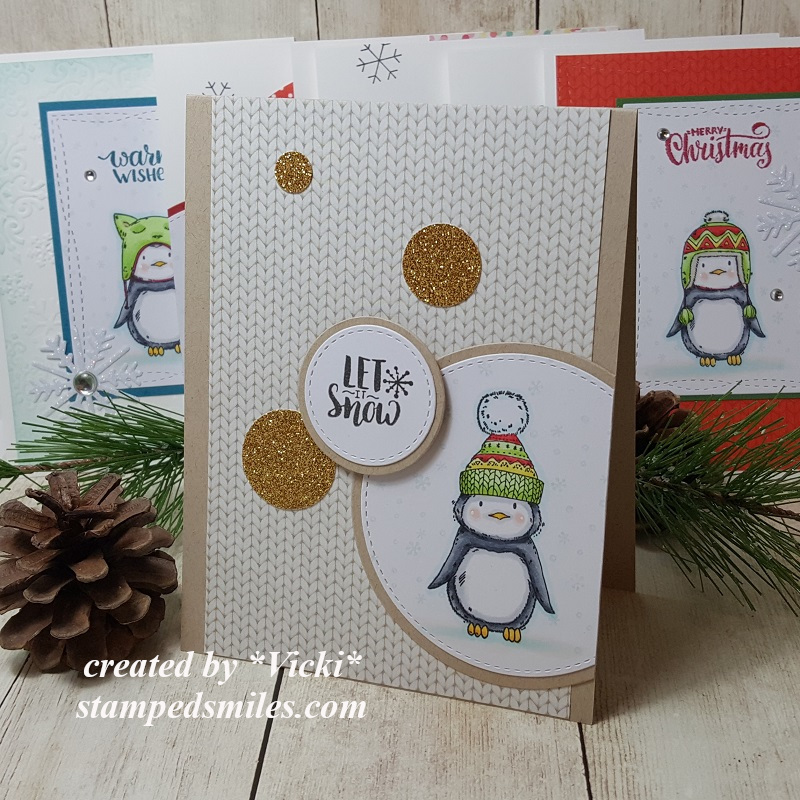
I just *had* to get these penguins in there somewhere! LOL! These set of cards are actually all just a bit different, but I colored up the penguins from the “Pablo the Penguin” free stamp set included with the Making Cards Magazine for December and cut them out in different ways and then mounted them onto cards. Some of them use some of the free papers that were also included with the issue. So this is another set of 6 cards that were mailed out. Love those cute penguins with the different hats! LOL!
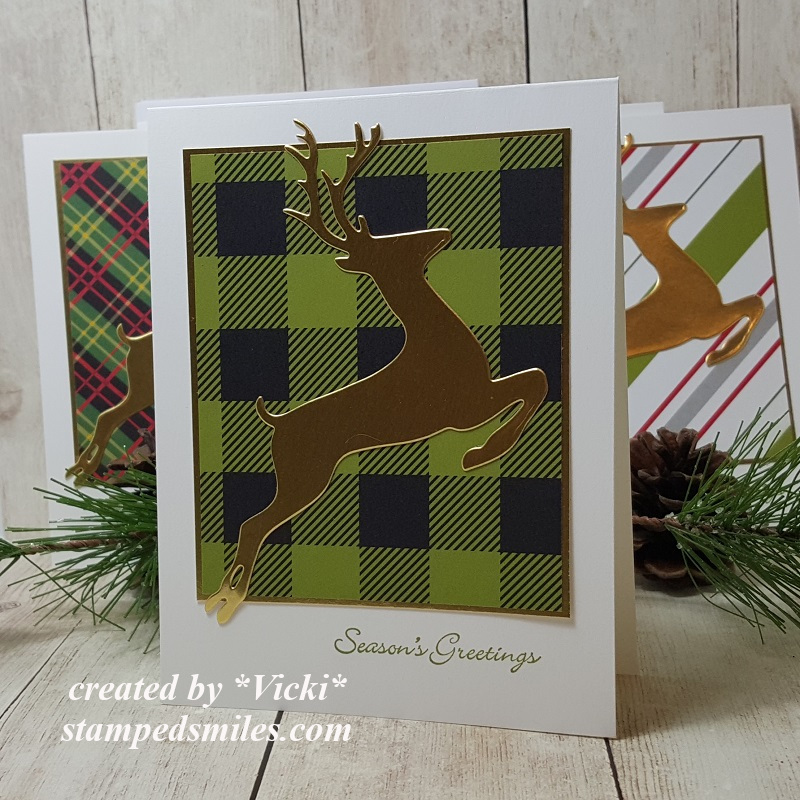
Here’s another set of cards that I’ve made to send out, but because these were even more simple than the ones above with very little stamping involved, I made 8 of these. (So if you’re counting, I’ve made 20 total so far…not including some other special cards I’ve mailed out to people along the way.) – I absolutely fell in love with this die set from STAMPlorations called “Two Reindeer” and was so excited to see that I had won a gift certificate from their blog and this was something that I knew I would be getting right away! This was cut from gold cardstock and mounted over a piece of various different Stampin’ Up! pattern paper from my stash…it’s always nice to be able to use up more of my hoarded paper stash! The sentiment is again from the Stampin’ Up! “Itty Bitty Christmas” stamp set.
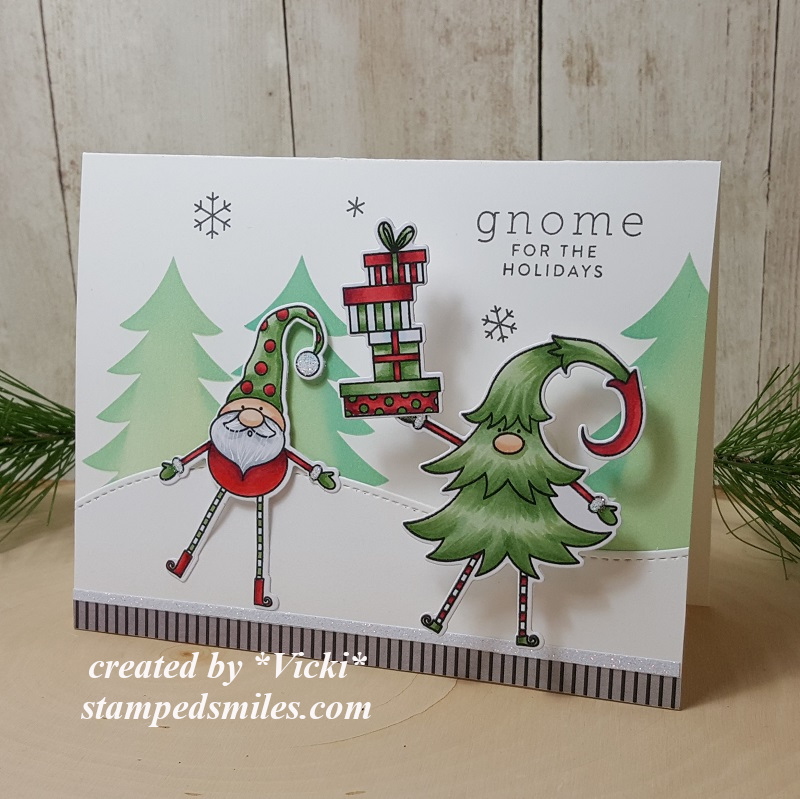
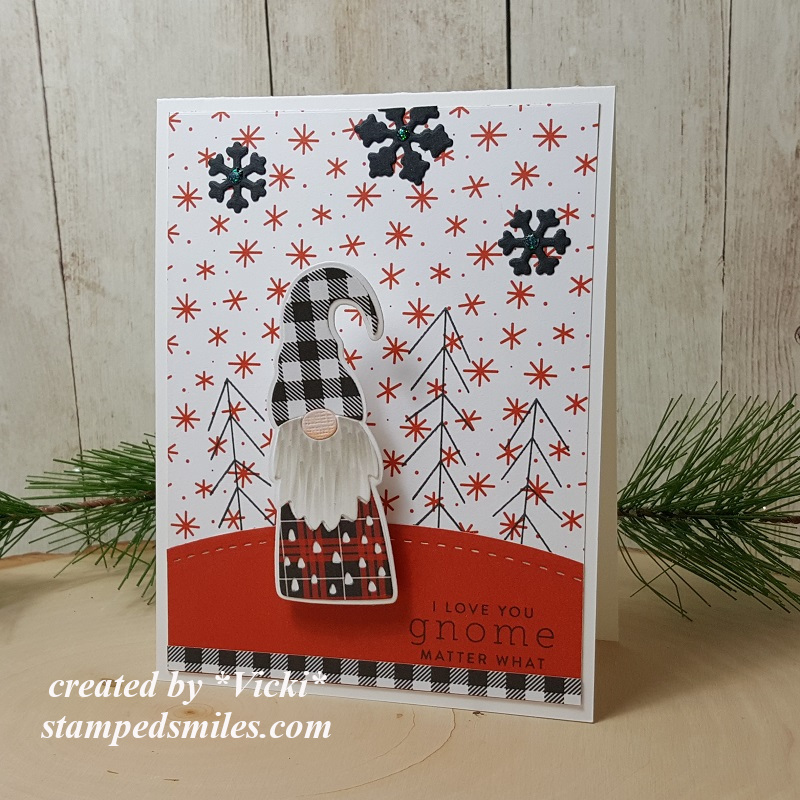
Now I didn’t want to leave out a couple of cards that I made especially for my boys. They know their mom likes to stamp, but they know I have to add in a bit of my goofy humor with them as well! 🙂 So of course I had to pull out this fun Simon Says Stamp “Gnome for the Holidays” card kit (sold out) to make them! I think I ended up using ALL of the wobblers in the kit too! I told my son that this is me wobbling with the presents about to drop everything and my hubby is trying to save everything! LOL!
Here’s a little wobbler action for you too…
And of course I had to make another card for my other son too…
I absolutely feel in love with all of those cute gnomes that came out everywhere this year for crafting…so I still have more that I didn’t get a chance to use, but thought this would be perfect for my son with this trendy style design…of course using a wobbler too! And I do love him GNOME matter what! 🙂
For some reason, I thought the wobbler action on this one was more fun! LOL! Not sure if it’s because of the weight/size or what…but cool to see the difference.
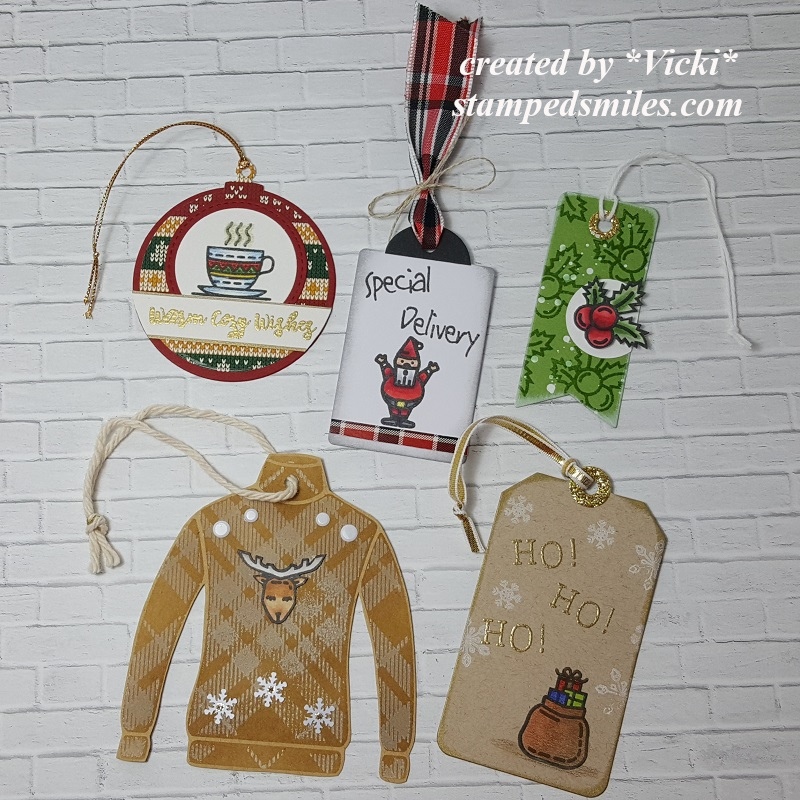
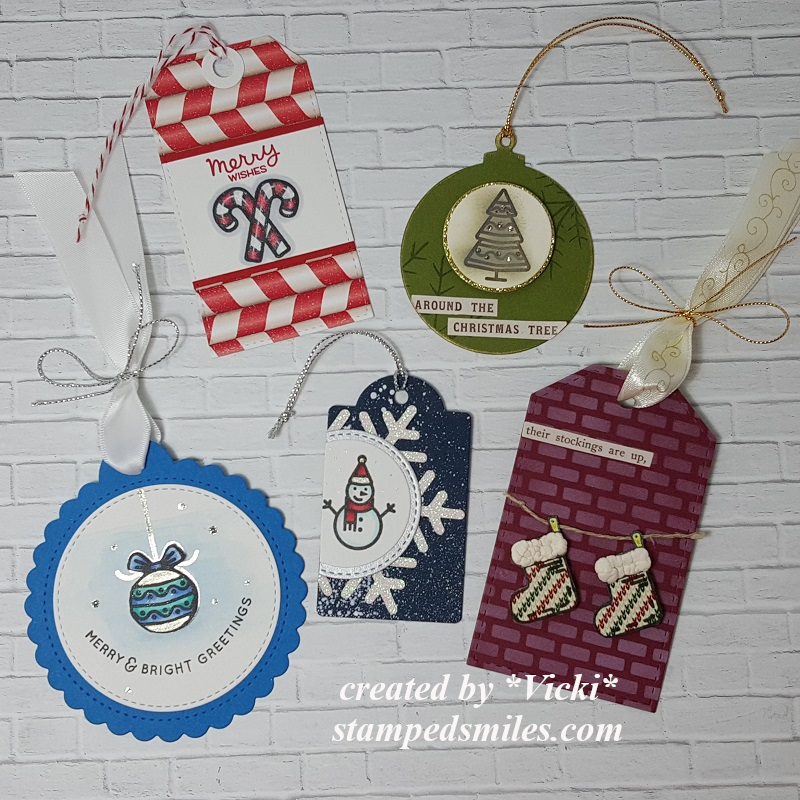
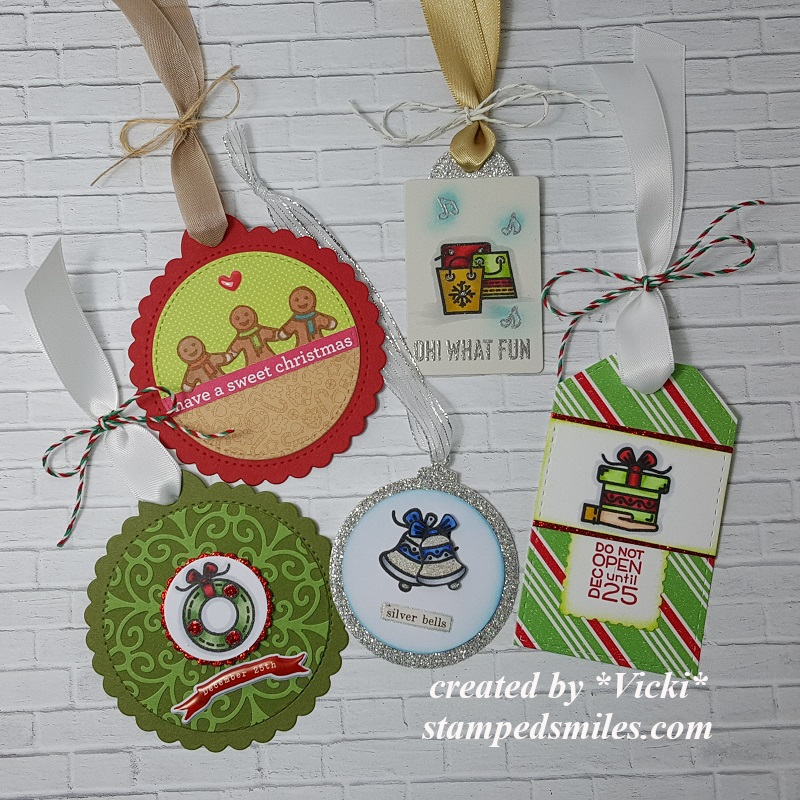
And whilst in the middle of making up all of these cards to mail out, I also had fun playing with the Christmas Advent Calendar that I had purchased a while back. Because it’s an “Advent Calendar” you start with December 1st and open each day. So each day to open was pretty cool because there was a new surprise stamp inside! So I took each day’s stamp and made a tag for each one clear up until today’s last window to open: (obviously previously opened and made to finish! LOL!)
I will show by the week. So this is week 1 with the first 5 days opened. The stamp that I received for each day is noticeably featured in each tag.
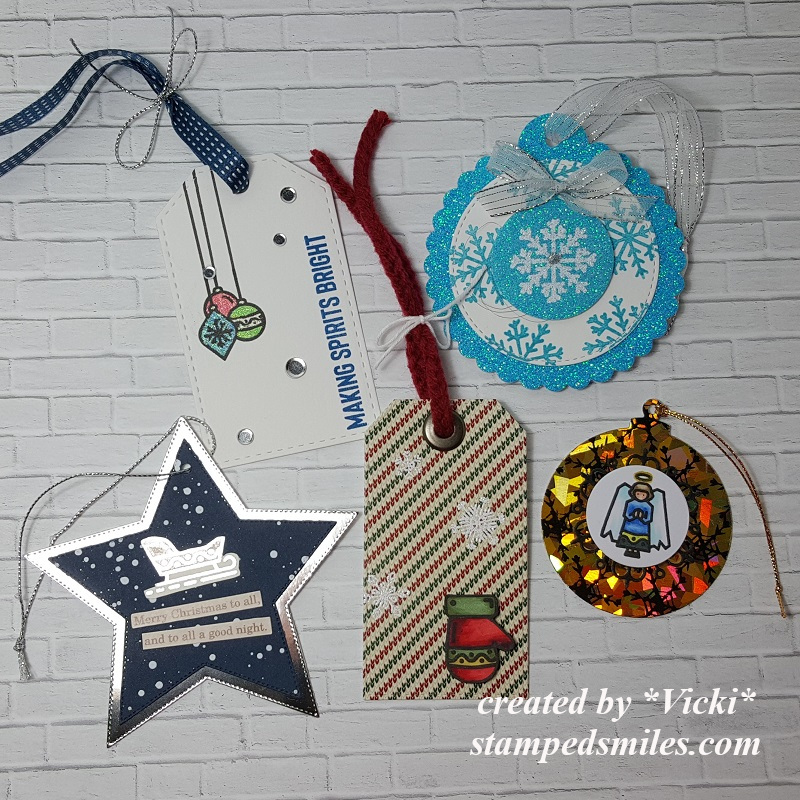
And these are the tags made for week 2. The angel tag was made with Deco Foil in the background.
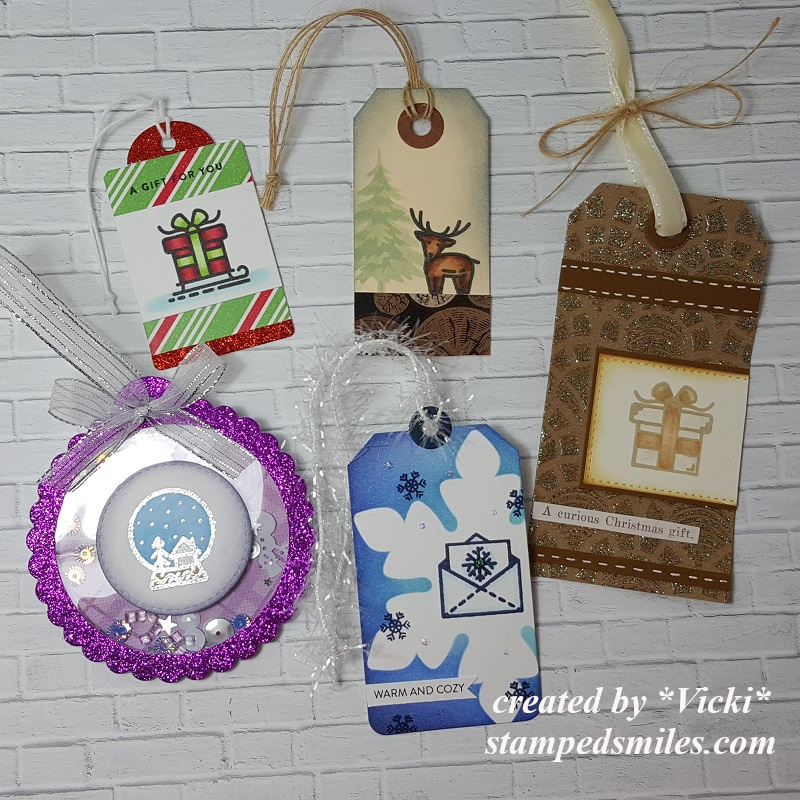
These are week 3 tags made. The purple colored tag on the left bottom is actually a shaker. The window sheet was glaring in the camera.
This is week 4 of the tags. Hubby picked out the candy canes as his favorite of all of them. Mine was the stockings tag.
And here is the final last week of the tags from the Advent Calendar. Really cool to have all of these tags on hand for gifts! I needed them! 🙂
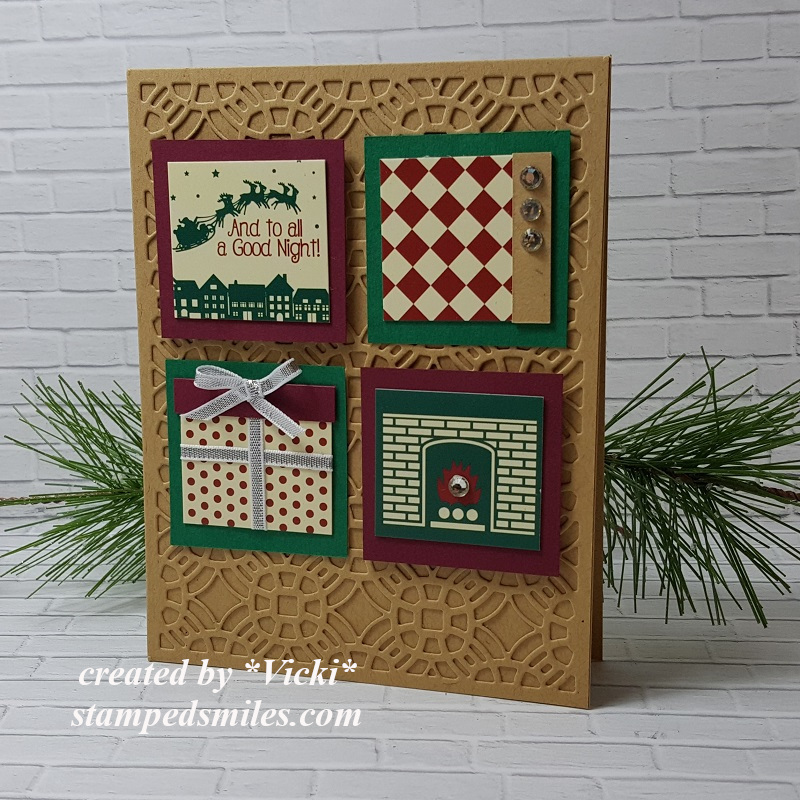
And of course I wasn’t done with the Advent Calendar box itself because I thought I could “recycle” the little window flaps on the box because they had some cute images on them for each day…so I cut them off with my scissors after I opened that day and kept them:
So I thought it would be fun to use them to create a card! They had numbers on them, but I have covered them up in certain ways so that they’re not showing. The cover die was cut out from the same colored cardstock for the background too.
Whew! Now to get finished up with my wrapping and “merry making” before the big day! I hope you are or have enjoyed yourself a wonderfully HAPPY Christmas day no matter how you’re celebrating it! Thank you for spending some of your time here on my blog today!
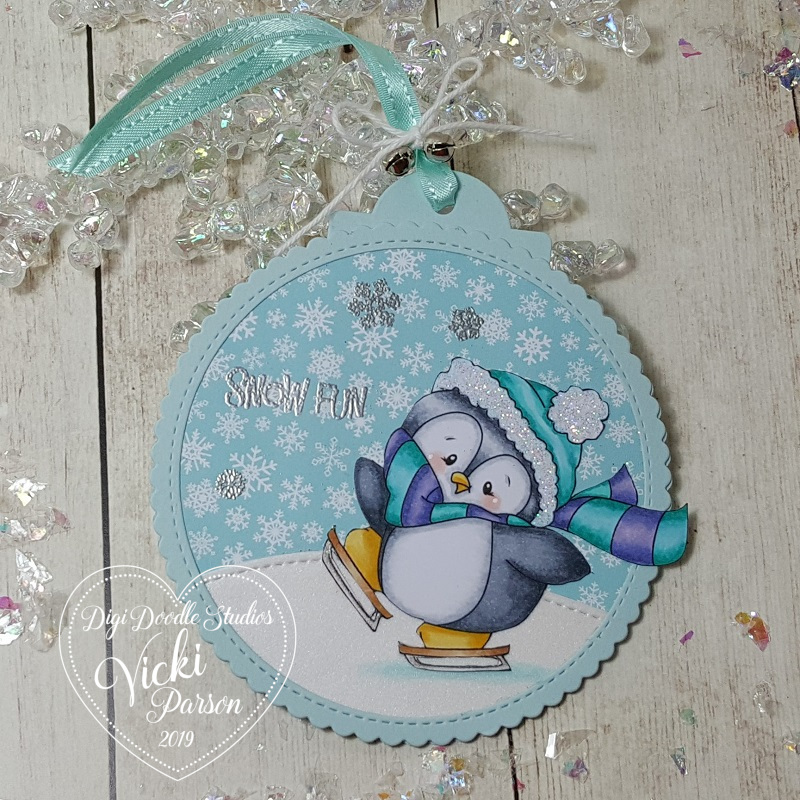
Hello friends! I’m on a roll with the tags and back again to share some more fun tags that I’ve been working on!
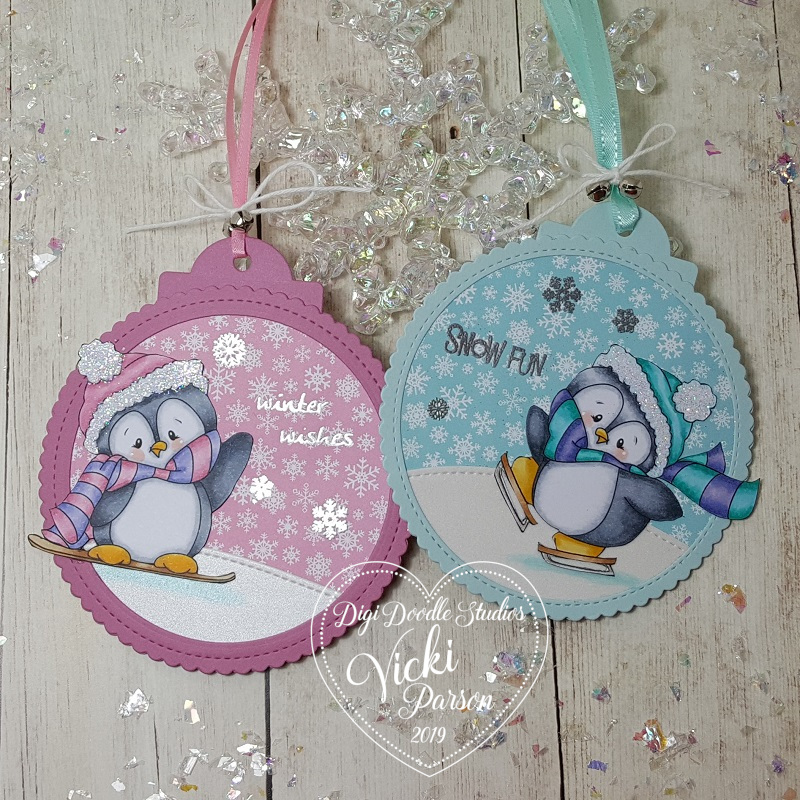
Check out these adorable penguins having some fun doing winter activities! Penguins are probably one of the top animals that I love! I have SO many penguin stamps in my stash and seem to keep on collecting more of them…so of course I was super excited to be able to add this Wintertime Penguins Pairables set from Digi Doodle Studios to my collection as well! 🙂
There is seriously so much fun you can have playing with this digital set and if you like penguins as much as I do, then stay tuned in as I will be sharing even more creations using this same set in December! You will see what I mean by all the different things you can do!
For both of the tags, I’ve used several dies from my stash to create my own tags. I took a stitched scallop circle die (MFT) and cut two of them out in the blue and pink colors along with a small tag cut with the same colors for the very top.
On one of the scallop circles, I used a circle die (Hero Arts) to cut out the center to create the “frame” for the front. I then took some snowflake papers (MFT) and cut out another circle that was slightly larger than the opening to attach behind it. I also took some pretty shimmer white paper and cut a “snow slope” for both penguins with a stitched border die (Lawn Fawn) and then cut it out with the same circle die as the snowflake papers.
I silver heat embossed the sentiments along with some snowflakes and then added my colored penguins over top. Then when I flip it on the back side I can put my “To: and From:” on it.
Here’s a closer view of the pink tag. For the digital image, I used Word on my computer to add the penguin and place it over one of the “ski” images from the set and enlarged it to make it look like a snow board instead of a ski! Then printed it out.
I’ve used my Copics to color her up and fussy cut her out. I even added some shadow on the snow hill for her. I took a glue pen and covered her hat trim with glitter.
Lastly, I found some more pink ribbon and tied some silver bells over it with some white twine in a bow.
And for this little guy…he cracks me up….I made him using Word again, but this time I actually took the “sled” image and sized it down so that it would fit on the penguin’s feet to make it appear as if he is ice skating! I did it for each foot. LOL!
I’ve colored him up with the Copics again only using more blue tones instead of the pinks and did the similar traits to it like the other one. I did use a clear metallic gel pen to color the “blades” of the ice skates.
Hope you’ve been enjoying my tags so far! Thanks so much for dropping by.
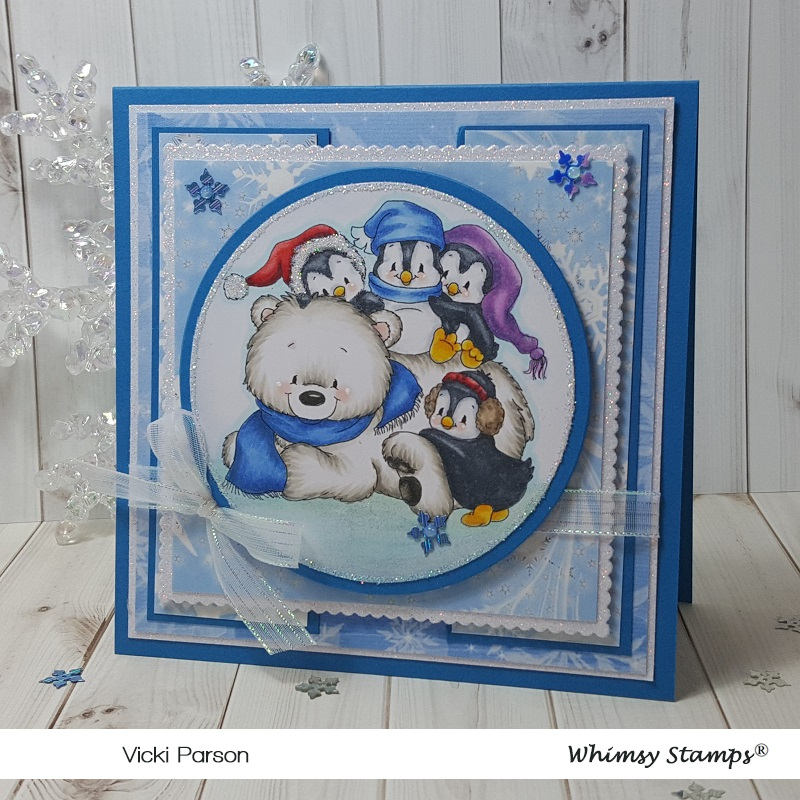
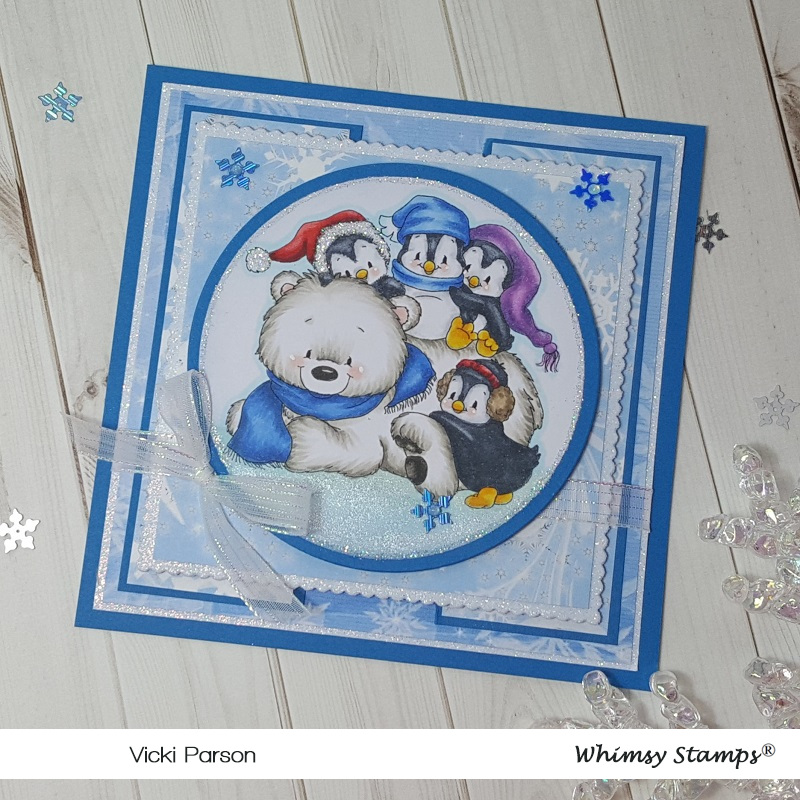
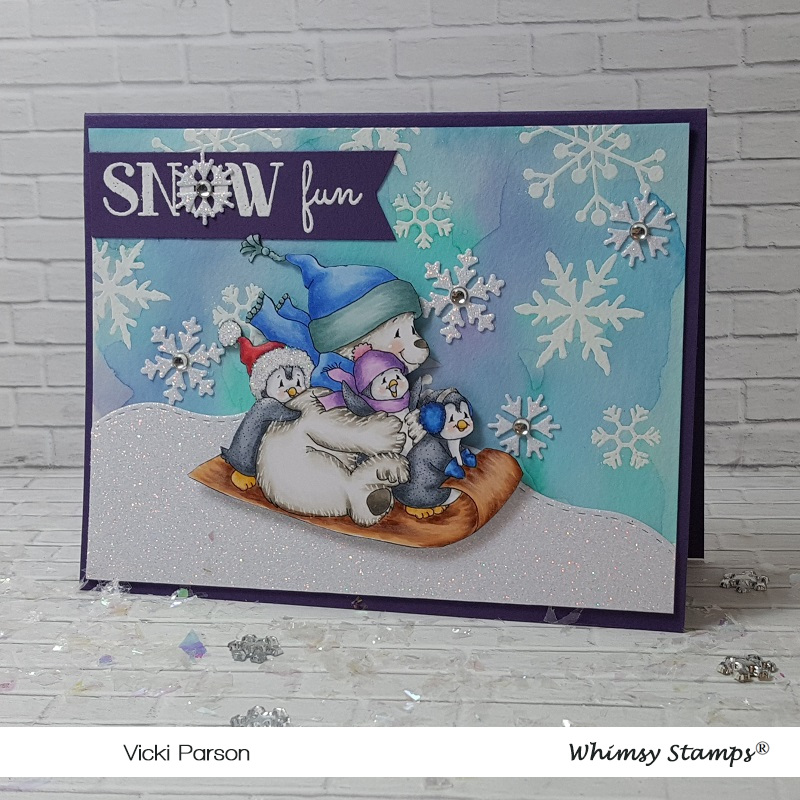
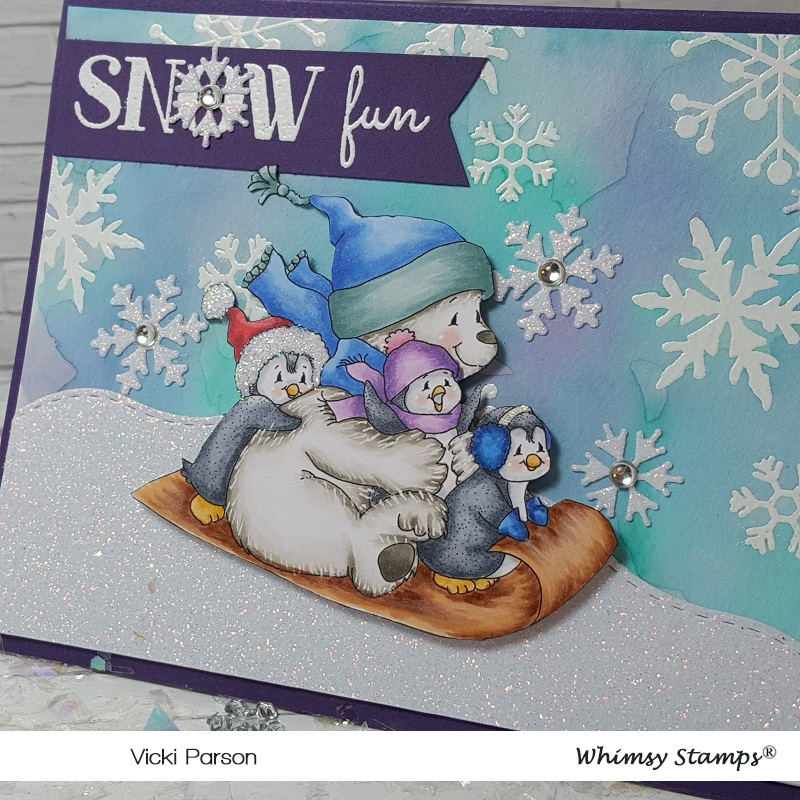
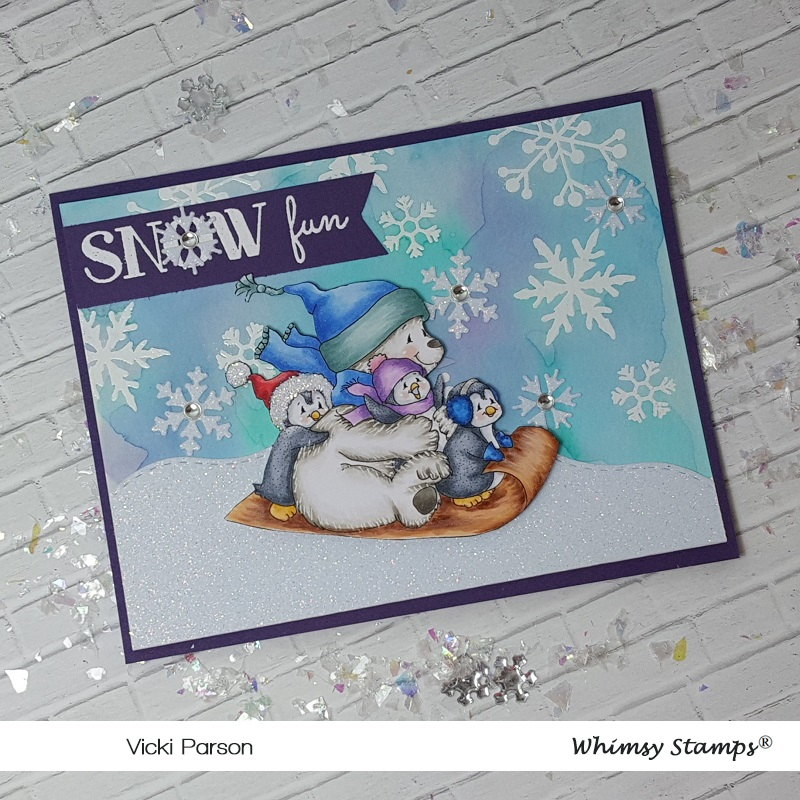
Hello friends! I hope that you are having a wonderful week so far! I have a cute wintry card to share with you today:
Isn’t this the cutest little clan you’ve ever seen?! It looked to me that the polar bear was sliding around and having fun on the ice, so the penguins decided they wanted in on the fun too and are trying to hitch a ride! LOL!!
As you may recognize the sweet penguins from artist Crissy Armstrong, this image has come out this month in digital format called Penguin Polar Express. I really adore her sweet images.
For my card, I have followed a sketch to make my card and thought it would be nice in blue colors and sparkle. So I printed out some papers from the Whimsy Stamps Winter’s Magic Blues digital papers and used them for my design. I’ve also cut out some white Glitterstock for some of the layers as well as some blue cardstock for a finished top folding 5.25″ square card. The scallop square panel was popped up with foam tape and the circle image panel was popped up with a die cut piece of craft foam.
I finished it off with some clear metallic ribbon and snowflake sequins that was dotted with some Nuvo White Blizzard Glitter Drops.
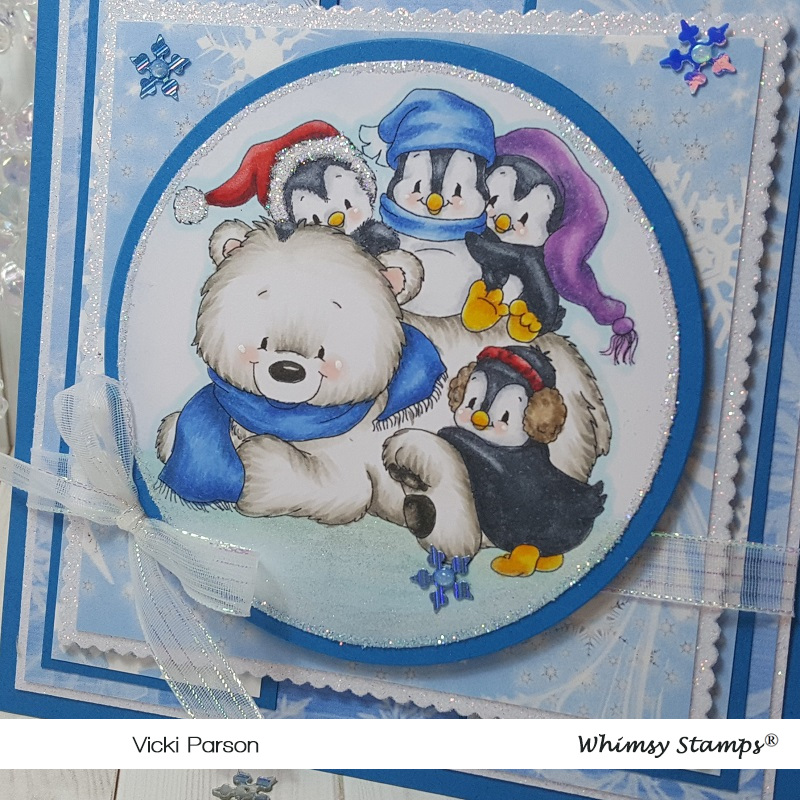
Here’s a closer view of the “gang” I’ve colored up with Copic markers. I was concerned about the colors of all of the different hats the penguins were wearing, but thought the colors really make the image stand out from the card. I dotted their cheeks with a white gel pen.
You can see where I’ve taken a glue pen and added some sparkle to the left penguin’s hat trimming. I also took the glue pen and went around the circle of the image and added some glitter there too. I colored the bottom of the image with Copics and covered it with a shimmer brush pen to make it look like ice. (You can see it better below.)
I hope you’ve enjoyed my card today and have been inspired in some way or at least been amused with this sweet image on my card!
I thank you so much for stopping by today! I look forward to seeing you soon!
Hello friends! Welcome to the weekend and I hope you are having a great one so far!
Today I’m sharing this adorable image from the November Digital New Release for Whimsy Stamps! Be sure to check them all out in the store! They’re so cute!!!!
How fun and cute are these guys?!! I’m using the Penguin Snow Fun image for my card today! Now you already know how I love these penguins, but how cute are they especially that one in the middle with the mouth open! LOL!
For my card I started with a watercolor panel and then white heat embossed the snowflakes over it from the Whimsy Stamps Snow Flurry stamp set. I then went over this panel with water and added some colors over it with Distress Oxide ink pads smooshed down on my glass mat and picked up with a brush and water. I’ve used Peacock Feathers, Stormy Sky, Dusty Concord, Chipped Sapphire and Salty Ocean for the colors. I tilted my panel to get the water to run down a bit and heat set it.
I cut a piece of glitter cardstock with the Kinetic Curved Hills die set as well as some snowflakes from the No-See All Seasons Tree die set. I placed the hill at the bottom of the watercolor panel and randomly attached the snowflakes to the background.
For the sentiment banner, I white heat embossed it from the same WS Snow Flurry stamp set and added a snowflake in the center of the ‘O’. I trimmed it into a banner with my scissors and added to the card.
I then took some foam tape and popped up the image over the hill and then added some gems to the center of each die cut snowflake.
Here’s a closer look at this adorable image that I’ve got all colored up with Copic markers. For the bear and everyone’s cheeks, I’ve used a white gel pen and for the band on the penguin’s earmuffs, I used a clear glitter gel pen.
For the penguin’s red hat trimmings, I used a glue pen and some loose clear glitter over top. I fussy cut out the image and popped it over top of the glittery snow hill.
OOPS…a bit of the snowflake staging stuck to the glittery snow hill a bit! LOL!
Really had a great time coloring this sweet image and getting messy creating the background too! Hope you’ve enjoyed my creation today as well!
Thanks so much for checking in with me today my friends! I appreciate it very much and I’ll be seeing you soon!
Hello friends! Here we are with the first week of September already coming to the end! Wow! I think it may be time to start thinking about that “C” word! (Christmas of course!)
Today is a new challenge over at Cute Card Thursday today and we have our first of the month “Anything Goes” challenge this week! We our sponsored again by the lovely Whimsy Stamps, so be sure to enter for a chance to win a fun prize!
Here’s what I’ve made with our sponsor’s product:
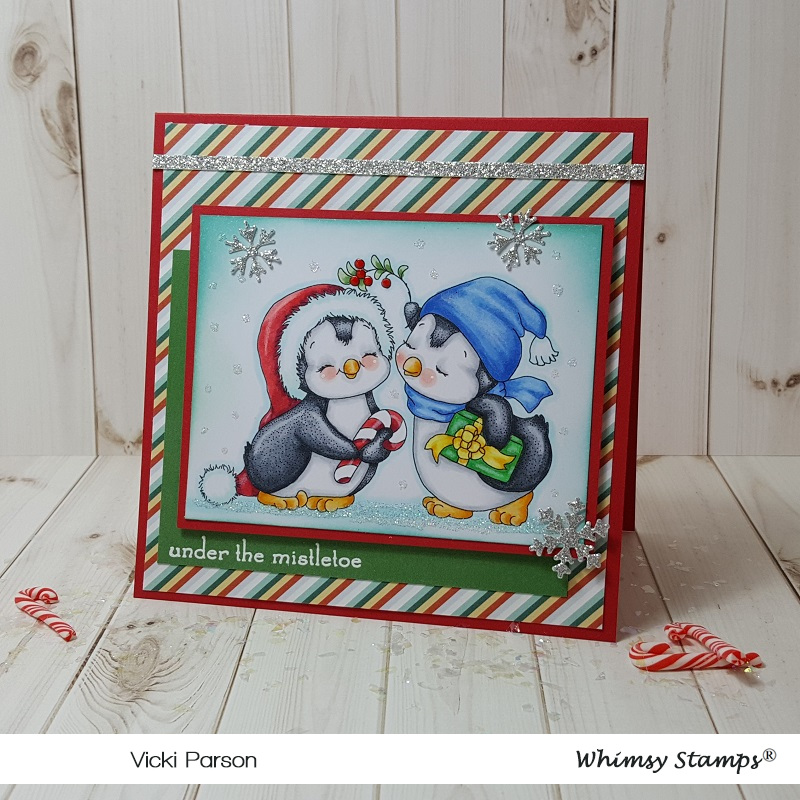
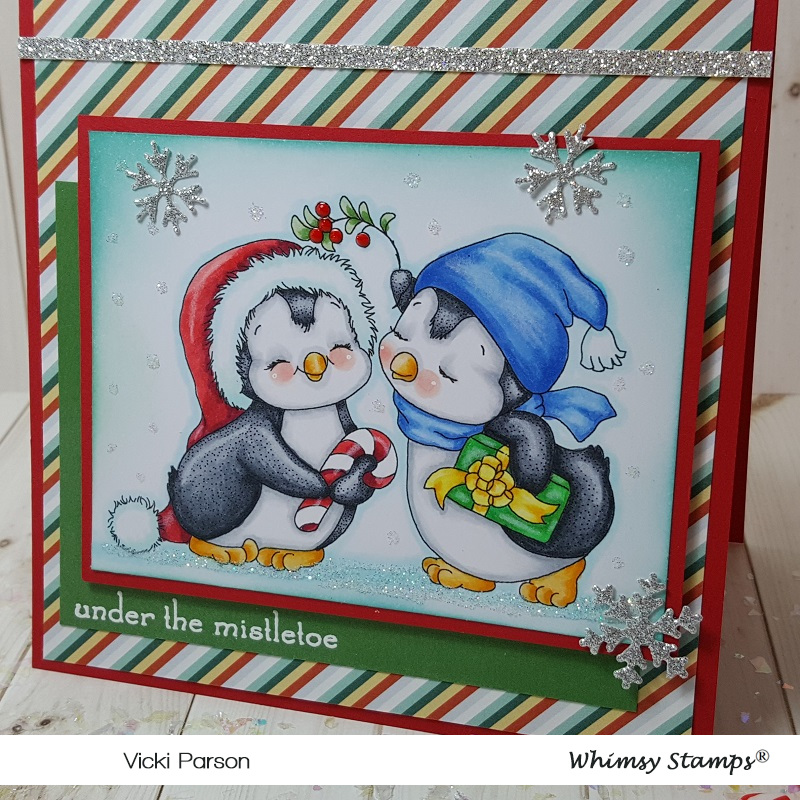
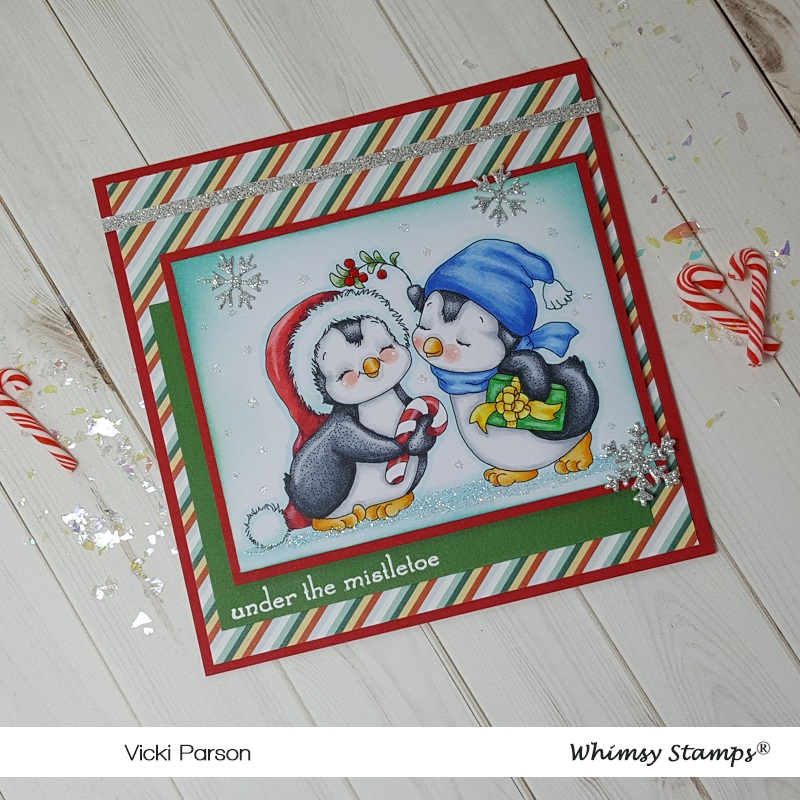
I’ve used this really sweet digital image from Whimsy Stamps called “Penguins Under the Mistletoe” and of course Crissy’s penguins are so fun to color up!
I have followed a sketch for my design using a challenge (see below) and have pulled out some older papers in my stash that I thought looked really festive and went with the colors I have picked out.
I white heat embossed the sentiment from the Whimsy Stamps Holiday Mini Sentiments on the green colored layer and popped the image panel layered in red cardstock over top with some foam tape.
I’ve taken some silver glitter paper and die cut a few snowflakes from the Whimsy Stamps No-See All Season Tree die set along with cutting a strip for the top of the card too.
Here’s a closer view of the image so you can see how I’ve colored it up. I’ve used the following Copic colors below:
Santa Hat and Candy Cane: R39, R37, R35, R32, BG000
Mistletoe: YG67, YG61 (berries are red Nuvo Drops)
Hat and Scarf: BB26, B24, B21, BG000
Gift: G09, G07, Y17, Y15, Y11
I used BG000 for snow ground shadows
I went around the edges of the image panel with Tumbled Glass Distress Ink and the ink foam blending tool. I ten took my quicky glue pen and added some dots for the snow as well as underneath the penguins and sprinkled on some glitter.
Thanks for stopping in and I’ll see you again tomorrow for something fun!
Hello friends! I hope you’re having a great week so far! Many thanks for the kind thoughts about my post yesterday and the video tutorial. I think I get a bit nervous thinking I’m going to mess up instructions, but perhaps I’ll get the hang of it! 🙂
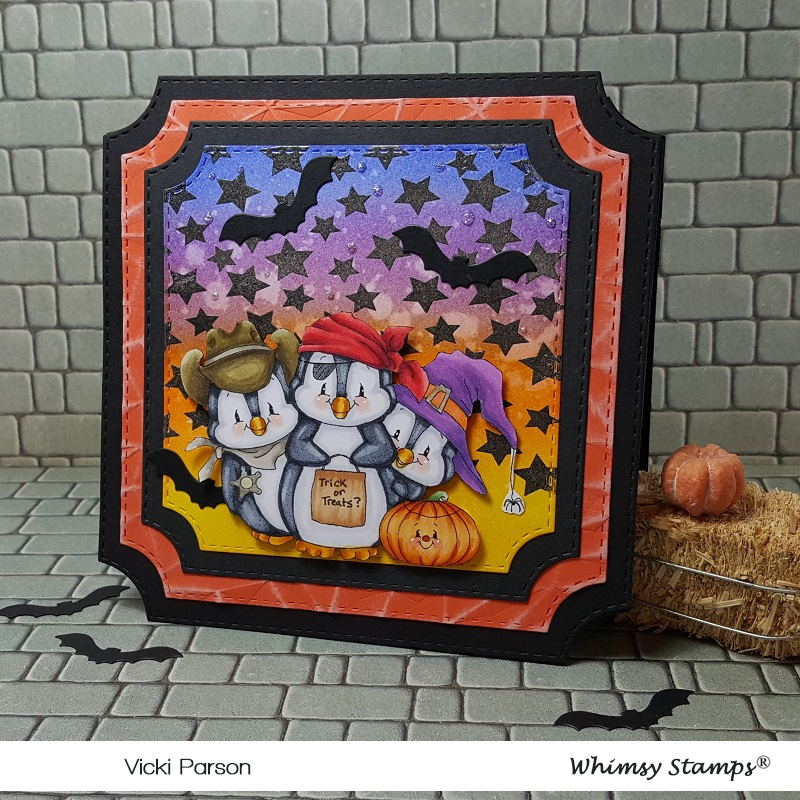
Today starts a new challenge over at Cute Card Thursday! This week it’s all about “embossing“! Now there are a few different ways to emboss and I happen to love them all! So you could do heat embossing, “dry” embossing with an embossing folder or even maybe do some embossing paste! However you emboss it, we look forward to seeing what you come up with! Here’s the card I made for the challenge:
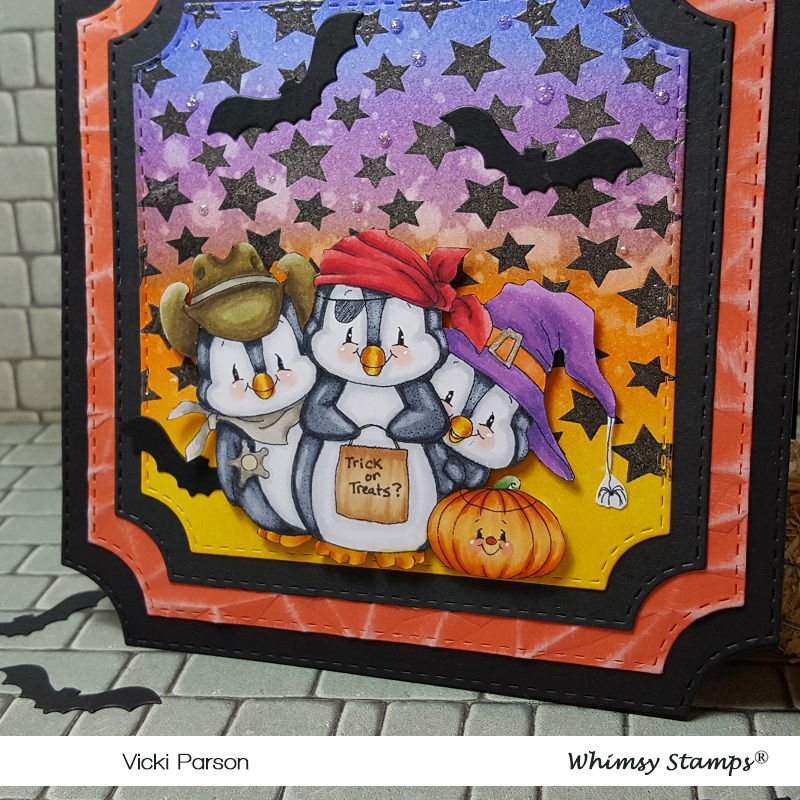
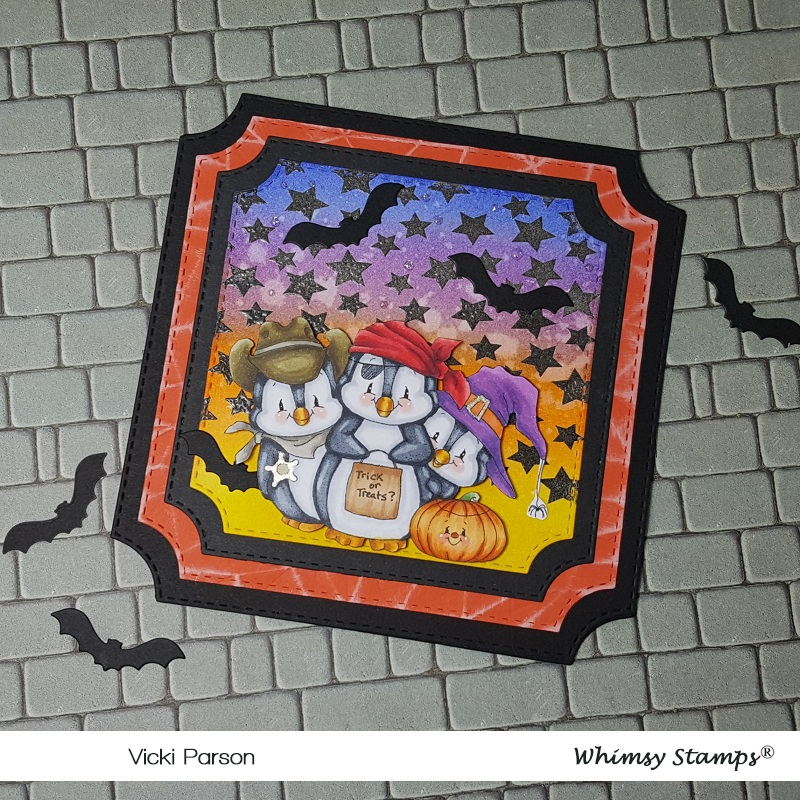
TRICK OR TREATS?!! Oh my word now how stinkin’ cute are these penguins?! Don’t they look like they just rang your door bell for Halloween?! LOL! That penguin image that I’ve used here is from Whimsy Stamps called Penguin Trick or Treaters and oh were they fun to color!
I was inspired to create with them for this embossing challenge, so I took a piece of Bristol Smooth Watercolor Paper and stamped the stars from the Whimsy Stamps Basic Christmas Backgrounds clear stamp set with a pigment black ink. I covered it with clear embossing powder and heat set them. Then I went over the stars with some distress inks (Mustard Seed, Carved Pumpkin, Wilted Violet & Blueprint Sketch) and ink foam blending tool. I also spritzed some water over it for the water droplet look.
All of the panels including the card base were cut from the Whimsy Stamps Notched Squares die set. So I took the finished colored panel and attached it over a black die cut panel and then I took a piece of orange cardstock that was die cut and ran an embossing folder over it. I rubbed a white ink pad over it to pop out the details in the embossing and then I mounted it over the die cut black card base.
After coloring the penguins, they were fussy cut out and popped up with foam tape over the colored panel. I had an older Halloween set of dies that I couldn’t part with from Whimsy Stamps and I cut out some bats from black cardstock and attached those to the starry background. I also added some drops with some Tonic Studios Silver Glitter Accents for a bit of sparkle.
Here’s a closer look at these cute little trick-or-treaters and how I’ve colored them up. I have used the following Copic markers to color them with:
Penguin bodies – C8, C3, C1, 0blender, R00, YR27, YR24, Y35, White gel pen
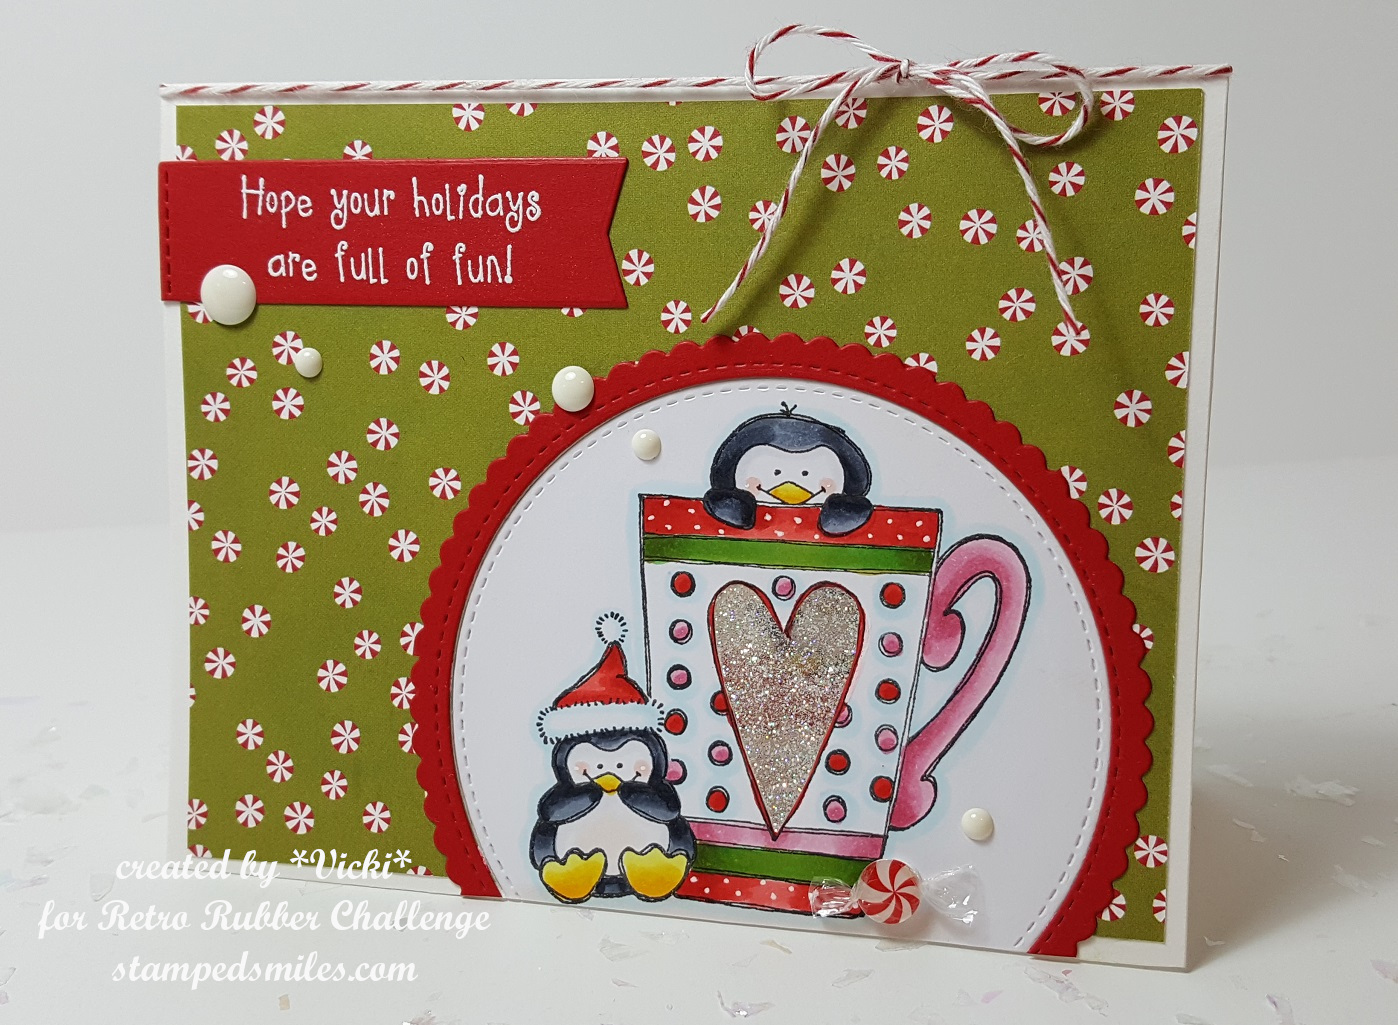
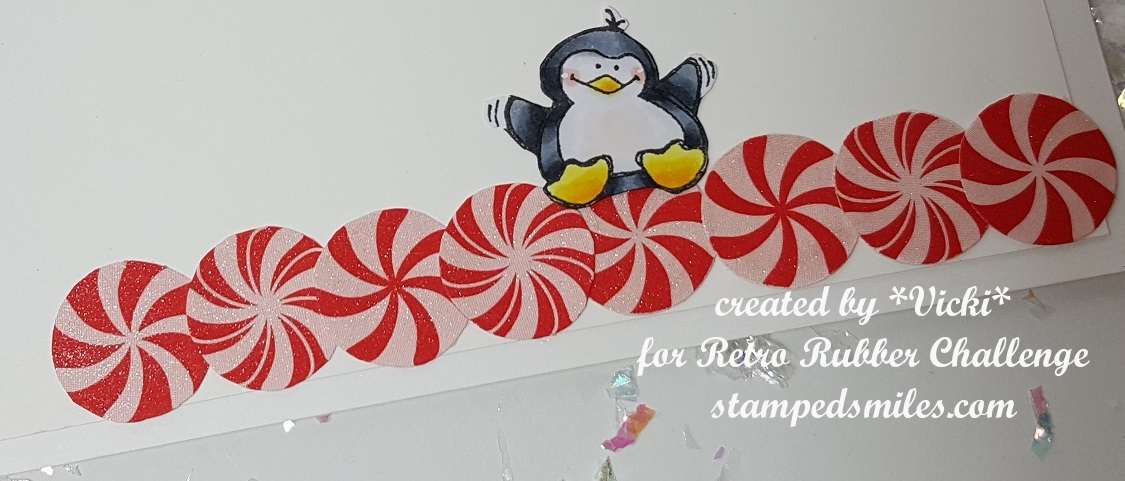
Hello friends! I’m super excited to have been asked to be a guest designer for one of the challenges over at the Retro Rubber Challenge blog! Yay! I really enjoy playing along in their challenges when I feel the need to break out some of my older stamps that have either been unused or neglected for a while. If you have some stamps that are at least one year or older…or older yet as many of mine can be, then this is a great challenge to play along with! Be sure to pop on over there and see what it’s all about, check out the inspiration from the design team and play along!
Here’s the card that I’ve created for the challenge but be sure to check out the full details along with lots more photos below!
For my card, I went with the bottom row of “animals,window and circles“:
I have pulled out some stamps from my “penguin stash” as I like to call it! LOL! I have lots and lots of them and most of them are years and years old. I’m actually not really sure how old this stamp set that I’ve used on my card today is, but it’s from Darcie’s Stamps and they haven’t been in the store for quite a while now I think.
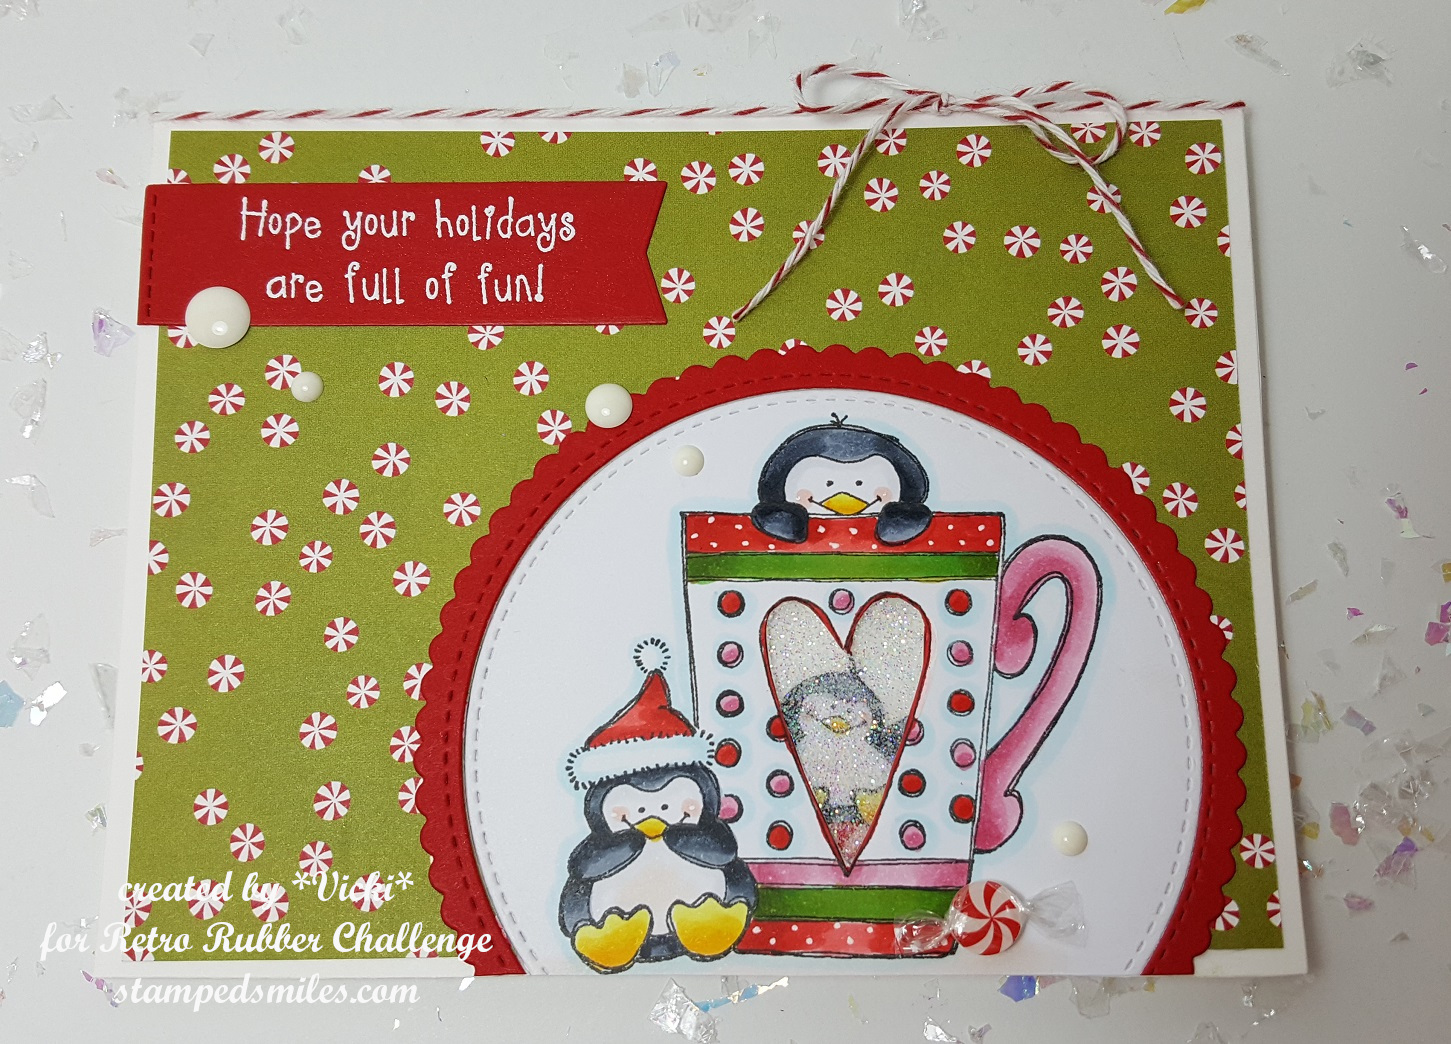
For my card, I’ve taken a circle die and cut out my colored images. I had to mask the hat so that it looked like the penguin was wearing it as well as mask that giggling penguin along with the hat so that I could stamp the mug so that it looked like the penguin was in front of the mug. I also white heat embossed the sentiment and cut it out with a banner die at the top. The sentiment also came with the stamp set. I cut out a scallop circle and then cut the center out with the same size circle as the penguins to create the frame around the penguin scene. I’ve used some older SU! papers from my stash to go along with my theme and then lastly added some red baker’s twine at the top along with some white enamel dots as well as a cute little wrapped up peppermint candy accent.
I have cut the center of the heart on the mug with my craft knife and now we are going to zoom in on the mug….
Here you can see the glittery heart window with the penguin on the other side! I have made a window by cutting out the heart on the mug and then on the other side, I’ve used some packing tape with the sticky side exposed through the window so that I could add some glitter to it.
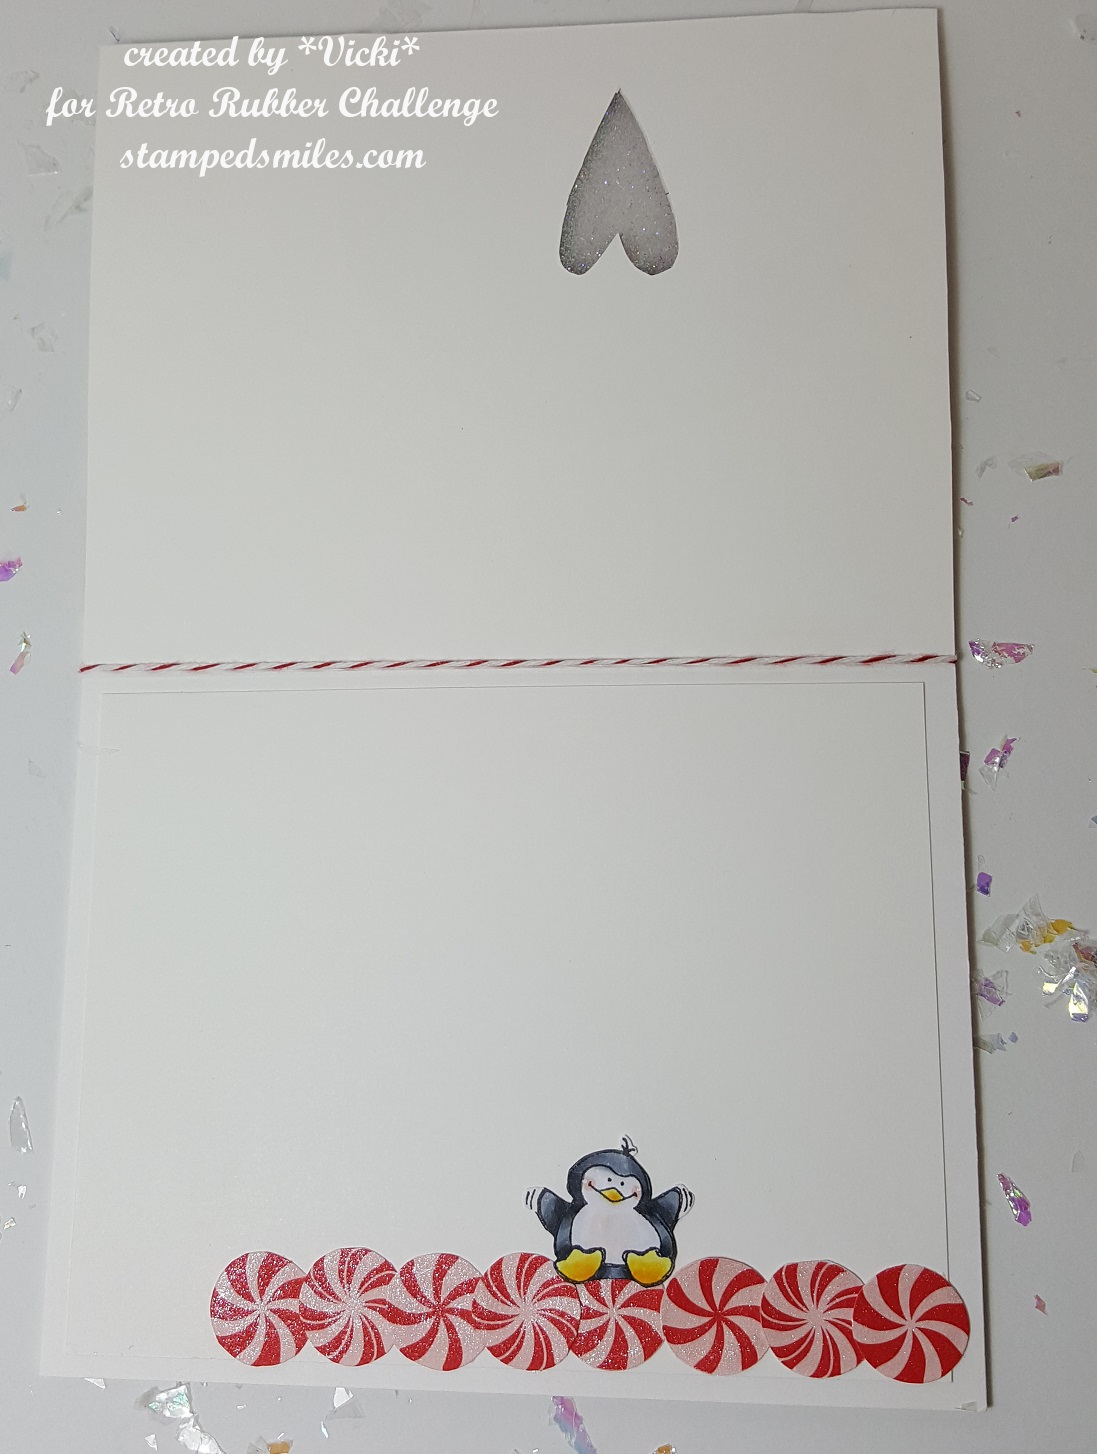
And then of course when you open the card, you can see this cute little penguin trying to balance himself on these glittery rolling peppermint candies! LOL! This is why the penguin on the front was giggling. I think they had too much sugar!
I colored in a penguin from the set, fussy cut him out and then layered him over this line of peppermint circles that I found from an older card kit I had in my stash. It’s from a piece of patterned paper that I cut out. I added some shimmer over them with a glitter brush pen. At the top you can see the cut-out heart I made.
This is just a closer view of the penguin on the inside. There is plenty of room above him to write a message. Wasn’t sure if I wanted to leave this blank or put a Christmas sentiment on the inside yet.
Hello friends! Can you believe that October has gotten here so fast?! I thank you SO MUCH to everyone that has shared about my give away and I really have been enjoying your comments about the way you share smiles through your creations. It is such an inspiration and joy to hear about this.
For my card today, I am sharing a sweet and fun festive image from the new release:
Yes, I cannot get enough of the penguins that Crissy Armstrong makes up for Whimsy Stamps! This image is called Penguin Elves at the Workshop and I think they’re having lots of fun for Christmas! They’re colored up with Copic markers and then I’ve taken a white gel pen for highlights as well as a silver and gold gel pen for detailing. I took some fine loose glitter and attached with liquid glue on parts of the penguins’ hats and then a glitter brush pen on the bow the penguin is holding. I have used the Pierced Border Trio dies to cut the panel on the top and bottom of the image. I then took an ink blending tool to add some distress ink around the panel.
For the sentiment banner, I printed out the new released Penguin Christmas Sentiments 1 and cut out a banner and then went over it with a Copic marker so that it matched up with my design. For the front panel of my card, I also took the newly released digital papers called Christmas Red, Gold and Green and printed them out and trimmed it to size my A2 white card base. I also took my ink blending tool to distress more coloring on the edges to match my image panel. I then took that and mounted it over the papers and then glued some gold thin ribbon on the top and bottom of the image panel and added a bow along with some festive sequins filled with Stickles tinsel glitter glue.
I hope you’ve enjoyed my card today using the new digital release from Whimsy Stamps this month. Be sure to check back for other creations I make from the new release this month too!! Thanks so much for stopping by!


 Check out these adorable penguins having some fun doing winter activities! Penguins are probably one of the top animals that I love! I have SO many penguin stamps in my stash and seem to keep on collecting more of them…so of course I was super excited to be able to add this Wintertime Penguins Pairables set from Digi Doodle Studios to my collection as well! 🙂
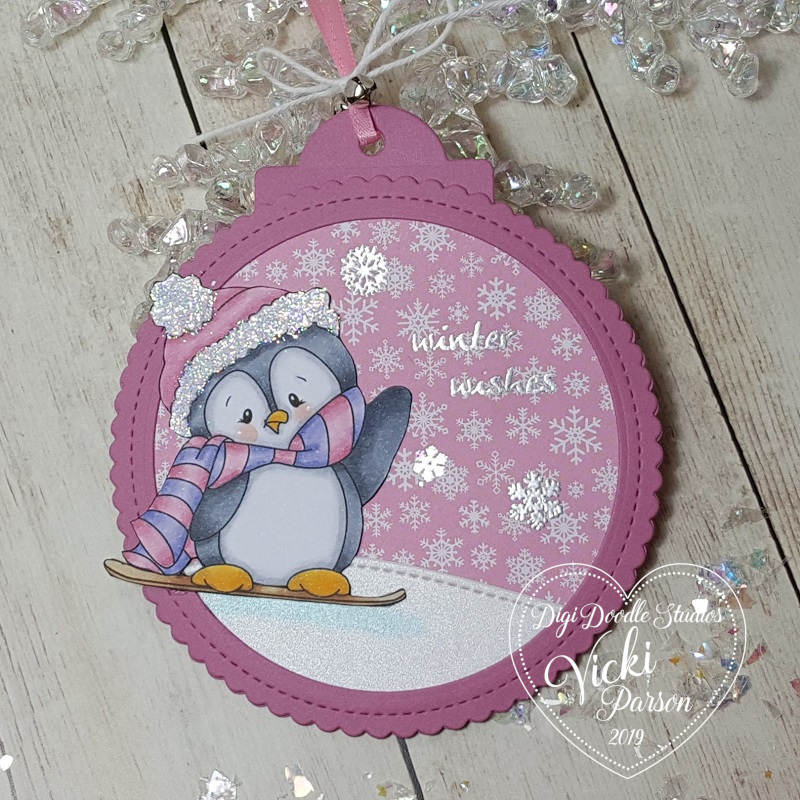 Here’s a closer view of the pink tag. For the digital image, I used Word on my computer to add the penguin and place it over one of the “ski” images from the set and enlarged it to make it look like a snow board instead of a ski! Then printed it out.