Adelina Fairy from Digi Doodle Studios Celebrating Peace & Happiness for 2021🎉

Hello friends!  It’s New Year’s Eve and I’m so excited to kick this year to the curb…how about you?!  Whatever your plans are to ring in the New Year, please stay safe and enjoy sharing with those you love for hope of peace and happiness in the New Year for 2021!❤🎉

Today, I have a card that I’ve made for a challenge deadline and needed to have it in by today, so I wanted to be sure to share it with you all:

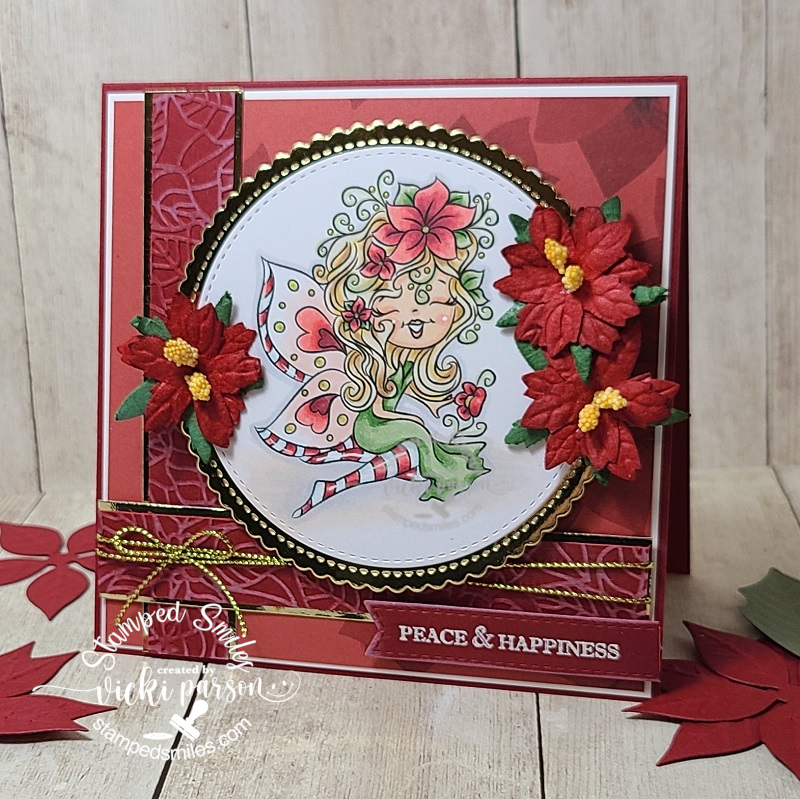
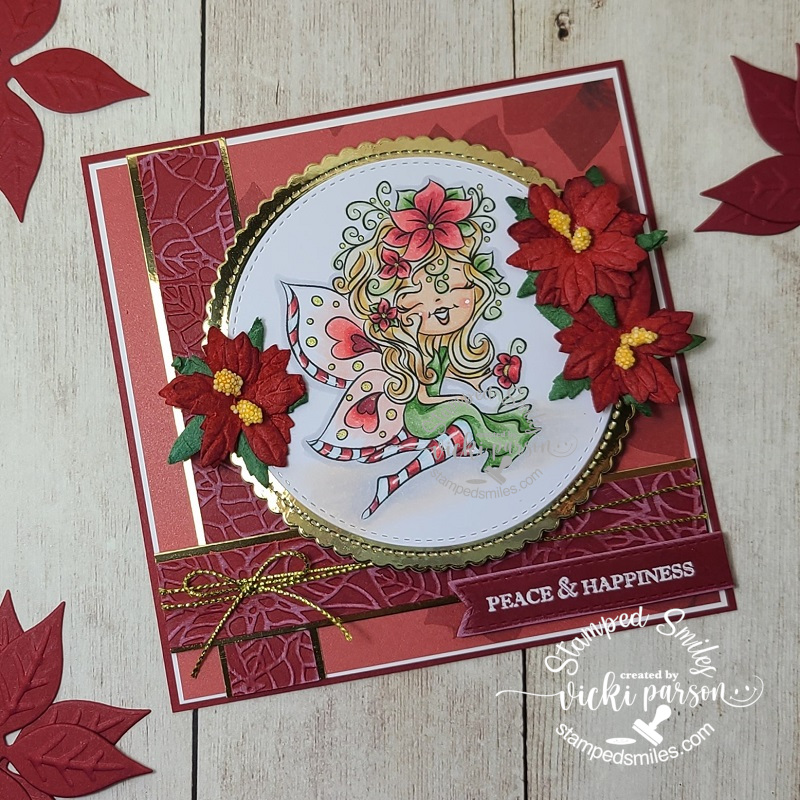
This was actually a “Digital freebie” from the Kit and Clowder Group Advent Calendar of Events they do every year.  Digi Doodle Studios gave away this darling image called Adelina-Fairy. (If you like the fairy/angel type images, check out these gorgeous images HERE as well!)

I made this card and colored up this sweet image as the Digi Doodle Studios Facebook Group was holding a special “coloring challenge” using this specific image and I wanted to make sure that it met the deadline for getting it in and so I actually posted it in there yesterday, but I’m posting on my blog today along with more photos and details.

The image is beautiful with her poinsettia flowers and so I wanted to be sure to color it up with red and green colors in mind…although I think she would be great for ANY occasion as well as coloring the flowers differently.  I used some die cut circles for cutting her out with and then layering her over a die cut piece of gold mirror cardstock.

I’ve used some poinsettia decorative papers from my stash for the background and layered some red poinsettia embossed strips layered with gold mirror cardstock over the background before adding the layered circle image on top.  The embossed strips also had white ink rubbed over top lightly to emphasize the textures.  I white heat embossed a sentiment and cut it out with a banner die to place on the bottom corner with craft foam which is what I also added behind the image circle panel too.

Before attaching the bottom strip to the card, I also added some gold cord and a bow.  I finished off the card with three poinsettia flowers from my stash.  The entire card measures 5″ square.

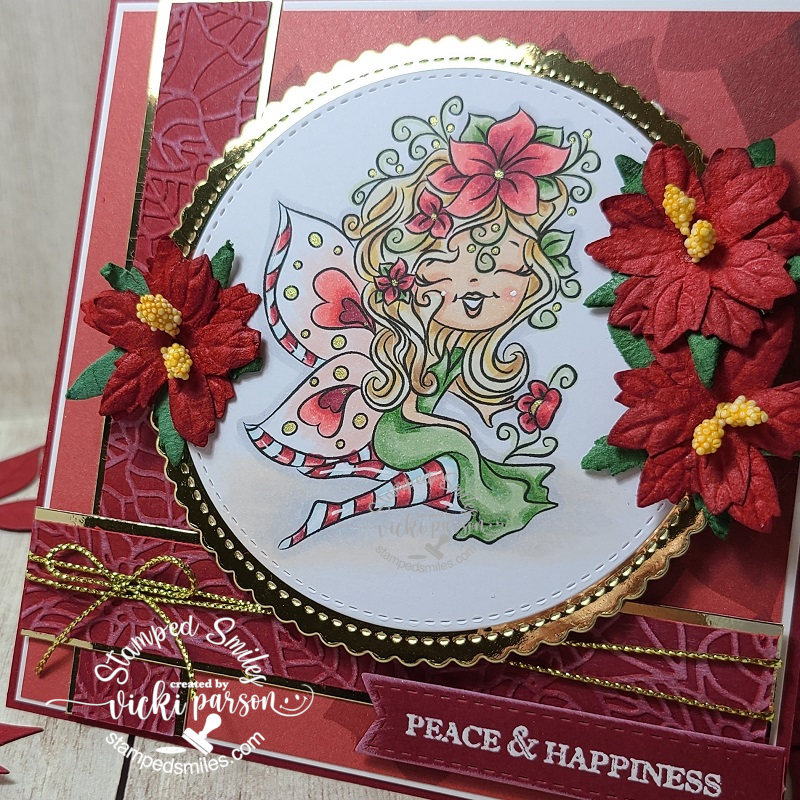
Here’s a closer view of the image and how I’ve got her colored up.  I added some really subtle shading with my Copics underneath her legs for shadows.  I did my usual white gel pen for checks and hightlights and then I used a gold gel pen for coloring in the dots on her wings and in her hair.

Really enjoyed coloring this gorgeous image and it’s awesome that I now have another Christmas card ready for next year as well!  Thanks so much for stopping in today!  Hope that you’ve enjoyed my final card and post for the year…

Speaking of which…I thought it would be fun to share this photo with you of my top nine posts on Instagram for 2020

I want to thank each and everyone of you for the wonderful support, kindness and friendship you have given to me this past year.  It really means so much to me and it’s been quite a year of creativity too!  I see that so many of my favorite companies are represented as my top photos which tickles me so much!

Here’s to wishing us ALL a happy, healthy and prosperous life in 2021!!🎉

See you in the New Year friends!

Challenges:

  1. Digi Doodle Studios Facebook Group – coloring challenge using this image
  2. Double D – Poinsettia
  3. Colour Crazy Craft – Anything Goes + coloring
  4. Creative Moments – #205 Anything Goes
  5. Die Cut Divas – Anything Goes December

It’s Christmas at Cute Card Thursday!

Well here we are friends!  Happy Halloween!!!   I hope whatever your plans are that you have a safe and wonderful evening!  I also hope the little trick-or-treaters don’t get too cold this year with the snow over my way!

Well, although it’s Halloween today, we are having a “Christmas” theme going on this week at the Cute Card Thursday Challenges!  So if you’re all packed up from making Halloween, then this would be a great time to start working on your Christmas makes for the year!  We look forward to seeing what you come up with!

Here’s the card I made for the challenge:

Vicki-CCT606

Isn’t this image just beautiful?!  I was so happy to pull out this stamp… finally and color it up for a Christmas card!  This was my purchase during STAMPtember from Paper Rose.  I had never heard of this company before that time, so this was the stamp set/die combo I picked to get as I fell in love with it.

I stamped the large image over a piece of Copic Blending Card and then stamped the sentiment from the set right underneath it.  Colored with Copics and then trimmed it down to fit over my card front.  I layered this panel onto a pice of brushed gold cardstock and then a piece of red.

For the card base, I took the two pine sprigs from the stamp set and randomly stamped them over a kraft colored A2 sized top folding card base.  I used the same ink color to stamp them with and then used that color to sponge around my image panel before attaching all the layers together.

Vicki-CCT606-close

Here’s a closer view of the coloring I’ve done over the image.  Although the brushed gold cardstock is a bit muted, you can see the slight shimmer in it.

I’ve taken a Copic marker and done some random “dots” all around the flowers.  I’ve also used a gold gel pen to color the center of the flowers as well as add some more “dots” around the poinsettias.

For the “berries” within the branches, I’ve added some Nuvo Morning Dew Drops which dries clear over them.  This would be the only dimension on my card which makes it nice and flat for mailing.

Vicki-CCT606-flat

I’m actually really happy to add another Christmas card onto my pile for this year and I have many places to send cards to, so I know I will be making more!

Please be sure to hop on over to the Cute Card Thursday blog and have a look at what the rest of the team has come up for this challenge and enter your project there too!  Hope you can join in the festive fun with us this week!

Thanks so much for joining me here today and I’ll be seeing you again soon!

Challenges:

  1.  Allsorts – Make Your Own Background Paper (stamped on card base)
  2. Pammies Inky Pinkies – Anything Goes PIP1943
  3. The Holly & Ivy Christmas Challenge – Anything Christmas Goes
  4. Through the Craft Room Door – Anything Goes
  5. Fab ‘N’ Funky – Christmas


Christmas Non-Card Creations and Final ICAD Week 9 Results!

Hello friends and TGIF!!  Hope you have some happy plans laid out for the weekend!  I will be doing various things including helping my son move as well as some crafty fun during the Splitcoaststampers “Dare to Get Dirty” event!  I will be hosting a challenge on Sunday…so perhaps I will share the creations I made for it! 🙂  If that link does not work for you, then that means that you are not a fan club member and if you’d like to learn more about becoming one, CLICK HERE.  There are lots of advantages to being a fan club member especially if you like to “hang out” with us on the website!

If you remember my post from last Friday, I shared some hand-made cards that I had entered into my local County Fair.  There are a few other items that I’ve entered besides cards for certain categories and I thought you’d enjoy seeing a few other things that I’ve created just for the fair:

Vicki-Christmas Center Piece-Snowman Hat

My first project was entered into the “Christmas Centerpiece” category and I was excited to see that I had won first place with this!  Can you tell what I’ve used to create the “snowman hat” design?

Let’s take a closer look…

Vicki-Christmas Centerpiece-Snowman hat1

I asked hubby to save me one of his empty coffee cans and I’ve spray painted it in black.  I’ve also bought a $1.00 charger plate from Hobby Lobby in black and then attached them together to form the snowman hat.  Then I took some white paint and splattered the entire thing for a fun “snow fall effect”.  I then began to decorate it by attaching some ribbon, pine tree sprigs and pine cones.

Vicki-Christmas centerpiece-snowman hat2

I bought a really pretty snowfake onament with lots of sparkle to use as a center piece for the front of the snowman hat.  The ribbon bow was attached below that and then the pine cone and sprigs were placed and attached in the center of the bow.  (even the plaid ribbon has some pretty sparkle in it!)

Vicki-Christmas centerpiece-snowman hat-3

For the pine cones and the “snow” over the top of the hat, I have used some embossing paste mixed with some texture stones to give it a thick snow appearance.  While it was still wet, I’ve added some glitter to all of it.  Love the way this turned out!  It will be a great center piece at Christmas time! 🙂

And since I was in a Christmas mood, I also made another item for the Fair:

Vicki-Christmasbasket

This poinsettia basket was entered into the “handmade basket” category and I was happy to see that I had won first place for this entry as well!  For the fair entry, you can have a basket made of anything as long as it was handmade…so of course I made a paper one! 🙂

Vicki-Christmasbasket3

I remember a while back this awesome basket with a tutorial that someone had made from Heartfelt Creations and I knew I wanted to give it a try.  I made mine Christmas and used what papers and flowers I had on hand, but the basket and handle were made with the same dies this person used from THIS TUTORIAL It is such a sturdy basket too as I’ve used some pretty heavy duty paper to compile it together.

Vicki-Christmasbasket1

The papers that I’ve used are actually some pretty old ones from a past Stampin’ Up! collection.  They’re double-sided and you can see the pretty poinsettia pattern on the other side from inside the basket walls.  The poinsettia die was a purchase I had made from a sale item in a booth at that Stamp Convention I went to earlier this Summer.  I love the embossing details it made with the poinsettia flower.  I also took some white ink to pop them out a bit so they’re more noticable.  There is one on each side of the basket and a smaller one at the top of the handle.

Vicki-Christmasbasket4

I’ve used some gold foil paper for the center of the flowers and then added some gold enamel dots on random spots for the centers.  I took some thin and narrow gold ribbon to the edges of the handle and then tied a triple bow with it and placed the poinsettia in the center.  I just filled the basket with pine cones that I had on hand, but I could see so many things that this basket would work for!  Maybe I need to make one for another Holiday too?!

Well although I made these for the fair, they will be nice to use for my own home and of course the photos do not do justice to what they look like in person!  I had so much fun with these projects too!  (I may still have another project or two to share with you from the fair entries…so keep watching!)

Lastly, I’m also very excited that I have fully completed my ICAD challenge for 2018!!  Yay!!  I cannot believe that I kept up with it the entire time and did a card for every single day the last 61 days in June and July!!  I know that I’ve posted every week what I’ve done and this is my final set for week 9:

Vicki-ICAD2018-week9

These were so much fun!  Some days were really hard and others I zoomed right through it!  I learned many things not only from other ICADians, but also about myself with art and how it affects me physically, mentally and emotionally.  I am very surprised in more ways than one.  Just when you think you don’t have it in you…you can surprise your own self! Have you ever done something like this?  I urge you to try as it is such a learning experience.

Vicki-ICAD2018-completed

There is just NO WAY I would have enough room to get every single one of these cards in a photo shot!  I had a huge ring binder that I kept them all on and they actually just barely fit on it!  LOL!  Such a fun thing to see all of these together at once and it will be great to go back and look at later too!  Glad I wrote on the back of what each one was.

I hope you’ve enjoyed my post today and have been inspired in some way!  There are SO many crafty things I enjoy doing….there’s just never enough hours in the day sometimes! LOL!!  We crafters can understand that! 🙂

I’m not really seeing any challenges that would fit my creations here, but if you know of any that I should enter, please let me know!  Thanks so much for dropping in, I really appreciate your kind thoughts and read each and every one!  See you soon!