Fairy Princess Bunny With a Pocket!

Hello friends!  Hope you have enjoyed your weekend.  Yay!  We are finally getting some decent weather to be outside in!  It’s been rainy and chilly for a while, so it’s been nice to see some sun the last few days!

Today I have this really sweet image to share from Whimsy Stamps May Digital release and a fun extra added element with it!

Vicki-PC Fairy Princess Bunny Tag

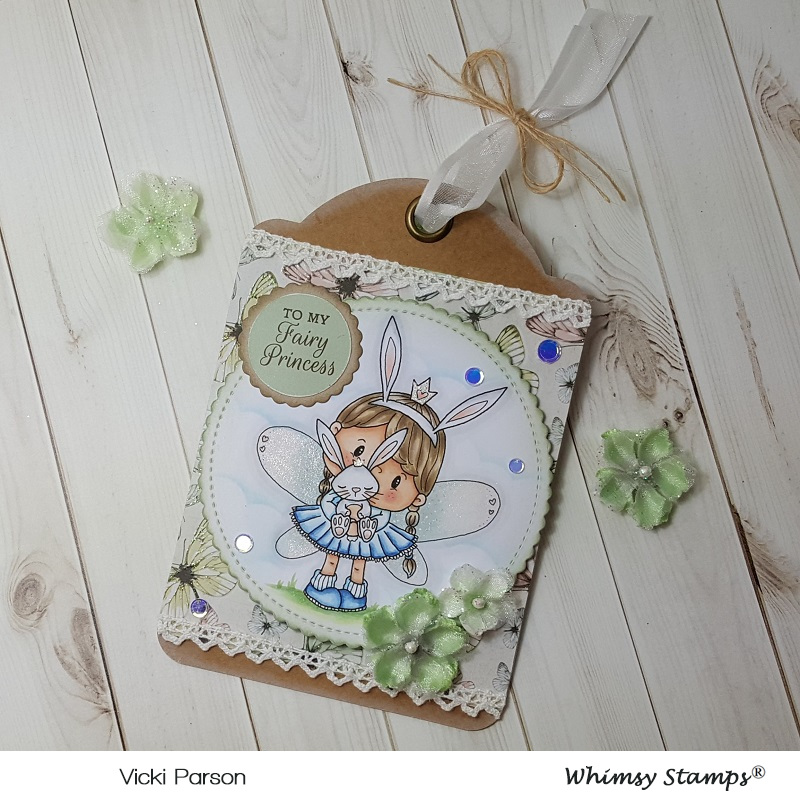
I have made a tag using this really sweet Pollycraft image from Whimsy Stamps called Fairy Princess Bunny.  Isn’t she so sweet?!  I found some pretty papers to go with her and placed it over a purchased kraft colored tag that I sponged some white ink around the edges.

After placing the papers where I wanted them and trimming it down, I also attached a lace trim on each end of the papers over the tag.  The papers also had a bunch of sentiments included in the pack, so I added the circle sentiment to the tag and then die cut a kraft piece to layer behind it.  I also added some flowers and the ribbon at the top and then finished it off with some clear sequins.

Vicki-PC Fairy Princess Bunny Tag-close

Here’s a closer view of the coloring I’ve done on this cutie.  I’ve used Copic Markers to color her in with using the following markers:

  • Dress, shirt, shoes, socks – B37, B34, B32, B01, B00, B000
  • Bunny, bunny ears – R11, R00, R000, C3, C1, C0
  • Wings – R00, R000, E000, BG000
  • Hair – YR30, E41, E43, E44, V95
  • Skin – E000, E00, E11, E21, R20, R00
  • Grass – G24, G21, G20
  • I used gel pens to make dots on wings and color in the crowns on the girl and bunny heads.  I also used a Wink of Stella glitter pen to go over the wings.

After I colored her in, I cut her out from a circle stitched scallop die and then sponged around the image with a cloud stencil and distress ink.  I also sponged around the edges of the scallop circle with another color of distress ink and mounted her over the tag with a piece of craft foam behind her.

Vicki-PC Fairy Princess Bunny Tag-otherside

So, when you flip the tag over, you can see that I’ve made a little pocket with the same papers I’ve used on the front of the tag.  I thought this would be a cute way to give out a gift card to your “Fairy Princess”.  The tag happens to be the perfect size for adding a pocket for a gift card to fit into.

Vicki-PC Fairy Princess Bunny Tag-flat

I hope you’ve enjoyed my little tag creation today!

THANKS SO MUCH FOR DROPPIN BY!!  HAVE A GREAT DAY!!

challenges:

  1.  Crafty Creations – Anything Goes
  2. Fab ‘N’ Funky – Anything Goes #437
  3. Crafty Catz – Anything Goes with optional twist of females
  4. QKR Stampede – Anything Goes #347
  5. Crafting By Designs – Fantasy

Sweet Anniversary Wishes

Hello friends!  Hope you’re having a great week so far!  It is really cold in our area right now as we are experiencing a “Polar vortex” with a high of -11 degrees F and low of -23 degrees F without wind chill for tomorrow.  Brr!  Many schools in the area as well as city workers are taking the day off due to the severe cold weather.   Please stay warm and safe wherever you are!

Not sure if you saw that Whimsy Stamps has started carrying this new adorable line of digital stamps from CC Designs in their store.  Here’s the card I’ve made today using one of those images:

vicki-pcaimeevalentino-jan29

I’ve used this super cute image called Aimee & Valentino for a special anniversary card.

I decided to print it out twice so that I could cut out the balloons and pop them up over the image.  I have used the following Copic markers to color it in:

  1.  reds on outfits, boots, hair clip and balloon – R37, R35, R32
  2. Pink on outfit and balloon – R85, R83, R81 (girl stripes on dress – E53, E51, E50)
  3. Boy’s outfit, boots and hair – C8, C5, C3, C1, C0, C00 (stripes on shirt – BG000)
  4. Girl’s hair – E27, E25, E23, E21
  5. Skin tones – E21, E11, E00, E000 (cheeks – R20)
  6. Grass/shadows – G24, G21, G20, E0000 (around image – BG000)
  7. I used metallic gel pens to color in the middle of hair clip, buttons and cheeks

I cut this image out with a stitched square die cut and then used a cloud stencil with Tumbled Glass distress ink and ink foam blending tool to add clouds behind the couple.

As mentioned above, I cut out the heart balloons on the second print out of the image and heat embossed the stamped numbers on them.  I used a stylist tool on the back of them to curve them in a bit and popped them up over the image with some foam dimensional dots.  I then added some shimmer over top of them with a Wink of Stella glitter brush pen.

vicki-pcaimeevalentino-jan29-upclose

Here’s a closer look at the coloring on the image.  You can see a bit of the shimmer over the balloons and where I’ve added some metallic color on the heart hair clip.  I took this image panel and layered it over a piece of gold mirror cardstock.

vicki-pcaimeevalentino-jan29-flat

I thought that the January released Hearts a Flutter digital papers were the perfect backdrop for this cute couple, so I printed the pink with white hearts one out and cut a piece out using the Whimsy Stamps Hand Stitched Nested Rectangle dies for that.  I found some coordinating card stock and gold heat embossed the sentiment from the WS Everyday Mini Sentiments clear stamp set and cut it out with a banner strip die.  I also placed it where I wanted it to go and used the Hand Stitched rectangle die again to create the stitch marks over it.

I took some gold ribbon and wrapped it around the heart design paper card front, placed the image panel over top and then layered on the sentiment banner with foam tape.  This was mounted over an A2 top folding white card base.  Lastly I added a gold bow and some gold sequins filled with some Stickles Tinsel glitter glue.

I hope that you’ve enjoyed my card! 🙂  Thanks so much for dropping by today!  See you soon!

Here’s some challenges I’d like to enter this card for:

  1.  CCEE Stampers – CCEE1904 Gold
  2. Aud Sentiments – Anything Goes + sentiment
  3. CRAFT – Love/Valentines (it fits with this theme as it’s about love!)
  4. Crafty Catz – Anything Goes with optional twist:  ribbon/lace
  5. My Time to Craft – All You Need is Love