Hello friends! I have a project to share which is a great send off post for an announcement of a blog break I’ll be taking for the next month🛳️🛫.
I wanted to share a project I made by request of my husband which was to recycle a plain notebook for traveling, so I pulled out some Doodlebug items and had some fun:
This is the front cover of the notebook which I covered with some Doodlebug papers, but I thought it would look way to busy, so I decided to tone down the papers by adding a wash of white paint over it. I think it makes the stamped images stand out better.
I’ve used a wave border die to cut some blue cardstock so that the boat could be in the “water” and I’ve added the sentiment underneath it. I stamped and colored the boat and airplane images and die cut them out with the coordinating dies. I also die cut a few clouds to add to the scene.
When I attached the painted pattern papers to the notebook, I decided to add an additional strip along the side of the wire spiral before adding the waves. I then took a black marker to create stitch marks with.
On the inside cover of the notebook, I took some more of those Doodlebug papers and attached them to the inside. I’ve made a pocket using the same papers that I’ve used on the front cover and you can see how bright and colorful they are which is why I decided to paint over them.
I added one of the cards from the paper pack to the front of the pocket and then I put a few pieces of washi tape with the airplane postage and travel stamps on the notebook paper.
And this is the inside back cover which was done similar to the inside front cover.
If you look inside the pocket of this, you can see that I’ve also made a bookmark for him that I’ve laminated. He can use it for his notebook or for another book he may be reading.
And here is the back of the notebook. This is where I’ve added a black elastic closure for the book BEFORE attaching any papers to it. The strips from the paper pack help to give it a little design and I’ve also included another shallow pocket.
He seems very pleased with it and has already put it to good use including the pockets and bookmark! He’s already wrote in it too! I tried to be sneaky and write a secret message on one of the random pages within the book, but he found it too early! I don’t get much past him!
I have lots of fun papers and ephemera left over from this cute Doodlebug paper pad, so I will probably be using it for a special scrapbook at some point…hopefully more on that later.
I would like to also let you know that I will be MIA for a while as we will be away on a much needed vacation time!
Thank you so kindly for stopping in and enjoy the rest of your summer!
Hello friends! I hope that you’re having a great start to your week! We’re almost there as Christmas approaches us quickly! I’ve been enjoying the Season and having fun keeping busy. Currently baking cookies and decided to take a break from that to sit and make a post about all of things that I’ve been doing besides posting!😆
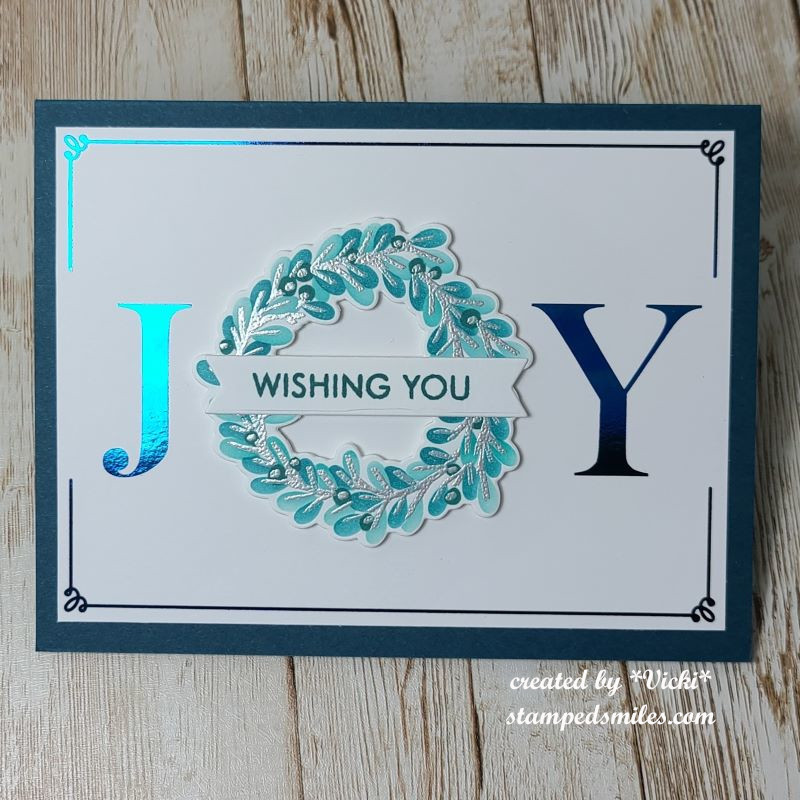
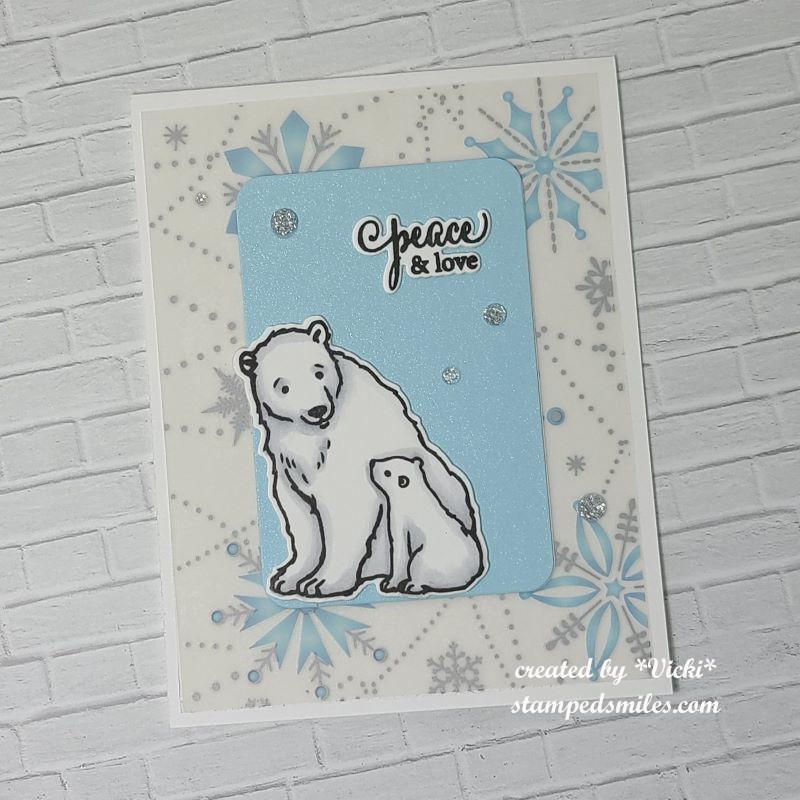
This is just one of the several similar cards that I created for my Christmas cards this year. It came from a Christmas in July card kit from Taylored Expressions. It mainly used the Wreathed in Joy Stamp & Stencil Combo set. There are dies you can cut them out with as well as foilable panels which is shown on this one.
I do not like to make several of the “same thing”, so I’ve changed them up to different colors, layouts, etc. So you can see the different versions I’ve done below. (If you are visiting my web page, just click on each photo to see it enlarged.)
*Apologies for the messy stack for photo taking…it was a lot to do all at once!
Most of these are blue and silver which is my favorite color combination for Christmas colors, so I did about 6 of these.
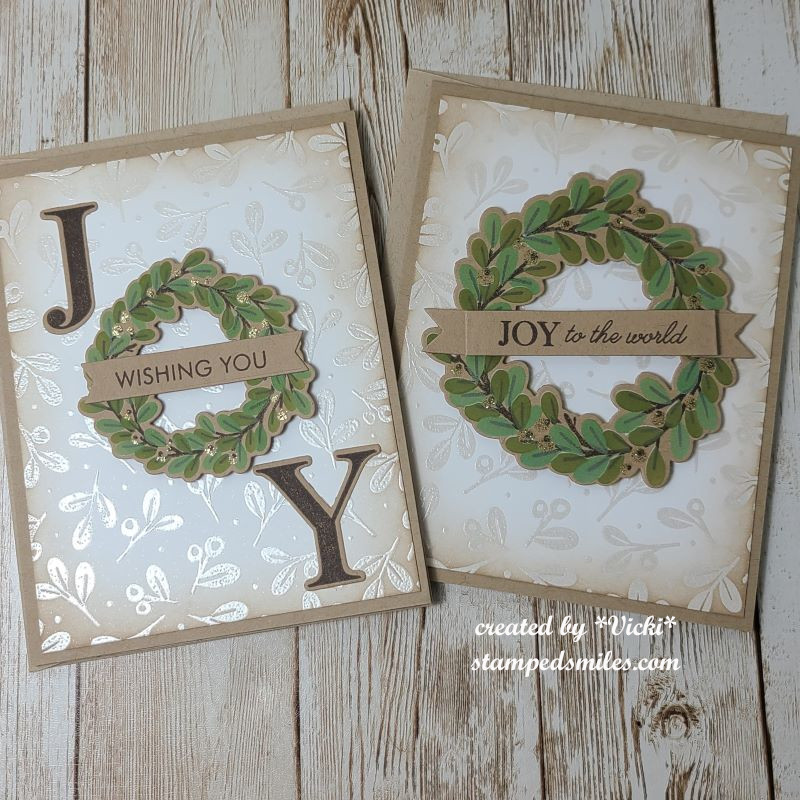
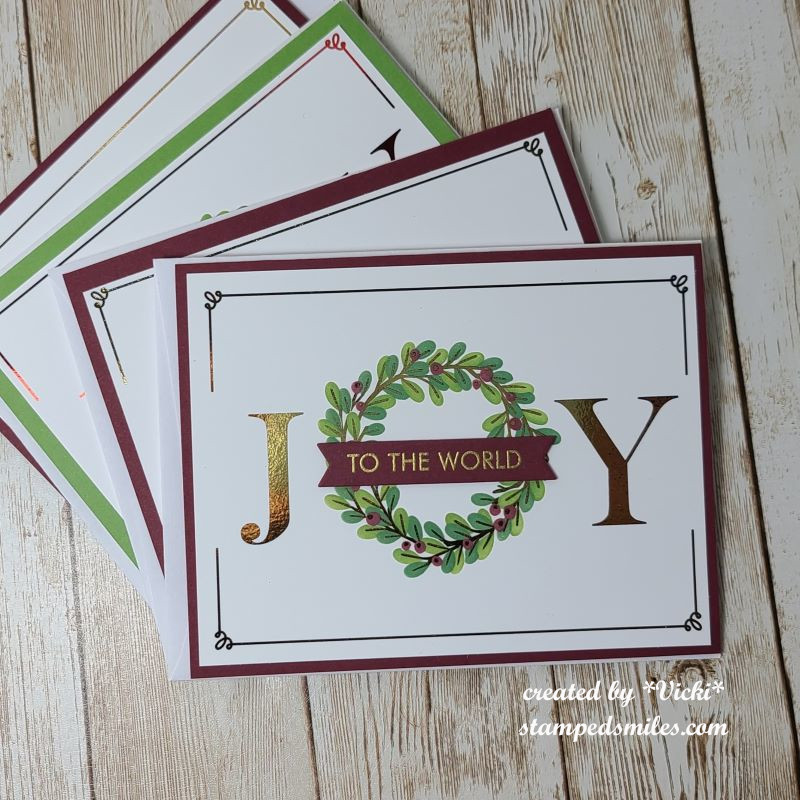
I think these look the most vintage with the soft tones. Only 2 of these.These are more traditional looking with the red and greens, plus some were foiled and some heat embossed. There are 4 of these.These are all pretty similar with the larger wreath used. I changed up the green colors a couple of times. There are 6 of this kind.
I thought these would be enough for all of the Christmas cards to send out, but I realized going back through my list that I wasn’t going to quite have enough.
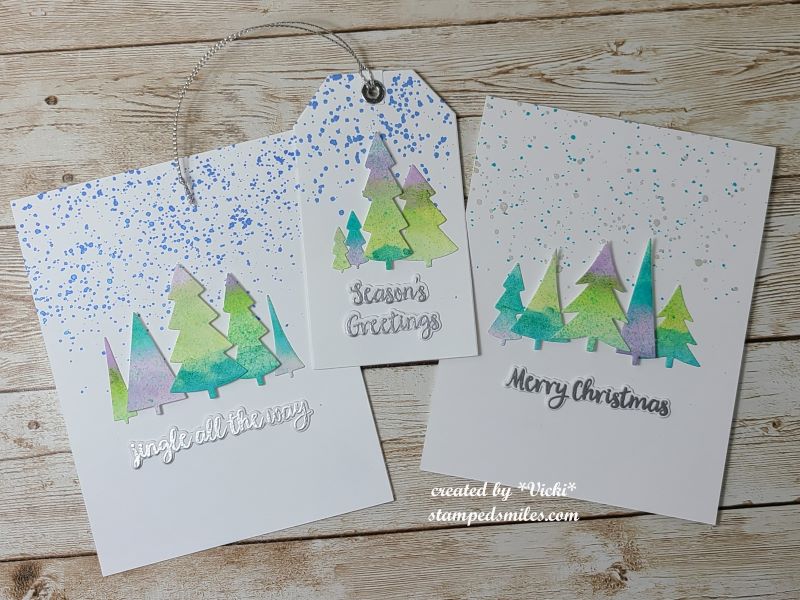
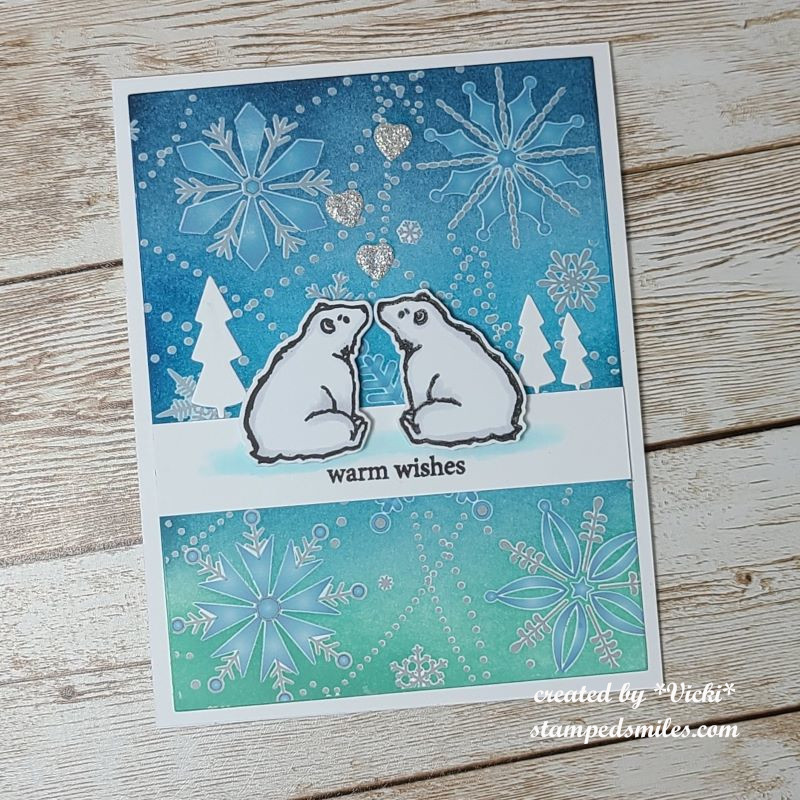
So I’m glad that at the beginning of this month I took a Hero Arts Stamp-a-Longand made several different types of Christmas cards. Here are the results of these below: (Again, if you’re looking on my web page, just click on the photos to enlarge them.)
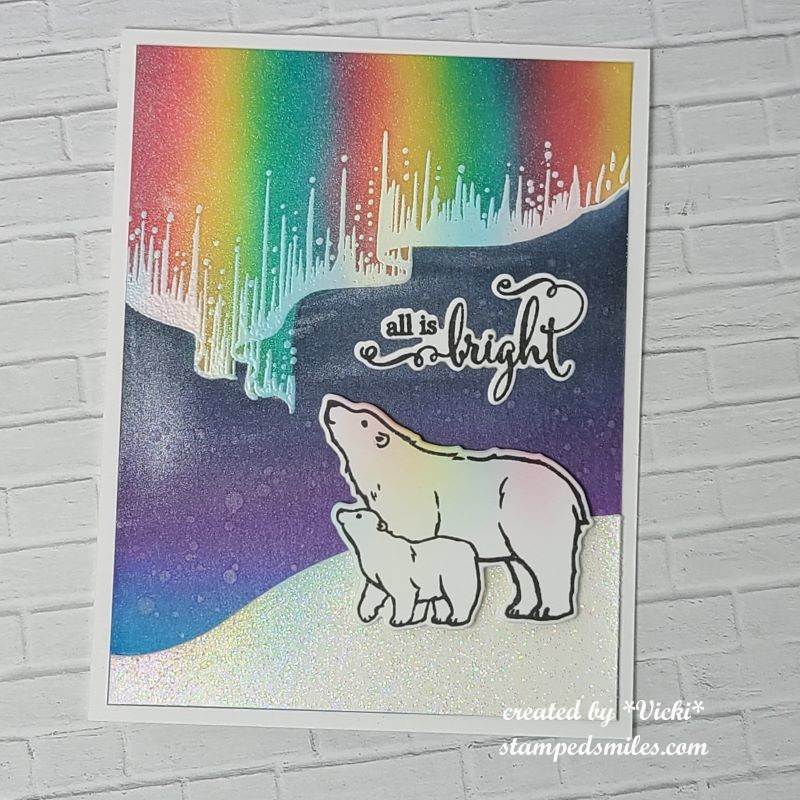
background using sprays and coloring die cutssimple CAS cardnorthern light mixed media techniqueemboss resist background and dimension die cuttinggift tag card with a pocket inside for holding a gift cardreverse die cutting on gatefold cardlayering tree stamp and gatefold cardusing die cut plate for stencilingWatercolor CAS projectsusing a die cut plate for embossing and masking
mirror stamping technique and rub-on background
So some of these were also taken and used for sending out more Christmas cards. I’m glad that I did the projects for this class or I probably would not have had enough cards.
BUT WAIT! That’s not all! I’ve also made a few other Christmas items that I’ve also sent out. I’m also sharing some gifts and gift tags that I’ve made from a Taylored Expressions Advent Calendar that I got this year. I made some more cards and tags. (I tried out wax melting which is something I’ve never done…it was fun) Others are from classes I took or participated in Craft Roulette for.
If you’re on my web page, just click on the photos below to enlarge each one.
a craft roulette challengeanother craft roulette challengeInky Stamper OOAK classcraft roulette challengestencil from my advent calendarmelted wax, tags, pine sprig die and stamp set from advent calendar
I usually make these every year along with a poem on the back for the hot cocoa ingredients. This one is called “Santa’s Soup”. I might add a few other fun items in there as well! The people that get one of these knows to look inside right away!
Wow, so that was a lot! I know that my blog has been pretty sparse with posts lately and I am finally getting around to posting the things that I’ve been working on, so I hope you’ll get that and you’re able to take some time for yourself this season and enjoy the peaceful quiet moments!
I will be sure to take a moment and catch up with everyone before Christmas arrives. In the meantime, it’s back to cookie making! Thanks so much for stopping in today!❤️
Hello friends! I feel like I’ve been so busy, but it sure doesn’t seem that way on my blog here! Hopefully, I’ll be able to show more things later…however, I think it’s about time for this month’s Art Journal page…don’t you?!
Today I’m sharing my monthly Art Journal page and collaborating with my blog friend Carol as we both try and get creative by using up our never-ending stash piles! So please hop over to her blog to see some more Art Journal inspiration with our “SMASH YOUR STASH” April prompt of: “recycled items/thrifted items to upcycle/pieces of magazine, gift wrap, etc.“! So here’s what I’ve come up with:
I absolutely LOVE The Peanuts Gang characters! I have a desk calendar that I use every year next to my computer and it has the Peanuts Gang on it. I was thinking this would be a perfect way for me to recycle it by fussy cutting out some of the characters on it and incorporating them on my AJ page this month!
So I’ve started out by creating my regular 9″x6″ sized page with thick watercolor paper and pre-cutting the holes at the top for my book. This time I’ve turned it in the landscape direction to work on the design. I took out a musical notes style stencil and added paste for texture to the background, but it turned out to look more like bricks instead..but I let it dry and used it anyway. I decided to pull out my Brushos that just sit on my shelf and never get used. I’m always amazed at the results with them just by sprinkling them and adding water.
I also took some printed vellum and attached ripped pieces over the background with collage medium. This is where I’ve also added a clock image that I cut from a magazine to recycle as well as the background Peanuts Gang characters (Snoopy & Sally). I then stamped a few musical notes and scribble stamps in the background using Archival ink. Lastly, it was also splattered with gold paint and set aside to dry. (Snoopy & Sally were covered for the splattering.)
The next portion was to create the piano going across the bottom for Lucy and Schroder to be on top. I took some black metallic cardstock that has been in my stash for years and free-handed the slope cut. The piano keys were simple with a white cardstock strip that I scored every 1/2″ and then I used a Word Window Punch (Also had for years from Stampin’ Up!) and punched out the black keys to add to the white scored piano keys over top. Attached this strip to the bottom of the page and then used foam tape to attach the black slope over top. At this point I had to punch the holes again at the top of the page for my AJ page book construction. This is where I glued and foam taped Schroder and Lucy over the black section of the piano between Snoopy and Sally.
The wording is something else that goes with the theme of my page. I had actually saw a video on You Tube with the Peanuts Gang singing the song by Chicago “Does Anybody Really Know What Time It Is?” and that’s where the musical theme came to my mind when cutting out the characters from my desk calendar. LOL Thought I’d share it if you’re interested in singing too:
For the wording on my AJ page, I just used my label maker and cut out the words to arrange on my page and then outlined each word with a black waterproof marker. I also took the same black metallic cardstock and cut out the letters to emphasize the word “TIME…” and glued it over the textured stencil.
But before I glued the black lettering over the brick texture, I took some metallic brass wax and rubbed over it to bring out the textured areas. I also used it around the edges of the page.
I thought the large black slope of the piano looked a little plain, so I made a flower using a scallop circle punch and cutting each scallop edge with my scissors to make “petals” from a musical sheet paper that I also sponged with black ink and splattered with gold paint. I also took more of the wax around the edges. Punched another circle with gold metallic cardstock for the center and topped the center with a black enamel dot.
I think it’s so fun to be able to incorporate just about anything into your art journaling and I’m glad to be able to pull out some of my neglected stash as well as find something to recycle rather than just throw away. It makes it so fun to be able to incorporate something different to suit your own ideas/thoughts/style too!
I hope you’re also enjoying the AJ pages too! Maybe you’ve been inspired to see something in your everyday life that you can turn into something creative…or maybe you can sing your own tune while you create!🎹
Thanks so much for stopping in today friends! So happy to share with you!
Tomorrow is inspiration from a new challenge for the month to try…see you then!
Happy Friday friends! We’re now upon Halloween weekend!🎃 Are you ready?! Lots of candy on hand to give out and some to enjoy for yourself…check. Scary movies at the ready…check. Ready for lots of fun before the weekend ends!
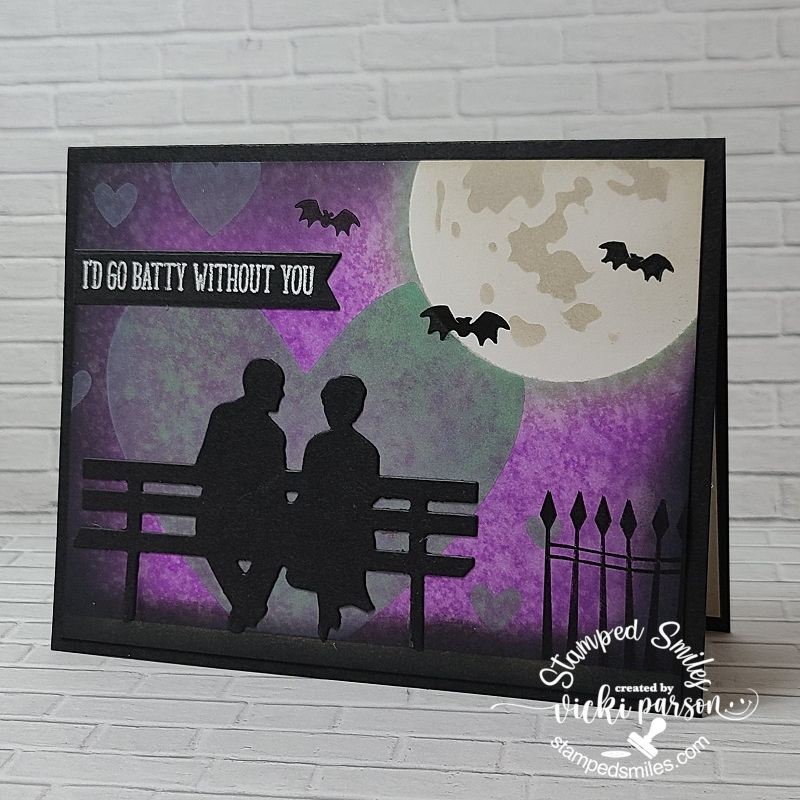
Not really sure exactly where my love for Halloween comes from, but I love it so much that even my wedding anniversary comes real close too! So today is our 22nd year anniversary and I couldn’t have made it in this crazy life without my “Boo”! I’ve made a card to let him know how I feel:
And yes, this is probably something we would certainly be doing under that moon as we’ve done before including watching bats fly around in the sky! We do weird and wonderful things which is just ONE of the gazillion reasons why I love him so! I’ve made a card with a bit of a “love/Halloween” theme. I’m not sure I’ve ever really made a Halloween style card for him before, but I know this will make total sense for him and he’ll get a kick out it.
Started with the background using some Oxide ink blending keeping careful with leaving the “moon” area clean. I sprayed water over top of the purplish/black background for that texture and then took a Taylored Expressions heart stencil over the background and introduced another color of oxide ink. I ink blended the edges and bottom with black. I have a Tim Holtz “Moon Mask” to create the moon with…which makes it super easy! I stamped the fence at the bottom right and the bats with black ink. The couple on the bench (TE “Love Story” die) was die cut from black cardstock and glued in the center of the large heart. Lastly, I white heat embossed the sentiment over another piece of black cardstock and cut it out with a sentiment banner attached to the top left edge.
It’s really a simple card, but I loved creating the background with a “spooky love” feel that I know he’ll like too!
And since we’re going “all batty” here, I thought I’d share my creation that I’ve made for this months’ Inky Stamper challenge using a recycled item! I thought this might be a good opportunity to create a fun treat! I took an empty paper towel holder to cut a 2″ tall container with a handle and covered it with some Doodlebug papers. I layered some trim and ribbon around it and added a punched-out circle for the bottom.
I’ve used the Inky Stamper Bat stamp set for the bat that I’ve stamped, colored and die cut for the front of my treat holder. I’ve cut out a stamped sentiment banner to tie onto the handle. Really easy and fun to create! You could get about 5 containers per empty roll which I thought was a lot!
I sure hope you’ve enjoyed my “BATTY” makes today and I wish you a very frightfully FUN weekend!
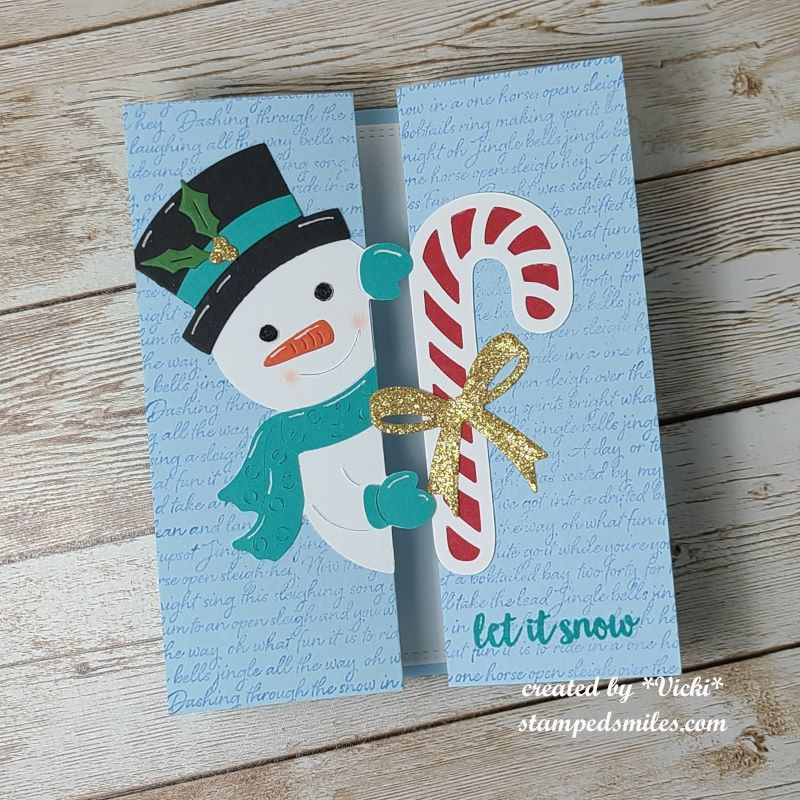
Hello friends! We’re here! We made it to Christmas Eve!😀 My cards have been sent out, my cookies are done and delivered as well as my other little gifts. This is quite a long post, so grab your hot cocoa or whatever your favorite beverage is and a Christmas cookie or treat and let’s see what I’ve been doing this past week:
So, starting with my Christmas cards, I usually make around 40ish cards each year give-or-take and I only like to make a handful of them at a time for not only boredom of the same design, but for product depletion as well.
So back in July, I purchased this really adorable card kit from Taylored Expressions (included was the Frosty Background Cling and Clear Combo set + more.) that came with coordinated colored envelopes as well as the seals. So, I made a set of four different colored designs in two of each one. The snowmen were popped up with foam squares over the backgrounds and I added some fun Snowflake bits that were included with the kit as well.
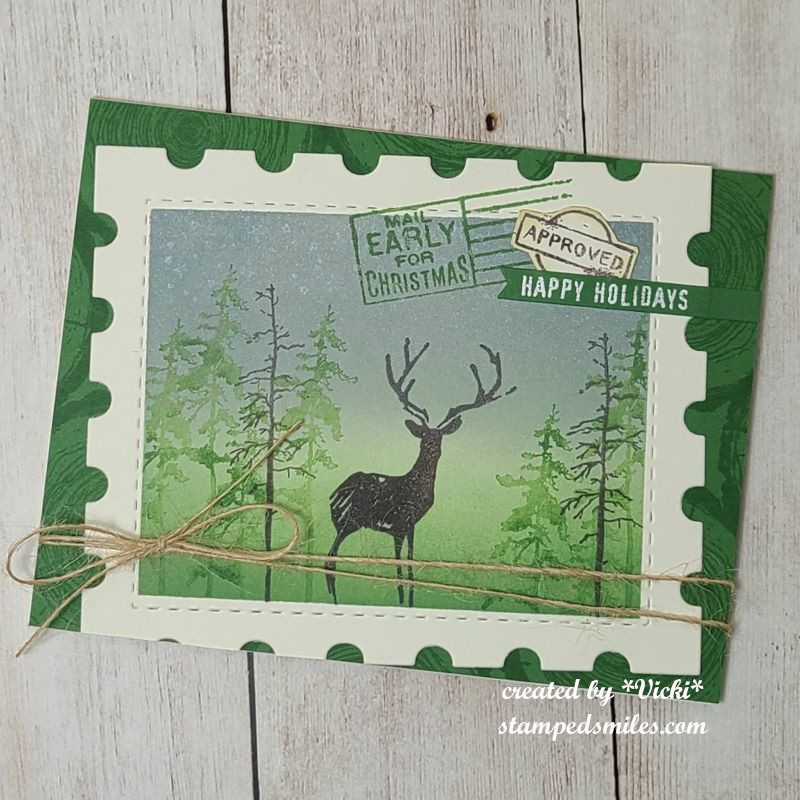
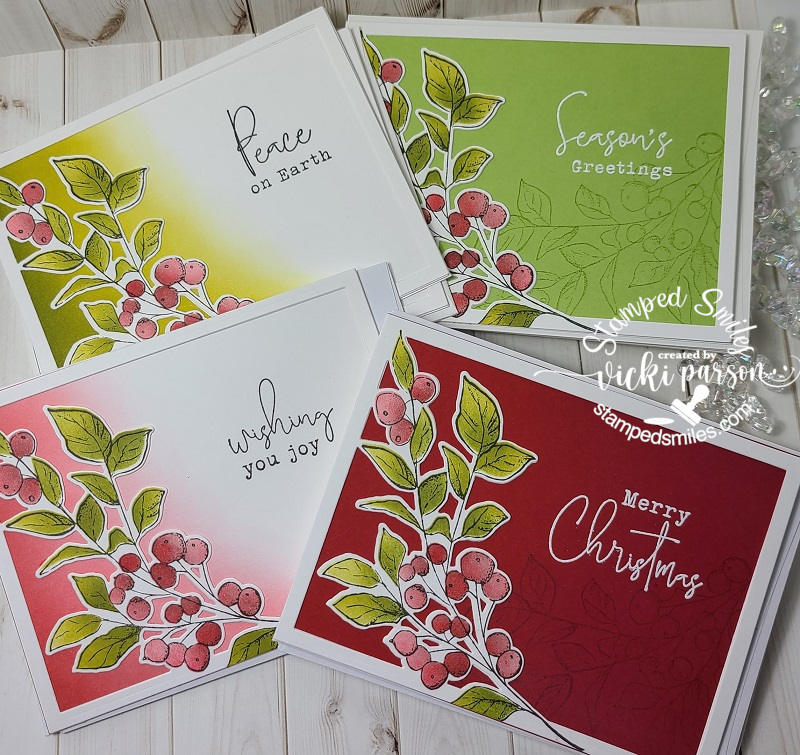
Next up is another set of cards I made using some more gorgeous products from Taylored Expressions. I’ve used the Seasonal Sprig stamp and die combo along with the stencil to color them in with. Some of these I ink blended the backgrounds, so I just used cardstock with a watermark effect and a white heat embossed sentiment. I used the die to cut an extra frame behind the stamped one for added stability. I made 4 of each design shown here for a total of 16.
I then made another set of four using the same products, but for these I gold heat embossed the image and sentiment and then used some watercolor for coloring it in with. I also got some of these coordinating envelope seals to use on about 10 of the 16 cards. (No longer available in store.) I’ve also partially ink blended the background behind the frame on these as well.
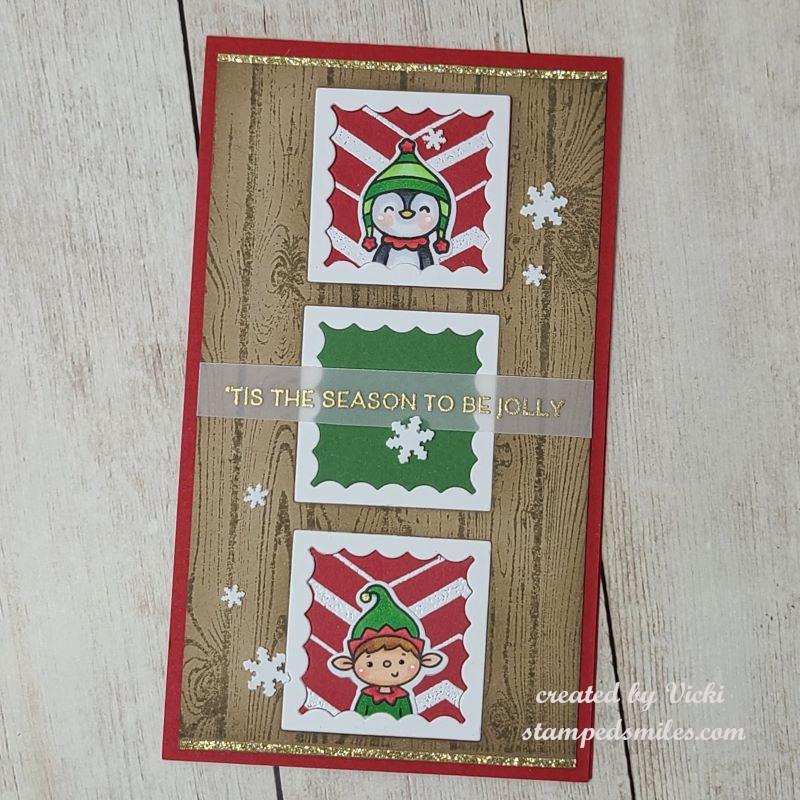
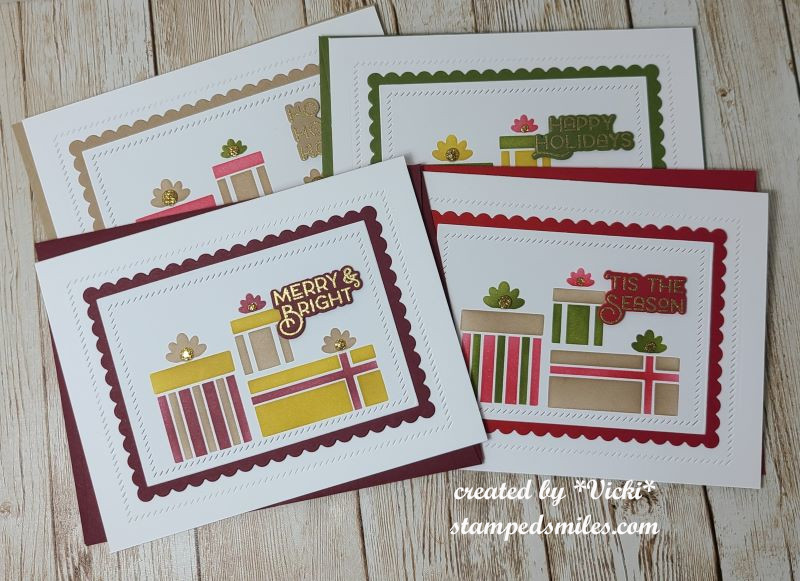
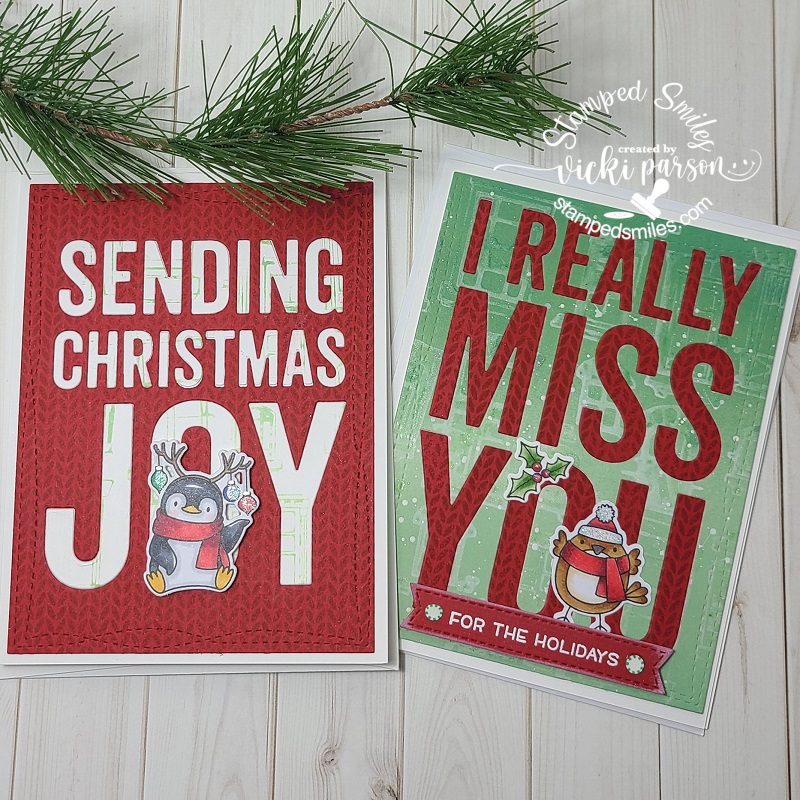
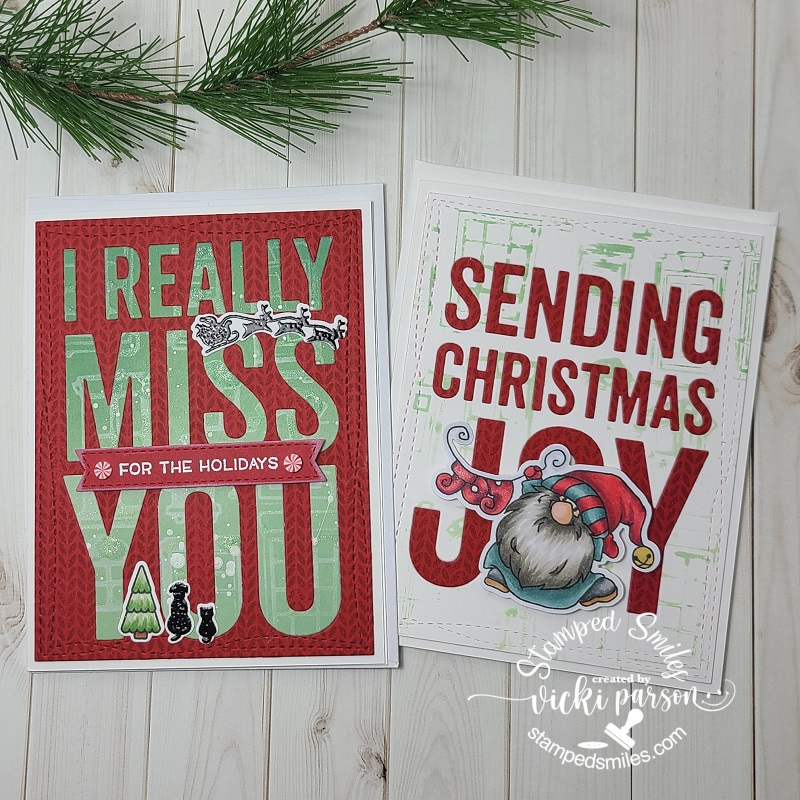
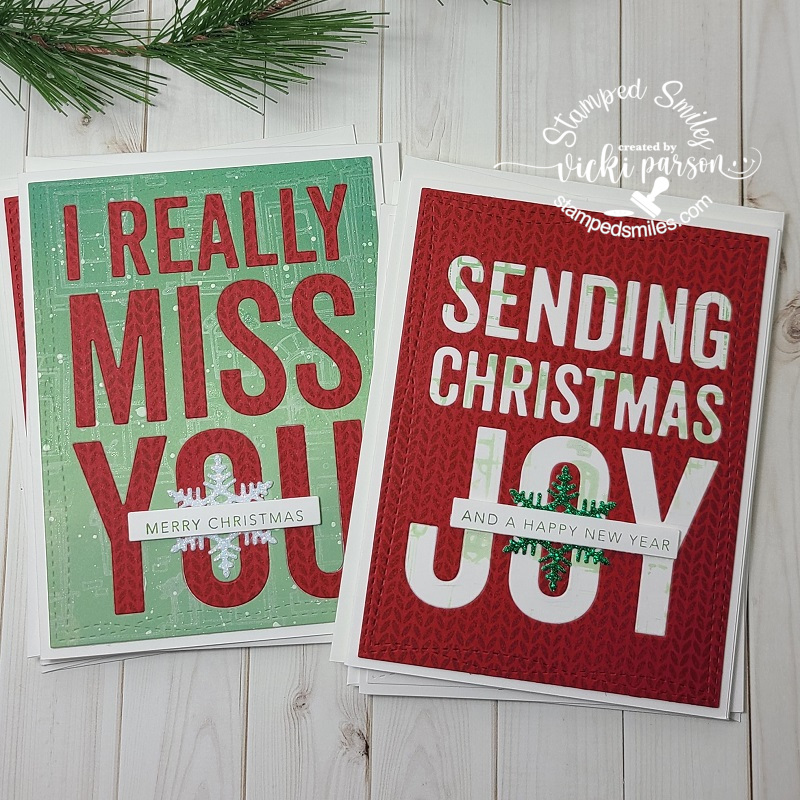
Here are some cards that I’ve actually made a total of 8 similar designs using the large wording background dies from My Favorite Things. I’ve used the “Sending Christmas Joy” and “I Really Miss You” dies for all eight of these, but only after I stamped the backgrounds. I used the MFT Knitted Sweater BG stamp and the Alley Cat BG stamp for a couple of backgrounds before I die cut them. Then I used the die cut letters to place into the other backgrounds on the cards to get that look. So it was like creating 2 cards with one cut and filling it all in. (For the Alley Cat background stamp, I ink blended the background and stamped it as a watermark effect over it and then took the “left over” ink from that to stamp it again to create an additional BG.) I then cut out each of the panels with the MFT Wonky Stitched Rectangle die and placed over a white A2 sized side folding card base. The penguin image is from the MFT Holiday Penguins set and the bird on the other one is from the MFT “Tweet Holidays” (Not found in store.)
And then of course you don’t want to waste any backgrounds you’ve made, so you make more cards! I’ve used a couple more images to personalize the design for people too. I combined the sets Newton’s Nook Whispering Pines and the Lawn Fawn Winter Skies. I think I took a set from them to create a sentiment to fit my cards as well. (not sure from which set.)
For the other card, I took this cute image from the Whimsy Stamps Gnome for Christmas stamp set, colored him up with my copics and cut him out with the coordinating die to pop him up over my card.
And then for these set of 4 cards, I’ve just die cut a snowflake from some glitter paper and glued in the center of the “O” on each design and popped up a sentiment over that with foam tape stamped and die cut from the Taylored Expressions Mini Strips – Holiday and Mini Strips die.
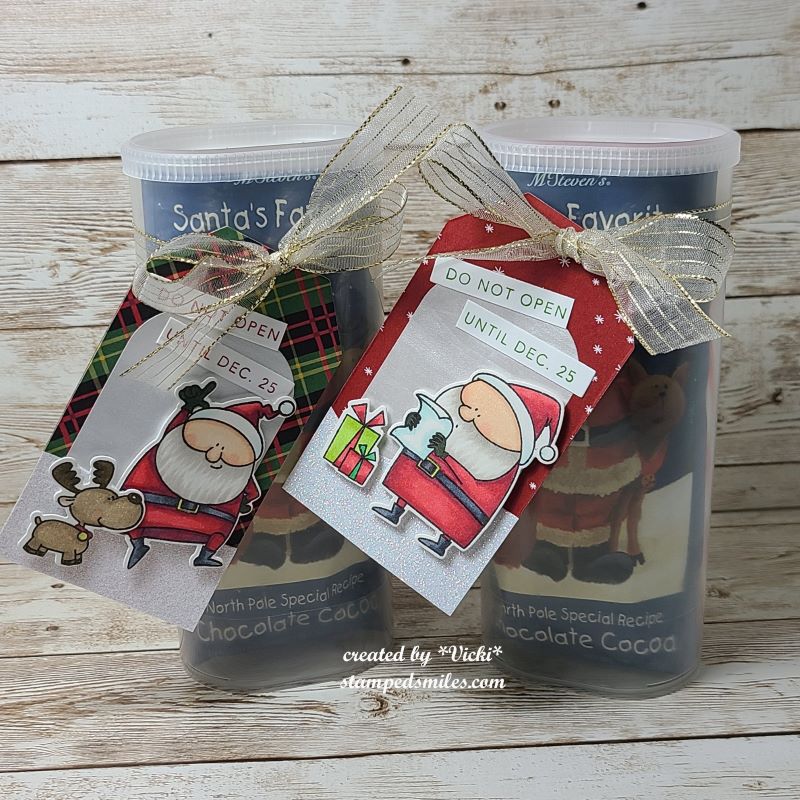
And as you remember in a previous post those “recycled Crystal Light containers” that I make, I made another set of three of them here. This time, I’ve used this snowman stamp. I just used my scissors to fussy cut those cute snowmen out as they were pretty simple to do and then I popped them up over an ink blended tag using the stencil over them. I used coordinating cardstock and silver heat embossed the sentiment strip at the bottom and of course added my “snowman soup” poem on the back of the containers. I’ve also added a layer of silver mirror cardstock behind the tags.
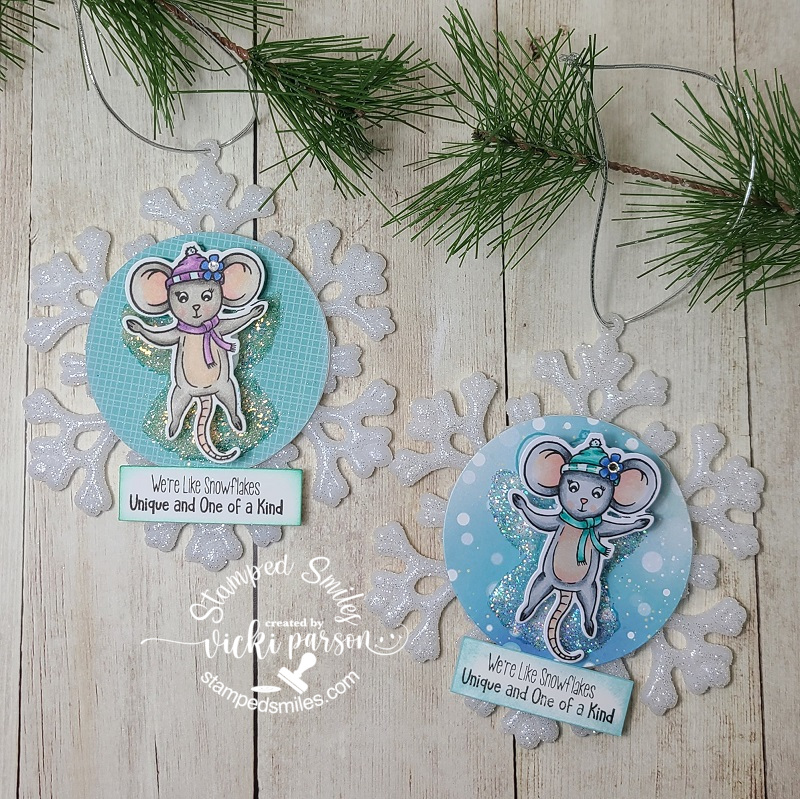
And I made a couple of these darling ornaments from a fairly “new to me” company that I was actually introduced to with product during my time as a {Cupcake Inspirations} sweetie DT when they sponsored a challenge a while back. P.S. There are a few more days left to enter their current challenge of “SNOWFLAKES” if you want to pop on over to join us too!!
But I was so taken with this darling image and kit from Inky Stampers from this Snow Much Fun Kit. You get the snowflake ornament (with string), the stamp set and die, papers, wobbler, along with glitter to complete it too! Well, I wanted to make more than one, so I grabbed another set of Snowflake Ornaments from the store and just added my own papers and glitter from my stash to make it.
Whew! I’m ready for that “Looong winter’s nap” now!!🥱 I hope you’ve enjoyed my post today and it has brought you some inspiration and/or a smile somehow! I have received some beautiful Christmas cards and I so appreciate them and have them all displayed by being pinned around my garland in our pass-through in the living room/dining area. I think after a bit of rest, I need to finish up my projects for the “Bugaboo Christmas Chaos” that I halted in the middle for to finish up Christmas projects….so I’ll be back soon with that.
In the meantime, I wish a MERRY CHRISTMAS TO ALL AND TO ALL A GOOD NIGHT!!🎅
Hello friends! This is my second post for today, so please scroll down to see it or CLICK HERE for the {Cupcake Inspirations} Reminder post.
I have several creations to share with you today because while I’m working on trying to get some last-minute Christmas projects finished, I thought that I would join in the fun weeklong “Holiday Chaos” challenges over at the Catch the Bug Blog for Bugaboo Stamps. I’ve caught up with all of the challenges up to today and then hopefully later this week I’ll be able to post the remainder of them:
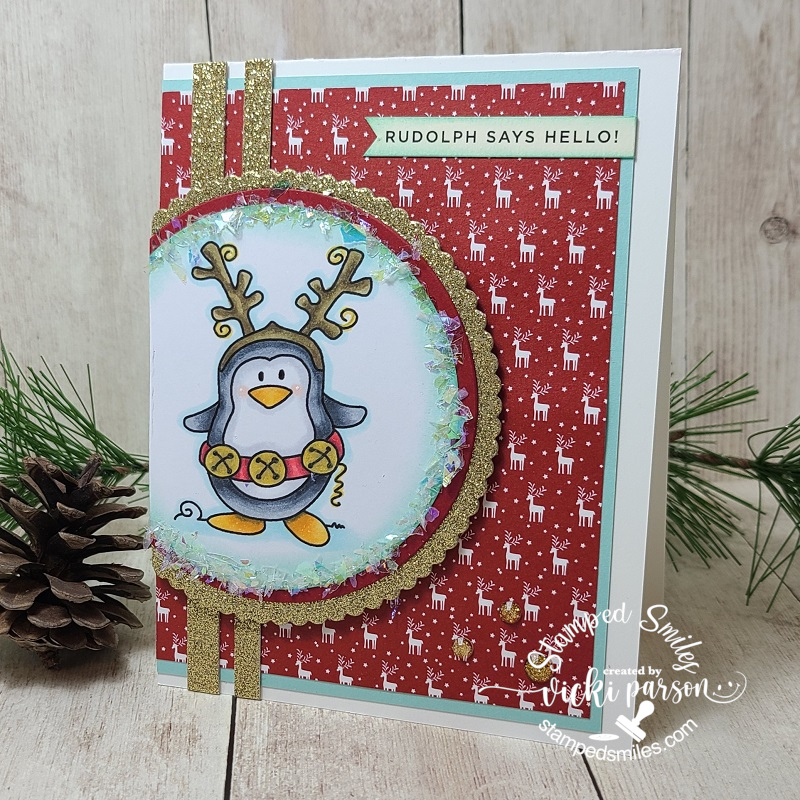
This card is for the Day 1 challenge of “Reindeer Games”, so I had this really cute Bugaboo image called Little Penguin Reindeer and colored him up for my card. I had these fun reindeer papers in my stash to pair with him and then found this fun sentiment strip to add with it as well.😂
I’ve used some gold glitter paper and added some gold glitter enamel dots in the corner. The bells on the penguin’s waist were covered with a gold glitter pen and then I added some faux snowflakes along the circle image border too.
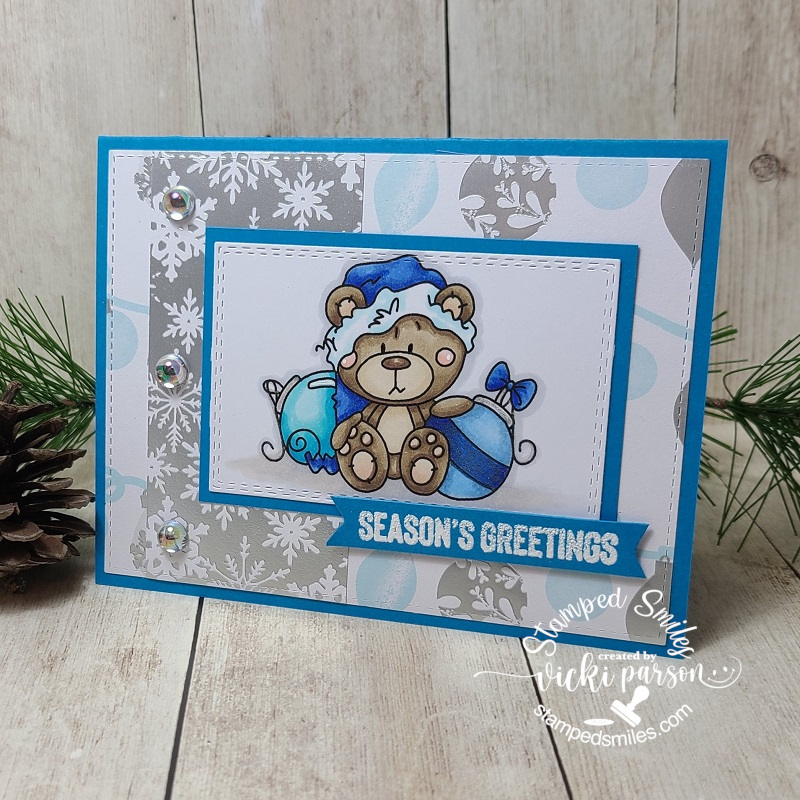
This next card was created for Day 2 Challenge of a sketch. I’ve colored up this adorable Bugaboo image called Christmas Teddy 2 Ornaments all in blue colors! Hard to tell in the photo, but I’ve used glitter gel pens to color in the stripe of the ornament and the silver tops.
I have been itching to pull out my Martha Stewart papers that have been lurking in my stash and I really love the colors in them along with the silver foil! I white heat embossed the sentiment from the Brutus Monroe “Holiday Essentials” stamp set and cut it out as a banner with my scissors and popped it up over the card with foam tape. I finished the design with some Drip Drops from Taylored Expressions.
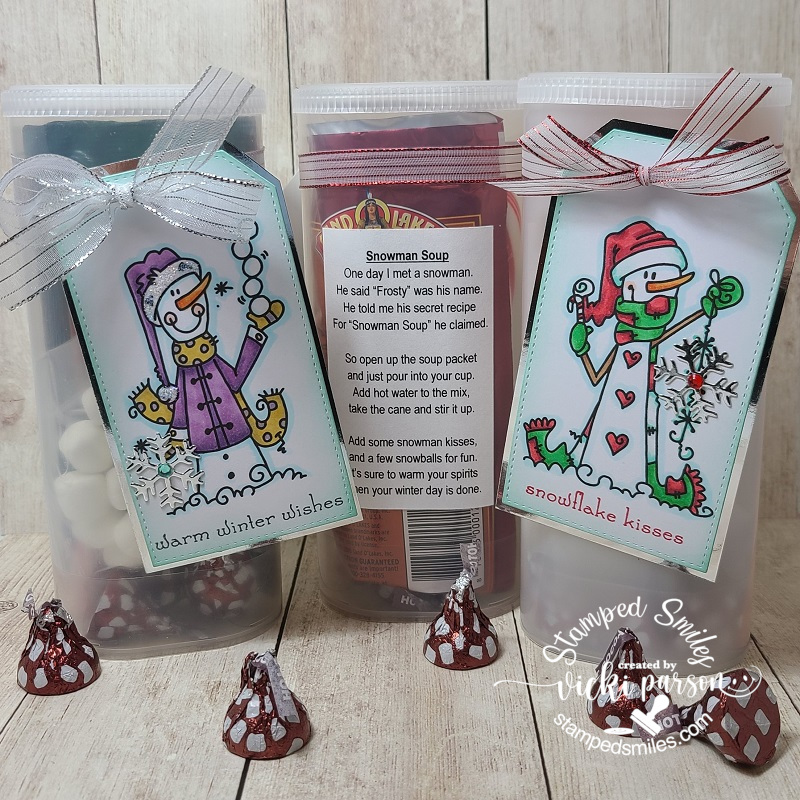
And of course, here’s my project for today’s challenge Day 3 ABC/Anything but a Card. I make these little “snowman soup” containers every year for my family and sometimes sneak in an extra “surprise” or 2 inside! You may have recalled these on my blog before, but they’re just recycled Crystal Light containers and they fit the hot cocoa, candy cane, marshmallows and a few chocolate kisses all in there perfectly together. I’ve decorated them in many different ways. CLICK HERE to see a previous post that shows another way I’ve made them in the past. This time, I just made tags to attach around the containers. I have made another set of 3 of these containers (different images) that I will show in a future post too!
I’ve used these adorable snowmen from Bugaboo Stamps called “Snowman Snowflakes” (right) and “Snowman Snowballs” (left). I colored them up with Copics and added a sentiment that was stamped at the bottom from Whimsy Stamps Holiday Mini Sentiments stamp set.
I’ve had this “snowman soup” poem for years and years and just printed it out on my computer and attached it to the back of the containers. The top of the lids are also covered with pattern papers. P.S. If you haven’t tried the “Hot Cocoa Hershey Kisses”…oh my goodness they’re so good! 😋
UPDATE:
I also wanted to share an update on the “Christmas Cards for Danny” post you may remember that I posted about a few weeks back. I’ve actually seen an update in my own hometown newspaper about all the cards he’s received and as of December 10th, he’s received 2,544 Christmas cards from ALL OVER THE WORLD! How cool is that?! This really touches my heart and uplifts me about the kindness in the human spirit. Thank you to those that took the time to send a Christmas card his way! It’s really what Christmas is all about.
Challenges:
Catch the Bug – Holiday Chaos Day 1: Reindeer Games (card 1)
Catch the Bug – Holiday Chaos Day 2: Sketch (card 2)
Catch the Bug – Holiday Chaos Day 3: ABC Anything but a Card (snowmen soup)
Hello friends! I’m back to share our new challenge for Cute Card Thursday this week! I have to say that I enjoyed this challenge, and I can’t wait to see what you come up with for this one. We would like to see some “Recycling” on your projects this week! There are so many different ways you could go…do you have a box full of “trash treasures” waiting to be used? Now is the time to pull it out! 🙂
Here’s what I’ve come up with for the challenge:
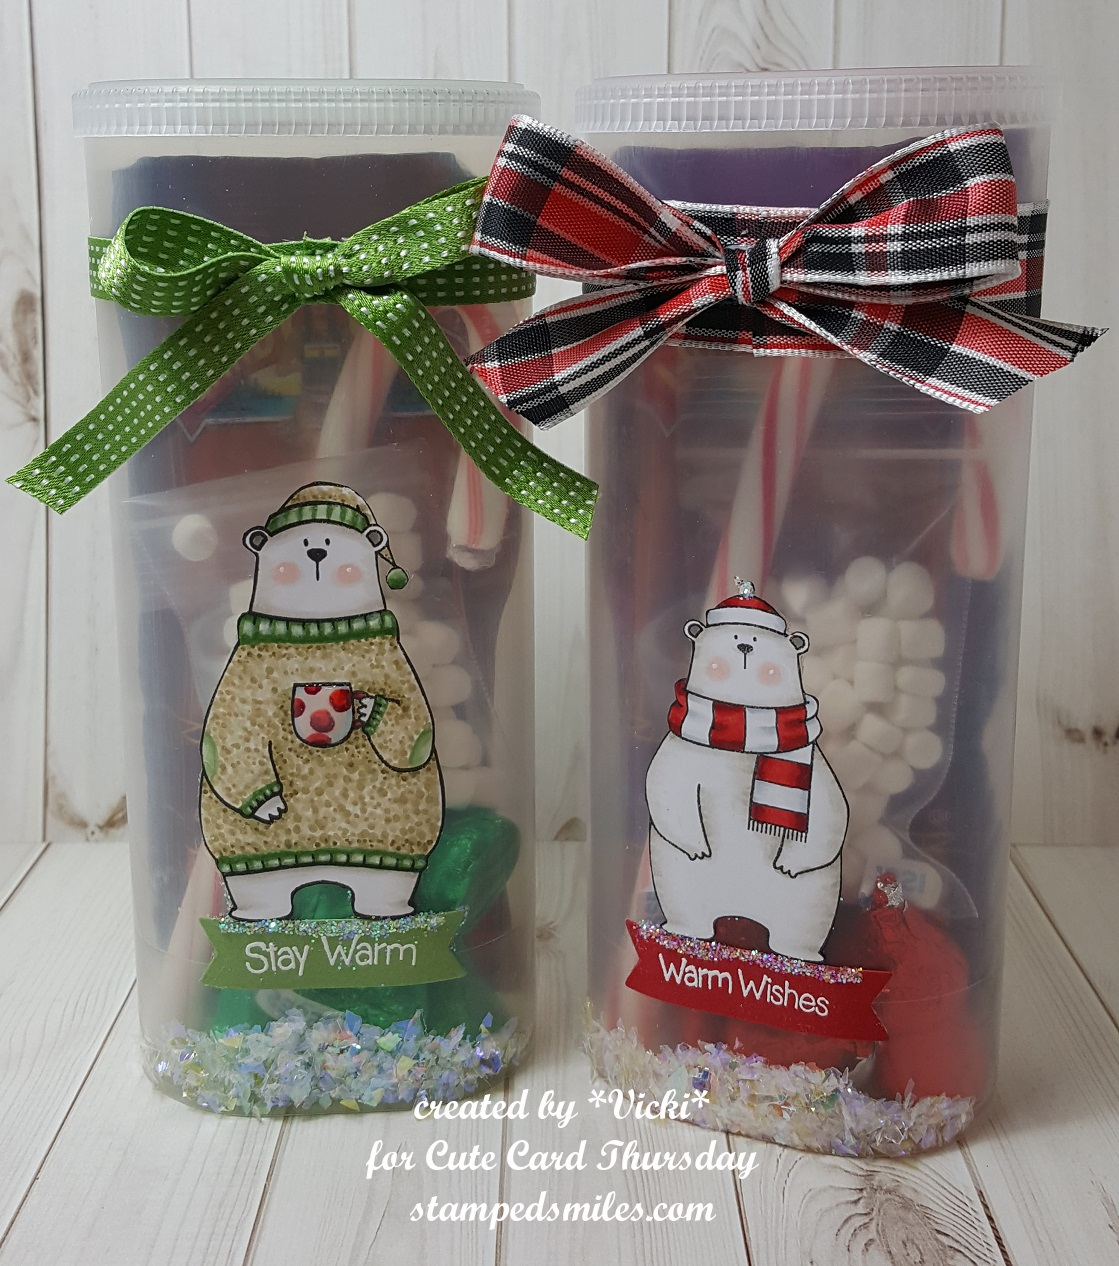
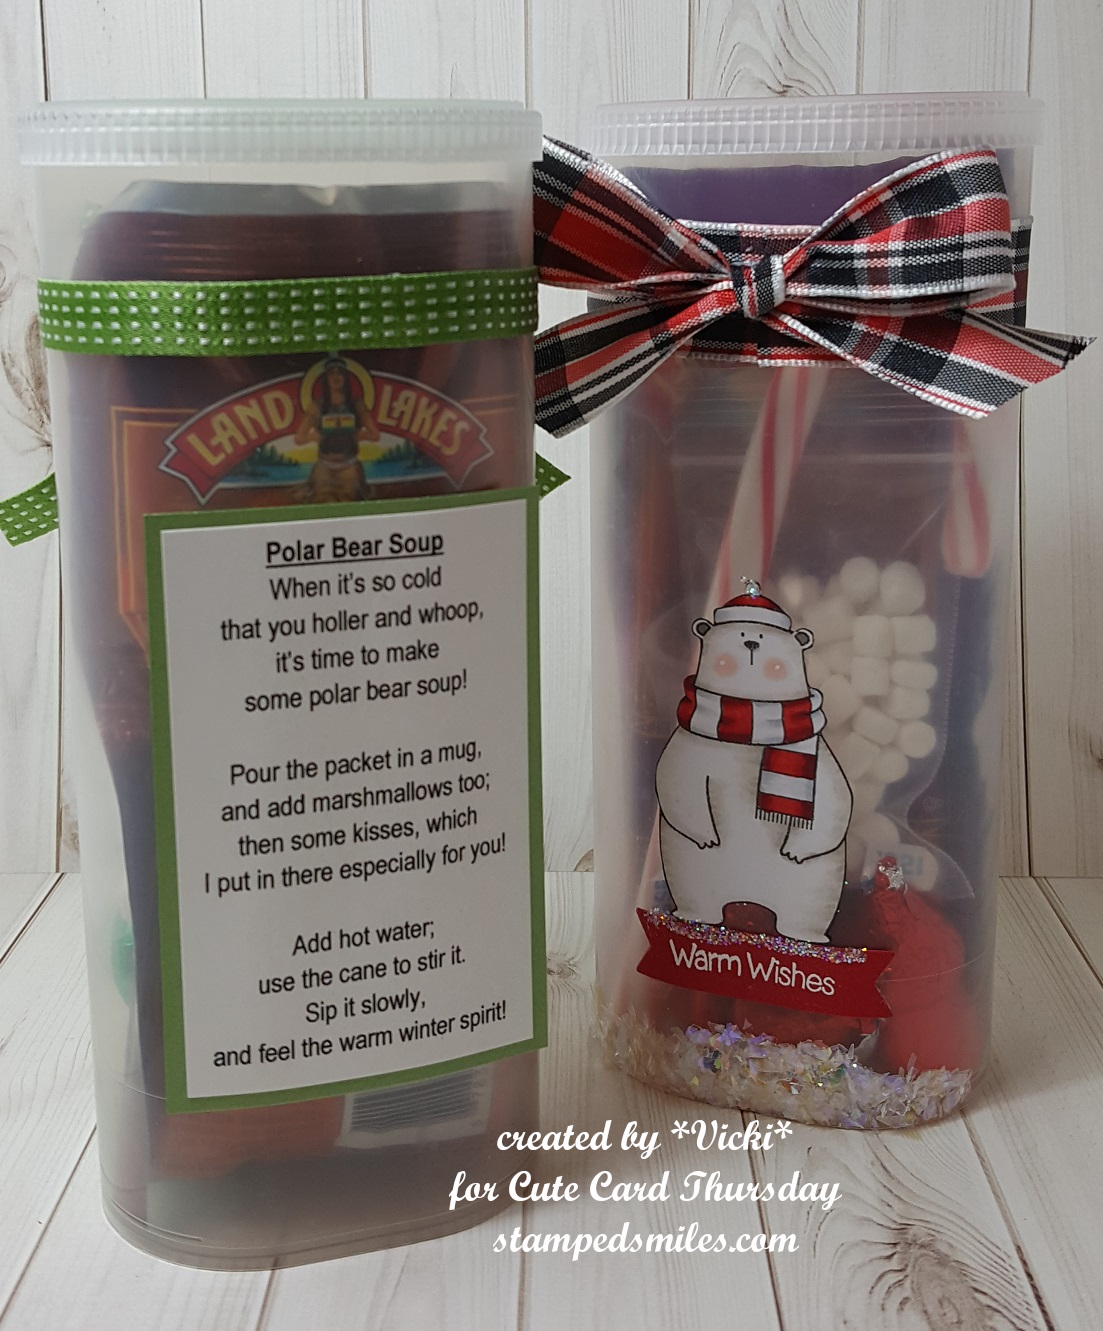
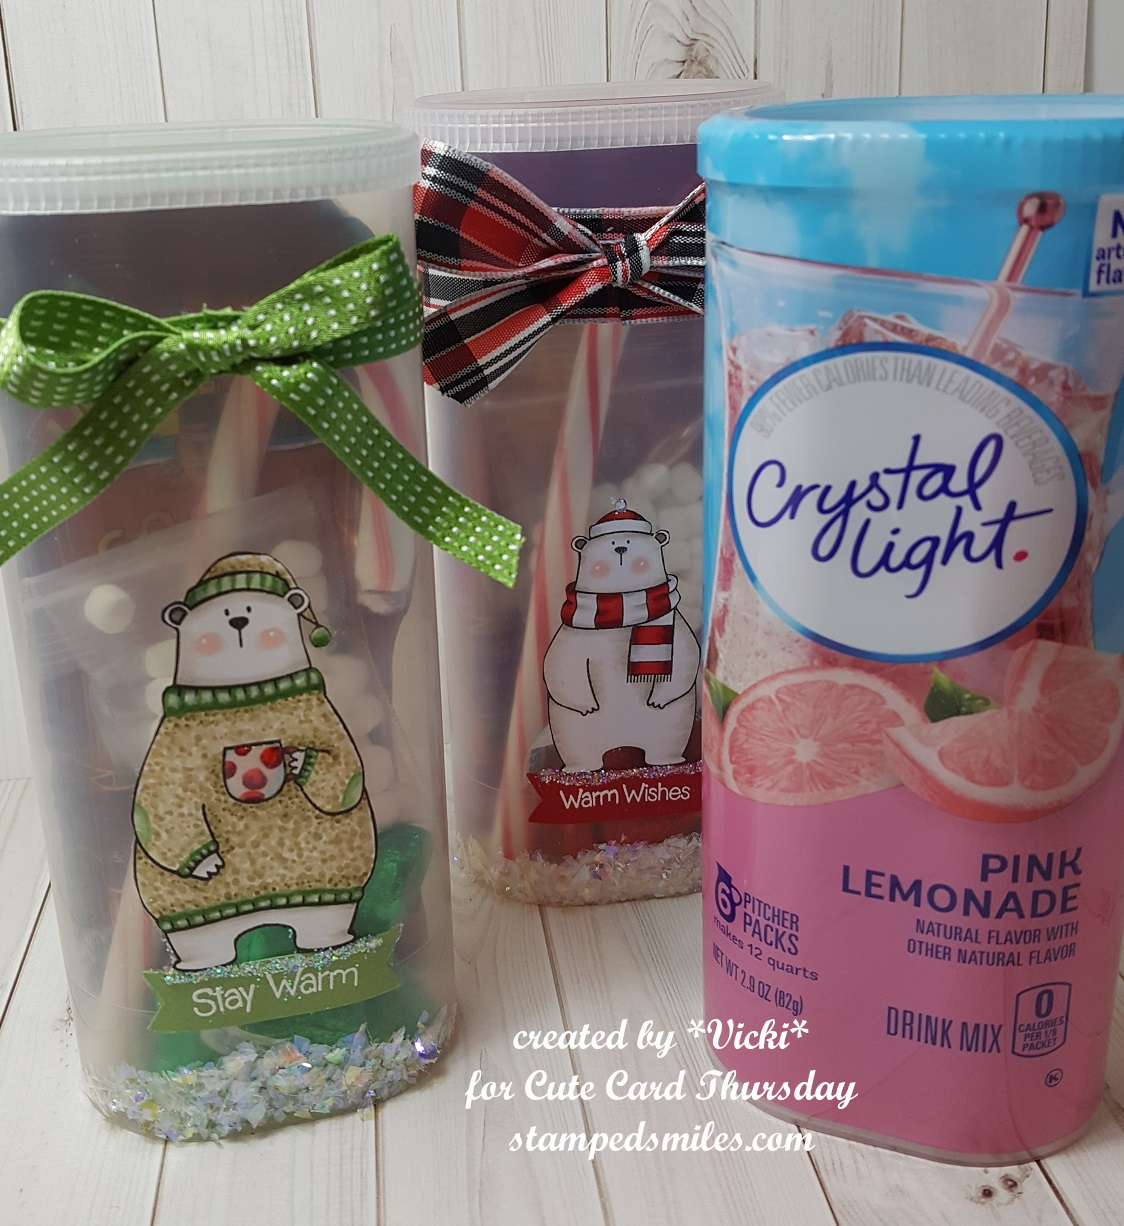
I haven’t made these for a couple of years, but I like to save those Crystal Light plastic containers and decorate them and use them as “gift holders” or like I have here for some “polar bear/snowman soup” containers!
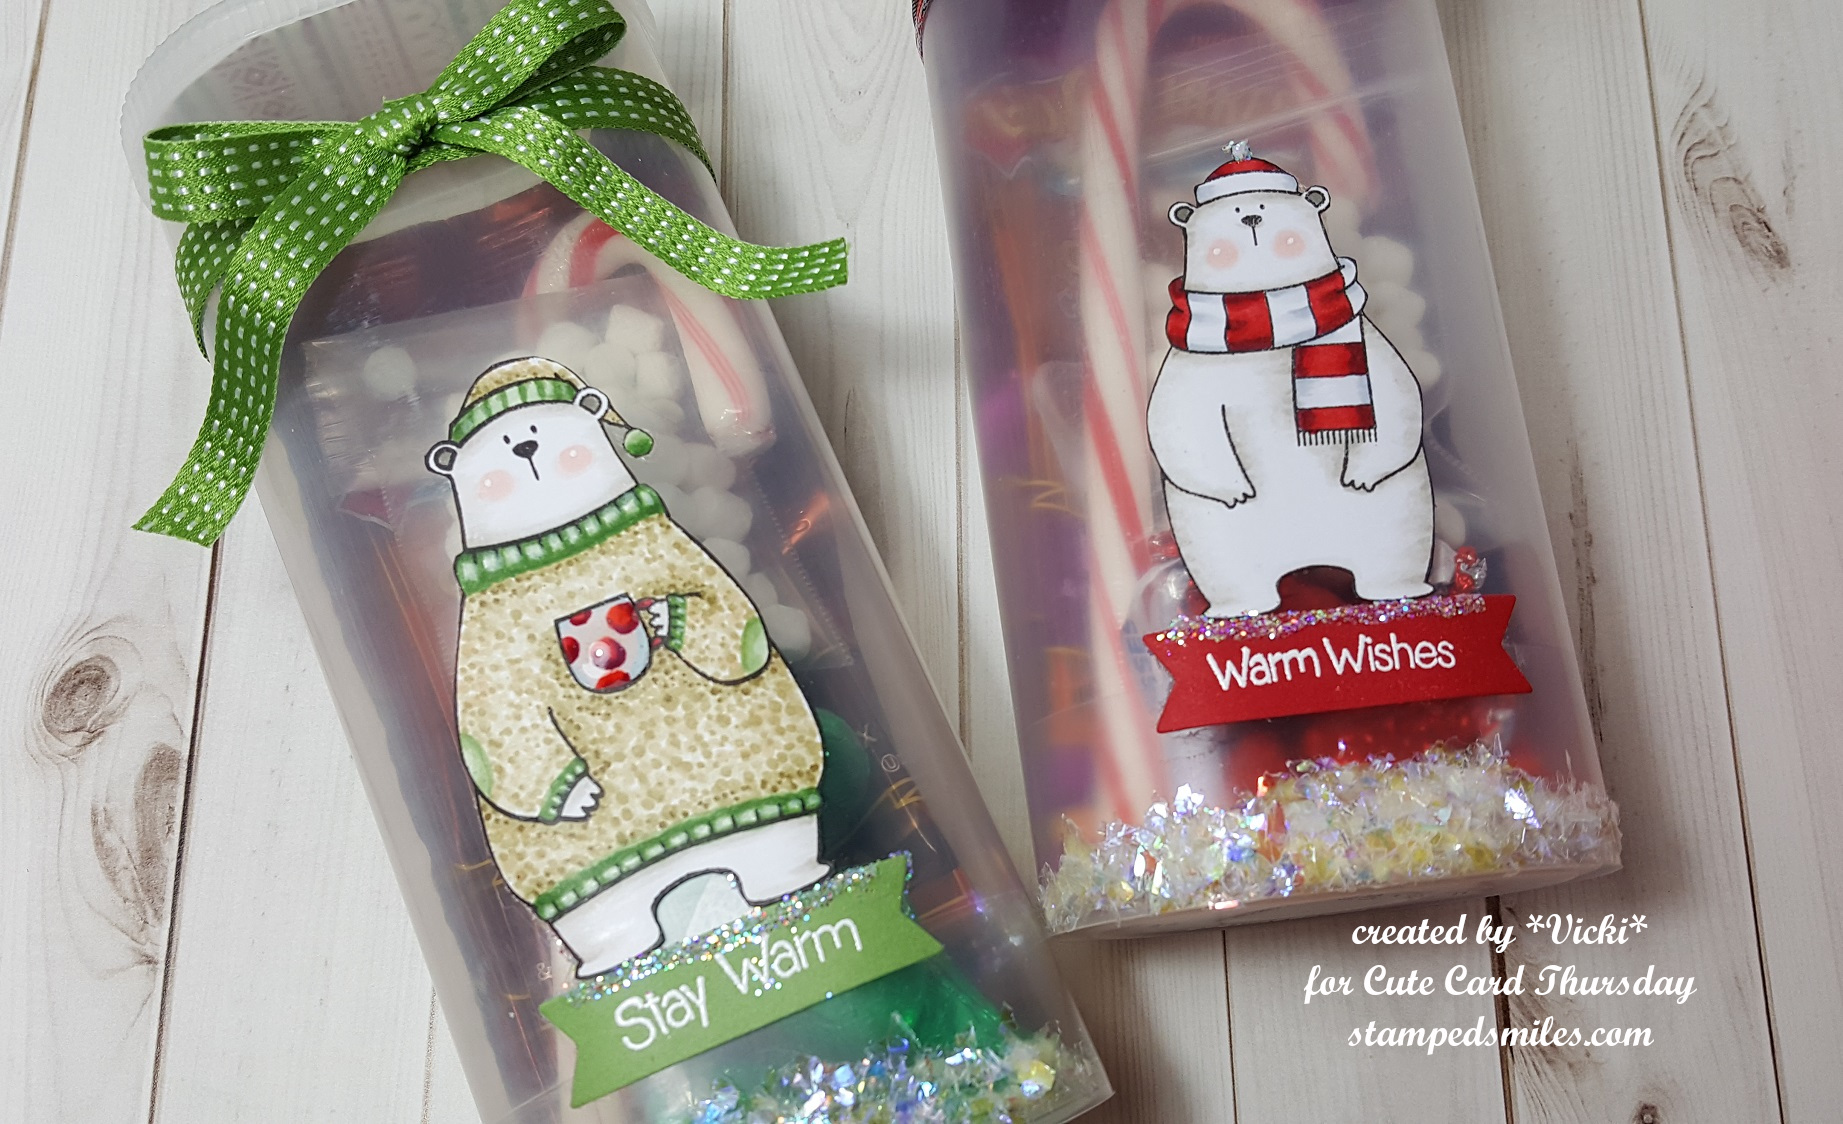
I try and keep the decorating somewhat simple, but I enjoy adding ribbon, glitter, etc. just for the fun of it! I’ve used an oldie but a goodie and my fave set from My Favorite Things called “Cool Day“. I’ve used both of the polar bear images and colored them in, fussy cut them out and attached to the containers. I’ve also white heat embossed the sentiments from the set and cut them out with a banner die for them to stand on. I found some matching ribbon that I’ve wrapped around the top of the container and then added the bow. Although I didn’t take a photo of the top of the lid, I’ve also cut out some matching pattern paper to decorate the top of the lid. I’ve used some liquid glue to add some faux snow at the bottom of the containers and then some glitter under the polar bears feet.
This is actually the first time that I’ve done polar bears for these. I usually use a snowman with the snowman soup poem, but since these were polar bears, I sort of changed out the wording to make it work with my design. LOL. I’ve just printed it up on the computer and added a coordinating mat behind it and attached it to the back of the containers. It slightly sticks out on each side, but I could always trim it down more if I wanted it to fit, but I was fine with it.
I just wanted to share a photo of the original packaging of these containers. I have my family save these up for me and I will create with them each year. I have about 10 of them saved up for now. As a crafter, we always keep our eyes peeled for something we can save and create with! 🙂
And here’s a closer look at the details of the polar bears. I used my Copics to color them. For the green one, I used the pointillism technique to create the look on the sweater. I also made the elbow pads and the circles on the mug. I covered the mug with some glossy accents. I added some glitter to the top of the hat on the red one.
Use Your Stuff – Mood board (inspired by the sweet treats, mugs and red/white colors!)
Double Trouble – Thing 1: My sweet treat is inside the containers! Thing 2: I used the mood board above from “Use Your Stuff” challenge! Thing 3: I used lots of “sprinkles” with faux snow and glitter!