R is for Ribbon

Hello friends and happy busy December to you!  It’s that time of the year and things start getting really busy with Christmas activities!  I’ve been working on lots of different things, but it seems hard to take the time out to photograph it and post about it! LOL  Maybe when things settle down a bit for me, I can post some of it!

Today marks another new challenge for the Alphabet Challenge Blog!  Our next letter is “R”, and our hostess Billie has chosen “Ribbon”.   I hope you will join in the fun with us!  (This will be the last challenge of the year until they start back up in January with the letter “S”)  *Please remember that this is a bi-weekly challenge, so you have two weeks to enter.*  Here’s the project I’ve made for this challenge:

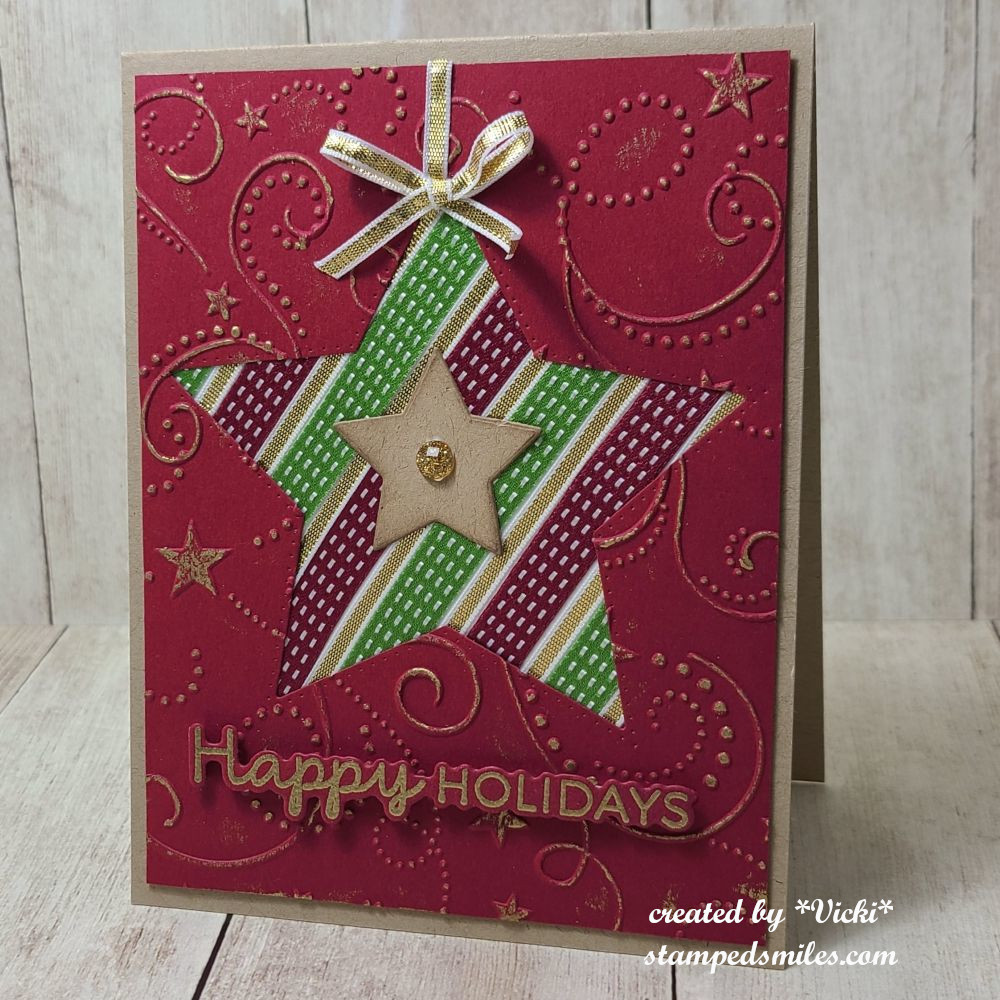
I really enjoyed making this one and I was very happy to pull some more items out from my stash to use up for this challenge!  Ribbon is something that I have so much of and don’t use it as often as what I used to!

For my card front, I took a red base and die cut a large star from it keeping in mind that I wanted to add a sentiment at the bottom.  I used an embossing folder and then rubbed a metallic gold ink pad over the raised areas to make it stand out a bit and set it aside.

For behind the star, I took another thin cardstock panel slightly smaller than the red star panel and covered it with double sided strong adhesive.  I then took some stitched ribbon in red and green as well as the thin metallic gold ribbon and layered them in a strip pattern over the entire panel.  I kept in mind where the star opening would be.  I then layered the red star panel over it and attached it to a top folding A2 kraft card base.

I die cut a smaller star in kraft cardstock for the center of the star opening and added a gold gem in the center of it.  I also took the thin gold ribbon and attached it from the top of the star around the red base and then added a bow above it.  Lastly, I just gold heat embossed the sentiment, die cut with the coordinating die and popped it up under the star with a foam strip.

  • Just a note that this will be my final project as a design team member for the Alphabet Challenge.  I have enjoyed working on this team and wish Caz all the best in the coming year for her challenges.  I appreciate the kind support.

I will try to get another post in before Christmas is here, if I can find the time to share the things that I’ve been working on.  I also have another art journal page to share before the end of the year as well.  Thanks so much for stopping by as I enjoy hearing from you!  Enjoy the Holiday Season as it approaches and take care of yourself.

Challenges:

  1. A Cut Above – Anything Goes with a die cut
  2. The Neglected Stuff – Old items (I’ve got not sure how old Stampin’ Up ribbon, old embossing folder and old star die cuts!)
  3. Crafts Galore Encore Anything Goes
  4. Creative Inspirations – ‘Tis the Season
  5. Fab ‘n’ Funky Christmas 
  6. Penny’s Paper Crafty Anything Goes Using Paper 
  7. Lil’ Patch of Crafty Friends Anything Goes
  8. Pammie’s Inky Pinkies – PIP2549 Anything Goes

February AJ Page-Explore

Hello friends!  Hope that you are doing well and staying warm and safe out there.  It’s been a few minutes since my last post, but that’s because I’ve been working very hard making wedding invites!  They’re coming together and almost done!  At some point I will share those, but today I have an AJ page to share with you!  It was nice to be able to take a break from creating invites to turning my mind on making a page.

**My crafty friend Carol is joining along with me each month to help inspire us both as well as others and I’m so thrilled to be doing this with her, so please click on her name and check out her page too!  We’re coming together as I think we both have an issue with “too much stash”…who doesn’t?!🙄 So I’ve come up with some ‘AJ prompts’ to help us both “Smash Our Stash” to start using it up for our own creative outlets and have some FUN!  The month of February gives us the prompt: ribbon/fibers/twine/thread

If you do any Art Journaling, then you know that sometimes when you have something in mind to do, it doesn’t always turn out like you think it will in your head!  This is the case with this one!  I like how it turned out and really enjoyed the process of it along with feeling good about using up some ribbon and twine overflowing in my stash!

I’m continuing on with making my own AJ book, so I’ve got the holes ready at the top of my 6″ x 9″ 140# watercolor page.  I like to use something really thick as I think it helps to hold all of the wet media/paint without it warping too badly.  

I’ve started by using a Tonic Studios “Falling Diamonds” stencil with embossing paste towards the bottom and not going all the way up to the top of the page.  I then used Salvaged Patina and Mermaid Lagoon Distress Oxide Sprays over top letting colors mix and run.  Once dried, I added some sponged white paint over a Tim Holtz stencil.  I then took some Ranger Ground Espresso paint and added some paint splatters over it, set aside to dry.  Then came my first introduction of the prompt onto my page.  I took some left over pieces of lace (in fact this was the last of this piece from my stash…why I kept it?  Who knows!!!) and glued it randomly onto the background.  Once dried, I added some water-downed Ground Espresso paint over those areas, sprayed with water and let run.  I also took the same paint and sponged around the edges to darken them up.  After it dried, I took some Art Alchemy “Old Silver” wax and rubbed over the raised areas of the paste and lace with my fingers until it showed up as I wanted it to.

I decided at this point, that I wasn’t going to do what I had planned in my head as I thought the background was going to turn out much lighter and brighter.  It turned out more antique/grunge, but I was still happy with it and just changed the plan a bit.  I don’t know what these are called, but I named them “Twine Twirls“.  I took a double-sided adhesive sheet and covered a piece of cardstock with one side, die cut a couple of different sized circles, took the backing off the other side of the adhesive and used some twine in my stash to continue to swirl around the center of the adhesive circle until reaching the edges.  (Do you ever get twine wrapped around one of your craft orders and save it?  That’s what all of this twine is from…can you believe I saved them and got plenty more to use?!!)  I then took a piece of VERY old ribbon from my stash and attached to the back of each “Twine Twirl”.  I laid these over the page where I wanted it and added an adhesive strip at the top of the page right below the holes to secure them as well as glued the back of the circles.  You can also see that I’ve attached some bows above 3 of the “Twine Twirls” too.  I used some Stickles glitter glue and brushed over top of each “Twine Twirl” and set aside to dry.

I also fussy cut out one of the Tim Holtz paper dolls to glue over one of the “Twine Twirls” and then used some foam tape to pop him up over the page as needed once the glitter had dried.

For the top of the page where I’ve added the “Twine Twirl” ribbons, I took another piece of lace that matched that ribbon and covered it over top of the ends.  Since it’s lace, you can see through it, so I layered on another piece of brown taupe ribbon in the center of that. (I’ve used scissors to cut the ends off the page.)

For the lettering, I used some of the items I used for the background page onto a piece of blank cardstock and then cut the letters out using the Taylored Expressions Cap It Off Alpha taking off the frame around the letters.  I glued the letters over top of the ribbon and then covered each letter with glossy accents.

The phrases come from a Tim Holtz “Clippings” sticker book and then I took a brown pen to outline around it.  I finished the page by adding some of the Tim Holtz stars adornments in random areas.

I really hope you’ve enjoyed our AJ pages today or have been inspired in some way!  Be sure to join us next month too!  Thank you so much for dropping in and I’ll see you soon!

Challenges:

  1. Art Journal Journey – What’s Your Style? (I love using stencils most of the time but enjoy “exploring” different medias too!  Not sure about a specific style…I like them ALL!)
  2. Simon Says Stamp Monday – Art Journal
  3. Try It On Tuesday – Add Some Texture
  4. Creative Artiste – #79 Anything Mixed Media Goes
  5. Mixed Media Lovers – #10 Anything Mixed Media
  6. Arty Divas – Anything Goes
  7. Simon Says Stamp Wednesday – Anything Goes