Merry Christmas Makes PLUS GIVE AWAY!!!!

Hello friends!  Just wanted to pop in to wish you all a Merry Christmas and to share some final Christmas creations that I’ve made basically within the last few weeks!  Some of these are cards that I’ve sent friends and family and some are recent makes for Craft Roulette challenges.

  • Scroll below this post to see the give away!

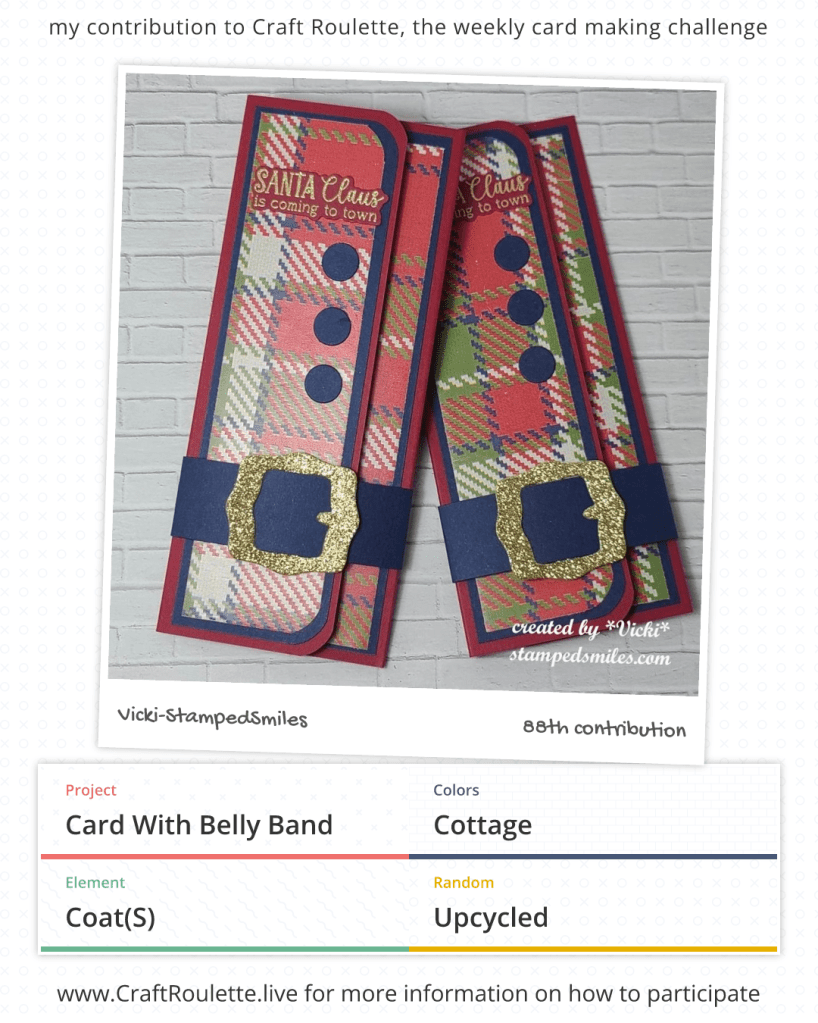
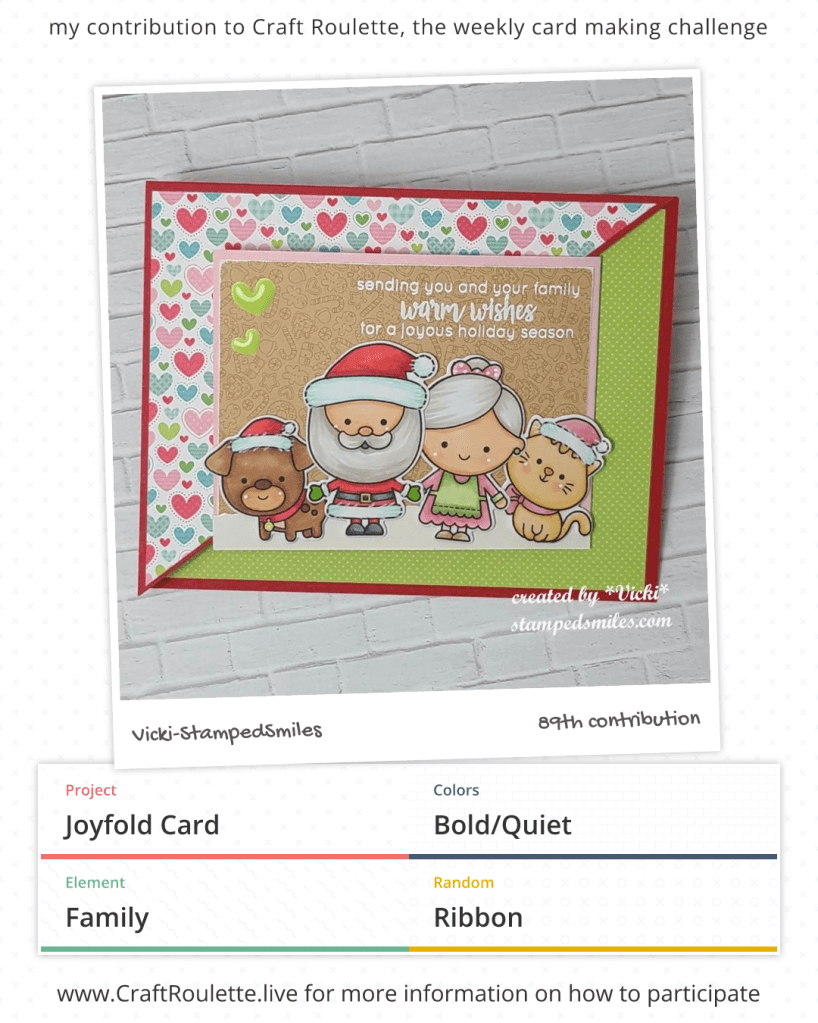
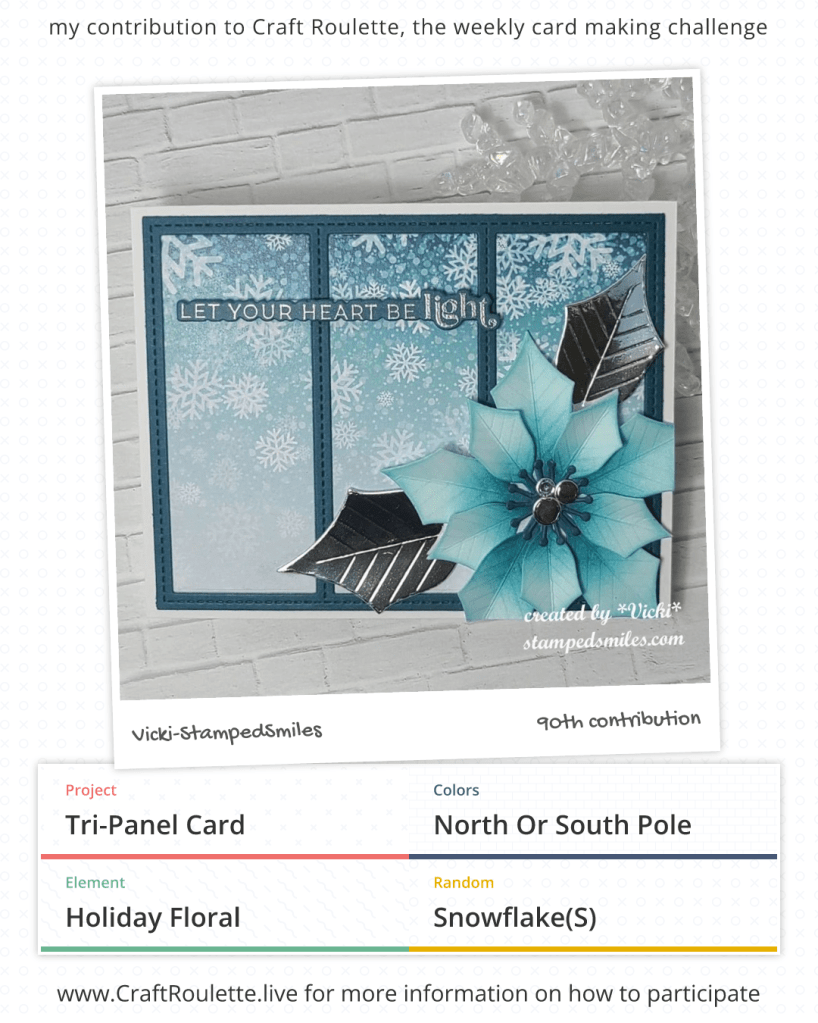
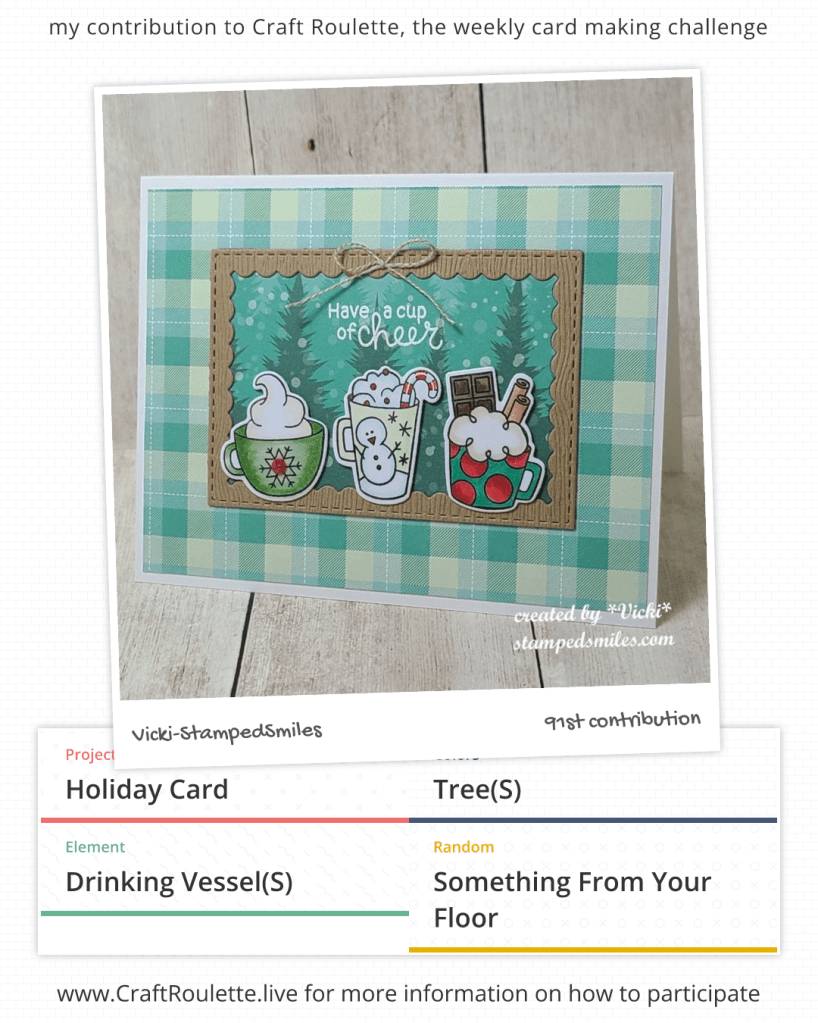
First up are the last few weeks of the Craft Roulette challenges:

(I got out my stretchy pants to play along!)😉

(These are money holders for Christmas with recycled wrapping paper)
(This is a diagonal joy fold card design)
(Tri-Panel Card for me was 3 layer panels on the front! LOL)
(Always stepping on those tiny gems on my floor!)

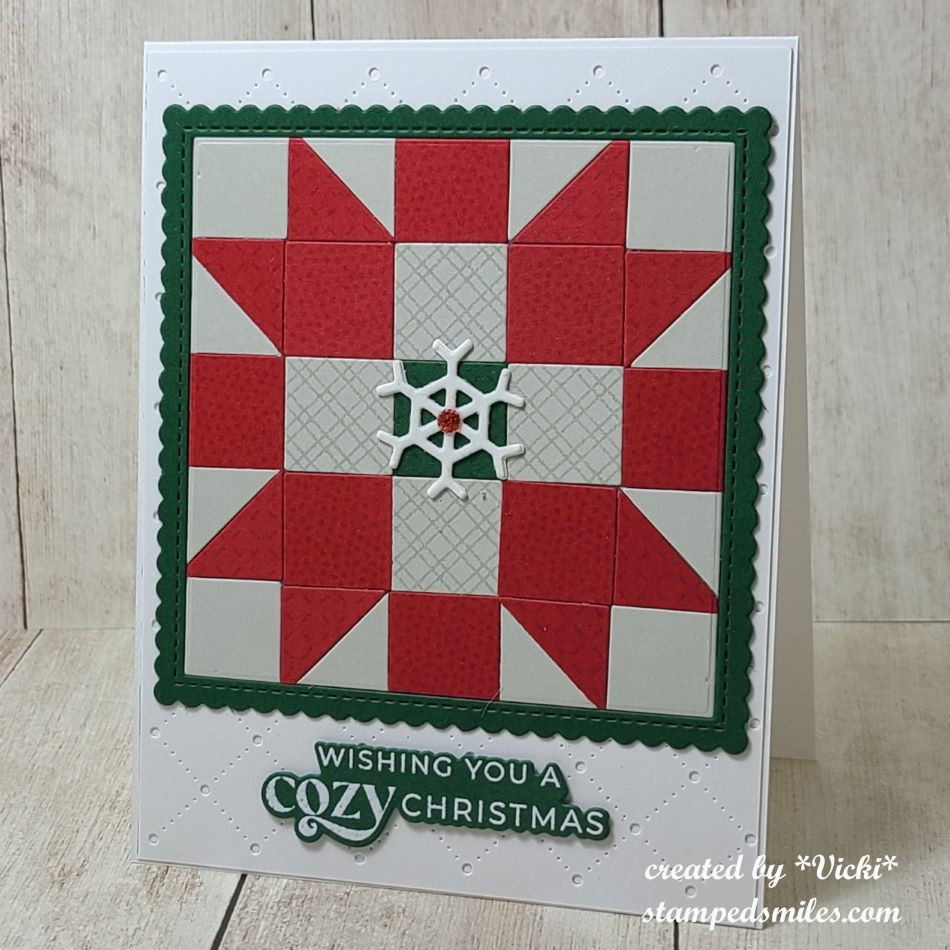
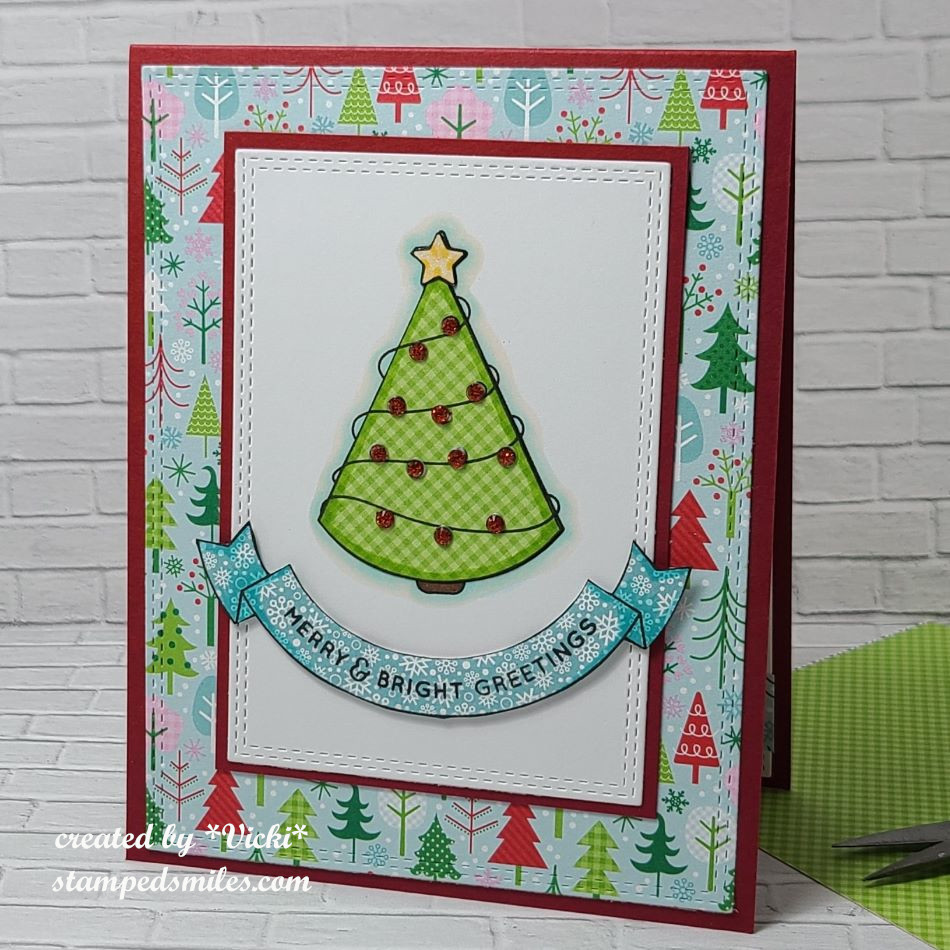
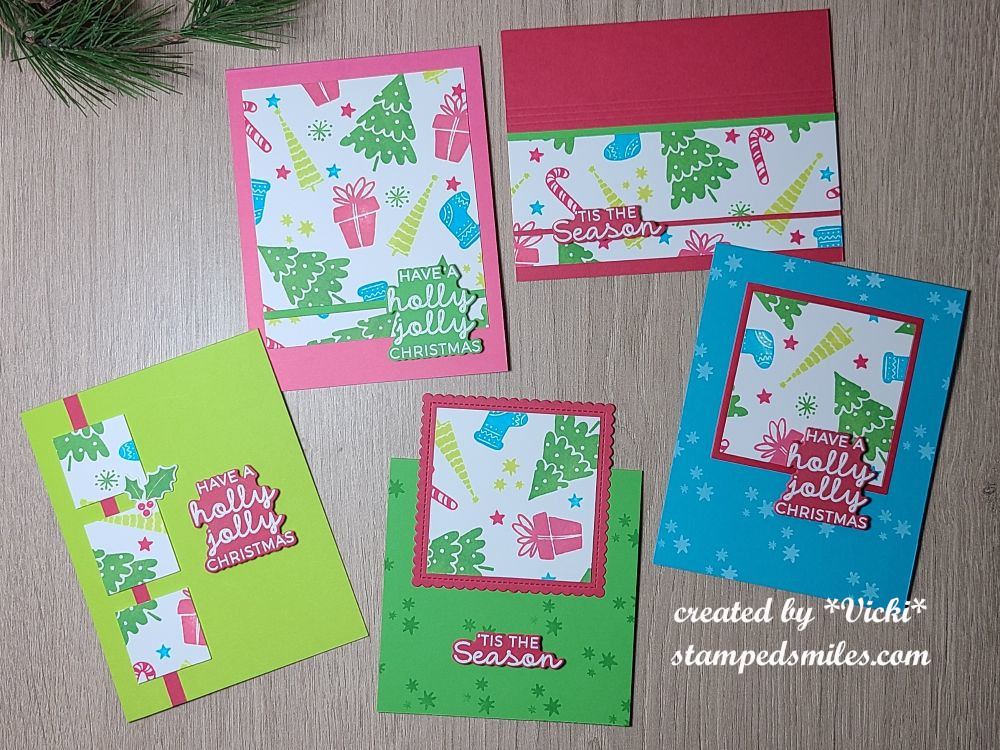
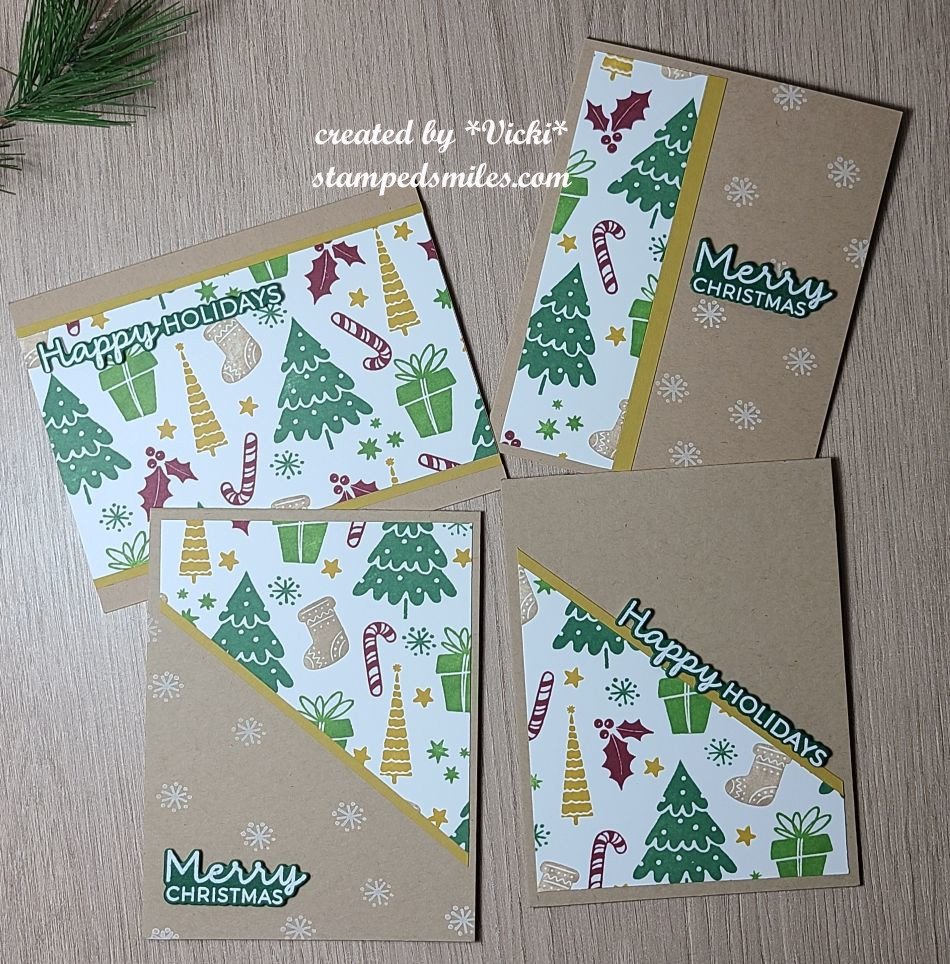
Hopefully the next several cards have been received by everyone they were sent to, but if not, maybe the surprise will be which one you will get!  I don’t like making several at one time, so I’ve split up the design in sessions using the Taylored Expressions Make It Merry Stamp Set along with the Happy Half Sheets: (I’ve made my own “map” with the images)

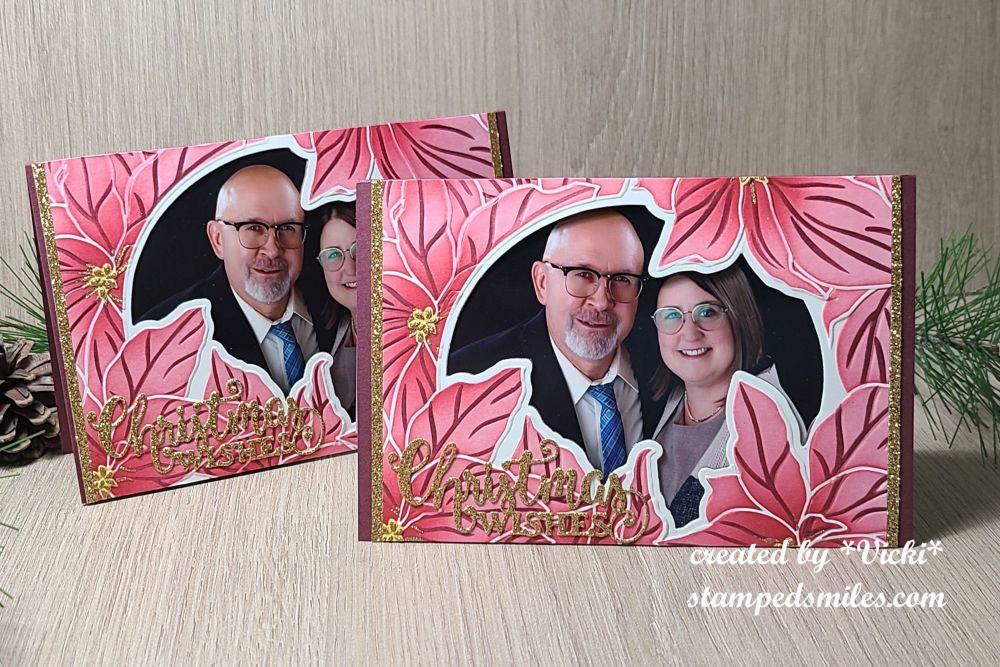
Lastly, I’ve made several of these photo frame cards using the Lisa Horton Framed Poinsettia Stencils/Die/Embossing Folder: (Using a photo recently taken for our 25th wedding anniversary)

Hope you’ve enjoyed all of my Christmas projects this year and a very special thank you for being apart of the crafting journey with me!  I’m so thankful for the friends I’ve met along the way! 


ALERT!!  GIVEAWAY!!

Since this is the season of giving, I would like to  gift someone that would like to receive this set that I have collected myself (over the entire year as an extra) to give away to someone:

Vicki-December2024-giveawayVicki-December2024-giveawayback

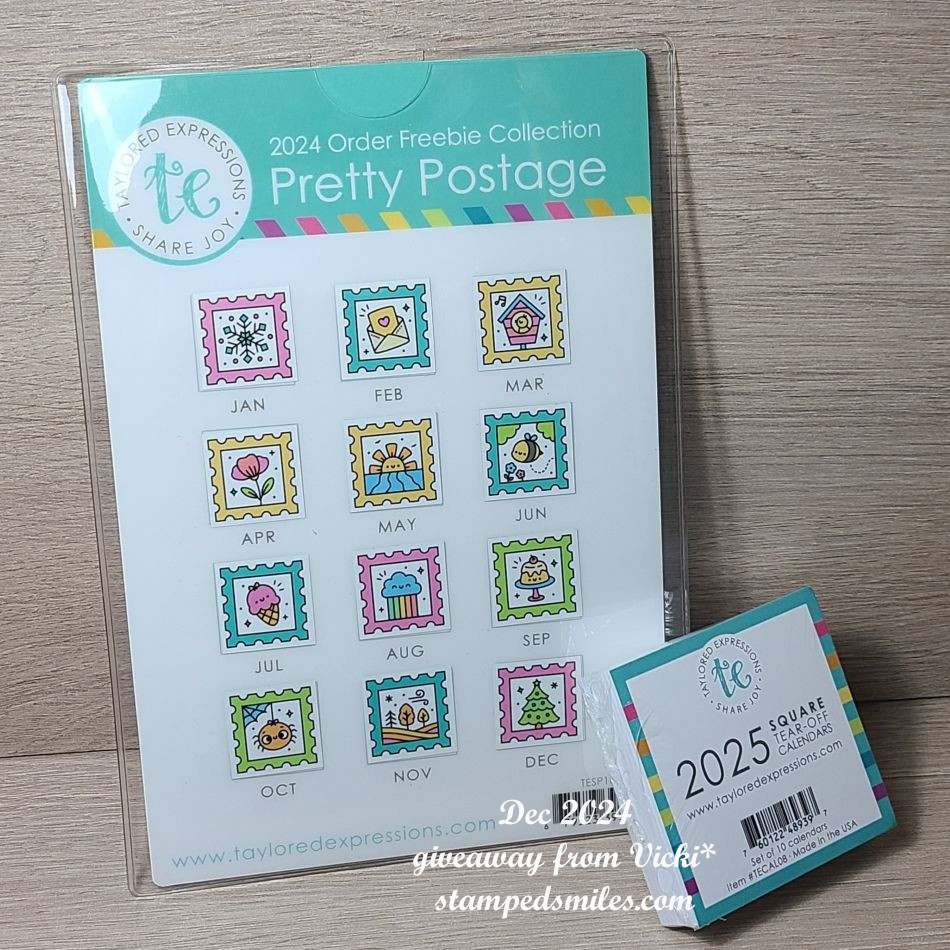
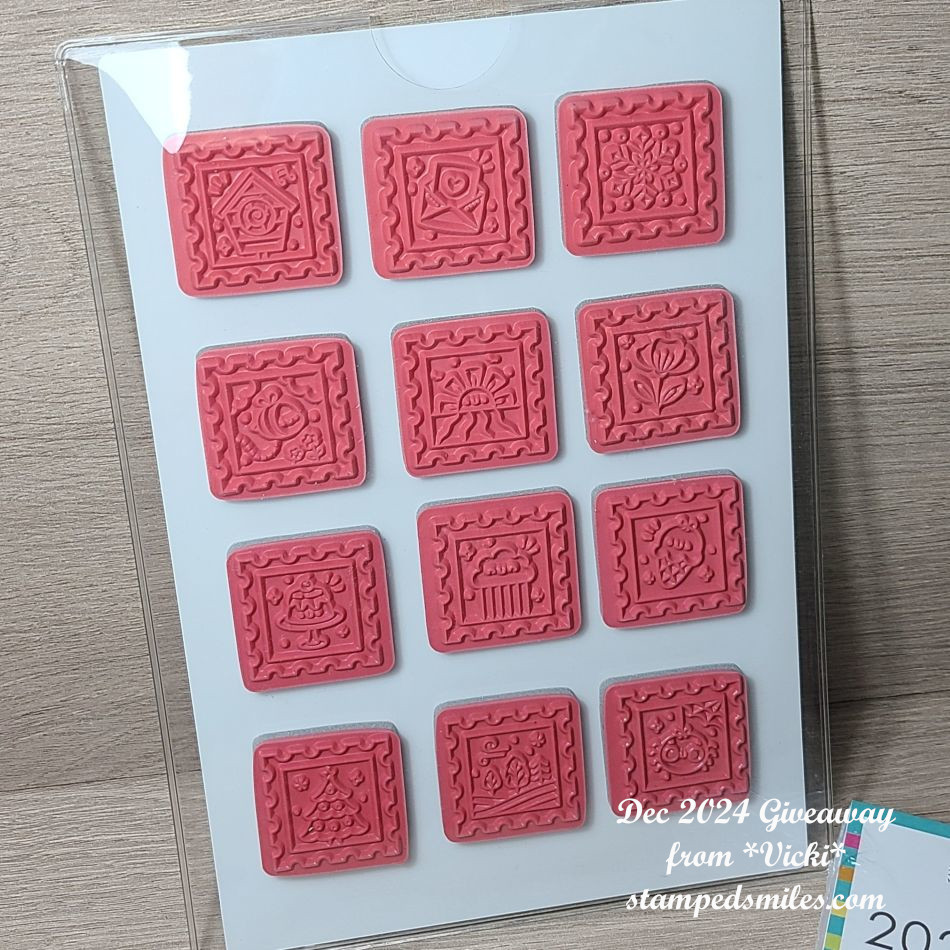
If you’re NOT familiar with Taylored Expressions, this is a collection of the “freebie” rubber stamps that a person receives when placing an order. Each month the stamp image changes to something else.  I have not only collected a set for myself, but I’ve also collected another entire set (12 rubber stamps) to give to someone else that would like one!   I have included the sturdy laminated Collection card, in addition,  a sturdy plastic sleeve in which to store it all in.  Plus, I’ve also included a set of 2025 tear-off calendars in a package of ten to go with it!

You can purchase these in the store here under the Pretty Postage Collection, but I’m giving them all away in one set for the entire year as I’ve collected them.  I did NOT include the Pretty Postage die set that cuts out the images, but you can purchase your own by clicking on the link.

  • If you are interested in this give away from me (no affiliation with any company), please just leave me a comment below to tell me that you’re interested in the give away.  THAT’S ALL YOU NEED TO DO, BUT YOU HAVE TO TELL ME IF YOU’RE INTERESTED IN GIVE AWAY!   
  • You will need to leave your comment below by January 3rd, 2025 to enter.   I will announce here on my blog who won by January 5th, 2025. (The winner will need to be in contact for mailing out prize.)
  • P.S.  If you have been collecting and looking for one you’re missing, let me know which month and I’ll see if I have it as I have several months that are extras! (I know that I do NOT have any August left, though.)

Just wanted to send out a little Christmas cheer to a crafty friend!  It doesn’t matter where you live, I will be happy to mail it out…so please don’t let that stop you!  It’s just a special gift from one crafter to another to enjoy!

Thank you for making my crafting journey a special one and for joining me here to share inspiration with one another!  Looking forward to more in the coming year!

Wishing you and yours a VERY Merry Christmas with lots of joy and love! 

(I will be back after Christmas (Saturday) to share an art journal page with you!)

Mix it Up With Paper Piecing!

**THIS IS POST TWO OF TWO FOR TODAY!  SCROLL BELOW TO SEE MY POST FOR THE GDT CREATIVE ARTISTE.  THANK YOU!**

Hello friends and a happy November!  I think that the last two months completely flew by and here we are getting closer to the end of the year…what?!  I hope that you look forward to happy times ahead and lots of crafting fun too!  I’m thankful you’re here with me, so let’s get this month started.

Today begins a new challenge over at the Mix It Up Challenge Blog and it’s always “Anything Goes with an optional theme“.  The optional theme this time is “Paper Piecing“! (This challenge is open for 6 weeks, so you have plenty of time to enter!)  Here’s what I came up with using this theme:

I absolutely love the look of quilts, but I like to keep my making of quilts done with paper!  So I thought this theme would be great for making a quilt pattern design for Christmas.  I normally paper piece stamped images, but I wanted to do something different this time and pull out more stash items and use them!

Several months ago, I purchased a card kit from Taylored Expressions called “Pieced Patterns” and I loved the concept of cut out squares attached over a “map” to follow along on how/where to place the squares.  It’s really easy to piece different colors/patterns together to make a design.  Some squares were also cut diagonal and I stamped a tone on tone pattern over some of the squares before they were cut out.  Then they were placed over the “map” design and cut out with a square die.  I also cut the stitched scallop frame to go around the square pattern.  I die cut a white snowflake twice to layer in the center of the pattern and added a red gem in the middle of it.

I attached the paper pieced pattern over a white card front that was cut with the Taylored Expressions Pierced Lattice Cutting Plate that was then attached to a top folding A2 white card base.  For the sentiment, I white heat embossed it from the Taylored Expressions Jingle All the Way stamp set and cut it out with the coordinating die.  It was popped up at the bottom with thin foam tape.

I can see this might be fun with several different squares cut out ahead of time to place over the different “map” designs to create multiple design patterns ready for cards!  It’s just a matter of taking the time to cut out all of the squares.


I have decided to create a “bonus” card using the same “paper piecing” technique, but with a stamped image this time…as we all need more Christmas cards, right?!  

For this card, I pulled out an older card kit from my stash (2016) and used the Doodlebug pattern papers that was included with the kit.  The papers are too cute not to use and hoarding them is not a good idea! 

I stamped the tree onto a stitched white rectangle, then stamped the tree, star and banner over some of the pattern paper, carefully cut it out and attached it to the stamped tree and white panel.  Before I attached the stamped pattern pieces, I used my Copics to color in the tree stump and outline around the tree.  I also added some details to the pattern pieces for shading as well.

 The banner was popped up with foam tape and I attached all the layers together over a top folding red A2 card base. All the cardstock/papers were included in the kit. I’ve added some red rhinestones on the tree where the ornaments were to finish it off.

Anyway, hope you’ve enjoyed all of my projects today and I hope you will take some time to check out the challenge blog to see what the other talented designers have made.  I look forward to seeing what you make!  Have a great day!

Challenges:

  1. Inkspirational – #327 Seasonal (Winter/Christmas) 
  2. Pammie’s Inky Pinkies – PIP2443 Anything Goes
  3. Cardz 4 Galz – #237 Showcase Your Patterned Paper (second card)
  4. Crafty Catz – #681 Anything Goes with optional twist: use dies/punches (top card, but dies used on both of them!)
  5. Lil Patch of Crafty Friends – #240 Anything Goes
  6. Penny’s Paper Crafty – #583 Anything Goes Using Paper

June Art Journal Page-Finding Happiness

Hello friends!  Happy weekend!  I hope you’re enjoying yourself with whatever you have going on.  It’s hard to believe that it’s almost time for us to celebrate the 4th of July holiday! 

We’ve been having higher than normal temperatures this time of year and you never really know if that humidity is going to circle back up in the air to create a thunderstorm.  Nature can be a wonderful thing though, and this is what the focus is for my page.

  • It’s time for the monthly Art Journal Page collaboration with my crafty friend, Carol (from Crafty-Stamper)! We get creative trying to use up our never-ending stash piles along with a prompt for each month.  I know she always has great inspiration to share, so please check out her blog too! Here’s my AJ page with the “SMASH OUR STASH” June prompt of “DISTRESS”-(rough up/sand/rip, etc): 

So taking this approach with the prompt of “distress”, I thought it called for green colors and lots of nature collage type elements from my stash!  I have tons of those Tim Holtz ephemera packages, so I pulled those out along with distress oxide sprays.  I haven’t used those in quite a while.

For the background:  I started with a 5.5″ x 8.5″ (pre-punched holes with the Bind-It-All machine) very heavy weight canvas paper.  I started with a couple of pieces of ripped printed papers and distressed/inked the edges of it with Vintage Photo Distress Oxide ink.  I then took a Tim Holtz stencil and randomly applied paste over it.   After the paste dried, I placed the panel into a box and sprayed it with variations of water and distress oxide sprays in Peeled Paint, Rustic Wilderness, Fossilized Amber and Vintage Photo.  I added water and dried with my heat tool after each color until it was blended as I liked.  I took off the Vintage Photo cap and splattered a few drop with it.

Before applying the ephemera pieces, I had a solid fern stamp that I randomly stamped with Rustic Wilderness Distress Oxide ink.  I also stamped a few of those “rain drop” images randomly in the center of the page with black waterproof ink.  I removed the background color out of the images with a watercolor brush and then added back in a touch of blue color from an ink pad lid.  I used a white gel pen to add a highlight and covered the drops with a glitter brush pen.

Finishing the page, I’ve stamped the bug and magnifying glass, colored them in and added some acetate behind the magnifying glass, I ripped, sanded and distressed the edges of the page, the card behind the bird and randomly over the background.  Before attaching the pieces, I took some white pearl wax and rubbed over the stenciled paste areas.   I also sanded around the edges of the black sentiment strips.  I attached all of the ephemera pieces and popped the card and butterfly pieces with foam tape.  I added a safety pin to the card and glitter to the tops of the flowers in the corner.  (hard to see in photo)

  • The sentiment at the top reads:  if you want to find happiness, find gratitude.

Another prompt I worked on with this is the challenge over at Art Journal Journey which was “What Makes You Happy“.  So although nature helps with happiness for me, I find that happiness is multi-faceted with the purpose being exactly what the sentiment says.   I thought it went perfectly with this page.

Since my husband is retired and we now have time to take little road trips here and there and sometimes stop along the way to find an interesting trail or nature walk or park to explore.  We’ve had some great times doing this and I love being out in nature especially among the trees after a gentle rain.  The smell and coolness in Autumn are fabulous for this!

 Click on a photo to enlarge it if you’re on my website:

This was quite a wordy post, but I hope you’ve enjoyed my inspiration today and how it was inspired.  Thanks so much for joining me today and please check out Carol’s blog too!

Challenges:

  1. Art Journal Journey – What Makes You Happy
  2. Creative Artiste – #105 Anything Goes Mixed Media
  3. Anything Goes in a Card Free Zone – June challenge ATG
  4. A Place to Start – Anything Goes optional:  Anything but a card
  5. Paperminutes – #852 Stencils

Masculine Makes

Hello friends!  I hope you had a great weekend!  It’s been record heat and continuing to be all this week over my way and it’s way too hot to be outdoors for any length of time!  So I thought it would be nice to bring the outdoors to my craft room instead.

I wanted to share the card I made for my husband for Father’s Day:

My husband is an outdoor type and where he prefers to be most of the time.  We really have fun going hiking and visiting parks whenever we can and this seemed like a great start for making a card for him.

I’ve used several Taylored Expressions items for this card including:  Great Outdoors Layering Stencil & Clear Combo, Through the Woods, Wood Slice Background Stamp, and Hello Lovely sentiment set to make this card along with an entire set pictured below.

For the background:  I stamped the Wood Slice stamp over kraft cardstock (along with the envelopes to match) and then I splattered some black and cream color paints over them.  I took the panel cut the Ridged Circle Stacklets into the background.  I wrapped some twine around it and attached them to an A2 side folding black card base.

The stencil creates four different scenes all at once by layering the stencils with colors you choose and then you cut each one out.  I layered mine over black cardstock and attached to the kraft card front panels.  I stamped the trees and sentiments and also added those to each card with some of them being popped up with foam tape.

Here’s what the rest of the cards look like using the same products.  I changed up the scenes for each one but using the same colors for each stencil layer.  I changed the sentiment so that I have a masculine card for several different occasions too.  There are lots of males in my family to send cards to and I always seem to run out of them.

Thanks so much for stopping in today!  I appreciate your kind words and taking the time out of your day!  See you soon!

Challenges:

  1. Cardz 4 Guyz – Father’ Day
  2. Addicted to Stamps & More – Die Cuts & Stencils #470
  3. Crafty Catz– Make it Masculine #674
  4. Cupcake Inspirations – For the Guys #596
  5. Allsorts – Masculine or Anything Goes #785
  6. Papercraft – For the Boys