Hello friends! I hope that you’re having a wonderful week so far! We have officially started Spring over my way and now I’m just waiting for the weather to warm up to match it. I’m looking forward to being outside with the flowers!
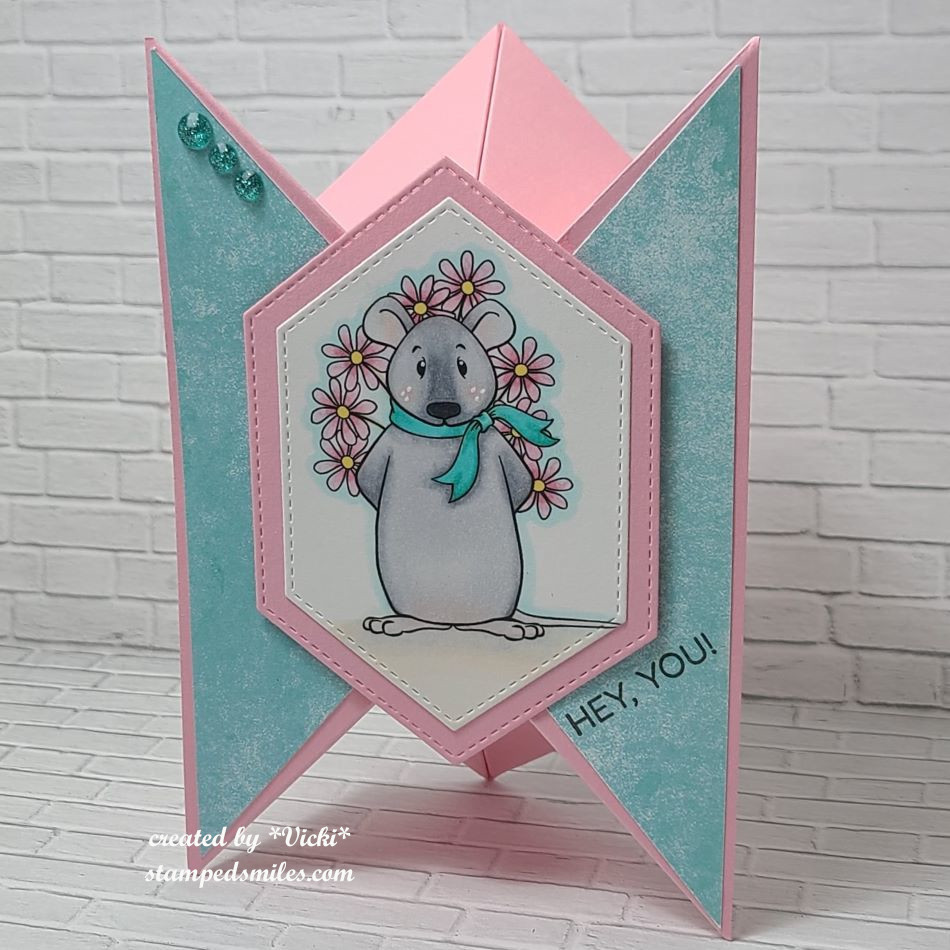
Speaking of flowers, I saw this really cute image over at Beccy’s Place and wanted to play along, so I printed it out and colored it, but didn’t quite know what I wanted to do with it until I saw Beccy’s tutorial – Tricorn Fold Card: (click name for her tutorial)
Isn’t this so fun!? I thought it was such a unique design that stands up, but also folds flat for a 4×6 card size. I usually make an A2 (5.5″x4.25″) card size, but I can also easily create my own envelope for any size too. It was a bit tricky at first and I messed it up because I put the scores going in the opposite direction, so I had to start over. I wasn’t confident enough to figure out the mat layers of all the angles, so I just added some pattern papers to the largest two panels and then placed blank white on the back of the card for a message.
I also found a stitched hexagon layering die in my stash that worked out for the design which is what I used to cut out my colored mouse and layer behind him. I found a sentiment that worked well for the space I had on my card and then finished it with a couple of teal rhinestones I had laying on my table. It was fun to create, and it will also be great to send out too!
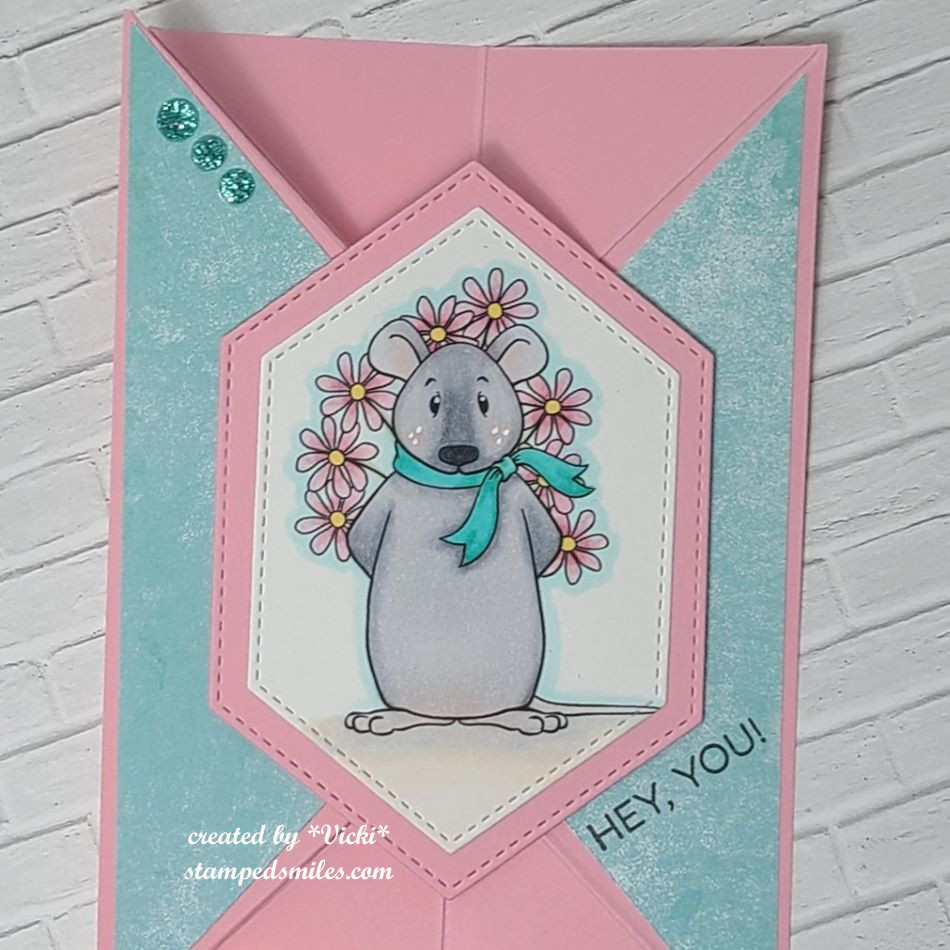
Here’s a closer view of the colored image that I’ve done using Copic markers. I did add a few white dots to his cheeks with a white gel pen as well as the center of his eyes.
I have my card lying flat so you can see that it will fit inside an envelope for mailing. It does spring back up, but I think that’s what will be great for a recipient to pull out of the envelope to see that the card stands up by itself.
Thanks for dropping in today and I hope you’ve enjoyed my card!
Challenges:
Beccy’s Place – March Monthly Challenge optional Bingo (Not sure if the flowers in the image qualify, but if it does then I used the center across row)
Hello friends! Hope your week is getting off to a great start. I can’t believe that January is over and we’re starting a new winter month already, but at the same time I’m already feeling like this cold weather can move along faster to Spring!
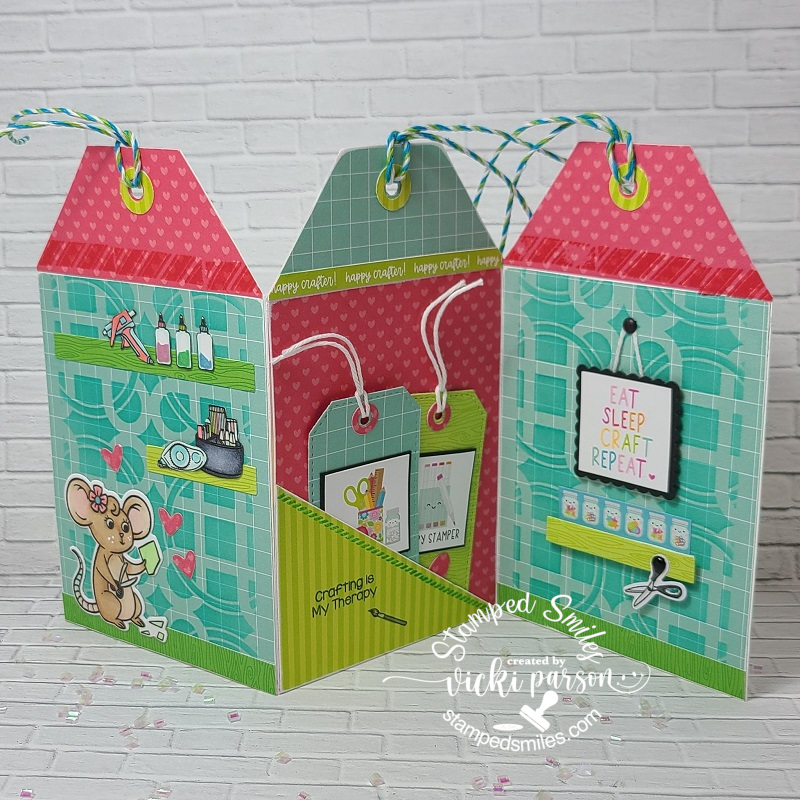
Today I have a couple of creations that I’ve made using those Inky Stamper products and playing a little “Craft Roulette” too! Chelsea was on Craft Roulette and if you’ve never seen it play out in action, take a look at the You Tube channel to see what it’s about! She was on episode #146 and here’s my card that I’ve made with her perimeters:
I had so much fun with this and I’ve never made a tag shaped accordion card before, but it was stuck in my head to give it a try and pull out the Inky Stamper Craft Room set to create it. The “Roulette Wheel” spun on: Double Tags, shelf/shelves, 2 shades of green and something in the background.
The two shades of green were easy with using the Doodlebug Paper Packs and adding in a few other greens to the coloring. I’ve also made two tags and placed them inside the pocket area in the middle of the accordion design. I used a stencil in the background of the other two panels and of course I added some crafty goodies to the shelves in Rosie’s craft room! The accordion card was easier than I had anticipated and just made a mini slim line size design by cutting off the edges to create the tag shape. The hole and reinforcers were made using punches and dies. You can see that I’ve colored up, cut out “Rosie” in her craft room where she is cutting her design going through her creative head!
When it’s all folded up and closed, this is what the card looks like. I could always add a sentiment on the back, but I thought this would be fun to send to a fellow crafter for sure! I just wish my shelves looked this organized! And I always try to use another thing from my stash as I pulled out lots of twine that gets thrown in a bin, so it was nice to use for the tops of each tag area. (Maybe on the back of the card, the crafter can add items to use up on their next project and display it! LOL)
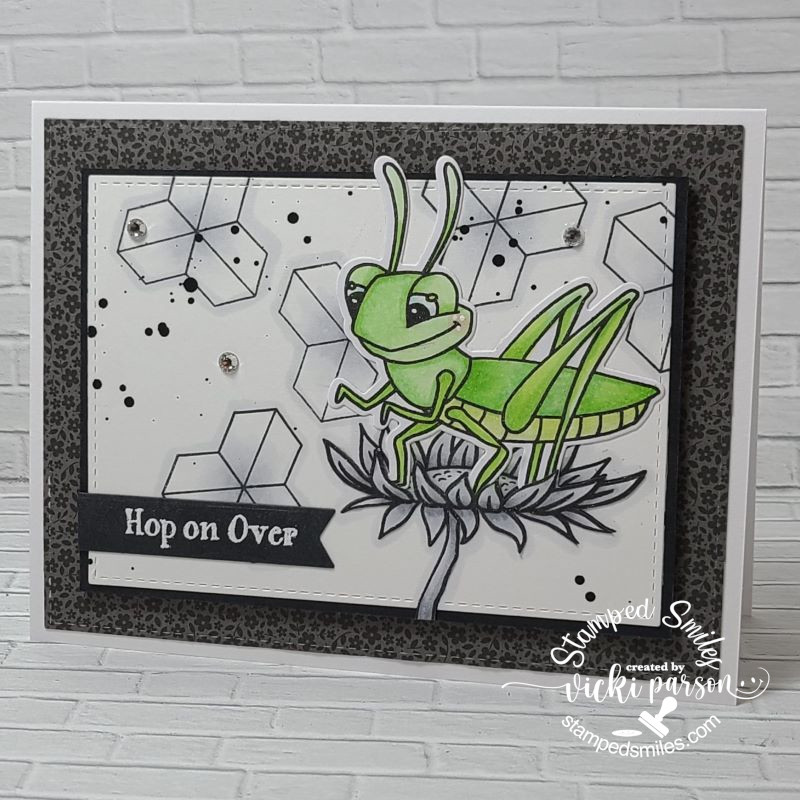
And here’s another card that I’ve done for the January challenge on the Inky Stamper Inkspiration FB Group which was to use: Black, white plus one other color:
I decided to pull out the Grasshopper set and make everything in the background black and white, but just color the grasshopper in green. All of the elements including the sentiment came from the same stamp set. I splattered some black paint over the background and the images were colored with some cool gray Copic markers. I white heat embossed the sentiment over black and cut it out with a banner die.
Behind the white panel, I took a piece of the black floral paper from the Doodlebug Floral & Graph Paper Pad and attached that to a white top folding A2 card base. It was a fun and easy card to put together!
Thanks so much for “hopping” over here today! Hope you’ve been inspired or smiled!😊
Hello friends! I’m really excited to be sharing some more inspiration today as a guest designer this month using some brand-new Inky Stamper stamp sets that were just released! Stop by the store and check them out…they’re so cute!
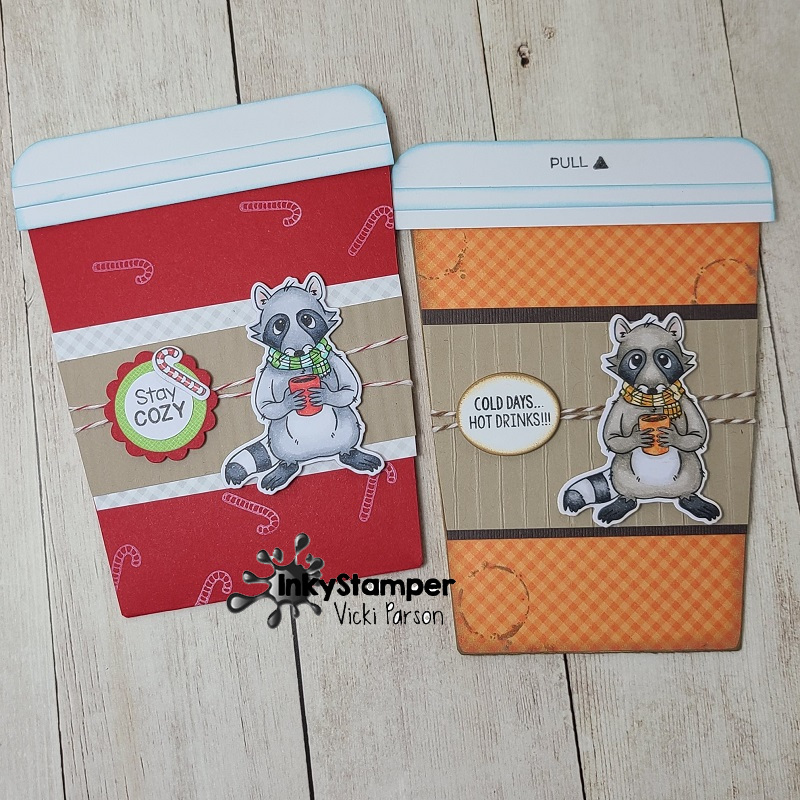
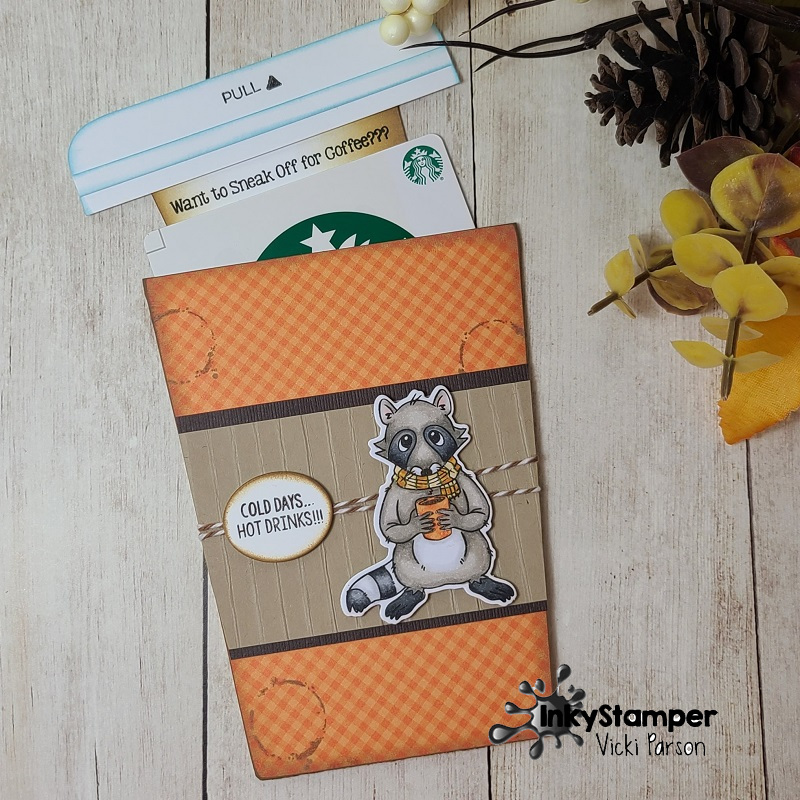
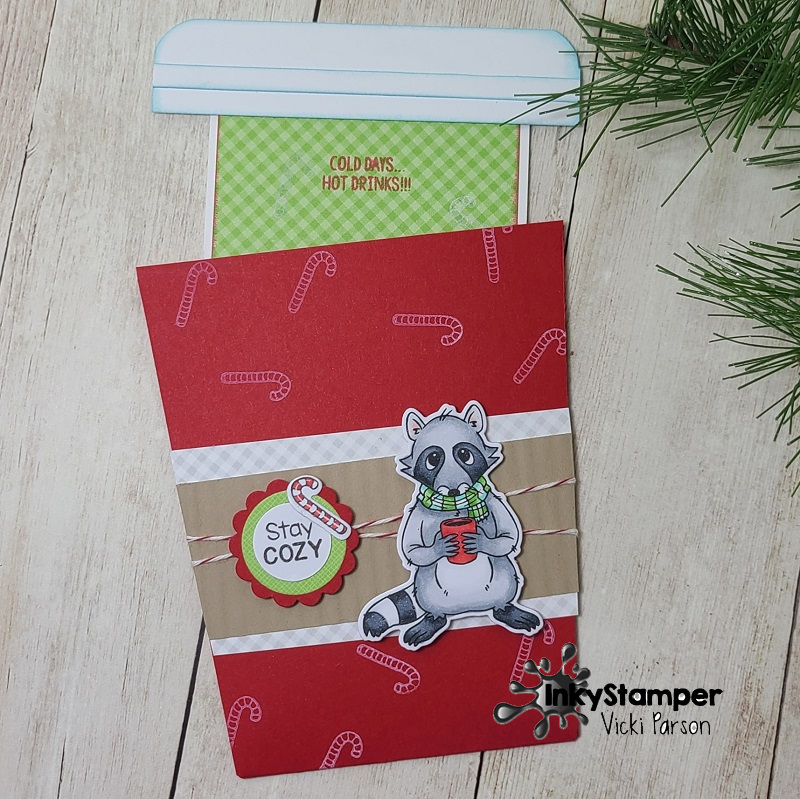
First, I have a couple of shaped interactive cards for those warm drinks as the temperatures start to cool down. I made one for Autumn and shared it in the Inky Stamper FB Group and was asked how it I made it, so I thought I’d share that one along with another Christmas style version that I made too:
Aren’t these so cute with that little raccoon from the Inky Stamper Warm Beverages stamp set?! The one on the right is the one I made with Fall colors covering the front of the cup with the Doodlebug Gingham/Linen paper pad. I also used the Doodlebug Bon Bon Twine around the cup sleeve.
The cup on the left is more Christmas themed and I’ve used pretty much the same products, but just changed up the colors a little bit. This cup is slightly different because it’s about 1/4″ shorter so that it would properly fit inside an A2 envelope. The Autumn card was a bit snug, so I tweaked the size a bit more on the Christmas to make it fit nicely.
When you pull the lid off the top of the coffee cup, there is an insert with a greeting and/or a place where you can add a gift certificate. These were so fun to create and easy to do! Mass production could be possible for sure!
All that is needed are some measurements and a few tips along the way to get you started. I thought it would be easier to understand with a video, so check that out below or watch on You Tube HERE.
I also had a birthday card that I needed to make for someone, so I thought I’d pull out the new Inky Stamper Hippo stamp set and have some fun with it!
Aren’t these party animals so cute?! I thought this one would be fun to turn into a polaroid style, so I pulled out a square die to create my own polaroid frame with it! I also cut another one in black cardstock so that I had a bit of dimension with it. I stamped the sentiment from the set at the bottom of the frame.
The background behind the Hippo was created by white heat embossing the music note image from the stamp set over some Inky Stamper Watercolor Panelsand then using some watercolors for an emboss resist background. I colored up the Hippo, bird and party hat and cut them out to arrange over the background. I added a couple of pieces of the Doodlebug Grey Swiss Dot Washi Tape over top of the Doodlebug Gingham/Linen Paper that was cut out with a wonky stitched die and attached to a white top folding A2 card base. I found a couple of sequins from the Picket Fence Rubber Duckies mix and then filling the centers of them with yellow Stickles.
So many different things going on in this post, but I hope that you’ve enjoyed it and have been inspired to create something too! Thank you so much for stopping in today!
So after getting my calendars ready to start the year off, which is easy to sit and craft during the cold snowy winter where I live, my mind turned to winter when creating! Sometimes it’s nice to create with a “snowflake/winter” theme because I think they can be used interchangeable for Christmas or just a “warm winter greeting” for someone! (Or… because you might be late sending one out or for those friends overseas that won’t arrive one time!)
Today I’m sharing a card that I’ve made for this month’s Inky Stamper challenge on FB with the theme: “Shaped Cards.”
Isn’t she cute?! I was trying to come up with a different shape besides a regular circle, etc. So, I looked up “coloring pages for kids” free online and found this one that I resized to what I wanted and printed it out over some light purple cardstock. I used another printed one as a template so that I could cut another one out over a folded cardstock piece to create a shaped folded card design. (You can partly see the back piece in the photo.) The sparkly “ball” at the top was just die cut out from a scallop circle die with sparkly silver cardstock.
For the card front, I used the Inky Stamper Snow Angel stamp set to stamp the snowflakes in the background with some purple ink. I white heat embossed the sentiment over and wanted it to stand out a bit more, so I sponged some more light purple ink over top of it. I colored “Rosie” over Copic blending card and used the die to cut her out with. I’ve die cut a couple of the large snowflakes from Lawn Fawn with white cardstock and layered them over the beanie hat. You can see that “Rosie” is popped out a bit over that snowflake, which is where I’ve added a “wobbler” to her.
I finished the card with some sparkly Icicles sequins mix. I filled the centers of them with some Silver Stickles.
Because of the “ball” on top and the length of the “beanie band”, it needs to be in a 5.5″ square envelope to mail. You could also make your own envelope which I do all the time anyway. But the 5.5″ size fits perfectly.
*Speaking of Inky Stamper things, this past prior weekend there was an OOAK event (on FB) that Inky Stamper was a part of, so of course I wanted to get the kit and play along too! Here’s my results:
The top card is an interactive “Theater Fold” design. (All of the pieces were included with the kit along with an instructional video/class.) She usually always includes a mini bonus card which measures about an ATC size. (3.5″ x 2.5″) She used the “icicles” from the stamp set, but I decided to stamp and cut out another snowflake for the front of mine. I added a pretty gem to the center of it.
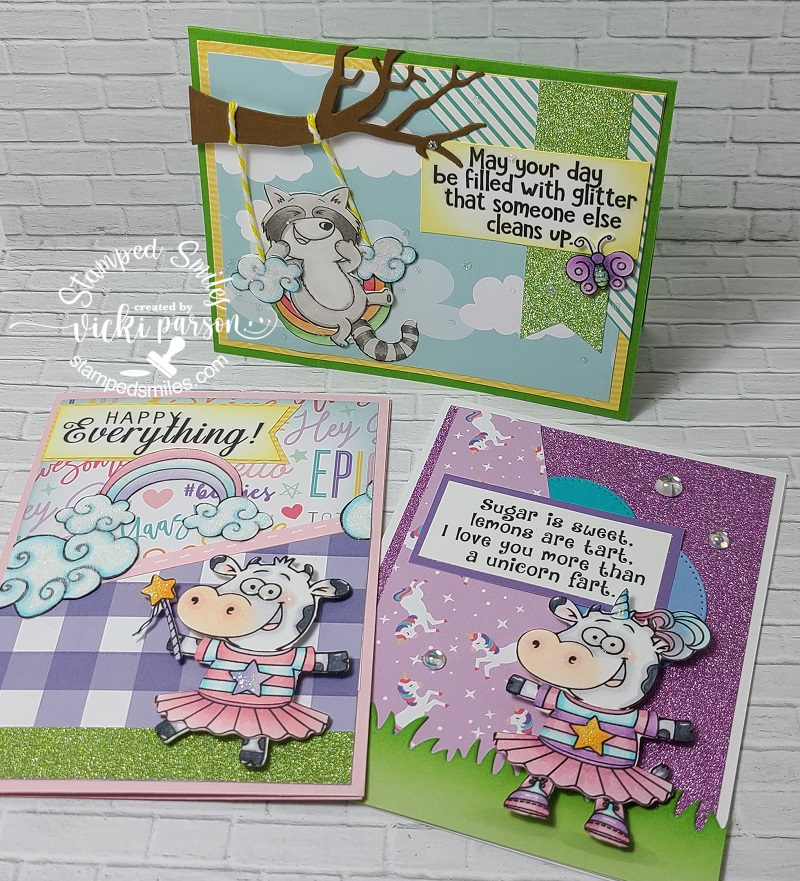
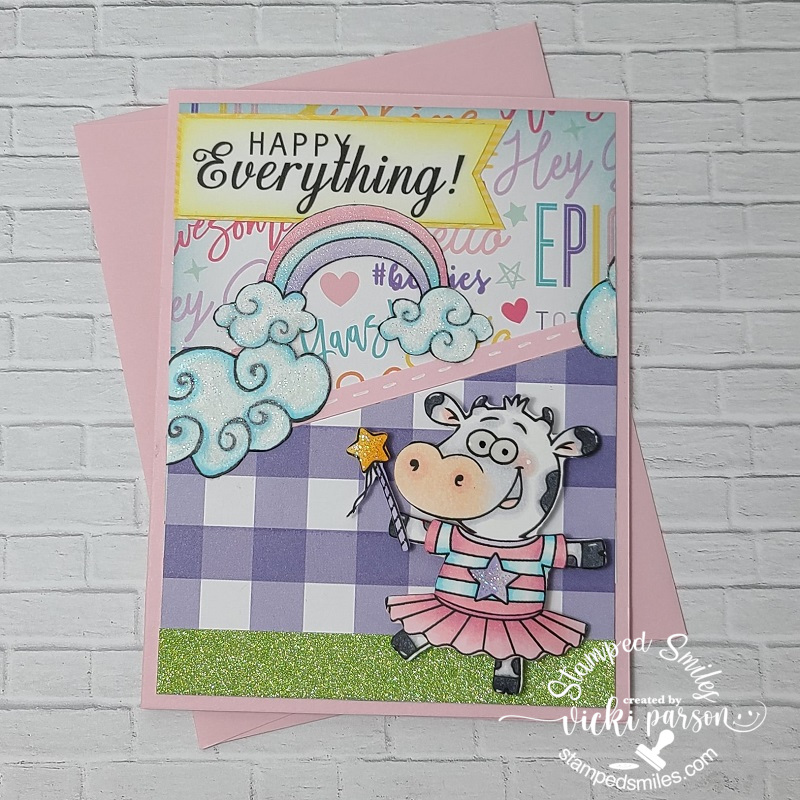
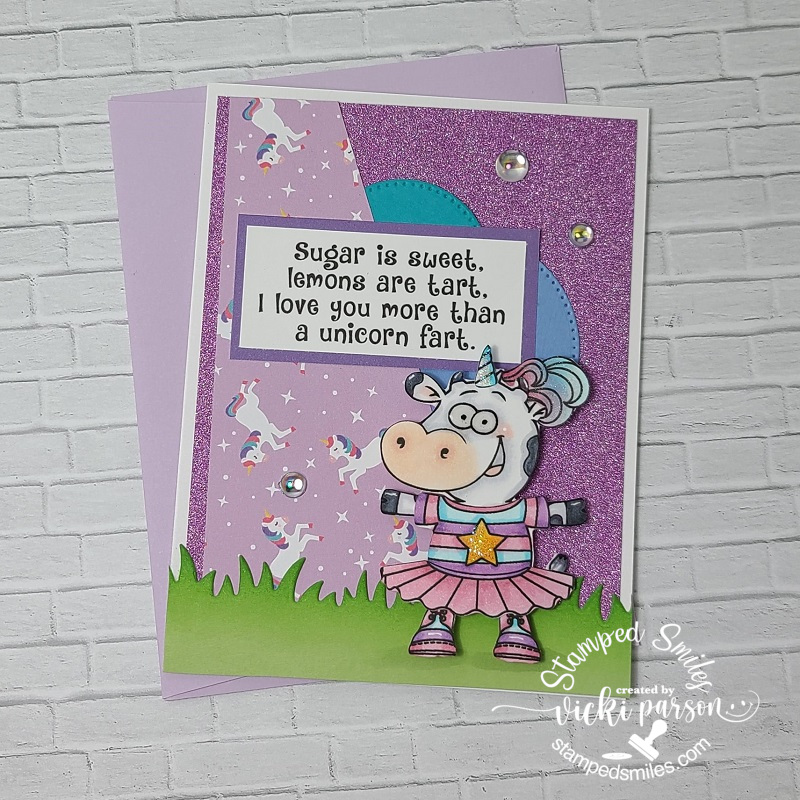
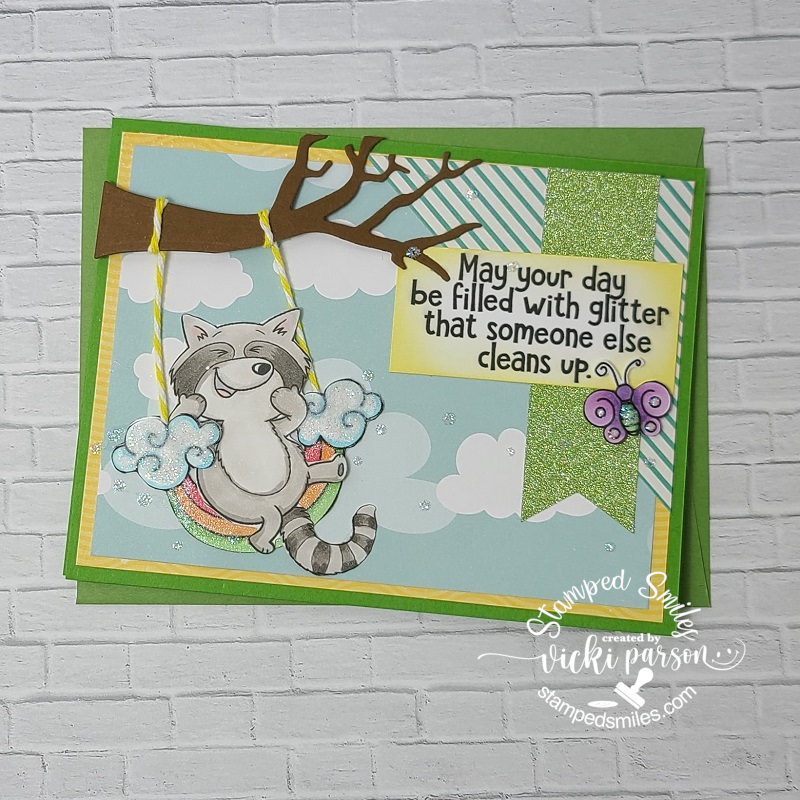
And of course, that’s not the ONLY fun I had during the OOAK event! I decided to play along with the always cute and funny Riley and Co. as well! Here’s the set of cards created from that class:
I just thought these were so cute with the cow images and their little outfits along with the “Funny Bone” sentiments! The instructions came with the kit which were really easy to follow along with. I basically looked at the photos and put together the pieces from the kit. For the clouds, I decided to pull out some sparkly white flock to cover them with. They have a nice soft feel to them! They just make me chuckle and I think it will be fun to send along to someone who needs a smile! 😉
*If you are visiting my website, then you can check out each one of these cards in the gallery below by clicking on the photos to enlarge them: (I’ve found some coordinating envelopes from my stash for each card.)
Flock was added to the clouds.purple, sparkle and funny sentiment…what more could you ask?!rainbow image was turned upside-down for the swing! So clever!
I sure hope that you’ve enjoyed my post today and have been inspired in some way! Really appreciate you stopping in and I’ll be seeing you soon!🥰 Stay warm!
Challenges (For Winter Beanie Hat Shaped card ONLY):
Hello friends! Wanted to thank you for your kind comments! Like I previously mentioned in my last post, I’ve still been crafting and following on FB by joining some classes, challenges, etc. So, although I haven’t been active on my blog, I’ve been crafting and sharing over there once in a while. Just having some fun while using more of my crafty stash is all! However, while playing around on FB, this happened:
A couple of weeks ago I was invited to join as a guest designer for Inky Stamper this month! Yay! If you haven’t heard of this company, check out the stamps…they’re too cute and the owner, Chelsea, is so fun too! She has such an infectious excitement about her that you can see if you happen to catch her on one of her weekly FB lives every Tuesday at 7:30 pm CST. (On the Company FB Page)
So, I will be sharing my creations using Inky Stamper products every Wednesday this month and I hope that I will be able to INKspire you with something fun! I’m starting this Wednesday with some products that just recently released:
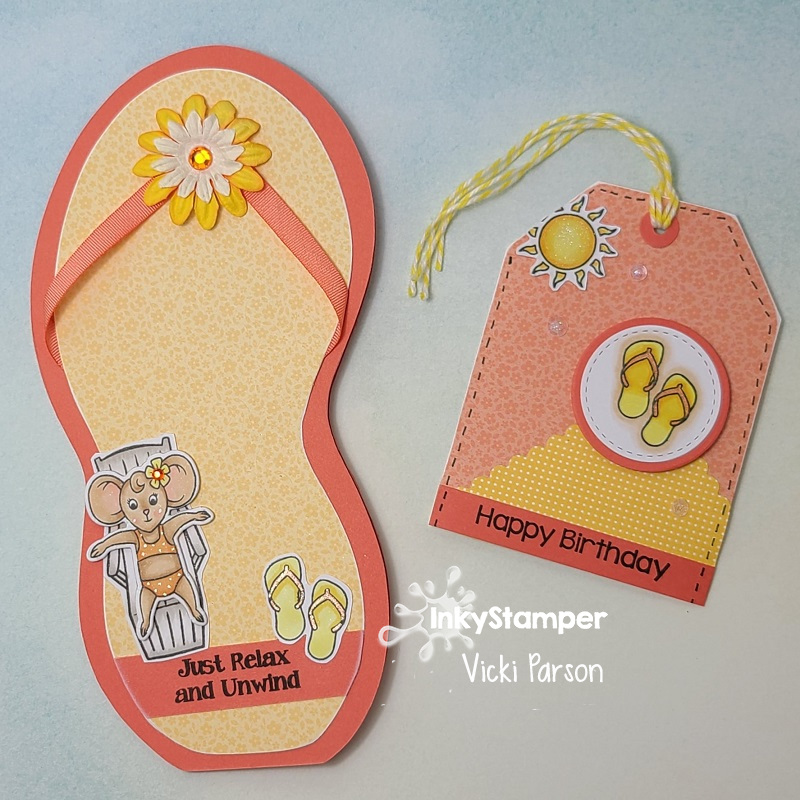
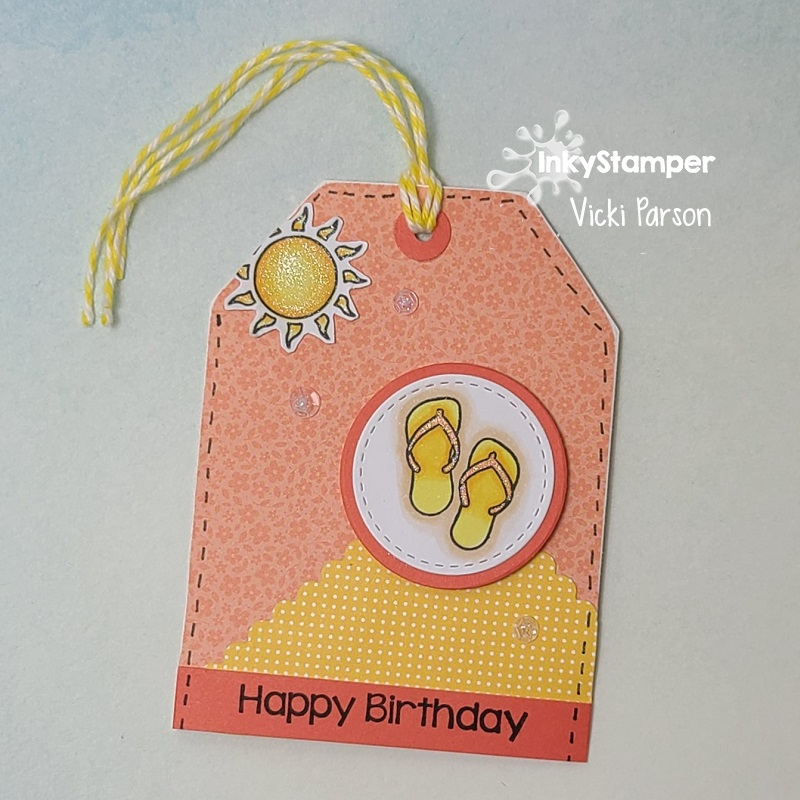
The first thing that Summer reminds me of is flip flops! There is a cute little image of flip flops in this Splash stamp set which inspired me to create this shaped card and birthday tag! That’s also where that cute little mouse you see is from as well! But the sun and chair come from the Chaise Lounge stamp set, which I’ve combined both sets to use on my creations here. I think these two sets go hand in hand with each other and it’s probably best to just get them both! If you choose to get the dies with these sets, it cuts out the mouse and frog separately from the floaties they’re already on so you can pop them up! So, they work on the floaties as well as the chairs. So cute!
For my flip flop card, I’ve taken a very old template that I had found in my stash while cleaning up my craft room and thought this would be perfect to make a shaped card with! I started by tracing the pattern for the base of my card and cutting two shapes so that I can make a card that opens from the side as you see in the photo. The card measures approx. 7″ x 3.5″. It’s a bit taller than a mini slimline card, but I can easily make my own custom envelopes with my envelope punch board. This is another fabulous way to use up those hoarded papers too!
I took the smaller template and used the fun Doodlebug Floral & Graph paper pad (Available in the Inky Stamper store too!) to cut the inner flip flop pattern with. (I had to angle the template to make it fit onto the 6×6 sized paper.) I added a couple of flowers from my stash along with the matching ribbon for the flip flop straps before attaching to the card base. Colored the images, cut them out and added the sentiment strip at the bottom and cut it to measure with the inner flip flop edge. I added some texture by sanding the edges of the paper too.
Here’s a little tip if you’re cutting out the stamped mouse image from the floatie: When you use the die to cut it out, the edges around it will have some stamped lines on it where the white border is. All I did was take a white gel pen to cover up those lines to that it looks like a perfect white line around the image! P.S. This is also a great way to cover any coloring mistakes made! 😉 This also works for fussy cutting an image as well!
I popped up “Rosie” (the mouse), as she is called, with foam tape over the chair. I’ve also added some Doodlebug gems to the center of the flower on Rosie and for the flower at the top of the flip flop card.
I thought this would be a nice summer birthday card so I wanted to make a matching tag to go with it. I’ve pulled out the Inky Stamper Mini Envie Die and used it for this tag design. Again, I pulled out the Doodlebug Floral & Graph paper pad and used this die to cut my tag with making sure that the center of the envelope die would be cut out. This is what I’ve used for the base of my tag. I like using these papers because they’re double sided. That way the back still has a nice color/pattern to it too.
I used this particular die for my tag because of the size. Putting another strip of paper on the back side of this tag will create a pocket for you to tuck a gift card inside if you want to use it for that! See below:
Since there are score marks to make the envelope, I ignored those lines and used my paper trimmer to cut out the center which is where the orange base of my tag came from. I cut off the top two corners diagonally and punched a hole at the top which created my tag. I also die cut the envelope tag again with the Doodlebug Swiss Dot Paper Pad this time being sure that I had a good portion of the scallop edging cut from it. I used that piece for a design element on the tag.
I stamped the sentiment and flip flops from the Splash stamp set as well as the sun from the Chaise Lounge stamp set, colored them, fussy cut/die cut them out to add to the tag. I used a black pen for stitch lines along the edges. I added my own hole reinforcer circle punched out and then added some Doodlebug Bumblebee Twine to the top. Finished it off with a couple of clear sequins from the Fishy Wishes sequins mix and filled the centers with Nuvo Glitter drops. I also covered the sun with a Sparkle Glitter Pen.
I hope that I’ve INKspired you today with my summer flip flop theme! Thanks so much for dropping in here. If you’d like to see more from this company, be sure to join the Inkystamper Inkspiration FB group! Hope to see you there! Have a great day!
Hey there friends! We’re now at the half-way mark of our wonderful “Birthday Celebration” challenge over at {Cupcake Inspirations}!
Have you been adding your birthday/celebration themed creations to the gallery yet for your chance to win a prize from one of the amazing sponsors we’ve enjoyed sharing the inspiration with?! If you haven’t, we hope you will be able to join in the fun with us as we’re really loving the wonderful projects we’ve been seeing so far!
Today I thought it would be fun to create a unique card with my friends for {Cupcake Inspirations} as well as another of an old favorite from our sponsor Riley and Company that was also featured for yesterday! I have loved this adorable moose for many years and so I couldn’t help but use another image to create something for a little chuckle….
I had so much fun with this easy to make card! I’ve used my Cricut Explore to print out and cut the shape of the cupcake. I actually did this twice so that I could make a folding card with the shaped design. I made a score mark on the bottom cupcake along the left side and glued it together so that it would open up on the right side.
I’ve taken this really adorable Riley and Company “Or Bust” stamp that I’ve had for a few years and stamped and colored him up. Since the space above the “or bust” words is empty, I filled it with a sentiment from a MFT set that was perfect! 😂 I then fussy cut him out and popped him up with foam tape over the card.
I used a gold metallic gel pen to color the frame of the sign he’s holding, wrapped some gold metallic ribbon around the cupcake with a bow and a cupcake button in the center and then finished it off with some glitter over the sprinkles on the top of the cupcake.
Hope that you’ve enjoyed my fun little shaped card today! Thanks for dropping in and I’ll see you on Day 10 for more inspiration with another sponsor!
Challenges:
Cut It Up – #207 Old School + die cut (Have had this Riley for years! Used Cricut)
Hello friends! I’m back again today with another fun card that I wanted to enter before the time runs out! So check it out:
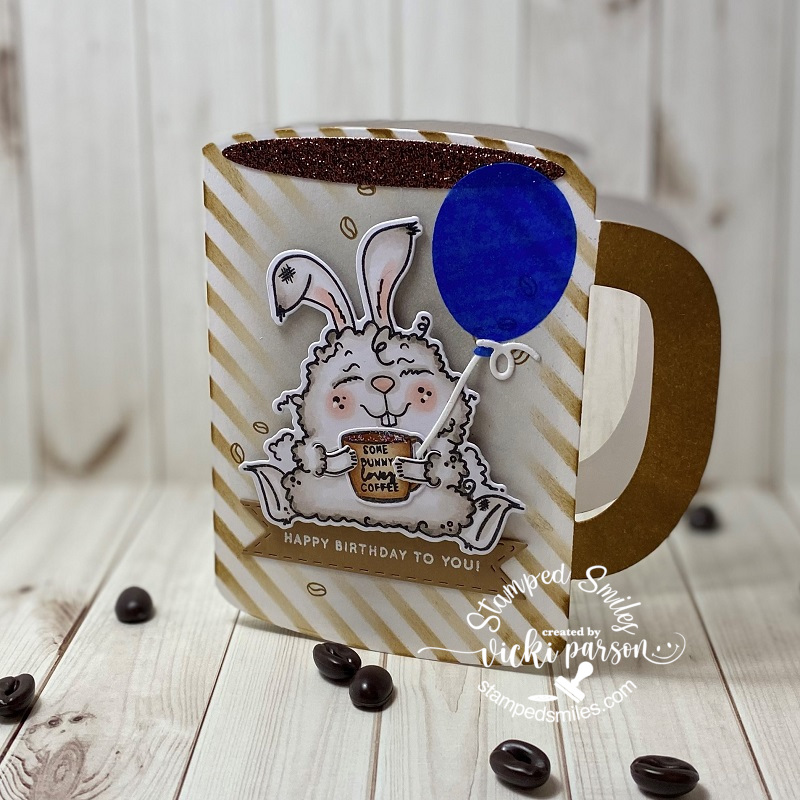
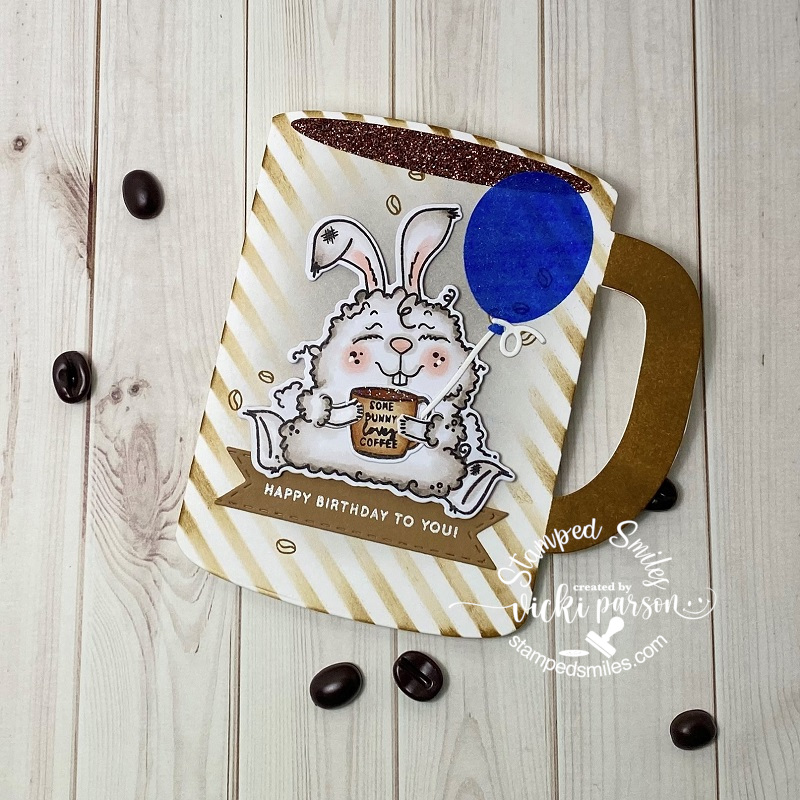
This adorable smiling bunny is so fun and I really loved creating this coffee themed cup shaped card using some products from Trinity Stamps. I’ve used the Dir-Tea Bunny stamp set along with the coordinating dies that also cut out his hands so you can stick stuff between them like I did with the coffee cup and balloon! The coffee cup came with the stamp set and I added that sentiment to it! The balloon is a die set from MFT. I cut out the balloon with vellum and used my Copic marker to color it in.
I used the Trinity Stamps Coffee Mug Card die set in white cardstock and then took the Slimline Stripes stencil to sponge over it. I completely sponged over the handle of the cup and then I sponged the center of the cup in grey colored ink for the bunny to be on top. I also stamped a few coffee beans from the stamp set with the same sponged ink. I took some Glitterstock to cut the die cut piece for the top of the coffee cup and for the inside of the card is where I added my gift card holder which comes with this die…which is pretty cool! It’s already to go for my coffee loving birthday person now!!
I did not have a Trinity Stamps birthday sentiment, so I pulled out one from my stash and white heat embossed it over a strip of cardstock that is the same color of ink from my cup. The banner was actually cut out with the Trinity Stamps Slimline Scalloped Card Panels and Banners die set. (I just shortened it as needed.) I used foam squares to pop up the die cut bunny to sit on top of the banner.
Here’s a close up view of the details on the card. I’ve used Copic markers to color in the bunny and added dots to his cheeks with a white gel pen. I’ve also took some glitter and added it to the inside of his coffee cup to make it look as glittery as the larger cup!
Hard to tell in the photos, but the blue vellum balloon was also covered with a Spectrum Noir glitter brush pen for a bit of shimmer. To attach the vellum balloon, I ran it through my Xyron Machine so you couldn’t “see” any glue marks.
(I love how he can hold different items!) 😀🎈
Wished I remembered to take a photo of the inside of the card, but it just has a coffee gift card holder on the inside along with a greeting and more stamped coffee beans.
Hope you’ve enjoyed my funny bunny shaped coffee cup card today! I sure appreciate you stopping in and I’ll be seeing you again soon!!
Hello friends! Hope that you’ve enjoyed a fantastic weekend whatever it was you were doing! It’s been SO freezing over my way and I’ve been covering up with electric blankets! Brr!
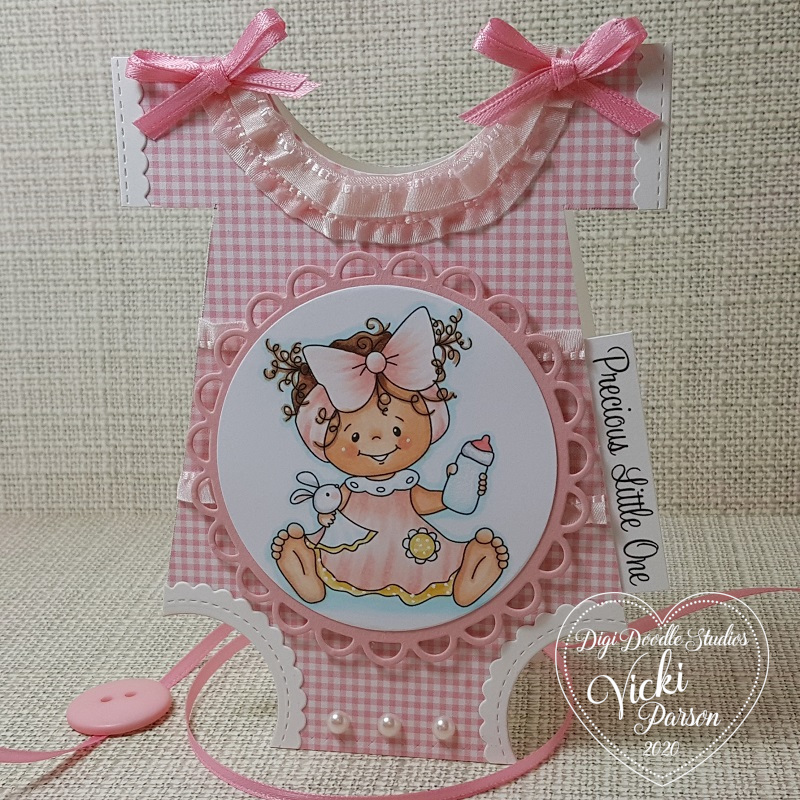
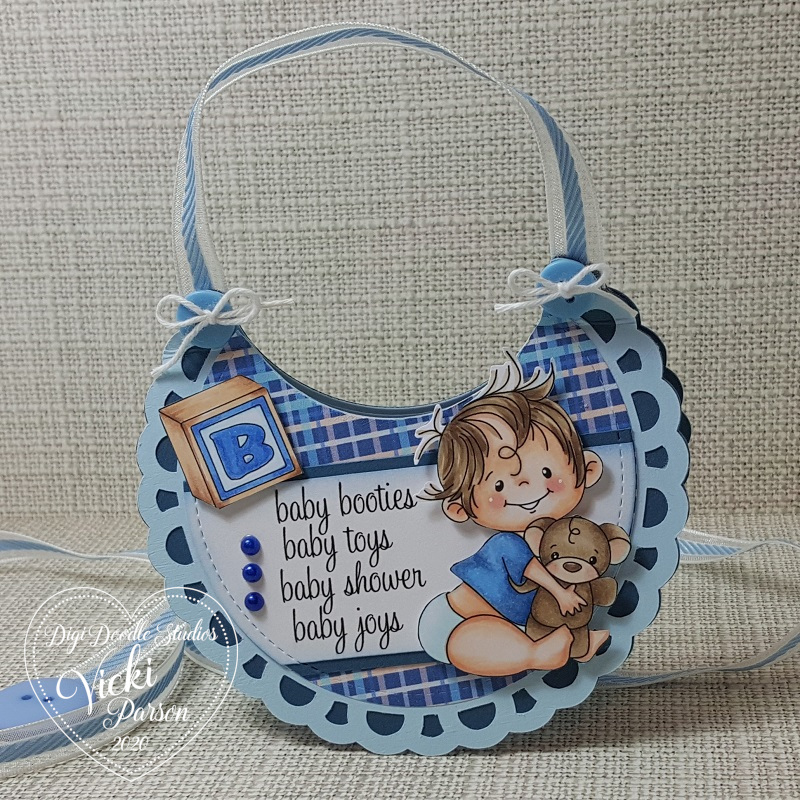
Today I’d like to share with you a couple of shaped baby cards made with a newly released and adorable Pairables set from Digi Doodle Studios along with a few other fun products from their store…
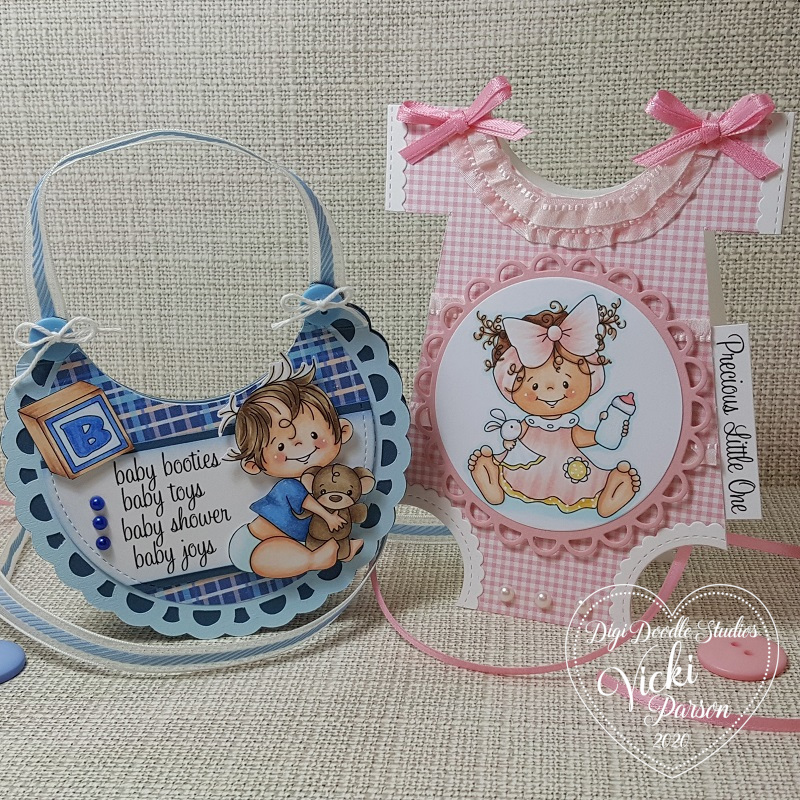
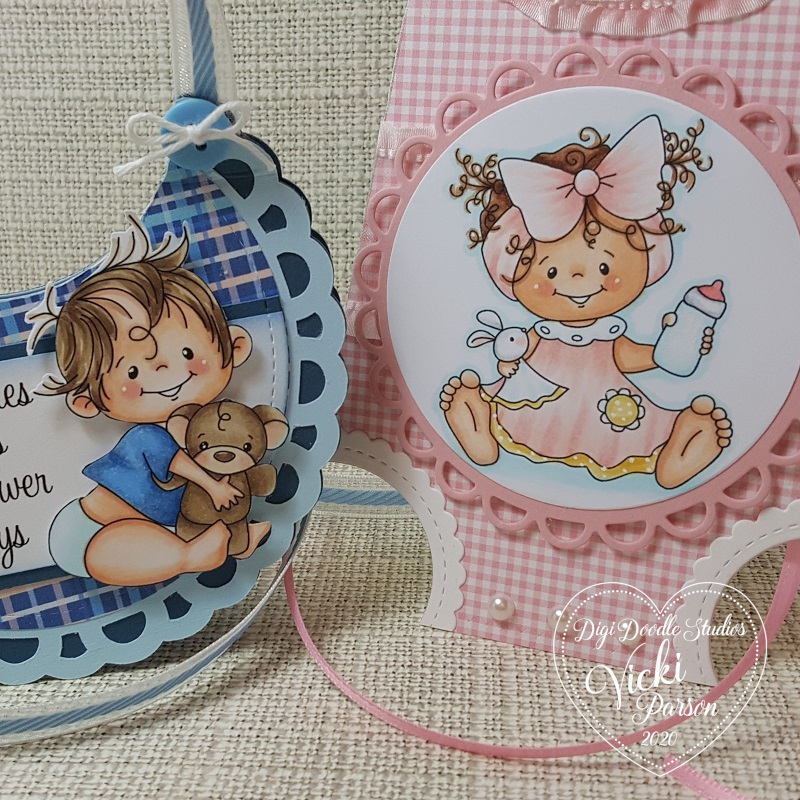
Check out these shaped baby style cards I made with these ADORABLE little baby images from the Precious Babies Pairables set! You may remember not too long ago the other baby card I made on THIS POST with the other new set called Little Ones Pairables.
I wanted to share a close-up look at the coloring I’ve done with these two sweet little baby images. I’ve used Copic markers to color them with and then just used a white gel pen for highlights on the cheeks as well as creating polka-dots for the baby girl’s dress on the yellow portions.
It’s hard to tell in the photos, but I covered the baby bottle with a glitter brush pen.
The baby girl was cut out with a circle die and layered over another die cut scallop circle from pink cardstock. I’ve used my scissors to fussy cut out the baby boy and pop him over the design with foam dots.
For this baby onesie shaped design, it’s actually REALLY simple to do! It’s just a matter of measuring in, cutting and then circle die-cutting where you need to put the neck hole and leg holes is all! It is a standard sized A2 top folding card and will easily fit inside a standard A2 sized envelope for mailing which I love!
The pink gingham paper that covers the entire front panel of this card comes from the Digi Doodle Studios Bundles of Joy Digi Paper Pack.
I’ve used the same ribbon for behind the circle panel as well as for the “ruffles” around the neck area. I just folded up the ribbon to give it that look and attached it along the neck hole line. I’ve attached a couple of pink ribbon bows on each side as well.
For the arm and leg hole areas, I’ve just used scallop style die cuts and sized them over the ‘openings’ and trimmed them down to fit.
I’ve taken the printed out sentiment from this same Pairables set and trimmed it down to attach along the side of the onesie, used some foam tape to pop up the baby girl image panel and added some pearls to the bottom of the onesie card.
For this baby boy bib card, it’s just as simple! You could use ANY circle die cut you have, but I didn’t happen to have a size that I was looking for, so this scallop circle design was cut from my Cricut machine. It cut out the light blue and the dark blue layer behind it. I ended up cutting out an additional dark blue panel to create my full shaped card design. (This card measures exact size as above for regular A2 sized envelopes!)
The next step was using a circle die to die cut through all of these scallop circle layers for the neck opening on the bib. I’ve used a score board to score a line on the top layer only (as the bottom was the back/inside of the card and didn’t need score lines.) and added the ribbon before securing the top two ends (behind the buttons) to the back of the card panel so that it opens like a regular top folding card. (I also added an additional light blue circle panel to the inside for a message.) The ribbon is secure and doesn’t interfere with the opening of the card.
I’ve used another circle die to cut a piece of paper from the Digi Doodle Studios Baby boy Digi Paper pack. Obviously this was also cut out for the bib neck line as well. I tied a bow with white twine on the buttons before gluing them down on the top ends of the bib. I printed out the sentiment from the DDS Little Ones set and cut it out with the same circle die that I’ve used for the papers and trimmed it down into a strip and added another dark blue layer behind that to attach to the front of the bib. I popped up the baby boy and the wood block with foam dots over the card and added some blue pearls along the side.
Thanks so much for joining me here today and I’ll see you again soon!
Hey friends! I hope you’re having a great start to your week! I have been in the Christmas making card mode the last few days and just finished sending out over twenty cards I believe. I had previously made a few and already had those sent out over seas too. I actually still have just a couple more to make for a few people close to me and I’ll be finished.
So I thought since I’ve been doing Christmas makings, I’d share some things that I’ve been working on with you!
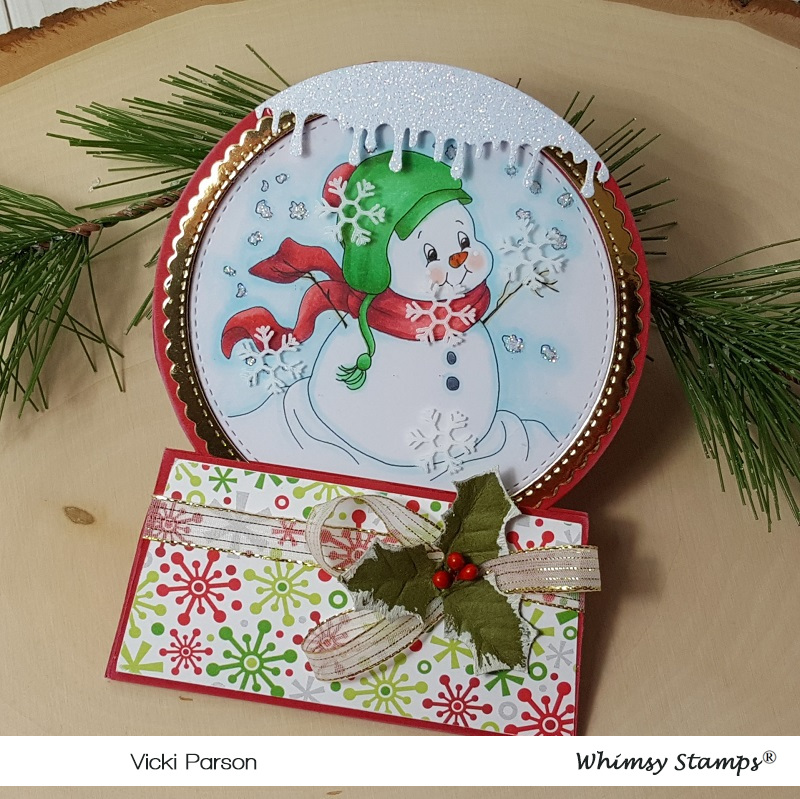
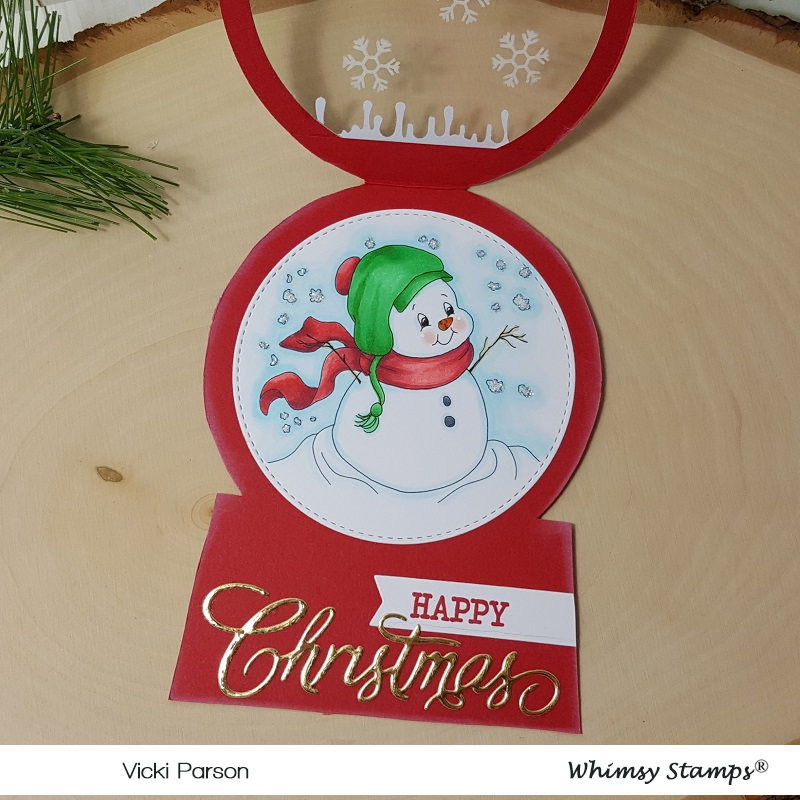
Here’s a fun “Snow Globe” shaped card that I had actually made for the Kit And Clowder Christmas card swap. I made it in November and had actually sent it out the last week of November. I just wanted to make sure she received it before I posted it anywhere and she did!
I have used this really sweet digital image from Whimsy Stamps called Snowman and Snowflakes by Crissy Armstrong. I had to make it a certain size so that it would fit with my “Snow Globe” design. So I’ve used a stitched die cut circle to cut it out with so that it could be placed on the inside of the card design.
If you would like to see how to put one of these shaped cards together for yourself, then you can check it out HERE on Splitcoast Stampers for the tutorial.
I’ve used some fun papers for the bottom and die cut a stitched scallop circle frame from some gold mirror cardstock and then used my MS “goo border punch” for the snow drip edge at the top. I even took some white Staz On ink and stamped a few snowflakes over top of the acetate piece on the front of the card. I added some gold ribbon and a holly sprig from Prima around the bottom.
Here’s a closer view of the image and how I’ve got him all colored up with Copic markers. I’ve also taken a glue pen and added some extra glitter to the snowflakes around the image as well.
And when you open the inside of the “Snow Globe” card, this is what it looks like with the sentiment. I have used a retired Whimsy Stamps clear stamp set called “Christmas Greetings” to stamp both the “happy” sentiment in red ink as well as the snowflakes on the piece of acetate with White Staz On ink.
I then took the Whimsy Stamps Christmas Large Word die and cut it out with a piece of gold mirror cardstock and glued that to the inside bottom of the card. I also took some white ink and sponged around the edges of this entire inside.
I haven’t made one of these Snow Globe cards for quite a while, so that was fun to do! I hope that you’ve enjoyed it too! Thanks so much for stopping in today and I’ll see you again soon!
Hello friends! It’s time for another weekly Cute Card Thursday Challenge! For this week, since it’s the beginning of the month, we will have our easy peasy “Anything Goes” challenge for you this week! We are sponsored by Whimsy Stamps!
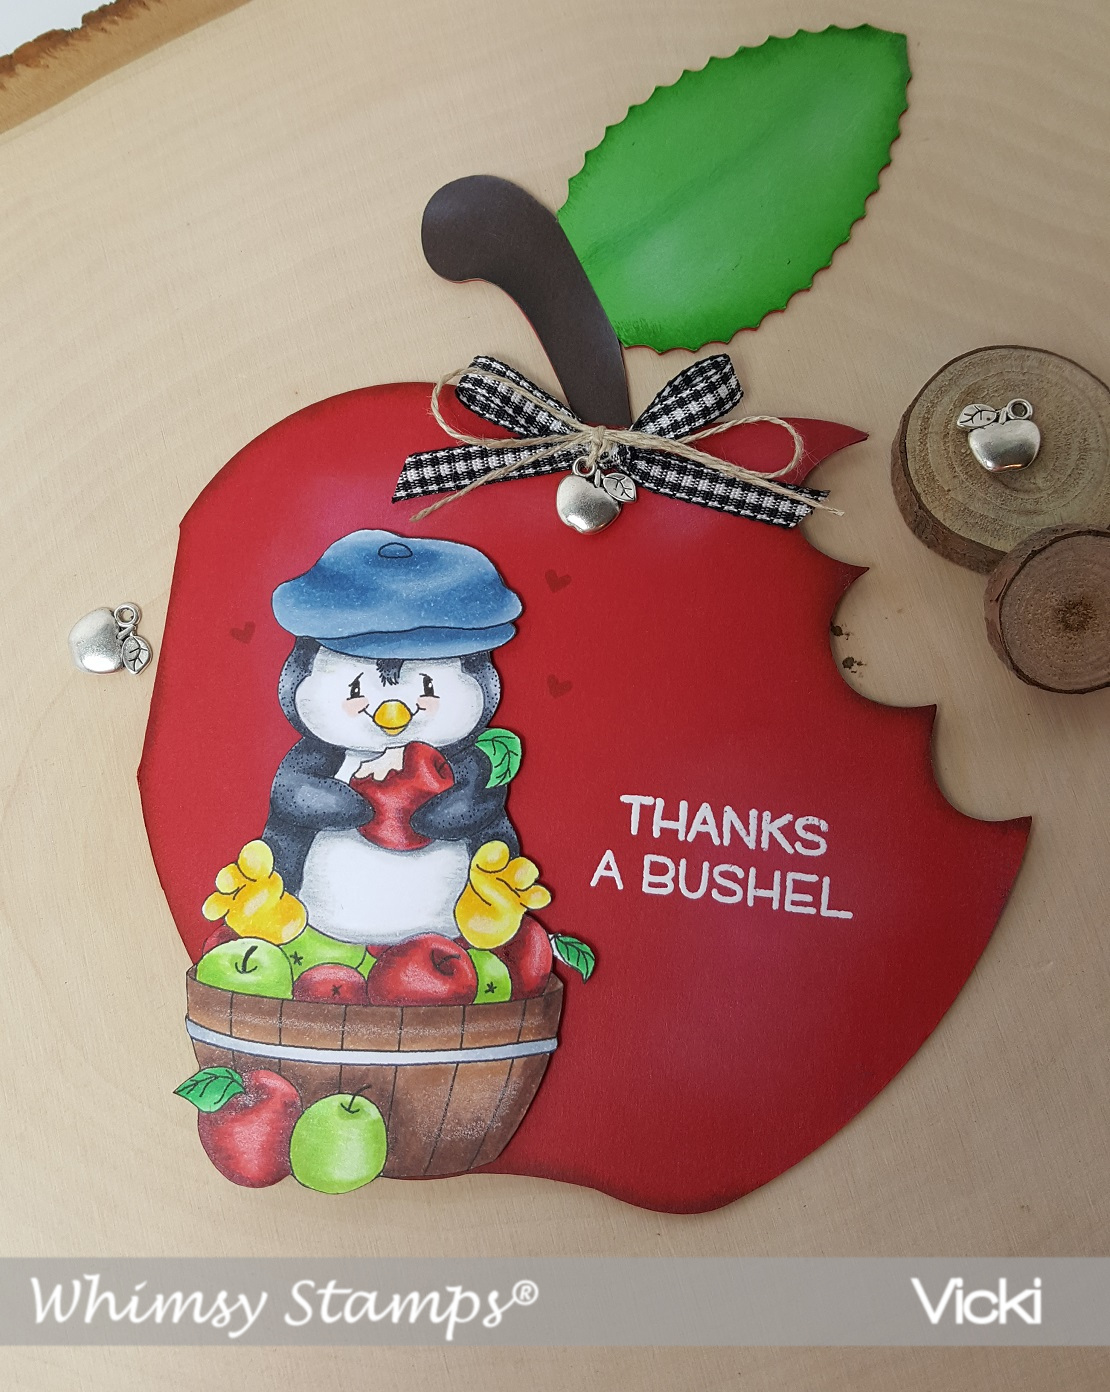
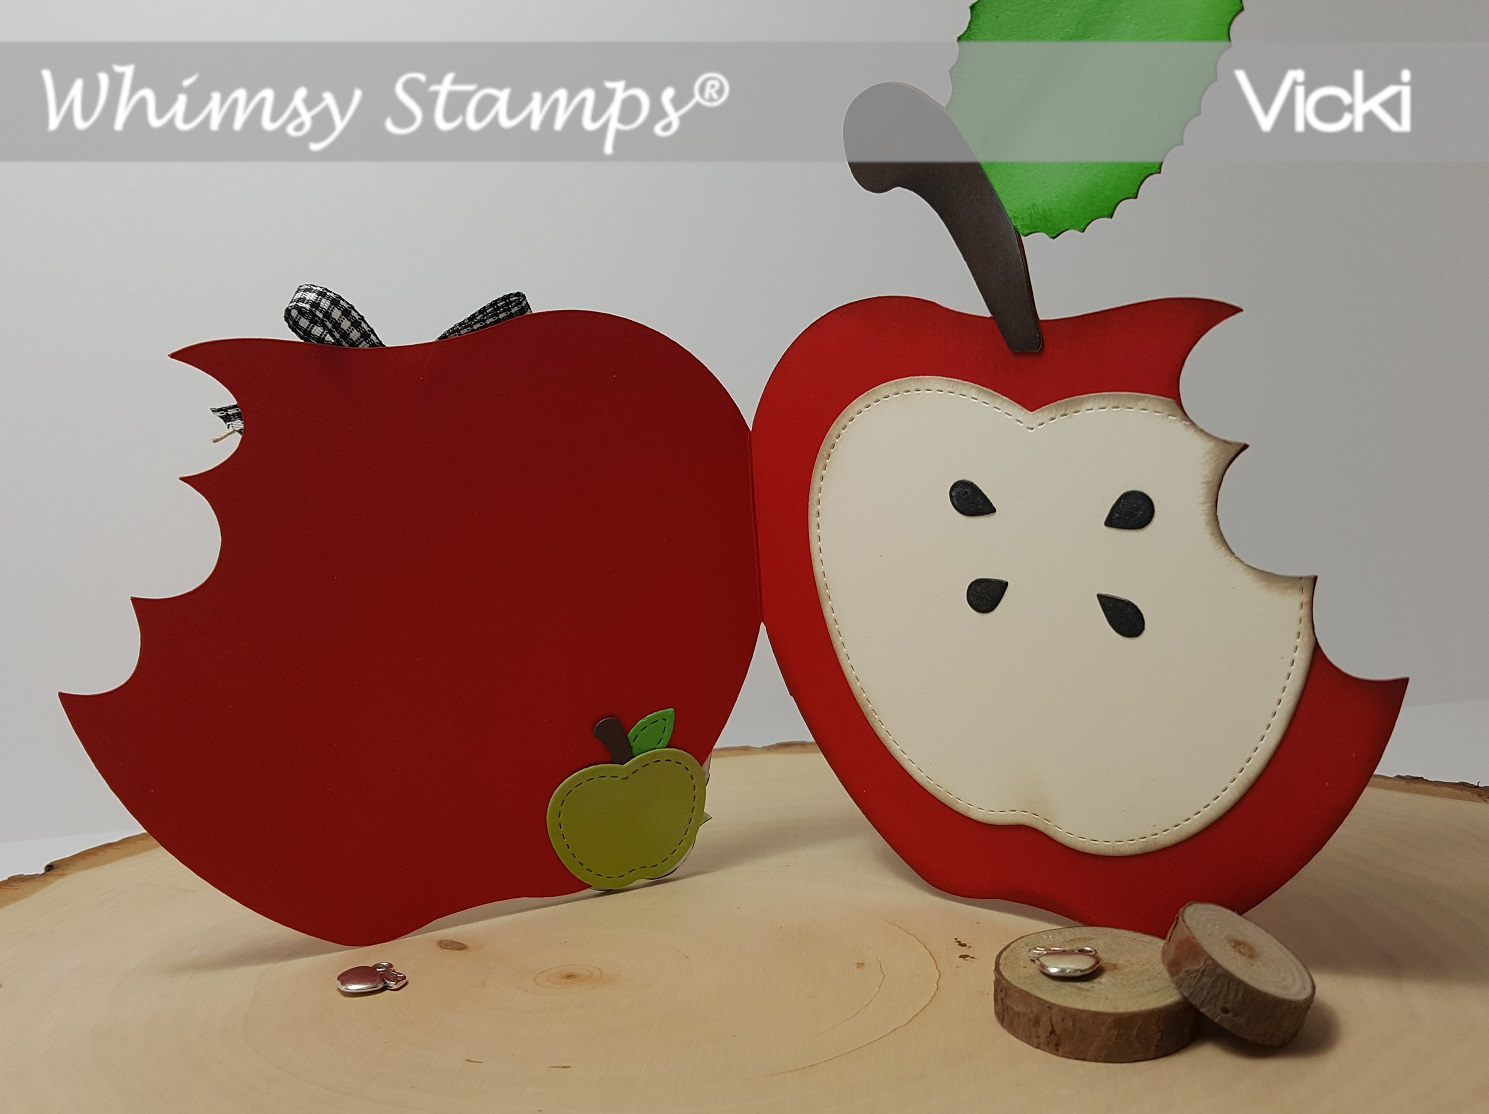
I couldn’t resist using this cute little fellow on my card for today! This is the Penguin Apple Bushel digital stamp from Whimsy Stamps. I’ve colored him with Copics and pencils and then fussy cut him out and attached him on the front of my apple shaped card with foam tape. Hard to see in the photo, but I’ve added just a wee bit of shimmer with my glitter brush pen on the bitten inside apple he’s holding. I’ve also added some white dots for his eyes with a gel pen.
For the shape of my apple card, I found a fun apple card pattern and cut it out with my Cricut Explore machine and enlarged it the size that I wanted it to be. I’ve taken some sponges and ink to add some shading and highlighting details to the apple. I’ve taken that CUTE stamp set from Lawn Fawn called Thanks a Bushel to stamp a couple of hearts around the penguin as well as white heat emboss the sentiment on the front.
I’ve also added a black gingham ribbon along with some twine that I’ve attached an apple charm to before attaching it to the top of the apple.
So of course, I wanted to show you what the inside of the shaped card looked like too! I thought that the inside needed to “look like” the inside of an apple, so I took the Lawn Fawn Outside In Stitched Apple die and cut a piece to fit the inside of the apple and then followed the “bite marks” to cut off the end and then I took a sponge to sponge around the areas of it with brown colored ink for shadows. I’ve also taken the same die set to add a tiny green apple on the opposite side of the inside of the card. The purpose for that was not just to add an extra decorative element, but I also wanted to cover up the back side of the penguin sticking out from the front of the card. I then needed to add the “apple seeds” to the inside of the apple, so I took the Lawn Fawn Stitched Apple Frames to cut out the seeds die in black cardstock and glued them to the vanilla die cut apple panel. I’ve also added some shimmer to the seeds with my glitter brush pen.
I thought that there was still plenty of room for a message below the seeds or you could also write on the opposite side as well. It’s just a fun and unique card design to go with that darling penguin! I will need to make a special envelope to fit the card inside for giving.
Thanks so much for joining me on my blog today!
Have a fantastic day!
Challenges:
Stamping Sensations – “I Spy with My Little Eye, Something Beginning with ‘B’!” (Bushel, bows, blue cap, bite, barrel)