A Single Flower at Sparkles Monthly

Hello friends!  Welcome to the start of a new week for mid-September!  I think Summer actually DID come back to us as we’ve set record high heats for this time of the year!  I think I’m ready for those cooler temps to come back! Ugh!  I know it won’t be long now and we can start enjoying trips outdoors as we look forward to picking apples and all Autumn festivities that we do!

Today is time to share a new challenge over at Sparkles Monthly and we have the theme of “USE A SNGLE FLOWER (floral image)  this month.  Flowers seem to be everyone’s favorite.  Here’s what I came up with: 

Mine is a single sunflower image.  My husband planting them in our backyard this year and they were so pretty!  Of course, I forgot to take a photo of one before they died off.

The items I’ve used came from an older card kit from Simon Says Stamp including the stamp set called Sunflower Fields.  There is a single sunflower image that I thought would be perfect for this challenge, plus I can use more items from my stash!

For the size of the flower image, I wanted it to stand out, so I used a tag and twine from the kit and decided to make this a mini slim card size.

For the background:  I used a piece of watercolor cardstock and gold heat embossed the “Romantic Script” background stamp (retired) from My Favorite Things and then used some oxide inks swiped on glass with spritzed water to make a “smooshed” background.  I also used these same colors to watercolor my flower with. (except the green, I only used that for the flower)  I also used some gold watercolor to splatter over the tag.  I only splattered the tag because I didn’t think it would show very much over the card background.

I cut the smooshed watercolor panel to fit over a kraft side folding mini slimline card base.  I die cut the flower and the sentiment to attach over the tag, added some twine and then used foam tape to pop it up over the ink smooshed background.  Lastly, I’ve added some yellow sequins to finish it off.

I hope you will take some time to pull out a single flower and join us in the challenge this month!  Looking forward to seeing your creations!  Thanks so much for dropping by!

Challenges:

  1. Creative Inspirations Anything Goes
  2. Ellibelle’s Garden Party Anything In or From a Garden
  3. Creative Fingers Anything Goes
  4. Lil’ Patch of Crafty Friends Anything Goes
  5. Penny’s Anything Goes Using Paper
  6. Love to Craft Anything Goes
  7. Crafts Galore Encore Anything Goes

H is for HOME

Hello friends!  This will be a pre-scheduled post as I’m away for a bit, so this is going to be a very short and sweet post from me.

There is a new challenge today over at the Alphabet Challenge Blog!   Our next letter is ‘H‘ and the hostess has chosen “H” is for HOME  *Remember that this is a bi-weekly challenge, so you have two weeks to enter*  I hope you will find some time to play along!  Here’s what I’ve created:

I have pulled out an older card kit from Simon Says Stamp called “Home Sweet Home” and used some of the cloud papers that came in the kit along with the stamp set to make my little square on the left.

This is a mini slimline sized easel calendar.  It folds flat for mailing and then sets up with a base at the bottom.  (I figured a message could go on the back.)  I got the Square Calendar Tear-Offs as well as the Landscape Calendar Table Tent Base from Taylored Expressions.  The “slash marks” on the home sweet home square also came from the TE Square Tear Off Calendar Stacklets Die Set which is how I was able to cut out the square to fit onto the design too.

Obviously, I have August 2025, but I also have 2026 calendars that I will have to replace for the new year.  I really love making these calendars every year to give as gifts and I thought it would be nice for someone moving into a new home as well.

  • Thanks so much for dropping in today!  I hope you will take a look at what the design team has for inspiration and join in the challenge with us!
  • I’ll have another scheduled post for tomorrow to share my monthly Art Journal Page.

It’s Easter at Sparkles Monthly!

Hello friends!  Hope your March is going along well and you’re starting to see some signs of Spring coming!  We even have a few flowers trying to pop up out of the ground which is so fun to see!  I hope they can hold out for a few cold days ahead.

Today I’m stopping in to share my card for the new challenge over at Sparkles Monthly and we have a very fitting theme of “Easter” this month.  I think I’m more than ready to start some Spring related projects, so I look forward to seeing the gallery.  Here’s the card I came up with:

How sweet is that bunny passing out his colorful eggs!  I pull out an older card kit (2019) and it had this adorable Simon Says Stamp set called “Bunny Wishes” (no longer available) mixed in with the kit which I don’t think came with it, but I wanted to use it with some of the other items that were in the kit like the papers.  It was like getting a brand new order and forgetting what I purchased! 😆 

I also used this beautiful oval die (not available) from SSS that cuts the oval, the flowers and the stitching marks around it.  I added a border of grass to place at the bottom and then I stamped the sentiment from the set and also stamped the “Easter” greeting on another piece of light blue cardstock cut with a banner die.  The gingham background was cut with a double stitched rectangle die and then I used the oval die to cut an opening for the bunny scene.  I added foam tape around the edges to pop up the panel on an A2 top folding pink card base.

Here’s a close-up view of the cute images that I’ve colored with Copic markers, cut out with the coordinating dies and then popped up over the floral oval scene with foam tape.  The extra Easter egg behind the basket was just glued to the scene.  It’s hard to see in a photo, but I’ve covered each egg with a glitter brush pen.  It’s sparkly IRL.

I did recently get this pretty Iridescent White Cord from SSS and took two strands of it to create a bow and then I attached it to the top of the oval.  It gives it a nice sheen and I might be using it again soon!

Thank you for stopping in today!  Hope you enjoyed my card and will join us for the challenge this month!  Have a great weekend!

Challenges:

  1. Pammie’s Inky Pinkies – PIP2510 Anything Goes
  2. Make My Monday Use a Die/Punch 
  3. Passion for Markers Dies &/or Punches + markers (used dies and Copics)
  4. Little Red Wagon Start Easter Projects
  5. Penny’s Anything Goes Using Paper
  6. Tic Tac Toe I used 3rd down or middle across
  7. Four Seasons – Spring/Easter

Mix it Up With Paper Piecing!

**THIS IS POST TWO OF TWO FOR TODAY!  SCROLL BELOW TO SEE MY POST FOR THE GDT CREATIVE ARTISTE.  THANK YOU!**

Hello friends and a happy November!  I think that the last two months completely flew by and here we are getting closer to the end of the year…what?!  I hope that you look forward to happy times ahead and lots of crafting fun too!  I’m thankful you’re here with me, so let’s get this month started.

Today begins a new challenge over at the Mix It Up Challenge Blog and it’s always “Anything Goes with an optional theme“.  The optional theme this time is “Paper Piecing“! (This challenge is open for 6 weeks, so you have plenty of time to enter!)  Here’s what I came up with using this theme:

I absolutely love the look of quilts, but I like to keep my making of quilts done with paper!  So I thought this theme would be great for making a quilt pattern design for Christmas.  I normally paper piece stamped images, but I wanted to do something different this time and pull out more stash items and use them!

Several months ago, I purchased a card kit from Taylored Expressions called “Pieced Patterns” and I loved the concept of cut out squares attached over a “map” to follow along on how/where to place the squares.  It’s really easy to piece different colors/patterns together to make a design.  Some squares were also cut diagonal and I stamped a tone on tone pattern over some of the squares before they were cut out.  Then they were placed over the “map” design and cut out with a square die.  I also cut the stitched scallop frame to go around the square pattern.  I die cut a white snowflake twice to layer in the center of the pattern and added a red gem in the middle of it.

I attached the paper pieced pattern over a white card front that was cut with the Taylored Expressions Pierced Lattice Cutting Plate that was then attached to a top folding A2 white card base.  For the sentiment, I white heat embossed it from the Taylored Expressions Jingle All the Way stamp set and cut it out with the coordinating die.  It was popped up at the bottom with thin foam tape.

I can see this might be fun with several different squares cut out ahead of time to place over the different “map” designs to create multiple design patterns ready for cards!  It’s just a matter of taking the time to cut out all of the squares.


I have decided to create a “bonus” card using the same “paper piecing” technique, but with a stamped image this time…as we all need more Christmas cards, right?!  

For this card, I pulled out an older card kit from my stash (2016) and used the Doodlebug pattern papers that was included with the kit.  The papers are too cute not to use and hoarding them is not a good idea! 

I stamped the tree onto a stitched white rectangle, then stamped the tree, star and banner over some of the pattern paper, carefully cut it out and attached it to the stamped tree and white panel.  Before I attached the stamped pattern pieces, I used my Copics to color in the tree stump and outline around the tree.  I also added some details to the pattern pieces for shading as well.

 The banner was popped up with foam tape and I attached all the layers together over a top folding red A2 card base. All the cardstock/papers were included in the kit. I’ve added some red rhinestones on the tree where the ornaments were to finish it off.

Anyway, hope you’ve enjoyed all of my projects today and I hope you will take some time to check out the challenge blog to see what the other talented designers have made.  I look forward to seeing what you make!  Have a great day!

Challenges:

  1. Inkspirational – #327 Seasonal (Winter/Christmas) 
  2. Pammie’s Inky Pinkies – PIP2443 Anything Goes
  3. Cardz 4 Galz – #237 Showcase Your Patterned Paper (second card)
  4. Crafty Catz – #681 Anything Goes with optional twist: use dies/punches (top card, but dies used on both of them!)
  5. Lil Patch of Crafty Friends – #240 Anything Goes
  6. Penny’s Paper Crafty – #583 Anything Goes Using Paper

Sheetload of Cards With Flashback Card Kit

Hello friends!  I hope you’ve had a good week and looking forward to a great weekend ahead!  The weather has been unseasonably cool for this time of the year and I’m able to get my windows open the last few days and enjoying it!  Unfortunately, it’s going to warm up again, so I know that the air will come back on.

Today I’m sharing something that is a bit different and new to me, but I think it will come in very handy for the future as my “goal for next year” is to use up those old card kits that have been stored in my stash for WAY too long!  I’m hoping to start this on my blog next year each month and focus on a card kit each month so I can clear things out from my stash!  Stay tuned!

I found a fellow crafter Call Me Crafty Al and I decided to give her Sheetload of Cards a try for this month and see how it goes!  It would probably have been much easier to do it the way she did, but I challenged myself to use my card kit items instead:

Here’s the set of all eight cards using the same sketch from Crafty Al’s Sheetload for this month.  You may not recognize the card kit that I’ve used as it’s an old one from Simon Says Stamp.  The box had November 2015 written on it, and the paper inside had “Here’s Looking at You” card kit on it.  I know that I have pulled it out and used a few things out of it, but there was still plenty to use!

I was looking to make some uplifting/inspirational cards so this all worked out great.

Click on the photos above if you’re on my website so you can get a closer view of them.

I’ve used all of the cardstock except one sheet of kraft, all of the 6×6 papers were used except two sheets and I’ve also used up some of the journaling cards that were included as well as the stamp set and thread.  The reason why some of the edges are rounded is because the journaling card inside the kit had rounded edges.  I just decided to incorporate that into the design and I think it worked out okay.

Honestly, I don’t know weather to be proud of myself for using up my extremely old card kit or feel embarrassed for having such an old card kit still in my stash!😂

Regardless, I hope you’ve enjoyed my play with the “Sheetload of Cards” for August 2024 utilizing a very old card kit!  How about you?  Do you still have some card kits or stashes of something from 2015…er older?  Would you like to use them up too?  Follow along with me next year each month as I attempt to use up those old old old stash items and have a session of “Crafting to the Oldies“!  This is me holding myself accountable!  Let’s do this!

  • Thanks so much for dropping in today and have a great weekend!❤️

Emboss It at Sparkles Monthly + Giveaway WINNER!

Hello friends!  I hope you’re having a great month so far and being able to enjoy the nice Spring weather!  It’s been really nice over my way, but I’m seeing we have a bit of cooler temps coming too.  Hopefully not too chilly! 

Today starts a new challenge over at the Sparkles Monthly Challenge Blog and this time we would like for you to “Emboss it”!  I hope you will hop on over to see the inspiration from the team and consider joining in the fun with us this month!

Here’s the DT creation that I’ve made:

I love to do embossing on my cards, and I know it’s a favorite for many!  I’ve decided to do a “Letterpress Embossing” technique and inked up an embossing folder to achieve the effect on my orange layer panel.  The raised areas stay white on the white cardstock.

For the two corners, I’ve taken a Simon Says Stamp Garden Greetings stamp set and gold heat embossed the floral spray image.  I’ve also used the same gold embossing for the “sending hugs” sentiment strip as well as the “Get Well Soon” sentiment over the shimmer vellum which was cut from a stitched circle die.  I added some gold sequins over it.

I wanted to keep it somewhat flat for mailing purposes, but I think some of it popped up would be pretty too. I was also very happy to pull out a past card kit and make another card with it.

I would love to see your embossed creations in the gallery this month, so I’ll hope you’ll play along!  Check out the challenge here – Sparkles Monthly


***ARE YOU A WINNER?!!***

vicki-tegiveaway

20230414_141351

I have taken all of the comments from my last post, added all of the names that mentioned they would be interested in the Beautiful Butterflies dies and foil package and wrote those names on pieces of scrap paper. I folded and crumpled them up and had my husband pick out a name. He threw them all into the hat he was wearing and pulled one out!

HERE IS THE NAME THAT HE PICKED OUT…………….

20230414_141630

Yay!  Congratulations Chrissy! 

Please contact me and send me your full name and snail mail address so that I can pop your package in the mail to you!  I hope you enjoy it!  (I haven’t even used mine yet!)  Sorry if your name didn’t get pulled as I only had one, but I know I have several “double” items that I’ve placed in a bin and will be pulling them out at some point to give away! So, stay tuned!

Thanks so much for dropping in and taking the time to say hello!  I appreciate you!


Challenges I’d like to enter my above card into:

  1. Creative Inspirations – Anything Goes
  2. Can You Handle the Pressure? – Anything Goes optional clouds
  3. Pammie’s Inky Pinkies – Anything Goes
  4. Ally’s Angels – Anything Goes
  5. Little Red Wagon – At least 2 layers 
  6. Penny’s Paper-Crafty – Anything Goes
  7. Tic Tac Toe – TTTC204 (middle down: die cut, free, embossing)tttc-challenge-board-204

An Electric Connection and Happy Mail Love For Valentine’s Day!

Happy Valentine’s Day friends!  Today is the day all about hearts and love!  Although I’ve already sent out my Valentine cards, I have a couple of lovely individuals who take a peek at my blog from time to time…so I have to wait until they’ve received their cards before I share them here!😉  It’s somewhat hard to “hide” my crafting since hubby’s now retired! LOL  So here’s the cards I made:

I just KNEW the minute I saw this Taylored Expressions Love Lights Stamps & Stencil Combo set that it was something perfect for making cards for my retired electrician hubby!  This set also coordinates with other products and so I started by foiling the TE Foil It-Love Lights panel and then ink blending with the stencil set.  I had to use blue as this is hubby’s favorite color.  So, I’ve used the TE Sprinkles and Potato Chip inks.  The cardstock is TE Sprinkles. (I used softer tones for the Valentine feel.)  I also used the coordinating TE Mini Strips-Watt’s Up sentiment set that was silver heat embossed over the TE Sprinkles cardstock and cut out with the TE Mini Strips-Asymmetrical Die.  I just love the punny sentiments that go with this set!

The tiny light bulb for the accent I used actually came from a TE ‘freebie’ with one of my orders, so I die cut the light bulb with white glitter cardstock and lightly sponged some yellow ink in the center.  I die cut the center and bottom of the bulb with silver brushed cardstock and glued it onto the light bulb.  I die cut a circle from some vellum and also sponged this with yellow ink and glued the light bulb on top of it and attached it to the side of the card nestled with the sentiment strips that were popped up with foam tape.  He will have gotten this one this morning.

And here’s another card that I sent to someone very special!  It’s a simple card, but wow it was so much fun to create with using the Simon Says Stamp Limited Edition Happy Mail Love card kit! (Looks like it’s still available at the time I’m writing up this post, but not sure how long it will stay available.)  I so love those CUTE Doodlebug products and there are so many of them including the stamp set that goes together in this kit!  I wanted to play some more with it, but I have so many other things to focus on, so I’ll have to come back to it later! LOL

I’ve used the Doodlebug background papers from the kit and cut it out with a Lawn Fawn Cross-Stitch die and also cut a strip of ‘grass’ with green cardstock at the bottom using the Lawn Fawn Grassy Border die.  The heart papers were attached over a red piece of cardstock from the kit and layered onto a top folding A2 white card base.  The grass border was attached over the red cardstock and heart background papers.  This gave me the room to take the CUTE Doodlebug LOTS OF LOVE Odds and Ends Ephemera die cut shapes to create my scene with!  This pack came in the kit and there are SO many pieces!  I’m sure you could go on and on making cards!  The bird and bunny die cuts were popped up with foam tape.  It’s hard to see in the photo, but I’ve taken my glitter brush pen to all of the hearts on the images and the cheeks on the cloud.

I think these cards did what was intended which was to create smiles during this cold winter season!  I sure hope that it has done the same for you as well! 😉 Wishing you a happy Valentine’s Day with all of my heart! ❤ Thanks for stopping in and I’ll be seeing you soon!

Challenges:

  1. Moving Along With the Times – Love/Anniversary/Wedding
  2. Creative Inspirations – With Love
  3. The Paper Funday – Anything Goes optional ‘Hugs & Kisses’
  4. 613 Avenue Create – Anything Goes optional ‘Whimsical Valentine’
  5. Everybody Art – Love and/or Heart
  6. Try It On Tuesday – ‘All Loved Up’
  7. Cardz 4 Guys – ‘Love’ cards
  8. Little Red Wagon – Be My Love/Valentines

Huge thank you to those that keep the challenge blogs going!

Vintage Anniversary and Commissioned Ones Too!

Hello friends and happy February!  I feel like we just started a new year and it’s already into the second month!  I will need to get going on a couple of Valentine cards really soon!  Today, I wanted to share a card I had made for my parent’s 57th wedding anniversary along with a few other anniversary cards I was commissioned to make that I had forgotten to share until I made my parent’s card! LOL!

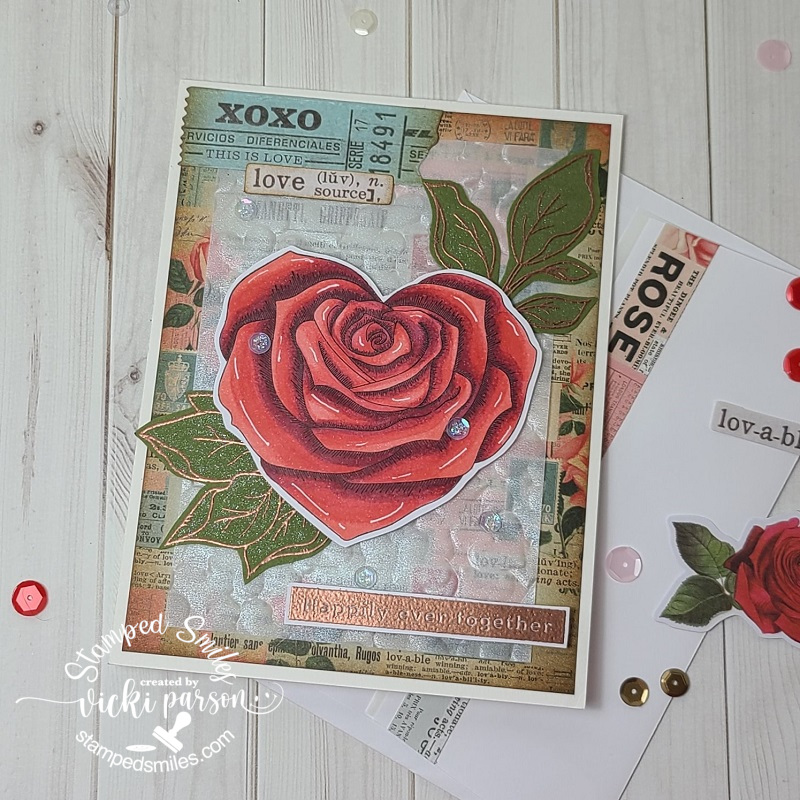
I really like how this one turned out!  If this looks familiar to you, then you may recognize it from a past Simon Says Stamp card kit. (This one came from a Valentine 2020 kit.)  I thought that the papers in the kit looked “Vintage” and I really liked that, so I thought I’d try to go for that style in my card.

I used the heart rose stamp image from the kit and colored it with Copics and fussy cut it out.  I also copper heat embossed the leaves from the stamp set included in the kit over some green cardstock and fussy cut those out as well.  The sentiment was also from the same set as the leaves, and I copper heat embossed that for the bottom right corner of the card.  It’s hard to see from the shine, but it says: “Happily ever together” and was fussy cut as well.

I started with the Vintage looking papers and cut a piece down to size and inked up along the edges with Vintage Photo distress ink and layered it over a side folding A2 white card base.  I pulled out a piece of shimmer vellum that I ran through a Sizzix 3D heart embossing folder and layered it over top of the background.  I also took some of the ephemera from the kit and added those to parts of the background after sponging the edges of that too.  (See the “ticket” in the top left.) 

Finally, I arranged the heat embossed leaves along with the heart shaped rose over top.  I glued the leaves and then popped up the rose with foam tape along with the heat embossed sentiment.  I added some shimmer to the leaves with a shimmer brush pen and then took some sequins from the kit to attach over the card and filled with Stickles glitter.

I think this would be a special Valentine card as well for someone! 😉

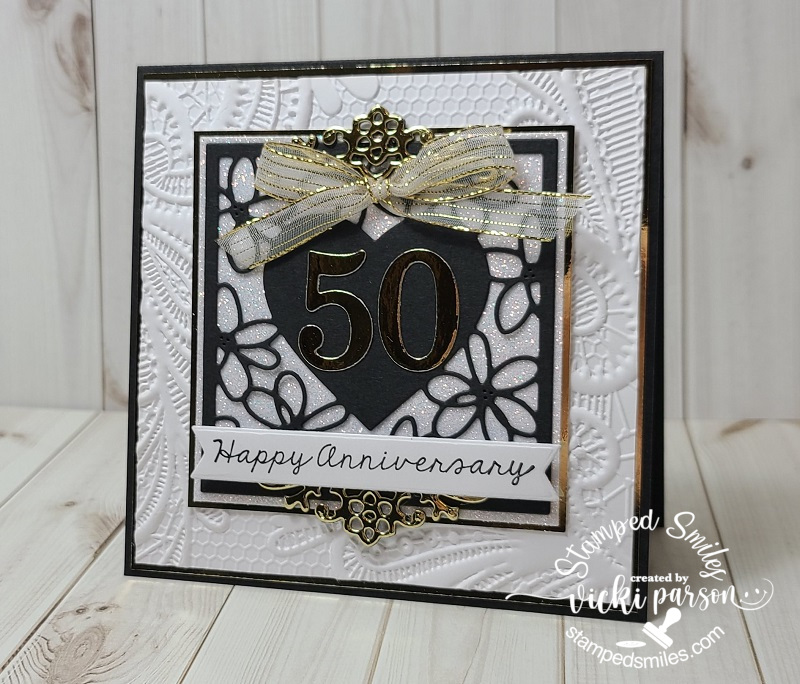
At the end of last year, I was also commissioned to make a 50th wedding anniversary card for someone.  I was just given the detail that the wedding photos were shown with the colors black and white…so I based my card using that idea.

I always think that wedding/anniversary style cards look especially elegant with die cuts and embossing, so I dig through my die cut and embossing folder stash.  I’m sure you can imagine me sitting on the floor with things everywhere! LOL!!  Do you do this too when you’re not sure what you want to do and/or what all you have?

So I found this really pretty Memory Box die cut with the heart in the center that I wanted to use and thought some glitter paper behind it would be so pretty.  This is why my card is a square shaped design.  Since it was celebrating 50 years, I thought it would be appropriate to add some gold in there too and die cut the numbers for the center of the heart as well at the border pieces on the top and bottom of the heart.  (Not sure where that die came from as it’s old. The number dies are really old too!)

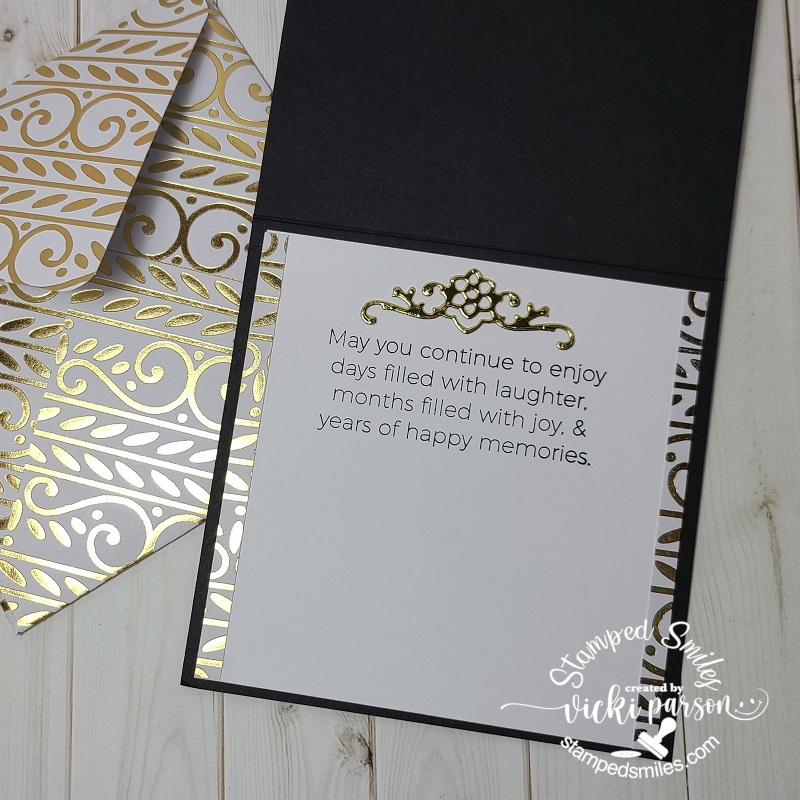
I layered this onto the glitter paper and gold foil paper.  I stamped a sentiment (Taylored Expressions-The Inside Scoop Anniversary used both inside and out of card.) and die cut it out with a banner die and popped it up under the heart with foam tape.  I layered this onto a white 3D embossed background that was layered over a black top folding square card base.  I attached a gold ribbon bow over top.

I stamped a sentiment for the inside of the card and you can see that I’ve decorated the inside of the card using the same die cut border with gold foil cardstock.  The papers I’ve used for the borders on the inside were also used to create a custom envelope for this card.  Sometimes if I don’t have the envelope on hand, I make my own envelope.  Sometimes I prefer to do this for special cards anyway.

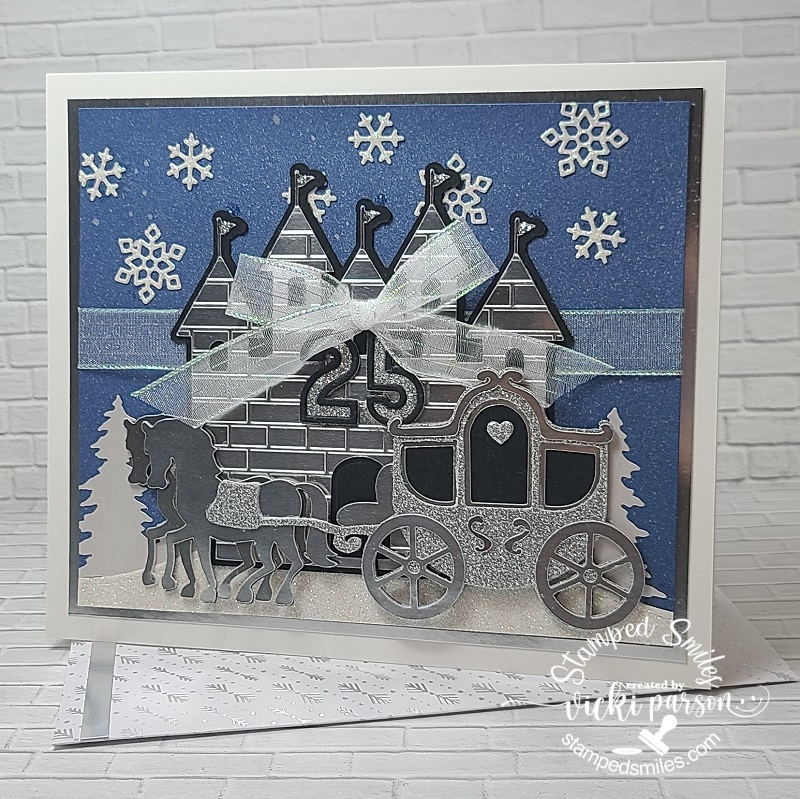
And this is another card that I had been commissioned to do for someone that wanted a card for an anniversary on Christmas Eve.  I was given the detail about them spending time at Disney World and seem to be a fan of Disney along with it being their 25th anniversary…so my card was based on those details.

I have no Disney character type stamps/products at all.  My thought was to create something with a “winter/Fairytale” theme which is why I turned to my Cricut machine for help.  I was lucky enough to find the carriage and horse image that I cut out using brushed metallic silver and silver glitter cardstock for the different pieces.  I also found a castle image that I cut from the brushed metallic silver as well.  I used black cardstock for the base and insides of the cut-out images.  After I cut out the castle, I ran it through a brick embossing folder to give it that brick castle look.  I also die cut the numbers from Taylored Expressions Cap It Off Numbers dies.  I attached the numbers in the center of the castle and attached a silver ribbon bow over top of the numbers.

Since I had my main cut out images for my card, I was able to create my scene and size based on those.  My finished card measures approx. 7″ x 5″ which is not a regular size for me, but I thought it was fitting given the type of card it was along with the cut-out images.  I started with a piece of blue cardstock and generously sprayed it with some Pearlescent Cosmic Shimmer previously received from a class I took.  It gives a really stunning look, and the shimmer doesn’t show very well from the photo either.  Once dried, I die cut both the snowflakes and snow border at the bottom from some white glitter cardstock.  Both dies used for them come from Lawn Fawn.  The trees behind the bottom snow border were cut from some pearl white paper with an older Stampin’ Up! die set in my stash.  

I attached the sprayed blue background over a piece of silver metallic cardstock after wrapping a silver ribbon around the center.  I then attached the trees and added the snow border at the bottom.  I added the castle and snowflakes next being careful that everything was showing the way I wanted and then I popped up the carriage with foam tape.

This whole scene was placed over a white 7 x 5 top folding card base. I also took some silver glitter to add to the little flag ends on the castle.  I thought with all of the glitter and shimmer it didn’t need any more embellishment!  I was happy with how it turned out because I wasn’t quite sure it would!

There was a custom envelope that was also made for this card using some pretty silver pattern paper from my stash.

Everyone seemed to be pretty pleased with how the cards turned out for them and I was very happy to have had the privilege of being a part of someone’s special day too!

Speaking of wedding anniversaries, I’ve been given the honor to create wedding invites for my son’s wedding coming up this Summer and I know I’ll be getting really busy putting those together as well!  So that will be coming up really fast and I hope I can keep up with things! LOL

Thanks so much for stopping in today!  I hope that you’ve enjoyed my creations or been inspired in some way!  See you soon!

Challenges (TOP CARD ONLY)

  1. Simon Says Stamp Wednesday – Anything Goes
  2. Krafty Chicks – All Occasions
  3. Crafty Catz – Anything Goes with optional add flowers
  4. Colour Crazy Craft – Anything Goes with coloring (Copics used for heart rose image)
  5. Creatalicious – Anything Goes with optional love
  6. Simon Says Stamp Monday – Use embossing folder (3D heart folder over vellum piece)

Hello! Welcome to 2022!

Hello friends!  I hope you are all doing well and looking forward to a promising year this go around!  I sure am!  I know it’s been a while since I’ve posted, but I was having a bit of a hard time with having lost my “MOJO” for a period, feeling really down and not myself at all.  Christmas came and then on top of it, I’ve gotten sick.  I am starting to feel a bit better now, so I decided that the only way to get through all of this is by doing what I’ve always felt to be therapeutic, which is to keep on creating!  I just need to get back into the mindset of it again is all, but I do enjoy it when I’m creating as I’m sure my fellow crafty friends can relate to!😉  Appreciate your kindness to me always.

Since I really haven’t created much lately other than Christmas cards (as you can see from my previous post below), I’m going to share some projects that I had done at the end of last year including some commissioned cards I was asked to do:

Last month was a birthday card for my dad, so I’ve pulled out a special birthday kit that came out sometime last year from Simon Says Stamp.  Everything I’ve used on the card including the embossing folder, stamps, sentiment strips and paper all came from the kit.  It may be hard to see in the photo, but I’ve foiled over the “super happy” sentiment strip that was included with the kit and glued it over top of the cake slice.

I’ve added some glitter over the candle flame, the yellow stars and the inside of the white embossed “birthday” strip under the cake slice.  I pulled out the blue colors from the striped paper to color the image with using Copic markers and die cut it out to glue over top of the sentiment strip and embossed oval layer.

And speaking of birthdays, I was commissioned to do a 50th birthday card for a guy that is a professional painter and enjoys grilling outdoors.  The first image that came to my mind was this really cute LOTV image.  I printed him out and thought it would be fun to incorporate the birthday number above “the painter” to make it look like he’s in the process of doing it while the paint is dripping everywhere.  So while the boy painter was printed out, I stamped and embossed the numbers above him.

My husband had the idea of the little grill along the edge going “up in smoke”.  So I created a “ground” area for the ladder and the grill to be on.  I stamped the grill image, colored it in and then a liner pen to draw the line to establish the separation.  I then ripped the corner above the grill and sponged some Black Soot distress ink around the grill and corner edging.  I didn’t want the background to be white or black, so I dug out some brick style pattern paper to place behind that corner area before attaching it to the card base.  Hopefully there were some chuckles from it!

So for the inside of the card, I thought it would be fun to take this corner border die that I received from a Halloween class and make it look like the red paint drip continued on the inside.  Then I found this really funny sentiment to go along with the grilling bit too!  I also sponged some more of that Black Soot distress ink around the edges.

These were really fun cards to do and I enjoyed the coloring process so much!  I find that coloring images really helps me get through some creative blocks…even if it’s a simple image or something that I don’t use, so I’m thankful to at least to be able to do that.  Hopefully I can get back into what I enjoy doing here.

I know people sometimes struggle with masculine style cards, so here are a few examples of cards that I came up with for men.  Hope it helped with some ideas for you too!  Thanks for stopping by today and I’m glad you did!

Challenges:

  1. 613 Avenue Create – Anything Goes
  2. Stamping Sensations – Anything Goes with stamping + use a die (top card only)
  3. Lil’ Patch of Crafty Friends Anything Goes
  4. Pammie’s Inky Pinkies – Anything Goes

Autumn Birthday For My Deer

Hello friends!  Really hope that you’re having a great week as we start to dip down into cooler temps and that means that Autumn is coming to a close (sadly) and winter is upon us along with Christmas!  Are you ready?  I’m working on things…that’s all I can say!  I need to get more motivated for sure!  Many things are already done, but it’s the double checking to make sure…and sometimes it’s not! LOL

Recently, I needed to make a birthday card for hubby, so I pulled out a card kit I had from last year and came up with this one for him:

This was a really fun one to do from the Simon Says Stamp Woodland Whimsy card kit from last year. (I linked the stamp set and dies still available.)   My husband is a huge fan of outdoor wilderness and especially deer in the Autumn season as they can be easier to spot with the falling leaves.  So it just seemed like the type of card to make suited for him.

I’ve colored in all of the images with Copic markers and die cut them out with the exception of the birch trees as there were no dies included with the set.  I placed them behind my die cut circle from the woodgrain paper included with the kit.  I backed it with another piece of the paper from the kit as well.  I even tucked in the back part of the deer’s feet along with a leaf to make it part of the scene.  I like the banner from the set which is left blank so that you can add whatever greeting you want with it.

The little heart above the deer was also fussy cut out and then I covered it with a glitter brush pen as well as some crystal effects over top for the shine. I thought about adding some sequins, but decided it wasn’t needed. The scene was layered over a piece of cardstock included with the kit and then I stamped some of the birch trees onto a coordinating envelope as well.


Also thought I’d share some other projects that I’ve been working on since my last post.  It seems that I’ve become a little addicted to taking those classes and events…honestly don’t need to be taking them, but sometimes it’s just fun to participate in the fun with fellow crafters!  I do enjoy sharing with those like-minded crafters like me! 😁

These are all projects I’ve made using products from Inky Stamper ***If you are on my website, just click on the photos to enlarge them to see better and the wording will also be more visible.

I’ve also been working on some Christmas things that I will share soon as well as some other requested commissioned cards that I’ve recently finished. I would like to get those Christmas cards finished up early for a change!  How about you?!  Are you all done creating for the Holidays yet?

Until next time, thanks for stopping in today friends!

Challenges (For deer card only)

  1. Alphabet Challenge – ‘P’ is for Patterned Paper
  2. Happy Little Stamper – Anything Goes with Dies
  3. Addicted to Stamps and More – Birthdays
  4. Pammie’s Inky Pinkies – Anything Goes
  5. {Cupcake Inspirations} – Fall Foliage
  6. The Crafter’s Café – Male