March AJ Page-Favorites

Hello friends!  Here we are again at the end of another month!  Although I’ve been really busy this past week, I think I’m ready for March to be over with!  Mainly because of this crazy weather and another because I’ve been busy doing things other than crafting! LOL  (Must be time for that organizing…er as I like to say “agonizing”!)

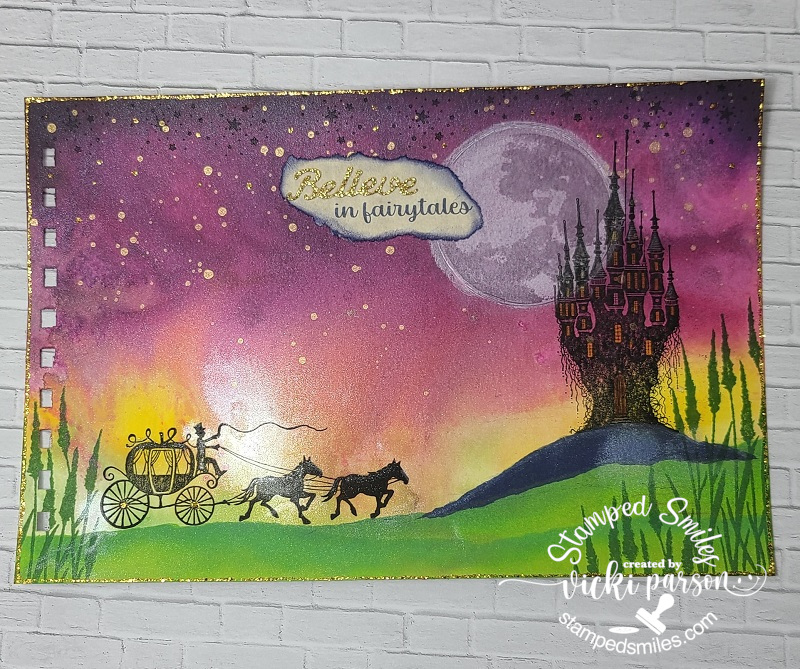
Today is our monthly AJ page with my crafty friend Carol (from Crafty-Stamper) who is collaborating with me to “SMASH OUR STASH”! We get creative trying to use up our never-ending stash piles along with a prompt for each month.  I know she always has great inspiration to share, so please check out her blog too! Here’s my AJ page with the “SMASH OUR STASH” March prompt of “Favorite Things”: 

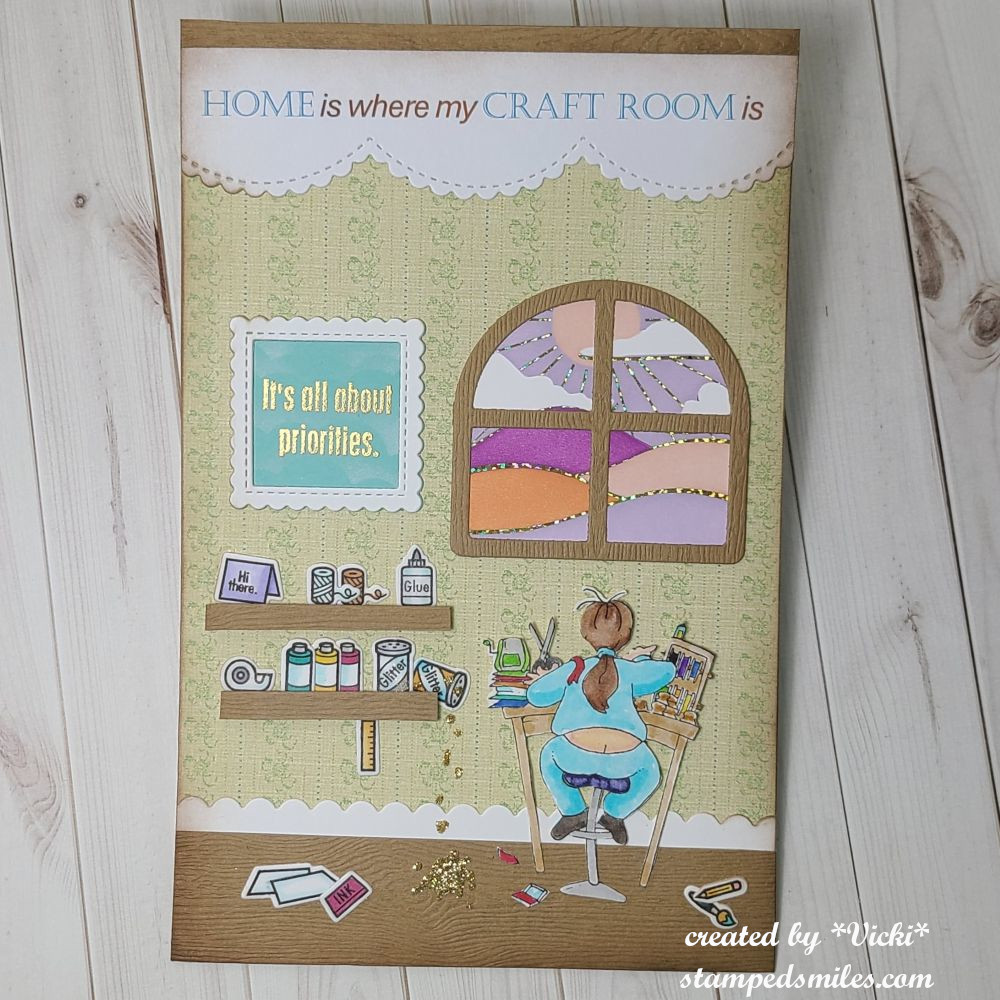
I’m sure you might’ve guessed that one of my favorite things to do is obvious on this page!  (This craft room actually looks a bit more organized than mine is currently!)  I did have so much fun with this one!  I’ve used SO many of my favorite things on here:  old stamps, mixed company favorite stamps, foiling, heat embossing, coloring (Copics and watercolor), ink blending, die cutting, fussy cutting, using old paper stash, mix of papers, favorite colors, the subject of stamping, my favorite room, wearing sweats, crafting while sun going down, etc, etc, etc.  Honestly, this was easy, but it could be because I enjoyed putting it together.

For the background:  I used a standard white cardstock base measuring 5.5″x8.5″ and then took some very old Stampin’ Up! paper (Porcelain Prints) to cover the entire size so that I could get the look of wallpaper.  I then used some textured woodgrain cardstock from my stash for the floor, the window and the shelves.  (The shelves were popped up with a foam strip)  I die cut a scallop border in white for the trim above the floor and also die cut a frame for the wall hanging.  The sentiment for the wall hanging was gold heat embossed and placed behind the frame. (I sponged some white clouds in there too.)  The border at the top was printed off my computer and I used another scallop border die to cut it out.  I sponged some brown ink around the edges of the page and added all of the elements.

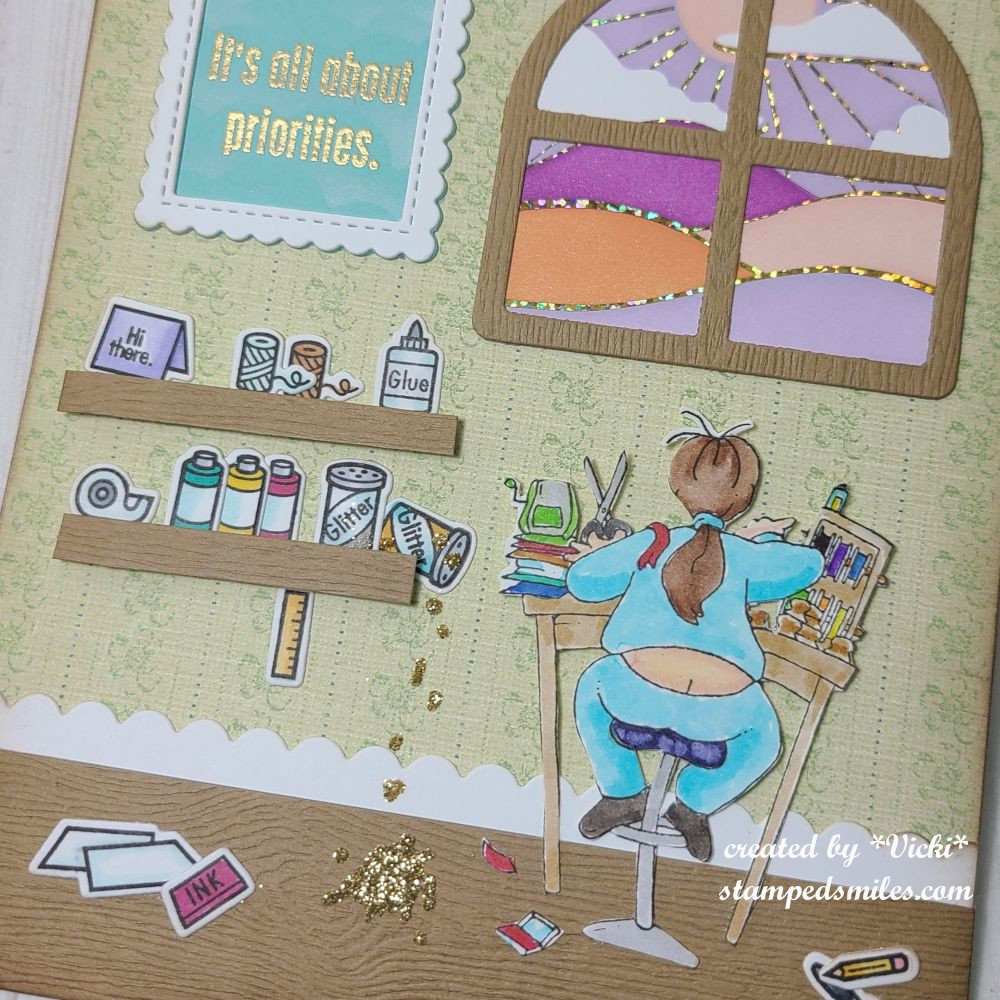
The stamper girl image was from an old company called “Hambo Stamps” (went out of business several years ago), but I think it’s so cute and funny!  This is where the gold embossed sentiment came from as well.   Had fun coloring her up with my watercolor pens.

For the window, I used the Taylored Expressions Foil It-Dreamscapes along with the coordinating stencils that I received from Virtual Stamp Joy earlier this month.  (I will share my projects in another post later on.)  I also used the TE Arch Windowpanes die set to cut out a frame in the woodgrain cardstock over one of the ink blended panels.

And lastly, the little crafty items on the shelves and floor came from the Lawn Fawn Just Add Glitter stamps & dies.  I stamped and colored those up with Copics to place on the shelves.  I also thought it would be fun to add some glitter spilling from the gold glitter bottle and dumping onto the floor…always a fun thing to happen in the craft room while you ignore it because you’re so intently working on something!

All this page did for me was to remind me that I really need to do more organizing!  I hope you’ve enjoyed my page today and take a hop on over to see Carol’s inspiration too!   Thanks so much for stopping in today!

(P.S.  I’m currently away and it will be a few days before I can reciprocate your comments, but I truly appreciate your kind words of support.)

Challenges:

  1. Art Journal Journey – Home Sweet Home
  2. Anything Goes in a Card Free Zone – March (no cards)

January 2025 “NEW” Art Journal Page-Smashing Our Stash Continues!

Hello friends!  I hope you’ve had a great month so far and staying crafty while also trying to keep warm and cozy!  Thank you for your kind support with my crafting journey and I’m so happy you’re here however you like to follow along.❤️

Today is the start of another year of art journaling and I’m thrilled that my crafty friend Carol (from Crafty-Stamper) is collaborating with me again this year to “SMASH OUR STASH”! We get creative trying to use up our never-ending stash piles along with a prompt for each month.  I know she always has great inspiration to share, so please check out her blog too! Here’s my AJ page with the “SMASH OUR STASH” January prompt of “NEW” (challenge/technique): 

As you know, we are forever trying to “smash our stash” and included within that stash are possibly some “new” stash or something that hasn’t been used before.  But if that’s not the case, then that’s totally fine too because there always seems to be a new “challenge” to over come or something like a new “technique” that you’ve always wanted to try and using up your stash helps with that too!  I’ve done this on my page in several ways…

NEW = art journal book used here.  I have a few AJ books that I haven’t used at all, so I pulled this one out which is a 5.5″ x 8.5″ spiral mixed media book.  I’ve never worked from a book before and not sure I like it as the pages do curl up on me and you can see that I’ve clipped it along the side to keep it from curling.  Going forward, I might make a separate page and then attach it to the book.  I’ve been so used to making my own book, so this was a new “challenge” for me to try.  If you art journal, how do you like to compile your pages together?

NEW = technique used for background with distress crayons.  I have a tin full of those distress crayons and I’ve barely even touched them, so I found a fun technique to try by taking a dotted stencil and applying gesso over the blank page.  I used several colors of the distress crayons to rub over the stenciled paint and then blended it together with a baby wipe.  It was fun!  (I’ve also used a black distress crayon around the edges of the page and went over the words inside the heart with a white distress crayon to mute it a bit.)

NEW = Lunar Paste colors used through a stencil.  I bought several colors of these metallic/shinny pastes last year and never broke them open, so I thought this would be a good time to see what they look like and they’re really pretty!

NEW = alphabet die letters used.  I got these set of alphabet dies with upper and lower case and haven’t had a chance to use them until this page.  I like that it includes both upper and lower because it seems you always have to get them separately.  

A closer view of the heart that I die cut.  I pulled out some cardstock in coordinating colors to match up with the distress crayons in the background and made strips with stamping words and then placing them together on the heart that I cut off the edges to keep the shape.

I was going for a “happy” rainbow style with all of it, but not sure after looking at it as I think it may be a bit too much/busy.  But, I’m just going to go with it and be happy! LOL  

I hope you’ve enjoyed my page today or at least have been inspired in some way!  Thank you for stopping in and I’ll see you soon!

Challenges:

  1. Art Journal Journey – DOTS
  2. Anything Goes in a Card Free Zone – no cards
  3. Ally’s Angels – #90 Anything Goes 
  4. Love to Scrap – #171 Anything Goes

December Art Journal Page-SNOW

**DON’T FORGET TO ENTER THE GIVEAWAY I’M OFFERING IN THIS POST – OR SCROLL BELOW THIS POST TO SEE!**

Hello crafty friends!  I hope that you all had a happy Christmas time with your loved ones and friends!  2025 is quickly approaching us and I know there will be lots of changes coming to look forward to!  Although I’m not feeling 100%, so I think I’m going to rest for the remainder of what’s left of the year🤒.

Today is the monthly Art Journal Page collaboration with my crafty friend, Carol (from Crafty-Stamper)! We get creative trying to use up our never-ending stash piles along with a prompt for each month.  I know she always has great inspiration to share, so please check out her blog too! Here’s my AJ page with the “SMASH OUR STASH” December prompt of “FOUND OBJECT(S)” (something you found or discovered):  (I’ve also combined 2 other past prompts with this one that I’ve missed out on earlier in the year!)

SNOW SNOW SNOW!  I know people that hate it and people that love it!  Whatever YOUR favorite place to be with it…or not…mine is being inside the warmth and watching it from the window!  I don’t mind shoveling if I need to help my husband, but I enjoy watching it peacefully from the window.

The prompt for THIS month (December) is “Found object(s)” and I found some VERY pretty blue ribbon on a present this year and decided to keep it…and I have plenty left for another project!  I used it above the die cut window.  (This page is my normal 5.5″ x 8.5″ with pre-punched holes at the top…I would have a book finished, but I wasn’t feeling well enough to get one done, so I’ll have to do it later.)

And for the other prompts I’ve missed this year:  August I was away and didn’t get to complete that one and the prompt for that month was “Vintage/Old“.  The background wallpaper area looks vintage to me and it came from a VERY old pack of paper that I’ve had along with the letters on the side of the window.  I also missed November and the prompt for that month was “Food“.  I love me a good cup of cocoa in the winter and I thought I would make myself some Linzer cookies to add with it in the shape of snowflakes with frosting on them!  I even took a bite out of the one in front of the cup!

Since I’m not feeling well, I’m going to stop typing and get some sleep now.  Please let me know if you have any questions about the page as I’d be happy to answer!

Thanks so much for taking the time to stop in!  I really appreciate it and will try to reciprocate when I feel better.  Happy New Year friends and I’ll see you in 2025!

Challenges:

  1. Art Journal Journey – SNOW

May AJ Page-Never Forgotten

Hello friends!  I hope that your month has been going well so far!  We’ve been doing lots of things outdoors and enjoying the time as much as possible until the temperatures climb higher and gets too hot.  I’m enjoying it now, but unfortunately, there will be storms this weekend in my area.

This weekend (Monday) is also Memorial Day for those of us in the U.S.  The date and name may vary by different countries, but it’s all about remembrance of our active military who’ve died.  I wanted to create my art journal page today in reflection of this.

  • It’s time for the monthly Art Journal Page collaboration with my crafty friend, Carol (from Crafty-Stamper)! We get creative trying to use up our never-ending stash piles along with a prompt for each month.  I know she always has great inspiration to share, so please check out her blog too! Here’s my AJ page with the “SMASH OUR STASH” May prompt of “MATERIAL”-(use fabric/cloth in some way): 

For the “material/cloth/fabric” prompt, it got me thinking because I don’t sew very much.  Sometimes I get out my sewing machine, but rarely!  I do have some fabric scraps and I thought it would be fun to cut out some squares with pinking shears!  Then I had to figure out what to do with them!

For the background:  I used a 5.5″ x 8.5″ of canvas heavy weight paper with the pre-punched holes at the top made with my Bind-It-All Machine and painted over it with some Crisp Blue Americana acrylic paint.  Once dry, I sprayed some silver metallic over it.  (You can see some of the shine at the top.)  I didn’t know how busy looking the fabric squares would look, so I decided to stop there.

Although I did cut several different squares of fabric patterns, my eyes were pulled to the red, white and blues which were perfect for Memorial Day.  I pulled out only those type of colors and used some fabric glue to attach over the background randomizing the patterns.  I also took some silver and navy ribbons to attach at the top and bottom areas where the fabric squares stopped.

The poem was a memory that I had during a vacation time with my husband when we ran into a memorial with a park bench and this poem was engraved with birds around it.  I looked it up and printed it out on my computer over a parchment paper.  I ripped it out and sponged the edges.  I also printed out the “forgotten” at the top and cut it out in a banner.  The poem was popped up with foam tape over the fabric squares.  “Do Not Stand at My Grave and Weep” – by Mary Elisabeth Frye

The stars and “never” letters were die cut and attached and I finished it with red rhinestones next to the “forgotten” banner.

  • Hope you’ve enjoyed my art journal page today and I really appreciate you stopping in!   I wish you all a wonderful weekend!

Challenges:

  1. Art Journal Journey – Poems
  2. Creative Artiste Anything Goes Mixed Media
  3. Love to Craft – #80 Anything Goes
  4. Simon Says Stamp Monday – Let’s Art Journal
  5. Crafting Happiness – #176 Any Craft

May AJ Page-Start a New Beginning

Hello friends!  I feel like the time keeps moving whether or not I do!  At the last minute before getting something done, I finally started this page! Once I got going, it was fun to just play around to see what happens!

It’s time for the monthly Art Journal Page collaboration with my crafty friend, Carol (from Crafty-Stamper)! We get creative trying to use up our never-ending stash piles along with a prompt for each month.  I know she will have some wonderful inspiration to share, so please check out her blog too! Here’s my AJ page with the “SMASH OUR STASH” May prompt of “FLOWERS”.

I noticed looking back on my AJ pages that I rarely use flowers on them unless it’s already apart of some papers that I’m using.  So this was a good challenge for me and it was fun to pull out these Tim Holtz “Flower Garden” stamps and dies from my collection to use for this one.

For the background:  I started with my 9″x6″ pre-punched holes of Canson 140# cold press watercolor and used a brick stencil and model paste.  I covered the entire page with some linen and umber paints mixed together.  I dabbed a bit of orange and spritzed it with water for a rust look.  I then went over that with a dry brush effect with some light ivory paint to bring out the texture of the brick pattern.

The flowers and stems were stamped over a watercolor Bristol that I previously made and splattered with chocolate paint.  I also covered the die cut flowers with shimmer spray. (Not sure if you can catch that in the photo.)  All of the stems were glued, and the flowers were glued with some being popped with foam tape.  I covered the bottom area over the stems with grit paste and then went over it with brown paint to give the appearance of dirt.

I took a Dylusions stamp and white heat embossed it over chocolate cardstock for the sentiment, hand cut it and popped up with foam tape at the top of the page.  I added a butterfly from a Tim Holtz ephemera pack.


Hope you’ve enjoyed my AJ page today!  Thanks for dropping in and checking it out!

Challenges:

  1. Art Journal Journey – Flowers
  2. Creative Artiste – Anything Goes Mixed Media
  3. Simon Says Stamp Monday – Watercolor (I watercolored the flowers/stems)
  4. Arty Divas – Anything Goes

October AJ Page-Believe in Fairytales

Hello friends!  It’s almost Halloween, can you believe?!  Today is actually hubby & my 23rd wedding anniversary that we are out celebrating and hanging out having fun right now.  So the theme of my page was designed to fit with this in mind today.

Hard to believe that the end of the month is here and also time for a monthly Art Journal page and collaboration with my crafty friend, Carol (from Crafty-Stamper), so please check out her blog for more inspiration too!🥰  
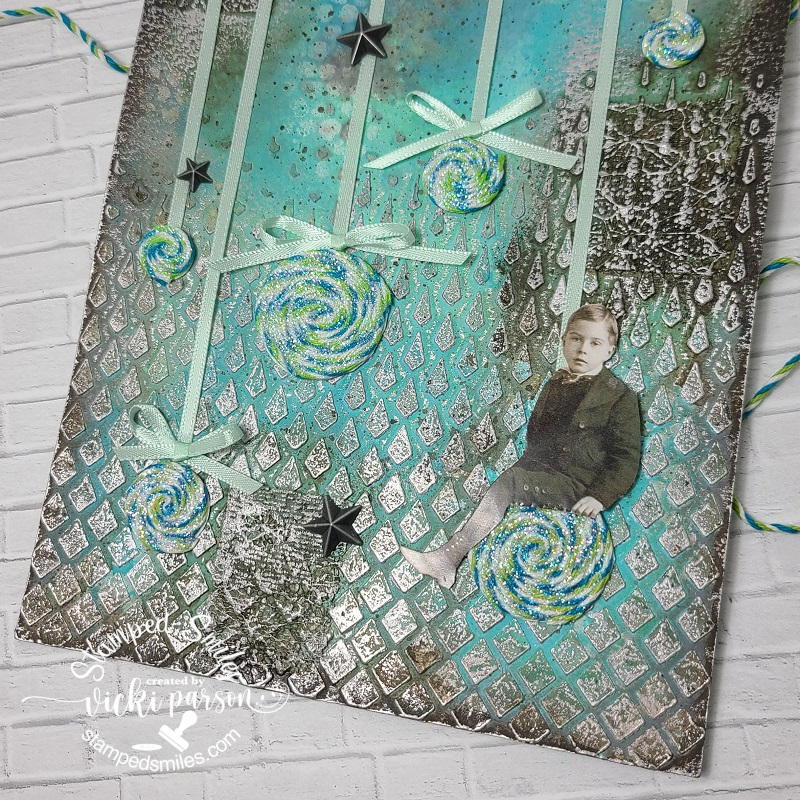
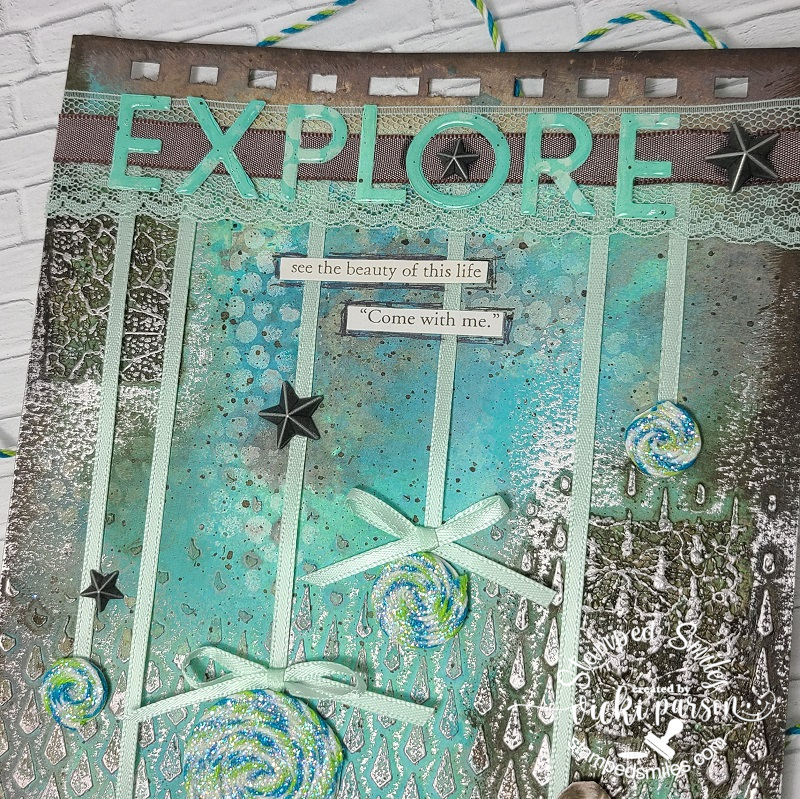
We’re trying to get creative by using up our never-ending stash piles!  So here’s my Art Journal inspiration with the “SMASH OUR STASH” October prompt of “UNUSED MEDIA from stash” :

As I was thinking of this month’s prompt, I was checking through my media to see if there was something that I had NOT used at all yet, but for the most part, I have. So, then my thoughts turned to what I haven’t used in quite a while.  So, after going through bottles and bottles of liquid watercolor…and throwing several away that were no good…I used some colors to create the background on my page using a 6″x9″ sheet of Bristol Smooth Watercolor paper with pre-punched holes.  I added drops of the watercolor on my glass mat, sprayed with water and “smooshed” the paper to create the look I wanted and let dry.  I wanted the smooth texture because I knew I was going to stamp over top.

Another media I haven’t used in a while is the Faber Castel Gelatos, which was used to create the moon.  I took a circle scrap, traced around it and then scribbled on a white and shimmer white gelato with my finger and rubbed into the areas I wanted.  I also pulled out several of the Lavina Stamps which were all used to create the scene over my watercolor background.  I had these stamps for quite some time but have never used any of these images.  So, I stamped stars at the top, the moon, the castle, the stagecoach and the tall grasses.  BEFORE all the stamping, I did use some gold paint to create splatters at the top.

After stamping the images, I took some torn scrap paper and sponged in the “ground” areas for my images.

For the quote, I printed out the “in fairytales” on my computer, added a die cut “Believe” sentiment cut from some gold glitter cardstock and attached it above the computer-generated wording.  I tore around this sentiment and sponged in some dark blue around it.  I finished off the page with some gold Stickles around the edges and drops randomly over the star areas.  I also took a glitter brush pen to add some sparkly highlights to the castle, ground areas and stagecoach.

Hope you’ve enjoyed my AJ page today & been inspired in some way.  Thanks so much for dropping in!

Challenges:

Art Journal Journey – Fairytales, Folklore and Fables (Mine is based on the Fairytale Cinderella)

February AJ Page-Explore

Hello friends!  Hope that you are doing well and staying warm and safe out there.  It’s been a few minutes since my last post, but that’s because I’ve been working very hard making wedding invites!  They’re coming together and almost done!  At some point I will share those, but today I have an AJ page to share with you!  It was nice to be able to take a break from creating invites to turning my mind on making a page.

**My crafty friend Carol is joining along with me each month to help inspire us both as well as others and I’m so thrilled to be doing this with her, so please click on her name and check out her page too!  We’re coming together as I think we both have an issue with “too much stash”…who doesn’t?!🙄 So I’ve come up with some ‘AJ prompts’ to help us both “Smash Our Stash” to start using it up for our own creative outlets and have some FUN!  The month of February gives us the prompt: ribbon/fibers/twine/thread

If you do any Art Journaling, then you know that sometimes when you have something in mind to do, it doesn’t always turn out like you think it will in your head!  This is the case with this one!  I like how it turned out and really enjoyed the process of it along with feeling good about using up some ribbon and twine overflowing in my stash!

I’m continuing on with making my own AJ book, so I’ve got the holes ready at the top of my 6″ x 9″ 140# watercolor page.  I like to use something really thick as I think it helps to hold all of the wet media/paint without it warping too badly.  

I’ve started by using a Tonic Studios “Falling Diamonds” stencil with embossing paste towards the bottom and not going all the way up to the top of the page.  I then used Salvaged Patina and Mermaid Lagoon Distress Oxide Sprays over top letting colors mix and run.  Once dried, I added some sponged white paint over a Tim Holtz stencil.  I then took some Ranger Ground Espresso paint and added some paint splatters over it, set aside to dry.  Then came my first introduction of the prompt onto my page.  I took some left over pieces of lace (in fact this was the last of this piece from my stash…why I kept it?  Who knows!!!) and glued it randomly onto the background.  Once dried, I added some water-downed Ground Espresso paint over those areas, sprayed with water and let run.  I also took the same paint and sponged around the edges to darken them up.  After it dried, I took some Art Alchemy “Old Silver” wax and rubbed over the raised areas of the paste and lace with my fingers until it showed up as I wanted it to.

I decided at this point, that I wasn’t going to do what I had planned in my head as I thought the background was going to turn out much lighter and brighter.  It turned out more antique/grunge, but I was still happy with it and just changed the plan a bit.  I don’t know what these are called, but I named them “Twine Twirls“.  I took a double-sided adhesive sheet and covered a piece of cardstock with one side, die cut a couple of different sized circles, took the backing off the other side of the adhesive and used some twine in my stash to continue to swirl around the center of the adhesive circle until reaching the edges.  (Do you ever get twine wrapped around one of your craft orders and save it?  That’s what all of this twine is from…can you believe I saved them and got plenty more to use?!!)  I then took a piece of VERY old ribbon from my stash and attached to the back of each “Twine Twirl”.  I laid these over the page where I wanted it and added an adhesive strip at the top of the page right below the holes to secure them as well as glued the back of the circles.  You can also see that I’ve attached some bows above 3 of the “Twine Twirls” too.  I used some Stickles glitter glue and brushed over top of each “Twine Twirl” and set aside to dry.

I also fussy cut out one of the Tim Holtz paper dolls to glue over one of the “Twine Twirls” and then used some foam tape to pop him up over the page as needed once the glitter had dried.

For the top of the page where I’ve added the “Twine Twirl” ribbons, I took another piece of lace that matched that ribbon and covered it over top of the ends.  Since it’s lace, you can see through it, so I layered on another piece of brown taupe ribbon in the center of that. (I’ve used scissors to cut the ends off the page.)

For the lettering, I used some of the items I used for the background page onto a piece of blank cardstock and then cut the letters out using the Taylored Expressions Cap It Off Alpha taking off the frame around the letters.  I glued the letters over top of the ribbon and then covered each letter with glossy accents.

The phrases come from a Tim Holtz “Clippings” sticker book and then I took a brown pen to outline around it.  I finished the page by adding some of the Tim Holtz stars adornments in random areas.

I really hope you’ve enjoyed our AJ pages today or have been inspired in some way!  Be sure to join us next month too!  Thank you so much for dropping in and I’ll see you soon!

Challenges:

  1. Art Journal Journey – What’s Your Style? (I love using stencils most of the time but enjoy “exploring” different medias too!  Not sure about a specific style…I like them ALL!)
  2. Simon Says Stamp Monday – Art Journal
  3. Try It On Tuesday – Add Some Texture
  4. Creative Artiste – #79 Anything Mixed Media Goes
  5. Mixed Media Lovers – #10 Anything Mixed Media
  6. Arty Divas – Anything Goes
  7. Simon Says Stamp Wednesday – Anything Goes