October AJ Page-Believe in Fairytales

Hello friends!  It’s almost Halloween, can you believe?!  Today is actually hubby & my 23rd wedding anniversary that we are out celebrating and hanging out having fun right now.  So the theme of my page was designed to fit with this in mind today.

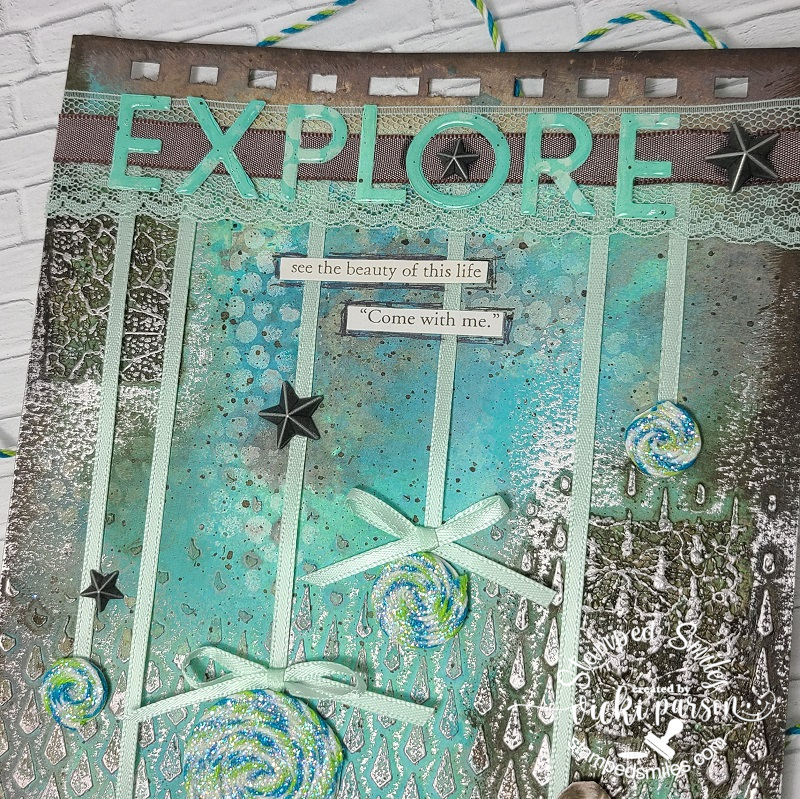
Hard to believe that the end of the month is here and also time for a monthly Art Journal page and collaboration with my crafty friend, Carol (from Crafty-Stamper), so please check out her blog for more inspiration too!🥰  We’re trying to get creative by using up our never-ending stash piles!  So here’s my Art Journal inspiration with the “SMASH OUR STASH” October prompt of “UNUSED MEDIA from stash” :

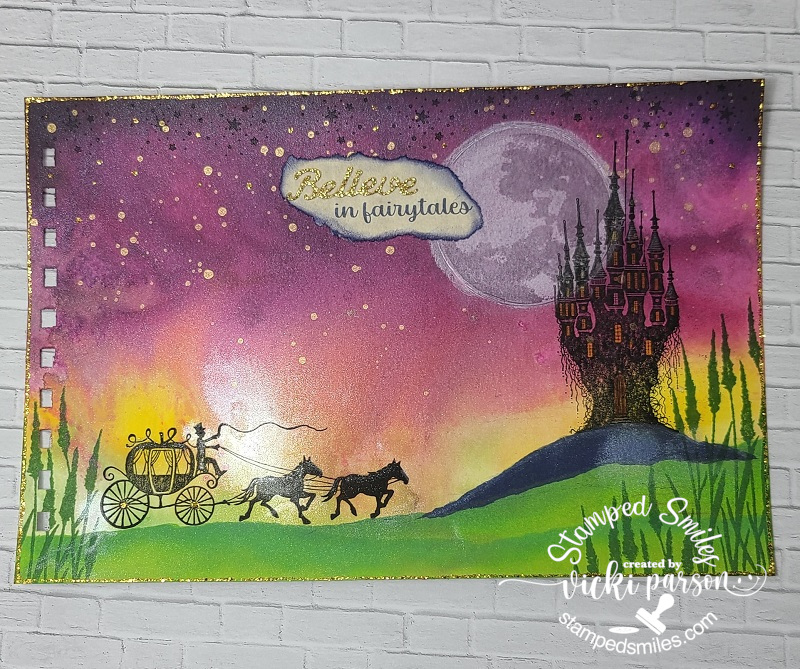
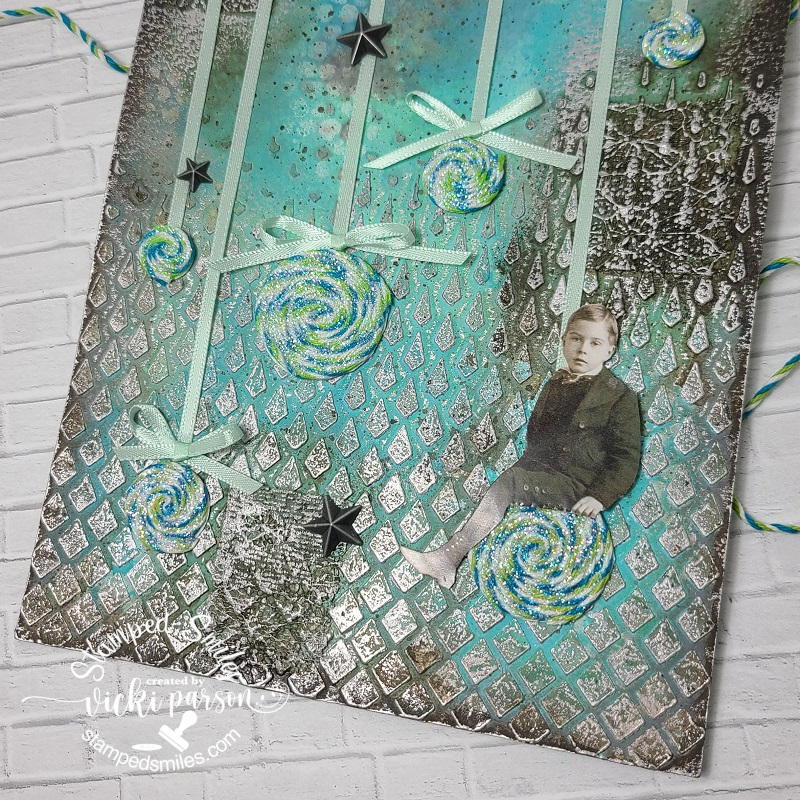
As I was thinking of this month’s prompt, I was checking through my media to see if there was something that I had NOT used at all yet, but for the most part, I have. So, then my thoughts turned to what I haven’t used in quite a while.  So, after going through bottles and bottles of liquid watercolor…and throwing several away that were no good…I used some colors to create the background on my page using a 6″x9″ sheet of Bristol Smooth Watercolor paper with pre-punched holes.  I added drops of the watercolor on my glass mat, sprayed with water and “smooshed” the paper to create the look I wanted and let dry.  I wanted the smooth texture because I knew I was going to stamp over top.

Another media I haven’t used in a while is the Faber Castel Gelatos, which was used to create the moon.  I took a circle scrap, traced around it and then scribbled on a white and shimmer white gelato with my finger and rubbed into the areas I wanted.  I also pulled out several of the Lavina Stamps which were all used to create the scene over my watercolor background.  I had these stamps for quite some time but have never used any of these images.  So, I stamped stars at the top, the moon, the castle, the stagecoach and the tall grasses.  BEFORE all the stamping, I did use some gold paint to create splatters at the top.

After stamping the images, I took some torn scrap paper and sponged in the “ground” areas for my images.

For the quote, I printed out the “in fairytales” on my computer, added a die cut “Believe” sentiment cut from some gold glitter cardstock and attached it above the computer-generated wording.  I tore around this sentiment and sponged in some dark blue around it.  I finished off the page with some gold Stickles around the edges and drops randomly over the star areas.  I also took a glitter brush pen to add some sparkly highlights to the castle, ground areas and stagecoach.

Hope you’ve enjoyed my AJ page today & been inspired in some way.  Thanks so much for dropping in!

Challenges:

Art Journal Journey – Fairytales, Folklore and Fables (Mine is based on the Fairytale Cinderella)

Smash Our Stash-“Learning to Fly” AJ Page

Hello friends!  My fellow U.S. friends will be celebrating Memorial weekend which means that the end of the month is here already!  Summer is coming very quickly and it seems that time is really flying by!  

The end of the month also brings the monthly AJ page collaboration with my crafty friend, Carol (from Crafty-Stamper), so please check out her blog for more inspiration too!  We’re trying to get creative by using up our never-ending stash piles!  So here’s my Art Journal inspiration with the “SMASH OUR STASH” May prompt of: “ephemera/chipboard/cut-outs, etc.“:

With the AJ prompt this month of “ephemera” my first thought turned to the the H-U-G-E pile of packages that I have of those Tim Holtz Idea-ology ephemera and paper dolls packs.  There are actually SO many different pieces in just one package that I decided to concentrate on just one of those packages from the “Botanical” collection. (I did pull in one more layer from the “Snippets” pack as well.)  I actually love the images which pulled me in to purchase them, but there they sit and never get used…so I’m using some today! Yay!  That “Botanical” pack is my fave with the birds and butterflies in there!

For my page background:  I started with my usual 6″ x 9″ watercolor 140# paper with the pre-cut holes at the top for my book.  I glued some of the “Tim Holtz Idea-ology Tissue Wrap” ripped pieces over the blank background first.  I then took a baby wipe and several colors of “DecoArt Media Fluid acrylics” and blended them together until I achieved desired look.  Trying to get another color over top, I decided to pull out the “Distress Oxide Spray Salvaged Patina” after the paint had dried up.  To help spread some of it around, I also sprayed with water too.  I was pleased with all of the coloring in the background, but felt it needed a toned down border because of the Vintage looking ephemera, so I blended some “Vintage Photo and Black Soot Oxide Inks” at the edges.

At this point, I started adding images by working on the stamping around the edges with a script text stamp using a hybrid brown ink in random places.  I also used the same ink to stamp a couple of the flying birds in the background.  This is where I thought it would a good idea to add some splattering with white and brown paint.  I finished it with more splatters of some “Liquid Pixie Dust” which gave it some pretty subtle sparkle all over.

So starting at top of my page, I decided to start adding the images to create my scene.  I ended up die cutting a branch from some dark brown cardstock and attached it to the edge of the page and then took one of those ephemera birds and popped it with foam tape over the branch.  I glued the butterfly above the bird and the “daisy” flowers off to the right were glued down while keeping in mind the placement of the large birds at the bottom.

The sentiment came from one of the stickers from the “Tim Holtz Idea-ology Clippings Sticker Book”.  I used a brown Micron pen to sketch around it, but decided it was too light, so I went around it again with a black one too.

For the bottom portion, you can see that I’ve glued down the little tag under the title. (I added a piece of twine around it before I attached it.) I also glued the corner floral spray in the bottom left of the page.  I’ve used foam tape to pop up the large birds as well as the butterfly above the floral spray.

The last thing I did was to grab the dark brown “Big Brush Marker” to add some shading around some of the ephemera pieces.  I didn’t do anything to the pieces that were popped up with foam tape.

Hope you’ve enjoyed my Art Journal inspiration today!  Thanks so much for joining me and Carol for our fun collaboration and you can always have fun following along with us every month!

Enjoy your Memorial Day weekend and please stop to remember and honor those who’ve sacrificed for us.

I’ll see you again soon!

Challenges:

  1. Art Journal Journey – Birds
  2. Creative Artiste – Anything Goes Mixed Media #82
  3. Mixed Media Lovers – Anything Mixed Media
  4. Dragonfly Dreams – Butterflies and/or Flowers
  5. The Corrosive – Anything Goes
  6. Arty Divas – Anything Goes

February AJ Page-Explore

Hello friends!  Hope that you are doing well and staying warm and safe out there.  It’s been a few minutes since my last post, but that’s because I’ve been working very hard making wedding invites!  They’re coming together and almost done!  At some point I will share those, but today I have an AJ page to share with you!  It was nice to be able to take a break from creating invites to turning my mind on making a page.

**My crafty friend Carol is joining along with me each month to help inspire us both as well as others and I’m so thrilled to be doing this with her, so please click on her name and check out her page too!  We’re coming together as I think we both have an issue with “too much stash”…who doesn’t?!🙄 So I’ve come up with some ‘AJ prompts’ to help us both “Smash Our Stash” to start using it up for our own creative outlets and have some FUN!  The month of February gives us the prompt: ribbon/fibers/twine/thread

If you do any Art Journaling, then you know that sometimes when you have something in mind to do, it doesn’t always turn out like you think it will in your head!  This is the case with this one!  I like how it turned out and really enjoyed the process of it along with feeling good about using up some ribbon and twine overflowing in my stash!

I’m continuing on with making my own AJ book, so I’ve got the holes ready at the top of my 6″ x 9″ 140# watercolor page.  I like to use something really thick as I think it helps to hold all of the wet media/paint without it warping too badly.  

I’ve started by using a Tonic Studios “Falling Diamonds” stencil with embossing paste towards the bottom and not going all the way up to the top of the page.  I then used Salvaged Patina and Mermaid Lagoon Distress Oxide Sprays over top letting colors mix and run.  Once dried, I added some sponged white paint over a Tim Holtz stencil.  I then took some Ranger Ground Espresso paint and added some paint splatters over it, set aside to dry.  Then came my first introduction of the prompt onto my page.  I took some left over pieces of lace (in fact this was the last of this piece from my stash…why I kept it?  Who knows!!!) and glued it randomly onto the background.  Once dried, I added some water-downed Ground Espresso paint over those areas, sprayed with water and let run.  I also took the same paint and sponged around the edges to darken them up.  After it dried, I took some Art Alchemy “Old Silver” wax and rubbed over the raised areas of the paste and lace with my fingers until it showed up as I wanted it to.

I decided at this point, that I wasn’t going to do what I had planned in my head as I thought the background was going to turn out much lighter and brighter.  It turned out more antique/grunge, but I was still happy with it and just changed the plan a bit.  I don’t know what these are called, but I named them “Twine Twirls“.  I took a double-sided adhesive sheet and covered a piece of cardstock with one side, die cut a couple of different sized circles, took the backing off the other side of the adhesive and used some twine in my stash to continue to swirl around the center of the adhesive circle until reaching the edges.  (Do you ever get twine wrapped around one of your craft orders and save it?  That’s what all of this twine is from…can you believe I saved them and got plenty more to use?!!)  I then took a piece of VERY old ribbon from my stash and attached to the back of each “Twine Twirl”.  I laid these over the page where I wanted it and added an adhesive strip at the top of the page right below the holes to secure them as well as glued the back of the circles.  You can also see that I’ve attached some bows above 3 of the “Twine Twirls” too.  I used some Stickles glitter glue and brushed over top of each “Twine Twirl” and set aside to dry.

I also fussy cut out one of the Tim Holtz paper dolls to glue over one of the “Twine Twirls” and then used some foam tape to pop him up over the page as needed once the glitter had dried.

For the top of the page where I’ve added the “Twine Twirl” ribbons, I took another piece of lace that matched that ribbon and covered it over top of the ends.  Since it’s lace, you can see through it, so I layered on another piece of brown taupe ribbon in the center of that. (I’ve used scissors to cut the ends off the page.)

For the lettering, I used some of the items I used for the background page onto a piece of blank cardstock and then cut the letters out using the Taylored Expressions Cap It Off Alpha taking off the frame around the letters.  I glued the letters over top of the ribbon and then covered each letter with glossy accents.

The phrases come from a Tim Holtz “Clippings” sticker book and then I took a brown pen to outline around it.  I finished the page by adding some of the Tim Holtz stars adornments in random areas.

I really hope you’ve enjoyed our AJ pages today or have been inspired in some way!  Be sure to join us next month too!  Thank you so much for dropping in and I’ll see you soon!

Challenges:

  1. Art Journal Journey – What’s Your Style? (I love using stencils most of the time but enjoy “exploring” different medias too!  Not sure about a specific style…I like them ALL!)
  2. Simon Says Stamp Monday – Art Journal
  3. Try It On Tuesday – Add Some Texture
  4. Creative Artiste – #79 Anything Mixed Media Goes
  5. Mixed Media Lovers – #10 Anything Mixed Media
  6. Arty Divas – Anything Goes
  7. Simon Says Stamp Wednesday – Anything Goes