**DON’T FORGET TO ENTER THE GIVEAWAY I’M OFFERING IN THIS POST – OR SCROLL BELOW THIS POST TO SEE!**
Hello crafty friends! I hope that you all had a happy Christmas time with your loved ones and friends! 2025 is quickly approaching us and I know there will be lots of changes coming to look forward to! Although I’m not feeling 100%, so I think I’m going to rest for the remainder of what’s left of the year🤒.
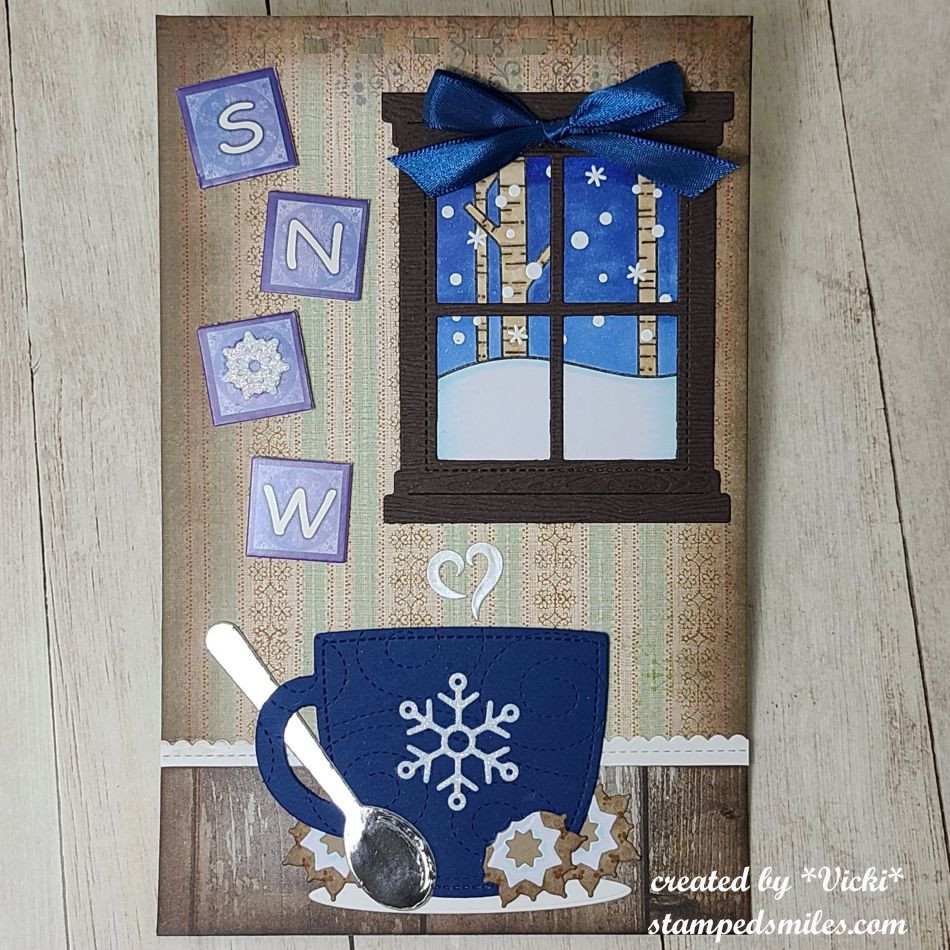
Today is the monthly Art Journal Page collaboration with my crafty friend, Carol (from Crafty-Stamper)! We get creative trying to use up our never-ending stash piles along with a prompt for each month. I know she always has great inspiration to share, so please check out her blog too! Here’s my AJ page with the “SMASH OUR STASH” December prompt of “FOUND OBJECT(S)” (something you found or discovered): (I’ve also combined 2 other past prompts with this one that I’ve missed out on earlier in the year!)
SNOW SNOW SNOW! I know people that hate it and people that love it! Whatever YOUR favorite place to be with it…or not…mine is being inside the warmth and watching it from the window! I don’t mind shoveling if I need to help my husband, but I enjoy watching it peacefully from the window.
The prompt for THIS month (December) is “Found object(s)” and I found some VERY pretty blue ribbon on a present this year and decided to keep it…and I have plenty left for another project! I used it above the die cut window. (This page is my normal 5.5″ x 8.5″ with pre-punched holes at the top…I would have a book finished, but I wasn’t feeling well enough to get one done, so I’ll have to do it later.)
And for the other prompts I’ve missed this year: August I was away and didn’t get to complete that one and the prompt for that month was “Vintage/Old“. The background wallpaper area looks vintage to me and it came from a VERY old pack of paper that I’ve had along with the letters on the side of the window. I also missed November and the prompt for that month was “Food“. I love me a good cup of cocoa in the winter and I thought I would make myself some Linzer cookies to add with it in the shape of snowflakes with frosting on them! I even took a bite out of the one in front of the cup!
Since I’m not feeling well, I’m going to stop typing and get some sleep now. Please let me know if you have any questions about the page as I’d be happy to answer!
Thanks so much for taking the time to stop in! I really appreciate it and will try to reciprocate when I feel better. Happy New Year friends and I’ll see you in 2025!
Hello friends! Hope you’re enjoying your day so far and staying warm! We’ve just recently survived a very cold below freezing temps in my area, so going outdoors is not that pleasant even bundled up! So with that, I stay inside and find crafting to be my happy space!
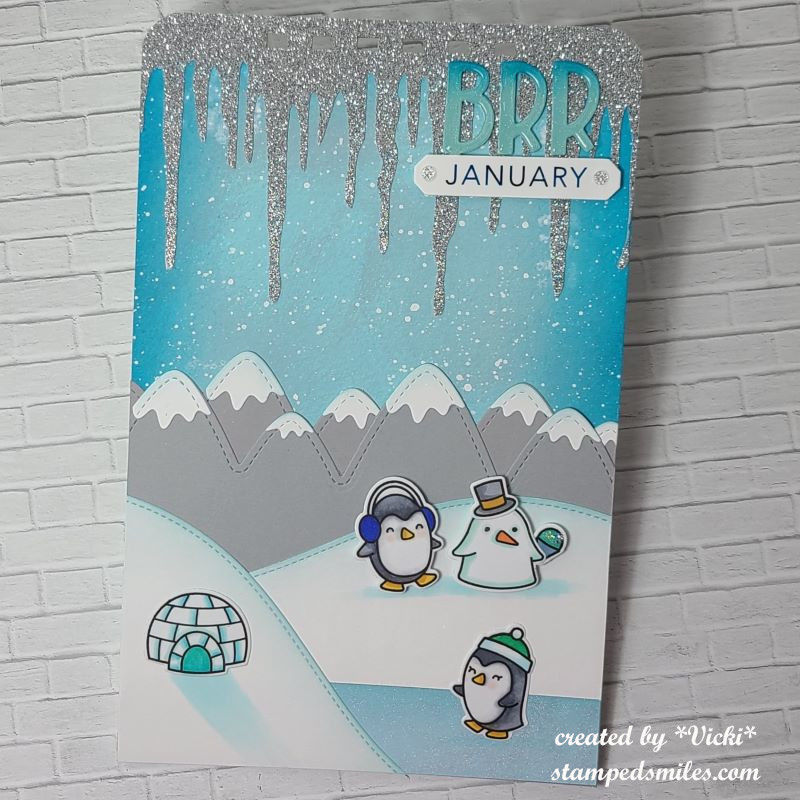
I’m very excited to be joining with my crafty friend, Carol (from Crafty-Stamper) for another year of SMASHING OUR STASH!🎉 I love the inspiration that we bring each other as well as accountability for getting those piles of stash used up! Thank you for joining me again and please be sure to check out the wonderful inspiration on her blog too! Here’s my AJ page with this month’s prompt of “COLD” (anything related to this word):
Of course when I think of cold, I think of my favorite animal…the penguin!! I pulled out some Lawn Fawn stamps to use on my page today. Lots of blues and silver and sparkle help with the feeling of cold too! I have so many sparkly items, so it was great to use some up!
For the background: I started with a piece of Canson Watercolor 140# coldpress 5.5″x8.5″ pre-punched holes at the top and covered it with blue colored acrylic paints using a baby wipe. I also went around the edges with a darker blue and then used a number stencil with white paint which you can barely see as I’ve covered most of it up. I then splattered with white paint using a fan brush for the snow.
I also found a cool icicle border and cut it out with my Cricut machine in silver glitter cardstock for the top of the page. I then used my Zutter machine to punch the holes again and used a corner chomper to round the top edges.
For the bottom: I used all Lawn Fawn border dies for the mountains and snow hills. The blue ice water the penguin is standing on is just a straight piece of blue cardstock covered with a glitter brush pen. I also used Stickles glitter to cover the snow cone that the penguin snowman is holding.
The lettering was done with a Lawn Fawn alphabet die that I ink blended in blues and covered with crystal effects. I foiled over the “January” word with blue foil and cut it out with a die and placed a couple of silver rhinestones next to it. This was popped up with foam underneath the “BRR” letters.
I hope you’ve enjoyed my AJ page today and have been inspired in some way! Thanks so much for stopping in!
Hello friends! Hope everyone has had a wonderful Thanksgiving for those that celebrate. And with that, there is also the Black Friday deals, and today is “small business Saturday”. So have you’ve gotten some really good deals or do you shop during this time? I don’t really shop too much during this time, but I enjoy hearing about the great deals everyone has gotten!
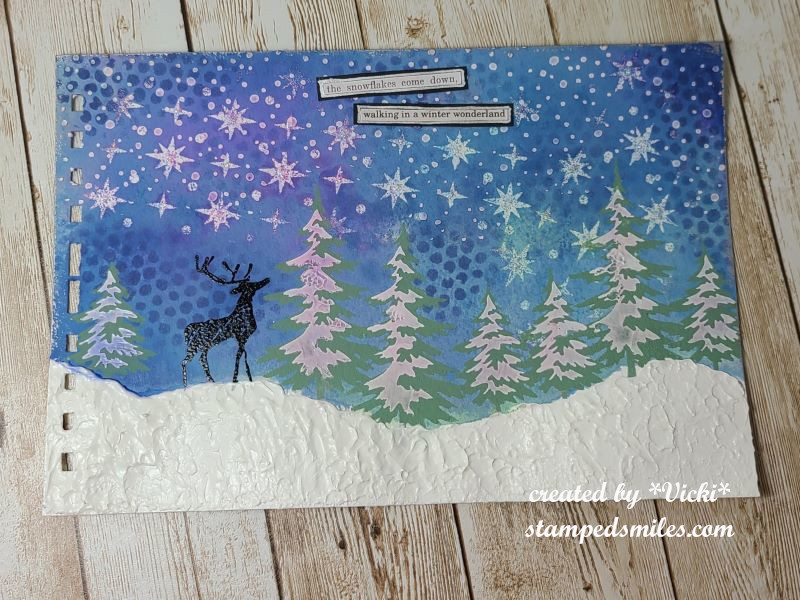
The last Saturday of the month also brings us to the monthly Art Journal Page collaboration with my crafty friend, Carol (from Crafty-Stamper)! We get creative trying to use up our never-ending stash piles along with a prompt for each month. I know she always has great inspiration to share, so please check out her blog too! Here’s my AJ page with the “SMASH OUR STASH” November prompt of “STENCILS” (can also make your own):
I do love stencils, don’t you?! I have lots of them in my stash and I don’t always use them as much as I’d like to, so how fun to pull out several of them for this month’s prompt! All of the ones I’ve used on my page are from Tim Holtz. The entire page is stencil expect for the deer, sentiment and bottom snow! (I would’ve used the deer for a stencil too, but I don’t have one.)
For the background: Started with my usual 6″x9″ 140# watercolor pre-punched holes on the side. I took the large star looking stencil and sponged some VersaMark ink over it towards the top of the page and heat embossed it with clear EP. (This made a “resist” for the ink I layered on top.) I took a long strip of masking paper and ripped it to create some hills for the bottom. I needed to mask so the colors didn’t go over it. I took several different colors of Distress Oxide sprays along with spritzing with water to help the colors move around and made a few layers with this. Once dry, I went over the background with the dotted stencil and sponged ink over it with a blue color.
For the tree stencil, I needed to be sure that it would cover the background I created, so I used some green paint to sponge over the stencil, but because the background is blue, it’s sort of harder to see the green. This stencil also had a second part where you can cover each tree with another layer for either another green or snow. So I used some Hero Arts white paste to cover it with. I also used the same paste to add another layer of stencil to the sky for snowfall.
The silhouette deer is a stamp that I stamped with black pigment ink and then I heat embossed it with clear EP. My final touch to the page was to take the Hero Arts white paste and cover the hills at the bottom using my spatula. Really love the dried look of the paste as it has a wonderful shine to it which works great for snow! It didn’t take as long as I thought it would to dry. (About 2 hours it was hardened.)
I found a couple of the Tim Holtz sticker quotes to go with my theme, added to black cardstock and went around the edges with a silver paint pen. I cut them out with scissors and glued to the page. I took some silver wax and went around the edge of the page with my finger and lastly added some glitter drops to a couple of the centers of the “stars” in the sky.
Hope you’ve enjoyed my art journal page today or have been inspired! I appreciate you taking the time to stop in!
Challenges:
Art Journal Journey – Nature (I love nature in the wintertime! So pretty covered in snow!)
It is here! The end of 2022 has arrived weather you are ready for it or not! I know as I’ve gotten older the time seems to pass more and more quickly. Each year I usually go through all of the things that I didn’t have time to do. This year I’m going to look at all of things that I DID do instead! I look forward to a wonderful year ahead and I hope you are as well!
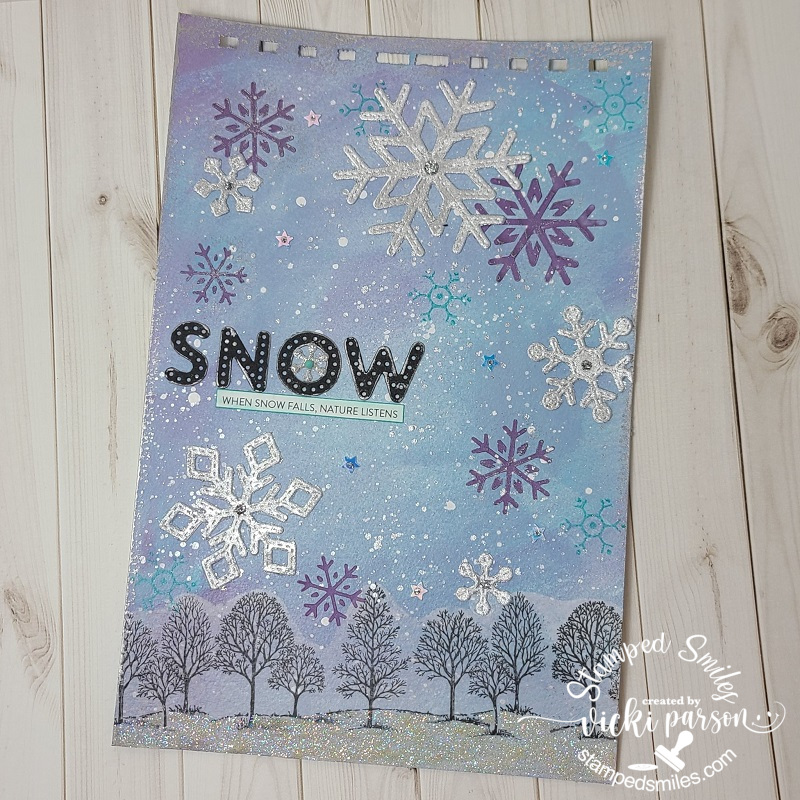
For this entire year, I’ve had such a wonderful time creating my AJ pages at the end of each month with my crafty friend, Carol (from Crafty-Stamper)! Thanks SO MUCH to her for the wonderful inspiration and joining in the venture with me! I know she’ll have something wonderful, so please check out her blog for an AJ page too! We’ve gotten creative by using up our never-ending stash piles! (I look forward to doing this for another year each month in 2023 and I’ll hope you’ll be here too!) Here’s my final Art Journal inspiration for 2022 with the “SMASH OUR STASH” December prompt of “Oldest Stash” :
It’s a bit challenging for me to FIND my “oldest stash” as I’ve been a bit of a collector over the years. So I’ve pulled out a very old, but favorite stamp set of mine from Stampin’ Up! called “Lovely as a Tree” from 2001. The container broke when I opened it up to take a stamp out! LOL I’ve also pulled out my Pearl Ex powders and some gilding flakes from my older media stash. It’s a good thing that powders don’t go bad otherwise I wouldn’t have been able to use them!🙄
For the Background – I’ve used some mix of paints and splattered some white paint over it for the snow. The trees at the bottom were stamped over vellum and then I cut it out and attached that to the bottom of the page so that they were a nice vibrant black as I didn’t think they would stamp over the paint very well. I did take a snowflake stamp (not too old) and stamped a few randomly over the background in teal ink. (water-proof)
For the Pearl Ex Powders – I mixed some Misty Lavender Pearl Ex with embossing paste and used a snowflake stencil to randomly add this to the background.
For the Gilding Flakes – I die cut some snowflakes with double sided adhesive sheets will make the front sticky. This made it so I could rub in the gilding flakes over them. They did turn out very pretty!
The “SNOW” letters were die cut and I found a neat winter clipping from my sentiment stash to add below it after I sponged some teal ink around it. I also die cut another tiny snowflake in the center of the ‘O’ with glitter cardstock and attached a tiny teal rhinestone in the center of it. I rubbed some silver wax around the letters and around the edges of the page. Lastly, I’ve added some star sequins and filled the centers of those and the gilded snowflakes with some silver Stickles. I covered the bottom of the page under the trees with glue and covered it with sparkly glitter.
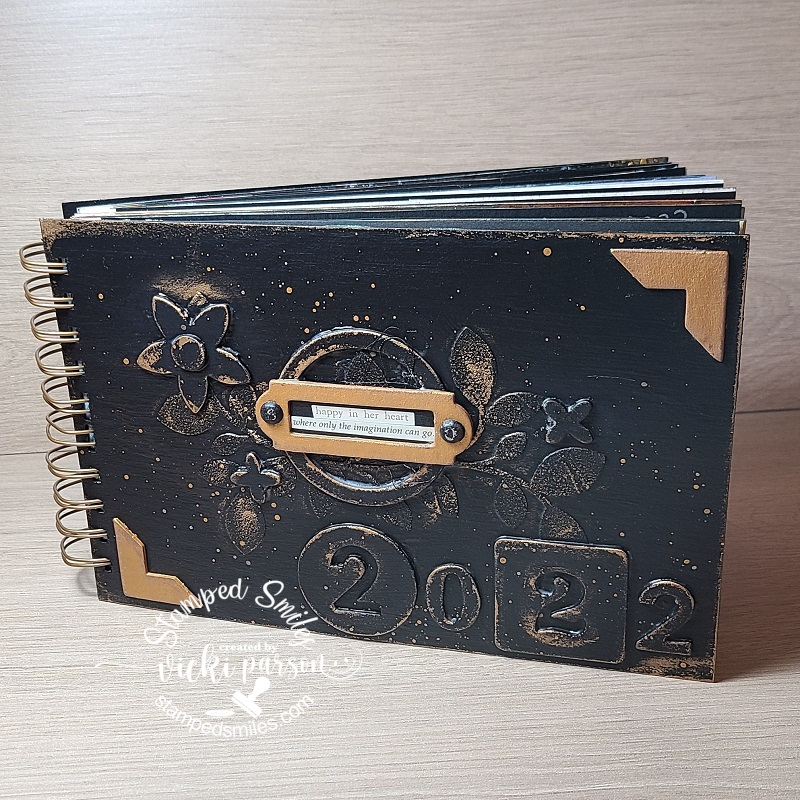
So I thought that since I’ve done an AJ page every month this year that not only did I need to close up the year, but I also needed to close the book to all the AJ pages I made from 2022 by finally finishing up a book to put them all in!
I made the covers with some chipboard along with some “old” chipboard pieces from my stash and did some painting with a bit of mixed media gold wax and stenciling. I wanted to be sure to add the year to the front and a little quote from my sticker book that says: “happy in her heart where only the imagination can go”
I fit all of the AJ pages completed this year along with a few extras that were created from before with unknown dates, added the front and back covers and used my Zutter Bind-it-All machine to add the spiral wire for a book. (This was the reason all of my pages had the pre-punched holes in them when I posted each month.)
That finishes up the 2022 year on my blog. I hope you’ve enjoyed my posts weather it’s for inspiration or just a smile. Either way, I’m so thankful that you have joined me this past year and your friendships. I look forward to a productive and crafty year ahead in 2023!
Hello friends! We’re here! We made it to Christmas Eve!😀 My cards have been sent out, my cookies are done and delivered as well as my other little gifts. This is quite a long post, so grab your hot cocoa or whatever your favorite beverage is and a Christmas cookie or treat and let’s see what I’ve been doing this past week:
So, starting with my Christmas cards, I usually make around 40ish cards each year give-or-take and I only like to make a handful of them at a time for not only boredom of the same design, but for product depletion as well.
So back in July, I purchased this really adorable card kit from Taylored Expressions (included was the Frosty Background Cling and Clear Combo set + more.) that came with coordinated colored envelopes as well as the seals. So, I made a set of four different colored designs in two of each one. The snowmen were popped up with foam squares over the backgrounds and I added some fun Snowflake bits that were included with the kit as well.
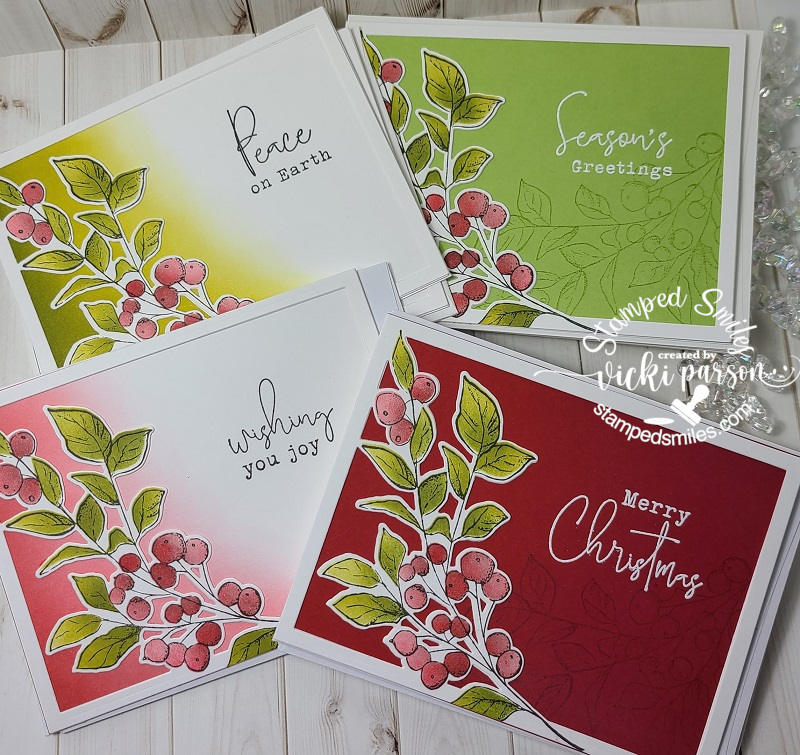
Next up is another set of cards I made using some more gorgeous products from Taylored Expressions. I’ve used the Seasonal Sprig stamp and die combo along with the stencil to color them in with. Some of these I ink blended the backgrounds, so I just used cardstock with a watermark effect and a white heat embossed sentiment. I used the die to cut an extra frame behind the stamped one for added stability. I made 4 of each design shown here for a total of 16.
I then made another set of four using the same products, but for these I gold heat embossed the image and sentiment and then used some watercolor for coloring it in with. I also got some of these coordinating envelope seals to use on about 10 of the 16 cards. (No longer available in store.) I’ve also partially ink blended the background behind the frame on these as well.
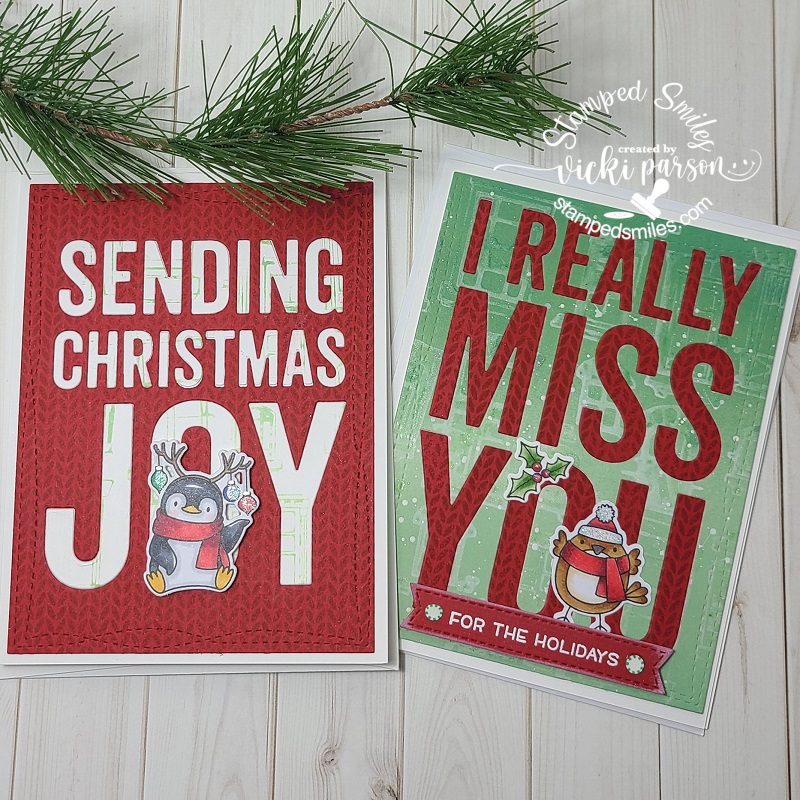
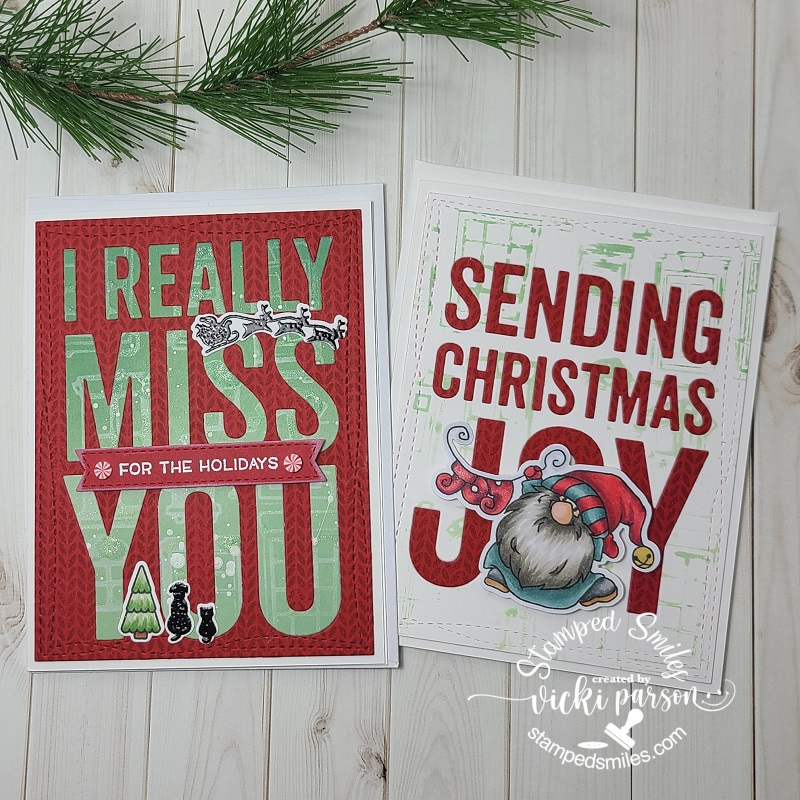
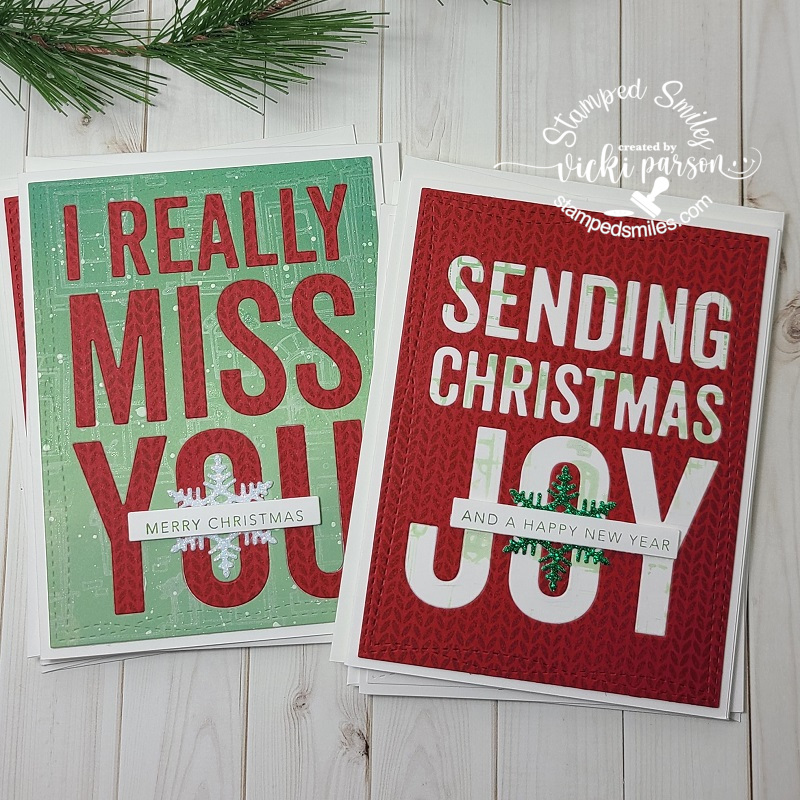
Here are some cards that I’ve actually made a total of 8 similar designs using the large wording background dies from My Favorite Things. I’ve used the “Sending Christmas Joy” and “I Really Miss You” dies for all eight of these, but only after I stamped the backgrounds. I used the MFT Knitted Sweater BG stamp and the Alley Cat BG stamp for a couple of backgrounds before I die cut them. Then I used the die cut letters to place into the other backgrounds on the cards to get that look. So it was like creating 2 cards with one cut and filling it all in. (For the Alley Cat background stamp, I ink blended the background and stamped it as a watermark effect over it and then took the “left over” ink from that to stamp it again to create an additional BG.) I then cut out each of the panels with the MFT Wonky Stitched Rectangle die and placed over a white A2 sized side folding card base. The penguin image is from the MFT Holiday Penguins set and the bird on the other one is from the MFT “Tweet Holidays” (Not found in store.)
And then of course you don’t want to waste any backgrounds you’ve made, so you make more cards! I’ve used a couple more images to personalize the design for people too. I combined the sets Newton’s Nook Whispering Pines and the Lawn Fawn Winter Skies. I think I took a set from them to create a sentiment to fit my cards as well. (not sure from which set.)
For the other card, I took this cute image from the Whimsy Stamps Gnome for Christmas stamp set, colored him up with my copics and cut him out with the coordinating die to pop him up over my card.
And then for these set of 4 cards, I’ve just die cut a snowflake from some glitter paper and glued in the center of the “O” on each design and popped up a sentiment over that with foam tape stamped and die cut from the Taylored Expressions Mini Strips – Holiday and Mini Strips die.
And as you remember in a previous post those “recycled Crystal Light containers” that I make, I made another set of three of them here. This time, I’ve used this snowman stamp. I just used my scissors to fussy cut those cute snowmen out as they were pretty simple to do and then I popped them up over an ink blended tag using the stencil over them. I used coordinating cardstock and silver heat embossed the sentiment strip at the bottom and of course added my “snowman soup” poem on the back of the containers. I’ve also added a layer of silver mirror cardstock behind the tags.
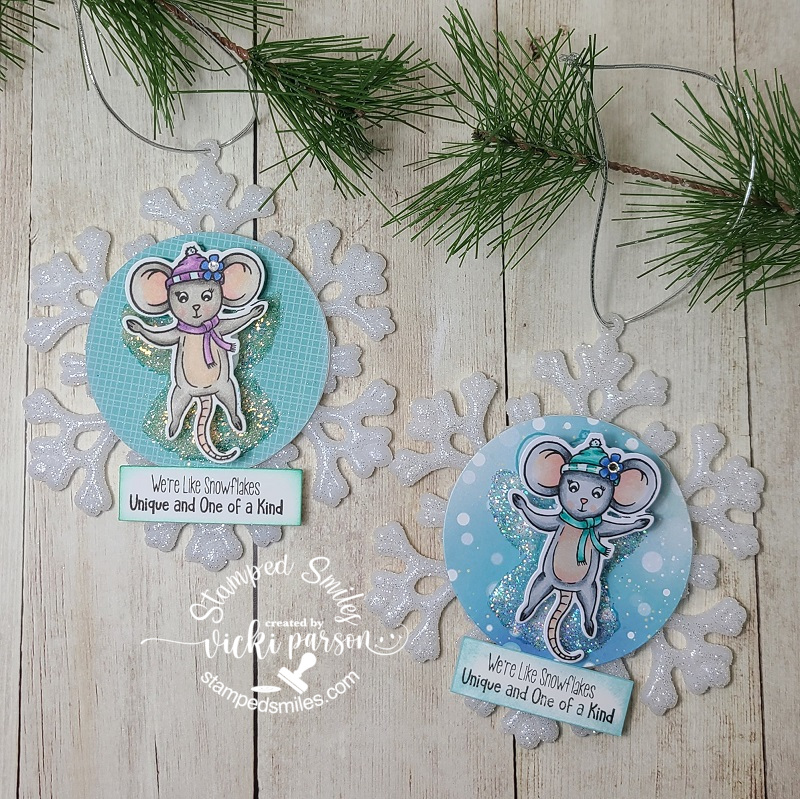
And I made a couple of these darling ornaments from a fairly “new to me” company that I was actually introduced to with product during my time as a {Cupcake Inspirations} sweetie DT when they sponsored a challenge a while back. P.S. There are a few more days left to enter their current challenge of “SNOWFLAKES” if you want to pop on over to join us too!!
But I was so taken with this darling image and kit from Inky Stampers from this Snow Much Fun Kit. You get the snowflake ornament (with string), the stamp set and die, papers, wobbler, along with glitter to complete it too! Well, I wanted to make more than one, so I grabbed another set of Snowflake Ornaments from the store and just added my own papers and glitter from my stash to make it.
Whew! I’m ready for that “Looong winter’s nap” now!!🥱 I hope you’ve enjoyed my post today and it has brought you some inspiration and/or a smile somehow! I have received some beautiful Christmas cards and I so appreciate them and have them all displayed by being pinned around my garland in our pass-through in the living room/dining area. I think after a bit of rest, I need to finish up my projects for the “Bugaboo Christmas Chaos” that I halted in the middle for to finish up Christmas projects….so I’ll be back soon with that.
In the meantime, I wish a MERRY CHRISTMAS TO ALL AND TO ALL A GOOD NIGHT!!🎅
Hello friends! Really feeling the cold air around here, so I’m still thinking in winter mode and have another interactive winter card to share with you again today! (Please be sure to check out THIS POST to see another interactive winter card and video tutorial if you’ve missed my last posting!)
What’s a better way to embrace the cold than to create interactive cards in your nice warm crafty space, right?! So sit back, have a warm sip and get creative with me today!
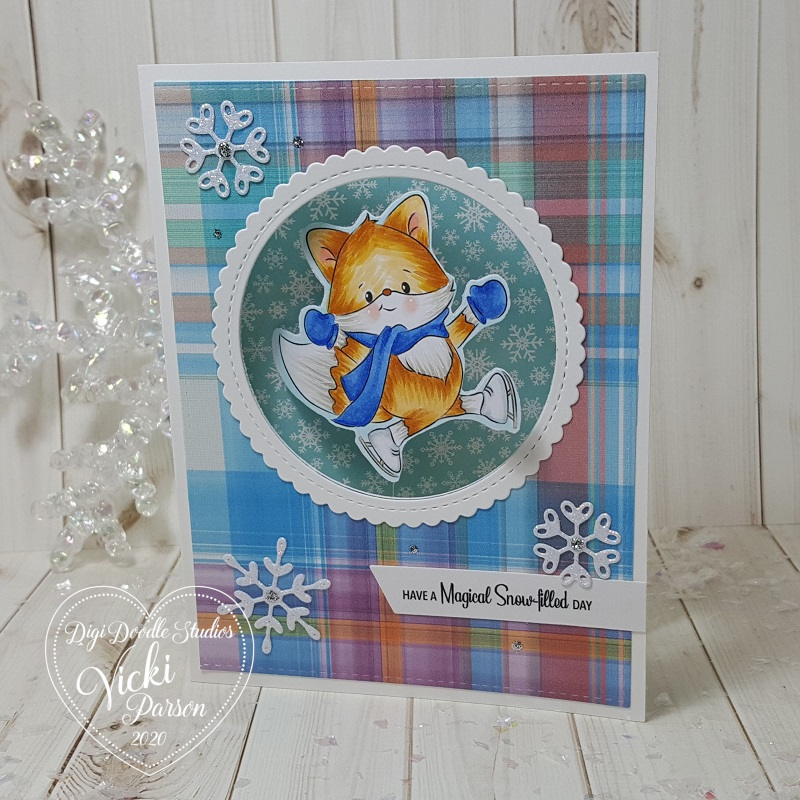
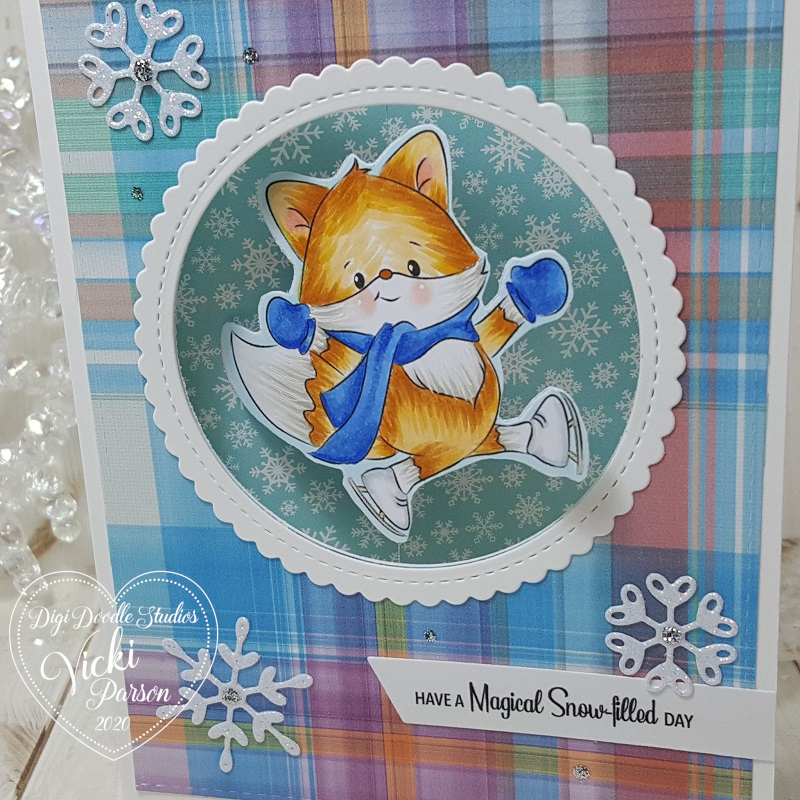
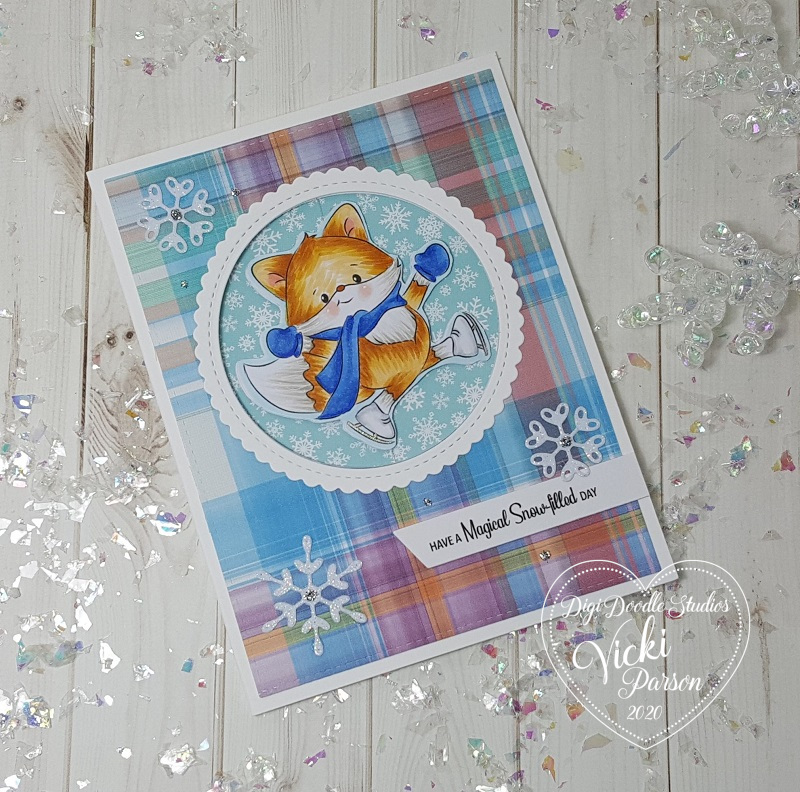
This cute little guy is so fun to watch him spin around doing his cool ice skating trick! I’ve used the Foxy Skater image from Digi Doodle Studios for my card here along with the Winter Plaids N’ Patterns Digi Paper Pack and Snow Days Sentiments set as well!
I’ve used several dies from My Favorite Things for the front of the card! I’ve cut out the plaid papers with the A2 Stiched Rectangle die and mounted it over an A2 sized side folding white card base. The spinner “window” was cut out with a Circle die that was also used to cut the center for the Scallop Stitched Circle frame around the opening. The sentiment was printed out and cut with the MFT Slanted Banners die (not finding link in store). I’ve also used MFT dies for the snowflakes (also not shown in store), that was cut from some Brutus Monroe Fallen Snow Glitterstock. I’ve added some silver Stickles to the centers of the snowflakes and dotted around the front of the card.
I’ve also used some snowflake papers for the inside area of the card from the Candy Land Paper Pack from MFT as well!
Check him out below as he spins around:
What’s different about this particular spinner card is how I’ve used a single digital image to create the front AND back of this Foxy Skater guy!
To see how I’ve put together this card for the spinner action, check it out in my video below or you can watch it on You Tube HERE:
I still have this card along with the other interactive card from my last post sitting here on my desk playing around with them! Not sure I can give them up quite yet as I’m having fun!! LOL!
Here’s a closer look at the cute “Foxy Skater” guy that twirls around on the card. I was going for a bit of a textured look on his fur, so I also used a white gel pen to mix in some white fur on his cheeks, chest and tail areas. I’ve also used a gel pen for the cheeks and a metallic gel pen for his skate blades. It was a little more time consuming to color in two fox images, but as you can see, it’s totally worth having both sides for this spinner action design! 🙂
To flip the image in the opposite direction, I used Word doc. on my computer, copied the original image so that it was the exact size, pasted him again and then used the “rotate” setting to flip him in the opposite direction.
Check out the video to see how I was able to fussy cut him down for my card design.
I hope you’ve enjoyed my spinner card today and that the video is helpful for you to create your own fun version during the wintry cold months ahead of us!
Thanks so much for stopping in today my friend and I’ll be seeing you soon!
Hello friends! I hope you are having a wonderful weekend! It’s getting closer to the big day now! Only 11 more days until Christmas! If you’re like me, then you wait until the last possible minute to mail out all of your Christmas cards! So guess what MY plans are this weekend?! LOL! Have you got all of your Christmas done and ready to go? I keep telling myself that NEXT year I will be prepared! LOL!
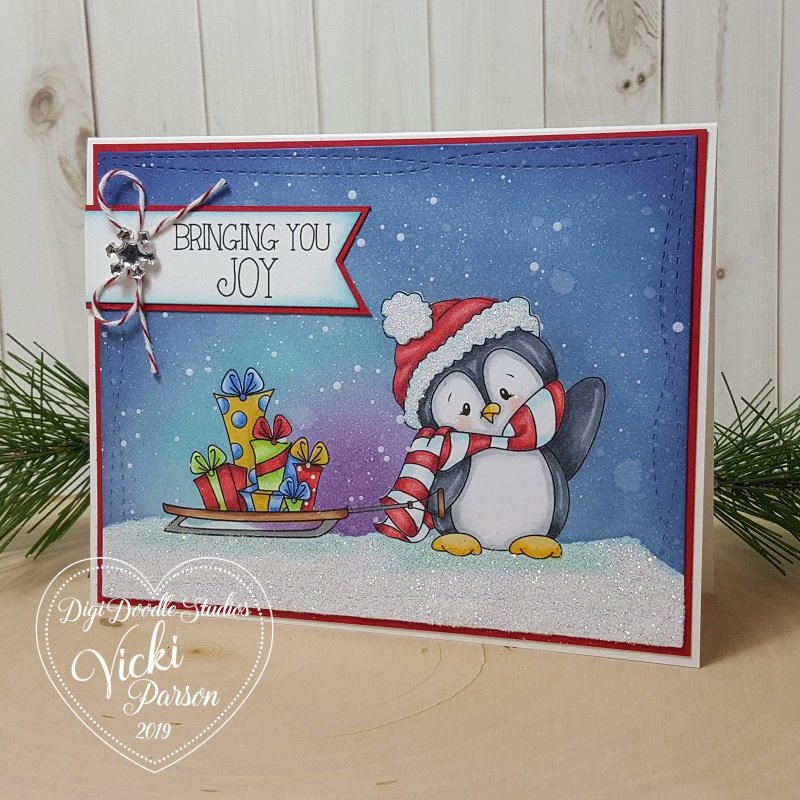
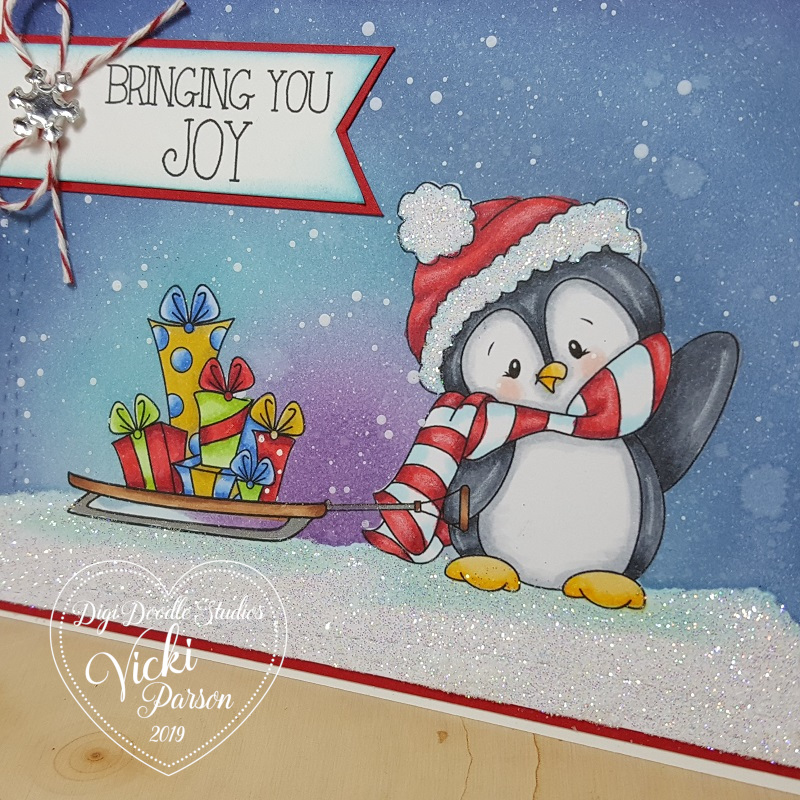
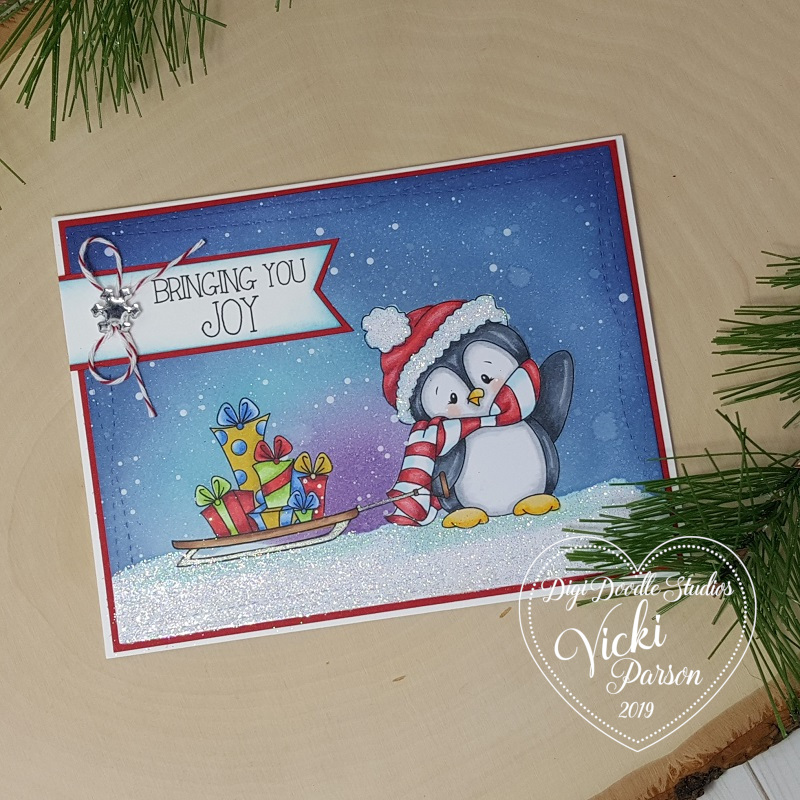
To help inspire those that are still looking for a fun and simple Christmas card, I have a cute one to share with you today using a Pairables set from Digi Doodle Studios:
You probably remember not too long ago the fun tags I made on THIS POST. I’ve used that same Pairables Wintertime Penguins digital set that I’m using on my card today! I love that you can get a whole set of digital stamps that coordinate together so that you can use them to create fun scenes or have them doing different things! Do you recognize the sled that this penguin is pulling full of gifts? I took that same sled image and used it as “ice skates” for the penguins feet on my tags in the previous post! That’s how fun and versatile this set can be!
This time my card is really simple. I just arranged the images how I wanted them on my computer and printed it out. I printed it again over some masking paper so that I could mask off the images to create my background.
To create the background, I ripped a piece of the masking paper to go along the bottom of the die cut panel after I masked off the images. I used ink blending for the background and then spritzed with water and dried it with a towel. I then took watered down white paint and splattered it for the snow effect.
Once it was dry, I removed the masks and colored up the images, made the sentiment (also from this same digital set) banner and mounted both pieces with some red cardstock which was mounted over an A2 sized white card base. I added some glitter to the snow ground at the bottom and on the penguin’s hat. Topped it off with some twine and a snowflake rhinestone.
Here’s a closer look at the coloring details of the penguin and his sleigh full of gifts. I used a white gel pen for dots on the one present and his cheeks. I also took some pencils for a few highlights.
I kept this card flat except for the sentiment banner so that I can mail it better. You could even leave it more flat than that if you prefer.
If you know me, then you know how much I love penguins. I have a special collection of stamps and will probably always keep them around.
I hope you’ve enjoyed my card today and perhaps this little cutie has brought you some joy too!
Thanks so much for stopping in today friends! See you soon!
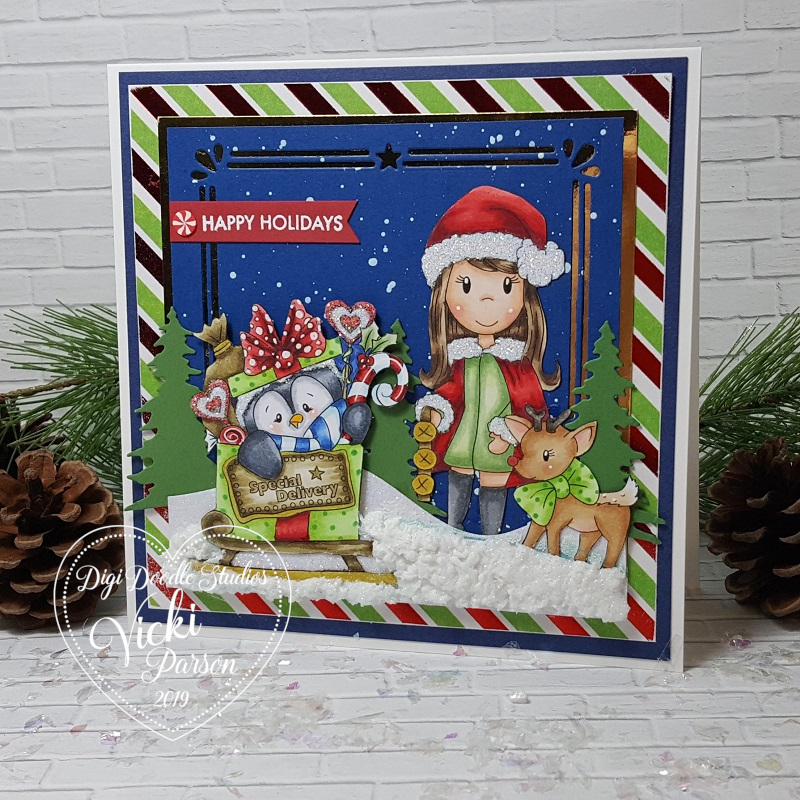
Hello friends! Today is the “special day” of our really fun and festive Collaboration Blog Hop! Hope you will be joining along with us for lots of inspiration and prizes! Woohoo!
MY HOLIDAY HOP PROJECT:
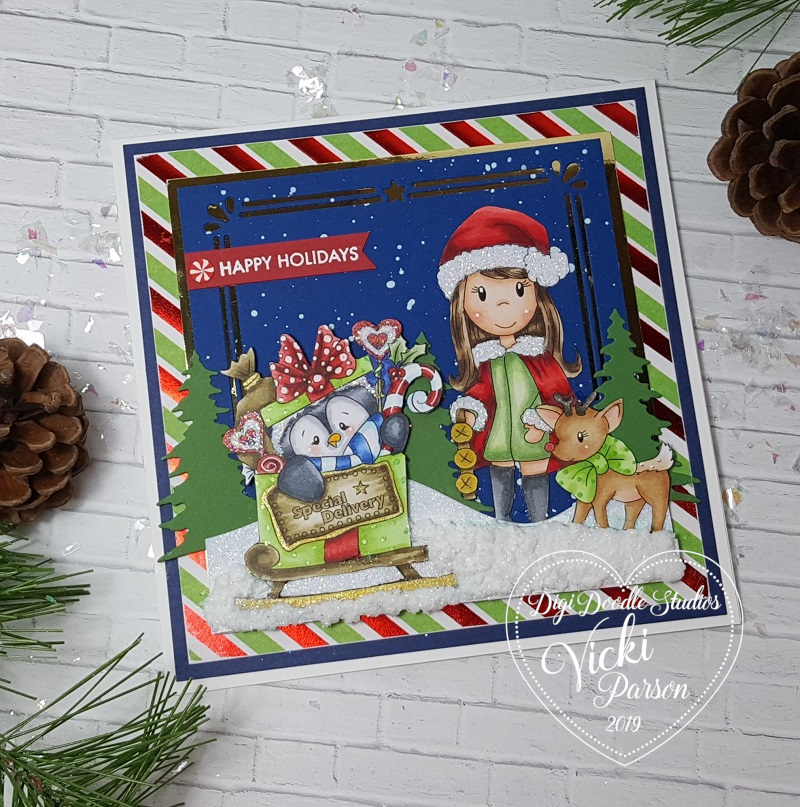
I am on the Digi Doodle Studios Design team and here is my interpretation of combining each companies’ images together to come up with this fun snow scene for the Holidays:
For my card here I have taken the Digi Doodle Studios Penguin Wobbles Special Delivery digital stamp along with the Paper Nest Dolls Holiday Friends digital stamp and printed them out over a piece of Copic Blending Card. I’ve colored them up and fussy cut them out for my scene here.
To create the scene, I’ve used some blue cardstock for the background and splattered some watered down gesso over it and then used a die cut to create the fun frame within it. I layered it over a piece of gold cardstock so it shows through. I also die cut some snowy hills with white glitter cardstock and some pine trees with green cardstock.
I arranged them over my blue cardstock panel and created the scene. I popped up the front layer of snow hill along with the penguin image with foam tape. I covered this snow hill layer with some texture snow paste…it’s so glittery!! I also added some more glittery details here and there on the images too.
I white heat embossed the sentiment and placed a peppermint candy embellishment next to it and attached the strip over the blue background. I then mounted this entire scene layer over some fun and festive foiled striped papers and then onto another blue piece which was then mounted over a top folding white 5.5″ square card base.
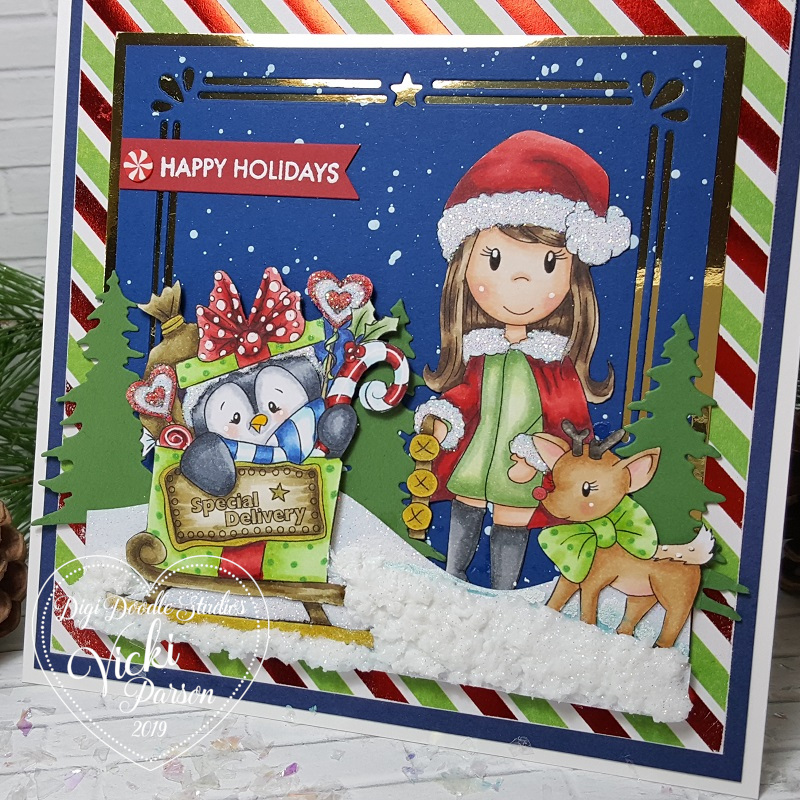
Here’s a bit of a closer look at the images and how I’ve colored them up with Copic markers. You can see that I’ve used my white gel pen for details on the bow in the present along with the shinny look on the candy cane and the cheeks of all the images. I’ve added a few dots on the deer’s back tail too.
I’ve used a gold gel pen to color in the sleigh runner, the band around the gift sack, the “lettering and dots” on the penguin’s sign as well as the bells the little girl is holding. I used a red gel pen to color in the little deer’s nose. I’ve used a green gel pen to create “dots” on the penguin’s present and the deer’s bow.
I’ve also added some glitter to the heart candies and the girl’s outfit trim.
You can also see just how puffy and dimensional that snow is too! It’s really glittery and was so fun to add to the scene! It looks like they’re gearing up to deliver some presents and the cute little Mr. Penguin Wobbles is all loaded and ready to go! LOL!
I really hope that you’ve enjoyed my card today and have been inspired with it in some way to get you into the festive Holiday spirit!
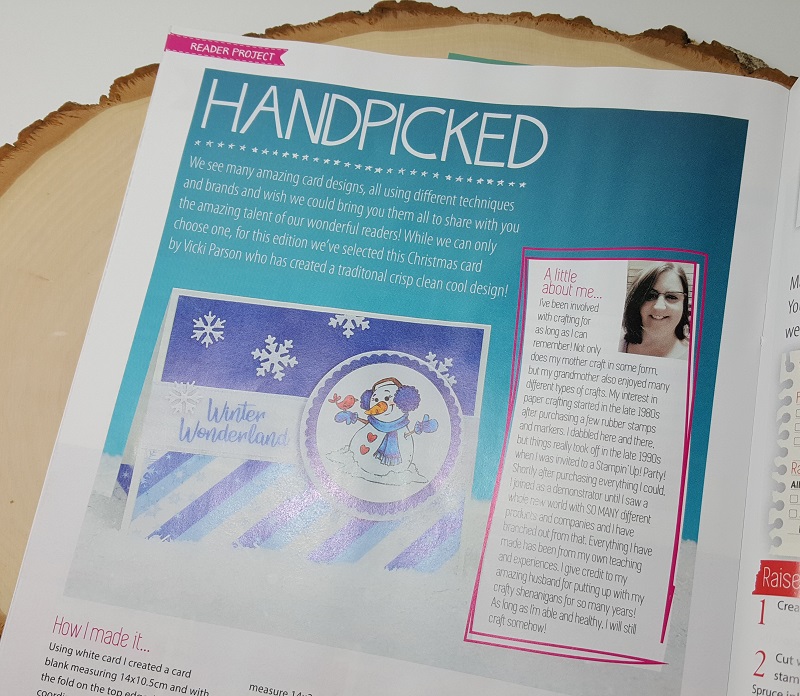
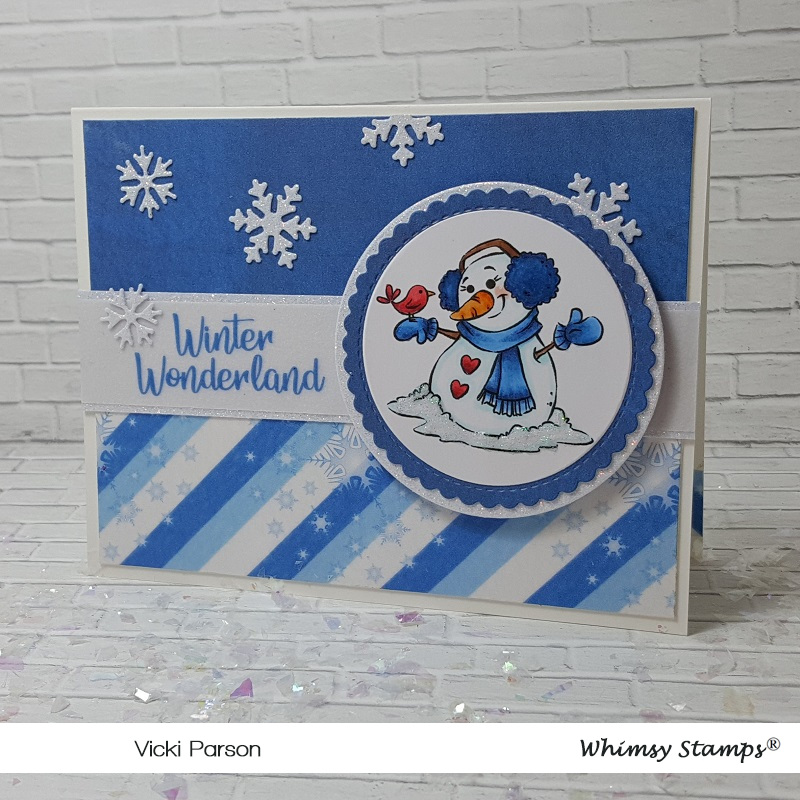
Hey friends! This is just a quick post to share my excitement with you about having a card I made for Whimsy Stampspublished in the December 2019 “Handpicked” article on p. 38 of the Making Cards & Papercraft Magazine!
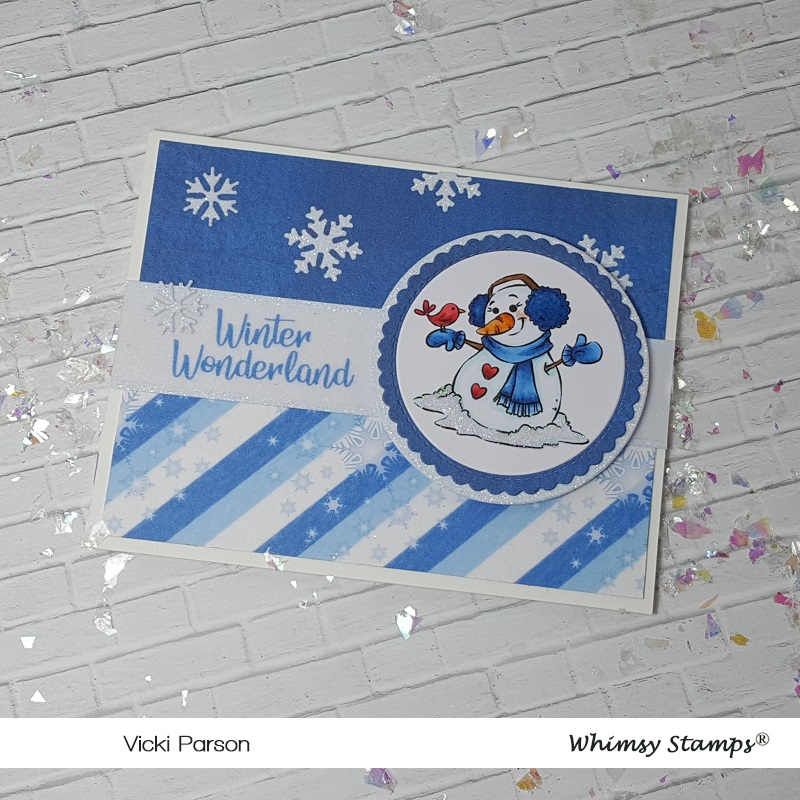
I would’ve shared this a bit sooner, but I wanted to take a photo of the issue in hand with me here. The stamp set that I’ve used for my card is from the brand new December release at Whimsy Stamps called “Winter Wonderland“. It’s a clear stamp set with lots of really sweet snowman images in it! It’s one of my faves from the new release too!
Here’s a photo of it that I took myself before sending it along to the magazine back in October. 🙂
I won’t go into great detail about it, but I’ve also paired this with the Whimsy Stamps Winter’s Magic Blue Digital Papers Collection as well as the Whimsy Stamps No-See All Seasons Tree die set(snowflakes only die) for my card design.
If you get the magazine, then you can see below in the article how it was put together.
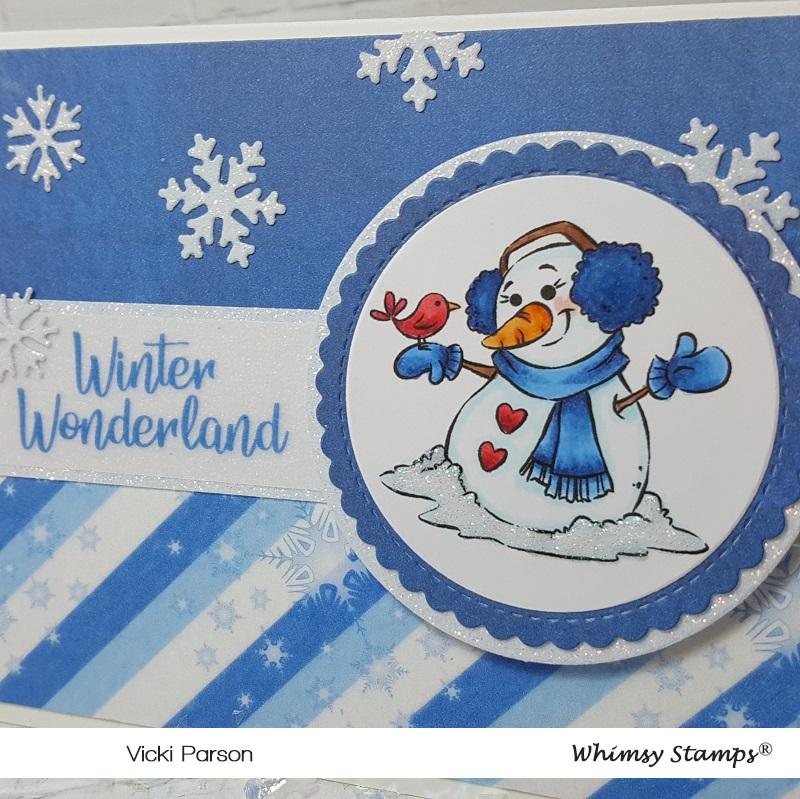
Here’s a closer view of the image and you can see the bits of glitter over it.
This was just a really fun card to make and quite simple to put together too! I really enjoyed it and how fun to get published with it as well!
Thanks so much for stopping in and letting me share my excitement with you!
P.S. I have a spot along the sidebar of my blog where there will be a photo of the magazine to click on my blog post link in case you’re interested about my card.
LOL! Hey friends! Did I grab your attention with my title today?!
Today starts a brand new challenge over at Cute Card Thursday and it’s an easy ‘ANYTHING GOES!’ Since it’s the first Thursday of the month, we are being sponsored by Whimsy Stamps! Yay! So please be sure to remember to add whatever creation you’re working on over in our gallery this week!
*News update: This will be my last challenge as a design team member for Cute Card Thursday. I have really loved being apart of the team and the wonderful ladies over there for over a year and a half. I wish them all well. I’m sure I’ll be playing along in future challenges of course!*
Here’s the card I made with products from our sponsor:
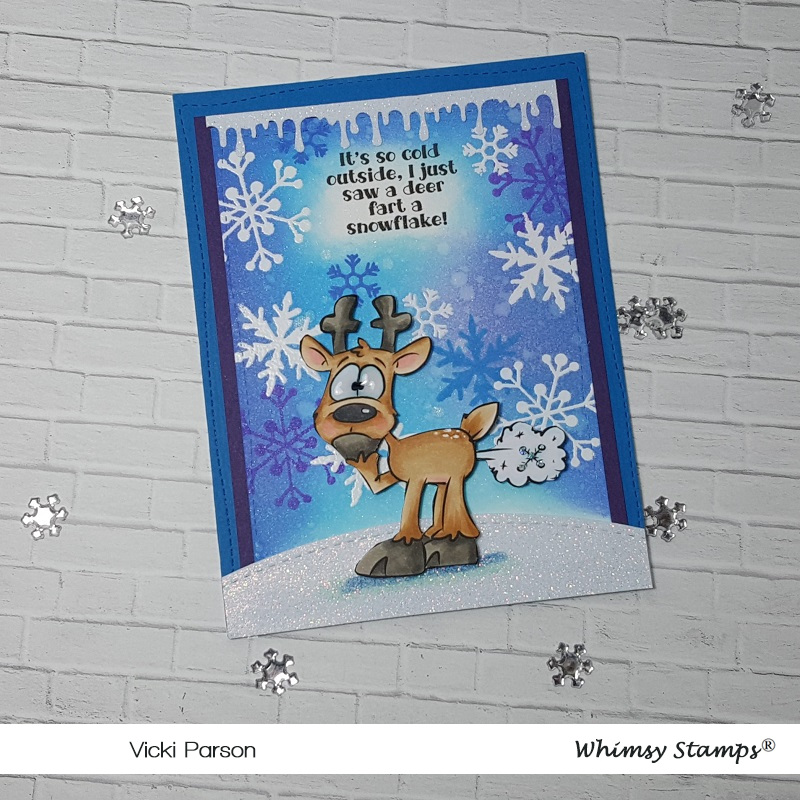
BWHAA!! HA! HA! Yep, I’m most positive it’s probably been that cold out over my way! LOL! It’s supposed to get down to the teens next week! Brr!
This hilarious digital image is called Reindeer Farts by Dustin Pike from Whimsy Stamps. It comes with the sentiment which I wouldn’t want it without that! LOL! This image was released back in October, but with all of the Halloween going on, it sort of didn’t get a good “spotlight” on it, so I thought now would be a good time to pull it out and perhaps send it out to my brother for Christmas…which he’ll get a kick out of! 🙂
I started out with a white cardstock panel cut with a stitched rectangle die with the printed out sentiment at the top of it. I pulled out the Whimsy Stamps Snow Flurry clear stamp set and white heat embossed some snowflakes in the background. I ink blended some Distress Oxide Inks over top of them in the colors: Salty Ocean, Wilted Violet, Mermaid Lagoon and Blueprint Sketch. I spritzed some water over it, dapped it with a paper towel and once completely dry, I stamped out some more snowflakes in a few of the Distress Oxide Inks over that to give it a little depth. The ink marks left over the white snowflakes were easily wiped away because the heat embossing resists the inks. I covered this entire panel with a Shimmer Spray. (You can see it in the photo below!)
I layered this piece onto a purple cardstock base and then layered it over a blue piece of cardstock cut from a stitched A2 sized rectangle die which was then mounted over a top folding A2 sized white card base.
I’ve used some White Glitterstock and cut a “snow hill” for the deer with a stitched hillside border die and glued that to cover the entire bottom of the card. I also took another strip of that Glitterstock and used my MS goo border punch to create the small border above the sentiment, which generates a more “cold feeling” to the card.
I’ve printed out the deer image with Copic Blending Card, colored it up with Copics and then fussy cut it out…including the “fart cloud” and popped it up over the snowy hill with some foam tape.
Before attaching it to the glittery snow hill, I took a couple of Copic markers to create a bit of shading for the deer standing on the snow. I also took a white gel pen and added some dot markings on the back of the deer.
You can also see where I’ve added some glossy accents to his eyeballs and I even took some Star dust glitter and added it to the snowflake in the “fart cloud”.
Well I hope you got a giggle from my card today! LOL! This will be a fun one to send along!
Thanks so much for stopping in today and I’ll see you soon!
Challenges:
Creatalicious – #176 Anything Goes with optional Winter

 We’ve gotten creative by using up our never-ending stash piles! (I look forward to doing this for another year each month in 2023 and I’ll hope you’ll be here too!) Here’s my final Art Journal inspiration for 2022 with the “SMASH OUR STASH” December prompt of “Oldest Stash” :