It’s Funny and/or a Pun at Sparkles Monthly Challenge!

Hello friends!  Happy weekend!  Wow, it’s been very warm outside and I’ve been spending my time indoors.  I hope to be sharing some more posts with lots of things very soon, so stay tuned in!  Today starts another challenge over at the Sparkles Monthly Challenge blog!

This time was my turn to choose a theme and I thought with Father’s Day, masculine cards are a good way to use those “FUNNNY and/or a PUN” on our cards!  To make someone laugh or at least smile, is the main reason why I love to make cards!  If you feel like having a chuckle with your cards, make one and enter this month!  I can’t wait to see what you come up with!

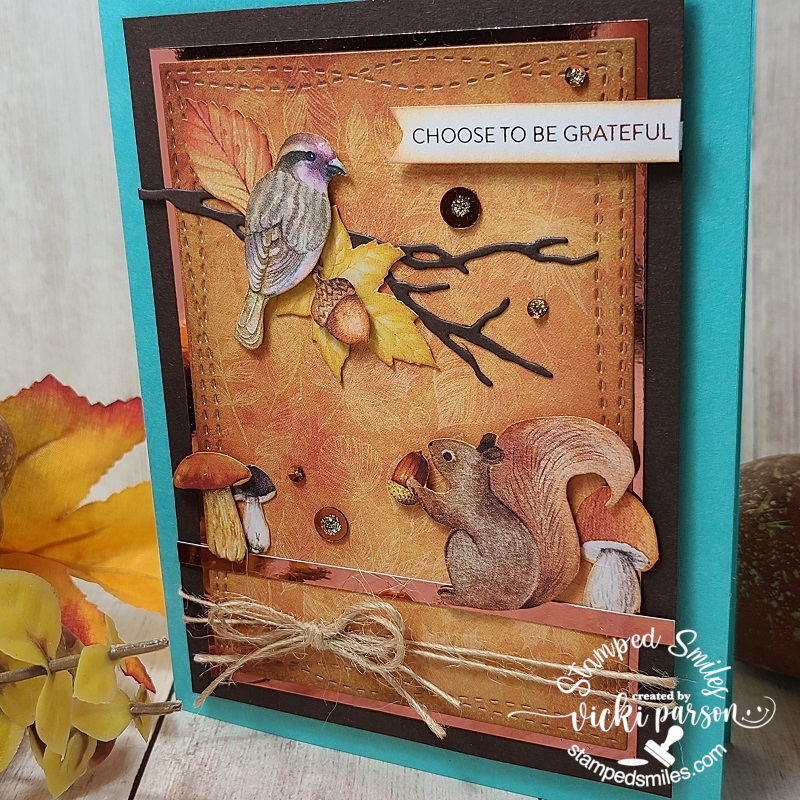
Here’s my card for the challenge:

Nothing better than a hot French fry, but a French fry with a smile and bow tie is too fun!😆  (This is an American term for this food, but I know they’re called “chips” in Britain…either way, delicious and fun!)

For this challenge, I knew I wanted to pull out a large card kit I had gotten back in 2018 from Simon Says Stamp partnered with Doodlebug to create the I Chews You kit.  (Most of the items are not available any more other than the stamp set that I’ve linked.)  I fell in love with all of the cute images and puns from the Doodlebug So Pun Friends collection!  In this card kit, there was a die that cut out the box and fries.  The sentiments came from some “Chit-Chat Clippings“.

I first took a piece of white cardstock for the front panel and cut it with a wonky stitched rectangle die and placed it over a side folded A2 red card base.  I then took a wonky stitched circle die and cut a circle from the Doodlebug So Much Pun paper pad.  I placed it in the lower right and cut off part of the edge of the circle sticking out past the white panel.

I took the die cut fry box and cut it out in red and white.  I used the white strip to make the band at the top of the box.  I cut out the fries and sponged around the edges and arranged them behind the box and attached it to the circle panel.

The sentiment bubble was inked around the edges and placed in the top left above the fries.  I added a black layer behind the box sentiment strip and cut off the edge sticking out.  Lastly, I thought it would be fun to add a smile face to the fry and then I stamped, colored and die cut a bow tie from my stash to add on the one fry.  I finished it with some Doodlebug Heart Sprinkles.

I really had a great time putting this one together and I hope you’ve enjoyed it too!  Hoping to pull out this card kit again and make several cards with it as there is still so many things in this kit that I never got a chance to play with!  (I have so many things I need to do this with!)😉

Please be sure to check out the challenge blog to see the inspiration from the team and I hope you will take some time to have fun and play along with us!

Enjoy your weekend and thanks for stopping by!  I’ll catch you soon!

Challenges:

  1. Crafts Galore Encore Anything Goes
  2. Pammie’s Inky Pinkies – PIP2423 Anything Goes
  3. As You Like It – With or Without Words and Why? (I feel like this is the main reason to send a card to someone that includes a sentiment.  I especially like the fun and/or pun for sending smiles.)
  4. Tic Tac Toe – TTTC249 (I used first row down:  layers, die cut, pattern paper)
  5. Penny’s Paper-Crafty – #573 Anything Goes Using Paper
  6. Aloha Friday Masculine
  7. Creative Moments – #259 optional twist: Men and Boys

An Electric Connection and Happy Mail Love For Valentine’s Day!

Happy Valentine’s Day friends!  Today is the day all about hearts and love!  Although I’ve already sent out my Valentine cards, I have a couple of lovely individuals who take a peek at my blog from time to time…so I have to wait until they’ve received their cards before I share them here!😉  It’s somewhat hard to “hide” my crafting since hubby’s now retired! LOL  So here’s the cards I made:

I just KNEW the minute I saw this Taylored Expressions Love Lights Stamps & Stencil Combo set that it was something perfect for making cards for my retired electrician hubby!  This set also coordinates with other products and so I started by foiling the TE Foil It-Love Lights panel and then ink blending with the stencil set.  I had to use blue as this is hubby’s favorite color.  So, I’ve used the TE Sprinkles and Potato Chip inks.  The cardstock is TE Sprinkles. (I used softer tones for the Valentine feel.)  I also used the coordinating TE Mini Strips-Watt’s Up sentiment set that was silver heat embossed over the TE Sprinkles cardstock and cut out with the TE Mini Strips-Asymmetrical Die.  I just love the punny sentiments that go with this set!

The tiny light bulb for the accent I used actually came from a TE ‘freebie’ with one of my orders, so I die cut the light bulb with white glitter cardstock and lightly sponged some yellow ink in the center.  I die cut the center and bottom of the bulb with silver brushed cardstock and glued it onto the light bulb.  I die cut a circle from some vellum and also sponged this with yellow ink and glued the light bulb on top of it and attached it to the side of the card nestled with the sentiment strips that were popped up with foam tape.  He will have gotten this one this morning.

And here’s another card that I sent to someone very special!  It’s a simple card, but wow it was so much fun to create with using the Simon Says Stamp Limited Edition Happy Mail Love card kit! (Looks like it’s still available at the time I’m writing up this post, but not sure how long it will stay available.)  I so love those CUTE Doodlebug products and there are so many of them including the stamp set that goes together in this kit!  I wanted to play some more with it, but I have so many other things to focus on, so I’ll have to come back to it later! LOL

I’ve used the Doodlebug background papers from the kit and cut it out with a Lawn Fawn Cross-Stitch die and also cut a strip of ‘grass’ with green cardstock at the bottom using the Lawn Fawn Grassy Border die.  The heart papers were attached over a red piece of cardstock from the kit and layered onto a top folding A2 white card base.  The grass border was attached over the red cardstock and heart background papers.  This gave me the room to take the CUTE Doodlebug LOTS OF LOVE Odds and Ends Ephemera die cut shapes to create my scene with!  This pack came in the kit and there are SO many pieces!  I’m sure you could go on and on making cards!  The bird and bunny die cuts were popped up with foam tape.  It’s hard to see in the photo, but I’ve taken my glitter brush pen to all of the hearts on the images and the cheeks on the cloud.

I think these cards did what was intended which was to create smiles during this cold winter season!  I sure hope that it has done the same for you as well! 😉 Wishing you a happy Valentine’s Day with all of my heart! ❤ Thanks for stopping in and I’ll be seeing you soon!

Challenges:

  1. Moving Along With the Times – Love/Anniversary/Wedding
  2. Creative Inspirations – With Love
  3. The Paper Funday – Anything Goes optional ‘Hugs & Kisses’
  4. 613 Avenue Create – Anything Goes optional ‘Whimsical Valentine’
  5. Everybody Art – Love and/or Heart
  6. Try It On Tuesday – ‘All Loved Up’
  7. Cardz 4 Guys – ‘Love’ cards
  8. Little Red Wagon – Be My Love/Valentines

Huge thank you to those that keep the challenge blogs going!

Choose to be Grateful for Crafty Chefs

Hello friends!  I hope that you’re having a wonderful week so far!  The weekend is here, but it sure has been a beautiful couple of days this week with sunny and warm days so hubby and I were able to go out to walk around a bit before the snow starts hitting us!

Something that is great to go out in nature to see are the critters with the birds and the silly squirrels…we have them EVERYWHERE!  They’re busy gathering and burying their food for wintertime around here.  My thoughts turned to the Simon Says Stamp “Big Thanks Autumn” November card kit (sold out, but not papers) as I love all things Fall/Autumn and this card kit with those beautiful papers spoke to me and I wanted to create with it to make my project for this month’s Crafty Chef’s Group recipe from our lovely friend Meg’s recipe:

There were some blue colored A2 card bases already cut and scored inside the kit, so I used one for my side folding card base here and then layered a dark brown cardstock piece from the kit as well as a piece of copper mirrored cardstock which was then layered over a piece of the decorative papers (I mentioned above) in the kit, which is also where the critter, mushrooms and leaves images came from on this card.

The leafy background paper was cut from a MFT Wonky Stitched Rectangle Die and then I took a strip of the copper mirrored cardstock across the bottom third of the layered pieces and also added some twine wrapped around the bottom of the layers before popping them up with craft foam over the card base.  I die cut a branch from a die in my stash and then fussy cut the images out from the papers included in the kit which were glued or popped up with foam squares over the panel.  I sponged some Tea Stain Distress Ink around the edges of these pieces before attaching.

Lastly, I’ve taken one of the sentiments from the sentiment strips sheet included in the kit and ran it through my laminator with a piece of copper Deco Foil.  (I think that is a cool way to add a little extra something to those sentiments.)  I made a banner out of it, sponged it with some of the ink I used for the images and popped it up over the leafy background piece with foam tape.  

Here’s a closer look at the critters I’ve cut out and how I’ve arranged and popped some of them up to create my scene.  There was also a very pretty SSS Autumn Sequins Mix included in the kit, and I took some of those and added it to the layout and then filled the centers with some gold Stickles glue.

For the Crafty Chef’s recipe that was given, here’s what I MUST use:

  1. Mirror cardstock
  2. 3 layers or more
  3. ribbon (I hope my twine counts!)
  4. image of garden visitors (birds, hedgehogs, etc)

CAN do items:

  1. Sparkle/Glitter (I used sequins and Stickles)
  2. pearls/gems (I did not use) *passed onto next chef.
  3. dry embossing (I did not use)

There is a new recipe given for each month and no pressure to follow along or even when you want to follow along and play…which is great and I’m happy to be able to use up some of the goodies from my stash (NEW AND OLD) and just have fun with it.

I hope you’ve enjoyed my creation today as well and I will be seeing you all again soon!  Thanks so much for stopping in today friend, as I’m very grateful for you!

Challenges:

  1. 2 Crafty Critter Crazies – Anything Goes + animal(s)
  2. Crafty Animals – Anything Goes + animal(s)
  3. Creatalicious – #199 Anything Goes optional Autumn/Thanksgiving
  4. The Paper Girls – #212 Thankful/Grateful
  5. The Divas That Cut Paper – Thanks or Thanksgiving
  6. A Bit More Time to Craft Anything Goes
  7. Lil Patch of Crafty Friends – #146 Anything Goes
  8. QKR Stampede – #408 Anything Goes