Hello friends! Hope you had a wonderful weekend! Stopping in today to share more inspiration for the current {Cupcake Inspirations} challenge:
“Nautical” is the theme for our challenge and you still have another 5 days to play along with us! It really is such a fun theme to play with especially during the Summer!
I don’t get a chance to be near any oceans as I live in the middle of the U.S., but I’ve always wanted to travel near the East Coast near Maine as I imagine how interesting it would be to see it all!
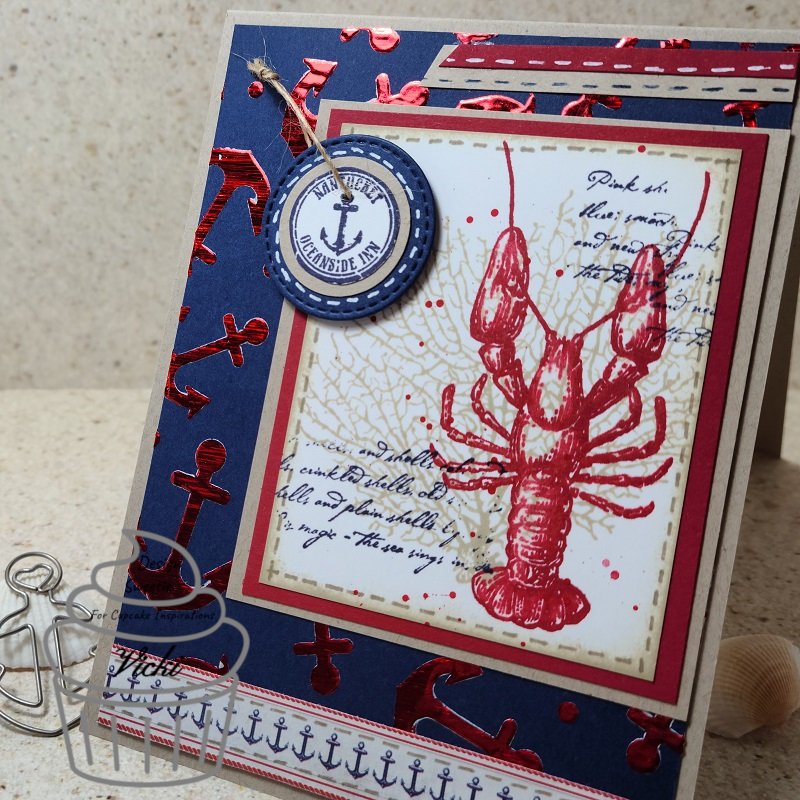
I don’t own very many nautical style crafty products, but I remembered this older Stampin’ Up! stamp set called “By the Tide” and it reminds me of those sailor type Inns or Pubs and you can see the wording of that with the circle anchor accent. I went with colors that related to the feel of “nautical” for me.
I also recently purchased this anchor stencil from Brutus Monroe and thought it would make a cool background with red foiling over the navy-blue color. So, I took some DecoFoil Transfer Gel Blanco so that it would be white over the dark background and the Red Static DecoFoil Sheet would show up over it. I put it through my laminator.
I just stamped the images from the SU! set in various colors, cut out layers of cardstock and added some stitch marks by hand along with a strip of anchor paper I found in my stash. I punched a hole in the circle anchor accent and tied a piece of twine through it and popped it up with foam tape.
Here’s a different angle of the card so that you can see the red shine of the DecoFoil background in the card.
I also took some of the Brutus Monroe Ruby Fluid Acrylic and watered it down to splatter over top of the crab image panel. I didn’t want to add too much in fear that it would look like blood or something. LOL!
Hope you’ve enjoyed my “nautical” style card today and that you’ll hop on over to the {Cupcake Inspirations} Challenge Blog and see what the rest of the design team has for inspiration and play along with us!
Thanks so much for stopping in today my friends! I appreciate you taking the time and I’ll be seeing you again soon!
Hello friends! Happy August! Really hope you’ve had a nice weekend!
Today starts a brand new challenge over at {Cupcake Inspirations} and the theme this time is “Nautical”!
I love the nautical theme and looking through my stash, I came across this older stamp set that someone had gifted to me and I thought I’d pull it out to play with:
This image is from Inkadinkadoo called “Down by the Seaside” that I’ve inked up in black ink over a piece of white cardstock. I used some masking tape to mask off the areas around the lighthouse to make the “light beams” and then used my ink blending tool to go around the edges with blue inks with the darkest color closest to the edges.
I’ve die cut it out with a Taylored Expressions Frayed Edge Stacklets dies and then I popped it up with foam tape over a hand ripped red piece of cardstock that was sponged around the edges with white ink. Before attaching the top layer over the red, I’ve added some twine around it and made a bow with a compass charm (by Tim Holtz) attached over top of the image panel.
These layers were attached to an A2 top folding Navy card base that I’ve stamped a compass image from a Stampin’ Up! stamp set called “Wherever You Go” with white ink. I’ve also used a sentiment from this same stamp set and stamped it over the image panel in the top right corner with black ink.
Here’s a closer look at the image where you can see the sponging I’ve done on the background. The rest of the image was colored in with Copic markers in certain areas. I didn’t want to use too much color as I didn’t think it really needed it.
Hard to tell in the photo, but I’ve covered the water, sun and lighthouse “light beams” with a glitter brush pen. You really notice it IRL when you pick it up and move it around and see the sparkle.
I hope that you’ve been inspired with my creation today!
Thanks so much for stopping in and I’ll be seeing you soon!😉
Hello there friends! Hoping that you had a fabulous weekend! Although it has been really hot over my way lately, I enjoyed spending a bit of time with hubby going out for a cold Starbucks frozen treat and time at the park. What is something that you enjoy as part of your Summers? In this crazy time right now, it seems we’re having to come up with different situations than we have in the past.
Today I’m sharing with you another project and reminder for our current {Cupcake Inspirations} challenge.
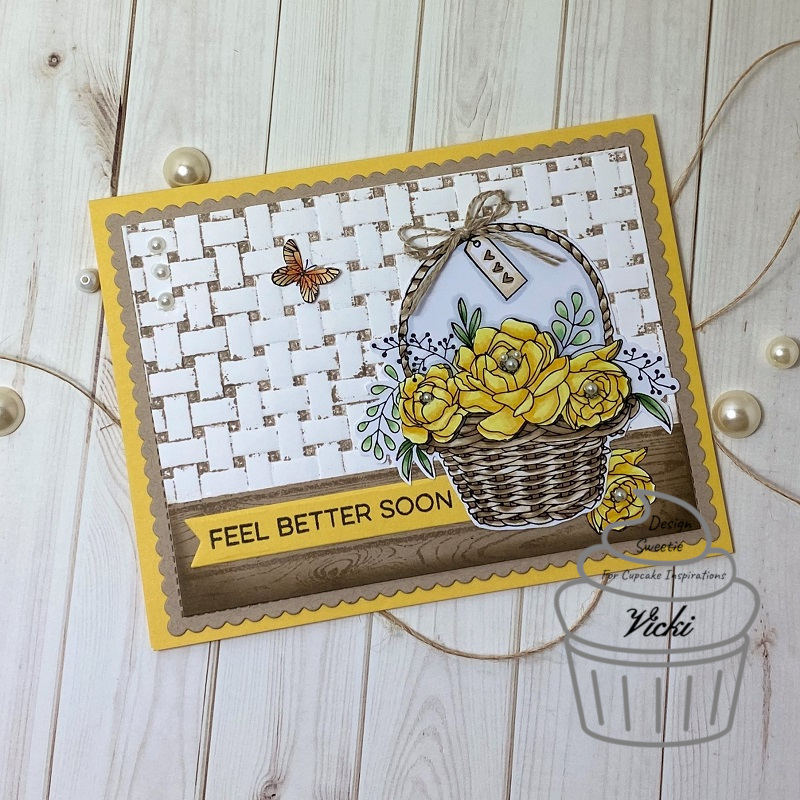
For my card here, I’ve pulled out another Stampin’ Up! set that has been a favorite of mine and I think it’s from a previous year Sale-a-bration set along with the embossing folder in the background behind it. The stamp set is called “Blossoming Basket”.
I have used the 3D “basket weave” embossing folder to emboss the white background, but before putting it through the embossing machine, I’ve taken an ink pad and inked up the folder to add the color to the background design.
I’ve also taken the “Hardwood” background stamp from Stampin’ Up! and inked it up over a piece of kraft cardstock and then used some brown ink around the edges of it and a cut strip for the bottom portion of my card to create the table area for the basket to set on. The sentiment as well as the banner strip and the scallop kraft layer were from My Favorite Things products and then I layered everything over an A2 sized top folding yellow card base.
Here’s a closer look at the image and how I’ve colored it in with my Copic markers.
I ended up fussy cutting out the images with my scissors and attaching them to the card design. I stamped the basket image a couple of different times and cut out extra flowers to place next to the basket and another set of flowers were popped up over the original image with foam tape. I only used glue in the center of the butterfly to lift up the wings.
I added a twine bow to the basket along with some pearls in the center of the flowers along with the top corner of the design.
I hope you’ve been inspired by my creation today in some way!
Speaking of which…I have some challenges I’d like to enter my card for:
Double Trouble – I used the tic-tac-toe board in 2 ways: emboss, insect, sponging and also insect, flowers, woodgrain
Hello friends! I know I’ve said this before, but it seems that I don’t ever have a sympathy card on hand when one is needed, so this time as I was making one because I needed it, I’ve also created an additional to have in my stash.
I have also just joined with some fellow crafty friends who started a sort of “challenge group” and I think we dubbed ourselves the “Crafty Chefs” simply because our challenges consist of “recipes” to follow of “MUST DO” and another list of “CAN DO” items to follow when making our projects and we each take turns being the “top head chef” in charge of making the recipes or lists. It’s just something non-pressure and just for fun which I think is fabulous as it helps me to use up my expansive crafty stash and join my fellow friends in paper crafting which we all have in common and love to do!😀
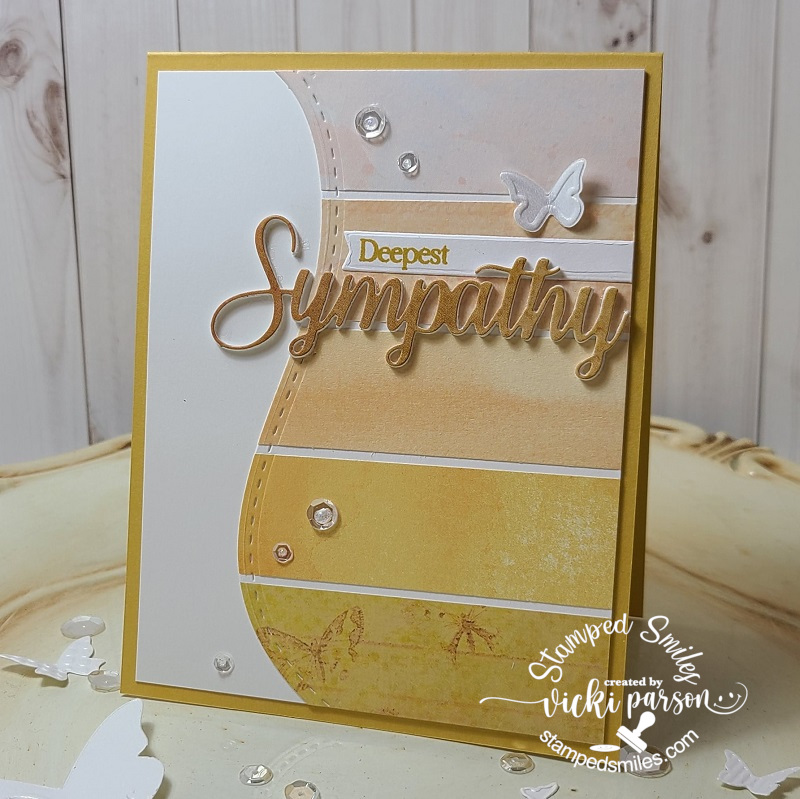
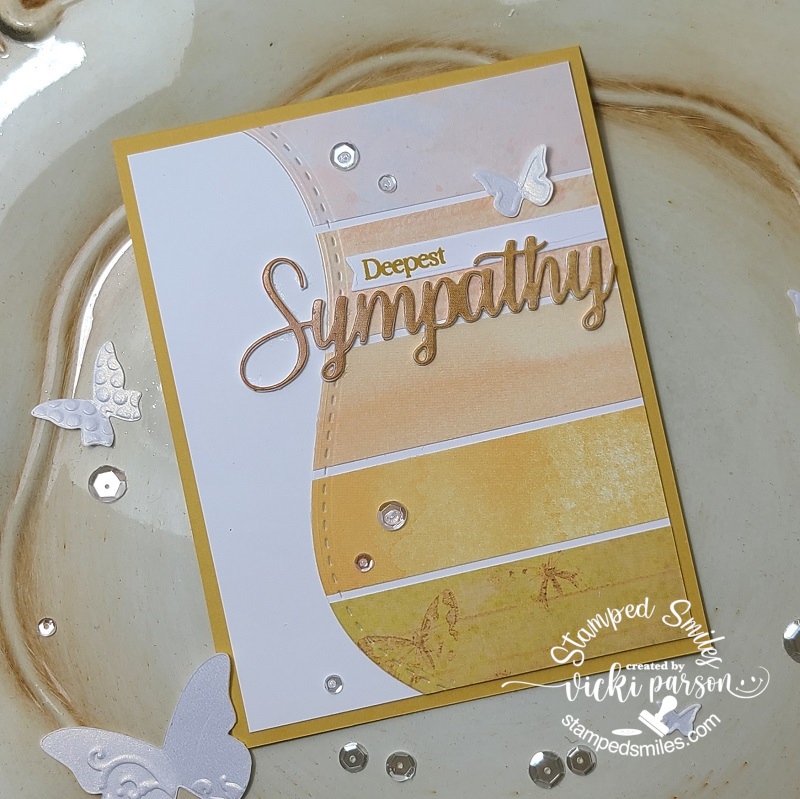
Here’s the sympathy card that I’ve come up with for our July’s Crafty Chefs Group Challenge! The July challenge is as follows:
MUST DO:
monochromatic
sentiment as focal point
paint chips
decorative papers
CAN DO: (items that are optional to add)
die cut
favorite color
summer fruits
When I saw the paint chips on the list, it immediately made me think of this technique with the wavy die cut along the edge of the design over a card and I think I had done it before, but it had been a long time ago. So with the decorative papers in mind, I went through my stash to find different ones in similar monochromatic color and the most I had was the yellow color. I love yellow, but if you know me, then you know purple is my favorite color…so I didn’t do that one or the summer fruits from the list..but the MUST DO are all included!
I die cut the word for the focal point of my design with some of the pattern papers that I’ve used and cut several to stack on each other. I also die cut a butterfly to add as an accent along with the stitched wave border die to cut my edge with. I also took the small word stamped with yellow ink over white and die cut it with a banner die to place over the design and then the panel was mounted over a yellow A2 sized top folding card base and finished with clear sequins that were filled with glitter glue.
I‘m really happy how it turned out and sort of challenged myself to make it a sympathy card. It had it’s twists and turns to complete each thing on my list, but worth the thought process to figure out! I’m glad I had this challenge! Hope you enjoyed it as well!
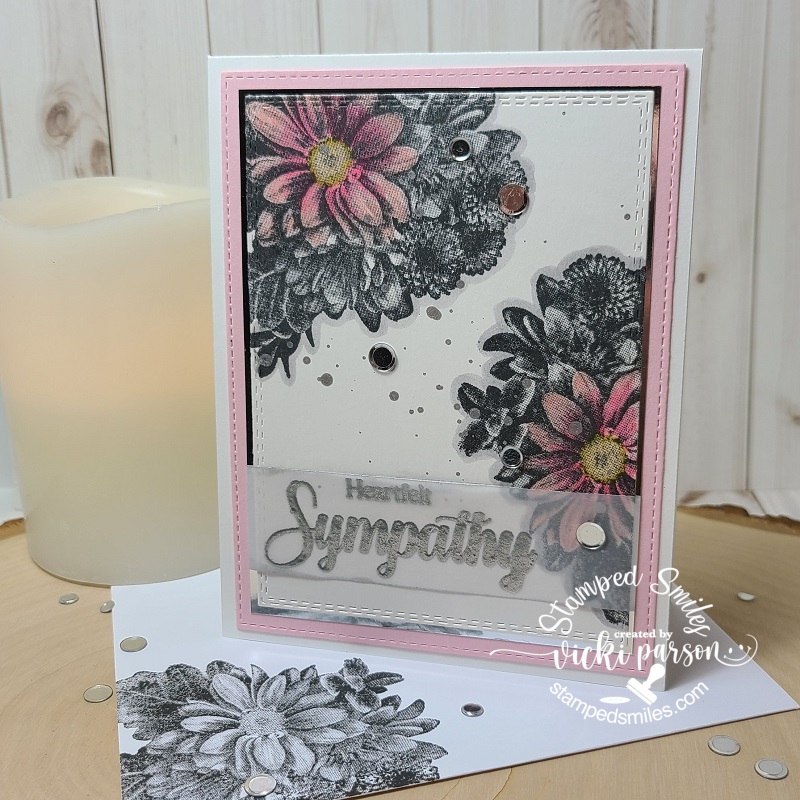
Here’s the sympathy card that I had made and actually hand delivered in person so I know they’ve already received it.
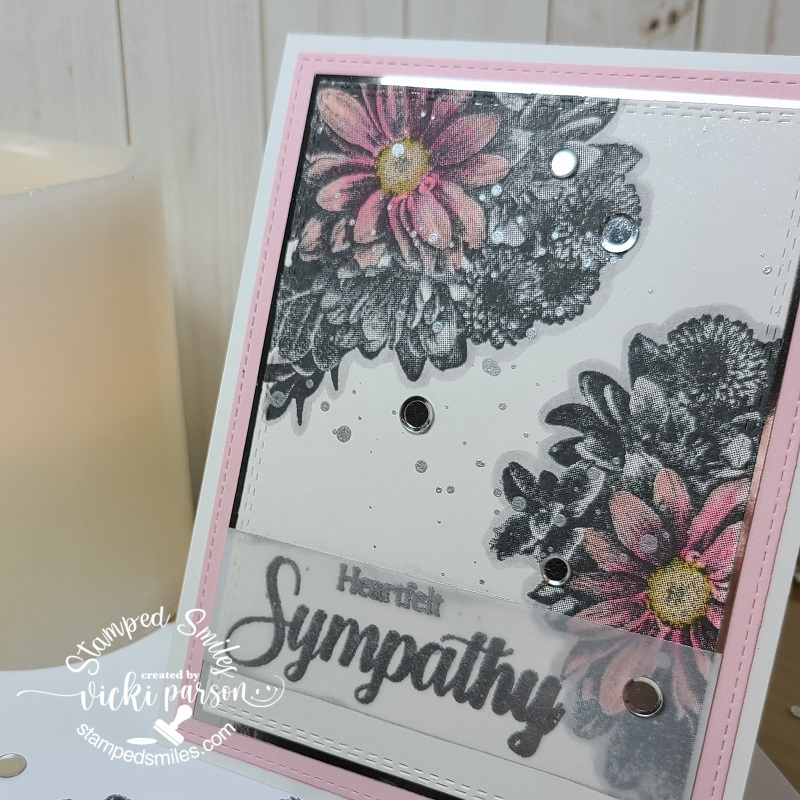
My thought on this one was the card was for females and I based my design on the flowers that I also gave to the recipient which had pinks in the mix along with the base of the lantern being white with the candle.
I went through my stash of floral stamps and have always loved this one from Stampin’ Up! which was stamped in black ink over white. I used some watercolor to just color in one of the flowers within the image. I used a piece of vellum to silver heat emboss the sentiment which was wrapped around the panel. I also took some silver shimmer paint that was watered down and splattered over top.
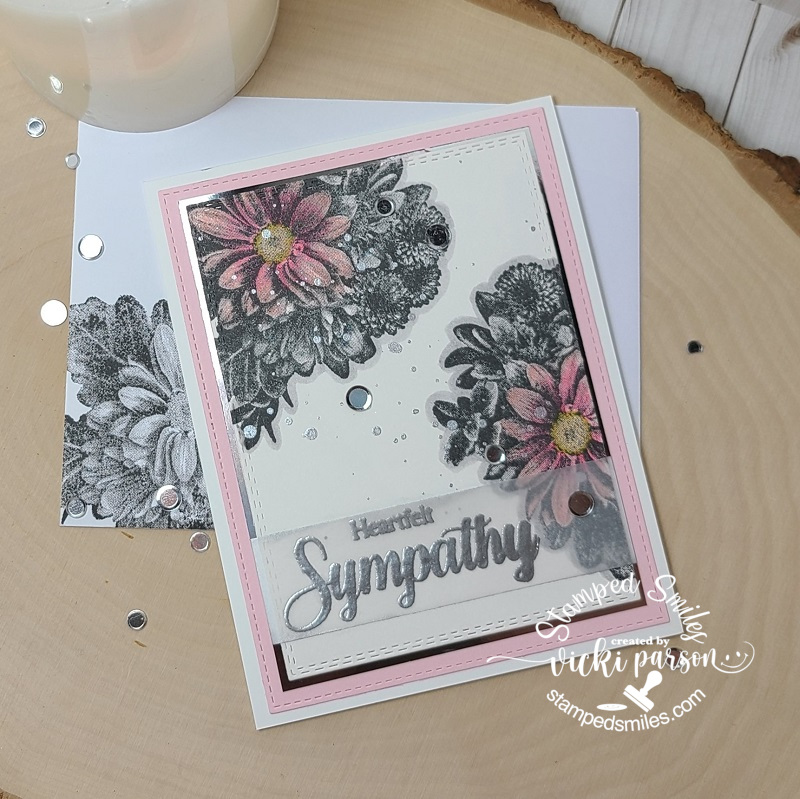
I die cut the panel, layered it over a piece of silver foil cardstock and then another piece of pink cardstock that was mounted onto an A2 sized white top folding card base. Lastly, I’ve added some silver sequins to finish it off.
Thanks so much for stopping in today my friends! I hope you’ve gotten some inspiration from my projects and I’ll be seeing you again soon!!
Hello friends! It’s started to really warm up over my way, so now it’s time to stay indoors and have some crafty play in the cool air! I will be trying out some new goodies too! Yay!
A few weeks ago or so, I was commissioned to create some graduation cards using certain school themed colors for a few local grads in my area so I wanted to share what I came up with.
I made a set of 3 graduation cards each one of a different style/design and I was told the color theme for each school/college to use along with the instruction of adding a pocket or place holder to fit a gift card inside. So I pulled out what graduation themed stamps I had in my stash and came up with a few different designs you can see below…
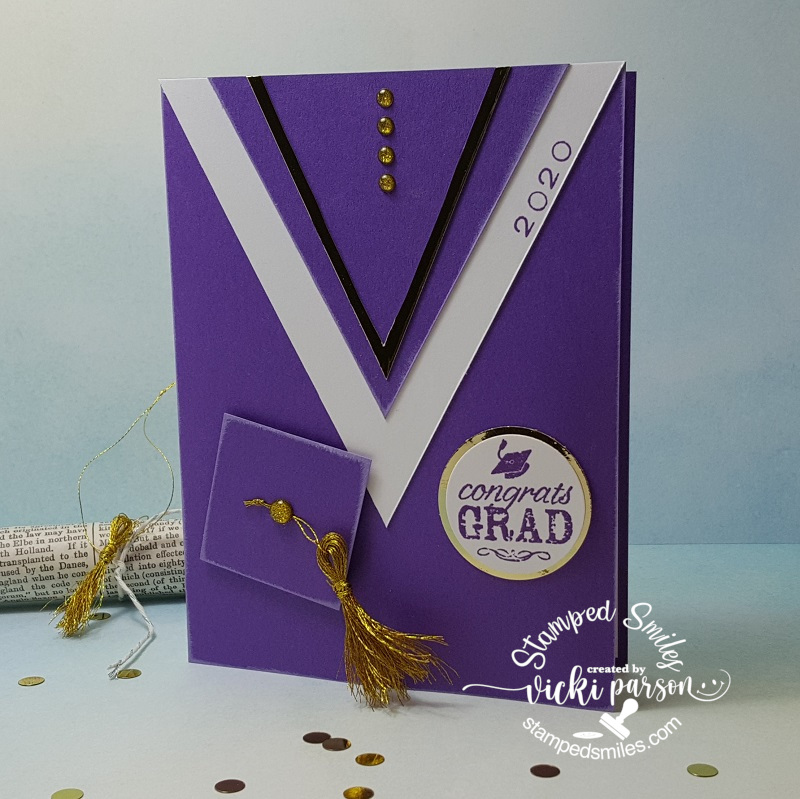
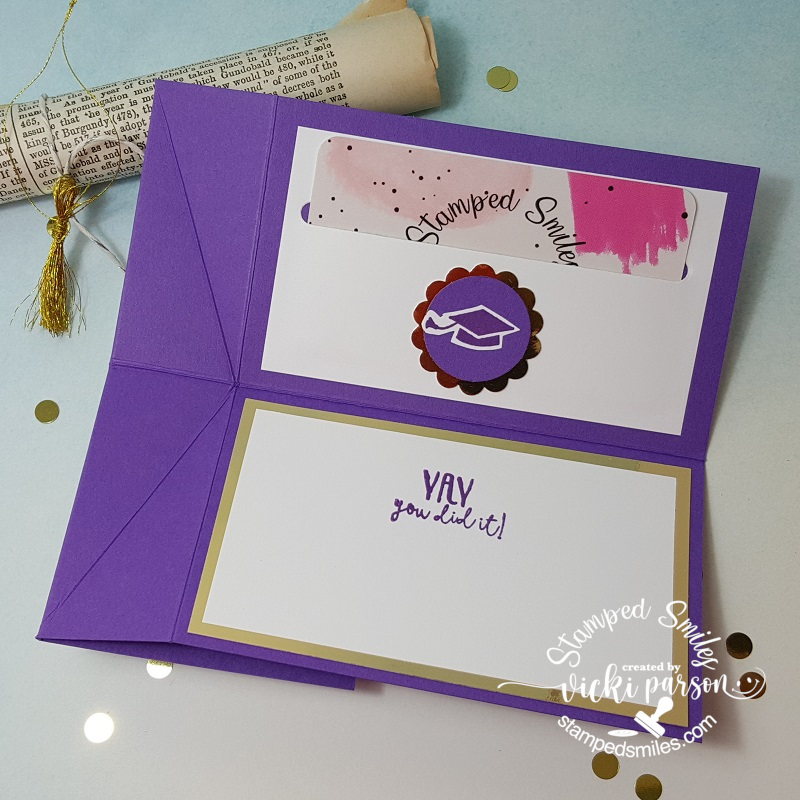
I dubbed this card “hassle with the tassel”!🤣
The colors were to be purple and gold. I just used my paper trimmer to trim out my cardstock to make the “V” line to mimic a grad gown and then I created the grad cap with a square piece of cardstock. The tassel was made with some gold metallic thread which was so very slippery that I went through like 4 “globs” of it to create a final tassel that looked decent enough to attach to the cap! Oh my goodness!🤨
I used gold mirror cardstock for the accent layers and I had a greeting for the sentiment from an older Stampin’ Up! set in my stash…(hadn’t pulled these out since my youngest graduated back in 2015!) I added the year along the neckline.
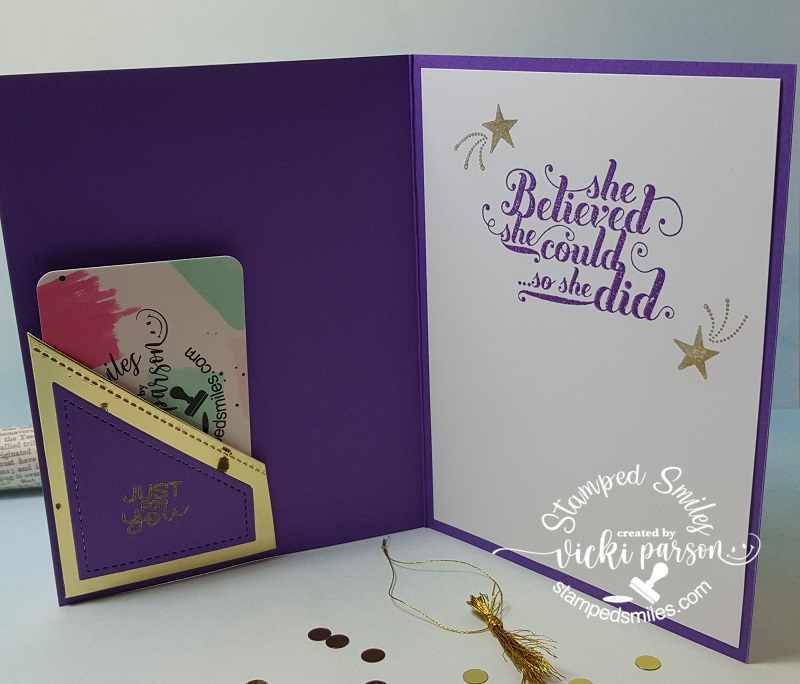
And then to add pockets, as instructed, I took the Lawn Fawn Diagonal Gift Card Pocket die for the inside corner of the card along with stamping a sentiment for the grad. (All of these cards were made for females graduating, so I knew this would work!)
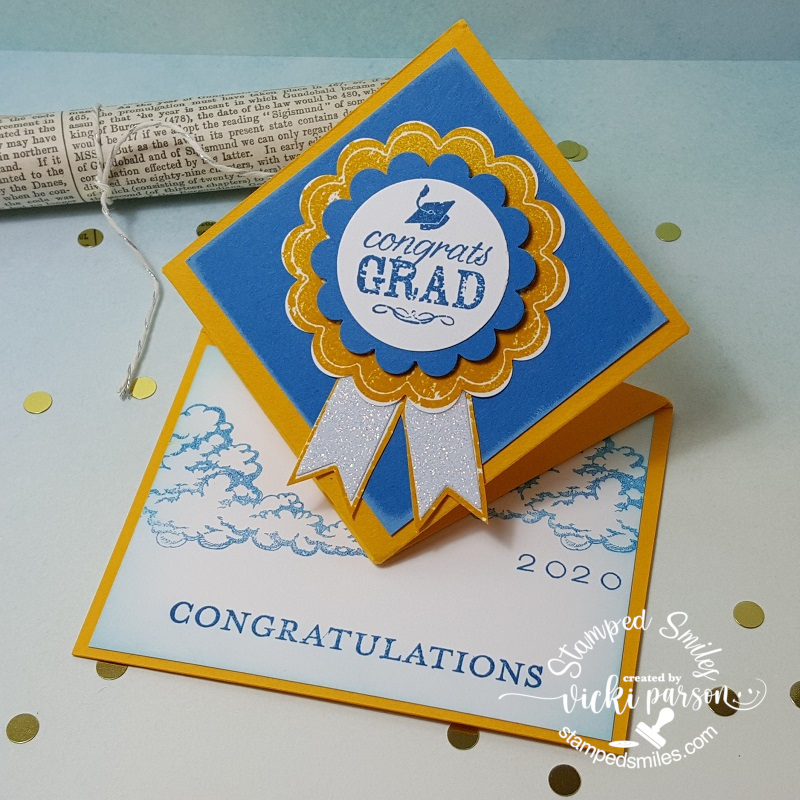
For my next card, my colors were blue and yellow. Being limited on my grad stamps, I’ve used the same greeting as the card above, but this one was used in a slightly different way.
I wanted to have this card look like the “appearance” of a graduation cap flying in the air. So I took this “Spring Card” idea to make it so that although it lays flat to place in a regular A2 sized envelope, it springs up like this for display. I added some stamped clouds in the background along with the year and greeting at the bottom.
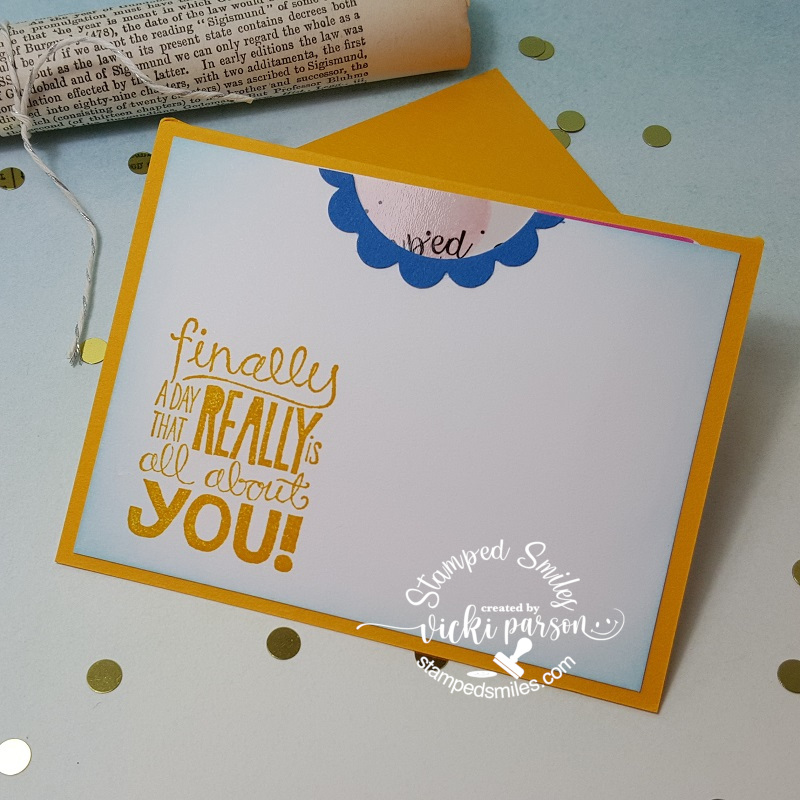
When you turn the card over on the back, you can see that I’ve stamped a greeting along with leaving a blank spot for a message or to sign a name.
You can also see the little area at the top where the thumb hole spot is to place a gift card inside the pocket that I created. Thought that was a fun little card display for the grad!
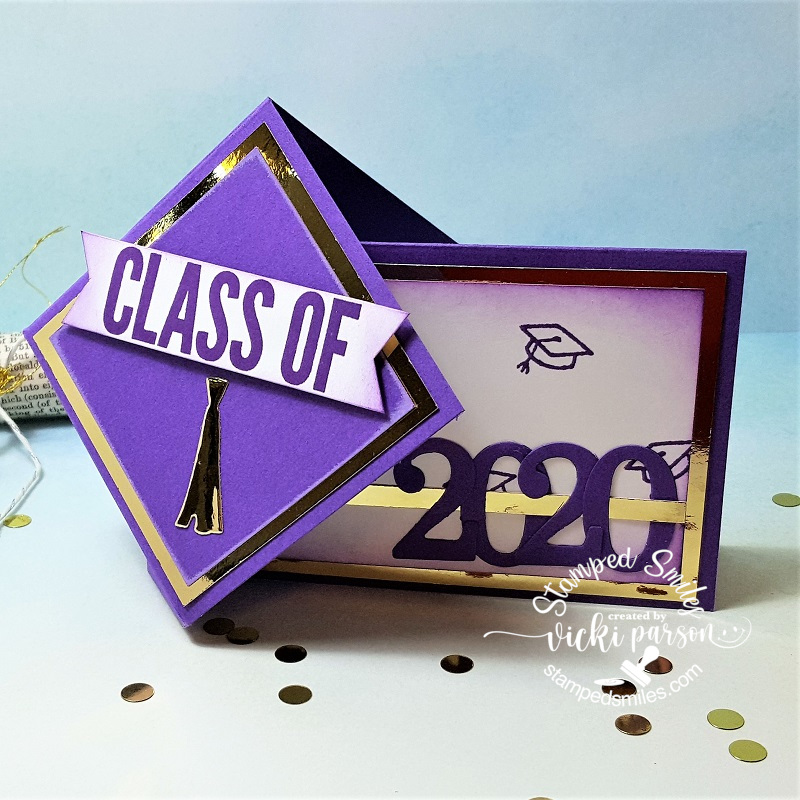
And for this last card, the colors were the same purple and gold colors to work with. I still wanted to work with the grad cap scheme as my supplies were somewhat limited and I wanted to come up with some different and unique designs for each.
So this is my take on a “Twist Turn Card”. This was so fun to do and actually super simple! I took parts of an older stamp image I had and used it for the stamping on this design. I die cut some numbers for the year and of course the design of the card mimics the square grad cap. The tassel actually came from a Stampin’ Up! balloon die set and fit nicely with this.
So when you open up this card, this is what it looks like on the inside with a nice little gift card slot at the top along with a stamped sentiment on the inside and space to write a personal message too.
Thanks so much for dropping in today! I hope you’ve enjoyed my graduation themed cards and were inspired! If you’d like to know how to make any of these cards, just let me know and I can show you!😉
I have some fun things coming…so I’ll see you soon!!
Merry Christmas to all of my friends here and I’m honored to be a little part of your life with you in some way…I hope you know that!
**This is a pre-scheduled post to wish you all a special happy day. I’m away spending time with my family right now, so sit back with your favorite beverage for a time out and I hope you enjoy today’s long post.**
Just wanted to share BATCHES of the cards and creations that I’ve made for the Holidays this year. I know that I make lots of creations, but for the purposes of mailing cards, I try to keep these particular cards as “mail friendly” as possible, so these are more simple in style for me, but really enjoyed making them and just had fun:
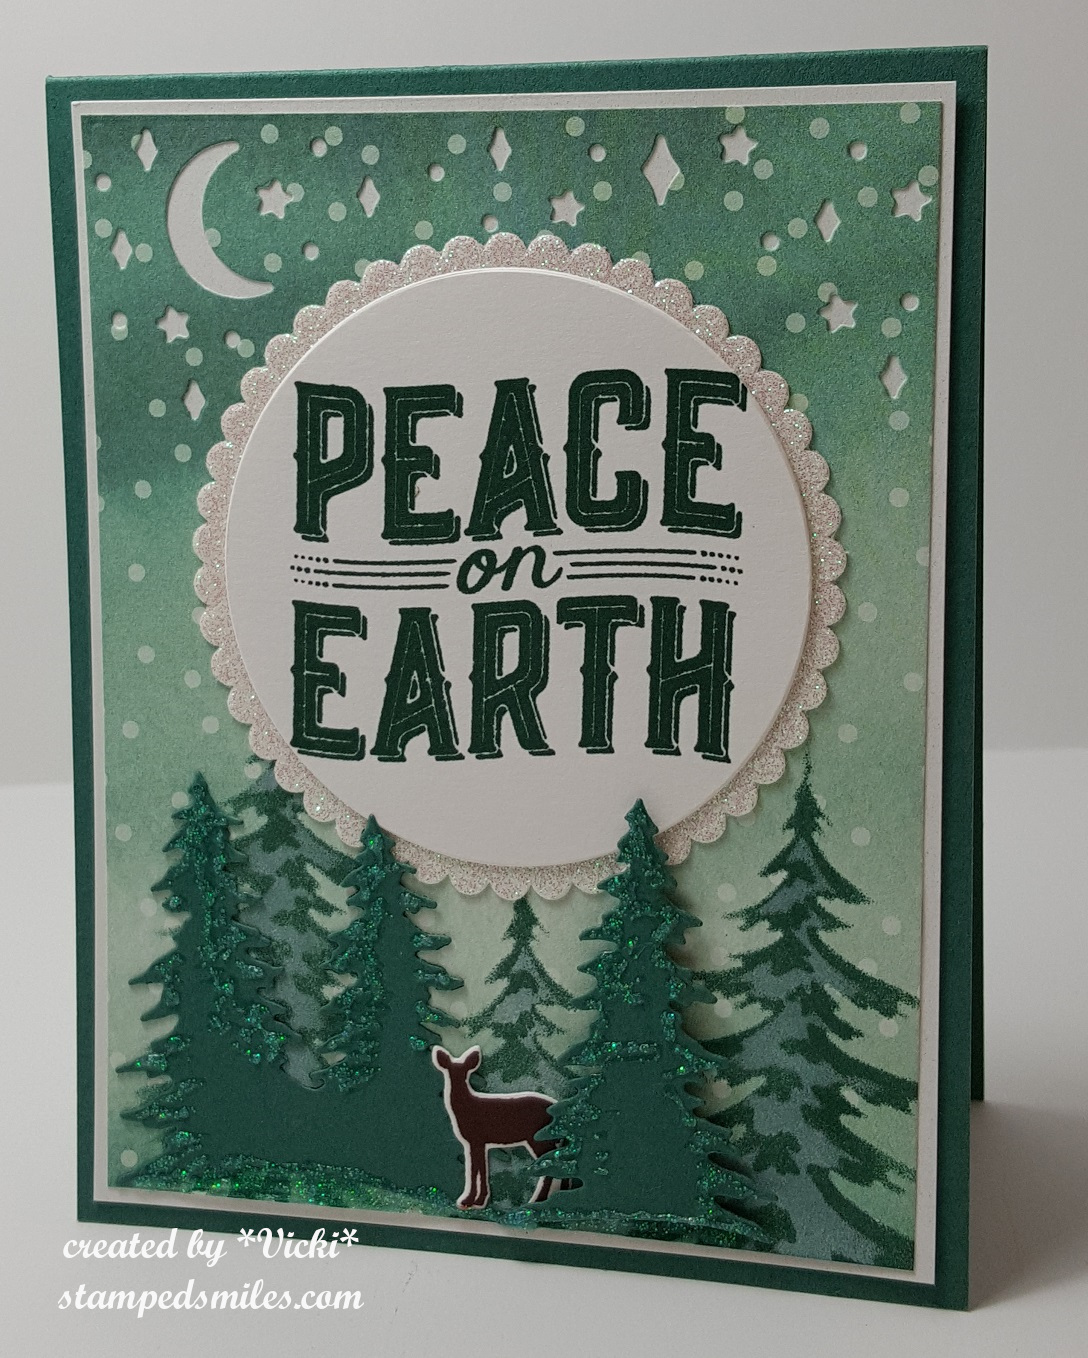
I tend to do bulk cards in a set of 4-6 so that I don’t get “bored” with it or run out of a certain supply or something! LOL! So this first set of 6 cards is using the gorgeous Stampin’ Up! stamp set “Winter Woods”. I stamped up the scene background and then covered the entire panel with double stick adhesive and then covered it with dazzling diamonds glitter. (The deer I added is from a favorite Newton’s Nook stamp set called Serene Silhouettes.) The white heat embossed greeting is from the Stampin’ Up! stamp set “Itty Bitty Christmas”. (I think this set was probably my favorite to do!)
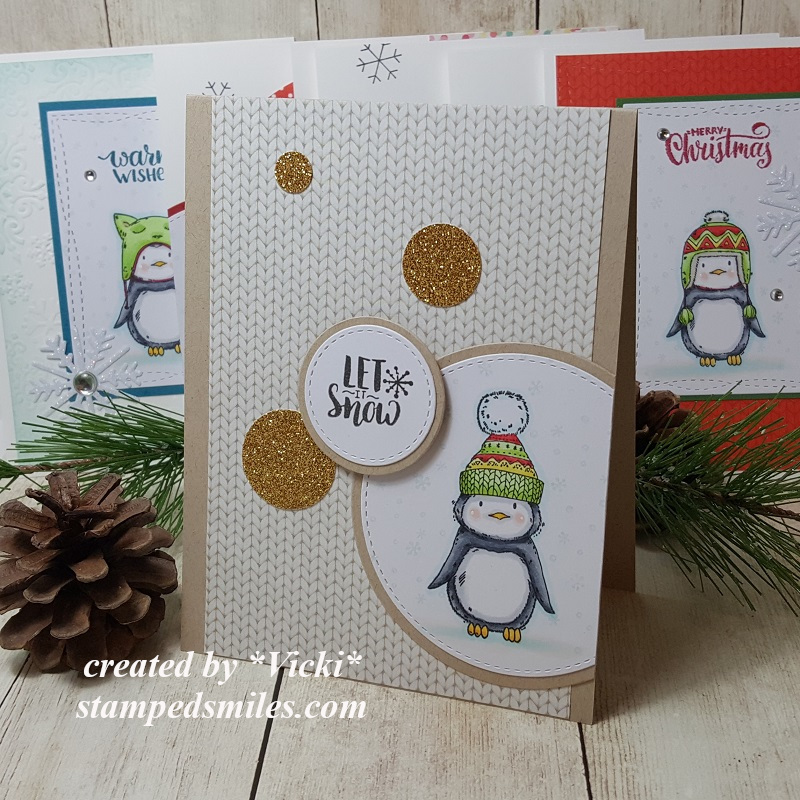
I just *had* to get these penguins in there somewhere! LOL! These set of cards are actually all just a bit different, but I colored up the penguins from the “Pablo the Penguin” free stamp set included with the Making Cards Magazine for December and cut them out in different ways and then mounted them onto cards. Some of them use some of the free papers that were also included with the issue. So this is another set of 6 cards that were mailed out. Love those cute penguins with the different hats! LOL!
Here’s another set of cards that I’ve made to send out, but because these were even more simple than the ones above with very little stamping involved, I made 8 of these. (So if you’re counting, I’ve made 20 total so far…not including some other special cards I’ve mailed out to people along the way.) – I absolutely fell in love with this die set from STAMPlorations called “Two Reindeer” and was so excited to see that I had won a gift certificate from their blog and this was something that I knew I would be getting right away! This was cut from gold cardstock and mounted over a piece of various different Stampin’ Up! pattern paper from my stash…it’s always nice to be able to use up more of my hoarded paper stash! The sentiment is again from the Stampin’ Up! “Itty Bitty Christmas” stamp set.
Now I didn’t want to leave out a couple of cards that I made especially for my boys. They know their mom likes to stamp, but they know I have to add in a bit of my goofy humor with them as well! 🙂 So of course I had to pull out this fun Simon Says Stamp “Gnome for the Holidays” card kit (sold out) to make them! I think I ended up using ALL of the wobblers in the kit too! I told my son that this is me wobbling with the presents about to drop everything and my hubby is trying to save everything! LOL!
Here’s a little wobbler action for you too…
And of course I had to make another card for my other son too…
I absolutely feel in love with all of those cute gnomes that came out everywhere this year for crafting…so I still have more that I didn’t get a chance to use, but thought this would be perfect for my son with this trendy style design…of course using a wobbler too! And I do love him GNOME matter what! 🙂
For some reason, I thought the wobbler action on this one was more fun! LOL! Not sure if it’s because of the weight/size or what…but cool to see the difference.
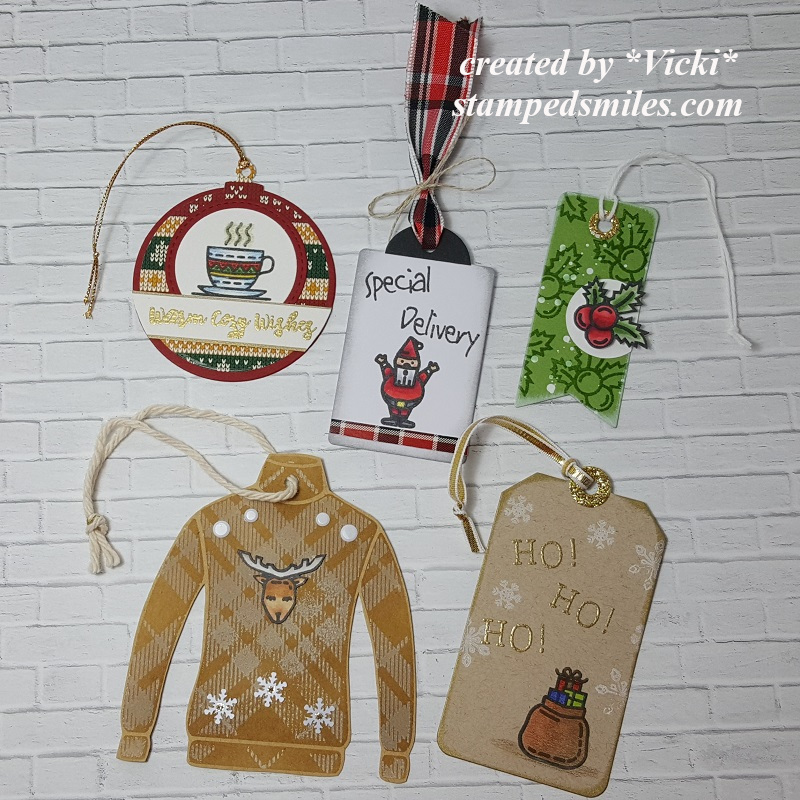
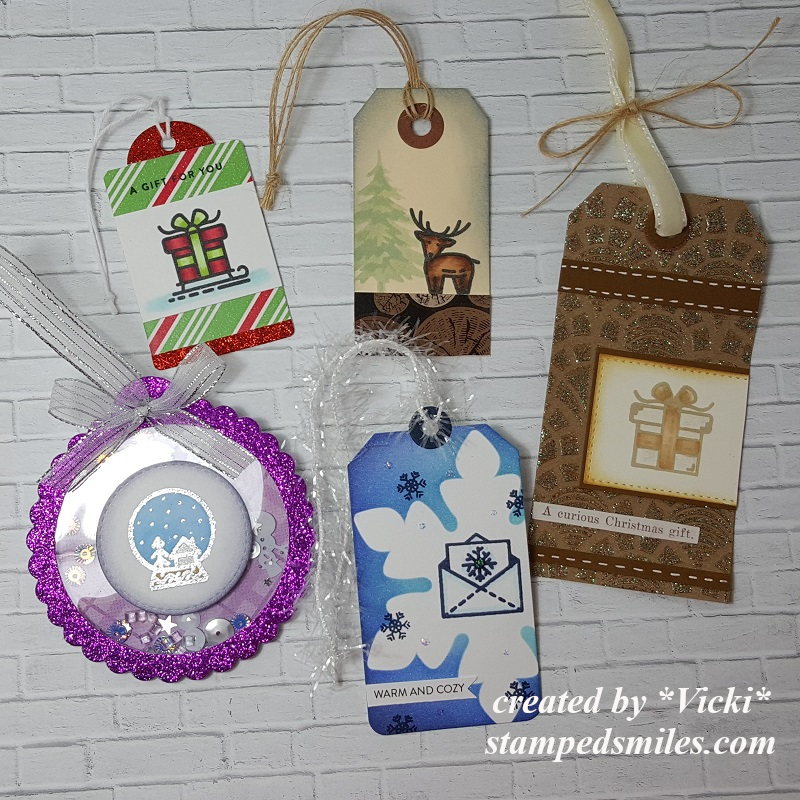
And whilst in the middle of making up all of these cards to mail out, I also had fun playing with the Christmas Advent Calendar that I had purchased a while back. Because it’s an “Advent Calendar” you start with December 1st and open each day. So each day to open was pretty cool because there was a new surprise stamp inside! So I took each day’s stamp and made a tag for each one clear up until today’s last window to open: (obviously previously opened and made to finish! LOL!)
I will show by the week. So this is week 1 with the first 5 days opened. The stamp that I received for each day is noticeably featured in each tag.
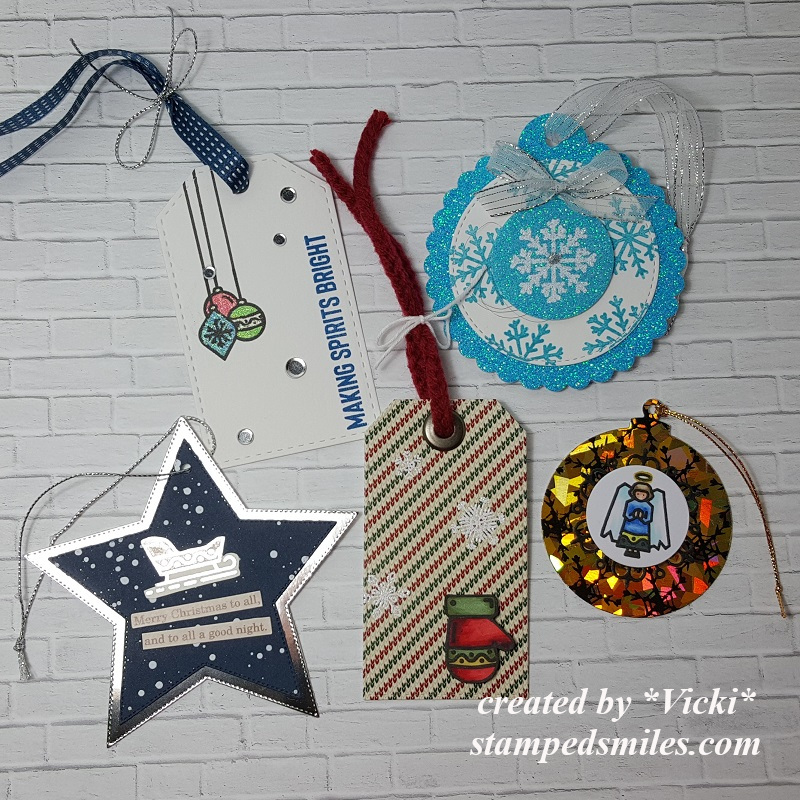
And these are the tags made for week 2. The angel tag was made with Deco Foil in the background.
These are week 3 tags made. The purple colored tag on the left bottom is actually a shaker. The window sheet was glaring in the camera.
This is week 4 of the tags. Hubby picked out the candy canes as his favorite of all of them. Mine was the stockings tag.
And here is the final last week of the tags from the Advent Calendar. Really cool to have all of these tags on hand for gifts! I needed them! 🙂
And of course I wasn’t done with the Advent Calendar box itself because I thought I could “recycle” the little window flaps on the box because they had some cute images on them for each day…so I cut them off with my scissors after I opened that day and kept them:
So I thought it would be fun to use them to create a card! They had numbers on them, but I have covered them up in certain ways so that they’re not showing. The cover die was cut out from the same colored cardstock for the background too.
Whew! Now to get finished up with my wrapping and “merry making” before the big day! I hope you are or have enjoyed yourself a wonderfully HAPPY Christmas day no matter how you’re celebrating it! Thank you for spending some of your time here on my blog today!
Hello friends! Today starts a new challenge for Cute Card Thursday! The theme for this week’s challenge is “Sparkles“. Usually when I think of sparkles, I usually think of Christmas or snow, but this time I went in a different direction for a reason…
Unfortunately, I needed a sympathy type of card this last weekend and it seems that I’m always making one as I need them instead of making several up at one time so that they’re ready and on hand when the time comes.
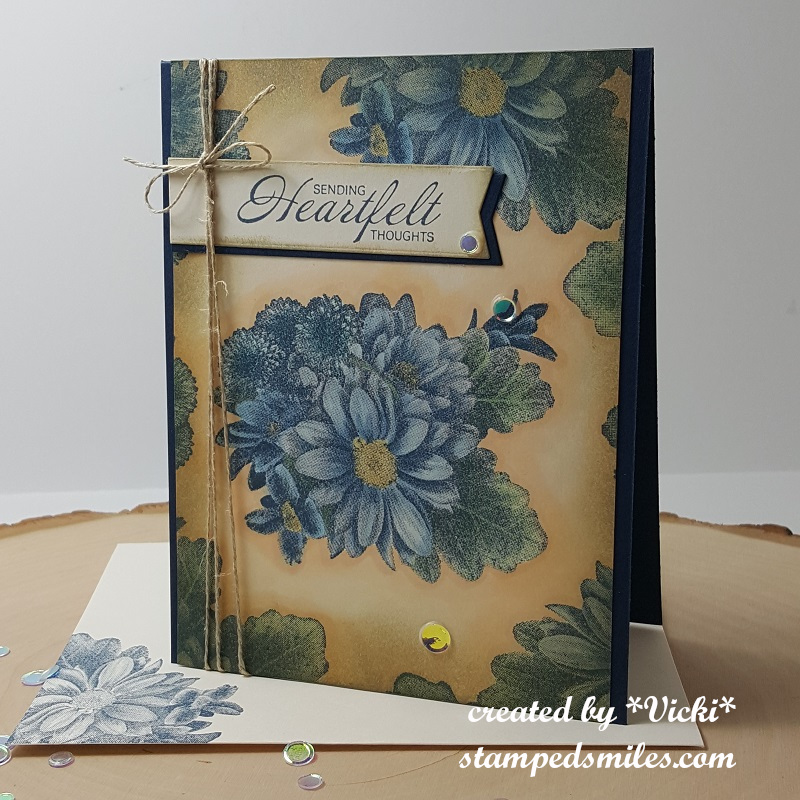
This is an older stamp set from Stampin’ Up! that I got a few years back during their Sale-a-bration time and it was a free set called “Heartfelt Blooms“. I actually really love the floral image and how detailed the image is so that you don’t have to color it if you don’t want to. It has been my “go-to” lately when I need something quickly.
I made it monochromatic green with the Old Olive color and Vanilla cardstock. The “sparkle” is that beautiful glitter paper behind the strip and sentiment. The sentiment was cut from oval dies and popped up with foam tape.
Hope you’ve enjoyed my simple card with sparkles today!
Thanks for dropping in and I’ll see you soon my friends!
Hello friends! Welcome to another Thursday and a new challenge over at Cute Card Thursday this week! The challenge for this week is Brads, Sequins/Gems. So pull out your embellishments and have some fun creating! Looking forward to seeing your creations using these items!
I decided that I was going to use all three items for my card today:
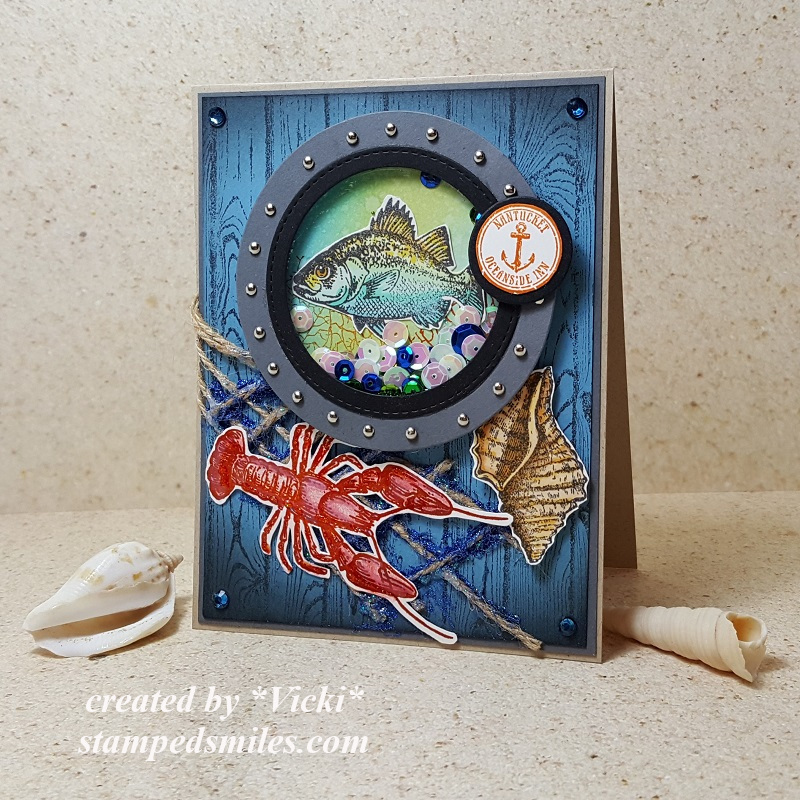
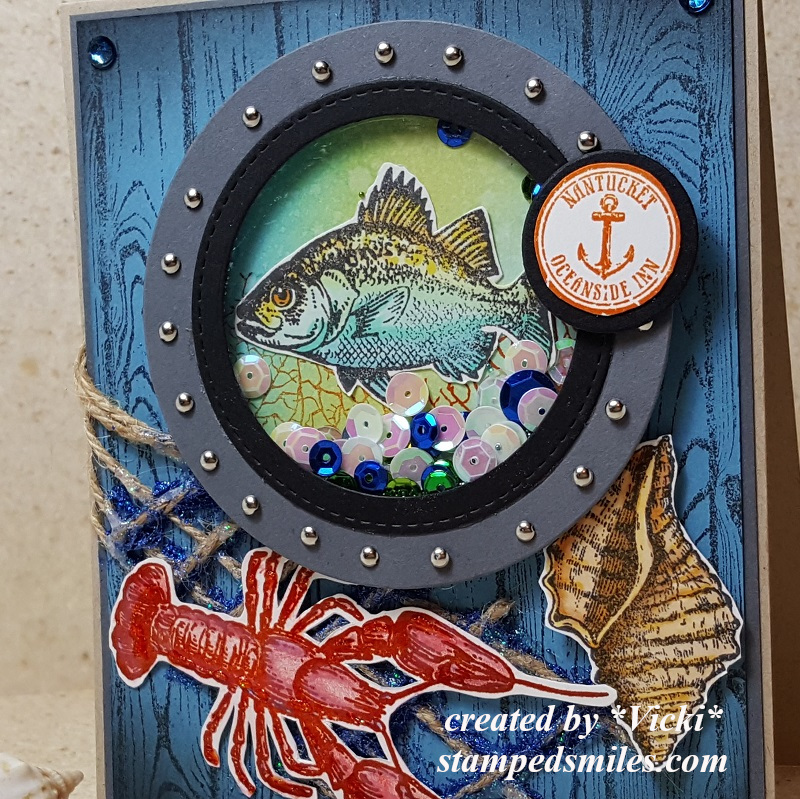
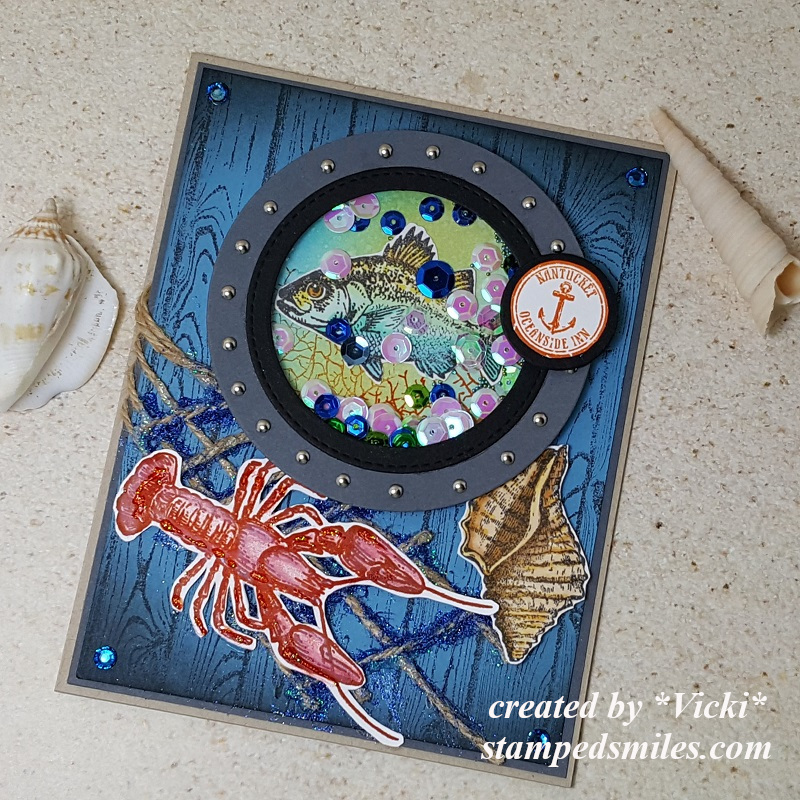
I’ve used an “oldie but a goodie” Stampin’ Up! stamp set for my masculine shaker card here. I’ve pulled out the “By the Tide” and “Hardwood” rubber stamp sets that I’ve had for a couple of years now. (Not sure if they’re still available or not in the catalog as it’s been such a long time since I’ve bought any SU! products.)
I started by stamping the background “Hardwood” stamp with Basic Gray ink over a piece of Marina Mist cardstock and then blended some gray and black distress inks along the edges of it. I mounted it with some Basic Gray cardstock. I’ve taken some twine pieces and used it to fashion a “netting” accent from the side of the card onto the bottom front and then added some blue glitter around it for some fun texture and sparkle.
For the shaker element of my card, I’ve used some circle dies to create the frames and that’s where I’ve attached the silver brads all around the edge. I’ve used some more distress inks and stamp some more images from the stamp set for the inside of the shaker design. I’ve added some sequins for the inside of the shaker window and placed it over the front of the card over the netting accent. I stamped the images with Gray and Cajun ink pads and then colored them in and randomly placed them over the card design.
Lastly, I’ve taken some rhinestones and colored them with a Copic marker so that I could get the blue color for my design.
Hello friends! Hope you have enjoyed a nice weekend. Unfortunately, I needed to make up a sympathy card and didn’t realize that I had run out of them, so I will need to make some up in the future so I can have them on hand and not have to worry about it when the time comes again. I had a friend who recently passed and needed a card for her family, so I pulled out a set that I hadn’t used before until now:
This is an older set from last year’s Sale-a-Bration at Stampin’ Up! called “Heartfelt Blooms”. I think it’s so pretty and since the lady who passed was a happy crafter, I felt good about making this tribute for her. I will miss seeing you at lunches Penny, rest in peace my friend.
I stamped the floral image several times with a Copic friendly navy color ink over some cream colored cardstock and then colored in the images with my Copic markers. I also went around the images with some markers and blended it all out around the design.
I then took some distress ink and the foam ink blending tool to soften the edges a bit and make it look a bit more Vintage. I also stamped the sentiment with navy ink and die cut it along with some navy cardstock with a banner die. I sponged around the edges of this as well. I wrapped some linen thread several times around this panel and tied it off with a bow next to the banner. I then attached it over an A2 sized top folding navy card base.
I created a matching envelope by stamping the image in navy ink over it as well. Lastly finished off the design with some clear sequins.
Here’s a closer view of the coloring on the floral image I did as well as the sponged around the front panel and banner. I thought all of the blue colors turned out really pretty and made a nice Vintage feel.
Crafty Catz – Anything Goes with optional: Blue, Green plus one other color (cream)
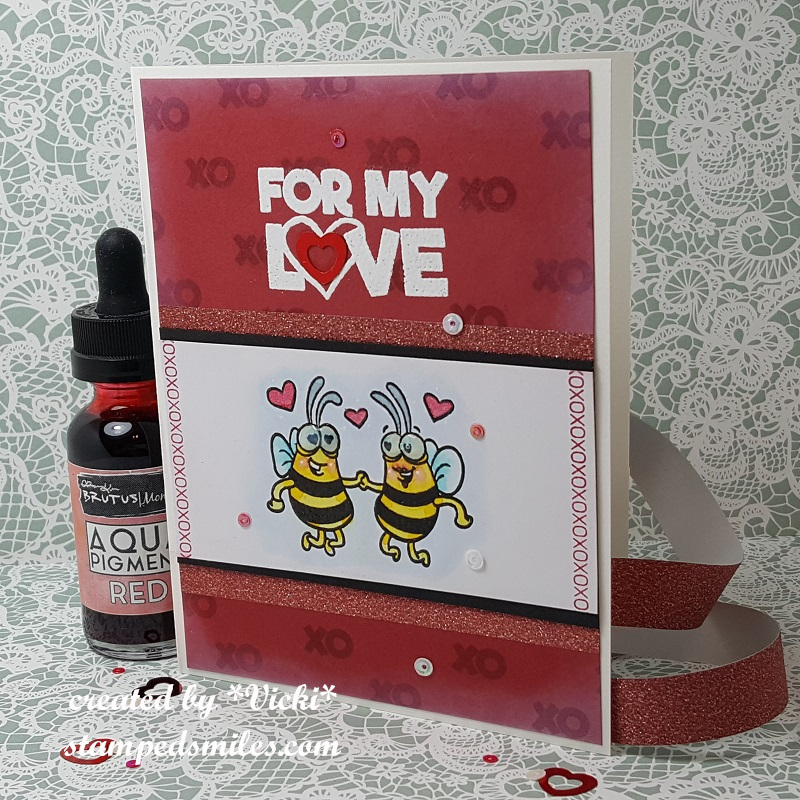
So on another {positive} note, I’d also like to remind you that there are still a couple of days left to play along with us over at the Cute Card Thursday Challenge this week! The theme for this challenge is “Banish the Blues” which I felt like doing in my craft room and so I decided to make this “Fun-Loving” card:
Now how happy do these cute honey bees look?! They almost look like they’re dancing in the air!! I’ve used items from a February card kit for this card.
I’ve heat embossed the bees and colored them in with some Aqua Pigments. I’ve used the paper from the kit and stamped the background and the edges of the bee panel with some SU! ink that happened to match up with it. I then white heat embossed the sentiment from the same stamp set above the bee panel. I sponged around the edges of this red panel with white ink and attached it to a side folding A2 sized card base.
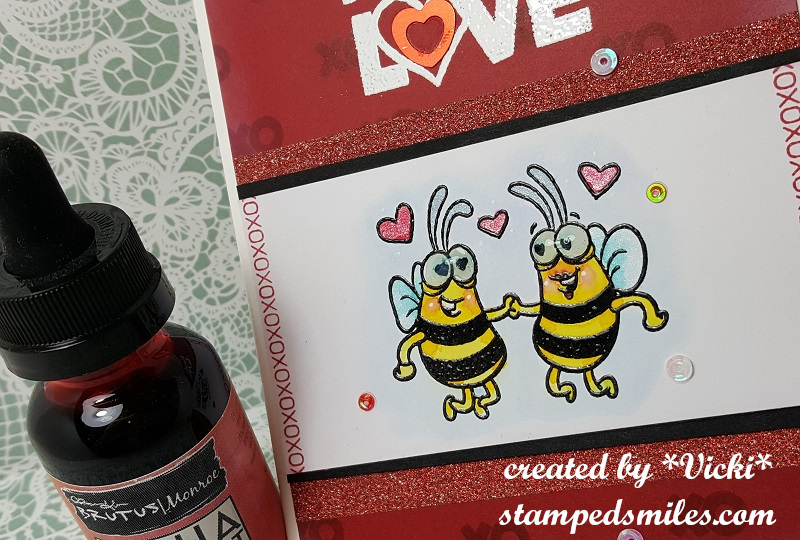
Here’s a closer look at the bees and how I’ve colored them. Some of the Aqua Pigments are shimmery and I’ve used a couple of those colors too! I’ve added some white dots on their cheeks as well as a few around the hearts. I topped off their eye-balls with some glossy accents. I’ve also stamped some more “xoxo”s on each end of this image border and layered it over a piece of black cardstock. I took two strips of glitter washi tape from the kit and added it above and below the image panel area and then attached the bees over top but between the strips. Lastly I’ve added a heart shaped sequins to the center of the white embossed heart “O” in the sentiment and the rest of the sequins from the kit randomly placed on the card. I topped off the circle sequins with some Nuvo White Blizzard Glitter Drops.
Hope this helped to end my post on a happier note with a smile.
Thanks so much for checking in with me today! I’ll see you again tomorrow for more crafty inspiration!!
Here’s some challenges I’d like to enter the above “Bee card” for:
Double Trouble: #20 Thing 1Trouble Maker – “Love is in the Air” (honey bees!), Thing 2Double Dare – Entered the Paper Girls Challenge #168, Thing 3Twisted Sister – “Sparkling and Shining” (I used metallic watercolor, sequins, glitter drops and glitter washi tape)
Hello friends! TGIF is what I am thinking today! Whew!
I have lots of fun things to share with you all today…so please take your time to read, relax, sip on your beverage and enjoy! 🙂
First, I’d like to share a couple of Christmas cards that I had made earlier this month and I didn’t take a photo of them until (with the exception of one of them) because I was in a hurry to meet a deadline of course and had to wait until I received them back! (I will explain that as we go…)
I am glad that I have started making up a few Christmas cards now because I literally ran completely OUT of any Christmas cards, I had last year and didn’t really have quite enough to send out all that I had wanted. Well, I’m going to be working DOUBLE hard on my Christmas from here on out because I have 2 craft shows that I’m going to be at, and I know I will really need some including several in a boxed-up form!
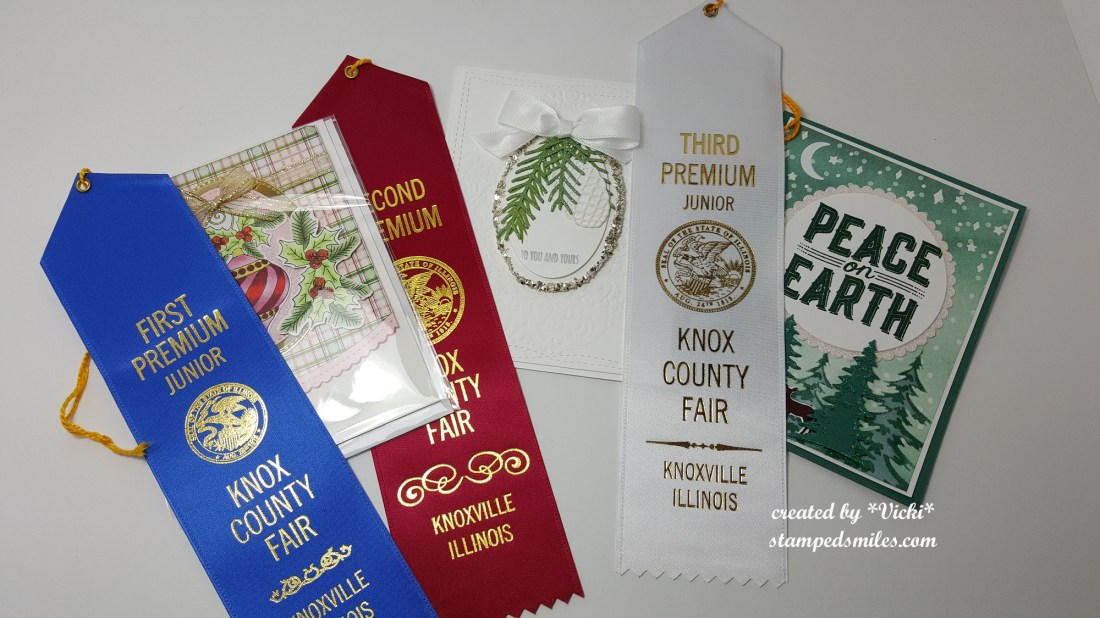
I have TONS of Stampin’ Up! products and I was happy to pull some things out and use it on my card here. I knew I wanted to go mostly white with this one because I wanted it to look elegant. I used some chunky silver glass glitter around the edges of my oval. Both the pine needles and outer pinecone where heat embossed with some clear glitter embossing powder. The embossing folder and ribbon are all from SU! too. I just used a wonky stitched rectangle die from My Favorite Things to cut out main panel.
This card won 2nd place at my local County Fair! (You can see more about that below)
Here is another Christmas card that I made using some more of my Stampin’ Up! products that I keep on hoarding in my stash and don’t use! LOL! The only thing I did different was the background pine trees are actually a Tim Holtz stencil from last year and then the die cut pine trees along with everything else including the paper and ink are all from Stampin’ Up! I added some Stickles clear glitter over the die cut pines and though it’s hard to see in the photo, I sprayed the DSP with some shimmer spray.
This card ended up winning 3rd place at the County Fair!
Here are the entries that I entered in one category at my local County Fair this month. I won 1st, 2nd and 3rd all in the same category which was “Hand Stamped Greeting – Holiday”. They don’t award any more than this in any category. So, I was happy to see that I placed all three! Above, you can see that I have entered the bauble Christmas card I previously posted, and it ended up winning 1st place! You can see the close-up details of the card in THIS POST if you are interested or missed it.
I just needed to start making up Christmas cards and I thought this was a great way to not only get some done but make the most out of it by entering them for the fair!
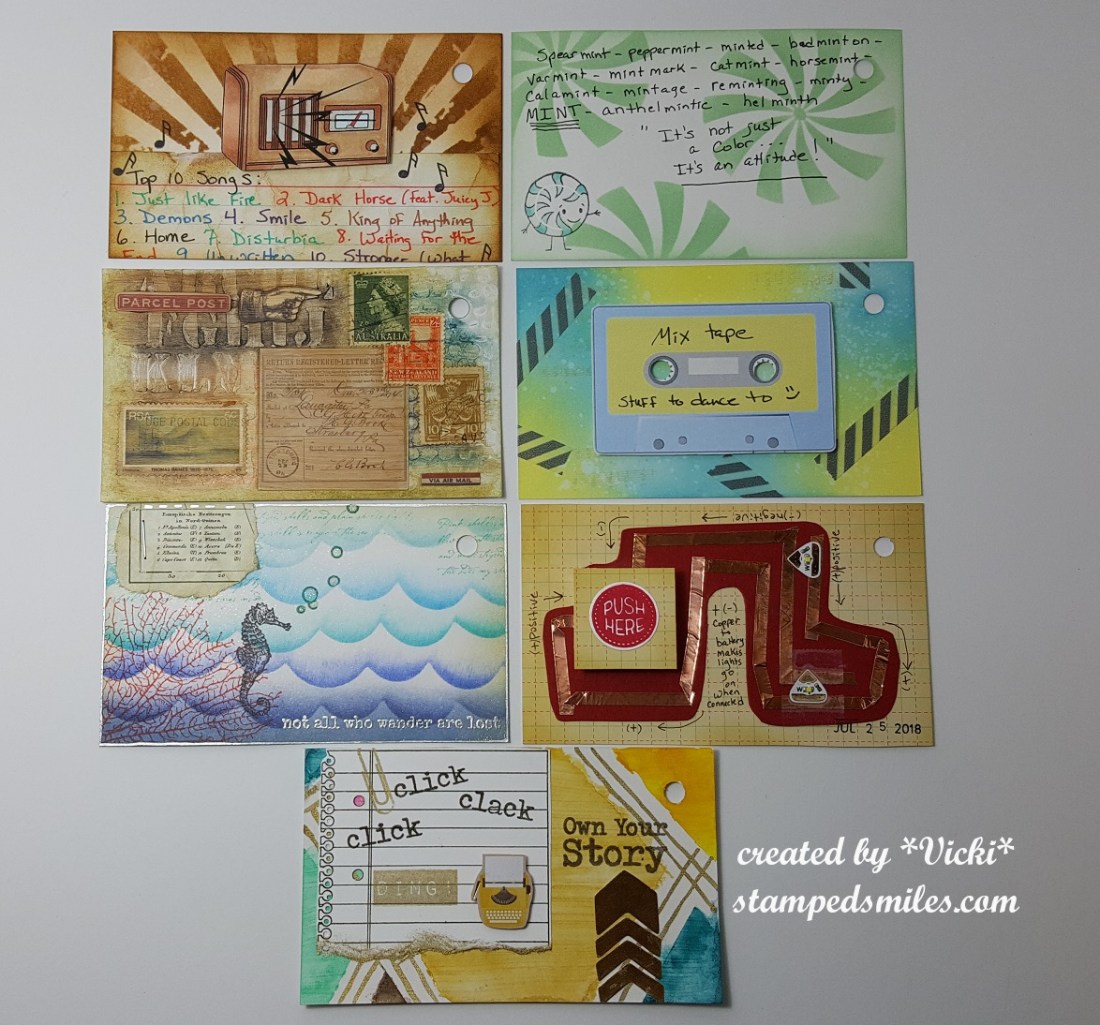
And of course, since it’s Friday, it’s also time for my weekly ICAD results!! I only have ONE more week left of this 61-day challenge…. can you believe it?!! So here are the ICAD 2018 week 8 results:
As always, things are a bit random and weird, but each day the prompts inspire me to keep on going to my room and have a play with media!
For one of the cards, I have used a Chibilights Electronic and yes, it is showing as there is a reason for it! LOL! But I wanted to share that it DOES really work on my card:
I just had to share that as it is the very first one, I’ve ever done that I got to actually work!! LOL! I was pretty excited! I will be back next week with my very final share from this!
Now you all know WHY I had random and spotted postings…I’ve been a busy stamper with getting projects done and ready for the County Fair (I’ve entered 16 projects and I will share more later on), and I’ve been getting samples ready for my challenge as well as my fellow Splitcoaststampers DDDT challenges getting ready to start soon.
I am tired now and I think I’ll relax with hubby this weekend! Tonight, we are going to go to a hot-air balloon moon glow in our area. The weather is beautiful for it! Hope you all have a wonderful and fun weekend too! Thanks so much for dropping in!