May AJ Page-Never Forgotten

Hello friends!  I hope that your month has been going well so far!  We’ve been doing lots of things outdoors and enjoying the time as much as possible until the temperatures climb higher and gets too hot.  I’m enjoying it now, but unfortunately, there will be storms this weekend in my area.

This weekend (Monday) is also Memorial Day for those of us in the U.S.  The date and name may vary by different countries, but it’s all about remembrance of our active military who’ve died.  I wanted to create my art journal page today in reflection of this.

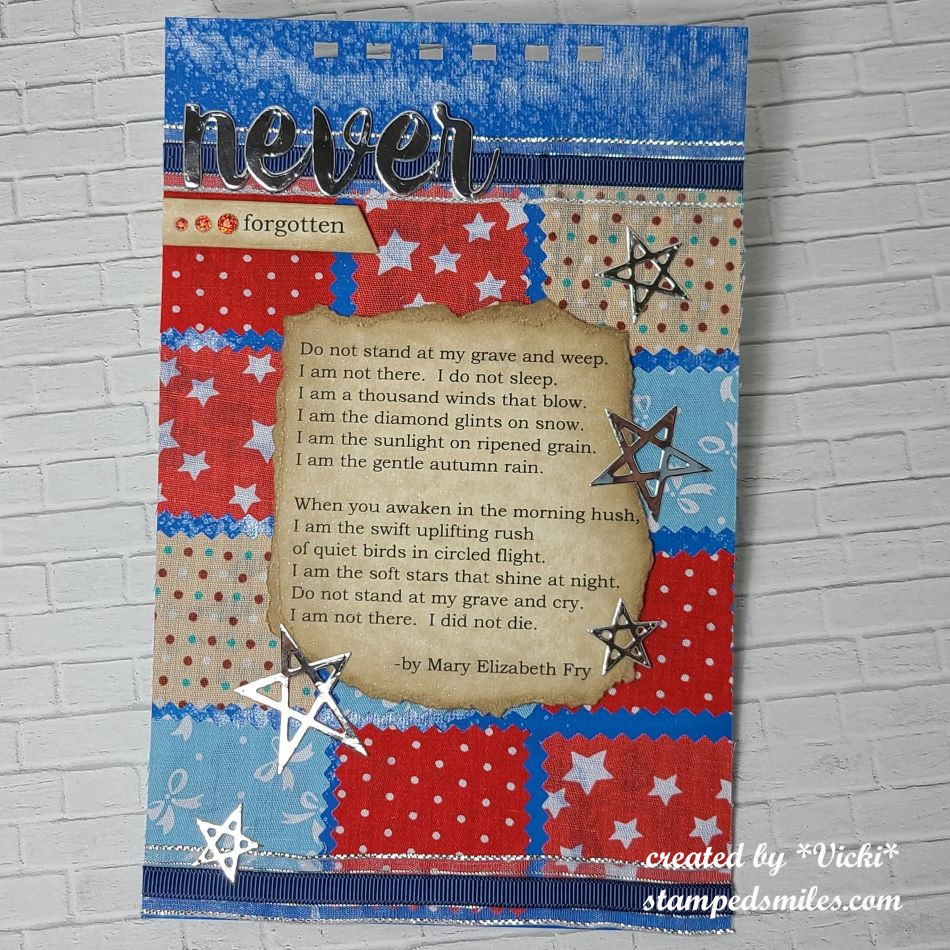
  • It’s time for the monthly Art Journal Page collaboration with my crafty friend, Carol (from Crafty-Stamper)! We get creative trying to use up our never-ending stash piles along with a prompt for each month.  I know she always has great inspiration to share, so please check out her blog too! Here’s my AJ page with the “SMASH OUR STASH” May prompt of “MATERIAL”-(use fabric/cloth in some way): 

For the “material/cloth/fabric” prompt, it got me thinking because I don’t sew very much.  Sometimes I get out my sewing machine, but rarely!  I do have some fabric scraps and I thought it would be fun to cut out some squares with pinking shears!  Then I had to figure out what to do with them!

For the background:  I used a 5.5″ x 8.5″ of canvas heavy weight paper with the pre-punched holes at the top made with my Bind-It-All Machine and painted over it with some Crisp Blue Americana acrylic paint.  Once dry, I sprayed some silver metallic over it.  (You can see some of the shine at the top.)  I didn’t know how busy looking the fabric squares would look, so I decided to stop there.

Although I did cut several different squares of fabric patterns, my eyes were pulled to the red, white and blues which were perfect for Memorial Day.  I pulled out only those type of colors and used some fabric glue to attach over the background randomizing the patterns.  I also took some silver and navy ribbons to attach at the top and bottom areas where the fabric squares stopped.

The poem was a memory that I had during a vacation time with my husband when we ran into a memorial with a park bench and this poem was engraved with birds around it.  I looked it up and printed it out on my computer over a parchment paper.  I ripped it out and sponged the edges.  I also printed out the “forgotten” at the top and cut it out in a banner.  The poem was popped up with foam tape over the fabric squares.  “Do Not Stand at My Grave and Weep” – by Mary Elisabeth Frye

The stars and “never” letters were die cut and attached and I finished it with red rhinestones next to the “forgotten” banner.

  • Hope you’ve enjoyed my art journal page today and I really appreciate you stopping in!   I wish you all a wonderful weekend!

Challenges:

  1. Art Journal Journey – Poems
  2. Creative Artiste Anything Goes Mixed Media
  3. Love to Craft – #80 Anything Goes
  4. Simon Says Stamp Monday – Let’s Art Journal
  5. Crafting Happiness – #176 Any Craft

February Art Journal Page-Catching Stars

Happy weekend friends!  We’ve had some great sunshine for the last few days and it’s been really nice, but it’s very unusual for us to have these warmer temperatures for this time of the year.  I will enjoy whatever it brings for sure!  But in the meantime, I’ve also been enjoying time in my craft room getting creative too!  

As you know, this month I’ve been sharing several art journal pages as I’ve been hosting this month’s challenge theme over at Art Journal Journey.  There is still lots of time left to join in the fun with us and share your inspiration with the “LIGHT” theme and I’d love to see your take on it!

Today, I’m not only sharing my project for that, but it’s also time for our monthly Art Journal Page collaboration with my crafty friend, Carol (from Crafty-Stamper)! We get creative trying to use up our never-ending stash piles along with a prompt for each month.  I know she always has great inspiration to share, so please check out her blog too! Here’s my AJ page with the “SMASH OUR STASH” February prompt of “LIGHT” (of course!):

Oh my stars!  I don’t know if these guys are expecting several rainy days ahead, but they really want to be prepared for it!  For my “stash smashing” I went with using some metallics.  Do you have a problem hoarding those metallic things because they’re just so pretty?  I am guilty!  I’ve used some metallic paper to cut out the lettering, I’ve used some metallic watercolor that I avoid using so I don’t run out and those star sequins I have so many in every metallic color!

For the background:  I’ve used a 5.5″x8.5″ piece of Canson watercolor paper with the pre-punched holes at the top using my Zutter machine.  I’ve pulled out my watercolors and used shades of blues, but also dark turquoise and dark violet.  I’ve used the metallic copper watercolor to splatter over the background for those distant stars.  I also added a very light touch of this metallic watercolor on the top highlight areas of the critters, around the wheelbarrow, the net, the lantern and the star with the mouse.  (Sometimes it’s hard to capture all of the shine on a project, but this thing is very shinny and sparkly!)

But before I put all of the details on the images, I took a black marker and drew in a ladder to reach up towards the clouds so Mr. Fox could climb up to the clouds and catch his star.  I then took a grass border die and die cut a strip in black for the bottom.

All of the stamped critters and clouds came from Lawn Fawn sets.  I stamped, colored and die cut them to arrange my scene.  Some of images are popped up with foam tape for dimension.  As you can see, I’ve added tons and tons of metallic copper sequin stars filling the wheelbarrow, dropping from the sky and even the little bunny is holding his star.

Lastly, I die cut the metallic copper letters, backed them with black cardstock and popped it with foam tape over the page and printed off the quote on the computer and cut them in strips to arrange on the scene.

This was lots of fun to do as I was able to use up some of that hoarded metallic stash!  Hope you’ve enjoyed it and gotten some inspiration from it. 

Thanks so much for stopping by and enjoy your weekend!

Challenges:

  1. Art Journal Journey – LIGHT/KEEPING IT LIGHT
  2. Stamping Sensations – Animals/Birds/Creatures/Anything Goes
  3. Creative Fingers Anything Goes

So Proud of You Commissioned Grad

Hello friends!  Just popping in to share a commissioned graduation card that I made for someone a few weeks ago.  I love making grad cards and was happy to help accommodate a personalized one for a special person in someone’s life.

She didn’t even realize that she told me her grandson’s name, and all she mentioned was the school colors to go by.  So I decided to have fun with personalizing an infinity shaker this time:

Vicki-TEgradshaker-comm

For the background of this card: I’ve started with the Taylored Expressions Bokeh Stars Layering Stencils blended over a white 4″ x 5.25″ cardstock piece with coordinating colors assigned to me using a burgundy/silver school color scheme.  I’ve decided for the inside shaker bits, to die cut a few sized stars with the burgundy (TE Mulled Wine) and some Brushed Silver from my stash. I also had some TE Sparkly Stars Bits & Pieces to add to them.  I turned the stenciled panel into an “infinity shaker” by using a TE A2 Infinity Shaker Panel and attaching it to a A2 sized “Mulled Wine” side folding card base.

For the front of the clear shaker panel: I die cut a frame from the Brushed Silver cardstock with the TE A2 Thin Frame Cutting Plate that was also attached to a Mulled Wine die cut banner that I’ve silver heat embossed the “so proud of you” sentiment from the TE Mini Strips-Grad stamp set.  I personalized the silver frame by die cutting the letters from the TE Cap It Off Alpha die set with the same Brushed Silver cardstock.  I attached these letters before setting the frame in place and then just cutting the frame off where the letters meet up with it.  Lastly, I thought of the Lawn Fawn Hats Off to You stamp set, stamped, colored it in to match up with the colors and added a bit of sparkle to the tassel with a silver gel pen and cut it out with the coordinating die. I popped it up with foam squares so that it is tilted over the “C” in the name.

The envelope was decorated with the year by die cutting the outline with the Mulled Wine cardstock from the TE Cap It Off Numbers die.  I also used one of the Mulled Wine stars I previously cut for the shaker to place in the middle of the “0” as well.

Here’s the “action” of the infinity shaker…

I think I enjoyed seeing those stars move around from edge to edge on this one! LOL  You can never have too many confetti stars shaking around to celebrate the grad, right?!⭐

And of course I made a greeting for the inside of the card stamped in the same Mulled Wine color along with a few stars stamped in there.  I used another piece of the die cut frame in Brushed Silver cardstock to go around the stamped panel and attached to the inside of the card.

You can see on the front of the silver envelope in the corner, that I’ve added a couple more of those die cut stars to decorate it as well.

She seemed pretty pleased with the card and of course very proud of her grandson.👨‍🎓

I hope you’ve enjoyed my project too and thank you so much for stopping in!  See you soon!

Challenges:

  1. {Cupcake Inspirations} – Graduation
  2. Crafty Catz – Anything Goes with optional “Celebrate”
  3. Country View – Seeing Stars
  4. Crafty Calendar – Anything Goes
  5. Lil’ Patch of Crafty Friends – Anything Goes
  6. Pammie’s Inky Pinkies – Anything Goes

Pink Halloween for Digi Doodle Studios GDT

Hello friends!  I hope that you’re all having a wonderful week so far!  The weather has really been changing this week as we get into Fall now.  Speaking of that, it’s time for sharing some fun Halloween themed projects!

I’m VERY honored to have won a guest spot for this month over at the Digi Doodle Studios Challenge Blog!  So, for the October challenge, the theme is “Pink and/or Halloween” You can choose to use either or both…I’ve decided to use BOTH on my creation:

As a winner, I was given this darling image to play with called Gwendoline DDS Good Halloween Witch and I thought she would be so much fun to color up in the pink and black colors!  I think she turned out adorable in her pinkness!

I have also decided to print out a sentiment from the DDS Halloween Happiness Digital Sentiments Collection that I’ve used as a strip on the right side of my panel placed directly under the image panel.  Both of these panels have been sponged with some pink ink around the edges.  The witch image panel was popped up with some craft foam.

For the  papers, I have printed out the fun pink and black dotted patterns from the DDS Wonky Halloween Digi Paper Pack and then used a sander around the edges of them for a bit of distressed look.  Before attaching the black with pink dots strip in the center, I wrapped some pink metallic ribbon around it with a bow.  This strip was placed behind the image panel, but in front of the layers behind the image panel. Those layers are pink metallic mirror cardstock and a scallop die cut black cardstock which was also layered behind the sentiment strip.  All of the panels were placed over a black top folding 5″ card base.

I’ve added a couple of die cut spider webs from some white glitter paper and attached them in the corners of the design and then found some pink sequins with stars that I filled the centers with some pink glitter drops scattered around as well as placing an extra die cut star and sequins in the center of the bow.

And here’s a closer look at the coloring I’ve done over her using Copic markers.  I’ve used a white gel pen for the dots on her cheeks as well as highlights on her legs.

It’s always hard to really show all of the wonderful shimmer and sparkle, but I’ve used a glitter brush pen over the pink stars in her dress as well as the stars surrounding her. (Her pink earrings were covered with it too.)  I took a pink metallic gel pen to color in the dots on her dress and the ones surrounding her.  I then took the pink glitter drops that I’ve used in the center of the sequins and add a couple more around her trailing stars and the center of the star in her wand too.

I also very lightly sponged in some pink chalk for the stars and dots area around her after it was all dry.

I hope you’ve enjoyed my card for today and have been inspired in some way!

Thanks for dropping in today my friends and I’ll be seeing you again very soon!😉

Challenges:

  1.  Daring Cardmakers – 3 Things Starting with ‘S”:  Stars, Spider Webs, Sequins
  2.  Pammie’s Inky Pinkies – PIP 2039 Anything Goes
  3. Always Fun – Die-cutting (my fave is stitched scallop!)
  4. A Perfect Time to Craft – Anything Goes Oct
  5. Creatalicious – Anything Goes
  6. Simon Says Stamp Wednesday – Anything Goes

Lavina Christmas

Happy Friday friends!  As my “Countdown to Christmas” continues, today I’m bringing you a card I’ve made using some “new to me” stamps!

Vicki-LavinaChristmas

I’ve been very intrigued with seeing some of my blog friends out there using these very magical silhouette style stamps and loving what they’ve come up using them!  So I decided to make a purchase or two or so of these and have a play!  🙂

I’ve used the Christmas Eve and the Stars 2 Miniature Lavina World stamps for my card design here.  I’ve stamped the images out over some white cardstock with a Navy ink and then used some blue distress ink to sponge around the edges with.

For the layering of this card, I’ve used the Spellbinders “Chantilly Paper Lace” die along with some of my regular oval shaped dies.  I’ve also used an older Die-Versions “Believe” die cut for the sentiment.  That along with the large background panel were cut from some Silver Mirror cardstock.

The oval layers in the background were matted with some Silver Glitterstock along with some Navy cardstock which is also what was used for the card base.  I’ve added a silver metallic ribbon bow at the top.  I based the size of my card with the die cut so it is more of a 4″ x 6″ sized card rather than a standard A2 size.

Vicki-LavinaChristmas-close

Here’s a closer view of the image where you can see that I’ve added some Stickles “Star Dust” glitter in certain areas on the tree as well as the star on top.

I also covered the bottom of the image panel with a glue pen and then sprinkled on some dazzling diamonds glitter to give the appearance of snow on the ground.

Vicki-LavinaChristmas-flat

This isn’t my usual “coloring in” cute style that you’re used to seeing from me, but I really enjoyed putting this one together and playing with my new stamps!  I hope you’ve enjoyed it as well!

Thanks so much for stopping by today!  I’ll see you again soon!

Challenges:

  1.  Lavina World Challenge – Anything Goes + NO digital
  2. Sparkles – Add Glitter & Sparkle
  3. Jan’s Digi Stamps – Anything Goes
  4. Watercooler Wednesday – WWS252 Anything Goes
  5. Cute Card Thursday– Anything Goes
  6. Creative Knockouts– Anything Goes
  7. The Paper Girls – Holiday Lights (Fairies lighting the tree!)

Tidings of Joy with Whimsy Stamps

Hello friends!  It’s December and that means Whimsy Stamps has fun things coming out!

I have this really sweet card just perfect for this time of the year….

Vicki-WSChristmasManger-Dec3

Today I’m sharing this really sweet image called “Christmas Manger” by Crissy Armstrong.  Isn’t this just as precious as can be!  You may remember a card I did last year IN THIS POST with a penguin style manger.  Really love Crissy’s sweet images and I’m thinking I may have to start collecting her mangers she comes out with each year now! LOL!

After coloring up this image, I’ve fussy cut it out while I worked on the background design.  I started by ripping a piece of masking paper and covered the bottom portion of a square 4″ piece of cardstock.  I took a “Light Ray” stencil and ink blended some Chipped Sapphire distress ink over it.  While the stencil was still on it, I took some white watered down paint and splattered over the background.  After removing the stencil, I let that dry while cleaning up my stencil and work area.  After it was dry, I took some Scattered Straw and Mustard Seed distress inks and blended over top.  I then took a glitter brush pen and went over each of the yellow strips in the background.  (I also covered the tops portions of the images too.  You can see this all better in the photos below.)  Lastly, I’ve used the other side of the masking paper that I ripped to cover up the sponged rays and ink blended with Rusty Hinge, Walnut Stain and Ground Espresso.  I used a marker to add some shading around the image and glued it down.

For the card, I’ve used a navy 5.25″ square card base and I’ve also used it as part of a layer behind the image panel along with a piece of gold mirror cardstock.  It’s hard to completely see this, but I’ve printed out some digital papers from the Whimsy Stamps Christmas Red, Gold and Green collection as well as the Whimsy Stamps Rustic Wood and Brick Collection.  The background was sponged with the same colors that I’ve used for the bottom of the image panel.  I’ve used some twine for the center strip area and tied a bow along the side with it.  The image panel layered with the Gold Mirror cardstock was popped up with some craft foam over that.

I’ve used a wooden star that I’ve heat embossed several times with some Gold Sparkle EP which is what I’ve used to heat emboss the sentiment at the bottom of the image panel from the Whimsy Stamps Holiday Mini Sentiments.  To finish it off I’ve decided to add some Studio Katia Sparkling Crystals.

Vicki-WSChristmasManger-Dec3-close

Here you can better see the sparkle and shimmer on the yellow “light rays” as well as the tops of the images where the light might be shining on them.  I’ve got the image colored up with my go-to Copic markers.

You can also see the sparkle and shine on the wooden star and sentiment from the gold sparkle embossing powder.  Plus of course the shine from the gold mirror cardstock.

Vicki-WSChristmasManger-Dec3-flat

I hope you’ve enjoyed my card today!  I sure had fun putting it together and I know someone special that this needs to get sent to as soon as I can!  Time is running out for it to make it on time!  Oh yes…that dreaded time running out is near isn’t it?! LOL

Thanks so much for stopping by today!  I appreciate you being here!  I will be seeing you again soon my friends!

Challenges I’d like to enter this card for:

  1.  Creative Knockouts – Winter/Holidays
  2. Daring Cardmakers – Anything Crafty with theme Shining Lights
  3. Crafty Friends– Anything Goes
  4. Merry Little Christmas – December Anything Christmas Goes
  5. Country Views– Stars
  6. Crafty Animals – #33 Anything Goes

Super Girl Starla Flying By!

Hello friends!  Happy Tuesday and I hope you’re having a wonderful week so far!  I actually can’t believe that September is already flying through this quickly!

Speaking of “flying”, I have this really cute card to share with you using another Whimsy Stamps image:

Vicki-WSStarla-Sept17

This little digital cutie is called Starla from Whimsy Stamps.  She has her arms out and so I thought it would be cute to have her appear as if she’s smiling while flying up through the clouds at us!  I also thought this would be a really nice encouragement card for a child and I’ll be sending it out to hopefully share some smiles.

I stenciled some clouds in behind her, cut the image out with a stitched square die and layered a piece of purple cardstock behind her.  I ran a piece of green colored cardstock through a star embossing folder, wrapped a silver ribbon around it and then attached it to a purple 5″ square top folding card base.

I die cut some stitched cloud borders for the bottom of the card design but sponged them with some Broken China Distress Ink before attaching them with foam tape.  I also die cut some stars to add for accents on the design with both silver glitter stock and a piece of purple to paper piece in the center of one of the silver outline stars.  I also added a rhinestone star to the center of the bow.

Vicki-WSStarla-Sept17-close

Here’s a closer look at Starla with the coloring I’ve done on her.  I’ve colored her up with Copic markers and added some details with gel pens.  I’ve also covered her headband with a glitter brush pen and also added some extra glitter over the stars at the top of her head band.  You can also see where I’ve added some “strokes” to show that she’s zooming through the clouds.  I also covered that area with a bit of shimmer with the glitter brush pen as well.    The “little girl” in me had to color some purple!

Vicki-WSStarla-Sept17-flat

The sentiment at the bottom was stamped with a sentiment from my stash with some black ink.

I hope you’ve enjoyed my card today and it’s brought you a smile or inspired you in some way!  Thanks so much for stopping in!  See you soon!

Challenges:

  1.  The House That Stamps Built – S1119 TicTacToe
  2. Daring Cardmakers – Special Thoughts
  3. QKR Stampede – #363 Anything Goes
  4. Sweet Stampin’ – Cards for Kids
  5. Addicted to Stamps – For a Lady/Girl
  6. Splitcoast Stampers Teapot challenge – Put a Smile on their face

Time to Celebrate at Cute Card Thursday!

Hello friends!!  I’m very excited to share my card with you today for Cute Card Thursday!  We are celebrating our 11th birthday this week!!  WOO HOO!!  So of course, the theme for this week is “CELEBRATE“!!  Hope you can pop on over and celebrate with us by sharing your creation!!

This week we are sponsored by All Dressed Up Stamps and I have used one of their adorable images for my card today:

Vicki-CCT573-ADU-Celebrate

I have used this very sweet image called Time to Shine and she is having so much fun dancing around with all of the stars floating about her!

For the card, I have taken some silver sparkle cardstock and cut the stitched scallop frame and then placed some pretty papers behind it.  I mounted these pieces onto a piece of black cardstock as well as the image that was cut out with another stitched scallop rectangle die, also mounted with a piece of black cardstock and then added to the center of the sparkle framed panel.

I also took some pretty, pink, silky ribbon and wrapped it around the corners of these layers and also tied a bow with it that I’ve attached to the upper right corner of the wrapped around ribbon.  These layers were then mounted onto a white, top folding A2 sized card base.  Lastly, I’ve added some stars that were die cut from the same sparkly cardstock and I’ve also added one to the center of the wooden star veneer that was glued in the center of the pink bow.

Vicki-CCT573-ADU-Celebrate-close

Here’s a closer look at the Copic coloring I’ve done on this image.  I have added some extra sparkly details to the image by taking a Spectrum Noir Glitter Brush Pen and went over just the bottom portion of her dress.  I then took a silver gel pen and colored in the stars around her and added some dots to her dress and hair with it as well.  I wanted to create lots of sparkle and shine to this one! 🙂

Vicki-CCT573-ADU-Celebrate-flat

Thanks so much for dropping by!  I really appreciate your kind comments and I enjoy reading them so much!  Hope you have a fabulous day!

Challenges I’d like to enter this card in:

  1. All Dressed Up Challenge – Anything goes + ADU image
  2. All Dressed Up Facebook Challenge – Girly Girls
  3.  Crafty Friends – Ladies/Girls
  4. Simon Says Stamp Monday – Feminine/Girly
  5. Crafty Creations – Anything Goes

Seeing Stars at Cute Card Thursday

Hello friends and welcome to Thursday already!  It seems like the weeks are quickly going by faster and faster as we close in on the end of the year!  It’s the “crazy crafting season” for sure! LOL!

Today brings up another Cute Card Thursday Challenge and for this week’s challenge, we’d like to see “STARS” on your creations!  I think this is a good one for whatever it is you’re crafting even if it’s Christmas…or not!   I have decided to make mine non-Christmasy this time:

Vicki-CCT556-MFTStarShaker

I am pretty much “out-numbered” with males in my family, so most of my birthday cards are for men and I have a couple more birthdays to celebrate next month, so I thought this was a great opportunity to sneak one into my Christmas card-making time!

All the stamps and dies used on my card today come from My Favorite Things.  (I have recently purchased some Christmas items and look forward to getting my hands crafty with some of it soon!)

I started my card out with the Blueprints 27 scallop rectangle die.  I took some star images from a retired MFT stamp set called “Totally Happy” and randomly stamped them with VersaMark on this card front panel and then heat embossed them with clear embossing powder.  I taped off the scalloped edges so that they wouldn’t get inked.  I’ve used the Blueprint Sketch, Peacock Feathers, Tumbled Glass and Twisted Citron Distress Oxide inks and blended them over the stars for an ink resist effect.  I also spritzed this panel and dabbed it with a paper towel for the water drop look.

I thought it would be fun to make a shaker card, so I die cut a star from this ink blended panel with the MFT Star Shaker Window and Frame Die-namics set and then cut the frame out from some black card stock.

Vicki-CCT556-MFTStarShaker-close

What makes this such an easy shaker card is that MFT also has these Star Shaker Pouches that coordinate with the die!  So I’ve taken this and fit it through the die cut star area on my card front panel and then filled it from the back with some confetti stars, I found some matching-colored seed beads and pretty sparkly silver glitter chunks to fit inside and then covered the back with some white cardstock.  Just love the sound when it shakes because you can hear the seed beads! 🙂

Vicki-CCT556-MFTStarShaker-1

I then took a strip of black card stock and white heat embossed the sentiment (same stamp set mentioned above.) to stamp the greeting.  I first layered the scallop inked panel over a black piece of cardstock and then attached the sentiment strip and cut off the edges to match that layer.  I then mounted this panel over an A2 sized top folding white card base.  I finished it off by adding some silver star sequins filled with some Silver Stickles in the centers of each one.

Sometimes you wonder about “adding too much bling” for a guy, but I think this is a fun shaker birthday card that a male would enjoy too!  Hope you’ve had some fun on my blog today!  I thank you so much for stopping by!  I will see you soon!

Challenges I’d like to enter this card for:

  1.  Challenge Up Your Life – Celebrate/Anniversary, etc.  (Happy 100th Challenge!)
  2. Use Your Stuff – Stars
  3. Crafty Cardmakers – Lots of Layers
  4. Shopping Our Stash – (SOS 380) Tic Tac Toe (I used the middle row going down:  stamps, glitter was handed from my grandma to my mom and then to me..so yeah, older than 5 years probably! LOL & Happy Birthday)
  5. Watercooler Wednesday – WWC196 – “All About Occasions”

Animal Star Gazers

Good evening friends!  Just swinging by to share a card I made with some cute animal star gazers! 🙂  I thought evening would be an appropriate time to post it:

Vicki-LFUponaStar-Com

When this set first came out from Lawn Fawn called Upon a Star, I knew I had to get it as I fell in love with it.  I really hadn’t used it all that much, so it was great to get it out for a play as I needed to make a commissioned card.  I have created a scene for these critters using masks that I made with my circle die set and some ink blending with my distress inks.  For the stars, I took a brush and splattered some “Super Sparkle Lumiere Paint” watered down a bit while masking off the moon and hill.  The moon was created with some watered-down distress inks and a brush.

I then stamped the critters sitting on top of the grassy hill where I wanted them and colored them in with my Copics.  I took a brush filled with clear water to “take out” the inks on the critters before I did that.  I also took a gray Copic marker to create shadows on the animals as well as draw in my own shadows on the hill.  I took a white gel pen to add some highlights on the animals where I thought the moon would be shining on them.  I also put dots in the center of the bunny’s eyes to make it appear as if a star is reflected in them.

To cut out the image panel, I have used a rectangle frame die which was used to cut out some watercolor cardstock.  I then used the same die and cut out a piece of this gorgeous black glitter cardstock and popped the frame up with foam tape to go around the edges of the image panel design.  I mounted everything over a black A2 sized top folding card base.

Vicki-LFUopnaStar-Com-close

Here’s a closer look at the details.  Here you can better see the shimmer on the moon.  As always you have to get just the right angle for the photograph, but I covered the moon with a Spectrum Noir Glitter Brush Pen.

I took a couple of the tiny solid stars from the stamp set and heat embossed them with Sparkle N Sprinkle Vanilla Ice EP.  Love the way it gives a bit of extra sparkle!  I think the stars really show up beautifully and it always looks better in person of course! 🙂

I do not have a sentiment on this as waiting for instruction on how to proceed with that if necessary.  I’m happy with the way this turned out and look forward to playing with more starry sky creations!

Thanks so much for stopping by this evening and I wish you a wonderful weekend my friends!

Challenges:

  1.  Lawn Fawnatics – Bling It Out!
  2. AAA Cards – Moonlight
  3. Sunny Day Crafting – Animals
  4. The Creative Crafter – Anything Goes
  5. Simon Says Stamp Monday – Starry Night
  6. Simon Says Stamp Wednesday – Animal Antics