Hello friends! Last month was a very busy month for me and I know that I had mentioned a couple of times that I had some things that I was working on “behind the scenes”, so I thought I’d share what I’ve been doing.
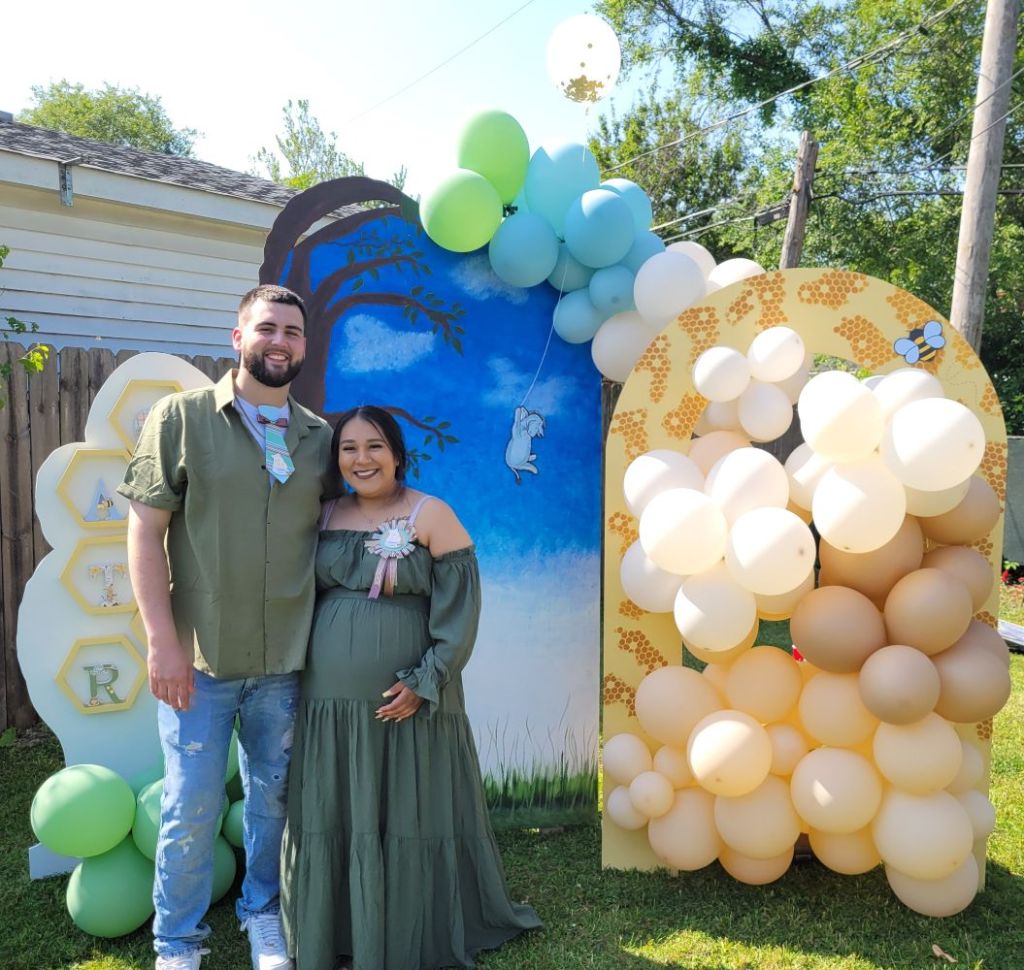
At the end of last year, my son surprised us with the news of a new grandchild coming! A few months ago, I was asked to help with some decorations for their baby shower and of course I wanted to help! Here’s a photo of the soon-to-be parents in front of a back drop that my husband cut out and I hand painted. My husband and I also put together the balloons around it:
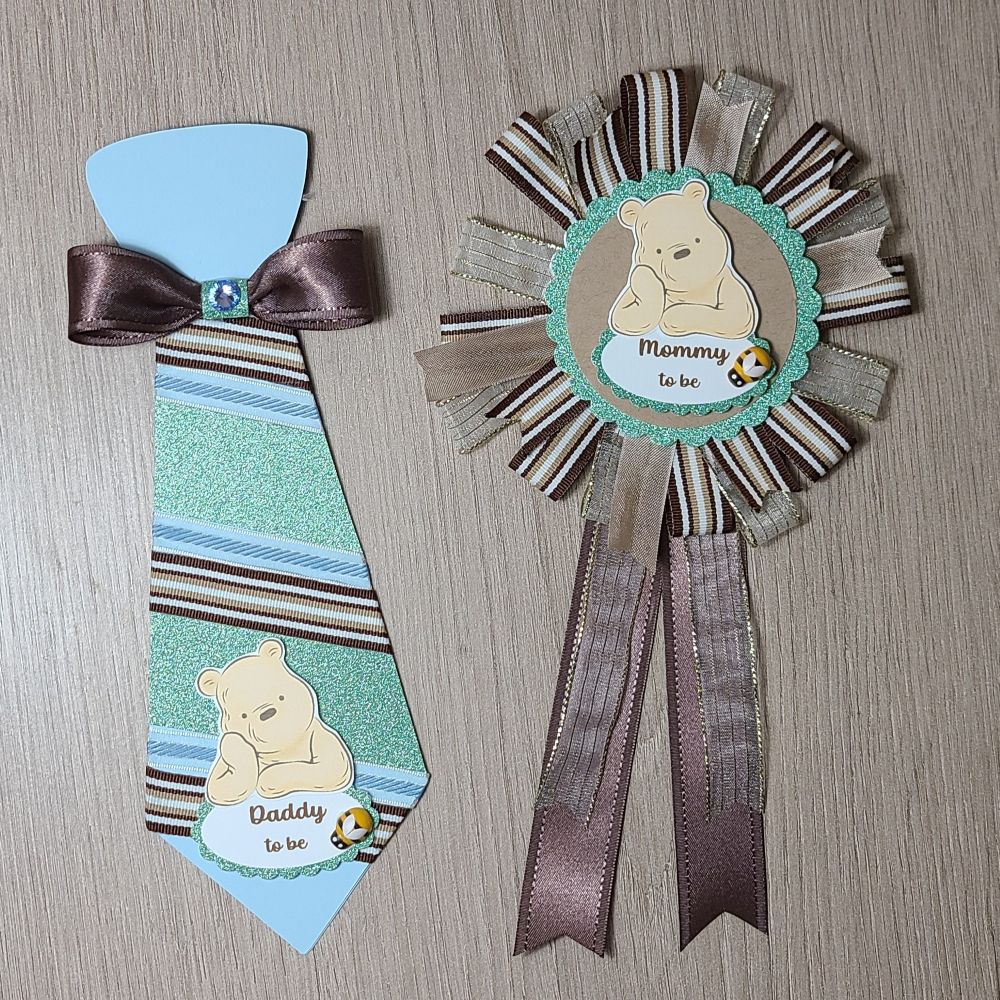
You may also notice, on the couple, they’re wearing a corsage that I made for each of them to wear. My son wasn’t too thrilled about wearing it, but he humored his mom. LOL
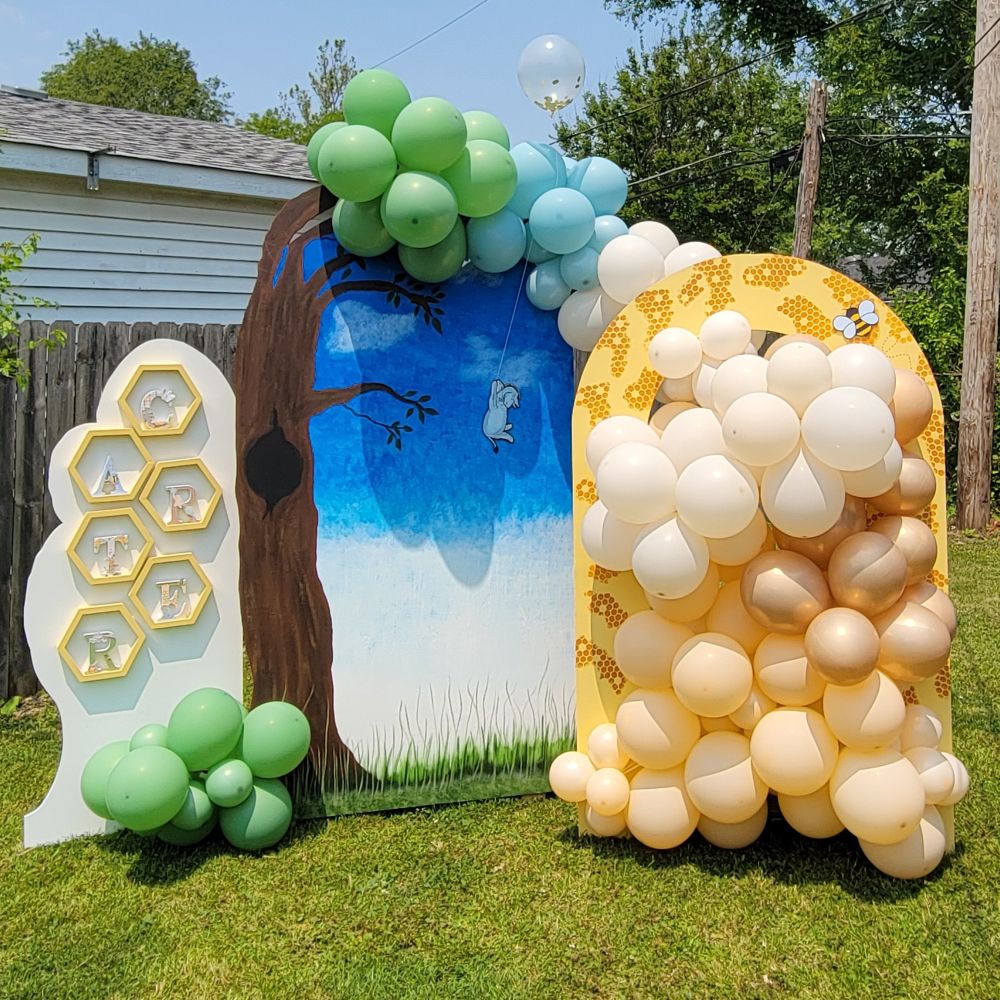
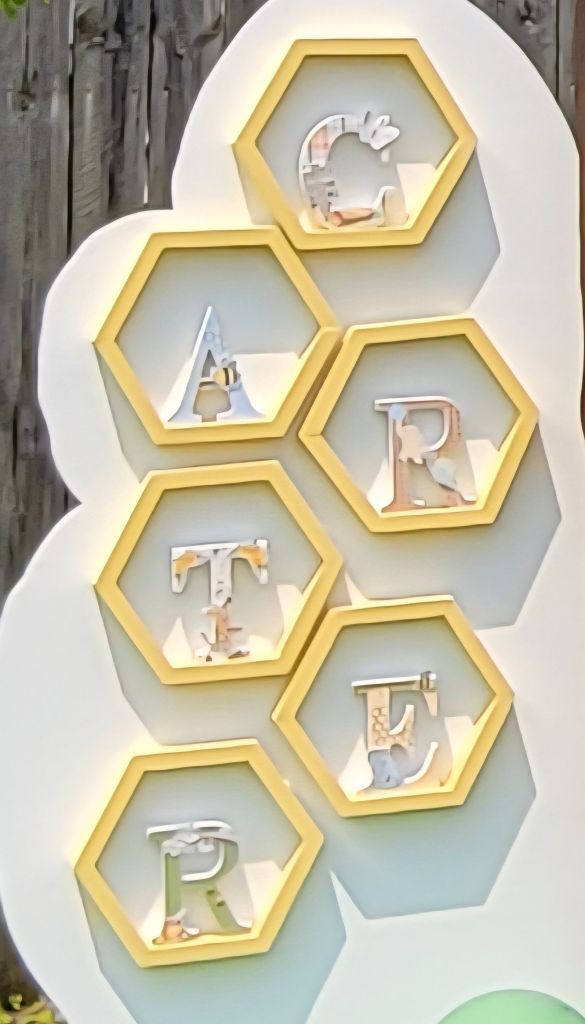
On the left white panel, There are hexagon shelves that my husband put together and there are wooden letters of the baby’s name. I decorated each of the letters with Winnie the Pooh papers and characters. I wish I had taken a better photo of them, but I tried to zoom in a photo with the gallery below.
You can see how tall each of the panels are. My son is over 6 foot tall. I don’t paint much, so painting something this large was a big undertaking, but I enjoyed the labor of love doing all of these things for them.
Below you can see all of things that I’ve made for the baby shower and there is a brief description with each photo explaining what it is. If you are on my website, please click on each photo to enlarge it and scroll just beneath it to read the description:
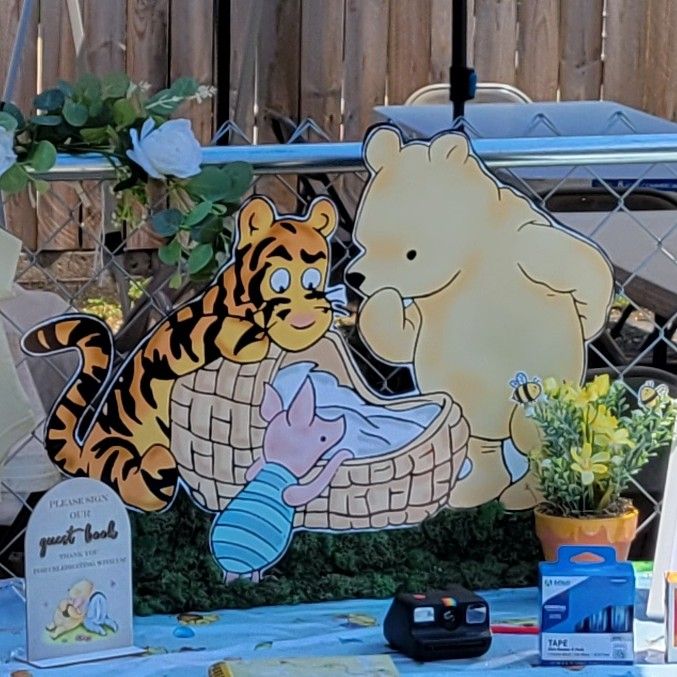
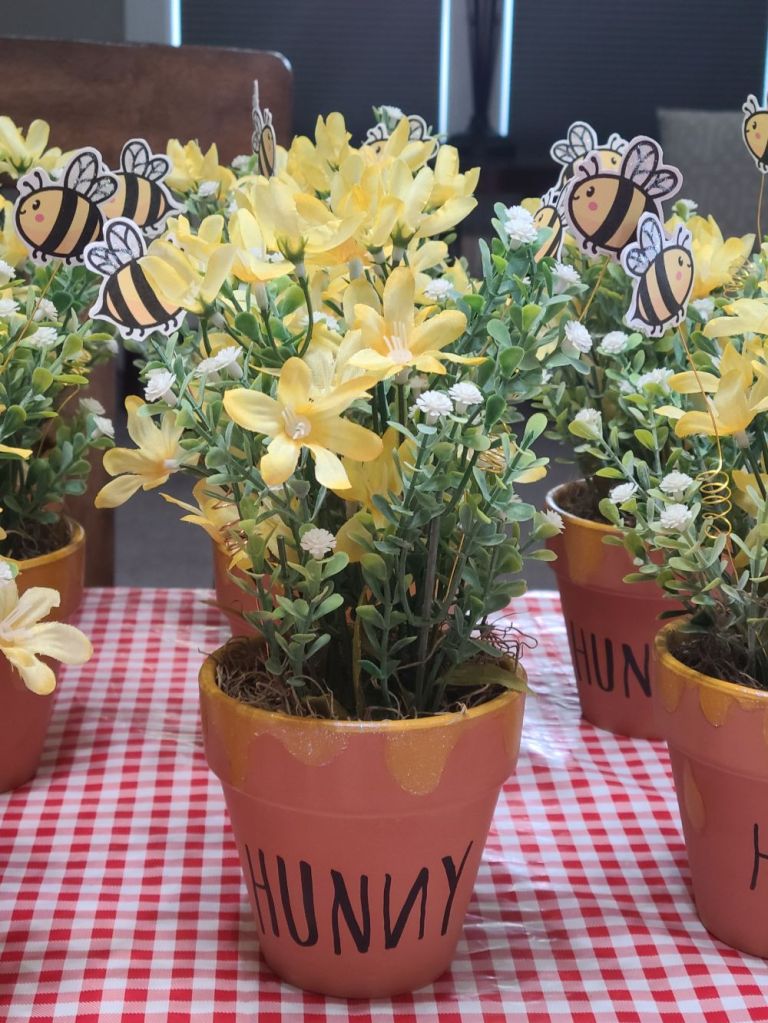
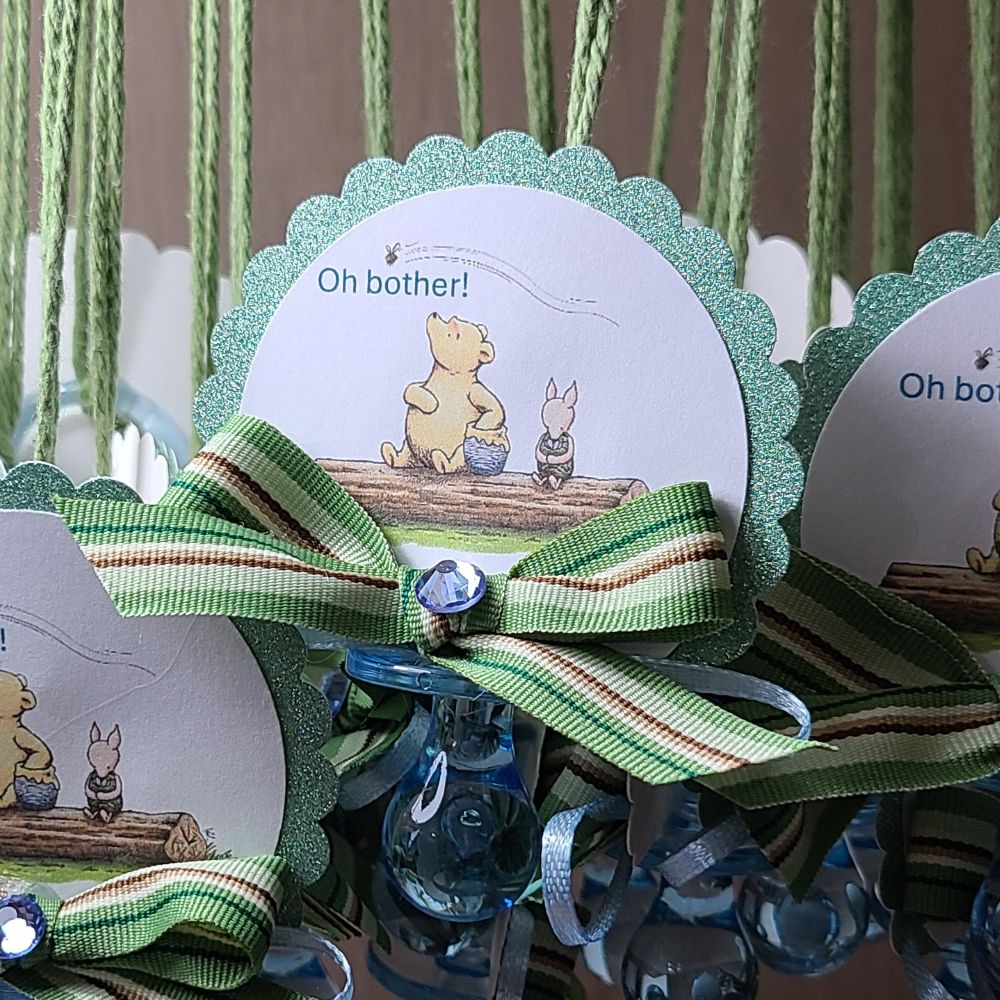
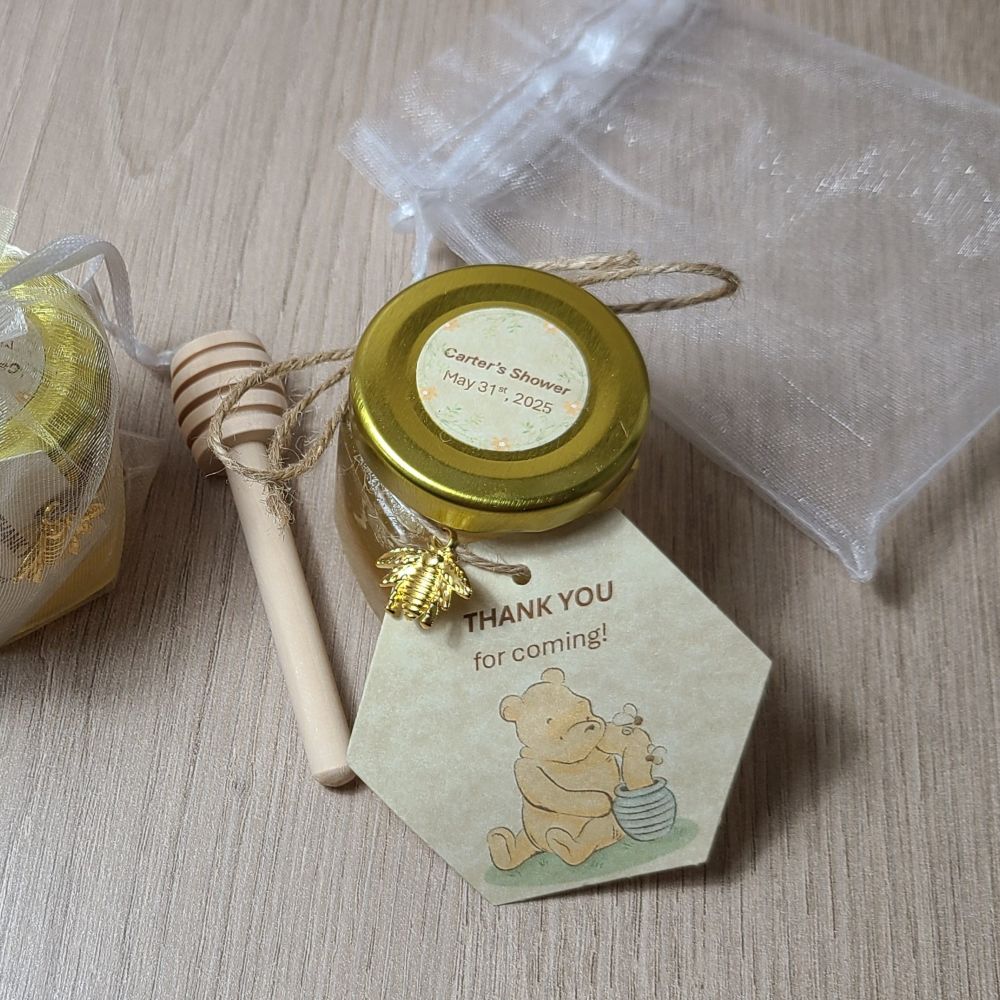
The full backdrop when finished with 3 large wooden panels cut out by my husband and hand painted by me. I added a hexagon stencil pattern with paint on the yellow arch panel. Eeyore and the bee were cut out from computer print and attached to a foam cut out by hand.Left back drop panel with hexagon shelves. Each hexagon has the wooden letters of baby’s name that I decorated with Winnie the Pooh characters and papers. This photo is really blown up because I didn’t capture a good photo of the letters.We made a large “hundred acre wood” sign that my husband cut out and placed in a clay pot. I used paper covered chipboard for the “welcome” and stenciled with black paint on the rest. The Winnie the Pooh character with all of the balloons was cut out from a computer print and flipped with each side on a cut out black foam piece. We staked it in the ground and attached the balloons around it. We made 5 different characters to line the drive.This is one of three different prints that we had done on poster size that was hand cut out and placed on a foam board. To make the characters stand up, my husband made a wooden stand with slots wide enough to fit the cut outs with the foam board. Since the front of the wood showed when the characters were upright, I covered the wood with moss by gluing it to the wood that showed. This character is on a table about 16″ x 20″ large. (I didn’t get good photos of these either!)I made 15 center pieces by painting the yellow honey drip over a clay pot. I also added some glitter paint over it and added the “hunny” letters. I printed and cut out the bees and attached them with wire to stick inside the pots with the fake flowers. I added some moss at the bottom to cover up the foam used inside to stick the flowers in. I covered the bee’s wings with glitter too.For each of the center pieces, we added a charger plate underneath each one so the couple could add candies for each of the tables.These are the corsages that I made for the mommy and daddy to be. I used the Cricut to cut the tie pattern from cardstock and then added some glitter papers, ribbon and cut out a cute Winnie the Pooh to go above the lettering. I had some wooden bee embellishments and added a pin on the back to attach the clothing with.I made 50 of these pacifier necklaces for the party. I cut out the image with a circle punch, added the glitter scallop punch layer behind it. I used some green yarn to tie around the blue acrylic pacifier decoration and attached the image over it with hot glue. I also attached a ribbon bow as well as a blue gem in the center. The rule of the game was if anyone was crossing their legs, arms, hands, etc. they collected a necklace from someone else. Whoever collected the most necklaces won the game. (It was funny to watch everyone playing the game! I lost mine really fast!)I made 50 of these hexagon tags and personalized sticker on top with the name and date for a party gift. Inside the jar was real honey combs from a local area.
They put in so much work having this baby shower with lots of food, yummy desserts and drinks. I know with all of the set up and cleaning up they were wore out! We were also wore out when it was finished up. LOL Now it’s just the waiting to meet the newest member of the family by the end of this month. We are certainly looking forward to it!
Hope you’ve enjoyed my post today…and now you can see why I’ve had “BEEs” on my mind lately! LOL Thanks so much for stopping by!
Hello friends! I hope that you’re enjoying your August so far! Recently, we’ve been experiencing much cooler temperatures than we normally have this time of year, so it’s been great to go out for a few walks.
I’m ALMOST caught up with things that I haven’t posted, with the exception of a few birthday cards that I’ll share later. For today, I’d like to share some projects that I’ve made at an event I attended back in April along with a class from Inky Stamper.
But first, here are a few projects I’ve made for their recent challenges:
This is a tag I’ve made for the Inky Stamper Inkspiration FB Group July challenge. The challenge was to make a tag and I thought I’d try out a fun idea of making a pocket for my tag that held another tag inside so that you could put a message and a gift card.
I’ve used some Limeade Dots/Stripe 12×12 Doodlebug paper to cut it out with and used a border die to help with the pocket decoration. I cut another tag to place inside the pocket for a special message and to include a gift card. At the top of the inside tag, I’ve made little “charms” with images from the Inky Stamper Margarita stamp set. I’ve also stamped the background of the inside tag. I don’t usually color with pencils, but this time I decided to pull them out.
To get the sentiment to fit around the pocket border, I had to curve the stamp a bit to make it work with the tag.
So the Inky Stamper Inkspiration FB Group challenge for August was to use a white pencil. This happens to be a favorite to use for Chelsea with her images and it does make for a nice quick highlight. So the images were just stamped on colored cardstock and I used the white pencil to highlight them with.
I decided to combine this with last week’s Craft Roulette Episode #226 with the parameters of – Project: “See-through” (I made a see-through shaker card) Colors: “Jungle” (I used greens and browns for my jungle) Element: “Teacher(s)” (The sentiment says it all!) Random: “Tangle” (There are a tangle of leaves inside shaker element.)
Back in April there was an Inky Stamper Inky Escape event that I attended and here are some projects that I made from the Make-n-Takes that were provided as well as some of the projects that I was working on using the new release that came out during the event:
(If you are on my website, click each photo to enlarge it and read the captions)
The tag was made my Chelsea that was attached to my “swag bag” and the box was a make-n-take project. There was a moon pie included with project, but when I came home, I added 4 Ghirardelli chocolate squares to show how many fit inside.This card uses the same stamp set as the tag above. The background is a scratch ‘N’ sniff made with Kool-Aid.This was a light up card using the Pear Blossom EZ Light.Cute make ‘N” take with a magnet on the back of the baby roo that fits inside the mama pouch slit!This was an extra make ‘N’ take using some ALL & Create Washi Tape! Cool!
There is actually another Inky Escape coming up in October that I’m attending and I’m sure it will be fun with Halloween and Christmas theme combined!
While I was there, I worked on some more of my own projects using some of the new sets:
I decided to take and use one 6×6 paper pack from my stash and it seemed to go really well with the outer space theme and I love the purple colors from this set. I’ve used the following Inky Stamper stamps sets: Astronaut, Big Words, & Alien.
Click on the photos below to see a close up look at each card:
Before the Inky Escape Event, there was also an on-line class from Inky Stamper that I took part in and that’s because I thought the projects were super cute! Here are the projects that were completed for this class:
These were both created with the Inky Stamper Hedgehog stamp set. The Journal Book , the Doodlebug DIY Snow globe and Doodlebug dimensional stickers/shaker balls were all provided with the class. I decided to add a few extra elements with mine. The tiny hedgehog on top of the snow globe was included in our box, but not apart of the projects…but I thought it would be fun to add it!
Speaking of Doodlebug, while I was at the Inky Escape Event, Chelsea had a few things on sale and I snagged a kit and special ordered the Doodlebug Frame with it. So when I got back home and the frame came in, I wanted to do my project right away:
I have this displayed in my stamp room and I love the rainbow of colors in it with the different crafty tools in smile faces! The size is 8in. x 8in. with a glass on the front. Although it’s not really that visible in the photo, it is actually quite dimensional.
I think it goes well with the black frame that matches my black frame with the crafty squares swap group I was in. (You can see that post here.)
Whew!😳 I’ve been really busy this year, but I don’t think you would’ve known this without my posting about it! I’m glad that I’ve gotten caught up with things that I’ve done and hopefully I won’t be doing posts like this in the future! It just seems like so much all at once!
Anyway, there we go and now I need to finish and send out a few birthday cards coming up, so I will catch up with that later as well! For now, thanks so much for stopping in and keeping tracks of my sporadic postings! I will be back to share a DT post for a challenge coming!
Hello friends! Hope your week is getting off to a great start. I can’t believe that January is over and we’re starting a new winter month already, but at the same time I’m already feeling like this cold weather can move along faster to Spring!
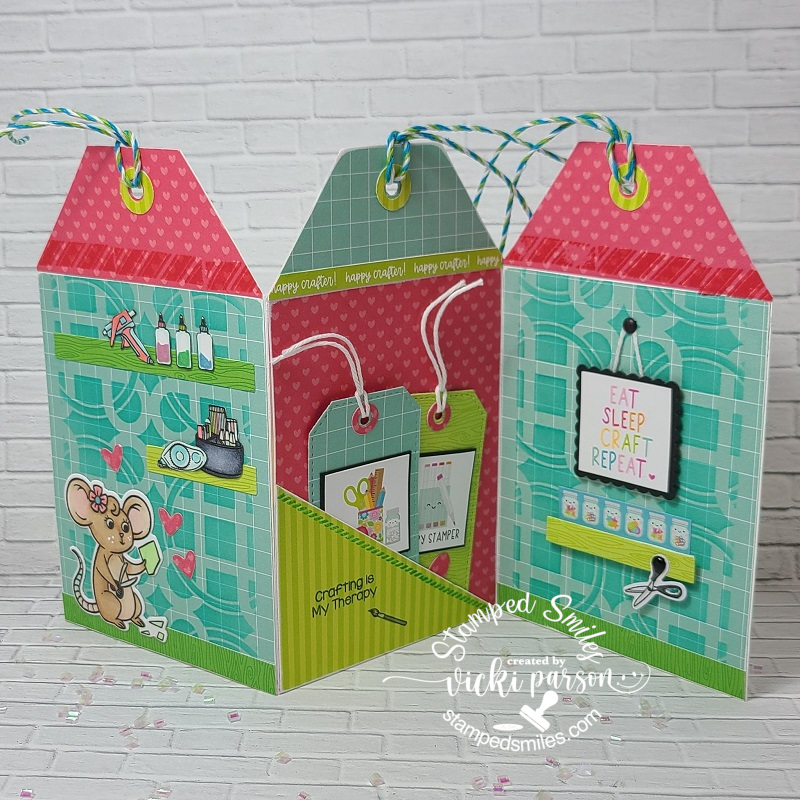
Today I have a couple of creations that I’ve made using those Inky Stamper products and playing a little “Craft Roulette” too! Chelsea was on Craft Roulette and if you’ve never seen it play out in action, take a look at the You Tube channel to see what it’s about! She was on episode #146 and here’s my card that I’ve made with her perimeters:
I had so much fun with this and I’ve never made a tag shaped accordion card before, but it was stuck in my head to give it a try and pull out the Inky Stamper Craft Room set to create it. The “Roulette Wheel” spun on: Double Tags, shelf/shelves, 2 shades of green and something in the background.
The two shades of green were easy with using the Doodlebug Paper Packs and adding in a few other greens to the coloring. I’ve also made two tags and placed them inside the pocket area in the middle of the accordion design. I used a stencil in the background of the other two panels and of course I added some crafty goodies to the shelves in Rosie’s craft room! The accordion card was easier than I had anticipated and just made a mini slim line size design by cutting off the edges to create the tag shape. The hole and reinforcers were made using punches and dies. You can see that I’ve colored up, cut out “Rosie” in her craft room where she is cutting her design going through her creative head!
When it’s all folded up and closed, this is what the card looks like. I could always add a sentiment on the back, but I thought this would be fun to send to a fellow crafter for sure! I just wish my shelves looked this organized! And I always try to use another thing from my stash as I pulled out lots of twine that gets thrown in a bin, so it was nice to use for the tops of each tag area. (Maybe on the back of the card, the crafter can add items to use up on their next project and display it! LOL)
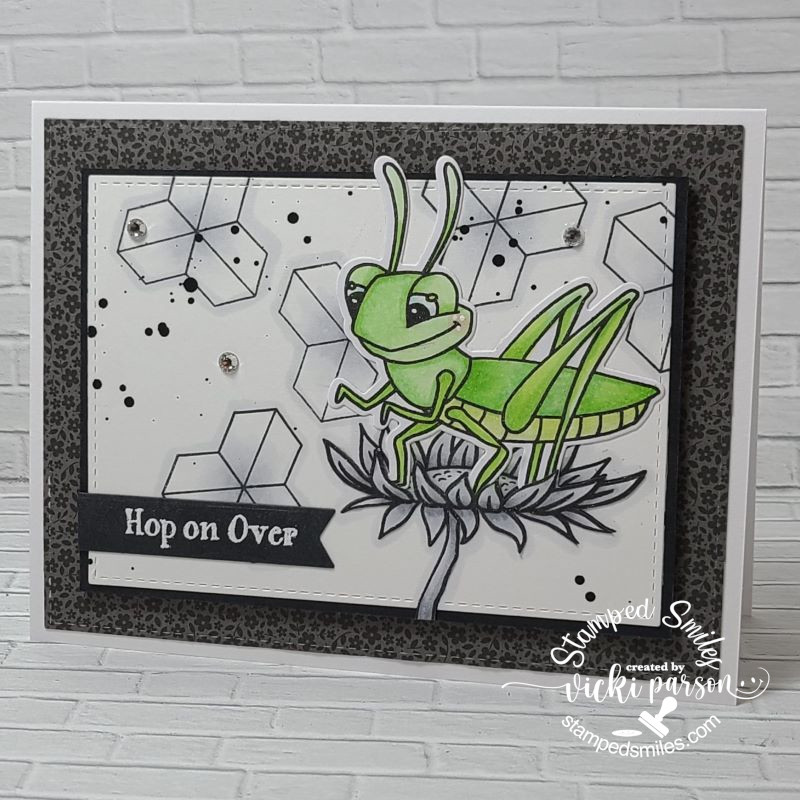
And here’s another card that I’ve done for the January challenge on the Inky Stamper Inkspiration FB Group which was to use: Black, white plus one other color:
I decided to pull out the Grasshopper set and make everything in the background black and white, but just color the grasshopper in green. All of the elements including the sentiment came from the same stamp set. I splattered some black paint over the background and the images were colored with some cool gray Copic markers. I white heat embossed the sentiment over black and cut it out with a banner die.
Behind the white panel, I took a piece of the black floral paper from the Doodlebug Floral & Graph Paper Pad and attached that to a white top folding A2 card base. It was a fun and easy card to put together!
Thanks so much for “hopping” over here today! Hope you’ve been inspired or smiled!😊
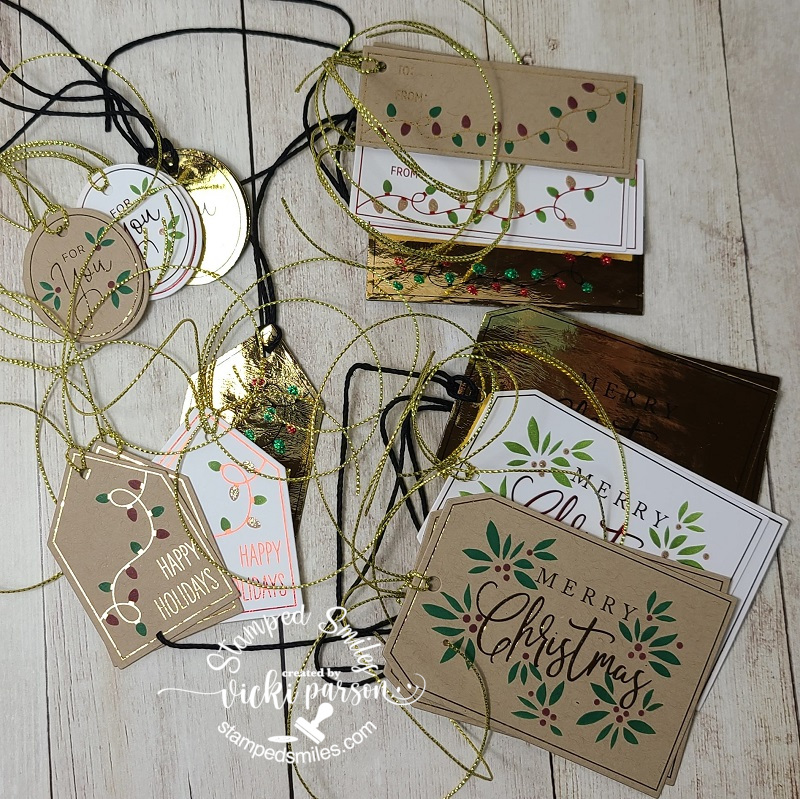
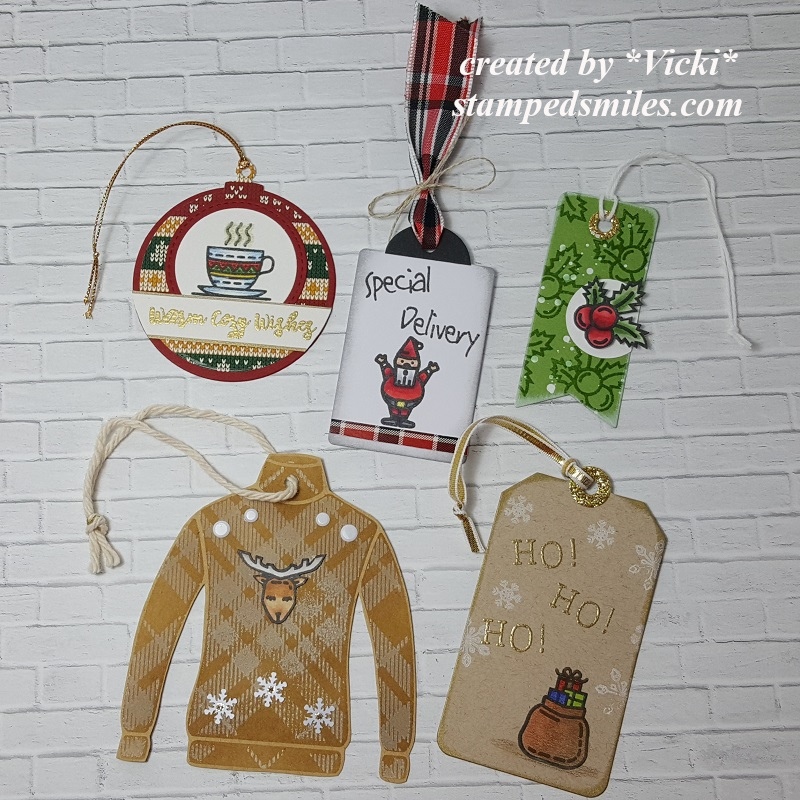
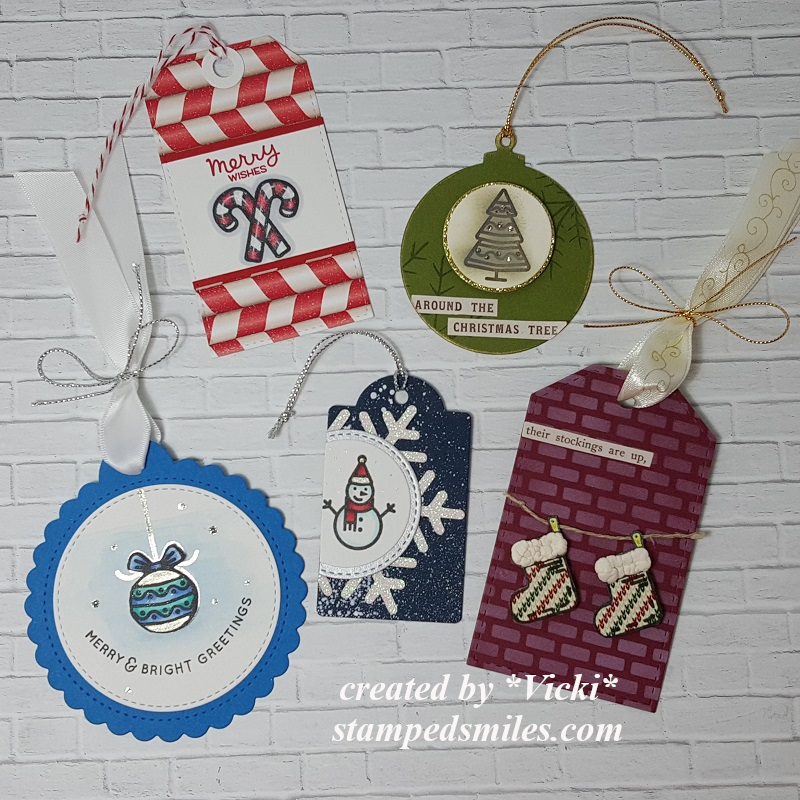
Hello friends! I thought I’d take some time for making up some tags which is something that I really enjoy doing, but don’t do it very often. They’re so nice to have a batch made up ahead of time so that you can pull one out as you need it instead of trying to hurry through making something. It’s always better to have fun instead of rushing!
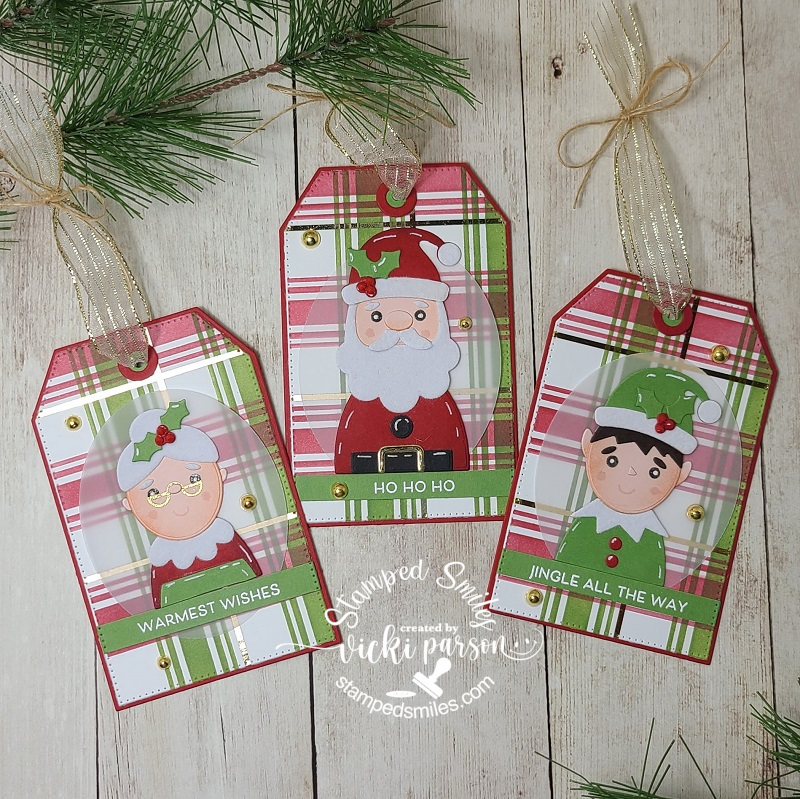
This trio of tags was a bit time consuming, but it was nice to finally pull out some things that I’ve been wanting to play with and use without being in a hurry. The characters are from the Taylored Expressions Holiday Squad die set. The tags themselves were cut from the TE Pierced Stacklets dies, the TE Tag Stacklets 2 dies and the TE Tag Reinforcements dies. The background for the tags was made with the TE Foil It-Plaid Layering Panels that I foiled in gold along with the stenciling from the TE Plaid Layering Stencil set. The sentiments were white heat embossed from the TE Just Saying-Christmas stamps. I’ve used various colors of Taylored Expressions papers and inks and then finished the embellishments for the “holly berries” using the red from TE Tiny Diamonds-Bold set and then I also used the TE Gold Drip Drops in the background. The ribbon and twine from my stash at the top.
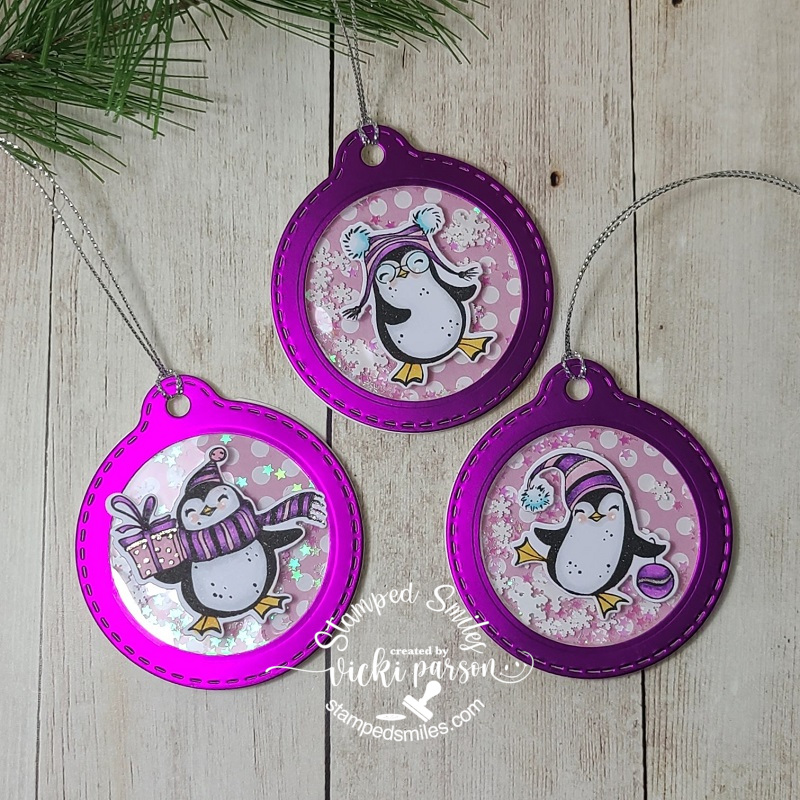
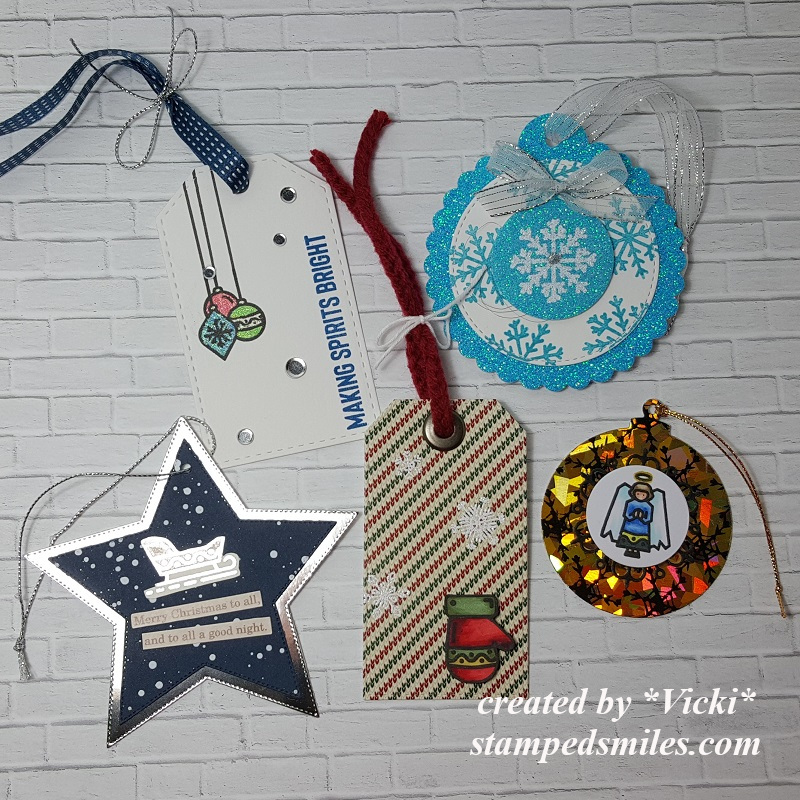
My next trio of tags here was really fun with these adorable penguins from Taylored Expressions Dancing Through the Snow stamp set and dies. I placed them over top of the transparency that was used to create a shaker tag behind the penguins. I used the TE Tag Stacklets 3 dies and also used some pink polka dotted papers from a free paper pad I received with an order. The bright shinny purple paper came from my stash I’ve had for quite a while and thought it would be a fun non-traditional color to use with these. I filled the shaker tags with the TE Bits & Pieces-Snowflakes and the TE Bits & Pieces-Sparkly Stars.
And these tags were a little hard to photograph with all of that cording in the way! (Pardon my photograph skills! LOL) They’re smaller than the tags above, but they work great for different packaging sizes! These were easy and fun as I’ve done mostly foiling with these using the Taylored Expressions Foil It-Simple Tags Holidays panels and the stencil to go with it. I cut them all out at the same time with the coordinating dies. The tags with the black cording are the negatives from foiling the toffee-colored tags and are mostly completely foiled. I just used different colored Stickles glitter to create the Christmas lights on those. (Really been having fun with the foiling this year!)
And lastly, I wanted to share a set of tags that I’ve made using various Inky Stamper sets! I decided to go through all of the different Christmas sets that I have from them and pull out the ones that I either haven’t used or barely used to play with them. The tag at the top was made with the Inky Stamper Fox set that I really enjoyed coloring. The presents at the bottom and the Santa hat were colored and fussy cut from the same stamp set. I made the background of that one with the Falling Snowflake Stencil with white ink and heat embossing over it with sparkly white embossing powder.
The tag on the bottom left is another fun shaker tag! I pulled out the Inky Stamper Nutcracker set to color him up and cut out with the coordinating die. He was placed over the acetate on the shaker tag. I used a scallop circle tag die with gold foil cardstock that I cut out the center with a circle die, added some papers for the background from the Doodlebug Buffalo Check/Woodgrain paper pack. The shaker bits inside are the Shaker Garnish which is really lightweight and still make a great shaker sound too!
The bottom right tag was cut from an Infinity Tree die set. I sponged the edges with some white ink and punched a hole at the top to make it a tag. That cute little truck is from the Inky Stamper Vintage Truck set that I colored and cut out with the coordinating dies. I used a fun Lawn Fawn road die to place him over and then stamped the sentiment from the stamp set with white ink. I also added some snowflake sequins above him with the Icicles sequins mix. And both blue and red Doodlebug Twine was used for two of the tags. The other ribbons/cord from my stash.
Thanks so much for stopping in today! Hope you’ve been inspired and enjoying the Season!
Hello friends! I hope you’re having a great week so far! I’m wondering if this cold weather has me feeling this way lately, but I’m seriously lacking in creativity and just have misplaced my MOJO lately! If you’ve found it, please let me know! LOL!
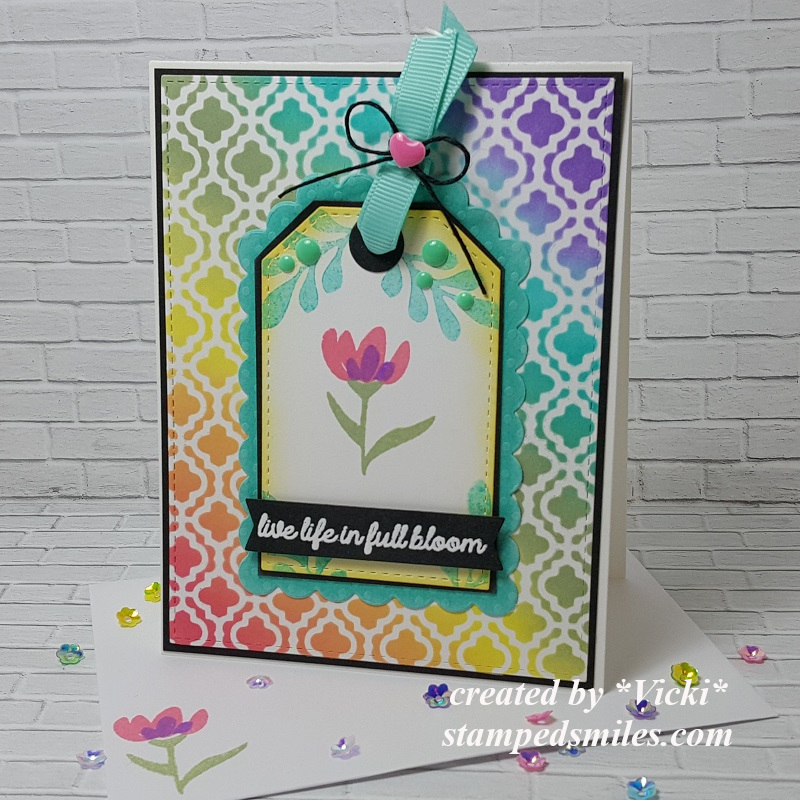
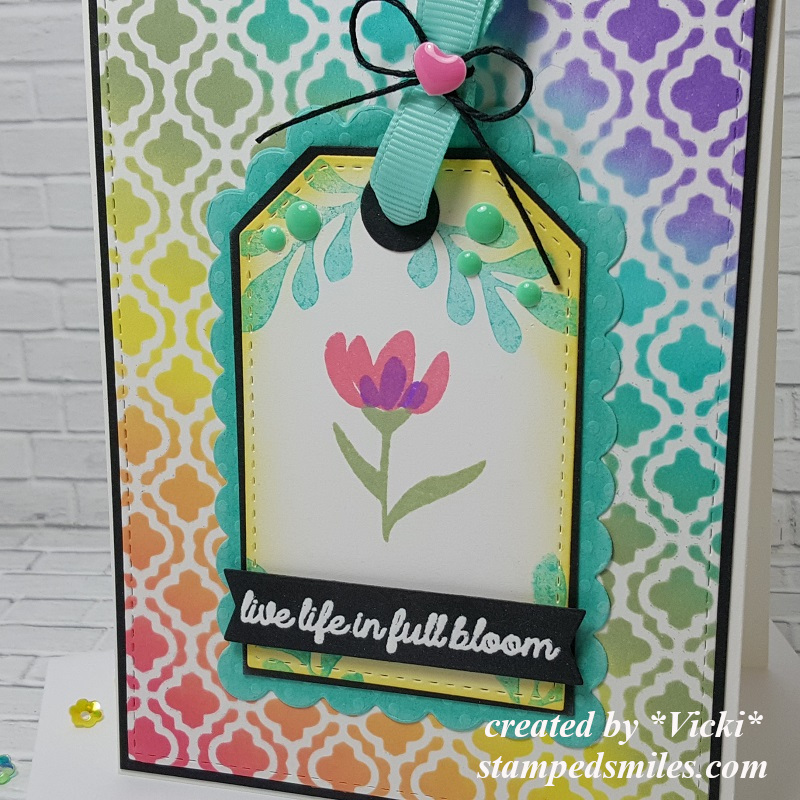
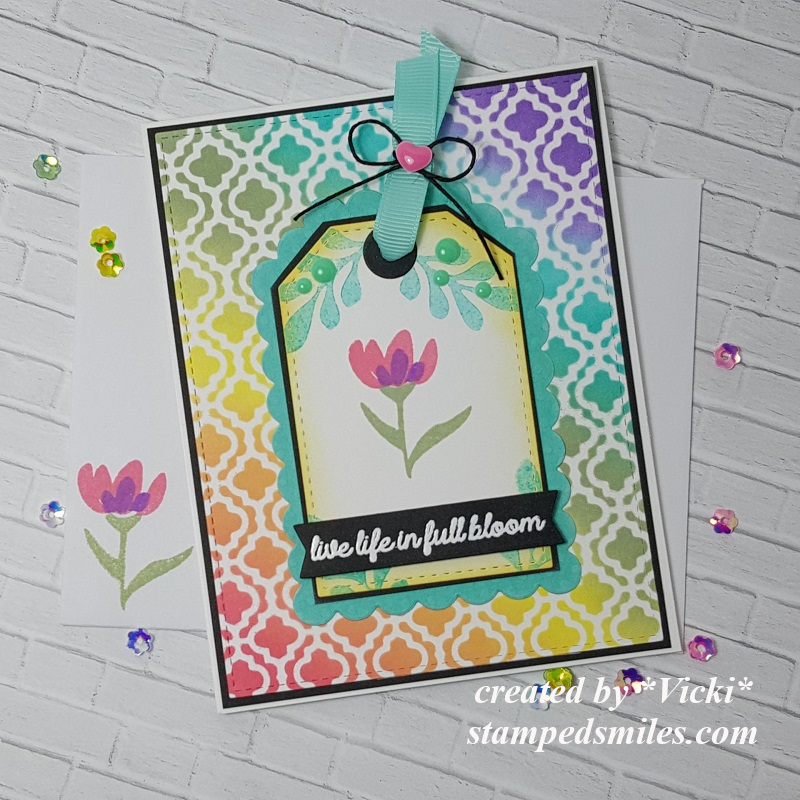
In the meantime, I seriously needed to create a rainbow in my life and found that a young lady certainly was in need of a smile sent her way as well so I thought I would do just that:
I had received my Pink and Main Crafty Courtyard Card Kit and really loved the happy colors and pretty blooms in the stamp set and so I started out using the stencil with rainbow order inks for the background!
I’ve also used the same color of Distress Oxide inks to do the stamping on the tag and envelope as well. I absolutely love the tag die set was included with the kit which I’ve used for the main focus of my card. I always want to add just a bit of black to my rainbow colors, so I decided to white heat emboss the sentiment from the stamp set and then used one of the tag die elements to cut it out with and pop up over the bottom of the tag.
I’ve also used the ribbon and enamel dots included in the kit to finish it off. (The floral sequins used for the photo prop were also included in the kit. LOL!)
Here’s a closer look at the details in the tag. For the black border around the tag, I just cut a piece down to size and then cut off the edges with my scissors to match up with the tag. The scallop tag behind it was cut with the paper and die from the kit. I used some circle punches to create the black re-enforcer and then I tied the ribbon together with some black twine from my own stash and topped the center with an enamel dot from the kit.
This card has now been sent along to a young lady that is currently in the hospital dealing with cancer treatments and really needs some cheerful happy colors, so I hope that this will help fill her day with some cheer.
Hoping that this card has also sent some feelings of cheer today your way as well! Thanks so much for stopping in today friends and I’ll see you soon! 🙂
Merry Christmas to all of my friends here and I’m honored to be a little part of your life with you in some way…I hope you know that!
**This is a pre-scheduled post to wish you all a special happy day. I’m away spending time with my family right now, so sit back with your favorite beverage for a time out and I hope you enjoy today’s long post.**
Just wanted to share BATCHES of the cards and creations that I’ve made for the Holidays this year. I know that I make lots of creations, but for the purposes of mailing cards, I try to keep these particular cards as “mail friendly” as possible, so these are more simple in style for me, but really enjoyed making them and just had fun:
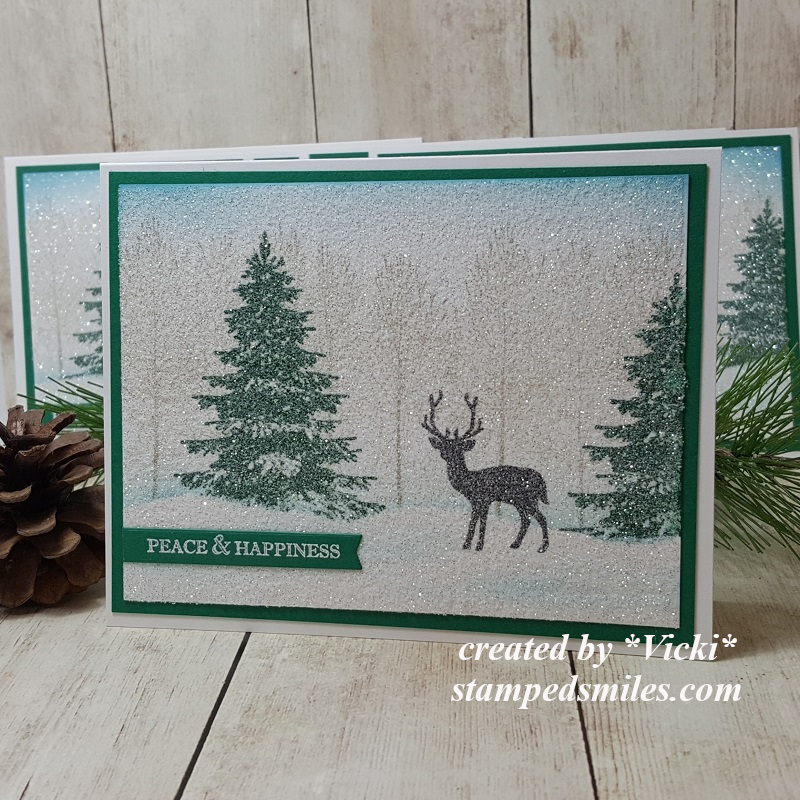
I tend to do bulk cards in a set of 4-6 so that I don’t get “bored” with it or run out of a certain supply or something! LOL! So this first set of 6 cards is using the gorgeous Stampin’ Up! stamp set “Winter Woods”. I stamped up the scene background and then covered the entire panel with double stick adhesive and then covered it with dazzling diamonds glitter. (The deer I added is from a favorite Newton’s Nook stamp set called Serene Silhouettes.) The white heat embossed greeting is from the Stampin’ Up! stamp set “Itty Bitty Christmas”. (I think this set was probably my favorite to do!)
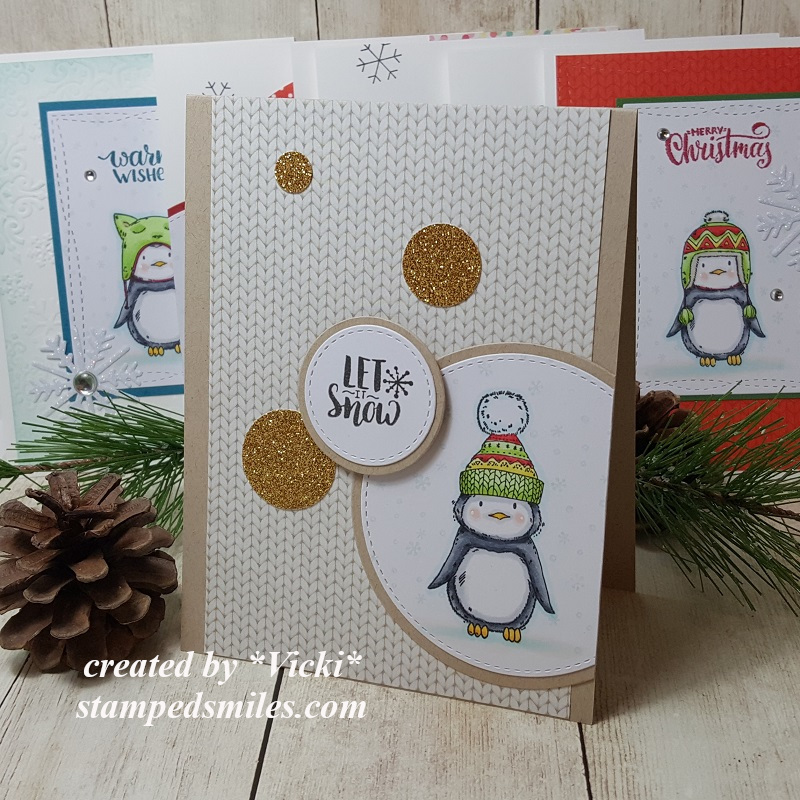
I just *had* to get these penguins in there somewhere! LOL! These set of cards are actually all just a bit different, but I colored up the penguins from the “Pablo the Penguin” free stamp set included with the Making Cards Magazine for December and cut them out in different ways and then mounted them onto cards. Some of them use some of the free papers that were also included with the issue. So this is another set of 6 cards that were mailed out. Love those cute penguins with the different hats! LOL!
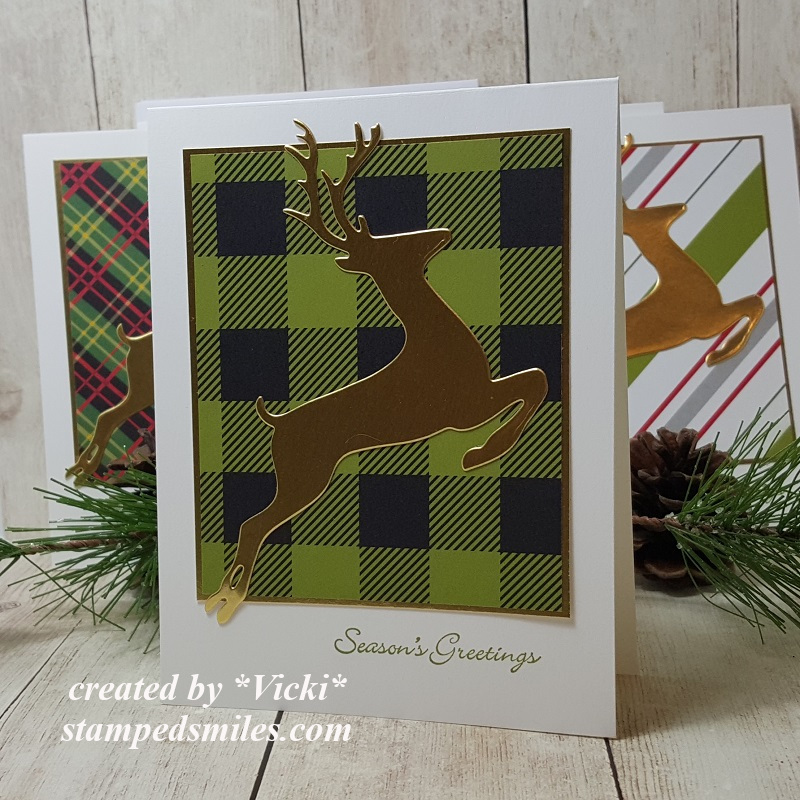
Here’s another set of cards that I’ve made to send out, but because these were even more simple than the ones above with very little stamping involved, I made 8 of these. (So if you’re counting, I’ve made 20 total so far…not including some other special cards I’ve mailed out to people along the way.) – I absolutely fell in love with this die set from STAMPlorations called “Two Reindeer” and was so excited to see that I had won a gift certificate from their blog and this was something that I knew I would be getting right away! This was cut from gold cardstock and mounted over a piece of various different Stampin’ Up! pattern paper from my stash…it’s always nice to be able to use up more of my hoarded paper stash! The sentiment is again from the Stampin’ Up! “Itty Bitty Christmas” stamp set.
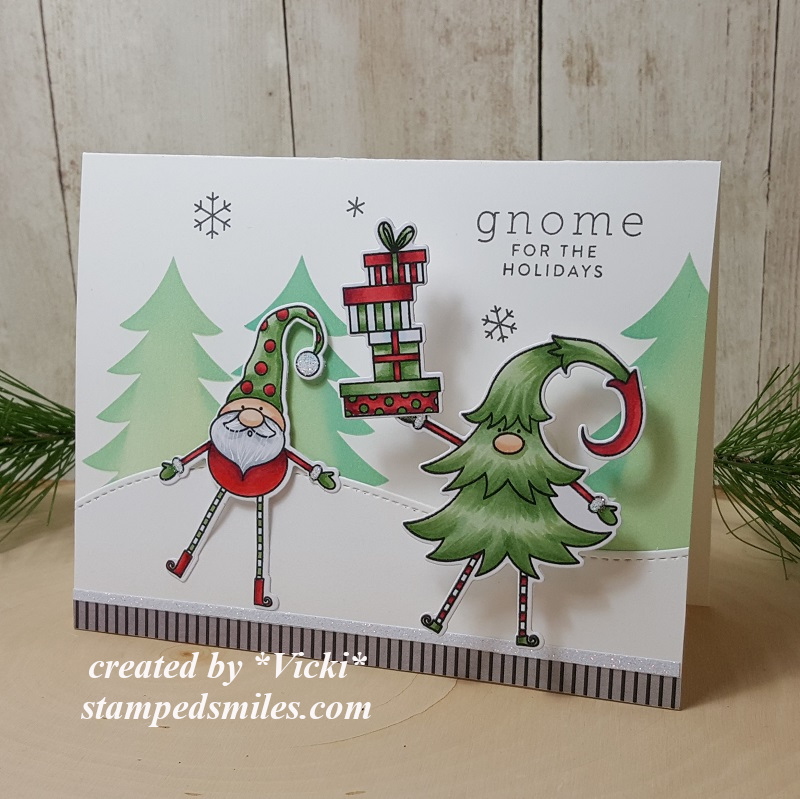
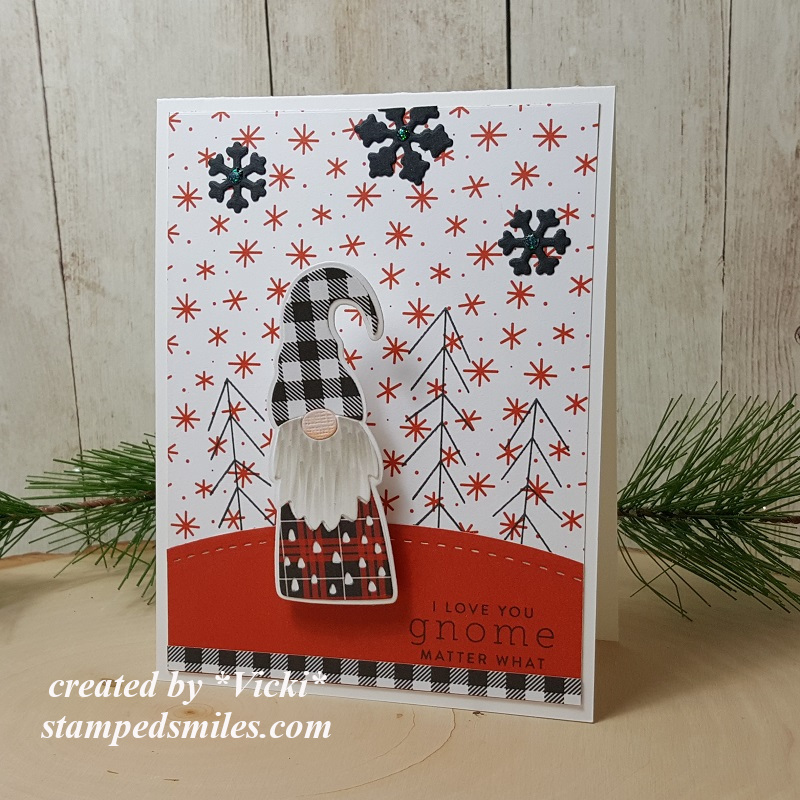
Now I didn’t want to leave out a couple of cards that I made especially for my boys. They know their mom likes to stamp, but they know I have to add in a bit of my goofy humor with them as well! 🙂 So of course I had to pull out this fun Simon Says Stamp “Gnome for the Holidays” card kit (sold out) to make them! I think I ended up using ALL of the wobblers in the kit too! I told my son that this is me wobbling with the presents about to drop everything and my hubby is trying to save everything! LOL!
Here’s a little wobbler action for you too…
And of course I had to make another card for my other son too…
I absolutely feel in love with all of those cute gnomes that came out everywhere this year for crafting…so I still have more that I didn’t get a chance to use, but thought this would be perfect for my son with this trendy style design…of course using a wobbler too! And I do love him GNOME matter what! 🙂
For some reason, I thought the wobbler action on this one was more fun! LOL! Not sure if it’s because of the weight/size or what…but cool to see the difference.
And whilst in the middle of making up all of these cards to mail out, I also had fun playing with the Christmas Advent Calendar that I had purchased a while back. Because it’s an “Advent Calendar” you start with December 1st and open each day. So each day to open was pretty cool because there was a new surprise stamp inside! So I took each day’s stamp and made a tag for each one clear up until today’s last window to open: (obviously previously opened and made to finish! LOL!)
I will show by the week. So this is week 1 with the first 5 days opened. The stamp that I received for each day is noticeably featured in each tag.
And these are the tags made for week 2. The angel tag was made with Deco Foil in the background.
These are week 3 tags made. The purple colored tag on the left bottom is actually a shaker. The window sheet was glaring in the camera.
This is week 4 of the tags. Hubby picked out the candy canes as his favorite of all of them. Mine was the stockings tag.
And here is the final last week of the tags from the Advent Calendar. Really cool to have all of these tags on hand for gifts! I needed them! 🙂
And of course I wasn’t done with the Advent Calendar box itself because I thought I could “recycle” the little window flaps on the box because they had some cute images on them for each day…so I cut them off with my scissors after I opened that day and kept them:
So I thought it would be fun to use them to create a card! They had numbers on them, but I have covered them up in certain ways so that they’re not showing. The cover die was cut out from the same colored cardstock for the background too.
Whew! Now to get finished up with my wrapping and “merry making” before the big day! I hope you are or have enjoyed yourself a wonderfully HAPPY Christmas day no matter how you’re celebrating it! Thank you for spending some of your time here on my blog today!
Hello friends! Welcome to December! We have already arrived at the final month of the year! Can you believe how quickly this year went by?! The first of the month means it’s time for a new challenge to start over at 2 Crafty Critter Crazies! Remember that it is an always “ANYTHING GOES + A CRITTER“. I love adding critters to my crafty projects so it’s easy for me! 🙂
Since I’ve been on a tag making binge, I’ve got some more to share today:
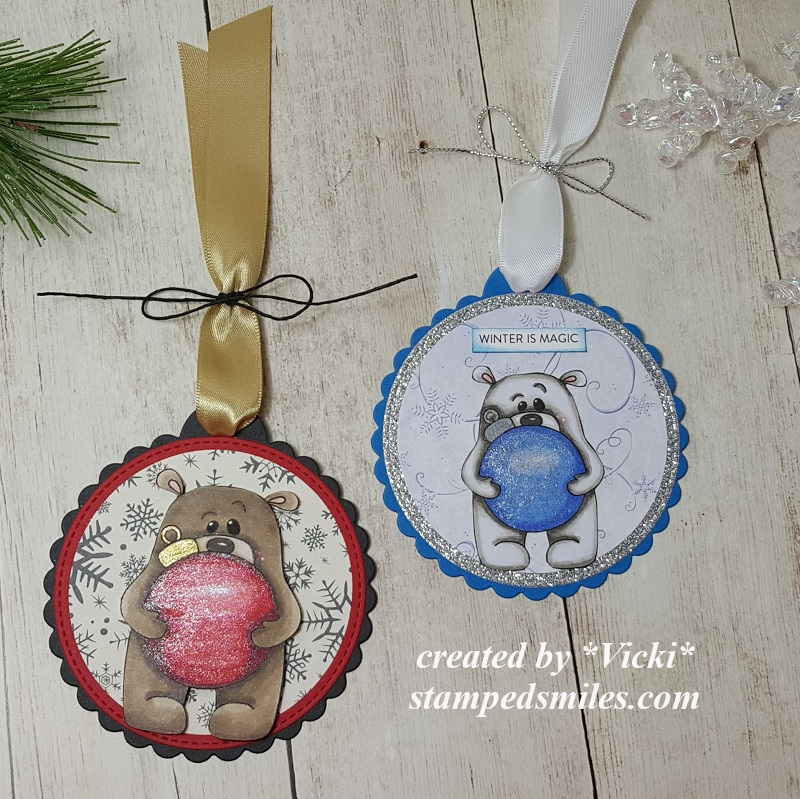
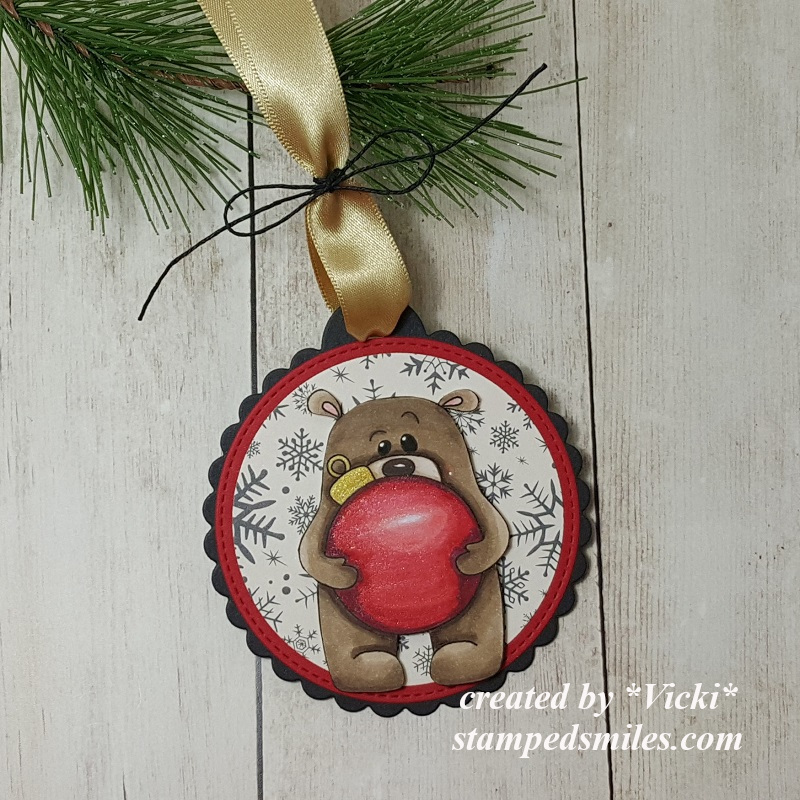
Isn’t this the cutest little bear?! We’re sponsored this month by Beccy’s Place and I have opted to try out this cute freebie that she has offered on her blog called Stanley’s Bauble.
I thought he was too cute and I wanted to try coloring him up in a couple of different ways and even a couple of different sizes too!
I just took my Sunny Studios scallop circle tag dies and die cut a couple of them in my selected color choices of course to match up with his bauble and then I’ve die cut some coordinating circles and pattern papers to match. He was fussy cut out and placed over top of the tag. I’ve added some silk ribbon for both and added a twine bow around them.
Here’s closer view of the Stanley’s Bauble red and black tag.
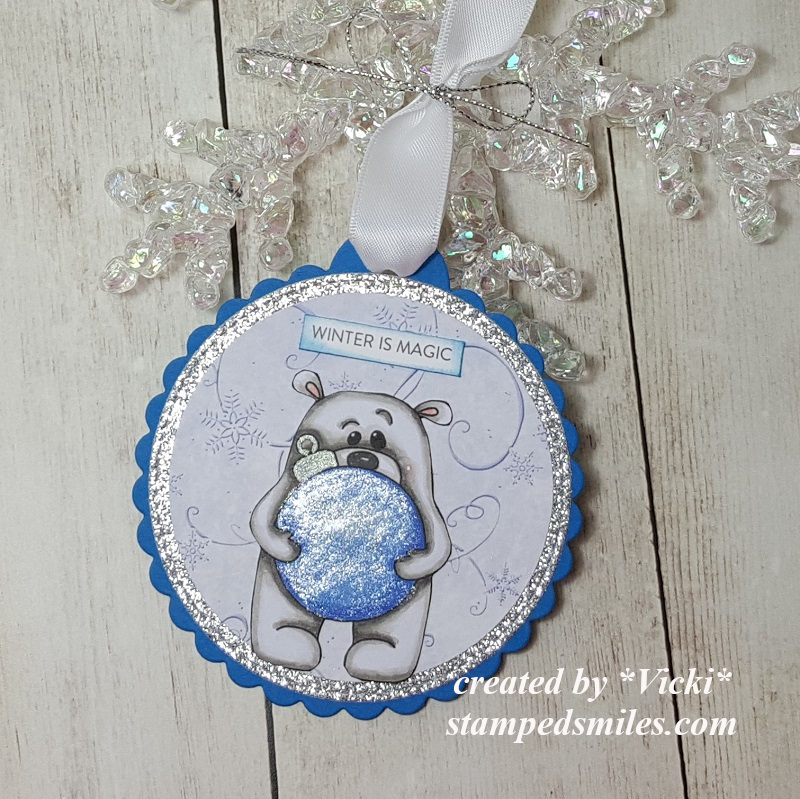
For this tag, he’s a bit larger than the other an he was popped up over the tag with some foam tape. I’ve colored the bauble hanger with a gold gel pen and then went over the red bauble with a glitter brush pen.
Here’s a closer view of the smaller tag. The light has caught this one just right to where you can really see the glitter brush over the blue bauble. I’ve also colored his bauble hanger with a silver gel pen.
The circle layer behind the snowflake paper was cut from some silver glitter paper. I’ve taken a Simon Says Stamp sentiment strip and cut it out, sponged it with blue ink and glued it above the bear. Since he was smaller than the other bear, I had room for a sentiment. He was just attached with glue this time.
I hope you’ve enjoyed these teddy bear tags today!
Hello friends! I’m on a roll with the tags and back again to share some more fun tags that I’ve been working on!
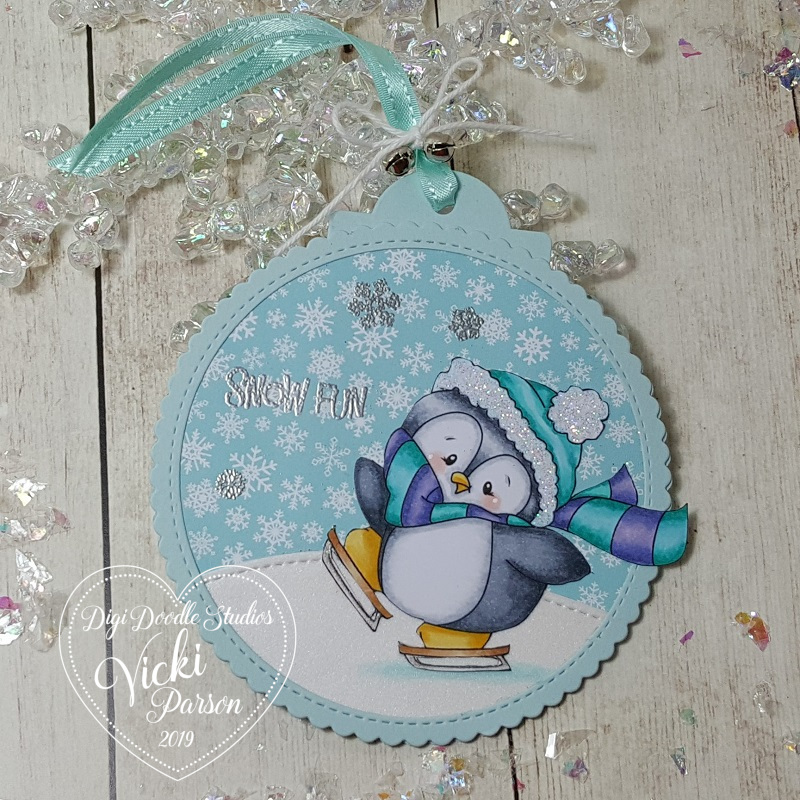
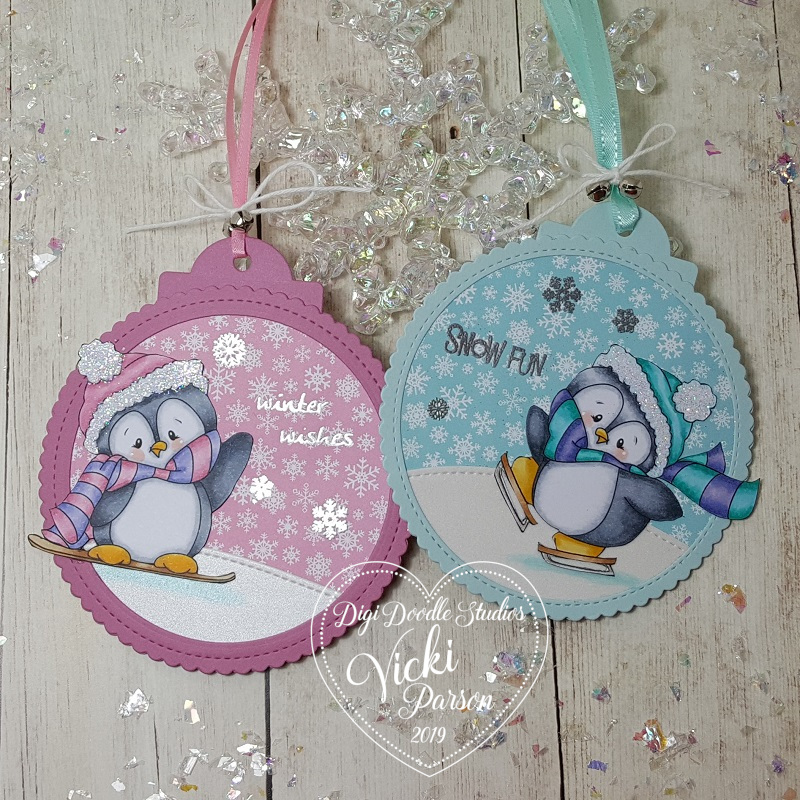
Check out these adorable penguins having some fun doing winter activities! Penguins are probably one of the top animals that I love! I have SO many penguin stamps in my stash and seem to keep on collecting more of them…so of course I was super excited to be able to add this Wintertime Penguins Pairables set from Digi Doodle Studios to my collection as well! 🙂
There is seriously so much fun you can have playing with this digital set and if you like penguins as much as I do, then stay tuned in as I will be sharing even more creations using this same set in December! You will see what I mean by all the different things you can do!
For both of the tags, I’ve used several dies from my stash to create my own tags. I took a stitched scallop circle die (MFT) and cut two of them out in the blue and pink colors along with a small tag cut with the same colors for the very top.
On one of the scallop circles, I used a circle die (Hero Arts) to cut out the center to create the “frame” for the front. I then took some snowflake papers (MFT) and cut out another circle that was slightly larger than the opening to attach behind it. I also took some pretty shimmer white paper and cut a “snow slope” for both penguins with a stitched border die (Lawn Fawn) and then cut it out with the same circle die as the snowflake papers.
I silver heat embossed the sentiments along with some snowflakes and then added my colored penguins over top. Then when I flip it on the back side I can put my “To: and From:” on it.
Here’s a closer view of the pink tag. For the digital image, I used Word on my computer to add the penguin and place it over one of the “ski” images from the set and enlarged it to make it look like a snow board instead of a ski! Then printed it out.
I’ve used my Copics to color her up and fussy cut her out. I even added some shadow on the snow hill for her. I took a glue pen and covered her hat trim with glitter.
Lastly, I found some more pink ribbon and tied some silver bells over it with some white twine in a bow.
And for this little guy…he cracks me up….I made him using Word again, but this time I actually took the “sled” image and sized it down so that it would fit on the penguin’s feet to make it appear as if he is ice skating! I did it for each foot. LOL!
I’ve colored him up with the Copics again only using more blue tones instead of the pinks and did the similar traits to it like the other one. I did use a clear metallic gel pen to color the “blades” of the ice skates.
Hope you’ve been enjoying my tags so far! Thanks so much for dropping by.
Hello friends! This year I’ve been really inspired with all of the cool tags I’ve been seeing lately during this festive season and I wanted to join in on the fun too! So you’re going to be seeing lots of tags from me scattered within my postings for the next several days!
The inspiration that I’ve been seeing comes from Tracey’s 25 Tags of Christmas Event and this is her 9th year of doing it! Every day there has been some really cool and inspiring tags, so I had to join before the time runs out! I did make a tag earlier…but a few more are to follow starting now:
I’ve been wanting to pull out a few of my stash that I and haven’t had a chance to take the time to play with! So I decided making tags would be a quick and fun way to play around a bit! These were really fun to make!
The “Joy Coffee” tag was something that I had actually started during the “Coffee Lovers Blog Hop” this last time and never got around to posting it! I was trying to combine the two events together as the inspiration for that tag came on Day 1 from Jen Schow’s tag for Altenew inspirational tags post. I like how she cut out the wording on her globe and I thought I’d do the same idea with the word “joy” over my coffee cup.
I’ve used the Cozy Coffee stamp set and colored in the coffee and fussy cut it out. I stamped the sentiment from the same stamp set, but only cut out the word “joy” from it and popped it up over the cup. I also took the hearts from the stamp set and stamped them over the kraft background with kraft colored ink.
I’ve taken the Holiday Essentials stamp set and heat set the snowflakes in the background of the tag with white EP. Also for the background, I took some metallic gold watercolor and splattered some over it as Jen did on her tag and I liked that subtle look to it.
I’ve taken some gold thread and made a nest under the cut out coffee cup that was popped up with some foam tape over the tag. (The tag itself was an old die cut from my stash BTW!) Added seam binding and twine at the top.
For this tag, I was really inspired with Kim’s tag on Day 4 of the Uniko post. LOVED the monochromatic red with all the sparkle!
I really love the glitter paper and I didn’t have a large enough tag die that I wanted to use, so I took a tag from my stash and traced around the backside of the Red Glitter paper and cut out my shape. I had some rounded rectangle dies (Hero Arts) which I made a frame with the white glitter paper.
Within that frame I took the Holiday Essentials stamp set again and used several of the images to stamp over a piece of white cardstock with red ink. (It was fun to create a stamped background panel for this!) I heat embossed one of the sentiments from the stamp set over a red piece of cardstock with the White Sparkle EP…it sparkles really pretty IRL! I die cut the sentiment out with a banner die and tucked it behind the white frame I made with the stamped images.
I finished the tag with some sparkling clear sequins with some White Blizzard Nuvo Glitter Drops in the center of each one and then I added some white organdy ribbon with a bow at the top.
Hope you’ve been inspired in some way as I’ve been inspired to create these! Thanks for stopping in and I will have a new post to share again with you tomorrow so stay tuned!
Try it On Tuesday – Inspired by a Song or Christmas Carol (I was inspired by “Joy to the World” on the first tag and “We Wish You a Merry Christmas” on the second with music notes!)
Hello friends! Hoping you’re having a great week so far and a happy Thursday too!
We’re starting a brand new challenge over at Cute Card Thursday today! Woo hoo! The challenge for this week is “FESTIVE“! With the Holiday Season upon us, I think this is a great idea to get more creations done!
We’re sponsored by All Dressed Up Stamps this week and I have been feeling festive myself and decided to make a fun tag with one of their images today:
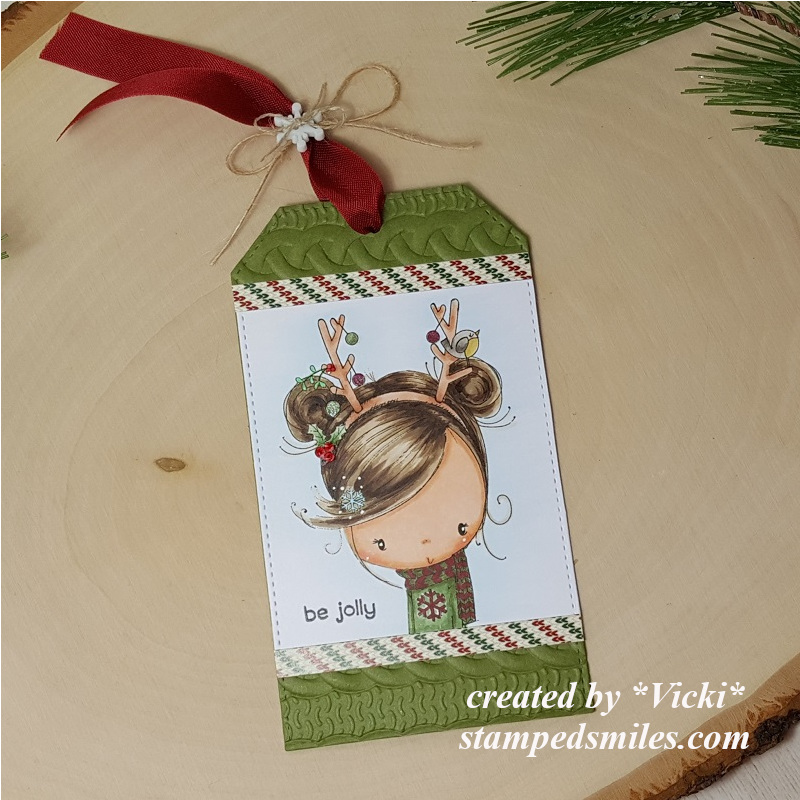
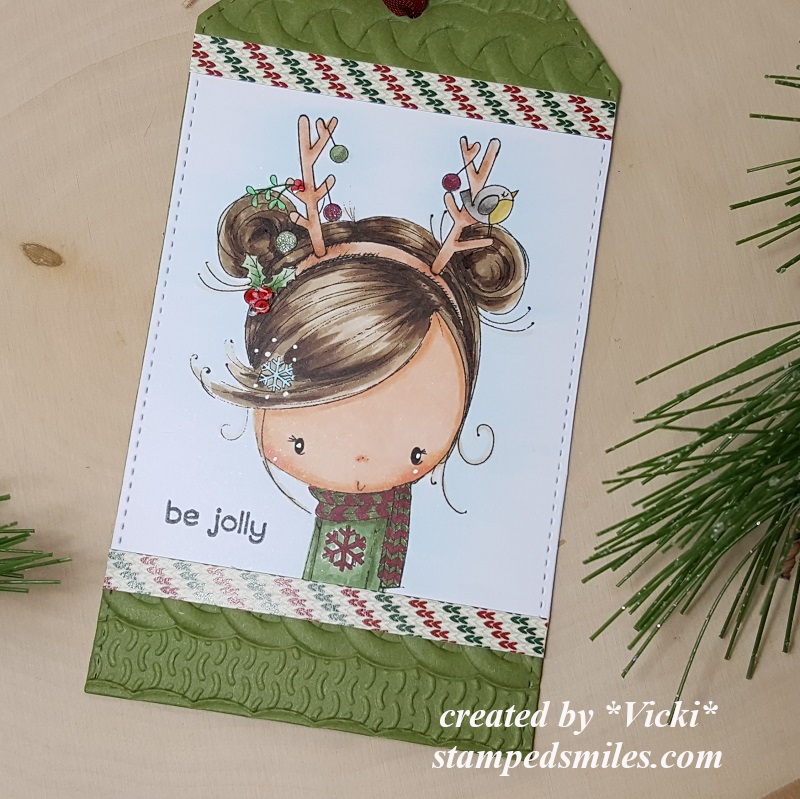
Now isn’t she just the cutest?! The image is called “Christmas Hair Do” from All Dressed up Stamps. When I’m feeling particularly festive, I like to wear fun holiday sweaters and such, but I don’t believe I’ve ever had a hair do like this one before. LOL!
I’ve used my favorite Stitched Traditional Tag dies from My Favorite Things and cut the largest out from Jurassic cardstock from Brutus Monroe. The two decorative paper strips on each end of the image are from the Sweater Weather paper pad by Brutus Monroe as well.
I took the die cut tag and ran the “cable knit” embossing folder (from Stampin’ Up!) over it and then added my image panel over top that was also cut with the stitched tag die on the sides. Then I glued the strips on each end and stamped the “be jolly” sentiment in the corner. I punched a hole at the top of the tag and added the red seam binding ribbon that was tied up with twine along with a snowflake button threaded with linen thread over top.
Here’s a closer look at the image on the tag and my coloring with Copic markers. I was trying to match up the colors on her outfit with the papers that I was using as I liked the sweater knit print and thought it would be fun to use with this image.
I’ve added some dots with a white gel pen on her cheeks, eyes and around the snowflake in her hair. I covered the berries in her hair with glossy accents and took a shimmer glitter pen over the round ornaments hanging from her antler head band.


 Check out these adorable penguins having some fun doing winter activities! Penguins are probably one of the top animals that I love! I have SO many penguin stamps in my stash and seem to keep on collecting more of them…so of course I was super excited to be able to add this Wintertime Penguins Pairables set from Digi Doodle Studios to my collection as well! 🙂
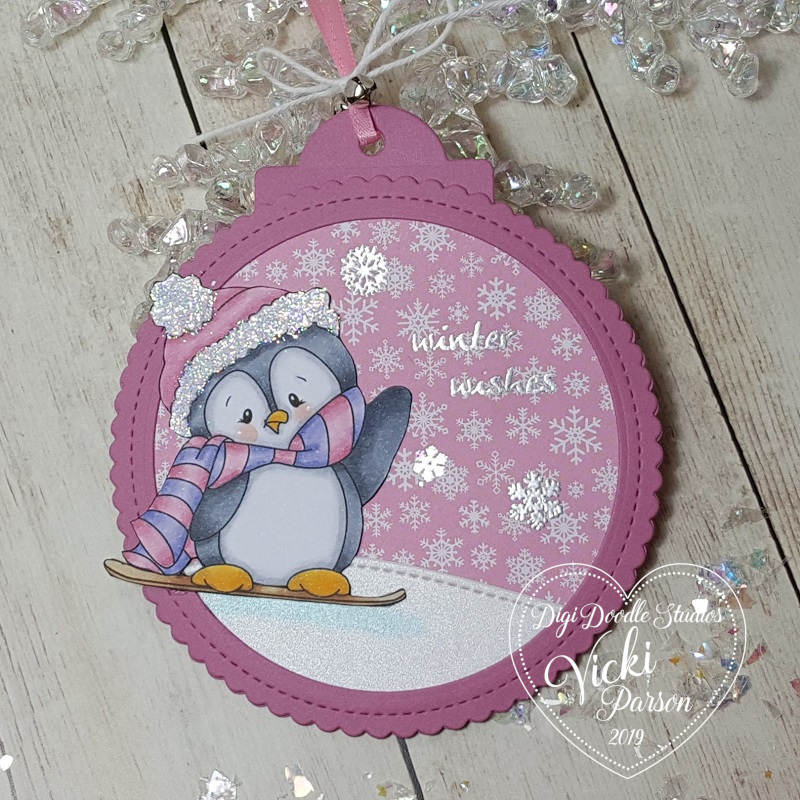 Here’s a closer view of the pink tag. For the digital image, I used Word on my computer to add the penguin and place it over one of the “ski” images from the set and enlarged it to make it look like a snow board instead of a ski! Then printed it out.