Hello friends! This will be a pre-scheduled post as I’m away for a bit, so this is going to be a very short and sweet post from me.
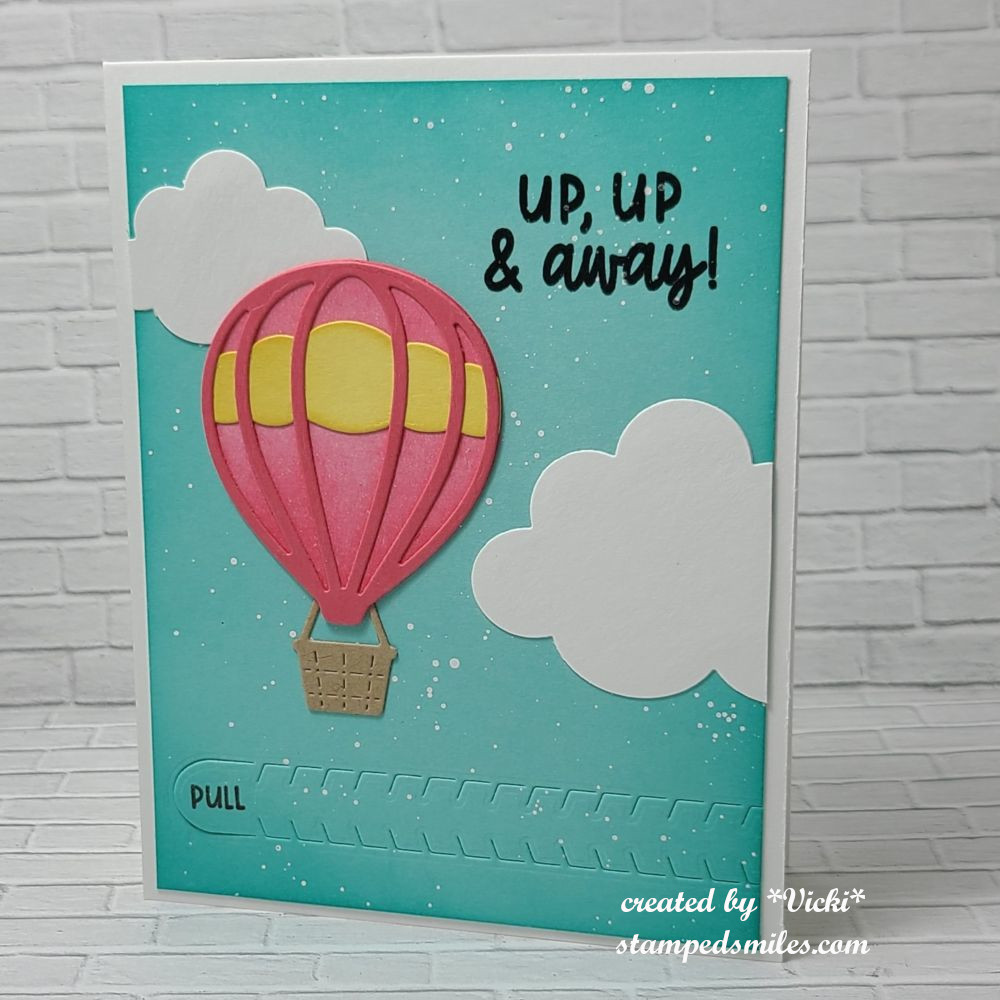
There is a new challenge today over at the Alphabet Challenge Blog! Our next letter is ‘H‘ and the hostess has chosen “H” is for HOME *Remember that this is a bi-weekly challenge, so you have two weeks to enter* I hope you will find some time to play along! Here’s what I’ve created:
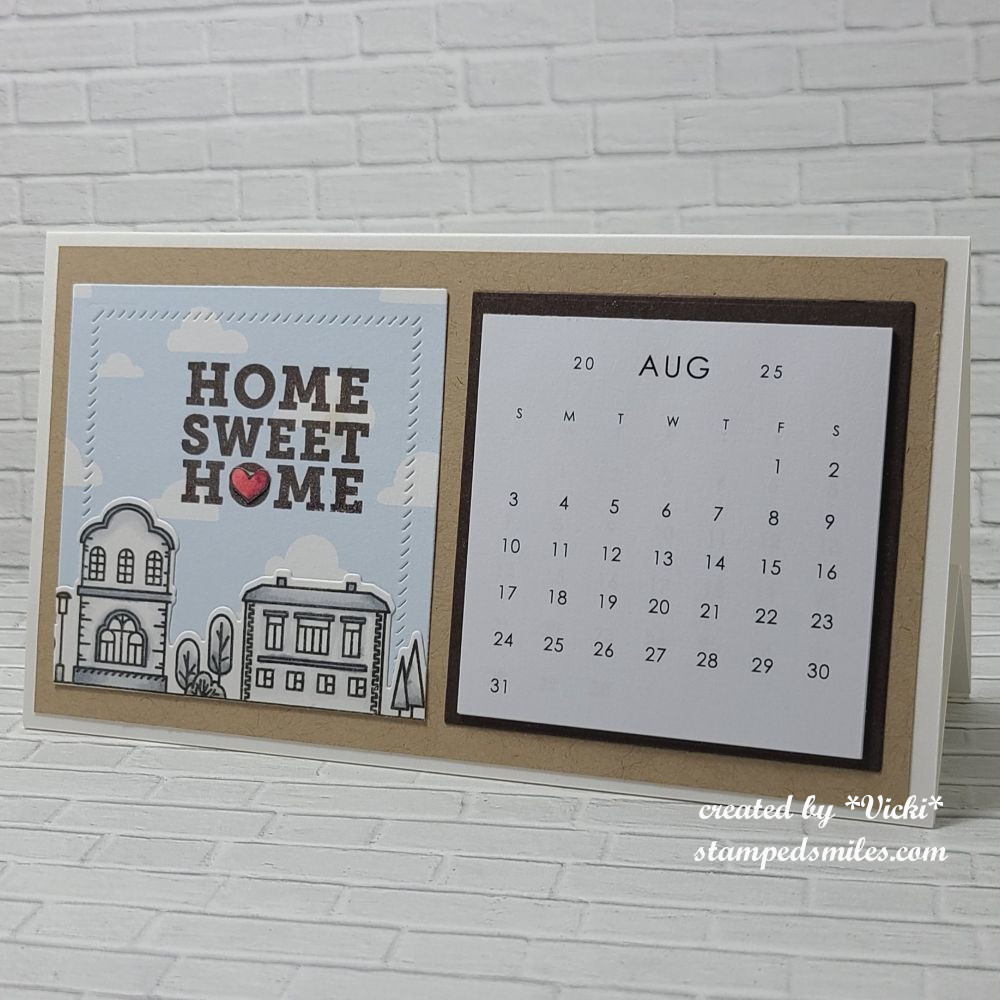
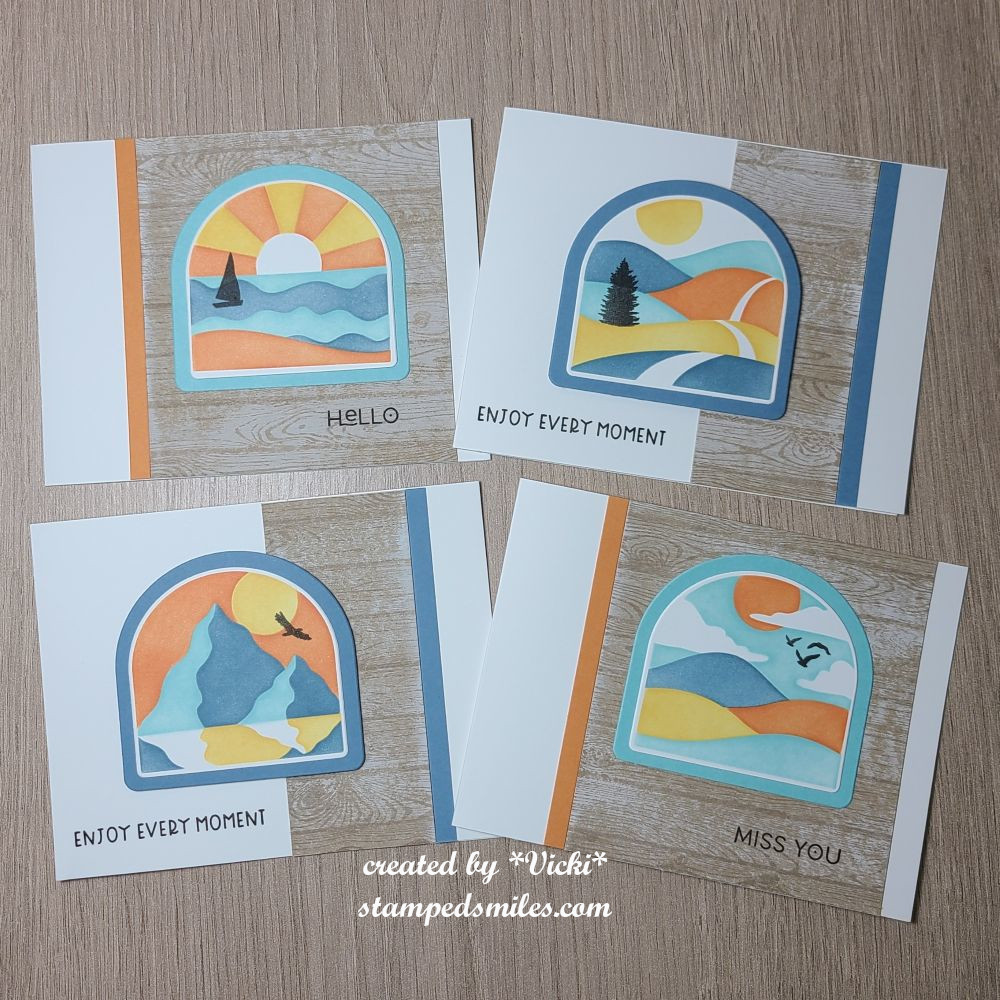
I have pulled out an older card kit from Simon Says Stamp called “Home Sweet Home” and used some of the cloud papers that came in the kit along with the stamp set to make my little square on the left.
This is a mini slimline sized easel calendar. It folds flat for mailing and then sets up with a base at the bottom. (I figured a message could go on the back.) I got the Square Calendar Tear-Offs as well as the Landscape Calendar Table Tent Base from Taylored Expressions. The “slash marks” on the home sweet home square also came from the TE Square Tear Off Calendar Stacklets Die Set which is how I was able to cut out the square to fit onto the design too.
Obviously, I have August 2025, but I also have 2026 calendars that I will have to replace for the new year. I really love making these calendars every year to give as gifts and I thought it would be nice for someone moving into a new home as well.
Thanks so much for dropping in today! I hope you will take a look at what the design team has for inspiration and join in the challenge with us!
I’ll have another scheduled post for tomorrow to share my monthly Art Journal Page.
Hello friends and happy Friday to you! It’s been so crazy warm over my way and I’m hoping this day finds us with a bit of a break in temperatures.
Today starts a new challenge over at the Alphabet Challenge Blog! Our next letter is F and it was my turn to choose a theme for this letter, so I have chosen “F” is for Feather(s) *Remember that this is a bi-weekly challenge, so you have two weeks to enter* I hope you will find some time to play along! Here’s what I’ve created:
I thought this would be a fun theme to play around with as you could just add a bird or anything with feathers. I look forward to seeing the projects for this one! I was happy to have this chance to pull out some things in my stash that I hadn’t used yet.
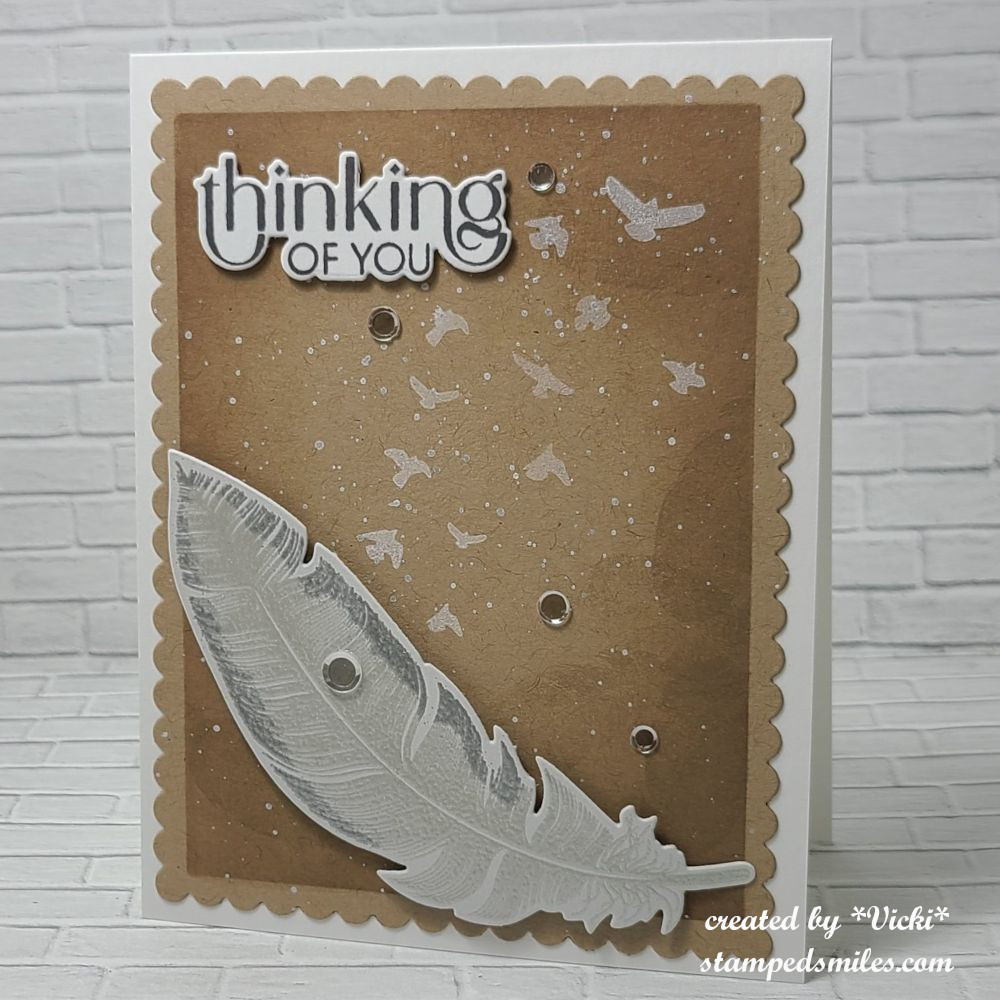
I started with a kraft colored cardstock cut with a scallop rectangle die and masked off the edges to ink blend and stamp a smaller feather around the edges with brown ink. I then took the flying birds image from the “Wings of Love” stamp set and stamped it in white ink. I also decided to add some white splatter over that. This panel was then attached to an A2 top folding white card base.
For the large feather at the bottom: I used my VersaMark ink pad to just ink up the edges of the feather, then I silver heat embossed just the edges of the feather. Without removing the feather stamp from my MISTI, I inked up the entire feather with VersaMark ink and then used a white opal embossing powder over the entire image. Since this embossing powder is translucent, the silver edges that I embossed still showed through. I die cut it out with the coordinating die and popped it up with foam tape at the bottom of the card.
The sentiment was stamped with grey ink and cut out with a coordinating die that I attached with thin foam tape at the top of the kraft panel. I added some clear sequins to finish it off.
Thanks so much for stopping in today! I hope you will grab your feather(s) and play along with us! I’ll see you tomorrow for a new Art Journal Page!
Hello friends! I hope you’ve had a wonderful week and looking forward to a great weekend coming up! We are having a heat advisory for the next several days over my way, so I thought it would be a great idea to stay indoors and craft! I also thought this would be a great time to catch up with some posts sharing some things that I’ve worked on the first part of this year that I hadn’t gotten a chance to share with you.
LONG POST – pull up your chair with your favorite beverage and enjoy!
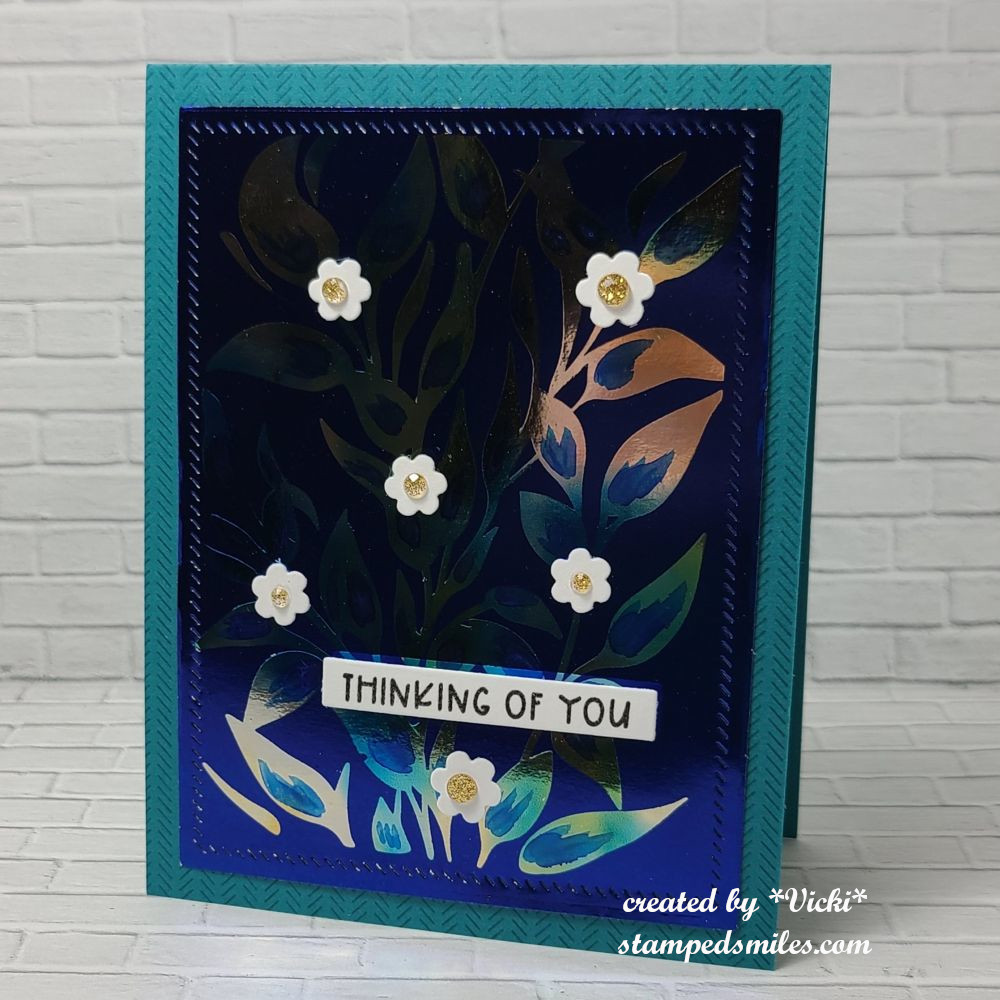
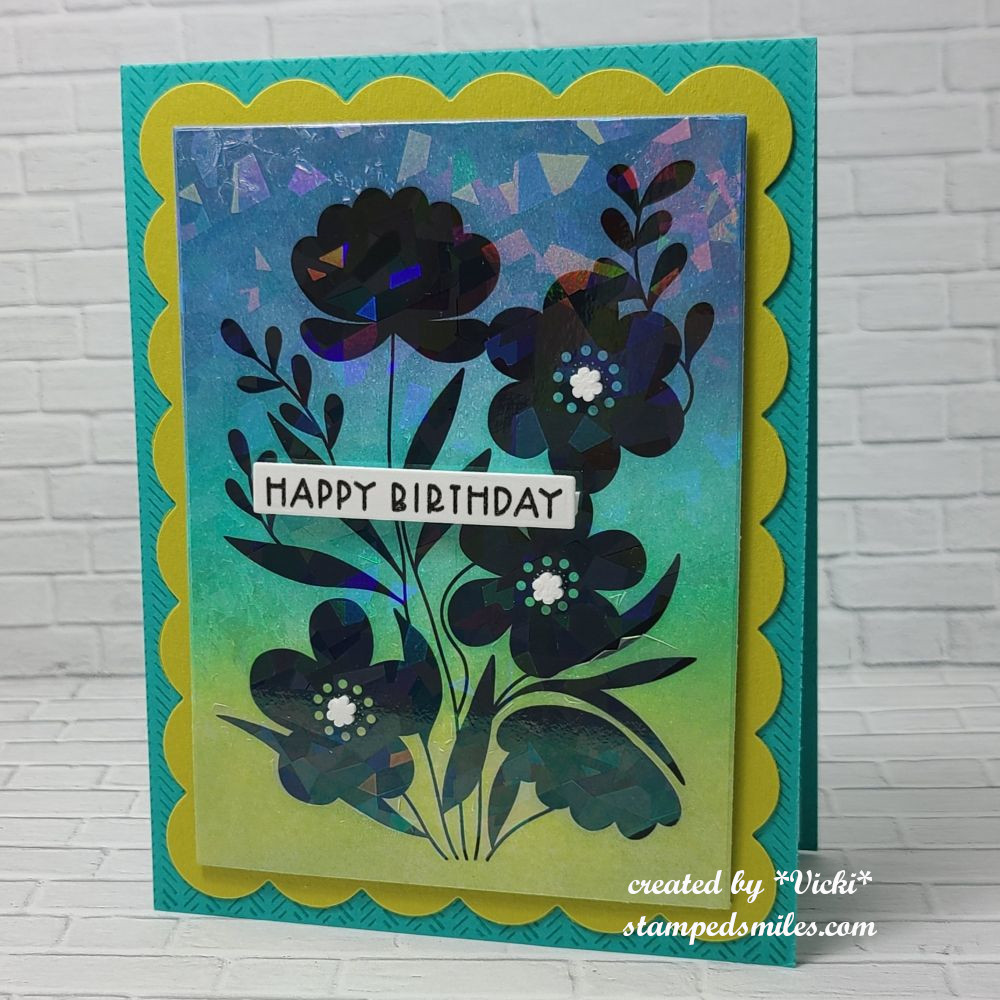
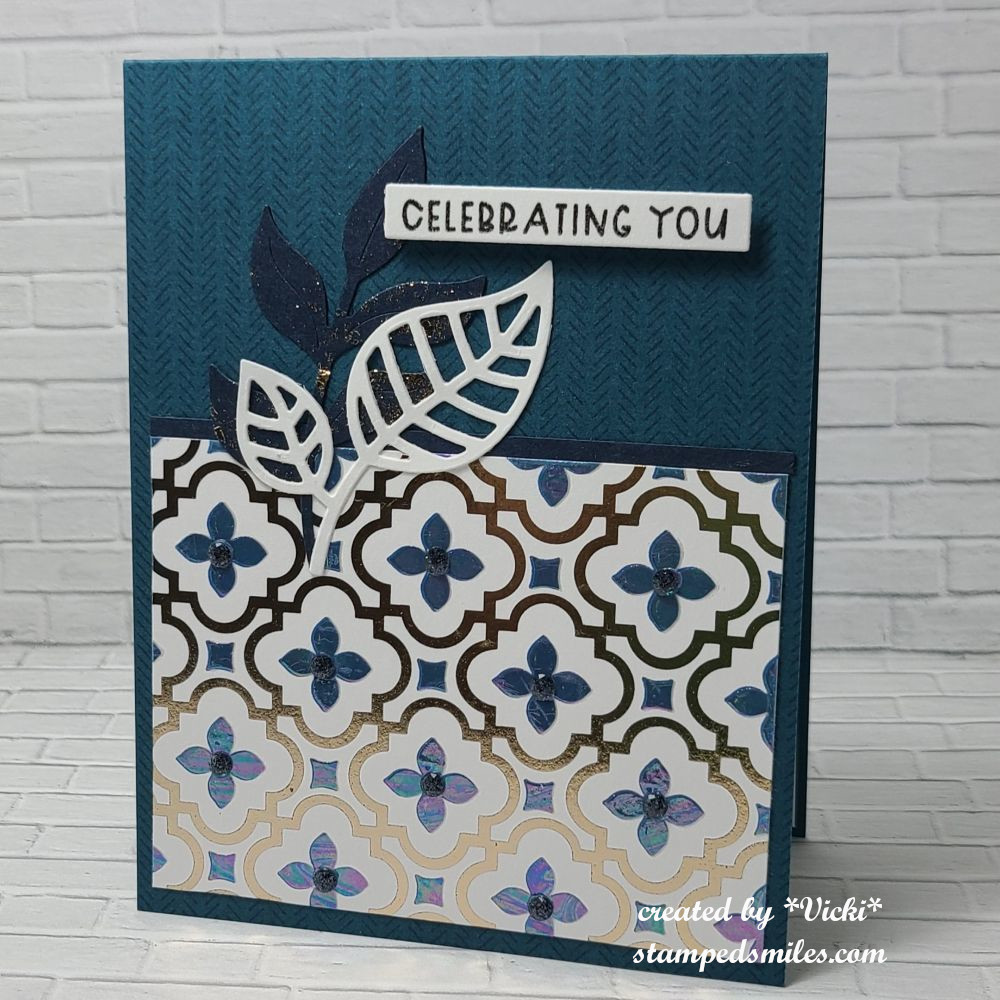
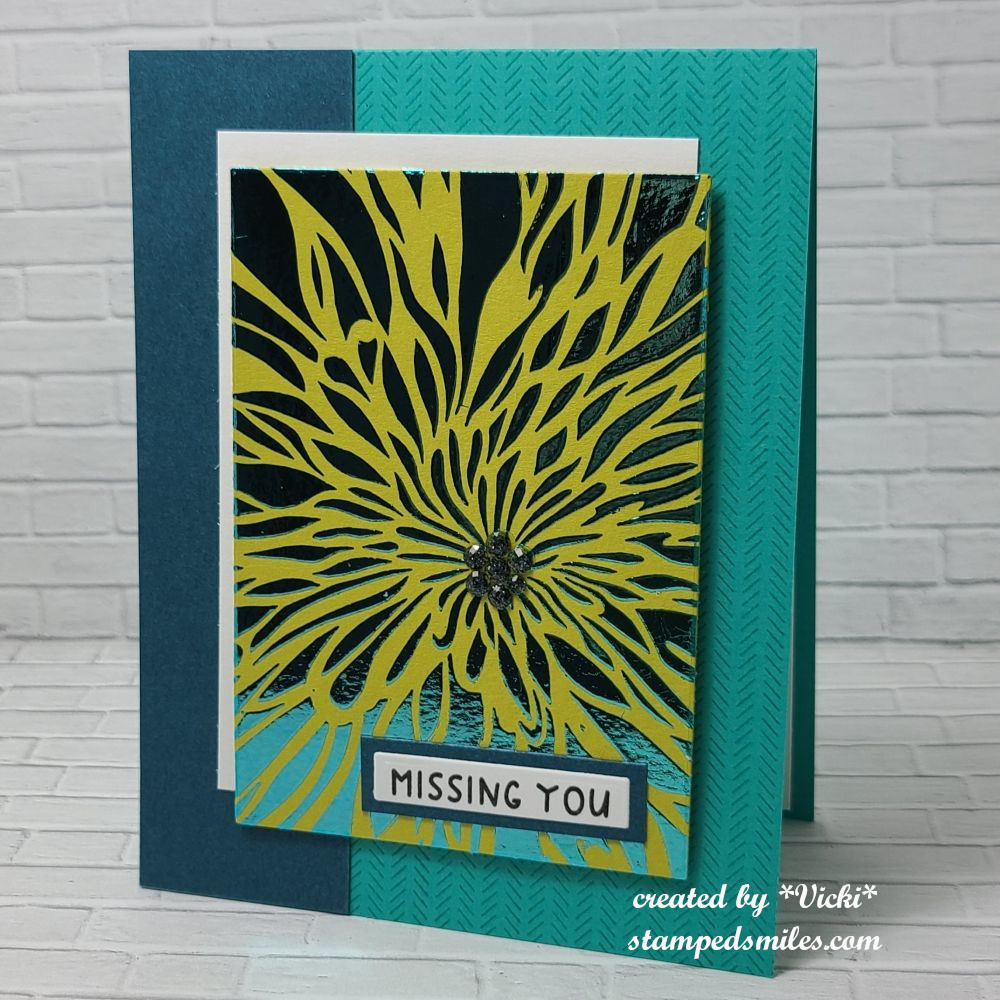
I thought I’d share the Taylored Expressions Virtual Stamp Joy that I did back in March. I actually spent the weekend attending the classes and creating as I followed along. I managed to get all of the projects done the day after the event was over, but failed to post all of what I had made due to the fact that I was busy helping two different people move…and then life just got really busy after that as well! LOL
*I also have added an additional event from Taylored Expressions this last weekend called “Summer School” which concentrated on foiling techniques. Although I’ve done foiling before, I sure enjoyed seeing new products and learning a few new techniques too! (These four cards are at the end of the gallery photos below)*
If you’re on my website, just click on the images below to enlarge the photos and view any details underneath each one. ENJOY!
Dimension Class-ink blending and splattering die cutsDimension Class-markers over die cutsDimension Class-stacked die cuts for layersDimension Class-liquid watercolor smooshing with die cutsInteractive Class-Light Up CardInteractive Class-Light Up Card pushing button to activate itInteractive Class-Pop Up CardInteractive Class-Pop Up Card when you pull up on the tab to reveal message and flowers pop upInteractive Class-Rip Strip Card – when the recipient pulls on strip, it reveals messageInteractive Class- Spinner Card – bee spins and moves along curved trackSession 1 -stenciling on perforated papersession 2 – watercolor panels using Karin Brush markerssession 3 – stamp a stack using quad stencils to make four cardssession 4 – marker coloringsession 5-ink blending on stamp and embossing over imagesession 6-calendar easel card with message padsession 7 – ink blending over glitter cardstockSummer School-double foil technique and using markerSummer School – clear foilSummer School – foil paste and sprayed foil techniquesSummer School – Foil paste over color cardstock
I always love to learn new things with stamping/crafting along with all of the fun new products that come out too! I know I REALLY don’t need to purchase more things, but when cool stuff comes out, it’s really hard to pass it by! I think doing these classes and joining in on different challenges help me to use these fun things up!
So I hope you’ve enjoyed my post sharing all of the things that I’ve been doing! I will have another post sharing more things that I haven’t shared yet too! In the meantime, I’ve also been working on a scrapbook which has been fun and something that I haven’t done in a really long time! A baby can do that to you! LOL
Thanks so much for stopping in today my friends! I’ll be seeing you soon! Have a great weekend!😊
Hello and happy Friday my friends! After things got heated up the last couple of days, I think I’m ready for a couple of days of cooler weather! I don’t want to skip Spring by going straight into a hot Summer! Hope you have some great things planned this weekend!
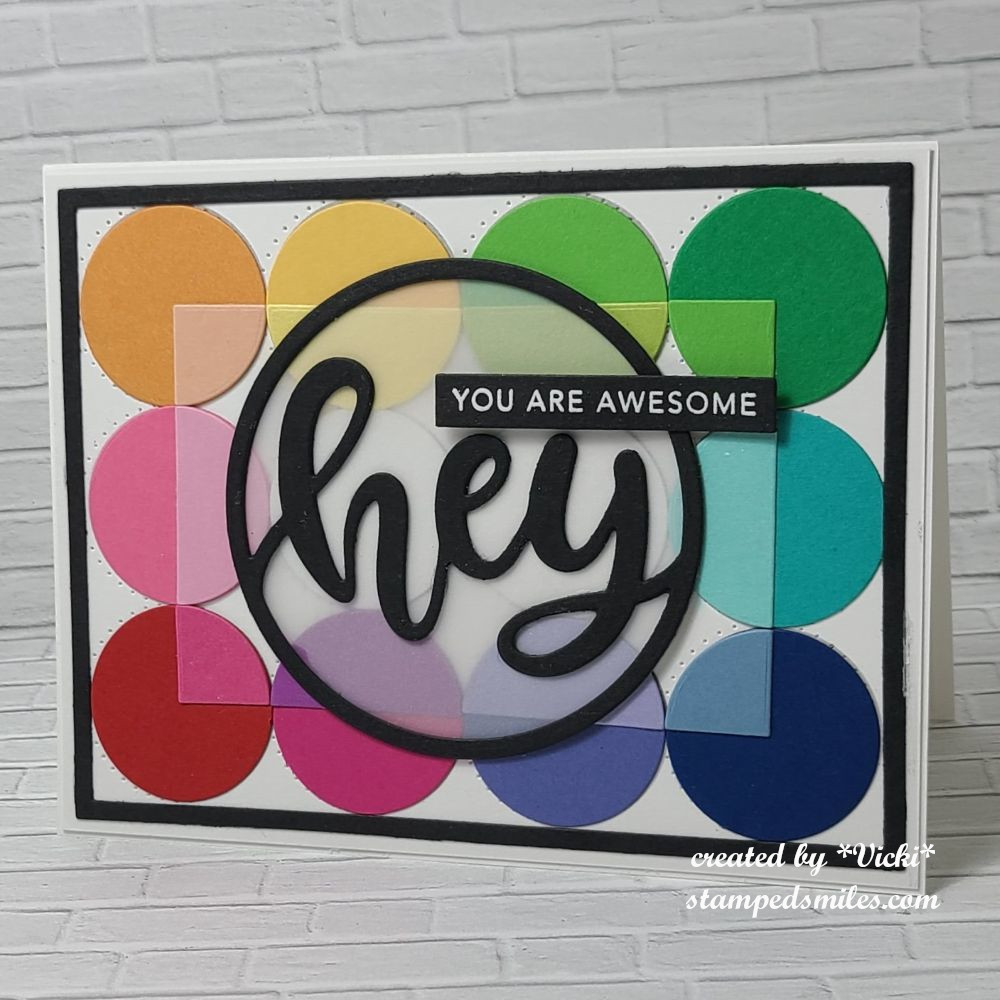
Today starts a new challenge over at the Alphabet Challenge Blog! We are now onto the letter “C” and the hostess has chosen “C” is for Circles *Remember that this is a bi-weekly challenge, so you have two weeks to enter* I hope you will find some time to play along! Here’s what I’ve created:
I do love me some circles and I thought I would just use them all over the place for this challenge! I pulled out my Taylored Expressions “Talking in Circles card kit” that came out earlier in the year and no longer available. However, the panel that I’ve used to create this design are still available in the store called “Talking in Circles A2 Sugar Cube Maps“. They make it easy to follow where placements need to be and lined up.
I used the TE A2 Thin Frame Cutting Plate for the black frame around the circles. I thought I would try and use another cutting plate, but the design pretty much covered it up. I layered this whole panel over a top folding A2 white card base.
For the sentiment in the center, I used another circle die from the TE, but I don’t think it’s in the store any longer. I cut the “HEY” circle out from black cardstock and layered some vellum behind it. I white heat embossed the “You are awesome” sentiment over black and cut that out with a Simply Strip die. This was popped up with a foam strip over the design.
Thanks so much for stopping over today! I hope you’ve enjoyed my card and you will take a hop on over to the challenge blog to see what the rest of the team has come up with.
See you soon! In case you need to know…you are awesome!
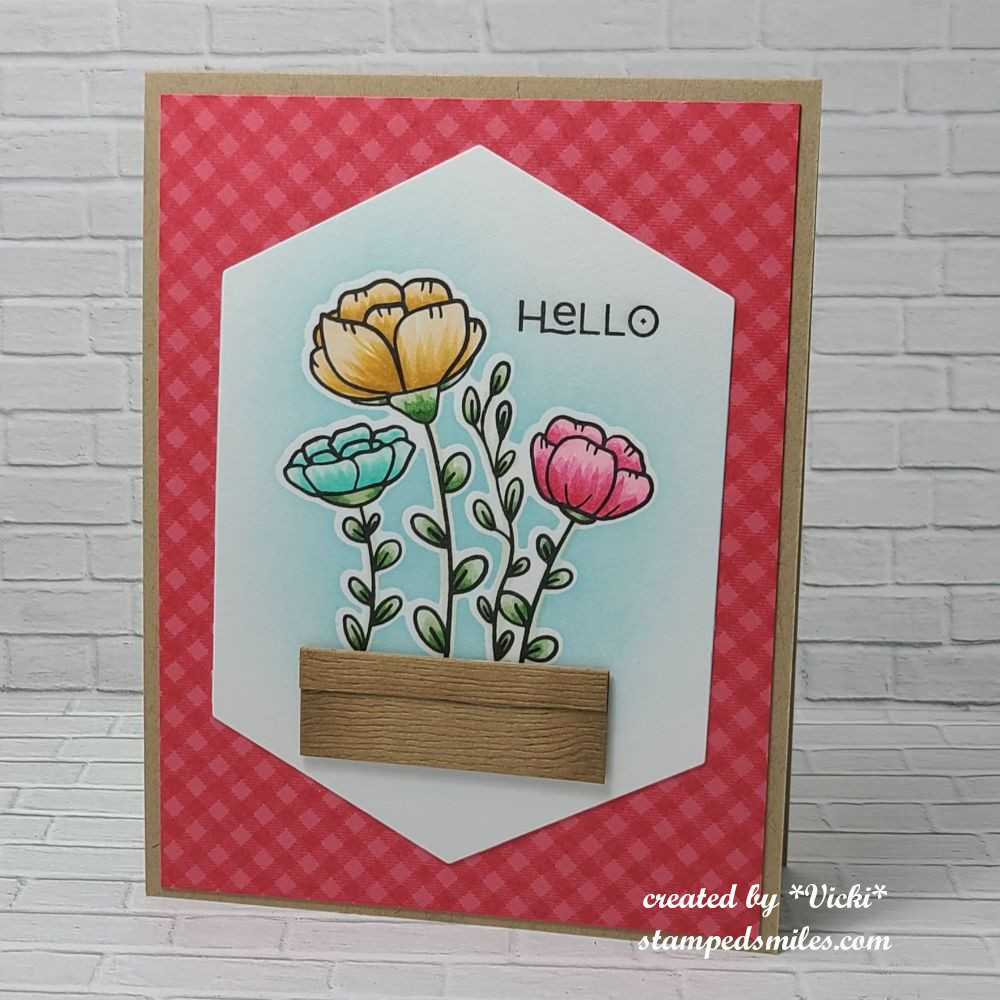
Hello friends! I hope that you’re enjoying this month so far! The weather has really started to warm up now and it’s been nice and sunny to be outside. I have so many projects that I’m working on, so my blog has been a bit neglected lately. I will be able to share with you all of the things that I’ve been working on later…but for now, let’s talk about flowers!
Today starts a new challenge over at Sparkles Monthly and this time it’s my turn to pick a theme and I have chosen “FLOWER(S)” for this month. Flowers seem to work for so many occasions which is why I chose it. Here’s the project that I came up with:
I needed a card for Mother’s Day this last weekend, so I thought I’d pull out my stash of die cut flowers from Taylored Expressions and create several pieces in different colors to place inside my wheel barrow.
I’ve die cut several pieces from the Fresh Cut Flowers die set in pineapple, guava, dried fig, chocolate truffle (centers) and green tea (stems and leaves). I used the same color of ink to sponge a bit of dimension over the centers and then splattered some white Copic ink over just the flowers and the toffee background that was stamped in toffee ink with the Weathered Words Background stamp.
I arranged all of the die cut flowers and leaves behind the Farmhouse Wheelbarrow die cut from chocolate truffle, toffee and woodgrain textured cardstock. I also used the Building Blocks Happy Additions to white heat emboss over a piece of chocolate truffle and cut out with the coordinating die. The toffee background was placed over an A2 sized top folding white card base and then I added a white frame die cut from the A2 Thin Frame Cutting Plate for an “anchor/ground” for the wheelbarrow to sit on. The sentiment greeting was popped up with a foam strip and then I’ve added a few enamel dots including in the center of the wheel.
Thank you so much for stopping in today! Hope you’ve enjoyed my card and that you will stop by the challenge blog to see the rest of the inspiration from the team. I look forward to seeing what floral creations you share in the gallery with us!
Happy Friday my friends! Are you ready for the weekend? I know that I don’t have a regularly scheduled workday every day, but I can still always feel a weekend ahead! LOL Hopefully I can enjoy some time doing some fun projects that I’ve been wanting to get to and go outdoors!
Today starts up a new challenge over at the Alphabet Challenge Blog! We are now onto the letter “B” and the hostess has chosen “B” is for Butterflies (use more than TWO of them.) *Remember that this is a bi-weekly challenge, so you have two weeks to enter* I hope you will find some time to join us in the gallery! Here’s what I’ve created:
I do love me some butterflies! I love using soft pastel colors for the Spring months too! I have used this set before, but I have gotten it back out again for my mini slimline card today. I’ve used the Taylored Expressions Beautiful Butterfly Wings & Coordinating dies to complete this.
I white heat embossed the three wings onto vellum and die cut them out. I also used the die cut to cut out the colored cardstock butterflies for each one along with their center antennas. Glued them together and set aside to work on the layout.
The base of the card is mini slim size of 3.5″ x 6″ side folded. I die cut a white layer with the TE Pettie Scallop Mini Slim dies and then layered another white piece using the Stitched Mini Slim dies. Before I attached it, I splattered some black paint over it.
I then attached each assembled butterfly to the layout design and added the white heat embossed sentiments between them with foam tape. The sentiment came from the TE Fluttering By Mini Strips & a coordinating strip die. I finished by added a rhinestone in the center of each butterfly.
**Just a special attention to the tab pages I’ve added at the top of my blog that shows I now have information about purchasing a handmade card from me as well as another page of craft supplies I have available for purchase if interested. I will regularly update so check back often to see what’s there!**
Thank you for taking the time to stop in and share your support! It really means a lot and I enjoy hearing from you! Whatever your weekend brings, I hope there’s some good in there somewhere!
Hello friends again! I have two posts going up for today, so please see my post for the Mix It Up Challenge details in the above post when it goes live or click HERE.
I’m so excited to have been asked to be a guest for this month’s Pearly Sparkles Challenge! I always love playing along in challenges and supporting them when I can as I always find inspiration in using my supplies when I play!
So for May’s Challenge, they would like to see: BLACK, WHITE PLUS ONE OTHER COLOR in your project(s). Here’s the card I made for this theme to inspire you:
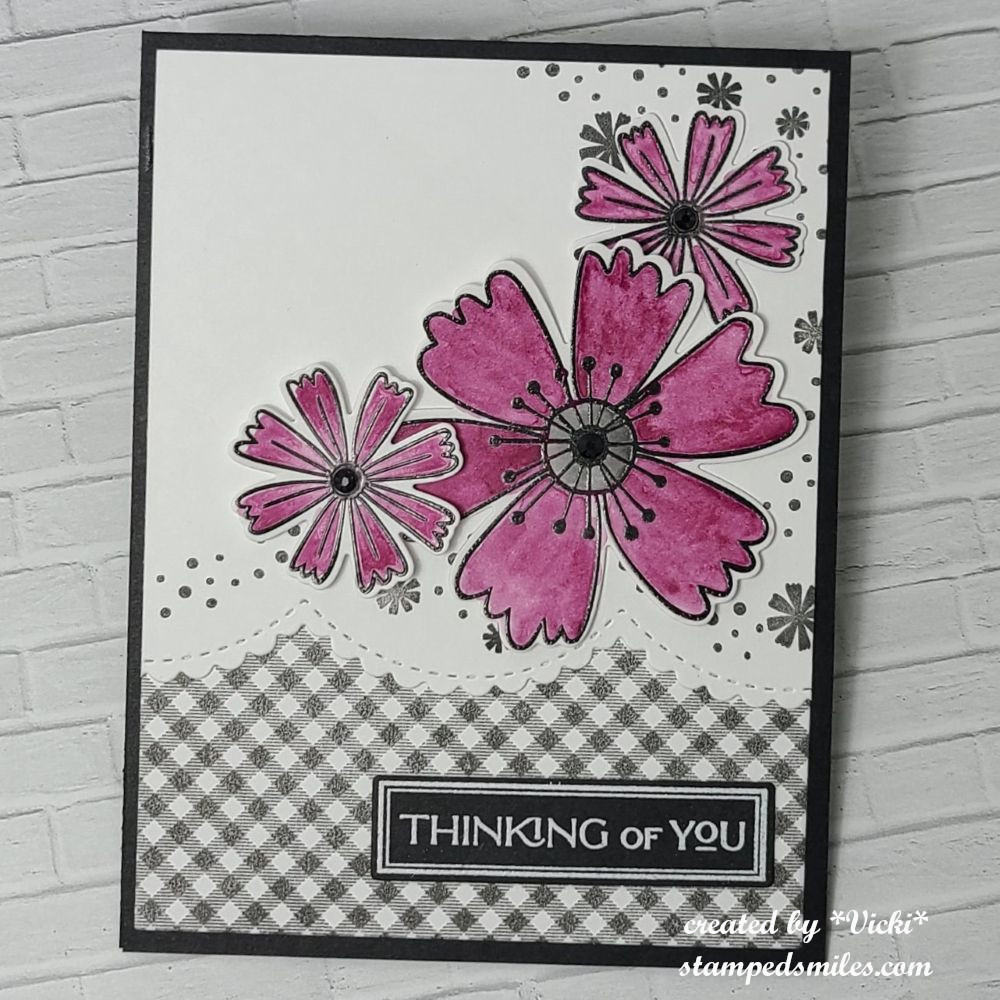
I wasn’t sure what I wanted to do for this, but I thought you couldn’t go wrong with some flowers. I pulled out a long forgotten stamp set from Taylored Expressions called “Picked Posies” (no longer available) and black heat embossed the images over watercolor paper and used one pink watercolor brushed over the petals. I die cut each flower with the coordinating die.
I made the rest of the card layout with all black and white elements. I stamped the TE Checking In Background stamp in black ink over a white panel, placed this over an A2 sized top folding black card base. I also used the TE More Easy Edgers die to cut an additional piece of white cardstock and placed it over the stamped checkered background. I also used some more of the elements from the flower stamp set and stamped some more black images on that background before I attached the watercolor flowers on it. I centered each flower with a black rhinestone.
Thanks so much for stopping in today and I hope you’ll check out this challenge to see what the rest of the team has to inspire you with so you can play along too!
Hello and happy Friday! It’s not only “Good Friday”, but it’s Easter weekend here for us, so plans to enjoy the time we have together with food and laughter. At least that’s the plan anyway! I hope that whatever plans you have that you enjoy yourself.
Today starts up a new challenge over at the Alphabet Challenge Blog! We have finished up the entire alphabet round and starting back up again for the 14th round which began in 2011! WOW! So beginning with the alphabet, the hostess has chosen “A” is for Alphabet(choose your own letter of the alphabet and a theme that begins with that chosen letter.) *Remember that this is a bi-weekly challenge, so you have two weeks to enter* I hope you will find some time to join us in the gallery! Here’s what I’ve created:
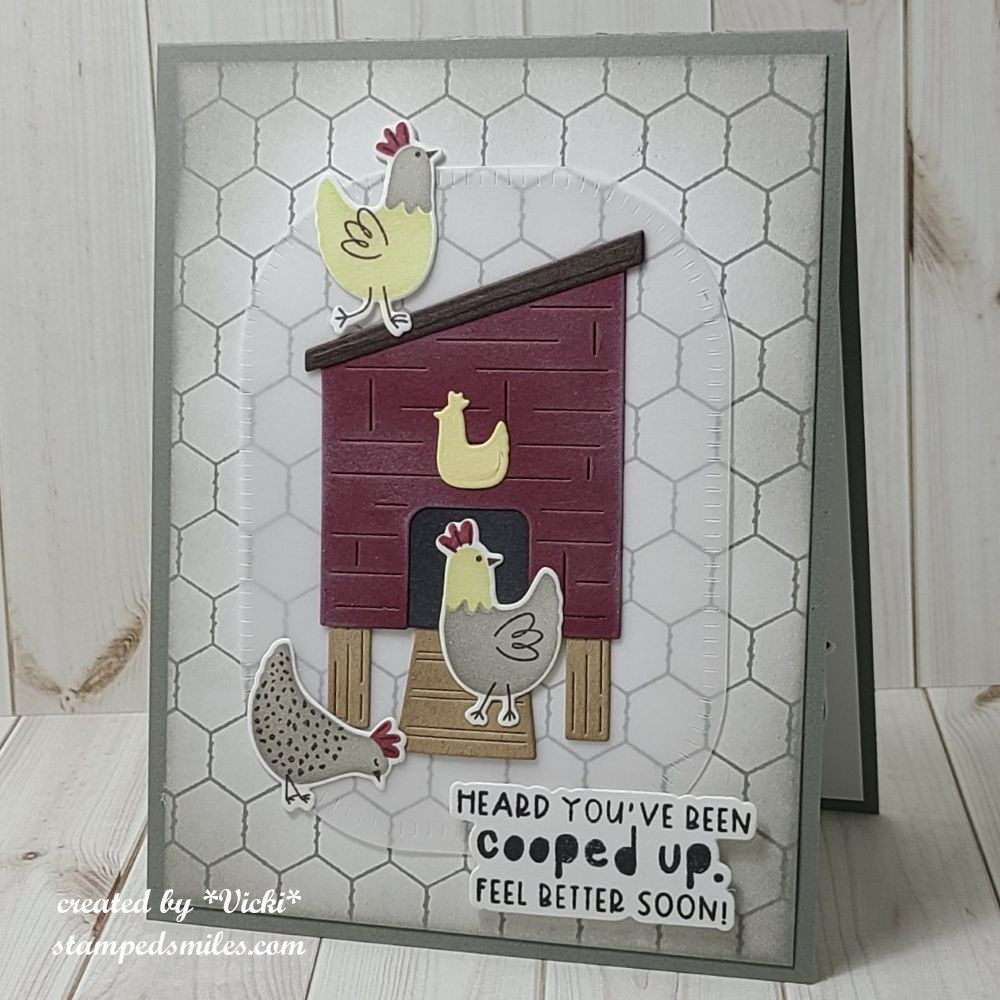
The quirky chickens and for an inside joke were sent to help cheer someone up not feeling well.
I started with a separate panel to stamp and stencil the chickens on. I cut them out from the stenciled panel. On another piece of cardstock, I stamped the Wire BG and ink blended around the edges. I placed this onto a top folding A2 sized gray panel. I wanted the area with the chickens to be the focus, so I took the TE Rounded Rectangle Stacklets and cut a piece of vellum that I used to create my scene on with the Yard House die set. I centered the “hen house” and then used the placement of that to adhere the vellum panel to the center of the card front.
Lastly, I added the other chickens to the scene and the stamped/die cut sentiment which was popped up with foam tape at the bottom right of card.
Thanks so much for stopping by today! I hope you’ve enjoyed my card and it gave you a smile! 😊 Have a wonderful Easter weekend my friends!
Hello there friends and welcome to April already! I do not know if this year seems to be flying by because I’ve been busy with life or it’s just flying by anyway! Speaking of things flying by…
Today starts up a new challenge over at the Alphabet Challenge Blog! We are on the last letter of the alphabet this time and the hostess has chosen “Z” is for ZOOM(anything that goes fast) for the theme. *Remember that this is a bi-weekly challenge, so you have two weeks to enter* I hope you will find some time to join us in the gallery! Here’s what I’ve created:
How cute is that pup standing on the bike seat to look over his bird friend perched on the basket! The name of these adorable animal friends are called “Gus & Gertie” which are a set of characters designed by Taylored Expressions. (If you click on the link, you can see the full line of them.) The set I’ve chosen is called Gus & Gertie Best Buds. I like these animals because they’re very easy to color!
I could’ve chosen the airplane from the set, but I kept thinking of those electric bikes & scooters you can rent from cities and they seem to go really fast when I see kids whizzing by on them! LOL
I kept my scene in a circle and added some clouds in the background that I stenciled in and then layered some hills/slopes and a grass border on the front. I just popped the “ride or die” sentiment at the top and attached the die cut image with foam tape. I layered the scene onto a black circle base that was attached to a red brick embossed background. All was attached to a top folding A2 white card base.
That’s all for me today! Thanks so much for checking in with me as I enjoy reading what you have to say! Enjoy your weekend and I’ll see you soon!
Challenges:
Critter Crazy – #97 Anything Goes with a Featured Creature
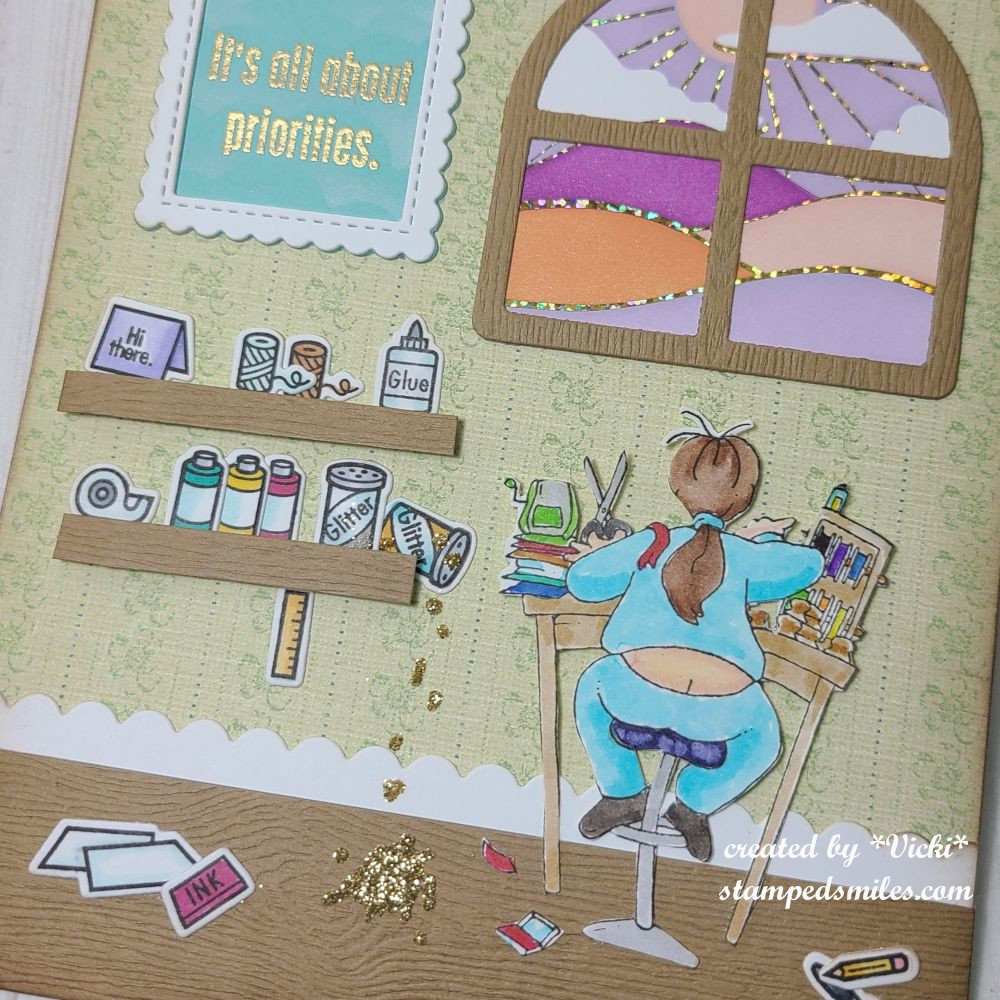
Hello friends! Here we are again at the end of another month! Although I’ve been really busy this past week, I think I’m ready for March to be over with! Mainly because of this crazy weather and another because I’ve been busy doing things other than crafting! LOL (Must be time for that organizing…er as I like to say “agonizing”!)
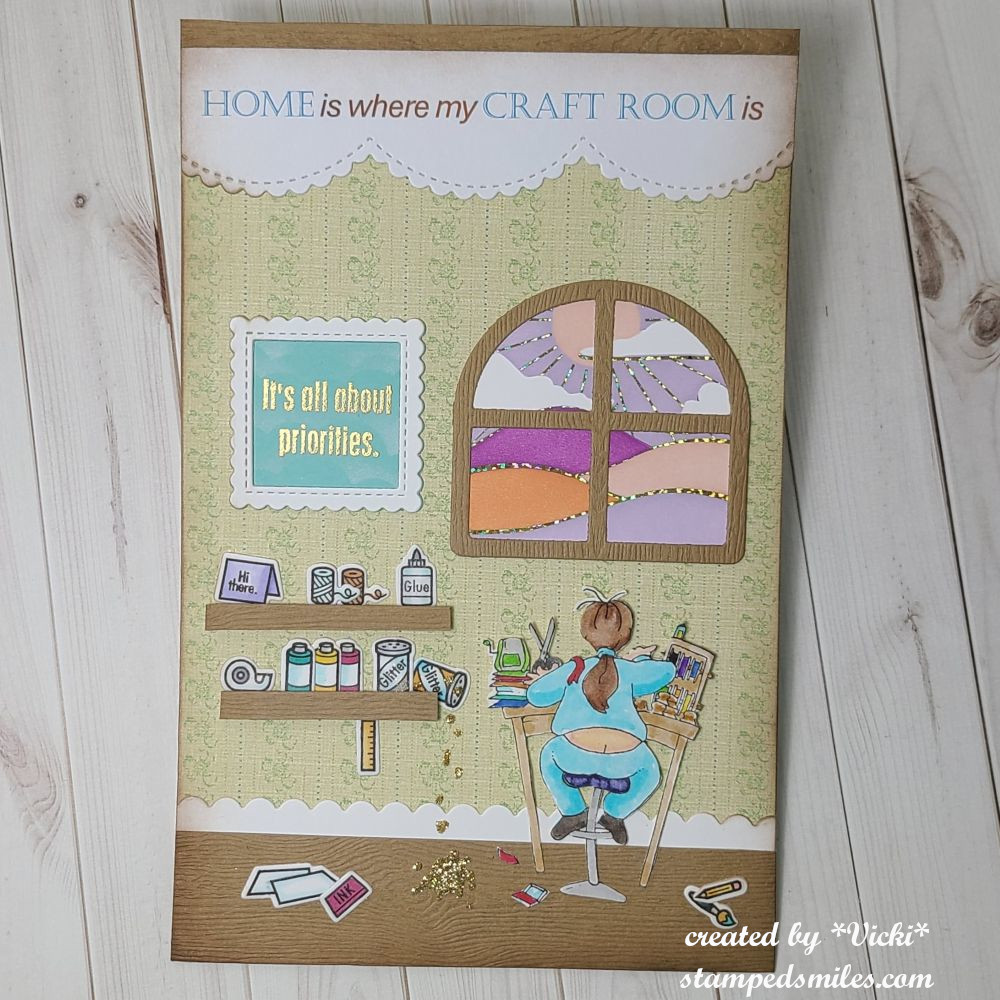
Today is our monthly AJ page with my crafty friend Carol (from Crafty-Stamper) who is collaborating with me to “SMASH OUR STASH”! We get creative trying to use up our never-ending stash piles along with a prompt for each month. I know she always has great inspiration to share, so please check out her blog too! Here’s my AJ page with the “SMASH OUR STASH” March prompt of “Favorite Things”:
I’m sure you might’ve guessed that one of my favorite things to do is obvious on this page! (This craft room actually looks a bit more organized than mine is currently!) I did have so much fun with this one! I’ve usedSO many of my favorite things on here: old stamps, mixed company favorite stamps, foiling, heat embossing, coloring (Copics and watercolor), ink blending, die cutting, fussy cutting, using old paper stash, mix of papers, favorite colors, the subject of stamping, my favorite room, wearing sweats, crafting while sun going down, etc, etc, etc. Honestly, this was easy, but it could be because I enjoyed putting it together.
For the background: I used a standard white cardstock base measuring 5.5″x8.5″ and then took some very old Stampin’ Up! paper (Porcelain Prints) to cover the entire size so that I could get the look of wallpaper. I then used some textured woodgrain cardstock from my stash for the floor, the window and the shelves. (The shelves were popped up with a foam strip) I die cut a scallop border in white for the trim above the floor and also die cut a frame for the wall hanging. The sentiment for the wall hanging was gold heat embossed and placed behind the frame. (I sponged some white clouds in there too.) The border at the top was printed off my computer and I used another scallop border die to cut it out. I sponged some brown ink around the edges of the page and added all of the elements.
The stamper girl image was from an old company called “Hambo Stamps” (went out of business several years ago), but I think it’s so cute and funny! This is where the gold embossed sentiment came from as well. Had fun coloring her up with my watercolor pens.
For the window, I used the Taylored Expressions Foil It-Dreamscapes along with the coordinating stencils that I received from Virtual Stamp Joy earlier this month. (I will share my projects in another post later on.) I also used the TE Arch Windowpanes die set to cut out a frame in the woodgrain cardstock over one of the ink blended panels.
And lastly, the little crafty items on the shelves and floor came from the Lawn Fawn Just Add Glitter stamps & dies. I stamped and colored those up with Copics to place on the shelves. I also thought it would be fun to add some glitter spilling from the gold glitter bottle and dumping onto the floor…always a fun thing to happen in the craft room while you ignore it because you’re so intently working on something!
All this page did for me was to remind me that I really need to do more organizing! I hope you’ve enjoyed my page today and take a hop on over to see Carol’s inspiration too! Thanks so much for stopping in today!
(P.S. I’m currently away and it will be a few days before I can reciprocate your comments, but I truly appreciate your kind words of support.)