It’s Christmas in July at Sparkles Monthly!

Hello friends! Have you’ve been enjoying the month of July so far? We finally got some rains, but now it’s humid and warmer. That’s OK because it’s always warm this time of year anyway and a great time for crafting indoors with the air conditoning!

Today starts up a new challenge for the Sparkles Forum Monthly Challenge Blog with the theme: Christmas in July! It’s a favorite for many card makers this month so that they can get an early start on those Christmas cards without having to wait last minute to get them all done. I don’t have an outrageous amount to send out, but I do like to donate and I have done 5 Christmas so far! So if you’re up for it, make a Christmas card and join the gallery at the challenge! Here’s the card that I’ve made:

There’s nothing like the smell of peppermint for Christmas (for me anyway!)  I had gotten this Candy Cane Lane card kit from Taylored Expressions last year and never really used it, so I thought this would be a good time to pull it out.

In the set, there came this cover plate die and I cut it out in the following, gold mirror, white glitter and white cardstock in A2 sizes.  I paper pieced each one over an A2 sized white card base front.  I added some light blue ink blending around the edges and bottom of the center panel and stamped a few “snowflakes” in the same color.

I die cut the candy canes and leaves and ink blended/stenciled those stacked together.  I used a white gel pen for the highlight over the canes, added a gold cord bow and some gold drip drops for the “berries”.  There was a stamp set with sentiments that I stamped out in red and then went over top of it with VersaMark ink so that I could emboss some Peppermint smelling embossing powder over it…that’s where the smell of peppermint came in for me!  I die cut it out with the coordinating die and glued it at the bottom of the candy canes.

Hope you can join the challenge with your Christmas cards this month!  Thanks so much for dropping in today!

Challenges:

  1. Sparkles Christmas – Include Gold
  2. Merry Little Christmas – Anything Christmas Goes
  3. Get Creative – Christmas in July
  4. Craft Rocket – Christmas in July
  5. Most Magical Time of the Year – ATG Christmas/Halloween optional:  Christmas in July
  6. Christmas Craft Creations – Christmas in July007July
  7. Little Red Wagon – Christmas or New Year?  (I hardly ever send out New Year cards)
  8. Krafty Chicks – Christmas
  9. CRAFT – Christmas

NO STAMPING ALLOWED at Sparkles Monthly

Hello friends!  It’s been a bit since my last posting!  I’m still crafting, but I’m also enjoying the outdoors lately too!  I’m just not making the time I need to post on my blog here!  However, being on a design team helps to keep me focused on posting and hopefully it’s something that will bring motivation because I need it!  So I will try and get some more posts in!

Today starts a new challenge over at the Sparkles Monthly Challenge and the theme is “No Stamping Allowed!This may seem a bit challenging, but I look forward to seeing what people come up with for it!  Be sure to check out the blog to see what the design team has come up with for inspiration!  Here’s what I’ve made for the challenge this month:

I was trying to channel something that would work and realized that I had these fun strip dies from Taylored Expressions and I wanted to play with some new colors, so I ran with that on the middle of my card front by alternating the strip colors.

I also die cut a frond three times and glued them together for thickness and sturdiness.  I attached it over the colored strip panel and then added a sentiment that was already toner printed so that I could foil over it with silver Deco Foil.  I also had a die that cut it out which was popped up with foam strips and added to the bottom of the die cut frond.  Lastly, I’ve just added some silver glitter drops randomly over the card front.

Hope you’ve enjoyed my non-stamped card today and will think about joining in the challenge with us this month!  Thanks so much for stopping in! Have a great week!

Challenges:

  1. Craft Rocket – Use Dies
  2. NBUS – #51 June – new colors and dies
  3. Creative Fingers – Anything Goes
  4. A Place to Start – Anything Goes and/or twist: flower + one other thing
  5. Penny’s Paper-Crafty – Anything Goes using paper
  6. The Crafty Addicts – Anything Goes
  7. CAS on Friday – Leaves


Sparkles Monthly Challenge-Things with Wings

Hello friends!  I hope you’ve had a lovely Mother’s Day weekend and are enjoying the month of May so far!  I look forward to seeing those beautiful blooms and digging in the garden! 

Today starts a brand new challenge over at the Sparkles Monthly Challenge and the theme is “Things with Wings“!  This is a good one as there’s several ways to interpret it!  Be sure to check out the blog to see what the design team has come up with for inspiration!  Speaking of design team, Caz is looking to add to the team, so be sure to check out the details if you would be interested in joining.  Here’s what I’ve made for the challenge this month:

I thought the butterfly from this Taylored Expressions stamp set called Endless Joy would be so fun to color and use for this challenge.  They were stamped with Copic markers and cut out with the coordinating dies.

For the background, I’ve taken the rectangle masking stencil and blended some blue ink over the center and then I’ve added an additional stencil over top of it and blended bluer to get the pattern.  I then added some raw umber paint and opaque white Copic to splatter over top of it.  I cut out a stitched frame and added it over the blended area.

I added the flowers and butterfly to the card by gluing and popping out the smaller flower as well as the wings on the butterfly.  The sentiment was gold foiled and cut out with a coordinating die that was glued at the top.  I added some highlights on the butterfly with a white gel pen and added some Stickles glitter to the center of the flowers.  The white panel was attached to a top folding A2 white card base.

I hope that you have enjoyed my card today!  I hope that you will stop into the challenge and play along with us this month!  Looking forward to seeing the gallery of wings!!

Have an amazing day and see you again soon!

Challenges I’d like to enter this card for:

  1. Four Seasons – Spring Season
  2. Triple B (Birds, Blooms &/or Butterflies) – Spring 
  3. Love to Scrap – Anything Goes
  4. Unicorn – Flowers
  5. Crafty Animals – Anything Goes + animal
  6. Critter Crazy – Anything Goes + featured critter
  7. Fab ‘n’ Funky – Things with Wings
  8. The Crafty Addicts – Anything Goes

Class Fun & Square Samplers + Give Away

Happy April friends!  We have finished March already and onto Easter very quickly approaching!  I hope you’re enjoying all things Spring coming up your way!  We’ve had several storms and we’re in the tornado season as well, so I hope everyone is staying safe out there whatever the weather.  I do have some things that I had previously finished and wanted to share:

First, I wanted to share about the Virtual Stamp Joy Event by Taylored Expressions that I participated in a few weeks ago.  I always have so much fun and enjoy the motivation that it seems to generate!  I’m sharing them in the gallery below, so if you’re on my website post, then just click on each photo to enlarge it.

  • The first four photos were from a class using the same floral stamp set and the others are from the next day of make-n-take projects.  Please let me know if you have any questions about any of them!

The last set of four cards were a “mass production” using a background stamp in different colored cardstock panels and clear heat embossing over them.  The class sample had “hello” sentiment on each one, but I changed up the sentiments and have placed them in a card box to give them out with envelopes as a gift for someone.

Hope you’ve enjoyed the inspiration as much as I enjoyed putting them all together!


From the end of last year up until this last month, I didn’t have much time with the Holidays and everything going on, but as you may have seen in previous posts, I participate in a “square sampler swap” and when everyone sends out their squares, we then complete a home décor piece with all of the squares, so I thought I’d share mine finally completed:

  • CLICK PHOTOS BELOW TO ENLARGE

This was for the Christmas Sampler SWAP and you can see that I’ve used a black shadow box frame for my sampler and placed some red with red metallic dotted paper behind it.  The square on the right is the one that I made. (I’ve used My Favorite Things products for my square.)

This was for the Winter Sampler SWAP and I went with a white shadow box for this one.  I’ve placed some soft blue snowflake papers for behind my sampler as I thought it was soft enough to not look too busy.  The square on the right is the one that I made. (I’ve used Inky Stamper products for my square.)

And recently we finished up our Spring Animals Sampler SWAP that I used another white shadow box for the sampler.  I’ve added a piece of pink colored “Watercolor Wishes” paper from Lawn Fawn behind it.  It looks a little off in the photo, but it looks better IRL.  The square on the right is the one that I made.  (I used Taylored Expressions products for my square.)

Not sure if we’re doing any more or not, but I had so much fun making the squares to swap with friends!


Lastly, I have a fun little thing to give to whoever is interested in these Taylored Expressions dies + foil-it panels package. (It’s not sold in stores anywhere as it was a free gift with purchase) I have an extra and so I thought I’d give it away to someone!  Just leave me a comment below if you’re interested and I’ll pick someone from the comments.
Leave a comment below if you’re interested!

That’s all I have for today!  Thanks so much for stopping in!  I’ll be seeing you soon!

Merry Christmas!🎄

Just wanted to share some Christmas cards I made this year and wish each and everyone a peaceful, loving and joyful season!  

Made with the Taylored Expressions Woodland Reindeer Silhouettes stamps & dies and the Woodland Reindeer Deco Foil Transfer Sheets.  The sentiments were foiled from the TE Simple Strips in Reverse Christmas Panels.  The shaded oval panel was blended on by using the TE Oval Masking Stencils and I splattered the background with white paint.

This card was made using a TE freebie (not available for purchase) and created in the same way with the card on top except this one has the sentiment in the center rather than the reindeer.  I also foiled a couple of the snowflake/stars randomly over it and rounded the corners.

  • Thanks so much for your continued support my friends!!!

Challenges:

  1. Fab ‘N’ Funky – Last minute Christmas
  2. The Sisterhood of Crafters – Traditional Christmas Colors
  3. Crafty Gals Corner – ‘Tis the Season
  4. Creative Moments – Christmas/Winter Celebrations
  5. Creative Knockouts – ‘Tis the Season
  6. Creative Fingers – Anything Goes
  7. Lil’ Patch of Crafty Friends – Anything Goes
  8. Pammies Inky Pinkies – Anything Goes

It’s Time For Tags!

Hello friends!  I thought I’d take some time for making up some tags which is something that I really enjoy doing, but don’t do it very often.  They’re so nice to have a batch made up ahead of time so that you can pull one out as you need it instead of trying to hurry through making something.  It’s always better to have fun instead of rushing! 

This trio of tags was a bit time consuming, but it was nice to finally pull out some things that I’ve been wanting to play with and use without being in a hurry.  The characters are from the Taylored Expressions Holiday Squad die set.  The tags themselves were cut from the TE Pierced Stacklets dies, the TE Tag Stacklets 2 dies and the TE Tag Reinforcements dies. The background for the tags was made with the TE Foil It-Plaid Layering Panels that I foiled in gold along with the stenciling from the TE Plaid Layering Stencil set.  The sentiments were white heat embossed from the TE Just Saying-Christmas stamps.  I’ve used various colors of Taylored Expressions papers and inks and then finished the embellishments for the “holly berries” using the red from TE Tiny Diamonds-Bold set and then I also used the TE Gold Drip Drops in the background.  The ribbon and twine from my stash at the top.

My next trio of tags here was really fun with these adorable penguins from Taylored Expressions Dancing Through the Snow stamp set and dies.  I placed them over top of the transparency that was used to create a shaker tag behind the penguins.  I used the TE Tag Stacklets 3 dies and also used some pink polka dotted papers from a free paper pad I received with an order.  The bright shinny purple paper came from my stash I’ve had for quite a while and thought it would be a fun non-traditional color to use with these.  I filled the shaker tags with the TE Bits & Pieces-Snowflakes and the TE Bits & Pieces-Sparkly Stars

And these tags were a little hard to photograph with all of that cording in the way! (Pardon my photograph skills! LOL) They’re smaller than the tags above, but they work great for different packaging sizes!  These were easy and fun as I’ve done mostly foiling with these using the Taylored Expressions Foil It-Simple Tags Holidays panels and the stencil to go with it.  I cut them all out at the same time with the coordinating dies. The tags with the black cording are the negatives from foiling the toffee-colored tags and are mostly completely foiled.  I just used different colored Stickles glitter to create the Christmas lights on those.  (Really been having fun with the foiling this year!)

And lastly, I wanted to share a set of tags that I’ve made using various Inky Stamper sets!  I decided to go through all of the different Christmas sets that I have from them and pull out the ones that I either haven’t used or barely used to play with them.  The tag at the top was made with the Inky Stamper Fox set that I really enjoyed coloring.  The presents at the bottom and the Santa hat were colored and fussy cut from the same stamp set.  I made the background of that one with the Falling Snowflake Stencil with white ink and heat embossing over it with sparkly white embossing powder. 

The tag on the bottom left is another fun shaker tag!  I pulled out the Inky Stamper Nutcracker set to color him up and cut out with the coordinating die.  He was placed over the acetate on the shaker tag.  I used a scallop circle tag die with gold foil cardstock that I cut out the center with a circle die, added some papers for the background from the Doodlebug Buffalo Check/Woodgrain paper pack.  The shaker bits inside are the Shaker Garnish which is really lightweight and still make a great shaker sound too!

The bottom right tag was cut from an Infinity Tree die set.  I sponged the edges with some white ink and punched a hole at the top to make it a tag.  That cute little truck is from the Inky Stamper Vintage Truck set that I colored and cut out with the coordinating dies.  I used a fun Lawn Fawn road die to place him over and then stamped the sentiment from the stamp set with white ink.  I also added some snowflake sequins above him with the Icicles sequins mix.  And both blue and red Doodlebug Twine was used for two of the tags.  The other ribbons/cord from my stash.

  • Thanks so much for stopping in today!  Hope you’ve been inspired and enjoying the Season!

Challenges:

  1. Country View – Christmas
  2. Ally’s Angels – Anything Goes
  3. Cupcake Inspirations – Happy Holidays
  4. Pammie’s Inky Pinkies – Anything Goes
  5. Simon Says Stamp Mon – Tag It
  6. Tag Tuesday – Winter Holidays
  7. Crafter’s Café – Anything Goes

Friendly SWAPs

Hello friends!  The weather has been really nice over my way so I’ve been taking advantage of it by enjoying the outdoors before it starts changing into more chilly temperatures.  All of the prize winners have contacted me and the packages have all been sent out.  I have received notice that the U.S. winners have gotten their packages and hopefully the overseas will be arriving soon.  My thoughts are also with those that were affected from Storm Ian and hope for healing and recovery as soon as possible.

Although it’s been a while since I last posted, I have been working on some things for SWAPs and a few other cards that I had created as well to share with you.

  • please click on the photos below to see them close-up

Within a FB Group that I’m in, we could choose to join an ATC SWAP with the theme of “Friendship” and these are the cards that I had created.  I swapped with two others and then kept one set of three for myself.  I was excited because this is the first ATCs I’ve sent overseas and really enjoyed making the collection.  I thought the butterfly theme with similar colors would work keeping the “Friendship” in mind… 

And then below are the set of ATCs I’ve received from my SWAP partners in return.  The first lady sent her ATCs from Australia and the other lady was from the UK I believe.  Love them and was excited to receive them to add to my book.

I was also involved in another “Stamped Sampler SWAP” making those squares like I had done with my Summer one if you remember that with my friends Patti, Shirley and Donna.  This time our squares were the theme of Autumn/Fall using the Stampin’ Up! colors Pumpkin Pie and Mossy Meadow.  It’s so fun to see them come in and then put it all together in the frame!  Here’s how mine finished out:

For my Sampler frame, I used some different colored woodgrain pattern paper to attach the squares to and this frame is a bit different than my Summer Sampler (Check it out in THIS POST if you want to see that one.)  It can stand on a table surface or you can hang it up.  I also decided to add a burlap bow at the top of the frame using a hot glue gun.

This is the Sampler Square that I had made using the adorable fox from the Taylored Expressions Woodland Squad Die & Clear Stamp Combo set.  The background was stamped with the TE Four Seasons Stamp & Stencil Combo set using ONLY the background stamp in one color.  I then using some gold acrylic paint to splatter over it.  I also added a twine bow to the fox.  I believe we’re going to be doing another one for Winter too…stay tuned!

My friend Patti had also sent me an extra card kit from one of her classes along with her SWAP square, which I thought was so nice…so I had some fun putting it together as I don’t have this set which I believe is a Stampin’ Up! one.

The card kit had all of the pieces in it along with the stamped birds cut out, the stamped branches and sentiments (even on the included envelope) along with cut glitter clouds and flowers!  There was a sheet with photo and instructions so I just followed along except I die cut some leaves for the branches from a piece of scrap green paper I had.  Now I have a cute little birthday card ready to send out, so thank you for the fun Patti!😉

And speaking of birds and Stampin’ Up!, I had to make a sympathy card for someone that lost their pet bird.  I was looking through my stash and found an older Stampin’ Up! set with a bird silhouette which I thought would be good for a sympathy card like this.  I was inspired to pull out more of my older Stampin’ Up! stash to use so I used some old punches, ribbon and paper for my card as well.

I hope you’ve enjoyed the inspiration today and I thank you so much for stopping in!  If you have any questions about my post, please let me know.  Have a great day and see you soon!

Challenges:

  1. Lil’ Patch of Crafty Friends – Anything Goes (Bird sympathy card)
  2. The Corrosive – Anything Goes (Butterfly ATCs)
  3. Crafty Animals – Anything Goes + animal (Fox Square and/or Bird sympathy card)
  4. Fab ‘N’ Funky – Embossing wet/dry (Bird sympathy card)
  5. Creative Knockouts – Anything Goes (Butterfly ATCs)
  6. Sweet Stampin’ – Anything Goes EXCEPT birthday (Bird sympathy card)
  7. Ally’s Angels – Anything Goes (Butterfly ATCs)

WINNERS of the TE Background stamps!

Hello friends!  It has been while since my last posting, but was having some back issues and hobbling around a bit which is never a fun thing to deal with, but I’m getting a bit better day by day.  Hoping to get back to doing some crafting soon!  I’m going to be working on an AJ page for tomorrow’s post…so stay tuned!

I realized that my giveaway had ended and I needed to pull some winners of the Taylored Expressions background stamps for 4 people!😀  So the way I drew out the names, I did sort of “old school” by printing out the names of everyone according to which stamp or stamps that were indicated via comments from the GIVEAWAY POST.  So if you were only interested in one of the stamps, your name only went in the draw for just that particular stamp.  If you indicated that you were interested in all of them, then your name went in for each one.  I cut the names in strips, wadded them up and had my husband hand-pick out a name strip for each stamp.  If there was a duplicated name, I would’ve had him draw another, but there was not any duplicates.  Here are the winners for each stamp……..

stampedsmiles.com giveaway Daisies For Days Winner 1stampedsmiles.com giveaway Daisies For Days Winner 2stampedsmiles.com giveaway Goodhearted Winnerstampedsmiles.com giveaway Winter Village Winner  

WOOO-HOOO!!🥳🎈  CONGRATULATIONS TO ALL OF THE FOUR WINNERS!!!

If you are one of the winners above, please be sure to CONTACT ME via the form and share your snail mail address with me so that I can promptly mail out your stamp package to you! (I will also try contacting you myself to let you know you were a winner as well.)  I would appreciate you contacting me as soon as you can so I can get your stamp to you.  If I don’t hear from you within 2-3 weeks, then I will try to draw another winner to claim it.

I’m very sorry if you were not a winner THIS time, (blame my husband!😁) but you never know when I’ll have “extra duplicates” in my craft room that I’d like to share with a fellow friend!  Thank you for your kind support!  Happy crafting!🤗

Gettin’ My Halloween On + GIVE AWAY!

Hello friends!  It’s been a minute or two since my last posting as I had been sick and then totally lost my “MOJO” during that point! So I was trying to get it going again with a few Halloween projects!  I have been playing with some new Taylored Expressions goodies and I thought it would be fun to give away some TE stuff as well!😀  Stay tuned to the end of this post!

  • click on the photos below to enlarge them if you’re on my website:

Now how cute are all of these critters, ghouls and creeps?!  As you may remember from my last post, I had been having so much fun creating with the Taylored Expressions Create-in-Quads stencils, so I had my play with the Halloween Create-in-Quads with the makes above!  I stenciled some black, candy corn, plum punch and lime zest colors, plus I went over the lime zest with some glow-in-the-dark glitter paste.  The stencil quads make two A2 sized backgrounds as well as the cat and witch cauldron too!  There is also coordinating dies to cut out the cat and witch that I used to cut out for the second set of cards.  For all of the cards, I’ve used the TE Frame in Frame 3 dies (free from an order a while back) that was cut with some black cardstock. I’ve also used the TE Simple Strips-Halloween stamped and heat embossed with some black glitter EP and cut out with the TE Asymmetrical Simple Strips Die for each card.

The set of cards on the left were created with the stenciled backgrounds and then with the black frames, I’ve added a character from a “free with purchase” Gus & Gertie Halloween stamp set.  The bird saying “boo” is in a bat costume. 😅 I popped up the sentiment strip, bird and dog with foam tape.  I die cut the “boo” sentiment with a speech bubble die from my stash.  The ghoul card was made with the awesome TE Monster Squad die set.  I placed a piece of vellum behind the black frame, so the ghoul stood out a bit more, die cut my pieces as I wanted and attached it right above the sentiment strip.  I added a green googly eye as well as a few die cut stars from silver metallic cardstock.

The set of cards on the right was put together with a couple of different unique backgrounds. On the black cat card, I used the TE Superstar Rotating Stencil and stenciled once with candy corn and only rotated once using the glow-in-the-dark glitter paste again.  I finished it by splattering black and white paint over it.  Topped it off with the black frame, the kitty and sentiment strip.  I also used some Cosmic Drip Drops for kitty’s eyes. (These were also used on the bows of the witch’s shoes too!)  For the witch background, I silver foiled one of the TE Foil It-Spiderweb panels and then ink blended some grey ink over a couple of the webs.  I then added the black frame, the witch and the sentiment strip. Lastly, I added a couple of spiders cut out with the TE Little Bits-Spiders die set.

These ghosts make me smile every time I see them with those faces! 👻 For these set of cards, I pulled out the TE G-G-G-Ghost Stamp & Stencil Combo.  I didn’t used any TE inks but pulled out my oxide inks for an ombre looking color to make these different backgrounds. The stencil was used for the faces by heat embossing some black glitter EP over VersaMark ink through the stencil. The purple is A2 sized and the set of cards on the right as mini slim cards.  I continued using my sentiment strips that were previously used on the card sets above, but with these I’ve added a black layer that I just cut from cardstock.  I’ve also used TE Ghost Gang Die & Clear Combo set to cut out the ghosts popped up around the sentiments and stamped their faces. 

For the purple ghost card, I used the silver foil negative from the “witch spiderweb background” card and foiled a cut out TE On the Block-Boo Shadow die which was popped up with several layers of die cut black ones.  I popped up the die cut ghost over the foiled “boo” as well as the sentiment strips.

For the set of mini slim cards, I did pretty much the same style as the purple, but for the “boo” sentiment I used the TE Boo Script + Backer and die cut 2 of the sentiments with black cardstock and then heat embossed it with the black glitter EP.  I placed it over the vellum die cut backer and attached to the card front.  I popped up the ghosts and the sentiment strips with foam tape.


**GIVE AWAY!!!**

(CLOSED)

So, because I’ve placed some TE orders, I have gotten multiple sets (duplicates) of goodies!!  If you or someone you know would like to get one of these stamp sets, please let me know in the comments below! (Which one(s) you want!)  I have FOUR large rubber stamps to give away!!  Check it out….

  • Click on each photo below to enlarge if you’re on my website!

These are all background A2 sized rubber stamps. The last stamp photographed is “Winter Village Background” which measures approx. 6.25″ x 2.5″ in size. I have TWO of the “Daises for Days” to give out.  (See the photo where it shows the clear stamp set included for stamping the flower centers.)  The “Good Hearted Background” stamp is perfect for almost any occasion just by adding a quick sentiment with it!  I also have a little “extra” to go along with each one of these to accompany the package too! 

  • If you click on the names in orange above, you can see some examples using them on the TE website for ideas!

Just leave me a comment below if you’re interested in my give away and tell me which one(s) you’re interested in by September 22nd, 2022 which is the first day of Fall for us here in the U.S.  This will give everyone time to see the post and tell a friend that might be interested too! – CLOSED!!!


Thanks so much for stopping by and sharing your support and inspiration with me as it helps keep me going! 😉

Challenges:

  1.  This is Halloween – Anything Goes Halloween/Gothic
  2. Two Old Bats – Anything Goes Halloween
  3. Crafty Animals – Anything Goes + animal
  4. Show Us Your Pussycats – Anything with kitty
  5. 613 Avenue Create – Anything Goes
  6. Through the Craftroom Door – Anything Goes
  7. Lil’ Patch of Crafty Friends – Anything Goes
  8. The Corrosive – Anything Goes
  9. Arty Divas – Anything Goes

Some Summer Session Sets

Happy August friends!  This Summer has really flown right by me this year, how about you?  Before you know it we’ll be getting ready for all things Fall…which is my favorite time of the year!🍂  I haven’t been feeling well for the last several days and haven’t done much crafting, but I do have some sets of cards that I’ve made sometime during these Summer months, but haven’t posted, so I’d like to share them with you today.

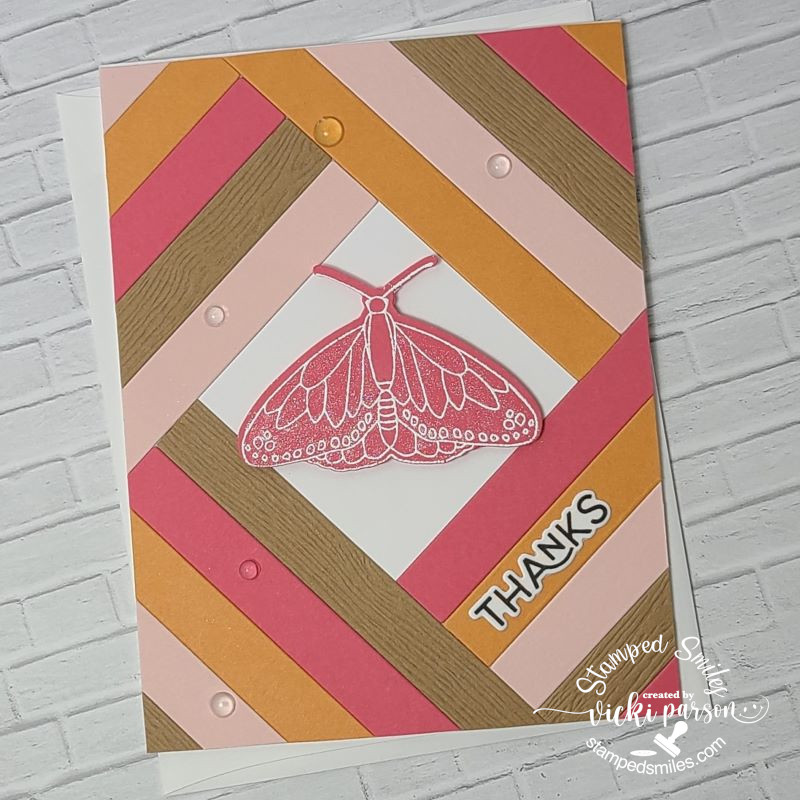
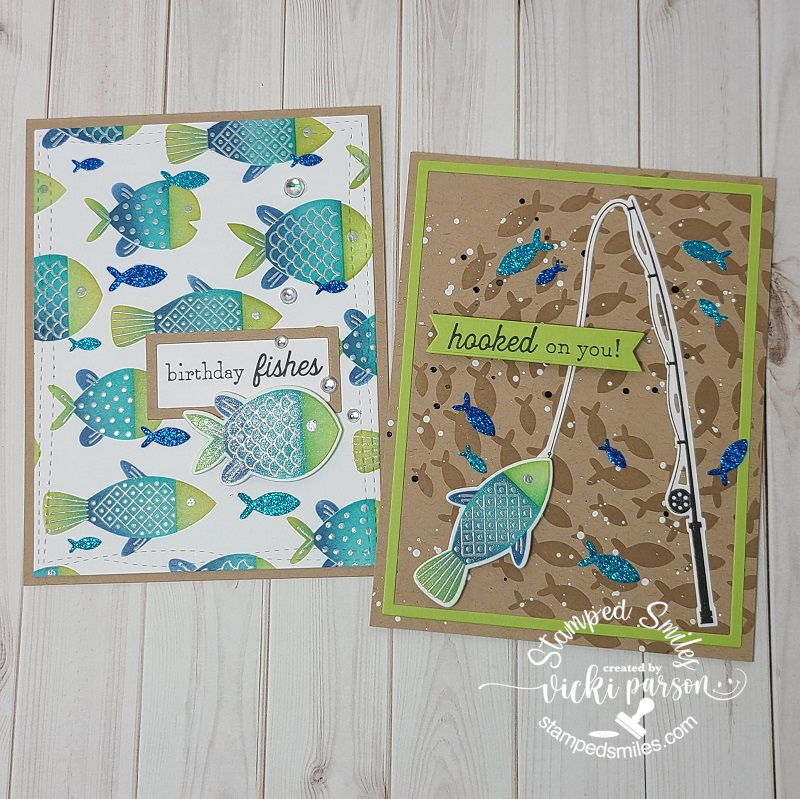
Taylored Expression had released an adorable collection of fish themed products this Summer that I thought would be so fun for several different occasions, and not just for those that like to fish, but for anyone for any occasion too!

The first white background card on the left was created with the TE Hook, Line & Sinker Stamp & Stencil Combo.  The stencil is really nice to create different effects in an easy way without lots of coloring. I like that the TE Hook, Line & Sinker Dies cut out some of the mass-produced stenciled fish background too!  (I saved one for the other card as well and still had a few more left over for another project.)  After I created a couple of the stenciled fish backgrounds, I cut out a panel with a wonky stitched rectangle die and placed it over a Kraft A2 card base.  I added some TE Drip Drops for the “bubbles” on the extra fish and you can see that I’ve covered the body of this fish with a glitter brush pen.

The second card on the right was created with the TE Just Keep Swimming Stencil with Toffee Ink color for a watermark look.  I splattered some white and black paint over the background.  The fishing pool as well as the sentiments for both cards came from the TE Reely Great Stamp & Die Combo.  (It includes the fishing pool die cut with it.)  You will also notice the tiny little sparkly fish on both of the cards which were cut from the TE Little Bits-Fish die with some blue and turquoise glitter cardstock.  The ‘frame’ around the sentiment on the first card as well as the green frame for the second card were extra pieces in my stash previously cut out with the TE A2 Thin Frame Cutting Plate. (I save the extras to use for other projects.)  

Of course, I didn’t “invent the wheel” on these as it was simple by following along with the TE “Hugs & Fishes Craft-a-Long Class” which I got for free with my stamp/combo purchase when it came out. I tweaked it slightly, but sometimes it’s nice to just create and follow along without having to think about what to do with it. 😁 


This next set of cards was actually pretty fun and easy to put together:

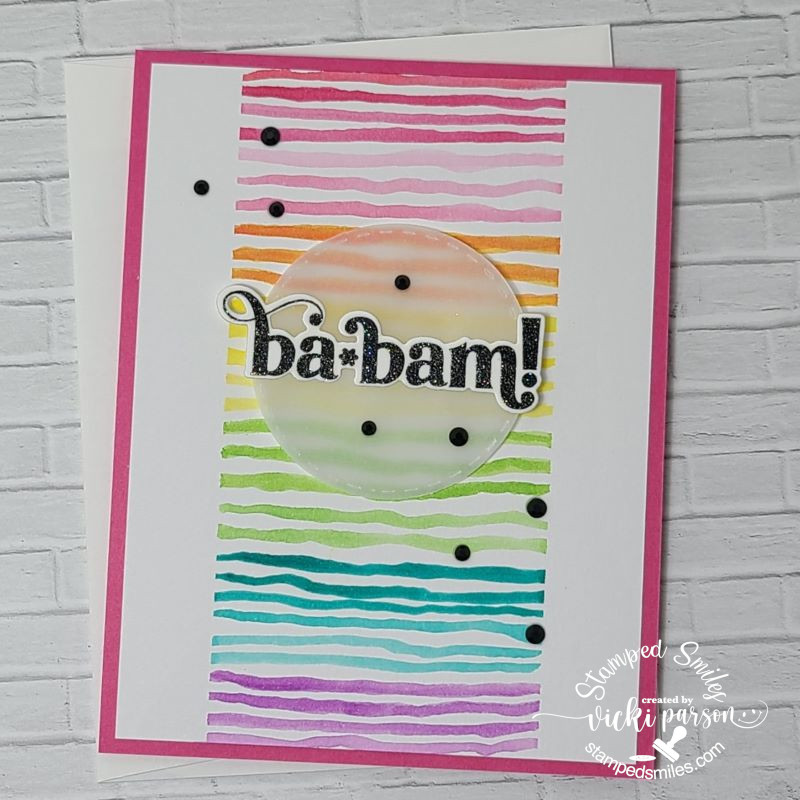
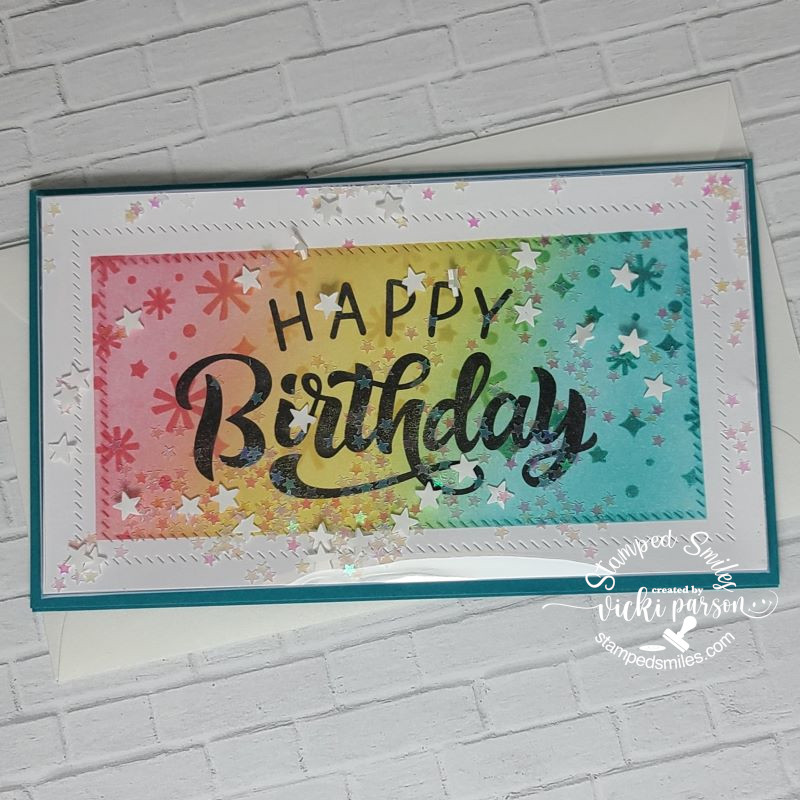
Continuing on with more Taylored Expressions products, I’ve used the TE Create-in-Quads Hexagon Layering Stencil Set.  Taylor had recently come with this series sometime last year I believe, and they seem to go over pretty well.  (I think I had previously made Christmas cards and some Mother’s Day type of cards earlier this Spring with other “Create-in-Quads” sets.)  It seems like a lot, but when you see how easy it is to knock out four cards at once…which I did with Christmas last year…it’s such a time saver with wonderful results!

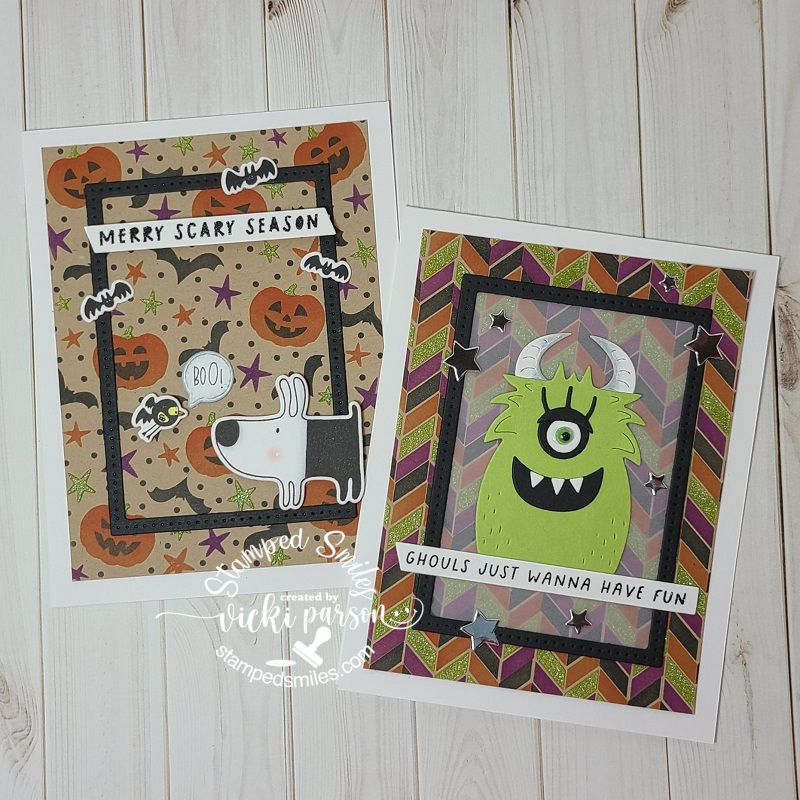
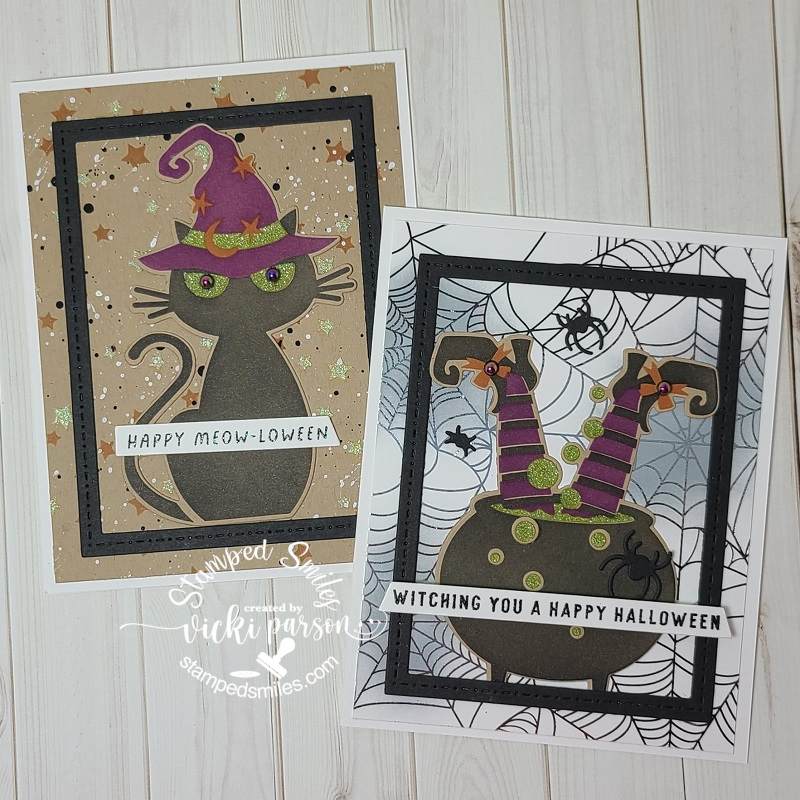
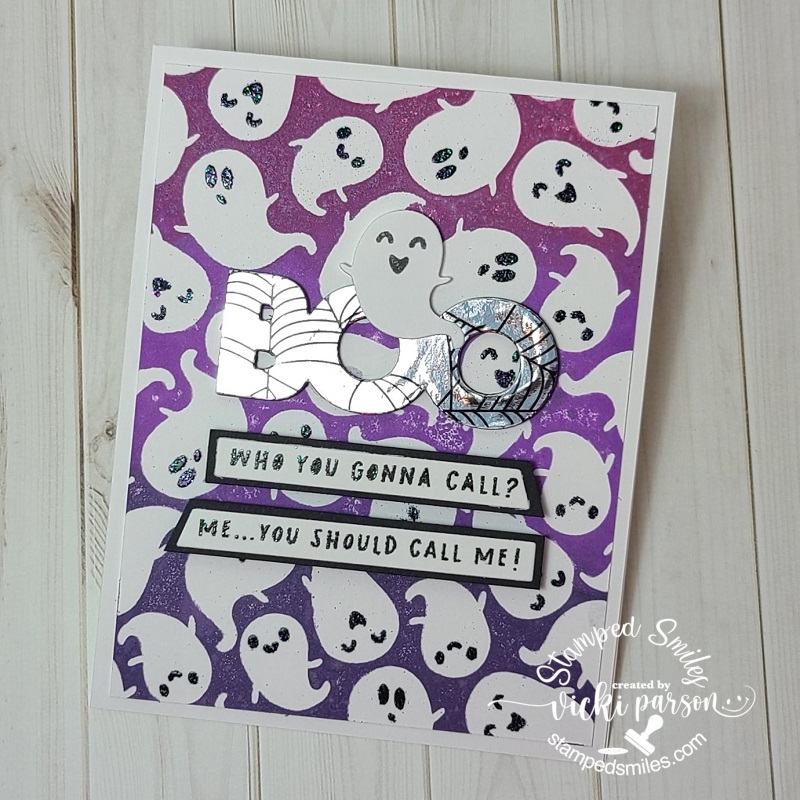
All of these cards were finished off with the TE Oh No You Didn’t stamp set & dies (love this set)! A couple of the cards use the TE Simple Strips-Snarky stamp set that were white heat embossed and cut out.  The other cards have sentiments that were foiled from the TE Simple Strips In Reverse-Everyday Occasions and die cut.  And of course, I didn’t want to waste too much of the foiled panels, so I again took my TE A2 Thin Frame Cutting Plate to cut a couple of the frames with it.  I also stamped out a couple of extra stars here and there from another TE stamp set, but I can’t remember which one I used. (I think it was from a previous card kit I have that’s no longer available…but any star will do!)

And again, no need to reinvent the wheel as I believe this was another class I received for free from a purchase.  You can check out the Create-in-Quads Hexagon Craft-a-Long Class if you’re interested in it.  I think I changed up the colors and details a bit for mine, but very similar in style.

**👀 Be on the look-out for another TE project set from me using another Create-in-Quads I recently got and can’t wait to use!  I’m also going to have some things to give away too!  STAY TUNED!!!


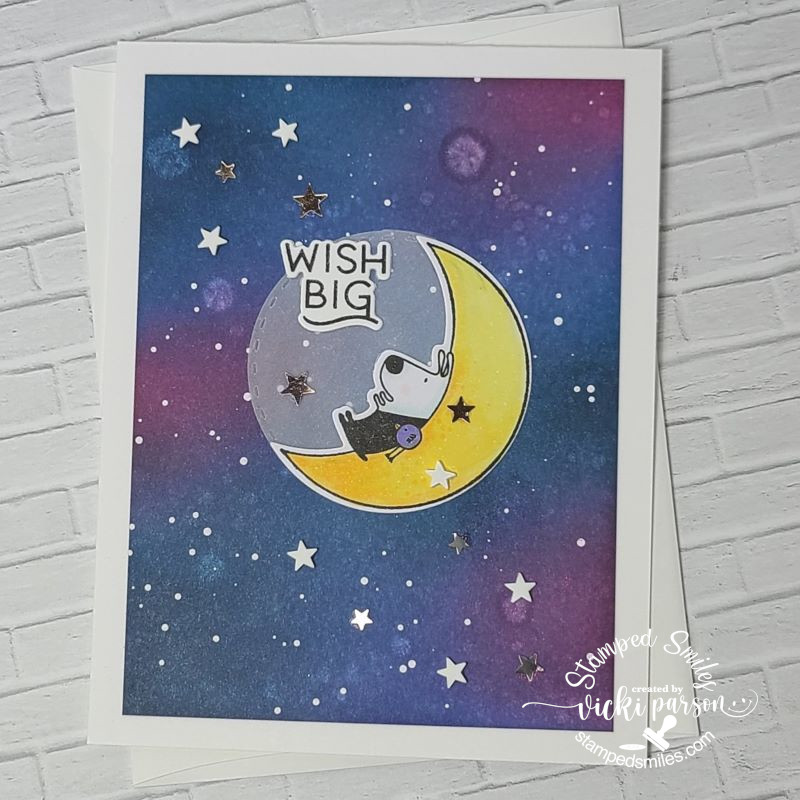
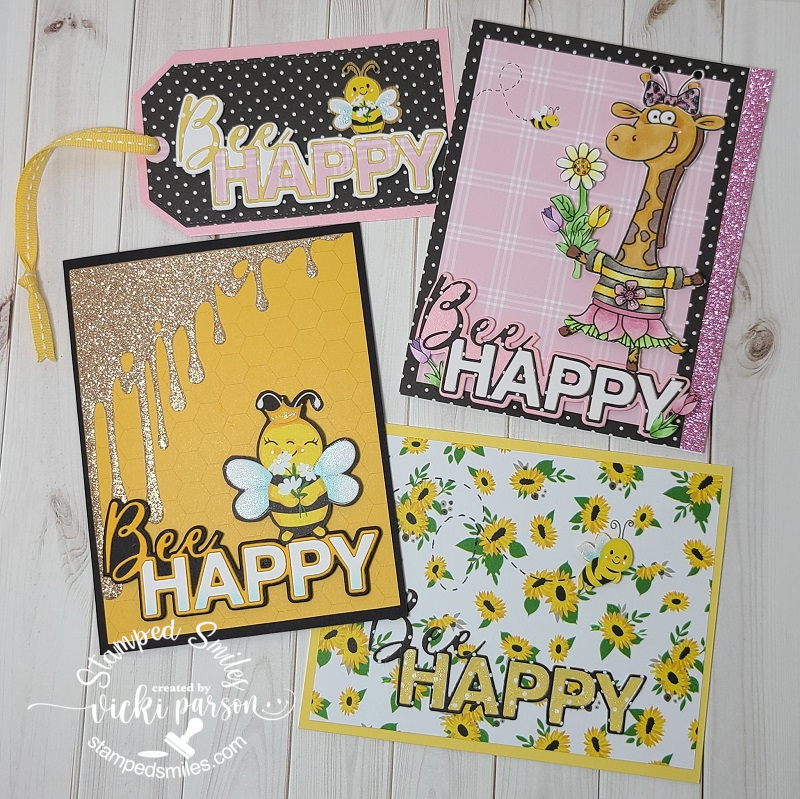
I had also attended a class from Riley and Company sometime this Summer as well:

I have loved that little Riley moose character for years, but Tanya (owner) does several of these on-line class events and she comes out with some really cute class kits.  This kit had everything you need to make the projects and this one also included the sentiment die as well as a full 6×6 packet of papers in the coordinating theme.

For my projects, the giraffe was the only pre-cut image to color.  All of the other bee images came from the papers that were included with the kit that you were to fussy cut from.  Since the sentiment die was also included, I die cut all of those pieces for my card too.  I decided to step-up my cards with some glitter cardstock along the edge of the giraffe card and then I die cut the “gold glitter honey drip” on that card from the Riley and Company Corner Goo Die.  I also added little details like the “flying trail” of the bee with a marker and using a glitter brush pen on the bee wings.

Hope you’ve enjoyed my Summer Session Sets today and have been inspired or brought a smile!  Thank you so kindly for your time to stop in and have a look!  I really appreciate it!

Challenges:

  1. Pearly Sparkles – Anything Goes
  2. Moving Along With the Times – Anything Goes
  3. Pammie’s Inky Pinkies – Anything Goes
  4. Addicted to Stamps & More – Die Cuts and/or Stencils (I’ve used both!)ATSM die cut stencils
  5. Happy Little Stampers – Anything Goes With Dies challengeimage
  6. Crafty Calendar – Anything Goes
  7. Creative Inspirations – Anything Goes