Time to Get Your Grumpy On!

Hey there friends!  Hope you’re having a wonderful week so far!  We’re getting closer and closer to Halloween already!🎃  I haven’t made as many Halloween makes as I usually do, but as the day gets closer I’ve been more in the mood to pull out some things to have fun with my stash and my thoughts turned to “Grumpy”.

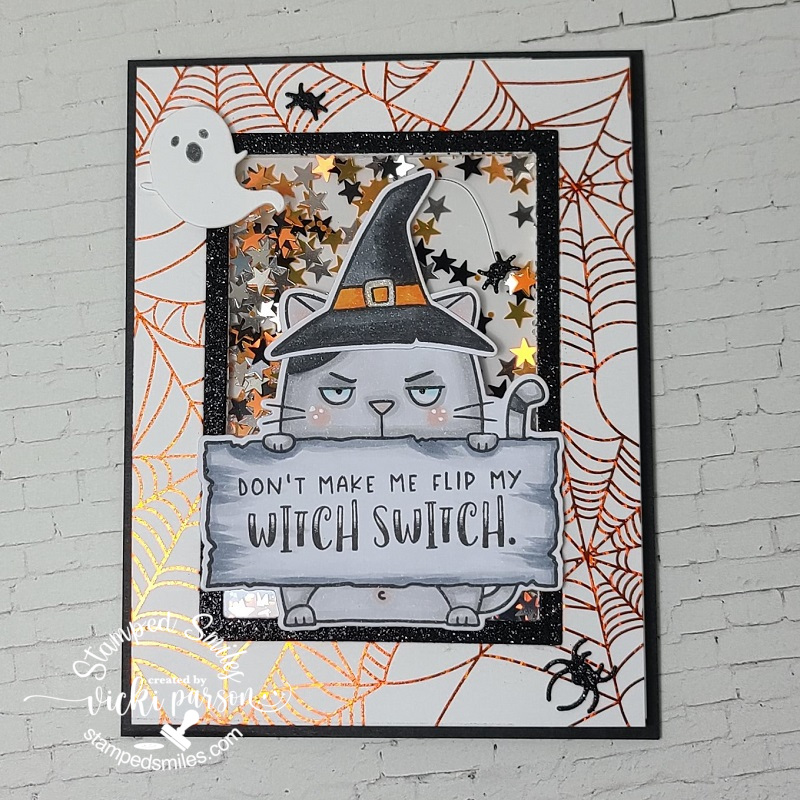
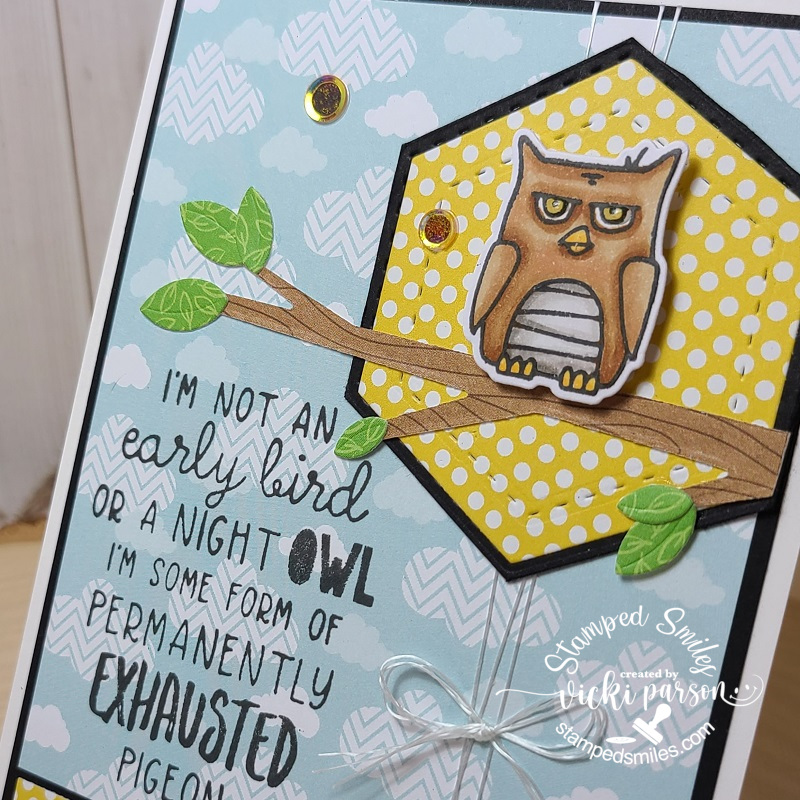
If you’re not familiar with “Grumpy”, this is the Big Grumpy Cat from Taylored Expressions.  I absolutely love the “Grumpy” and “Grumplings” line and I don’t pull them out as much as I’d like to.  Since it’s closer to Halloween, I’ve also pulled out the Big Grumpy-Halloween accessory set to go along with him too! (The only thing I used from this set was the witch hat and the sentiment.)  I’ve stamped, colored and cut out each of these items for my card.

The #TEMakerChallenge has the theme this month of using Oreo & Sugar Cube with the option of adding any other pop of color.  I’ve decided to pop in an orange color for mine.  The theme was also “Sparkle & Shine” through foiling, heat-embossing, glitter paste or sparkly cardstock.  

So, for the “Sparkle & Shine” I’ve taken a Foil-It Spiderweb panel and foiled some orange Deco Foil over it.  I then took one of the Frame in Frame 3 dies to cut out the middle of this panel, added some acetate over the opening and made it into a shaker panel.  I die cut the same frame as well as the Little Bits-Spiders die from some black Glitter Cardstock.  I attached these pieces onto the web panel along with adding the Grumpy Cat with his hat string and extra spider attached to him over the acetate.  I attached double-sided foam around the opening and added some “shaker stars” in the colors orange, black and silver.  And lastly, I thought it would be fun to pop up a left-over ghost I had from a previous project at the top!  (I think the ghost is in fear of the “witch switch”!) 😂

  • I also have another “grumpy” card to share…

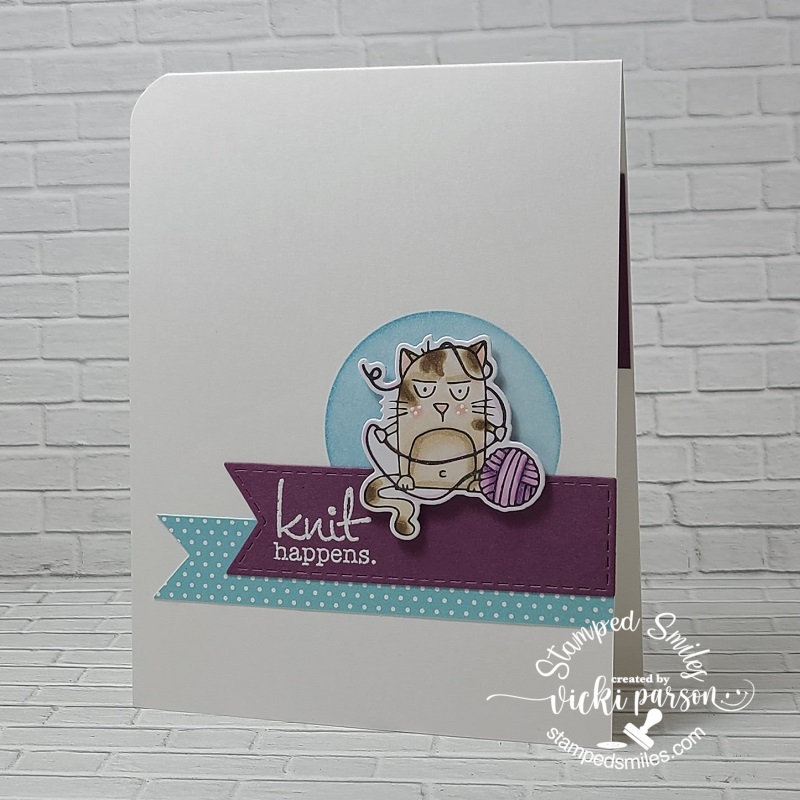
So this card was made to send a smile to a friend.  I’ve used a cat for this one as well from the Taylored Expressions “Grouchy Grumplings” set which I don’t believe is available in the store any longer.

I kept it a simple card by stamping, coloring and cutting out the grumpy.  I ink blended a circle that fit him with blue ink, white heat embossed the sentiment and cut it out from the TE Stitched Banner Stacklets. I popped grumpy with foam tape over the sentiment banner and circle.  I also used some TE decorative papers from my stash and cut out a banner with it using my scissors.  A corner chomper was used to round the top left corner of the card to finish it off.

I hope you’ve enjoyed my “Grumpy” projects today and have been inspired in some way!  Really appreciate you stopping in!

Challenges: (Top card only)

  1. Country View – Halloween or Harvest
  2. Craft Rocket – Autumn/Halloween
  3. Crafting Happiness – Halloween
  4. Aud Sentiments – Halloween/Fall + Sentiment
  5. Crafty Gals Corner – Halloween Colors
  6. Colour Crazy Craft – Anything Goes + coloring
  7. Allsorts – Add a Sentiment
  8. Pammie’s Inky Pinkies – Anything Goes
  9. Double D – Orange & Black

Massive Mass Producing!

Hello friends!  I hope that you are having a great week so far!  After the little “heat wave” hit us, I’ve been enjoying some ‘nicer’ outdoor temperatures, finally.  As you may have read in a previous post, I had been working on my son’s wedding invites as well as some thank you cards for them to send out afterwards.  I will be sharing that later on, but today I have some other “mass production” that I’ve been working on in addition to those:

First up, I’d like to share a set of cards I’ve made for the Taylored Expressions Fans FB Group challenge for May which calls for “4-8 mass-produced cards. (similar or identical)” & the colors “Poblano Pepper with Confetti Cake“.  I do not own the Poblano Pepper, but I do have a small cube of Confetti Cake ink.

I’ve been wanting to create several sympathy cards so that I had them on hand instead of making at the last minute for one, so I was happy to get these made.  I decided it was just easier to make them identical so that I didn’t have to decide how to arrange or cut my papers, etc.  I’ve used the Taylored Expressions Diamond Botanicals with dies as well as the TE Diamonds Masking Stencils for the main image.  The background uses the TE Pierced Lattice Cutting Plate over a piece of Toffee cardstock.

Here’s a close-up look at one of the cards.  I stamped the floral image in black ink as well as the sentiment from the stamp set and then took one of the Diamonds masking stencils with some Confetti Cake Ink to softly blend around the edges of the sentiment area with it.  I also used a blender brush to blend around the edges of the cut Toffee layer too.

Since I only had the Confetti Cake ink color, I matched up the coordinating colors with my Copic markers and colored in the image using only those color tones.  I think it worked out great for sympathy cards.  After I colored up the images, I used the coordinating die cut and popped it up over the Toffee cut panels with foam tape squares and then layered it over a side folding white A2 card base.  I finished each one with some of those coordinating TE Pastel Tiny Diamonds.  (Although the suggested listed coordinating colors on the website don’t have the Poblano Pepper or Confetti Cake, I thought it matched up rather nicely to this anyway.)  I think these cards work out great for mailing too.


And speaking of sympathy cards and Taylored Expressions, I thought it would be great to create a nice gift set too:

If you remember one of my previous posts, you may remember where I created a greeting card gift set (CLICK HERE).  I’ve went along with the same idea here and made them all sympathy related cards using my own acetate box and some Taylored Expressions products.  These were all quick and easy to pull together using the Taylored Expressions Done for You Alcohol Ink Background Panels along with a previously released card kit stamp set/die.

I decided to heat emboss several of the fern images with white, gold and silver over a few of the panels, some over white and vellum and then cut out.  I placed them along with the heat embossed sentiments cut out and arranged them over the panels.  I matched up the cardstock that I had from my stash with the panels to create the completed cards.

Here’s a gallery of a few of the cards up close along with the finished gift box tied with a ribbon: (Just click on each photo from my website to see them enlarged.)

I think this will make a nice gift for someone as I always hear people saying they never have a sympathy card on hand when they need one or for those people that don’t make their own cards too.


And lastly, I’ve made a couple sets of mini slimline style cards using the Taylored Expressions In the Garden-Triple Slim Layering Stencil:

I quickly fell in love with this quad type of stencils especially with these gorgeous florals!  I love the way these floral panels are different from one another, and you can stencil them all up with the same color in one pass!  I needed a couple of Mother’s Day cards, so making all of these at once sure came in handy for bonuses too!

Using the “craft-along” video from Taylor and Heather, I used the same, or similar colors that was used, added my black splatters and then used the TE On Occasion with dies as well as the TE Get the Word Out-Mother’s Day with dies for the sentiments where I white heat embossed over black cardstock and cut out.  I just glued to the panels and attached each panel to a white mini slimline card base.

And then here’s another set of mini slimline cards using the same products as above except I used Toffee instead of the white cardstock for these.  I also stamped the sentiment with dark brown ink over white cardstock and then cut them out to place over the stenciled panels. 

I also used both dark brown and white paint to make the splatters over these.  I also used the TE mini slimline stitched and scallop die cuts for these cards and then layered them over top of a Toffee mini slimline card base.  I’ve also added a few TE white rhinestones for a bit of sparkle too.

I also think that these would make great greeting card gift sets as well!  So, then it’s just a matter of which ones to keep and which ones to give away as a gift!?🤔

Hope you’ve enjoyed my mass production post today or have been inspired in some way.  Thank you so much for taking the time to drop in and say hi as I enjoy hearing from you!

Challenges:

  1. Creative Friday – No patterned paper (top set of cards only)
  2. Colour Crazy Craft – Anything Goes with coloring (top set of cards only)
  3. Creative Fingers – Anything Goes
  4. Sparkles Monthly – Floral Frenzy
  5. Lil Patch of Crafty Friends – Anything Goes
  6. Pammie’s Inky Pinkies – Anything Goes
  7. Stamping Sensations – Anything Goes optional: Flowers/Fauna

Hopping By For an Easter Hi

Hello friends!  I don’t make too many Easter cards, but I sure do love those cute bunnies, the Spring theme and of course who doesn’t love a good chocolate candy or two?!  I’ve been seeing some bunnies hopping around my yard lately and so they’ve inspired me!  Since the month of March is starting to run away from me, I wanted to participate in a few challenges going on.

This cute little bunny waving out his hand to say “hello” is Bunny from Inky Stamper!  He comes with the bow tie I have colored and popped up with foam tape.  He also comes with the sentiment as well as the smaller egg hiding among the grass.  Such a CUTE stamp set not just for Easter, but other occasions too!

For the Inky Stamper Inkspiration FB Group, the challenge for the month of March is “stitching” and it can be any sort of stitching.  I’ve pulled out some Doodlebug Swiss Dot papers along with a special Doodlebug Cute & Crafty paper pad (used for the large egg) to create my scene.

I’ve used lots of fun stitched style dies to help me out including the stitched hexagon die from the Inky Stamper Mini Envie Die set you see at the top to create a border. I’ve also used the Taylored Expressions Stitched With Love Cutting Plate over my stitched oval piece. (You will see this same cutting plate in the card below too.)  I’ve also used some stitched cloud dies from Lawn Fawn.  I’ve also used a grass border die for the bunny to stand on too.

Once I’ve die cut and placed all of my images and die cut pieces together on my card front, I took a black marker and a white gel pen to create stitch lines for the challenge theme as well.  I even added stitch marks to the small egg and the bunny’s bow tie.  The sentiment was white heat embossed over a black strip and attached to the large oval “egg” and I’ve added some glossy accents to the bunny’s eyes.  I think he turned out pretty cute!

This card was made for the #TEMaker challenge in the Taylored Expressions FB Fan Group.  The challenge for March is using the colors Lavender Glaze & Potato Chip and/or Easter Parade (Easter/Spring theme).  There are SO MANY cute Easter products, but I was trying to use some things that I haven’t pulled out yet.

As in the card above, I’ve used the TE Stitched With Love Cutting Plate over a piece of Toffee cardstock.  I used a double stitched circle die to cut it out along with another piece of white cardstock to layer behind the Toffee.

The center of the circle was made by taking the Lavender Glaze and Potato Chip cardstock and using the Easy Strips 1/4″ die and layering them over a double adhesive sheet.  Once I’ve cut it down to size, I attached it over the white A2 top folding card base and stamped the Full Circle -Easter stamp in Toffee ink.  I took a white pencil to color in portions of the images within it.

I then used foam tape to pop up the toffee layer over top centering the circle image through it.  I white heat embossed the sentiment from the stamp set and die cut from a banner die in my stash and popped it up over the center of the circle image.  I also die cut a Lavender Glaze frame from the TE A2 Think Frame Cutting Plate and attached to the card along with a little white bunny from the TE Little Bits-Oh Hoppy Day die set. I sponged some brown ink around the edges and glued a white pom pom for his tail and attached him right above the frame on the right bottom of the card.

It looks like he’s getting ready to hop into the hole to join his other Spring friends.

Well, I HOP you’ve enjoyed my Easter cards today, or at least gotten a smile or been inspired in some way!  Thanks so much for taking the time to stop in as I enjoy hearing from you!

Challenges:

  1. Cardz 4 Guyz – Equinox Seasonal Change-Spring
  2. CRAFT – Anything Goes
  3. Colour Crazy Craft – Anything Goes with Colored image (top card)
  4. Crafty Catz – Anything Goes Optional Easter
  5. Pammie’s Inky Pinkies – Anything Goes
  6. A Bit More Time To Craft – Anything Goes

Donut You Want a Sweet Birthday!?🍩

Hello friends and happy Friday!  Wishing you a wonderful weekend ahead as we head into Valentine’s Day on Monday!  With this holiday, I’m always reminded by the sweet treats and memories of my children passing out their Valentines, making special boxes to hold them in and classroom parties with lots of goodies!  I thought it would be fun to incorporate those thoughts into a fun birthday set and a small treat with NO ‘REAL’ SUGAR ADDED!

I can never turn down a good donut, how about you?  I had so much fun creating this set with the Taylored Expressions Donut Days Cling & Clear Combo and decorating them!  This was created with the February #TEMakerChallenge color combo and theme in mind when putting the set together.  I’ve used both the TE Spearmint & Peaches ‘N Cream ink and cardstock for these.  I’ve added some Chocolate Truffle, Toffee and White EP as well.

To create the “donut box” on the card, I’ve stamped the TE Argyle stamp only without using the stencils and then I’ve cut it out with the TE Box Top Stacklets die to give the frame look for the donuts to be placed in!  (Note the small treat container was decorated on the front with the left-over middle piece from the frame…so save everything!)  I then took the stamped frame and ran the TE Pierced Lattice Cutting Plate over it for an added design.  To assemble the box of donuts, I took a piece of tissue paper, crumpled it up and glued the decorated donuts together over it.  The back of the frame with foam tape was then centered over the donuts so it was popped up.  I ripped the excess tissue paper and attached the card together.  I used some of the TE Peaches ‘N Cream cardstock and white heat embossed the TE Mini Strips Donut Worry and cut them out with the TE Mini Strips die.

FOR THE TREAT HOLDER – 

I found this really fun video tutorial for a Hand Sanitizer PocketBac box container using my envelope punch board.  (CLICK NAME FOR THE TUTORIAL!)  I always love finding new ways to use a tool I have especially in a totally different way than what it was intended for!   I didn’t wrap decorative paper around mine like she did, but like I mentioned above, I saved the center of the cut-out frame and cut it down to size to decorate the front.  I took one of the sentiments and donuts left over from the card, wrapped some twine around it and tied it so the bow is centered inside the donut hole.

I do love me a good pun…so please feel free to pun away my friends!!😅 Maybe you can come up with a “hole in one”! 

I hope you’ve enjoyed my birthday sweet treats today and thanks so much for stopping in! 

Challenges:

  1. Penny’s Paper Crafty – Anything Goes using paper
  2. Watercooler Wednesday – Helen’s “All About Occasions” 
  3. Creative Fingers – Anything Goes
  4. River of Creativity – Anything Goes
  5. Crafty Calendar – Anything Goes
  6. Lil Patch of Crafty Friends – Anything Goes

Thank you to all of the wonderful challenge blogs and keeping them going!

Taylored Expressions Sept Birthday Challenges & Exciting News!🥳

Hello friends!  Happy Friday and are you ready for the weekend?  I’m supposed to be helping hubby with some outside work, but my allergies have been bad and I’m not feeling well.  Hopefully some medicine will be helping so we can get things finished up!

I have been a “grumpy” fan of Taylored Expressions for a few years as you might have seen in some of my past posts…so of course I get “pulled in” by other cute products too and that’s what happened…my story anyway!  In their FB fan group there is a monthly #TEmakerchallenge with prompts to follow as long as you use at least one of their products.  So I’ve made a fun card for this month I’d like to share:

Now how CUTE are these little critters?!  During TE’s Sept birthday month (13 years in business), they released a collection of birthday related items, and this is the introduction of “Chip & Charlie Party“!  I’m saying that Chip is the bird and Charlie is the raccoon…not sure, but that’s what I’m saying! LOL I’ve colored them up with Copic markers and added some shimmer to the balloon, party hats and cherry on cupcake with a glitter brush pen.  I’ve also added some highlights with a white gel pen.

I wanted something in the background, but not too distracting from the critters, so I stamped the Party Time background stamp in the same cardstock color (Cherry Pop) I then used the stencil from this combo set to white ink blend the tops of the hats.  The paper strip accents came from a TE paper pack I had in my stash.  I thought it needed an extra little image element on the front of the card, so I added some Doodlebug Twine and the party hat from Big Grumpy-Birthday, colored with Copics and popped up with foam tape on bottom corner. It was covered with a glitter brush pen, and I also added a Doodlebug Matte Sprinkle at the top of the party hat and in the center of the twine bow.

You might notice that the image panel is not completed adhered to the card front and there’s a score mark in the center as well.  So, I was going for something a bit different than a regular A2 birthday card…and the Sept challenge prompts are 1. Heat or non-heat embossing, 2. Napa Valley color quad and/or 3.  Something that begins with “E” You have to pick at least one of these along with a TE product.  So, for the “E” I’ve decided on making an Easel card…

So, when you open up the bottom flap, you place it behind the popped-up sentiment that was white heat embossed (also a challenge prompt) and cut out with the coordinating die from the “Get the Word Out-Celebrate” set.  I’ve also added some more of those yellow polka-dot papers and a thin strip of Cookie Monster cardstock which is what I used to mat behind the image panel as well as for the sentiment.  There is still room to line the inside of the card with a special birthday message.

I hope you’ve enjoyed my card and please see at the end of this post for other challenges I’ve entered…PLUS a special birthday give away if you’re interested!

____________________________________________________________________________________________________________________

**Now for some EXCITING NEWS**

Taylored Expressions was holding a special set of birthday challenges this month in their FB fans group with certain prompts for each one.  There was a set of four different challenges, and I decided to make something for each challenge, and I ended up winning a future guest design spot for a future release!  WHAT?!  Taylor shared which one was her favorite I made in THIS FB ANNOUNCEMENT, but I will share all the creations I made here: (click on the photos to enlarge them if you are viewing them on my blog.)

I honestly wasn’t thinking about winning anything! I was basically just enjoying the process of creating and pulling out some stash that I hadn’t yet used and wanted to use so I thought I’d just play along.  I was very surprised to see that I was picked as a winner!  Very humbled and honored by that!  So be watching for an upcoming GDT post!

I have actually joined several of Taylor’s classes, virtual events, etc. and have made many cool things during the time that I wasn’t blogging, so I never shared them… but like I said, I’ve been creating and having fun!  I do remember something fun she taught in a virtual event from July I was a part of that was Halloween themed, so I’ll have to pull those cards out soon as well since the time is coming up and I do love me some Halloween! 🎃

One last thing!  With all of the fun and exciting things going, I realized it’s my birthday month as well!  I’m not 13, but let’s just say a few years older!😁  So I think the best thing to do for my birthday is to give rather than receive!  If you feel the same and think someone would enjoy this little Taylored Expressions bundle that I have shown above in the photo, let me know!  If you’d like to gift this for yourself, let me know!  I would love to give someone these extra set of items already in my stash to someone!  There is a Banner Simple Strips die, a 3 piece balloon layering stencil with a clear stamp set combo, a Cupcake ink pad (unwrapped, but NOT used at all, I just noticed I already had one after unwrapping it!) and a tiny cake and celebrate stamp set all from Taylored Expressions and perfect for party making! (There may be a few other things added as well!)

**Please just leave me a comment that you are interested in the TE give away by October 10th, 2021 and I will be happy to pick someone to send it out to!**

Whew!  I think that’s about it!  Thank you for stopping by friends and enjoy your weekend!

I’d like to enter the top easel card ONLY in these challenges:

  1. Taylored Expressions FB Fans Group Sept #TEmakerchallenge – heat/dry embossing and easel card for something beginning with “E”
  2. Festive Friday – #FF0093 I used: balloons, red & twine
  3. Krafty Chicks – All Occasions (birthday)

Name That Bird!

Hey there friends!  Ever have one of those days where you were up late or you got up in the middle of the night and then realized you weren’t sure if you got any sleep at all?  Sometimes I have days and then forget to do something and then I’m thinking about it all night only to realize that I’ve spent my time thinking about it and not sleeping when I could’ve just got up and done it!😂

This post is sort of a representation of that issue!  Not only did I forget or run out of time to get my post ready, but it’s also THE last day of the month to get these projects finished for the challenges they were intended for!  Story of my life!

Vicki-TEpigeon

Oh my gosh this is too funny!!🤣  A few months back I had spent some time at the Taylored Expressions store and had a laugh at some of the sentiments that I didn’t realize were in the store and decided that they would make some great cards to send out and they go well with those Grumplings stamps too!  I also wanted to participate in the #TEMAKER challenge before it ends, so I enjoyed putting this one together!

Believe it or not, I had a sample of dental floss in my purse and decided to pull some out and use it for this card!  LOL!  It meets the challenge which is to use something from your purse or junk drawer!  I just tied it around the card front!  I used some dies from my stash for the tree branch and the hexagon shape.  The papers comes from Taylored Expressions along with the Grouchy Grumplings II stamp set (owl) that I cut out with the coordinating die and popped him up with foam tape over the branch.  The hilarious sentiment comes from the Pitch Black stamp set and I know I’ll be using some of those others on more cards soon!  Tee hee!  I also found some fun yellow sequins laying on my desk and added them to finish it off!

Vicki-TEpigeon-close

Here’s a closer view of the “bird” and how I’ve colored him up with my copic markers.  I’ve used the TE papers to cut out the pieces in the branch as well as the background and hexagon shapes.  If you look at the “bird’s” eyes, you can see where I’ve added some glossy accents.  He does look a bit tired!!

Vicki-TEpigeon-flat

The reason for the strip at the bottom actually came from a mistake in calculating measurements for my card panel, so I just added a strip that I cut out from the hexagon die and used it as part of the design.  Sometimes there are ways to fix mistakes, so never think you’ve ruined something!

I hope you’ve gotten a chuckle from my card today as it has made me laugh!!😆  Thanks so much for dropping in today as I really appreciate your support and thoughts here!

P.S.  I have been busy “behind the scenes” doing various different things and haven’t shared them as of yet in my posts, but here’s a little look at what I’ve been doing lately:

Vicki-DDSLadyinWaiting-colored1Vicki-DDS-New Little OnesVicki-DDSPrimrose-colored2Vicki-DDS-Sunflower DreamsVicki-DDS-WintertimePenguins

I also haven’t shared my latest masculine cards, so I’ll be sharing those soon as well as other things I’m working on too!  Just getting things sorted out and taking the time to do it is all!

Have a great day and I’ll be seeing you soon!

Challenges (for bird card):

  1.  Taylored Expressions – #TEMAKERCHALLENGE – hexagon, yellow & purse
  2. Simon Says Stamp Wednesday – Anything Goes
  3. Colour Crazy Craft – Any Handcolored Image
  4. Creative Fingers– #189 Anything Goes
  5. Crafting Happiness– #55 Anything Goes
  6. Use Your Stuff – Free Week
  7. Creatalicious – #190 Anything Goes