Hello friends and happy November! Really excited to share that I’ve been asked to a be guest designer this month for one of my favorite companies which is Inky Stamper! Yay!🎉 If you follow along with me, then you’ve probably already seen some of my creations using their products. Please be sure to click the badge below to be taken to the store! (The characters are so cute!) I will be adding this badge to the sidebar of my blog here so you can find it if you want to come back to it later.
For my first project this month, I actually pulled out an older stamp set which I think is perfect for this time of year especially when you want to give “thanks” to those special people in your life.
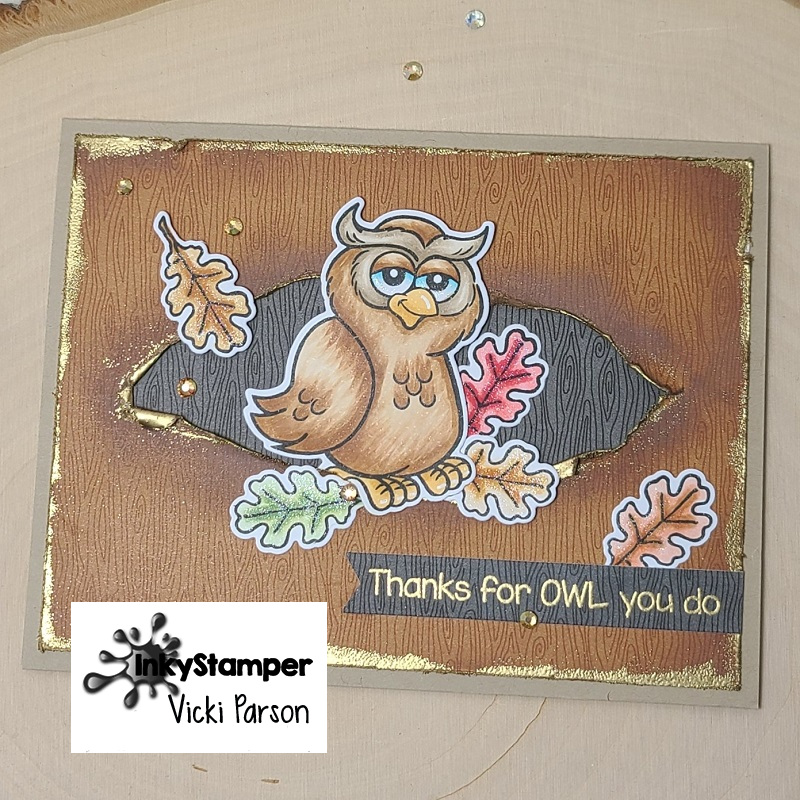
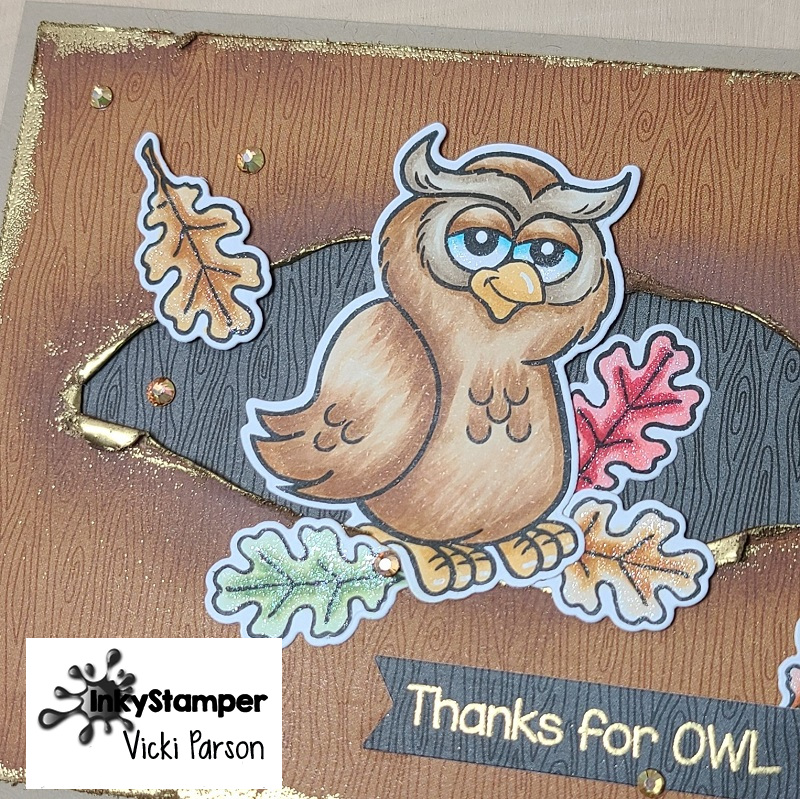
Isn’t this guy with his quirky face adorable?! I’ve used this fun Inky Stamper Owl stamp set with dies for this card. The punny sentiments that are always with these stamp sets make perfect options!
Have you seen the “Torn Window Card” technique around social media? I think you could probably find it just about anywhere and not sure where exactly it originated from, but I wanted to try it and give it my own spin by creating a torn hole with a slightly pulled around opening. Which I thought was a perfect “tree hole” for my quirky owl to pop out of! What’s fun is that you don’t need any special tools or die to do this…just rip it!
For my papers, I’ve used the Doodlebug Buffalo Check & Woodgrain 6×6 paper pad from Inky Stamper with the brown color for the outside “tree trunk” portion that I ripped the hole in the center for and then another piece of the woodgrain in black for behind the hole which makes it look like the inside of the “tree trunk”. Plus, I think it makes the owl stand out more. To rip the hole, I just cut through it with scissors and gauged what size to rip based on the owl image. I used some brown ink to sponge around the edges including around the “hole”. I then distressed the edges of the paper as well as lifted/curled the torn edges of the “hole” area. When I did that, it exposed the buffalo check pattern on the other side of the paper, so then I took my VersaMark ink pad to rub around the edges and gold heat embossed all the distressed edging. I also gold heat embossed the sentiment from the stamp set over some of the black woodgrain for the banner at the bottom.
Here’s a closer look at the owl all colored up with Copic markers. I added a few white gel pen marks to his beak and feet. I also colored up several of the leaves with this set and die cut all the pieces to attach to the card. I glued the leaves around the owl and then for the owl, I glued the bottom of him over the leaves and then popped up his head with foam tape. I also used foam tape for the leaf to the left of the owl.
For a little extra sparkle, I painted on (using a brush) some Liquid Pixie Dust for the leaves and the owl’s eye whites. To finish it off, I added some Picket Fence Sands of Time-Gems. (These are a couple of my personal favorite extras!)
I hope you’ve enjoyed my ripped hole owl card today and have been inspired to doing some ripping of your own!
Thanks so much for stopping in and I’ll see you soon!
Hello friends! I hope you’re having a great week! We got a tiny break from the hot weather, so I had to spend the last few days enjoying it and was happy to get away from being indoors! Now as the temps climb back up, it’s time to get busy and craft some more!😃
As promised, I’m catching up with my postings to share the wedding invites, thank you cards and special wedding card I made from my son’s June wedding. I made them a few months back, obviously, but I thought it would be nice to condense it altogether here in one posting.
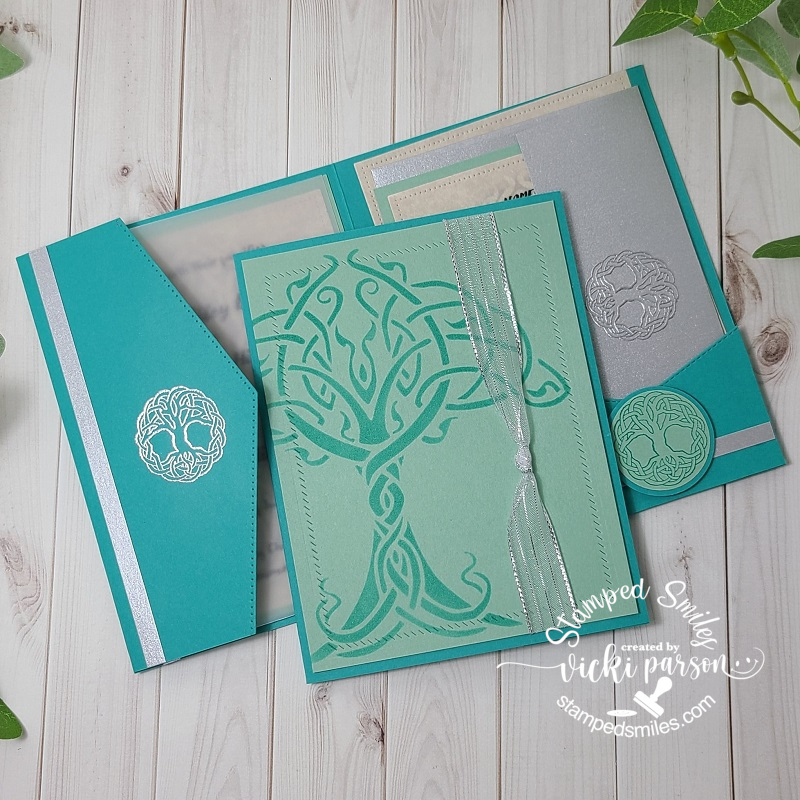
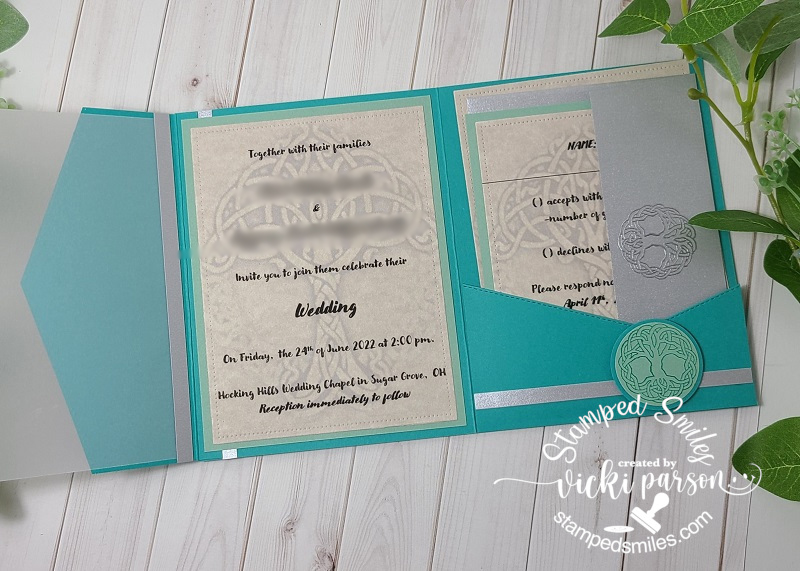
The couple had asked for me to make their invites for them and of course it was a great honor to be able to do that for them. I was given a photo of an image and was educated about the “Tree of Life” to incorporate that into a design as well as a sample of some color shades. Making a total of 50, here’s what I came up with:
I was able to find some similar Stampin’ Up! colors that closely resembled the samples given and come up with Bermuda Bay and Mint Macaron for the design. I wanted both the ink and cardstock colors and worked it out from there.
For the base of the design, I’ve used the darker Bermuda Bay and on the front panel, I used a piece of Mint Macaron with a stenciled “tree of life” over top of it with Bermuda Bay ink. I actually found a fairly inexpensive stencil on Amazon and thought it looked very similar to the image I was given and thought it would be perfect for the front with a partial side off the edge. I never inked up 50 panels before, but this stencil certainly got a workout! I was thinking it needed a bit more to it than just the stenciling, but I didn’t want to do too much with having 50 to make! I took the Taylored Expressions Diagonal Stitched Rectangle die to impress a design around the edge, wrapped silver ribbon around the front with the knot and layered it over the front of the invite.
So being happy with that, the hardest task was to figure out the inside details….
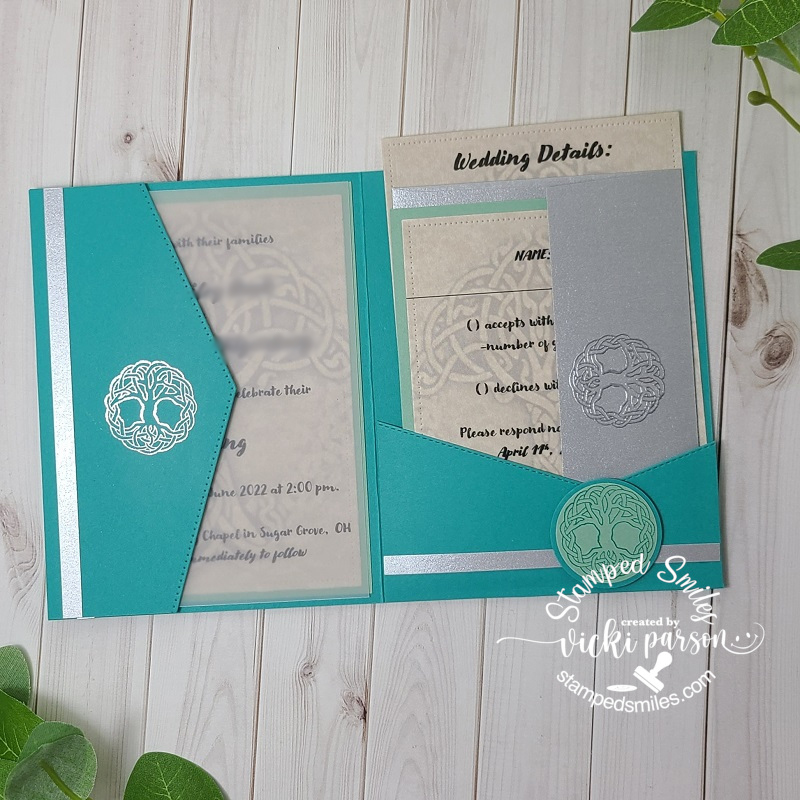
I wanted to make the inside a portfolio style with a pocket containing the wedding details as well as the RSVP/envelope inside and then the actual “announcement” on the other side. As I was piecing it together, I thought a decorative flap with some vellum would be pretty over the announcement too.
I’ve used the Stampin’ Up! Basic Borders die set to die cut the pocket front as well as the vellum flap on the left side. I had to adhere two Bermuda Bay card panels together and cut out the areas I didn’t need. (I ended up using the left over pieces to punch out a circle layer. To add a bit more of a decorative detail, I cut strips of silver cardstock as well as silver heat emboss the “tree of life” circle stamp. (I was happy to also find this really inexpensive rubber stamp image for a couple of dollars to use for this too!) For the image on the pocket area, it was stamped with Bermuda Bay over the Mint Macaron cardstock, layered with that left over Bermuda Bay circle punched pieces and popped up with foam squares over the silver strip. I was happy with how the portfolio design was working.
And now once you open up the vellum flap on the left side, you will see the announcement portion. The silver strips were strategically placed to cover up where all of the layers are glued/attached together, but still looks like it “belongs” there. The image that was given to me via digital photo was used at the “back drop” behind the wording. It was a very bright image that I altered on my computer and muted it down so that it was faded in the background, but yet still clearly visible on the design. I thought it worked out nicely and still coordinated with the stenciled area on the front.
Because this invite was so thick in nature, I didn’t want to add more layers of cardstock, so I used a thinner parchment style copy paper as everything was printed out from the computer anyway. The parchment made it feel a bit more professional I thought. I die cut ALL of the printed parchment pieces with a Lawn Fawn RETIRED Small Dotted Rectangle dies. (I thought the “small dots” went with the SU! edges I used on the flaps.) I placed the announcement over a piece of Mint Macaron and then layered it inside the card. I layered the RSVP card over a piece of Mint Macaron and the “wedding details” card was left on its own.
Finally, you can see that on the silver envelope flaps, I silver heat embossed the image. This was also done for the larger silver envelopes for the whole invite to fit in as well. I even used the “Tree of Life” computer generated image to create some address sticker labels for them and give them extras ones to use.
Of course, after the wedding, you need to send out the thank you cards, so I also made 50 of those….
I really didn’t want to event a new wheel with it, so I had plenty of cardstock colors and just repeated the same design on the front as I did with the invites except for this one, I used the Taylored Expressions On Occasion stamps. I stamped them out with the Bermuda Bay over the Mint Macaron cardstock, cut it out with the coordinating dies and popped it up with foam tape over the silver ribbon. Stenciling another 50 panels with this same stencil gave it another work out yet!
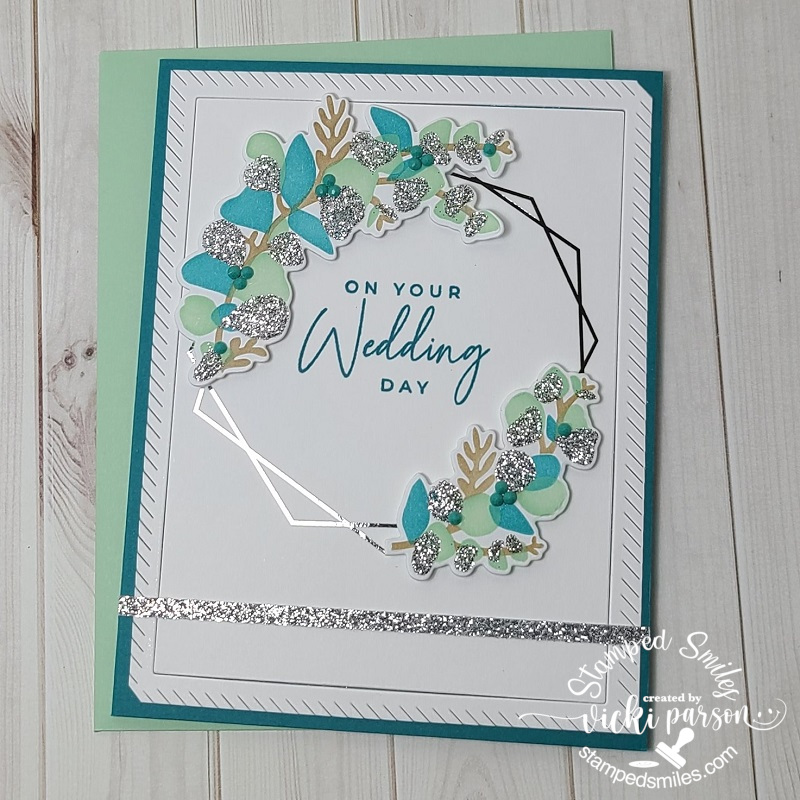
So, for the actual day of their wedding, this is the card I made FOR the couple. I was able to get a little more “intense” with this one as it was only ONE card!
I was so excited when I saw this stunning card kit come out from Taylored Expressions called “Modern Eucalyptus” (no longer available) and I thought it was the perfect colors to create something with for their wedding. The white panel was silver foiled and then I stenciled the colors of the wreath pieces, stenciled some silver paste, die cut them out and popped them up over the foiled wreath. I stamped the sentiment in the center, added some TE Tiny Diamonds to some areas and cut a strip of silver glitter cardstock to go across the bottom.
Around the edge of the panel, I used a free gift that I got with purchasing items and tried it out and on my panel without realizing that it cut the center. I went ahead and attached it down anyway as I liked the decorative look to it. I had a matching envelope and off we went to the wedding!!!!!
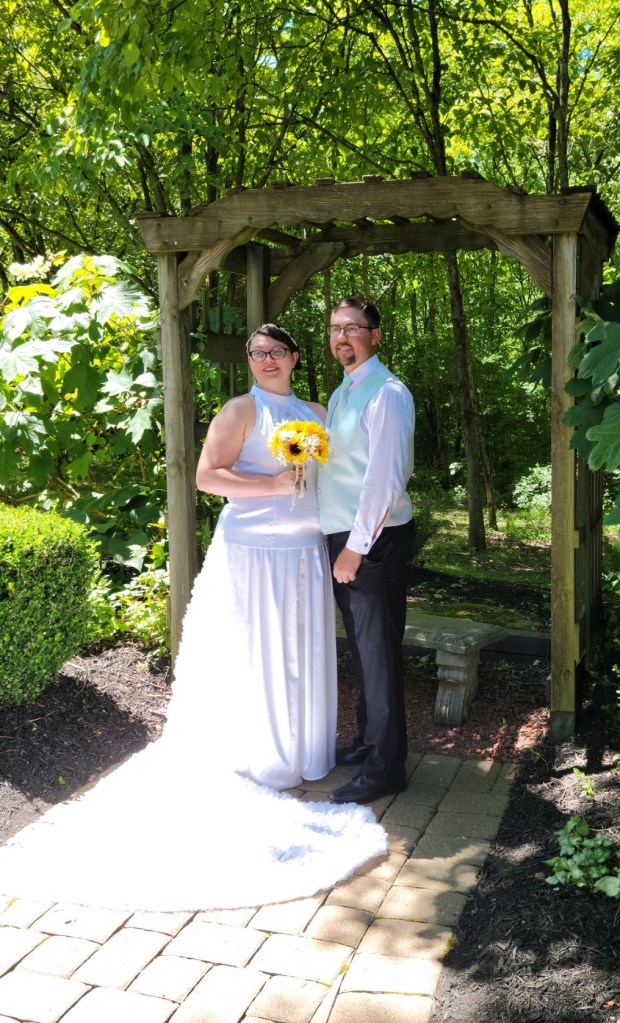
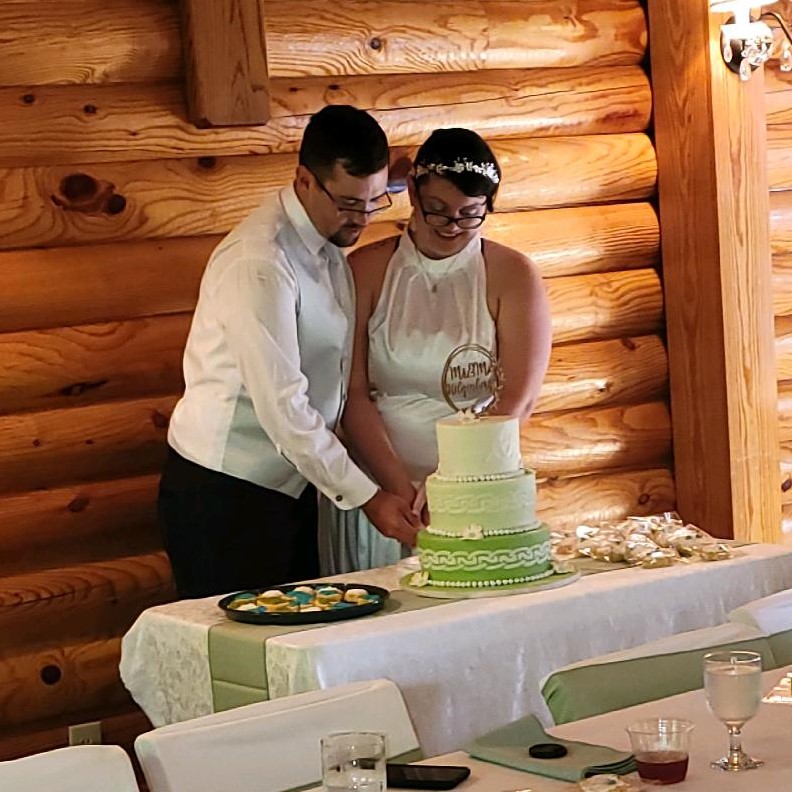
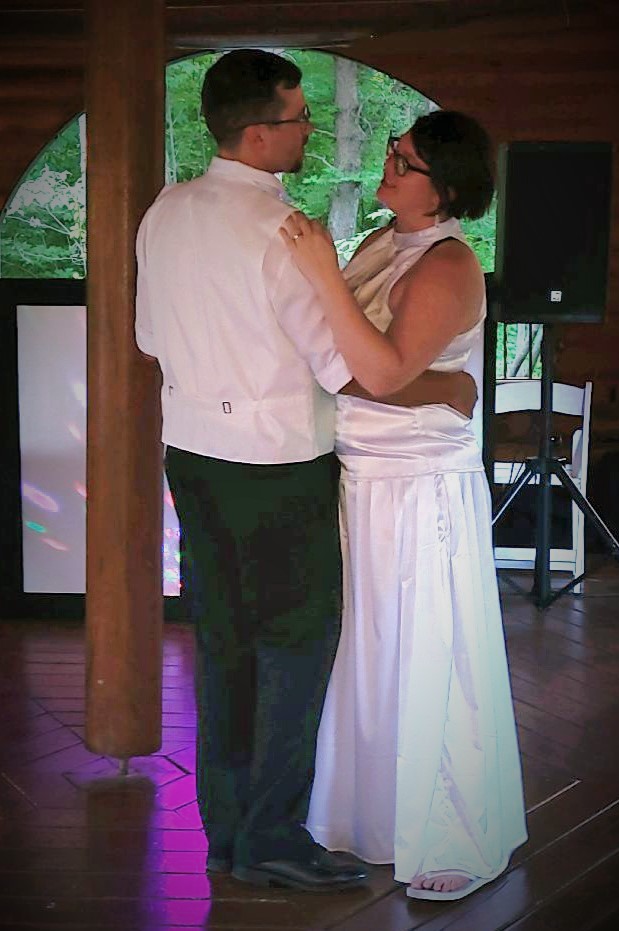
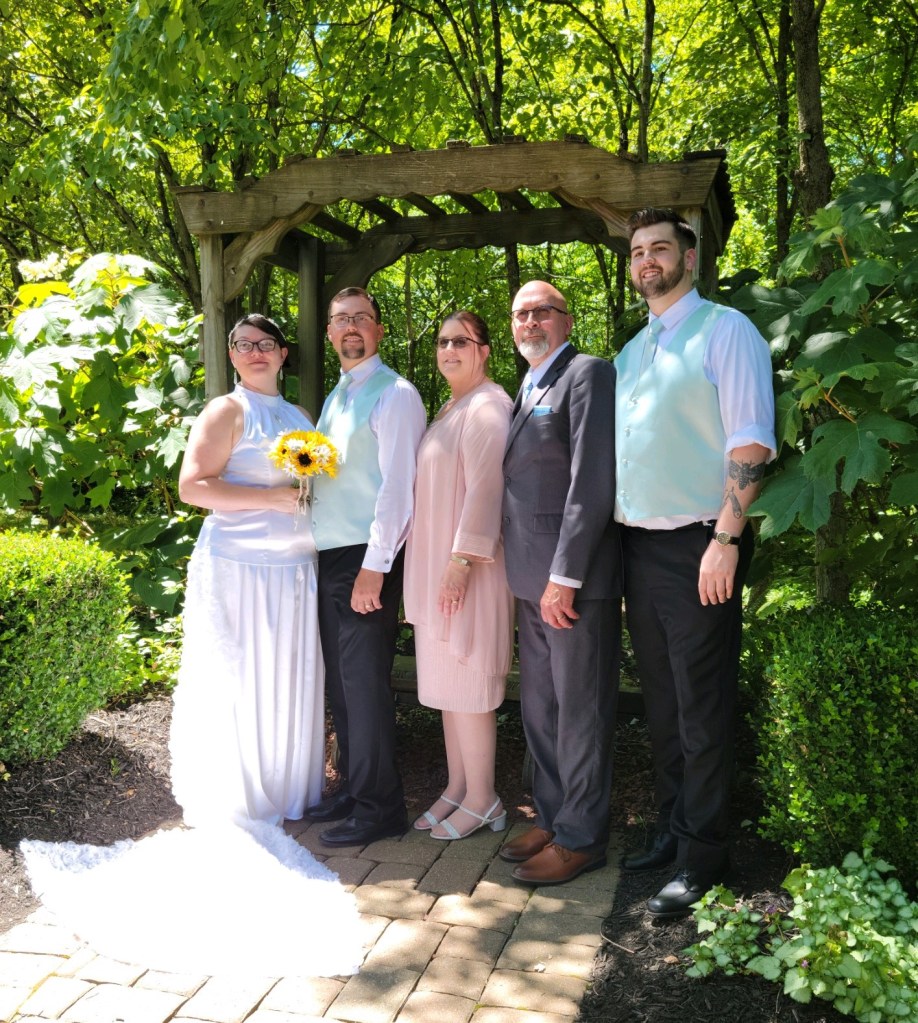
The couple was married in Hocking Hills (Ohio State Park area) and it was absolutely beautiful over there! The venue they used only had a certain capacity limit and so this is why there were only 50 invitations that went out. It was a very nice private wedding with everything done and organized for them. I do not have any professional photos of the wedding as of yet, but I had to rely on my husband for taking a few photos on his phone and then handing the phone to someone for photos as well…my dress didn’t allow me for handy phone carrying. LOL But here a just a few photos (not professional) of the wedding.
As being a first time “mom of the groom”, it is quite an experience and very emotional especially when my son picks out a song for our dance with a song I used to sing to him as a baby in my belly! We both had tears!! LOL It was such a joyous occasion and I’m thrilled to welcome our new family into our lives for years to come! May they always feel the joy and love together for ever after!
Hope you’ve enjoyed my wedding post today and have been inspired in some way to brighten your day. I thank you so much for taking the time to stop in and say hello! It means so much to me! See you soon!
Challenges:
Crafty Friends – Embossing Wet/Dry (heat embossed on invites)
Hello friends! I think we’re getting closer and closer to Spring! I sure am ready for it, how about you? Let’s welcome the warmer weather and pretty flowers to come!
I had previously made a winner/top 3 for a challenge I had entered which was exciting to have also won a place to be a future guest designer for one of the challenges too.
So this month, I’m very excited to be joining my friends over at the Cheerful Sketches challenge blog as a guest and they always have a beautiful sketch along with lots of inspiration for it each month! So please be sure to check them out and play along if you can! Here’s the lovely sketch they’ve provided for me to work with this month:
This is a very nice sketch and open to lots of different interpretations as well, so I had fun playing with it along with an image that was provided to me from a current sponsor for the challenge and here’s what I came up with:
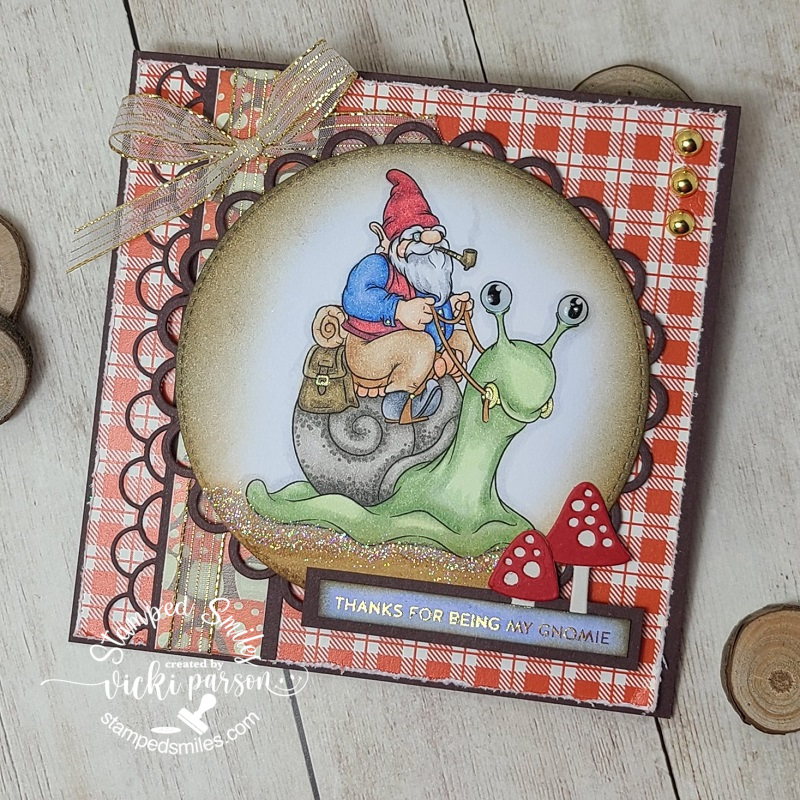
Everyone loves the gnomes and this one is too cute riding his snail friend! I’m using the “Grumblebonce Rides Again” from Dr. Digi’s House of Stamps for my card today. I’ve colored him up with Copic markers, added details with gel pens, glitter under the snail and glossy accents on the snail’s eyeballs. I die cut the image with a stitched circle die and ink blended around the edges before attached to another loopy circle die cut from brown cardstock.
I found some fun papers fitting for the image with red plaids and a strip of mushrooms that I’ve attached over another loopy die cut strip I’ve had in my stash forever. I wrapped some gold ribbon around it and attached to the red plaid papers that are attached to a 5″ square top folding brown card base. Before attaching the red plaid papers, I used a distress tool to rough up the edges. I’ve popped up the image with foam tape and added 3 gold enamel dots in the upper right corner.
With the card now laying flat, you can better see some of the shine from the sentiment at the bottom. I found these fun gnome style sentiments that can be foiled. So I used some gold foil and ran the strip through my Minc Machine. I sponged some blue and brown inks over it and then added some die cut mushrooms behind it and layered a piece of brown cardstock to layer behind it.
I placed the mushroom sentiment at the bottom with a portion of it with foam tape and the other parts just glued to the circle sentiment panel. I think it turned out pretty cute and I had fun coloring it up!
So please be sure to check out the challenge and come play along!
Thanks so much for dropping in and I’ll see you soon!
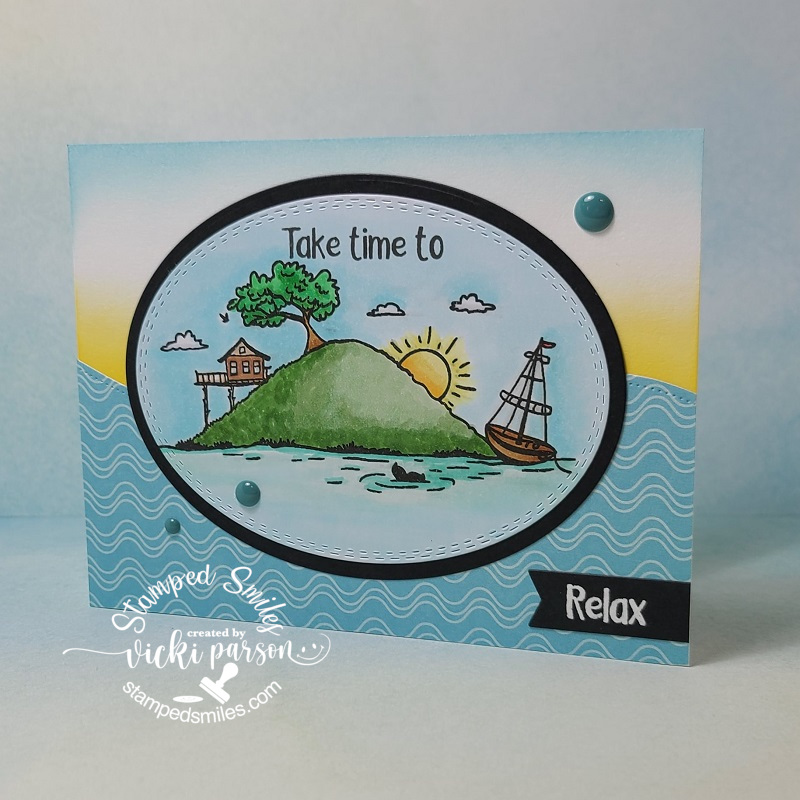
Hello there friends! It’s hard to believe that we’ve made it to November and rounding the corner to end 2020! It’s been a very strange year all the way around, but I have to say that it’s a bitter sweet day today as hubby will have his last day of work on his 40 year career as an electrician. So today I’m dedicating my post to him:
This would be a perfect situation for my hubby and something he talked about all the time…which was to go out to the lake, relax, enjoy some fishing time on a boat including staying in a cabin. Sure look forward to spending some time with him doing just that next year too!⛵🌅 He is a hard worker and certainly deserves it.
The stamp set that I’ve used for this card was a perfect scene image from Whimsy Stamps called Happy Place. I colored it up with Copic markers and cut it out with an oval die and layered another oval piece from black cardstock.
I found some papers in my stash that I thought would be perfect with this, so I’ve used the Whimsy Stamps Pierced Border Trio Dies to cut it with to fit half-way on my A2 white side folding card base. Before attaching the piece down over the base, I took some Mustard Seed Oxide Ink and sponged across the middle of it and then used some Tumbled Glass Oxide Ink slightly at the top. I then attached all piece including the image panel.
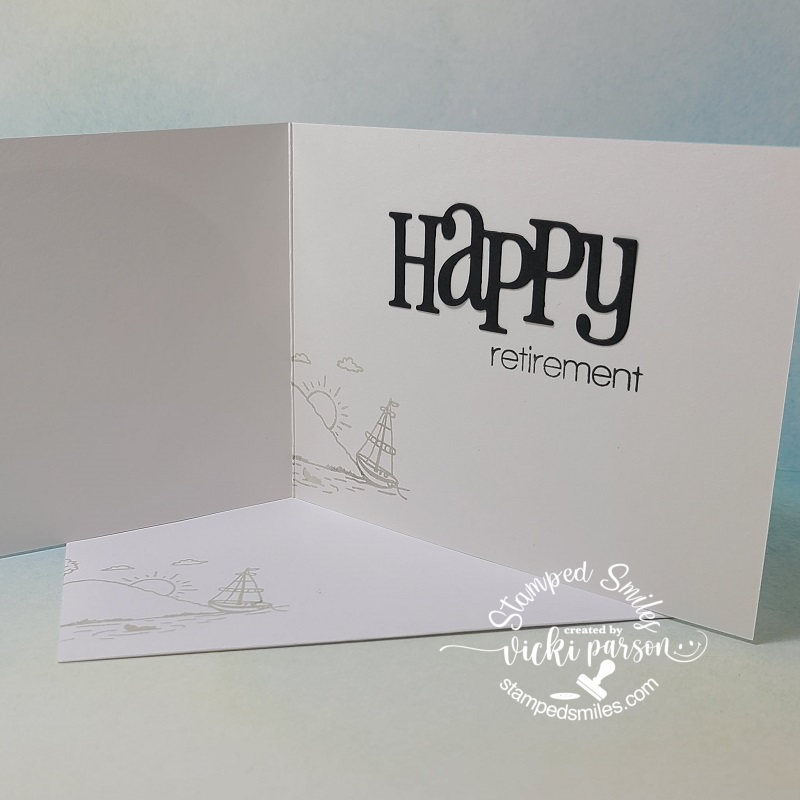
Then of course I wanted to share the inside of the card which you can see that I’ve used the same image from the stamp set from the front of the card and just stamped that in a lighter grey ink color. I masked off the edge of the inside of the card so it didn’t stamp completely. I also used it in the same way on the envelope as well.
It may be hard to tell in the photo above, but I’ve also taken a glitter brush pen and went over the sun as well as the water for some added sparkle.
This card was actually fun to put together and I was thinking about the future and all the things we had talked about the last few years and getting ready for this day. Things are a bit different than we had envisioned of course, but we will have “our time” for sure. We’re so excited about it!
This card is being handed to him this morning while we have our coffee before he leaves for work on his last day!😀
And now I also have some more finished kits that I’ve been working on since the Whimsy Stamps Virtual Workshop Weekend! I’m still really enjoying finishing them up and still have MANY more to do! I’m so amazed at how much we received and very happy that there were several Christmas projects which I’ll be working on next! For now…here’s more of the finished kits:
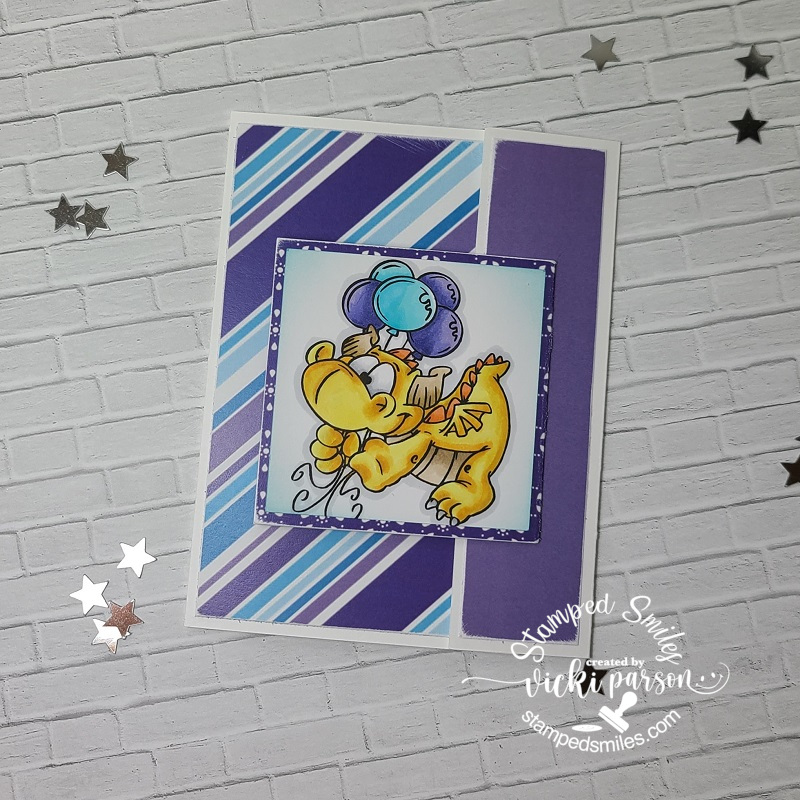
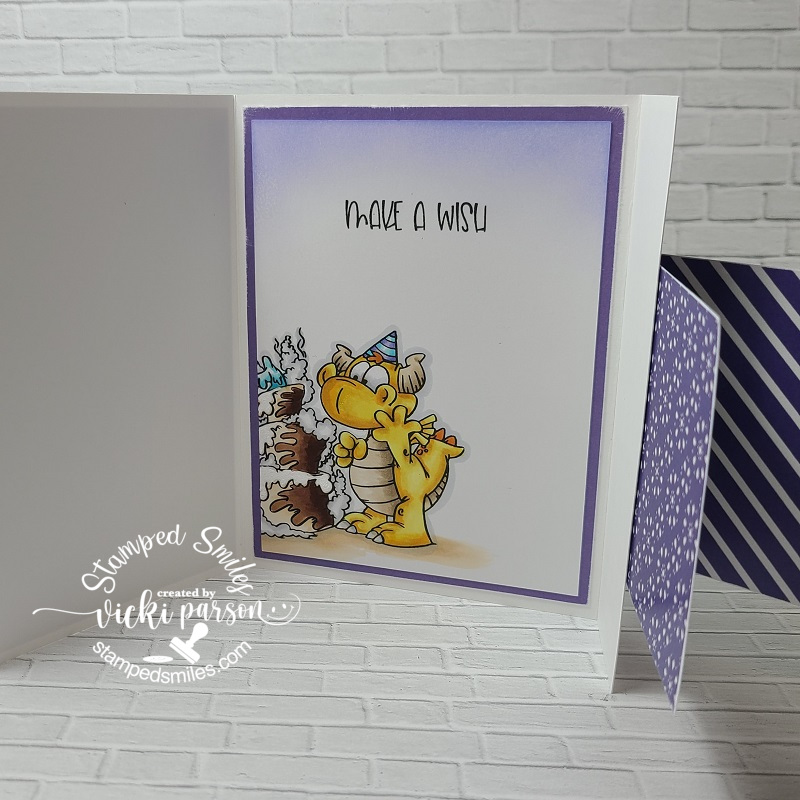
This was for kit 12 and I LOVED the cute dragon in the purples! This card is going to my youngest grandchild as she is my “PURPLE girl”!!
This is the INSIDE of Kit 12. It was a really cool “FUN FOLD” design! I put my image off to the edge so I had room to write a message.
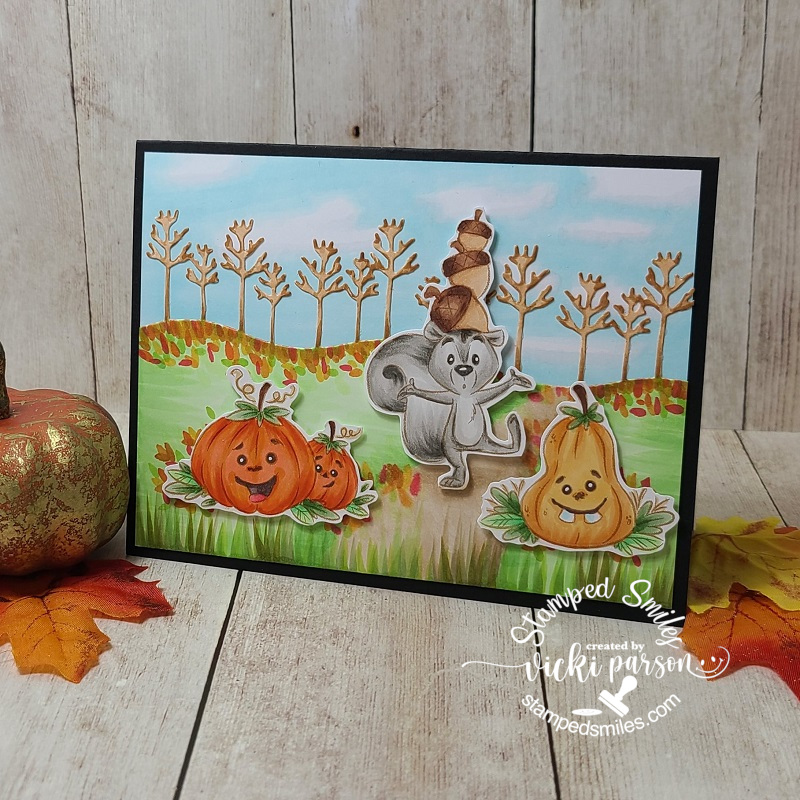
This was for Kit 6 and the entire scene was made using Copic coloring including the sky background! The squirrel and pumpkins were popped up with foam tape.
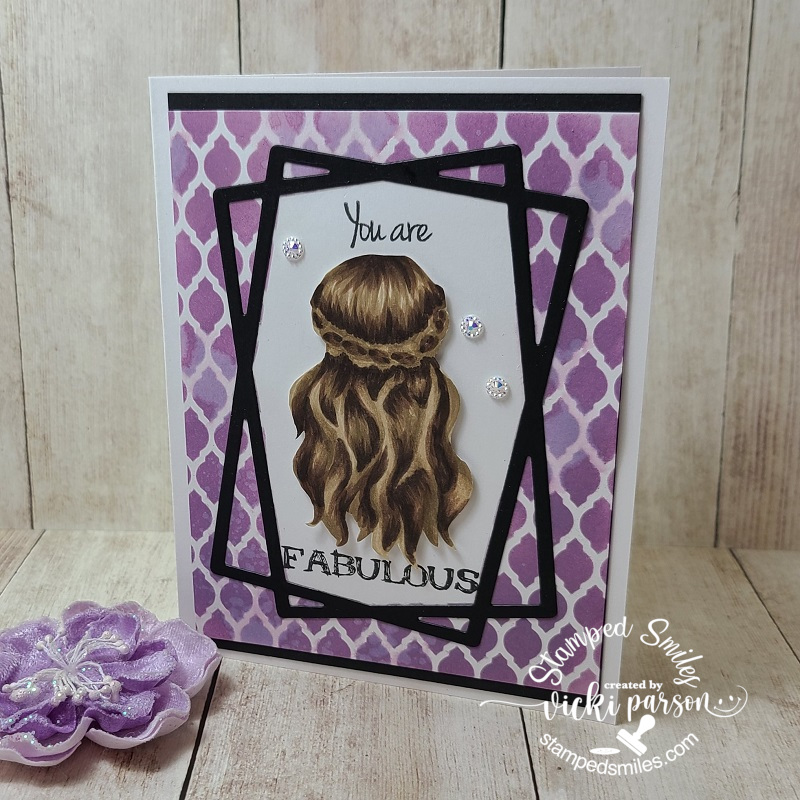
This was for kit 21 and my first time practicing with no-line coloring!
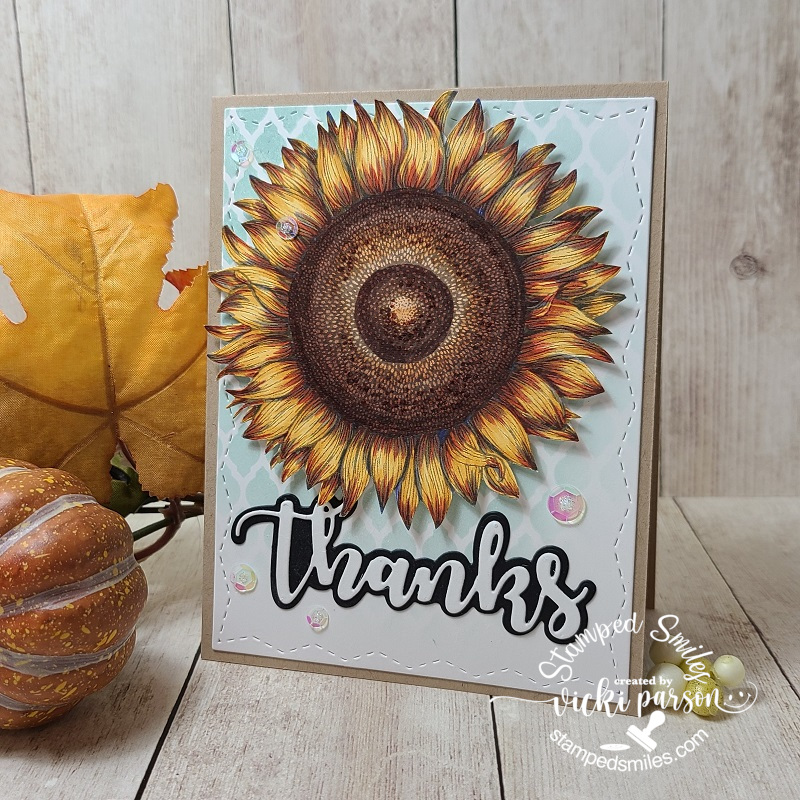
This was for kit 22. This mega large sunflower is gorgeous! Loved coloring and fussy cutting it out!
I hope you’ve enjoyed my projects and post today! I sure have been having fun just playing and trying out different things with my cards. I do look forward to finishing up these kits as we get near the Christmas time! So be watching for more of those!
Thanks for dropping in with me today and I’ll see you again soon!
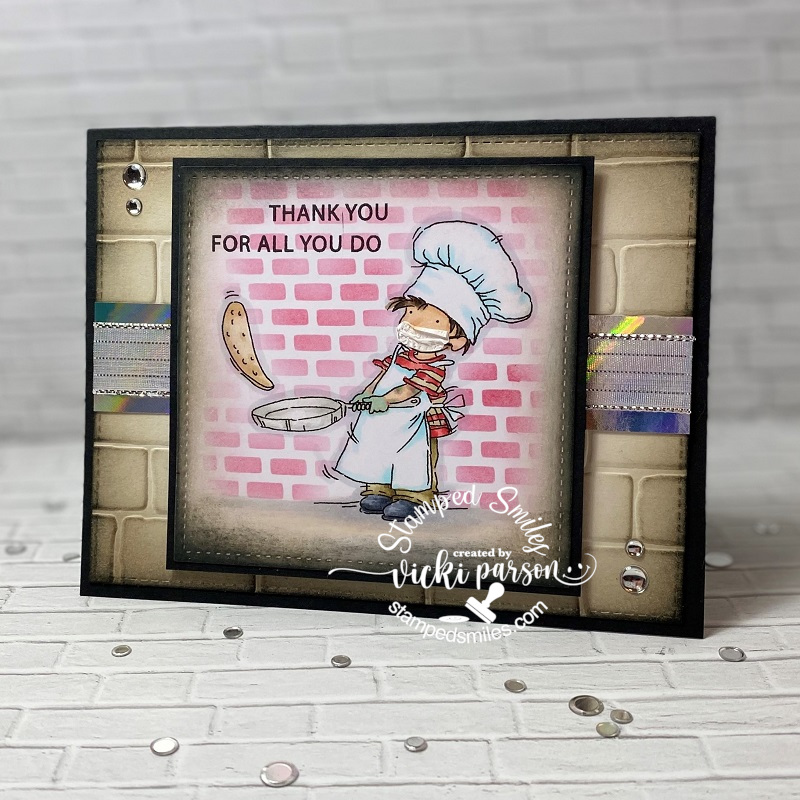
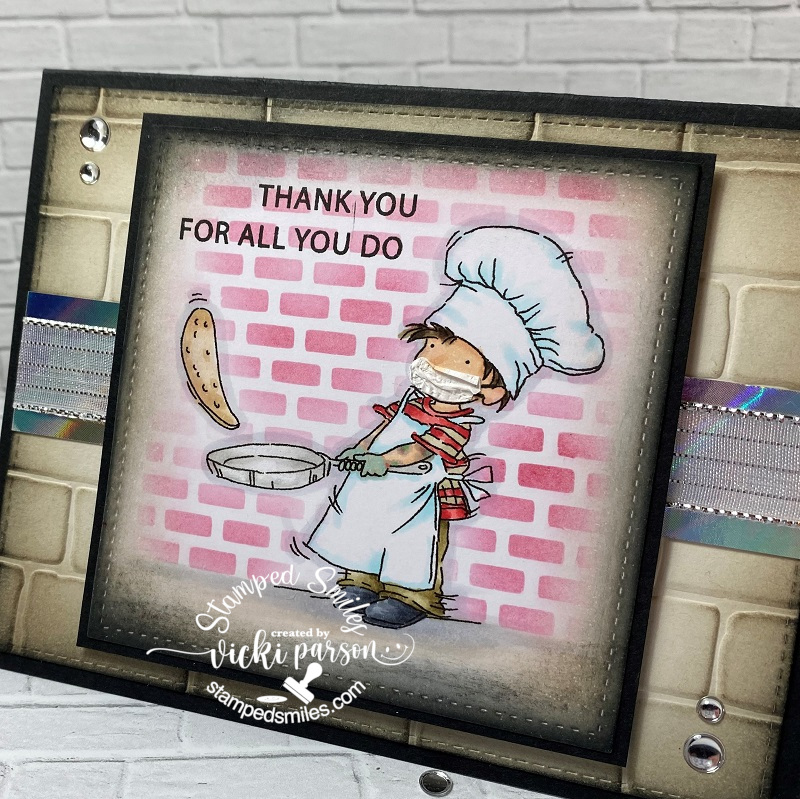
Hello friends! I hope that your week is finding you in a good place right now. Sometimes I feel a bit overwhelmed with things that are going on in the world, but I am so thankful that I have the crafty time to keep my mind creative and music to help alongside to keep on keeping on. This is one way that I know I can express myself in a postitive way and hopefully inspire someone too.
In my previous post, I had made several healthcare worker cards and I had made one for my son who is a mail carrier, but I was having a hard time finding an image for a food service worker. (check out that post HERE.) I asked if anyone knew of any images. Someone had reached out to me and shared a few images that were just too adorable and I couldn’t pass up on nabbing one for my other essential worker son:
Isn’t he just as cute as can be?! I’ve used the LOTV Pancake Day digi stamp for my card. It actually reminds me of my son making crepes for a restaurant that he used to work for. I was treated with a delicious pumpkin pecan cream crepe by him a few years back on my birthday! It was yummy!
As you can see, I’ve altered the image a bit to fit with the current covid-19 restrictions by giving him a make-shift face mask as well as coloring some plastic-style gloves on his hands. To make it even more personal, I decided to give him a couple of colored tattoos on his arms as my son has tattoos on his arms and dark brown hair.😁
For the card, I’ve used some Sidewalk cardstock from Brutus Monroe and used a Stampin’ Up! brick embossing folder over it and then sponged some distress ink around the edges. It was cut out with a stitched rectangle die. I added a strip of Prism paper and some silver metallic ribbon over it before attaching it to a top folding A2 sized black card base. I finished it off with some silver Glossy Dots from Pink and Main.
I colored the image with Copic markers and as mentioned above added the special coloring for the tattos and gloves for his hands. I’ve also covered the pan with a glitter brush pen.
To make the face mask, I took a Copic liner to draw in the lines for the cord around his ear and then I took a tiny piece of thin tissue style paper that was used between the packages of acetate sheets you buy. I wanted it because it was thin and I was able to create tiny folds and wrinkles in it…I just glued it over the area on his face and manipulated it before it completely dried.
I stamped the sentiment from a Lawn Fawn stamp set with black ink next to the image and then I used a stencil that was cut out by my mom, thanks mom, on her Cricut machine and inked it up with some red ink using a foam brush tool. I wasn’t very accurate with not covering the image, but thankfully the sand eraser helped out! I finished coloring up the “ground” area and sponged around the stitched square cut out of the image. I layered it onto another piece of black cardstock and popped it up over the card with craft foam.
I think this card turned out so cute and it’s on the way to him now! I think he’ll get a kick out of it and he’ll probably notice the extra personalized details I’ve added to it too!😂
I hope you have enjoyed my special essential worker card today and brought you a smile! Thank you so kindly for stopping in and I’ll see you again soon!✌
Hello friends! I’m still sharing some projects that I had been working on from the previous month and hadn’t posted until now. I’m also having fun creating “behind the scenes”, which is nice to just be able to “relax” and not rush on creating projects just for posting! I’m keeping that in mind when I tell myself that I’m “behind”!
I think just having some fun is the key!
So earlier, I was “challenged” to use some of the pre-printed “Card Panels“. These are card panels that are also foilable prints or you can color them, ink blend over them, etc. So I decided to have some fun and play with a past card kit from my stash:
The Berry Thankful Card Panels were used for both of my cards. I used some colored pencils and a water brush to color in both panels. But because they’re not a water friendly type of cardstock, you need to be aware of possibly too much moisture in the paper. So I kept a very light hand with it and just did some basic coloring on them. Then after I got them colored up, I used my laminator and foiled over them with some Silver Deco Foil sheets. For the sentiments on the cards, I took out the Berry Thankful stamp set also included in the same card kit, and heat embossed them over the grey cardstock included in the kit with some Foil Reactive EP and ran it through the laminator again with the same color foil I used on the card panels.
After running through the laminator, I used some dies to cut them out with and then I ran some glue along the edges and dipped them in some chunky flaky glitter that was also included with the card kit and popped them up over the card panels (with foam tape) that were placed onto some cardstock in the kit and layered over an A2 sized folded card base. Before I attached the card panels, I wrapped some twine around them and tied with a bow.
Lastly I added a thin strip of decorative paper and also added some sequins from the kit. I filled them with silver glitter in the centers.
Normally, I would’ve posted a photo of each design, but really wasn’t sure that I would be posting about these on my blog. So I hope you enjoy the “berry” shinny cards!!😂
Thanks so much for dropping by today and I wish you a very fun and happy upcoming Memorial Day weekend!! (Wow! Where did the month of May go?!!)
Hello friends! Happy weekend! I’m actually excited about it being the weekend! This weekend is a nice long holiday weekend so I can spend time with hubby! Yay! However, I won’t be resting on my blog as there are lots of fun things going on since it’s the start of a new month! So be sure to keep stopping by to see what’s going on! 🙂
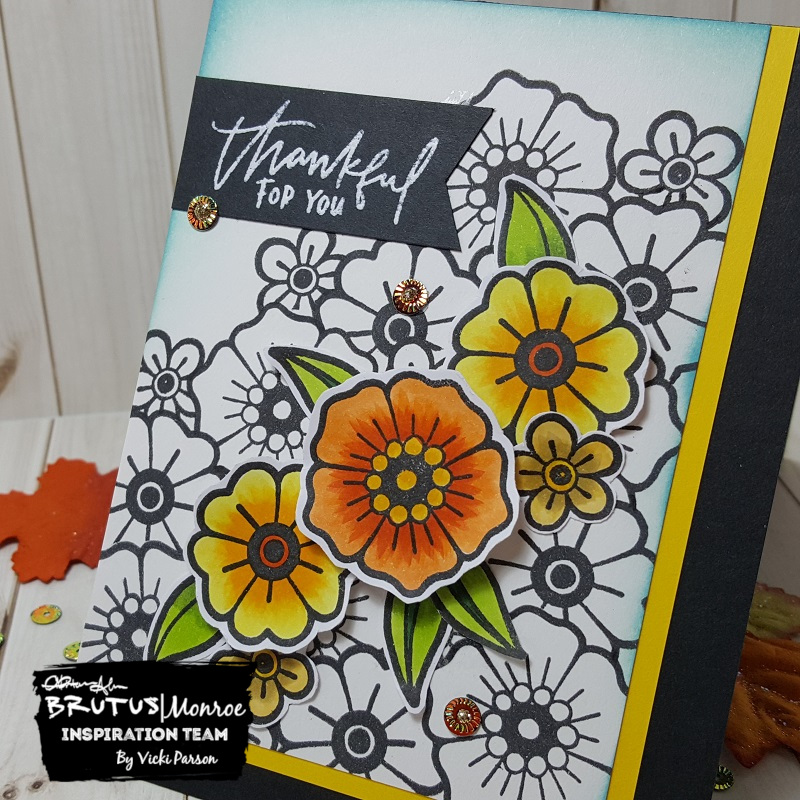
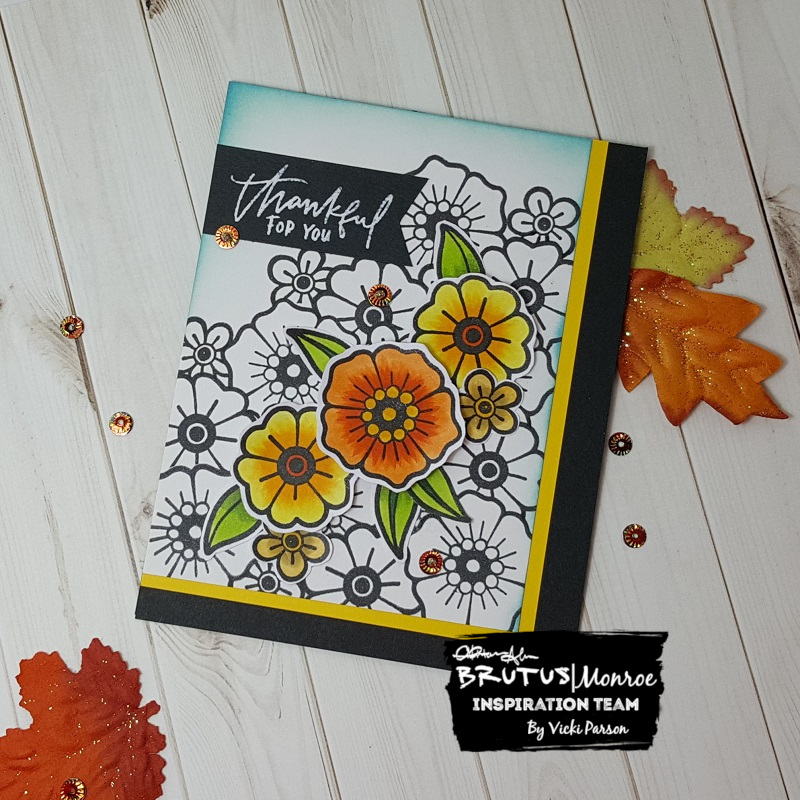
Today I took out some flowers and fussy cut them and colored them in happy Fall like colors.
I’ve taken this Flowers stamp set and settled on about 3 different sized floral images to work with along with a couple of leaves. I’ve colored them with Copic markers and then cut them out with my scissors…I set them aside.
I took a piece of white cardstock along with some masking paper and began working in the flowers for the background with Black Ink. I made a mask for them as a went along and worked my way up. After I was done, I took an ink foam blending tool and some soft blue Ink to sponge around the top and side of the panel. I attached the flowers on with glue and some foam tape. (I used thicker foam tape for the largest flower.)
For the banner, I heat embossed the sentiment from a Sentiment stamp set over some Black cardstock with white EP and cut it into a banner and attached it to the card. Lastly, I attached the sequins and then added some gold glitter to the centers.
I attached the white floral panel over a piece of yellow cardstock and then mounted that over an A2 sized top folding black cardstock base.
Here’s closer look at the flowers and how I’ve colored them in.
You can better see the sequins that I’ve used. I actually had one of them laying on my table while I was assembling this card and thought the color matched up nicely with it. Otherwise, I would’ve never thought to get those out to use on this particular card! You never know what could be lurking on your table un-used! LOL!