Hello friends and happy Friday to you! It’s been so crazy warm over my way and I’m hoping this day finds us with a bit of a break in temperatures.
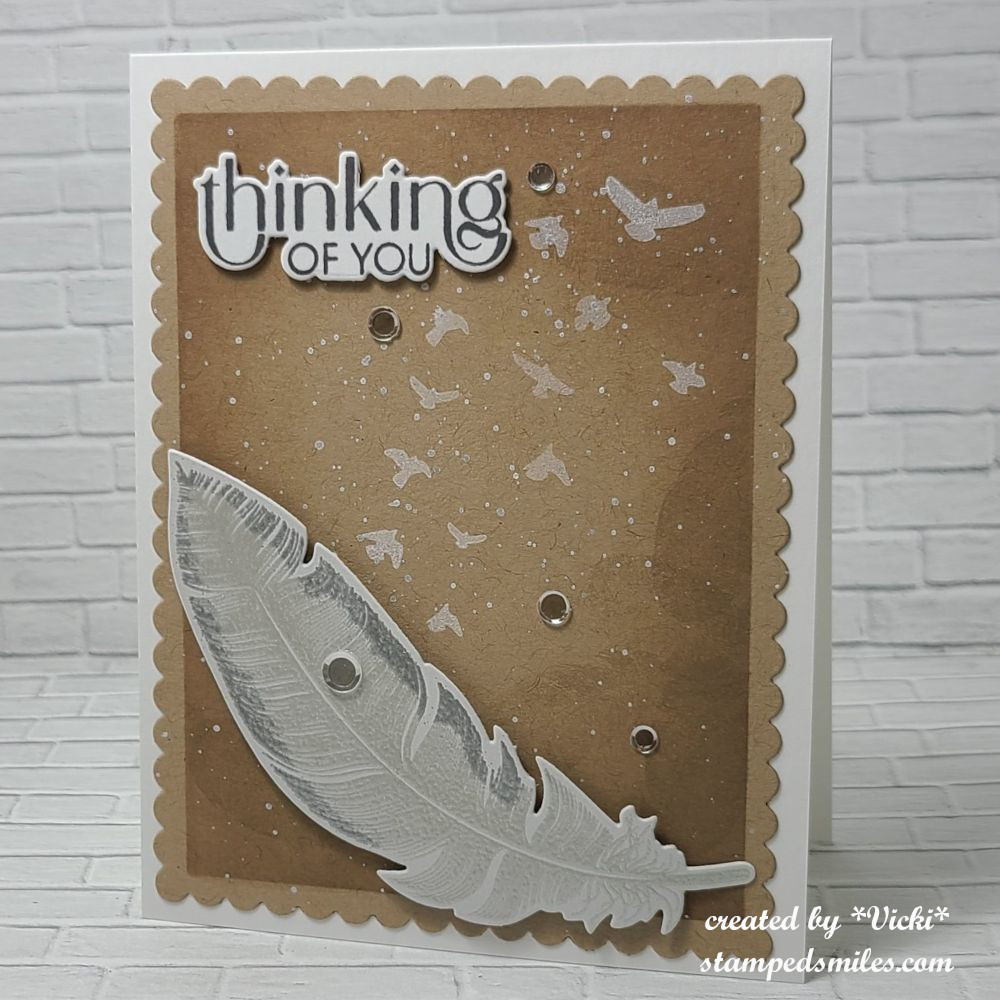
Today starts a new challenge over at the Alphabet Challenge Blog! Our next letter is F and it was my turn to choose a theme for this letter, so I have chosen “F” is for Feather(s) *Remember that this is a bi-weekly challenge, so you have two weeks to enter* I hope you will find some time to play along! Here’s what I’ve created:
I thought this would be a fun theme to play around with as you could just add a bird or anything with feathers. I look forward to seeing the projects for this one! I was happy to have this chance to pull out some things in my stash that I hadn’t used yet.
I started with a kraft colored cardstock cut with a scallop rectangle die and masked off the edges to ink blend and stamp a smaller feather around the edges with brown ink. I then took the flying birds image from the “Wings of Love” stamp set and stamped it in white ink. I also decided to add some white splatter over that. This panel was then attached to an A2 top folding white card base.
For the large feather at the bottom: I used my VersaMark ink pad to just ink up the edges of the feather, then I silver heat embossed just the edges of the feather. Without removing the feather stamp from my MISTI, I inked up the entire feather with VersaMark ink and then used a white opal embossing powder over the entire image. Since this embossing powder is translucent, the silver edges that I embossed still showed through. I die cut it out with the coordinating die and popped it up with foam tape at the bottom of the card.
The sentiment was stamped with grey ink and cut out with a coordinating die that I attached with thin foam tape at the top of the kraft panel. I added some clear sequins to finish it off.
Thanks so much for stopping in today! I hope you will grab your feather(s) and play along with us! I’ll see you tomorrow for a new Art Journal Page!
Hello friends again! I have two posts going up for today, so please see my post for the Mix It Up Challenge details in the above post when it goes live or click HERE.
I’m so excited to have been asked to be a guest for this month’s Pearly Sparkles Challenge! I always love playing along in challenges and supporting them when I can as I always find inspiration in using my supplies when I play!
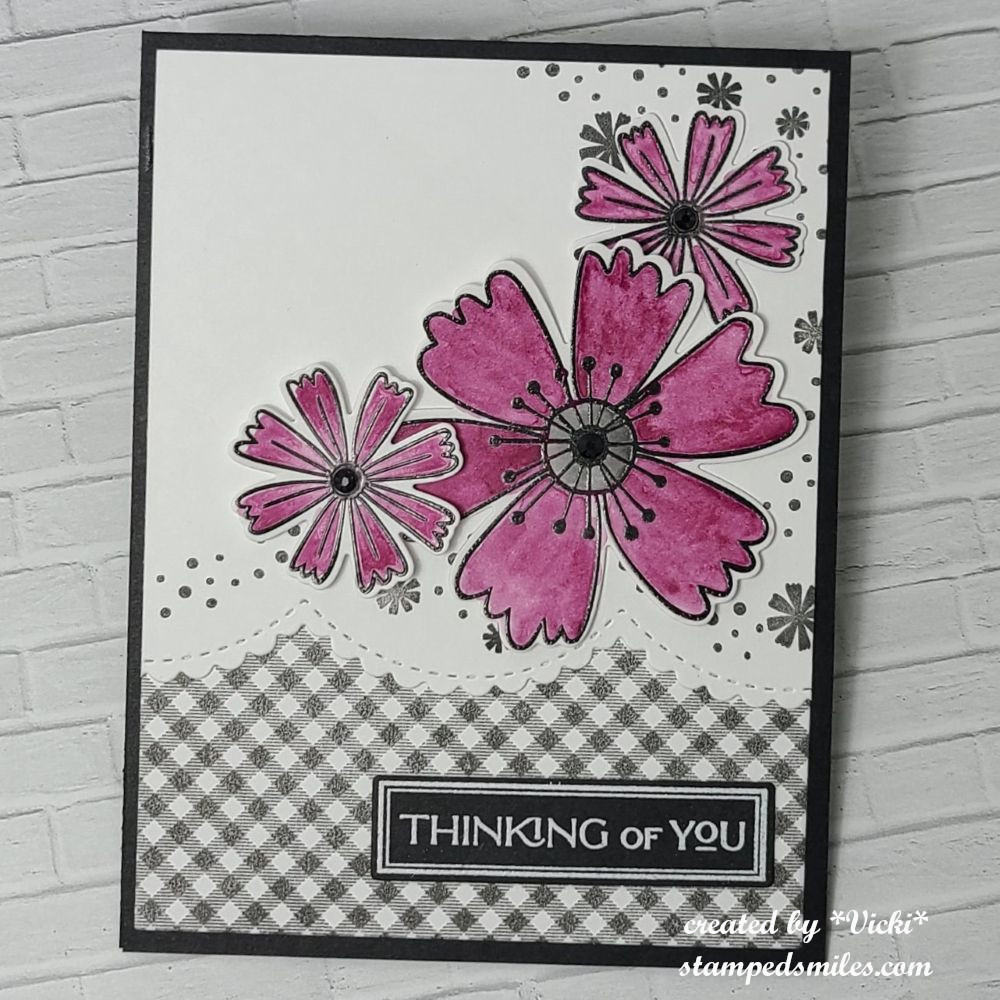
So for May’s Challenge, they would like to see: BLACK, WHITE PLUS ONE OTHER COLOR in your project(s). Here’s the card I made for this theme to inspire you:
I wasn’t sure what I wanted to do for this, but I thought you couldn’t go wrong with some flowers. I pulled out a long forgotten stamp set from Taylored Expressions called “Picked Posies” (no longer available) and black heat embossed the images over watercolor paper and used one pink watercolor brushed over the petals. I die cut each flower with the coordinating die.
I made the rest of the card layout with all black and white elements. I stamped the TE Checking In Background stamp in black ink over a white panel, placed this over an A2 sized top folding black card base. I also used the TE More Easy Edgers die to cut an additional piece of white cardstock and placed it over the stamped checkered background. I also used some more of the elements from the flower stamp set and stamped some more black images on that background before I attached the watercolor flowers on it. I centered each flower with a black rhinestone.
Thanks so much for stopping in today and I hope you’ll check out this challenge to see what the rest of the team has to inspire you with so you can play along too!
Hello friends! Hope that your week has been a good one for you! Thank you to everyone for stopping by and taking your time to spend with me as I appreciate your kindness.
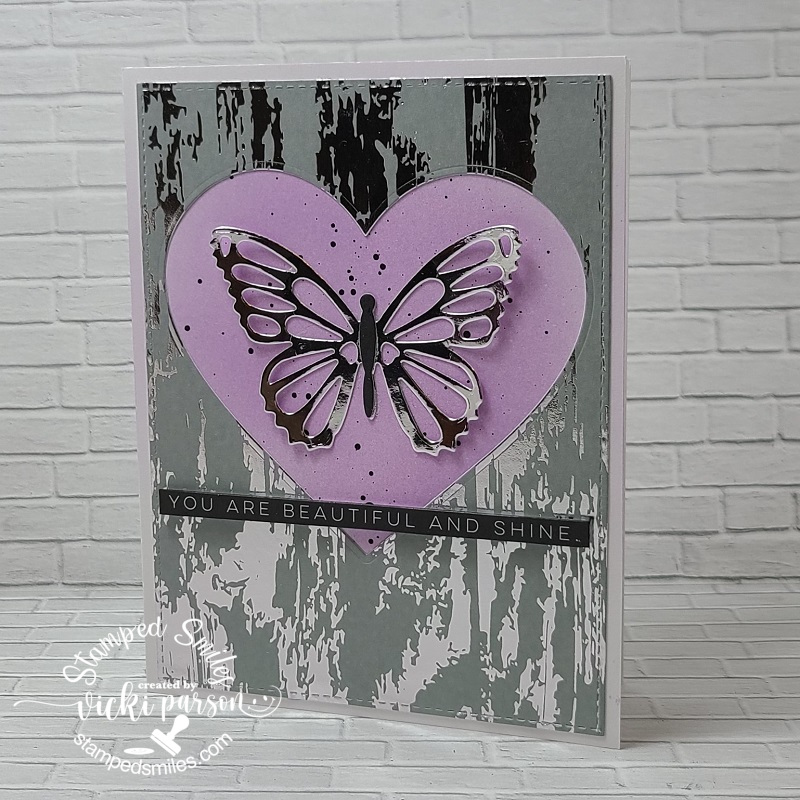
Today starts the August challenge over at Sparkles Monthlyand for this month, our hostess is asking to see a butterfly or butterflies on your projects. I love butterflies and look forward viewing the gallery on this one. Be sure to stop by the blog to see what the rest of the team has created for you. Here’s my project for this challenge:
I like how this one came together! I’ve used several butterfly items from Taylored Expressions. I started with the background by taking the Fluttering Friends Layering Stenciland stencil the colors Sour Gummy, Spearmint & Peaches ‘N’ Cream over a white card base. Once the stenciling was finished, I used the Fluttering Friends 3D embossing folderover it which also impresses the bodies and antenna on them. I layered this over a top folding A2 Spearmint card base. (I also cut out a frame with the same colored cardstock using the Frame in Frame 3 Cutting Plate).
Hello friends! Happy July! I can’t believe that June is gone and the 4th of July Holiday is gearing up now! I’m looking forward to some happy times ahead through the Summer and I hope you are too!
Today begins a new challenge over at the Mix It Up Challenge Blog and it’s always “Anything Goes with an optional theme“. For the optional theme this time, we’d like to see some “Veggie Stamping“! (In other words: use vegetables as your source for stamping with!) I’ve never done it before, but I gave it a try! Here’s what I came up with:
Now I’ve heard of people carving food as art, but I don’t think I’ve ever really seen anybody actually use vegetables/food as a stamp! Have you ever tried this? I encourage you to give it a try and join in the challenge with it because it was so much fun to play!
For my vegetable stamping, I didn’t want to use ink pads in fear of contaminating/ruining it, so I decided to use some acrylic paints instead. I grabbed some veggies from the fridge along with a plate to hold the paints and cut the veggies to dip into the paint piles. My husband decided to come around and snap a photo of what I was doing, so I thought I’d share my mess:
I was actually in the process of cutting out the “veggie flowers” when he took the photo, but I started with some acrylic paper because I was using paints and cut the paper large so I had plenty of room to play around. It was a bit of trial to figure out how each veggie would look. I thought it worked best to dry out the veggies as much as possible on a paper towel. The coral large flower came from the red pepper. I found that using a paint brush to apply it to the veggie was a better look. Then I dipped the celery end to make the purple flowers. The shallot was used to create the teal flower (the shallot was applied the same as the pepper) and I used the end of the carrot for the center of the flowers with yellow paint and then I used a broccoli to dab on the center of the flowers as well with some dark grey paint.
I then tried to arrange the flower bouquet how I wanted on my card base after cutting out the flowers. I took a paint brush with (no kidding) celery green colored paint and painted the stems coming from each flower. For the “leaves”, I used the same paint and dabbed the celery end around the stems.
I finished out my card by stenciling the brick background before attaching the cut out flowers. I popped some of the flowers up with foam tape and then I white heat embossed a sentiment over dark grey cardstock and popped that up over the bottom of the bouquet. This was attached to another panel of grey cardstock that I attached to a top folding white A2 card base. I topped it off with a few gems.
So what do you think? First time trying it out and just playing around having fun is all! A little abstract for sure, but hopefully they do look like flowers on here🏵️! I’m really looking forward to seeing what everyone does with this! Hope you can play along too! (Remember you have 6 weeks to enter! So plenty of time to play!)
THANKS SO MUCH FOR POPPING BY TODAY! HAVE A GOOD ONE & I’LL SEE YOU SOON!
Hello friends! I hope that you’re having a wonderful week! I’m excited about the changes I’m seeing outside with the weather! Looking forward to that cooler temperature and pretty colors!
I wanted to do a bit of “house keeping” regarding my blog. I apologize if you’re having problems trying to leave a comment. I’ve had a few people contact me about this and I noticed that when I cleared the “cookies/cache” from my end…it somehow changed the appearance of my blog comment area…I don’t know why!? I did find out that if you start typing in the comment box, buttons above the box will appear in which you can choose how to login. I suggest that if you don’t have a WordPress/Gravatar account, to choose the envelope button to leave your name and e-mail address that way. (The Facebook login does not work.) Then you can hit the reply button below the box to publish it. I tried letting the commenter leave an anonymous reply (without having to type in name and e-mail), but then I’ll have NO idea who it is unless a name is given within the comment, so I had to re-engage that again. I have also contacted a support person to help me navigate what’s going on and maybe I can get it back the way it was before. I do apologize if it’s giving you a problem. You can also go to gravatar.com to create an account which will work with ANY WordPress platform blog….but you don’t have to unless you want to do that! You should still be able to leave a comment regardless. Thank you for taking the time to care enough to share your support with me…I deeply appreciate it!
So now to get on with some crafting projects! I’ve had to change gears on the seasonal makes and create some cards that I needed to send out to some people and they all happen to be in blooms:
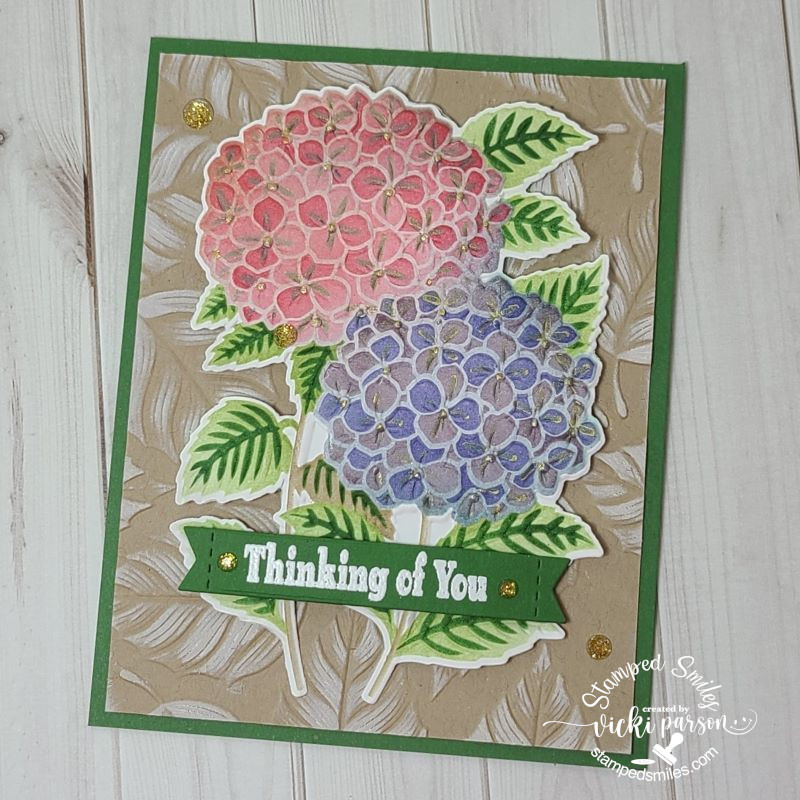
First up is a “thinking of you” card creating for a friend using several Lisa Horton products. These particular LH products all came from Inky Stamper.
I started with the craft background and embossed it with the LH Variegated Leaf 3D embossing folder and went over the texture with white ink. I then used the LH Hydrangea Stencil/Die/Embossing Folder to create the blooms…love how it turned out! I took some gold ink on the last layer of the stencil to go over the centers of the flowers. I popped the bloom up over the embossed craft background and white heat embossed the sentiment from the IS Pig Cause stamp set and cut it out in a banner to place over the blooms. I finished it with some gold gems.
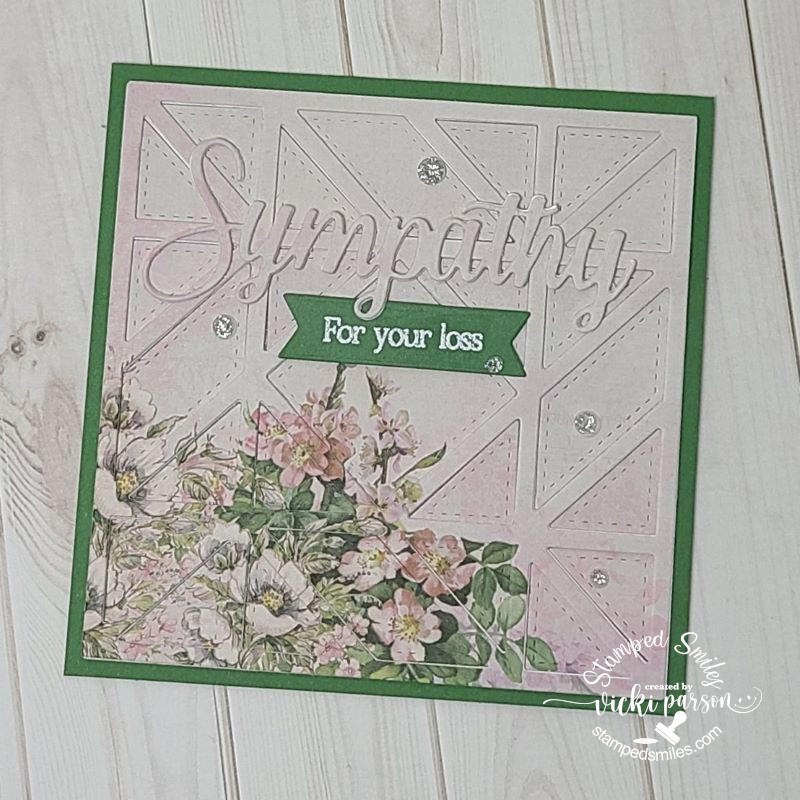
My next card is a sympathy card needed for a craft friend who lost a loved one. This person likes to cross-stitch and quilt, so I thought this MFT stitched quilt die (this one retired) would be fun to do over some pretty floral papers. I had to die cut several white frames with it and lay the centers of the paper cut pieces on the first frame and then I layered two more of the white frames over top with the last pattern paper over that to give it that 3D look. (Not sure where the paper came from other my stash!)
I cut the sentiment from the Whimsy Stamps Sympathy/Heartfelt/Condolences die set and layered it in the same way I did the quilt frame die. I also white heat embossed the sentiment from the WS Deepest Sympathy stamp set and cut it out from a banner to attach right underneath the “p” in the die cut word. I finished this one off with some clear gems.
And on a happier note, I’ve made another bloom card to wish someone turning 75 years young a happy birthday! This is the first chance I’ve had to use this fun die set from Taylored Expressions! The bottom container came from the TE Antique Pails die set. I stamped the TE Burlap Background over it with the same color ink as the cardstock as well as Butter Cream ink to give it some texture. The flower arrangement was cut out from the TE Garden Variety die set in various colors. I also brushed some of the same colors in the centers of the flowers. The centers of the flowers have a silver metallic enamel dot.
For the frame, I’ve used the TE Diagonal Stitch Rectangle die that only leaves the marks but doesn’t cut anything out. The sentiment was stamped and cut out with the TE All Together-Occasions 2 set/die and popped up with foam squares over the panel.
I think the most fun was arranging the flowers in the container!
I hope you’ve enjoyed my cards today and you’ve been inspired! Thank you so much for stopping by! I appreciate you! Have a wonderful weekend!
Hello friends! I hope you’re having a good week so far and staying safe wherever you are in the world. Sending hugs to all experiencing a troubled time. I hope that my post can bring a smile to you today.
I needed to create some get well type of cards and so I thought I’d try to incorporate some challenges while working on them which helps me to concentrate more in what I’m doing and maybe think outside the box a bit.
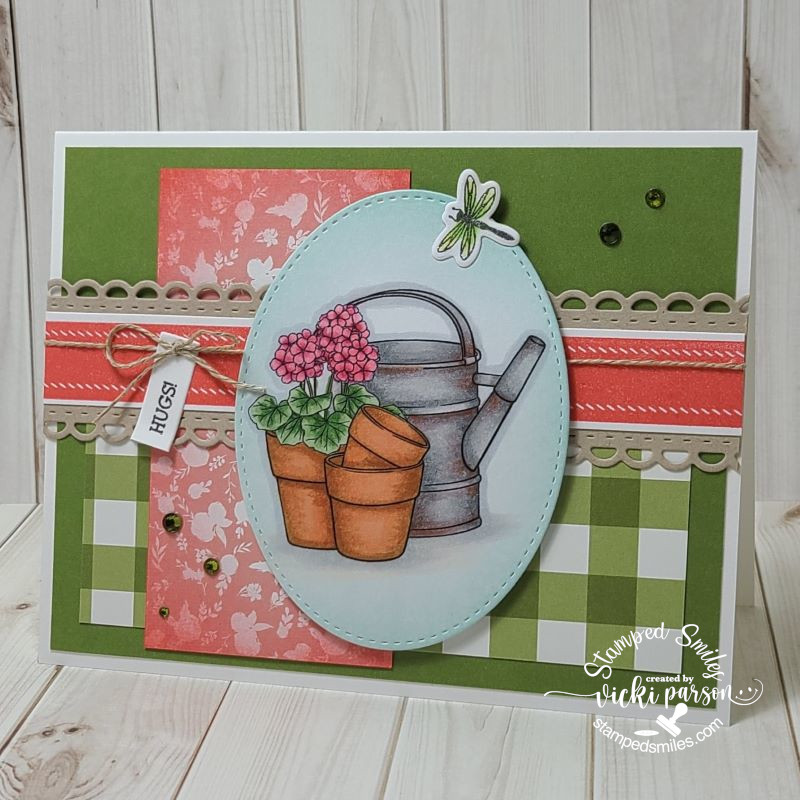
My first card is made with the Beccy’s Place Challenge freebie this month and she also challenged us with a sketch which I’ve decided to use for my card. (see sketch below) I was really happy to use up some more pattern papers with it and I also decided to add a tiny dragonfly at the top to enter another challenge and to adhere to my “bug” theme today!
I printed the image in black and white and colored with Copics. The dragonfly and the center pink strip were stamps that I cut out and added to the design. The rest is pattern paper from my stash except the scalloped kraft border in the center that I cut out with a die. I stamped the sentiment and cut it out to go with my twine around it. *You will notice in ALL of these cards that I’ve used some sparkly gems. I wasn’t aware until posting them! I must be on a kick of wanting to use them!*
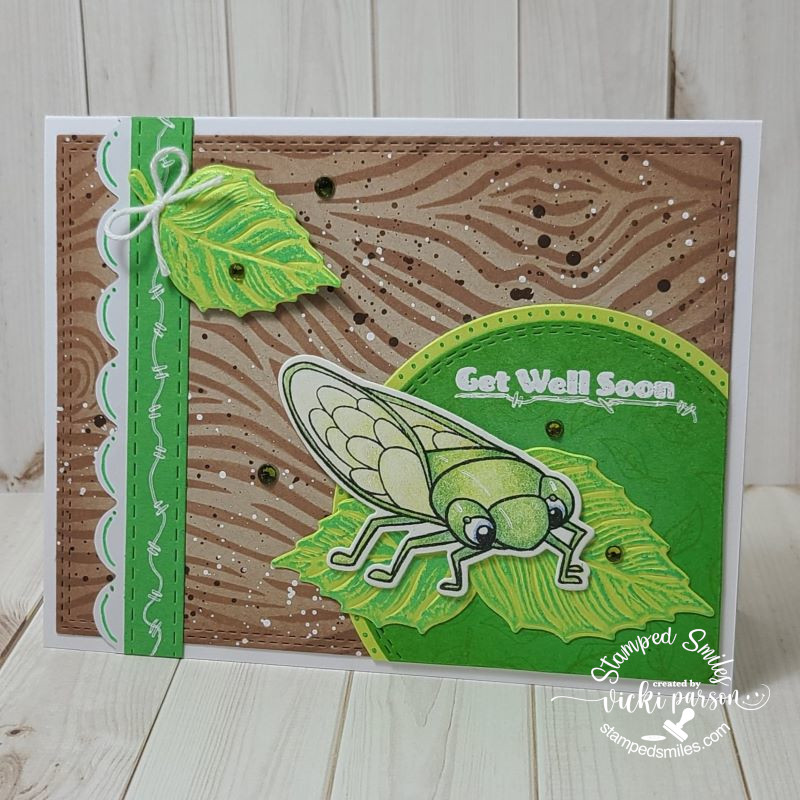
And for this next card, I’ve played with a large bug:
Around my area this time of year, you can hear the sound of these cicada bugs with their distinct noise throughout the trees. My husband likes the sound when a bird catches one! EEW! This bug is a cute one from Inky Stamper called Cicada and I’ve colored it up with pencils this time. Hard to see, but I’ve also added some shimmer with a glitter pen on his wings.
I’ve used the Picket Fence Tree Bark stencil over kraft on the background and then splattered it with brown and white paint. The leaves under the bug and the accent came from the Lisa Horton Variegated Leaf EF+die that I cut over light green cardstock. I used some metallic green wax to go over the details in them. I also used some gel pens to make some doodles around the strip, the circle and under the sentiment along with following a sketch. (details below) You will also notice more sparkly gems! I’m also entering this in the Inky Stamper FB challenge this month which is using an IS bug image.
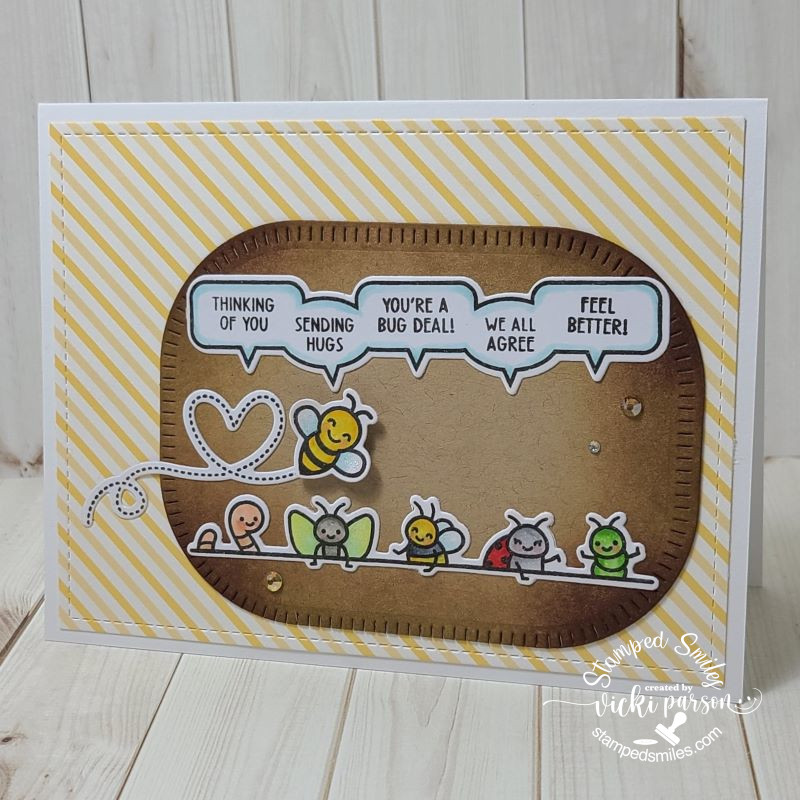
For my last card I decided to keep this one simple’ish’:
So, I know these aren’t real bugs because I’m not squealing, but these guys are too cute! They’re popping up out of the dirt for a special greeting! I mixed in both a new and older stamp set from Lawn Fawn on this one. I’ve used another sketch for this one and decided to keep it very simple. The hardest part of this was the coloring which honestly wasn’t all that difficult either because they’re small images. I’ve also added some shimmer with a glitter pen on the wings and of course, there’s those sparkly gems again!
Hello friends! I hope that you are having a great week so far! After the little “heat wave” hit us, I’ve been enjoying some ‘nicer’ outdoor temperatures, finally. As you may have read in a previous post, I had been working on my son’s wedding invites as well as some thank you cards for them to send out afterwards. I will be sharing that later on, but today I have some other “mass production” that I’ve been working on in addition to those:
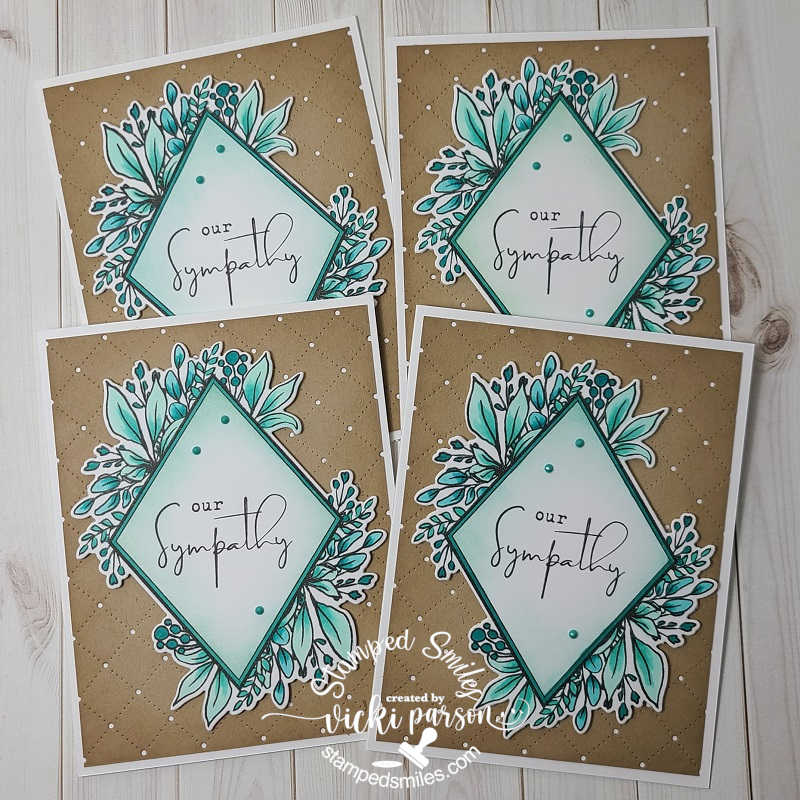
First up, I’d like to share a set of cards I’ve made for the Taylored Expressions Fans FB Group challenge for May which calls for “4-8 mass-produced cards. (similar or identical)” & the colors “Poblano Pepper with Confetti Cake“. I do not own the Poblano Pepper, but I do have a small cube of Confetti Cake ink.
I’ve been wanting to create several sympathy cards so that I had them on hand instead of making at the last minute for one, so I was happy to get these made. I decided it was just easier to make them identical so that I didn’t have to decide how to arrange or cut my papers, etc. I’ve used the Taylored Expressions Diamond Botanicals with dies as well as the TE Diamonds Masking Stencils for the main image. The background uses the TE Pierced Lattice Cutting Plate over a piece of Toffee cardstock.
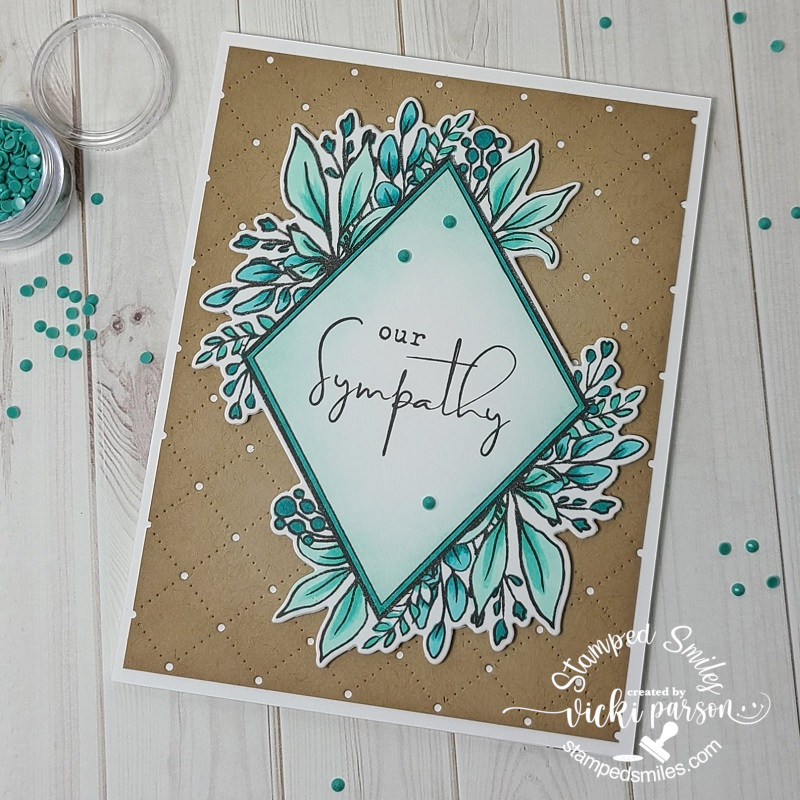
Here’s a close-up look at one of the cards. I stamped the floral image in black ink as well as the sentiment from the stamp set and then took one of the Diamonds masking stencils with some Confetti Cake Ink to softly blend around the edges of the sentiment area with it. I also used a blender brush to blend around the edges of the cut Toffee layer too.
Since I only had the Confetti Cake ink color, I matched up the coordinating colors with my Copic markers and colored in the image using only those color tones. I think it worked out great for sympathy cards. After I colored up the images, I used the coordinating die cut and popped it up over the Toffee cut panels with foam tape squares and then layered it over a side folding white A2 card base. I finished each one with some of those coordinating TE Pastel Tiny Diamonds. (Although the suggested listed coordinating colors on the website don’t have the Poblano Pepper or Confetti Cake, I thought it matched up rather nicely to this anyway.) I think these cards work out great for mailing too.
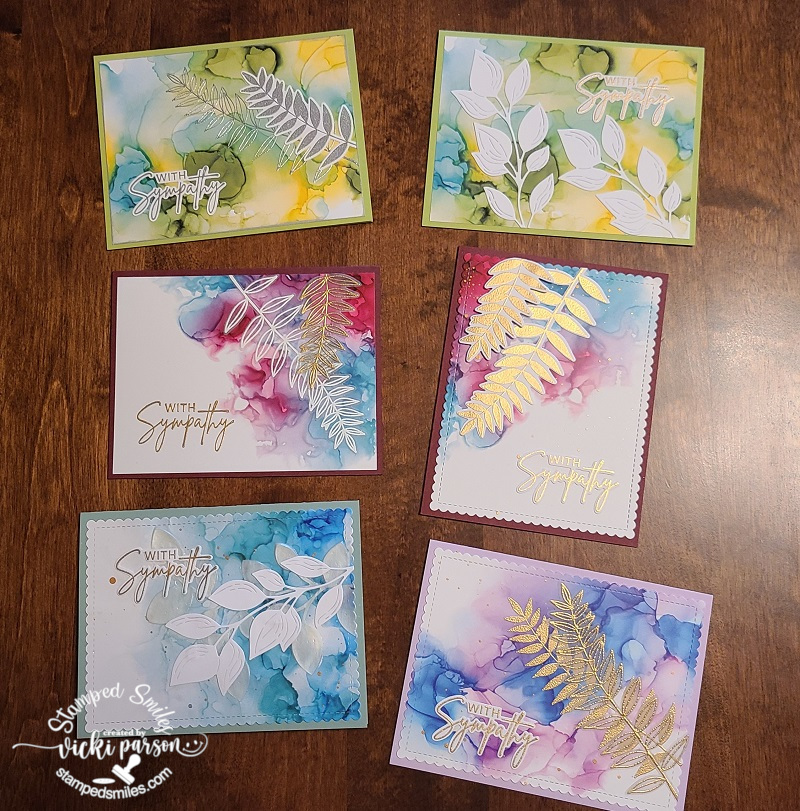
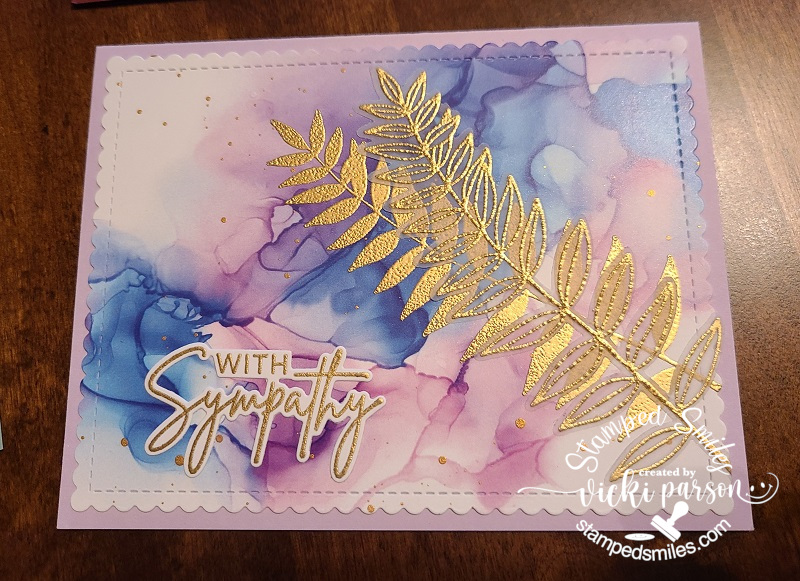
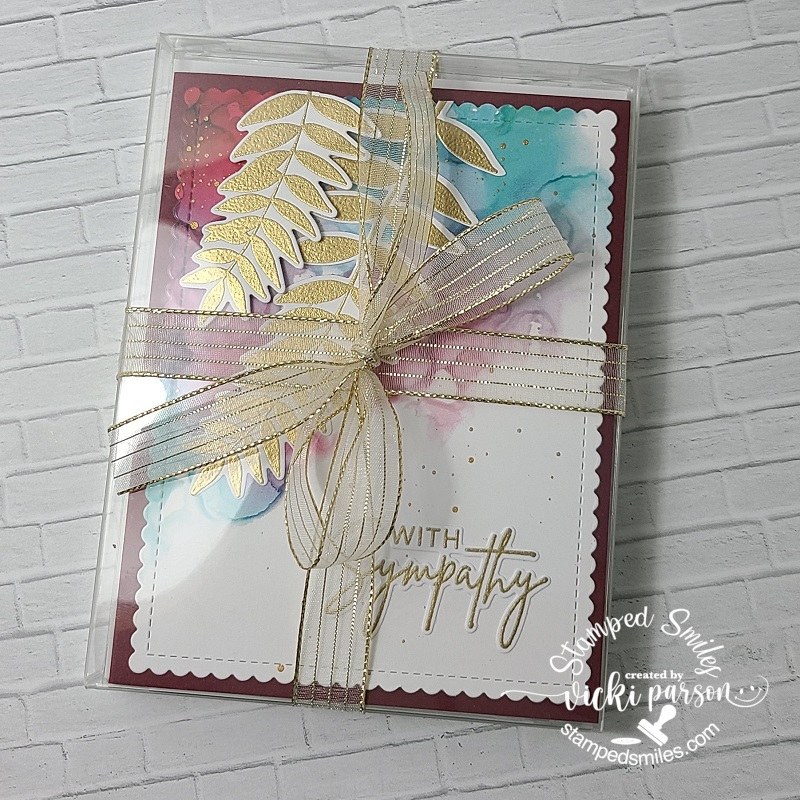
And speaking of sympathy cards and Taylored Expressions, I thought it would be great to create a nice gift set too:
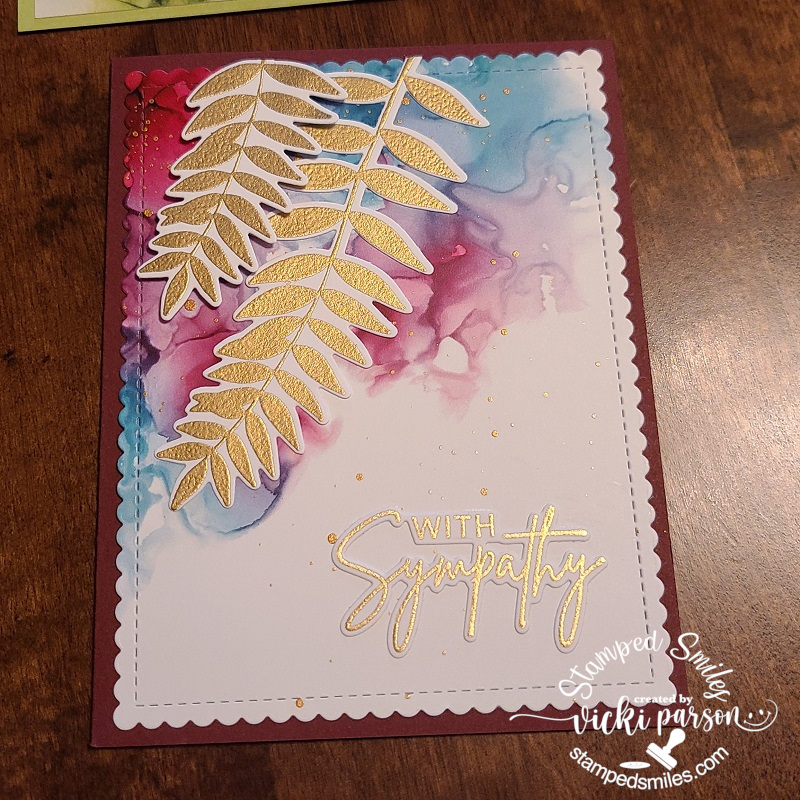
If you remember one of my previous posts, you may remember where I created a greeting card gift set (CLICK HERE). I’ve went along with the same idea here and made them all sympathy related cards using my own acetate box and some Taylored Expressions products. These were all quick and easy to pull together using the Taylored Expressions Done for You Alcohol Ink Background Panels along with a previously released card kit stamp set/die.
I decided to heat emboss several of the fern images with white, gold and silver over a few of the panels, some over white and vellum and then cut out. I placed them along with the heat embossed sentiments cut out and arranged them over the panels. I matched up the cardstock that I had from my stash with the panels to create the completed cards.
Here’s a gallery of a few of the cards up close along with the finished gift box tied with a ribbon: (Just click on each photo from my website to see them enlarged.)
I think this will make a nice gift for someone as I always hear people saying they never have a sympathy card on hand when they need one or for those people that don’t make their own cards too.
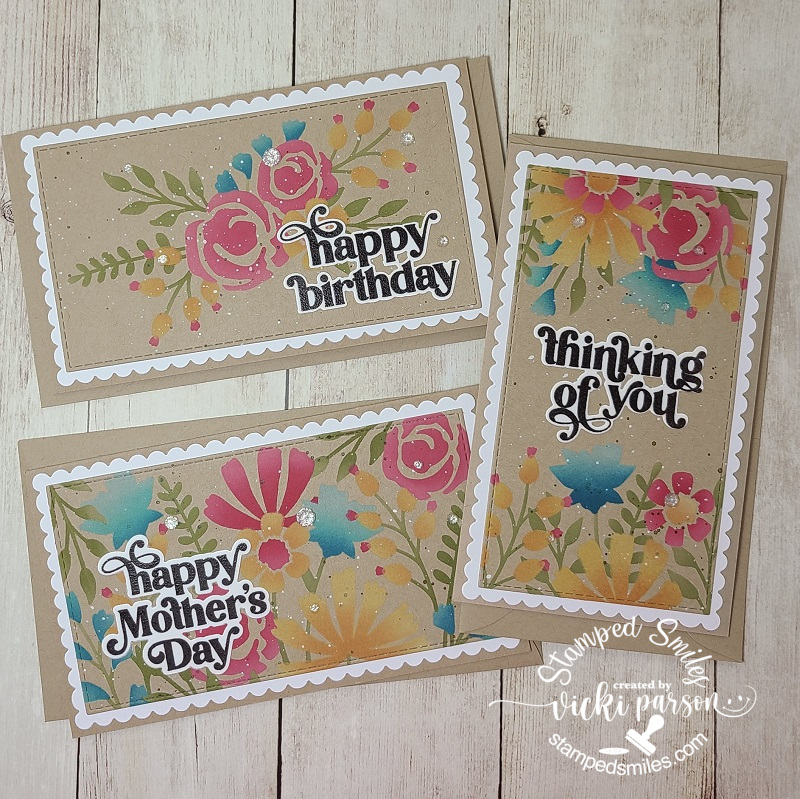
And lastly, I’ve made a couple sets of mini slimline style cards using the Taylored Expressions In the Garden-Triple Slim Layering Stencil:
I quickly fell in love with this quad type of stencils especially with these gorgeous florals! I love the way these floral panels are different from one another, and you can stencil them all up with the same color in one pass! I needed a couple of Mother’s Day cards, so making all of these at once sure came in handy for bonuses too!
Using the “craft-along” video from Taylor and Heather, I used the same, or similar colors that was used, added my black splatters and then used the TE On Occasion with dies as well as the TE Get the Word Out-Mother’s Day with dies for the sentiments where I white heat embossed over black cardstock and cut out. I just glued to the panels and attached each panel to a white mini slimline card base.
And then here’s another set of mini slimline cards using the same products as above except I used Toffee instead of the white cardstock for these. I also stamped the sentiment with dark brown ink over white cardstock and then cut them out to place over the stenciled panels.
I also used both dark brown and white paint to make the splatters over these. I also used the TE mini slimline stitched and scallop die cuts for these cards and then layered them over top of a Toffee mini slimline card base. I’ve also added a few TE white rhinestones for a bit of sparkle too.
I also think that these would make great greeting card gift sets as well! So, then it’s just a matter of which ones to keep and which ones to give away as a gift!?🤔
Hope you’ve enjoyed my mass production post today or have been inspired in some way. Thank you so much for taking the time to drop in and say hi as I enjoy hearing from you!
Challenges:
Creative Friday – No patterned paper (top set of cards only)
Colour Crazy Craft – Anything Goes with coloring (top set of cards only)
Hello friends! Happy Labor Day! Can you believe we’re in September already? The time goes so quickly! I’ve been helping my husband around the house so we can finish up some projects before the weather starts getting cooler on us! He does keep me busy since being retired! LOL!
As I had mentioned, although I wasn’t posting on my blog, I was still crafting. I’ve also been trying to organize my craft room with my husband helping me to move things around as my space had really gotten to be over-whelming. Carrying several card kits (many never used) and boxing them up to store, I realized how many things I actually have and never used! It’s fun to buy stuff, but I think it’s even better to use something I have…as I’m becoming my own store! So for this reason, my purpose has really shifted to TRY using what I already have if possible! I know many of us are in the same boat, so perhaps I can help inspire too!
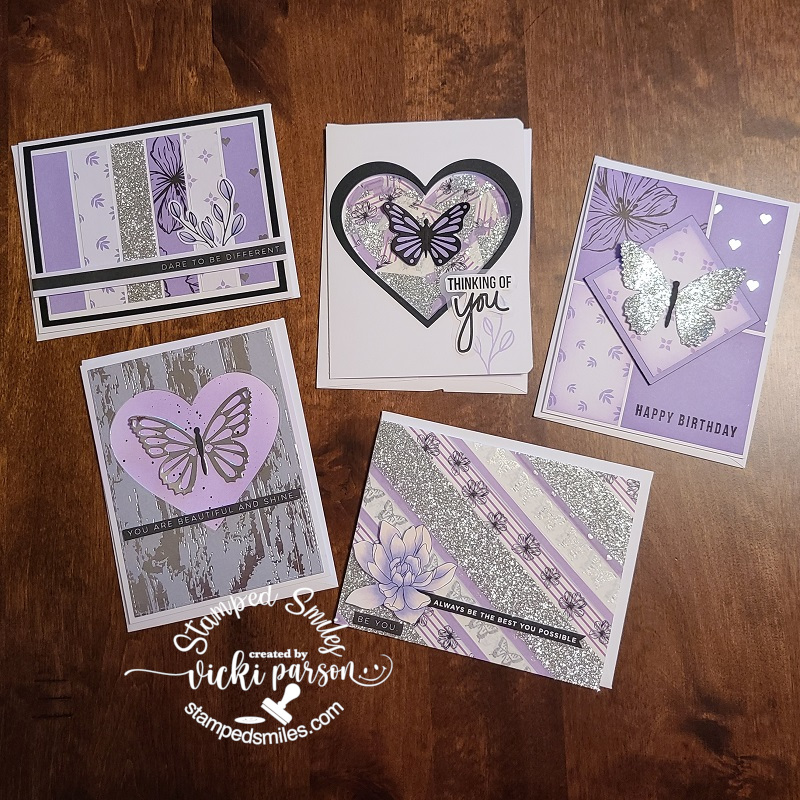
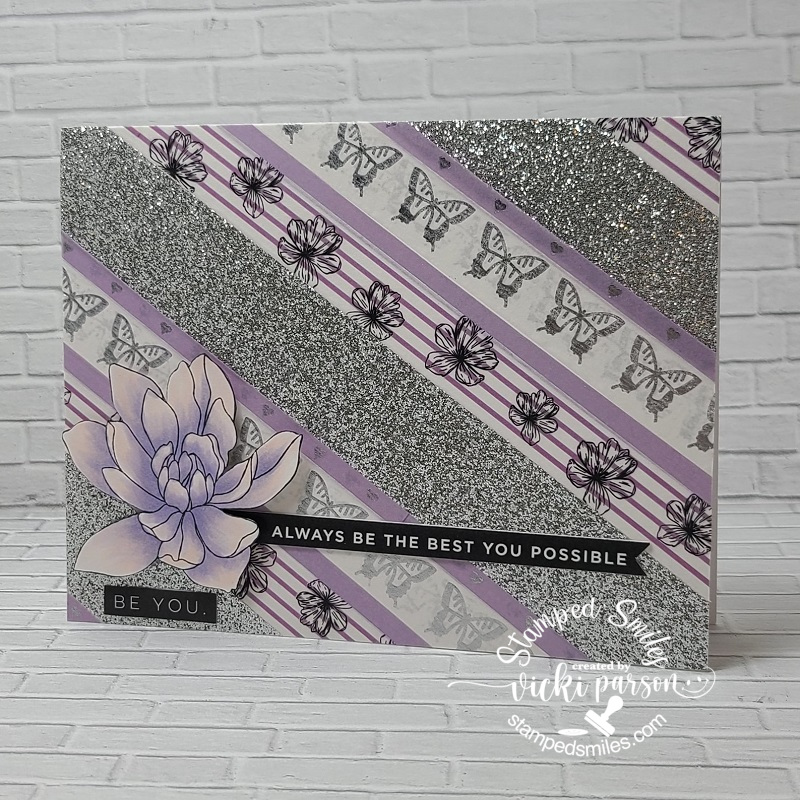
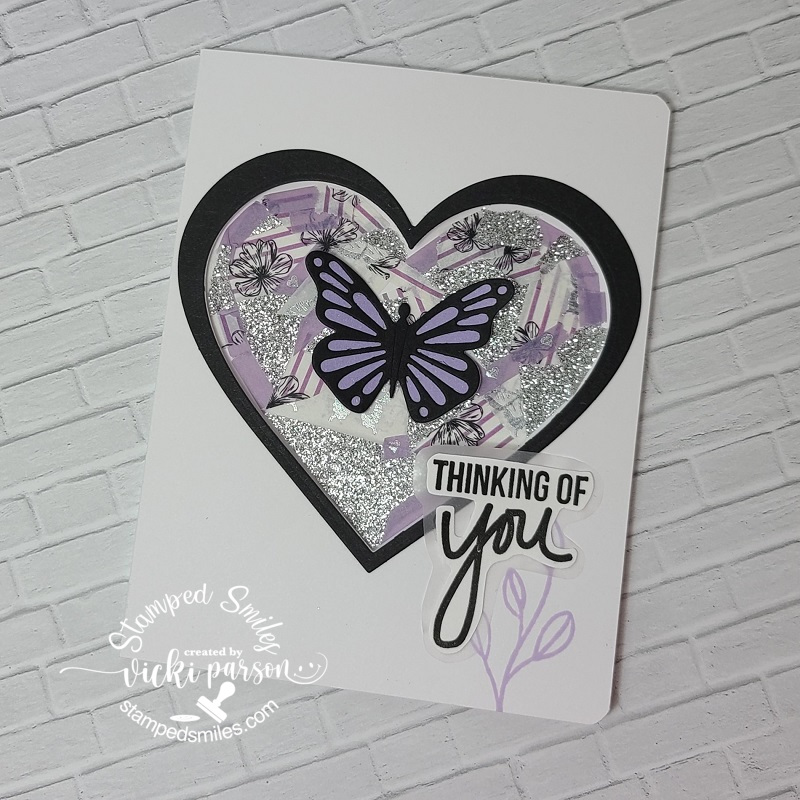
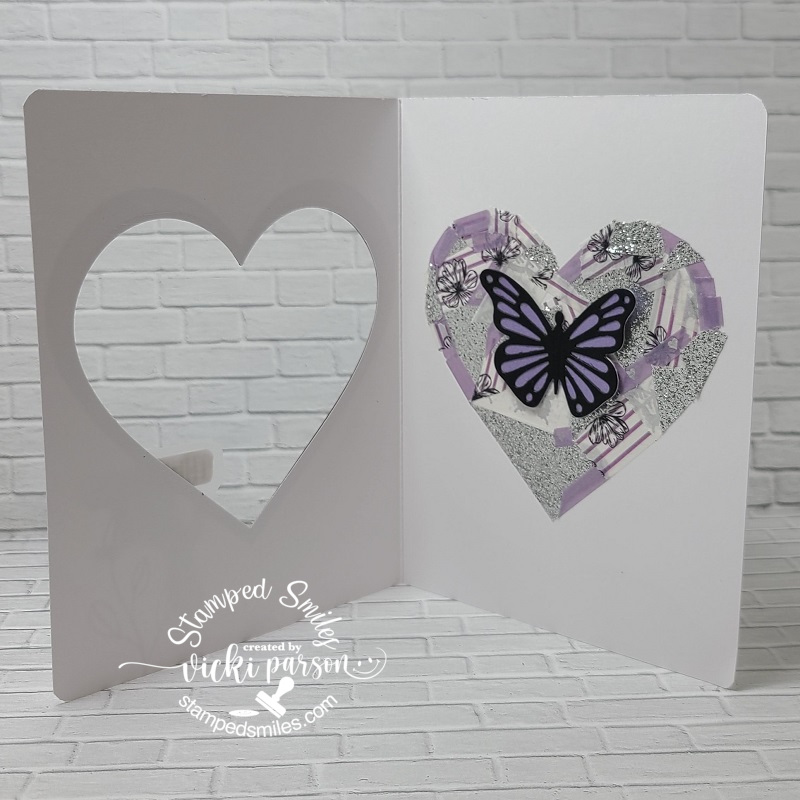
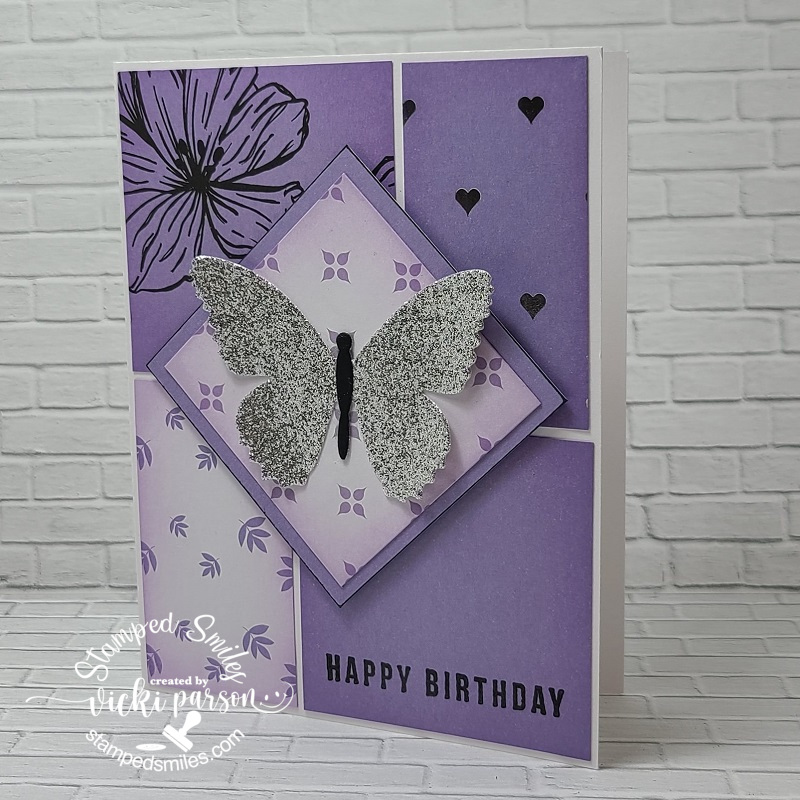
Here’s a set of cards that I’ve been working on from a virtual class that took place sometime in July. It was supposed to be a set of 4 cards created with this gorgeous paper, stamp set and washi tape collection from Teresa Collins (Called “Create a Beautiful Life”). The purple and butterflies really spoke to me, and I got the kit…which I honestly didn’t need, but this is how it’s been! I was supposed to get some already cut butterflies with the kit, which I didn’t…but it was fine, as of course, I had some dies that worked just fine for these cards, and I decided to go off a bit on my own anyway.
Remember the post I had recently done about the washi tape challenge? This is what made me think about this card kit class and that I needed to finish it up! There are a couple ideas in there using some of the pretty washi tape from the TC collection. I think taking all of these virtual classes has taken a tole and burned me out a bit as well because although I’m making the cards (and have a huge stash of them), I usually still have extra product/material to use up too! It sort of compounds the problem and doesn’t really help much. I think it’s just time to consider a heavy freeze on it all! Or at least until some of my stash gets used up anyway! 🙄
Here’s a closer look at each one of the cards in the set. If you’re on my website, just click on each photo below to enlarge it or if you are set up with e-mail, it will probably show in original form. (There’s a caption under each card with the details too.)
The background is made using washi tape.Left over washi tape pieces from previous card to form heart.Inside of heart window with washi tape pieces.layout using pattern paper.More papers used with an ink blended heart window and black splatters.Used more snippets from paper collection.The washi tape cards are the top 3 and the paper snippets/scraps are the bottom 3.
I stamped some of the sentiments that were included with the stamp set from the collection, but there were also strips at the bottom of some of the pattern papers, so I took some of them and used them for some of the other cards.
I really like how they’ve turned out and this will be a nice set of encouragement cards to send along for my donation box this month to “The Butterfly Project” for domestic violence.
Really hope they were inspiring for you as well and that you’re reminded to use your own stash of papers, washi tape and other forgotten materials too!
Hello friends! Welcome to the month of September! I cannot believe that Fall is at the door here! The weather has already started to cool us down a bit and Summer is starting to fade as you can see the flowers starting to die off. Now I will look forward to the changing color of leaves which is always amazing.
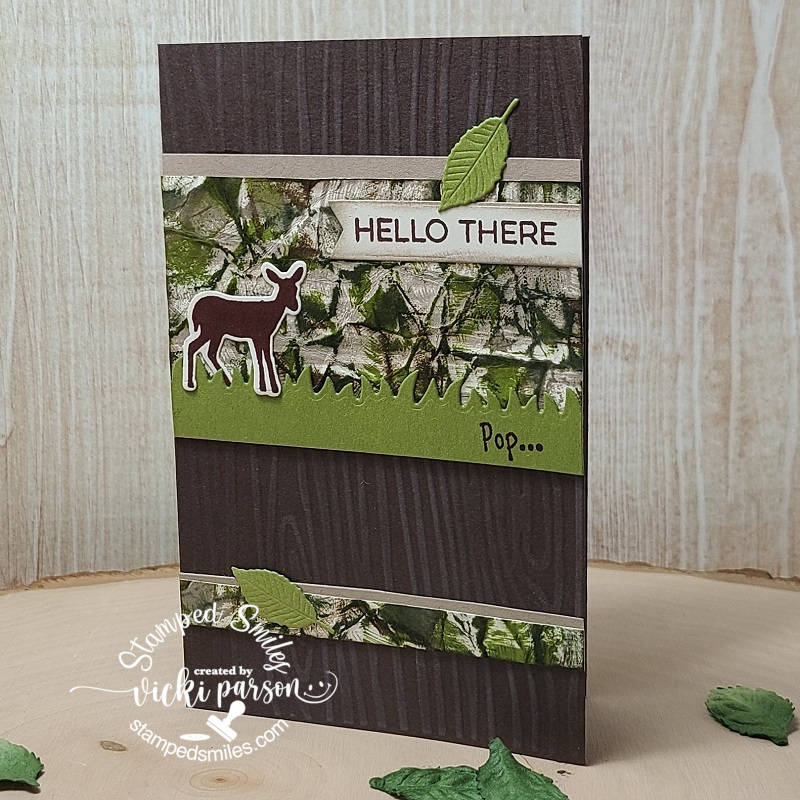
Today I have a project to share that I’ve made for the Splitcoaststampers Teapot “Make it Pop” challenge. This card is in need of a special SCS friend’s father who is having some difficulties with health and I wanted to help with a smile for him if I could:
“Pop” as he is lovingly called, enjoys the outdoors and hunting which is something that several men in my own life enjoy, so I knew that this would be a direction I was going in with some stamps I have from Newton’s Nook.
For the background, I took a woodgrain embossing folder before fully assembling the card.
Since this is a hunting theme, I thought it would be fun to make a camouflage background and so I’ve used the fabulous tutorial on SCS HERE to create the look. I also cut off a thin strip towards the bottom to add some interest to the design as well. Over top of the background, I layered the sentiment from MFT and also cut it out with a banner die. I used a grassy feilds border die from MFT for the strip at the bottom of the panel and stamped the “Pop…” over it in brown ink. I stamped and cut out the deer from the Newton’s Nook Serene Silhouettes set with coordinating dies. I also die cut a few green leaves with an older MFT die for a few accents inside and out.
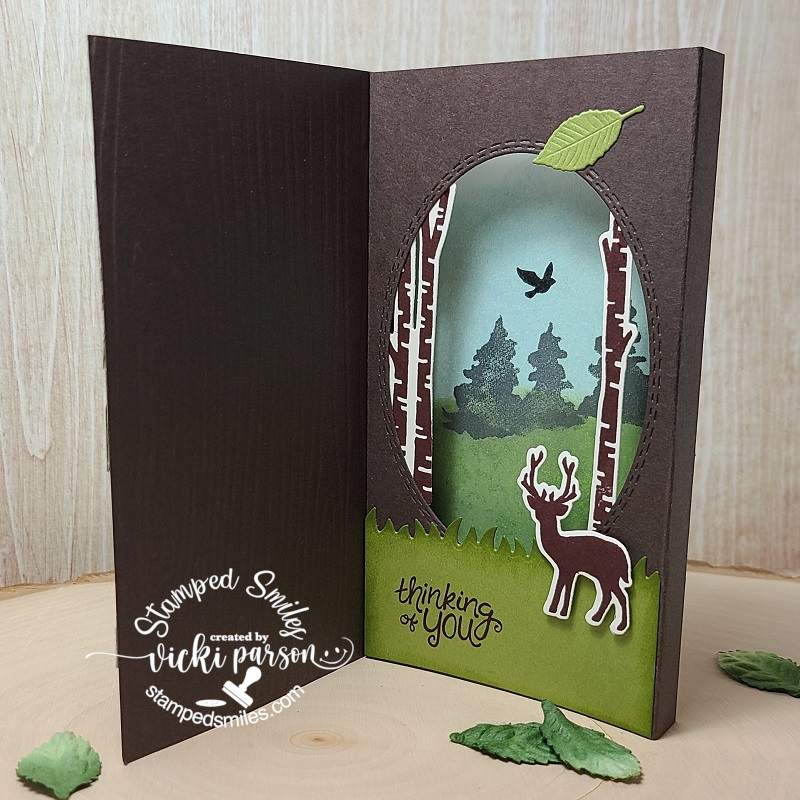
When you open up the card…
Because of the name “Pop”, the challenge was “Make it Pop”, we needed to show some sort of element like this on our design. So I found this really fun “Pop-Up Diorama” card tutorial on SCS for my design.
I’ve used an oval die to cut the center of my card and then used a piece of cardstock for the background to attach behind it. On this panel, I created a scene with blending inks and adding stamped and die cut elements from the Newton’s Nook Whispering Pines stamp set that I’ve also used the sentiment from on the inside.
For the rest of the card, I’ve used the same stamp set that I used on the outside of the card and arranged them to create this scene with different layers that are popped up.
Hope this helps bring a smile over to “Pop”. Thanks so much for stopping in today and I hope you were inspired in some way too!
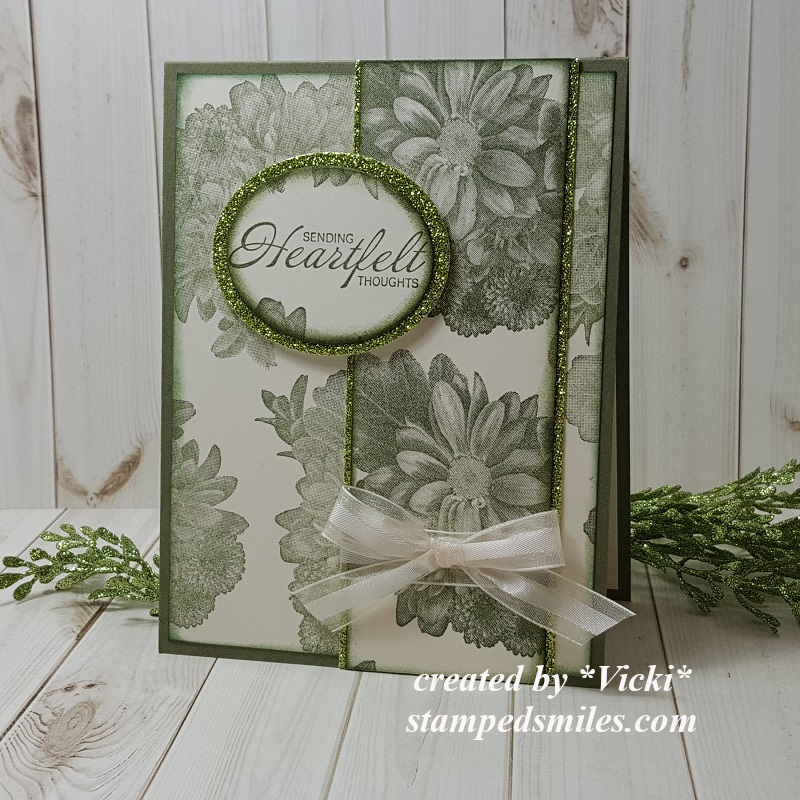
Hello friends! Today starts a new challenge for Cute Card Thursday! The theme for this week’s challenge is “Sparkles“. Usually when I think of sparkles, I usually think of Christmas or snow, but this time I went in a different direction for a reason…
Unfortunately, I needed a sympathy type of card this last weekend and it seems that I’m always making one as I need them instead of making several up at one time so that they’re ready and on hand when the time comes.
This is an older stamp set from Stampin’ Up! that I got a few years back during their Sale-a-bration time and it was a free set called “Heartfelt Blooms“. I actually really love the floral image and how detailed the image is so that you don’t have to color it if you don’t want to. It has been my “go-to” lately when I need something quickly.
I made it monochromatic green with the Old Olive color and Vanilla cardstock. The “sparkle” is that beautiful glitter paper behind the strip and sentiment. The sentiment was cut from oval dies and popped up with foam tape.
Hope you’ve enjoyed my simple card with sparkles today!
Thanks for dropping in and I’ll see you soon my friends!