Bon Voyage! Blog Break

Hello friends! I have a project to share which is a great send off post for an announcement of a blog break I’ll be taking for the next month🛳️🛫.

I wanted to share a project I made by request of my husband which was to recycle a plain notebook for traveling, so I pulled out some Doodlebug items and had some fun:

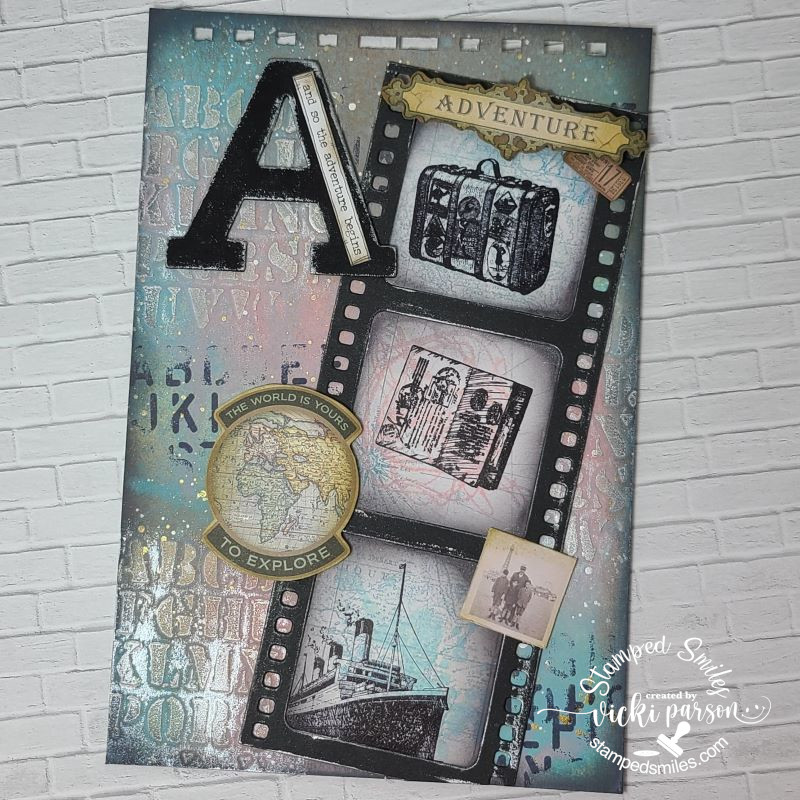
This is the front cover of the notebook which I covered with some Doodlebug papers, but I thought it would look way to busy, so I decided to tone down the papers by adding a wash of white paint over it.  I think it makes the stamped images stand out better.

I’ve used a wave border die to cut some blue cardstock so that the boat could be in the “water” and I’ve added the sentiment underneath it.  I stamped and colored the boat and airplane images and die cut them out with the coordinating dies.  I also die cut a few clouds to add to the scene. 

When I attached the painted pattern papers to the notebook, I decided to add an additional strip along the side of the wire spiral before adding the waves.  I then took a black marker to create stitch marks with.

On the inside cover of the notebook, I took some more of those Doodlebug papers and attached them to the inside.  I’ve made a pocket using the same papers that I’ve used on the front cover and you can see how bright and colorful they are which is why I decided to paint over them.

I added one of the cards from the paper pack to the front of the pocket and then I put a few pieces of washi tape with the airplane postage and travel stamps on the notebook paper.

And this is the inside back cover which was done similar to the inside front cover.

If you look inside the pocket of this, you can see that I’ve also made a bookmark for him that I’ve laminated.  He can use it for his notebook or for another book he may be reading.

And here is the back of the notebook.  This is where I’ve added a black elastic closure for the book BEFORE attaching any papers to it.  The strips from the paper pack help to give it a little design and I’ve also included another shallow pocket.

He seems very pleased with it and has already put it to good use including the pockets and bookmark!  He’s already wrote in it too!  I tried to be sneaky and write a secret message on one of the random pages within the book, but he found it too early!  I don’t get much past him!

I have lots of fun papers and ephemera left over from this cute Doodlebug paper pad, so I will probably be using it for a special scrapbook at some point…hopefully more on that later.


I would like to also let you know that I will be MIA for a while as we will be away on a much needed vacation time!

Thank you so kindly for stopping in and enjoy the rest of your summer!

Challenges:

  1. Ally’s Angels – Anything Goes
  2. The Creative Crafters – Anything Goes #79

August AJ Page-A is for Adventure

Hello friends!  Wishing you a happy weekend!  We’ve had a heat advisory in our area all week, so I’ve been staying indoors organizing, cleaning and crafting!  Hope that you’re taking some time to enjoy your weekend even if it’s just for a moment of time.

I can’t believe we’re at the last weekend of August, because it’s time for the monthly Art Journal Page collaboration with my crafty friend, Carol (from Crafty-Stamper)! We get creative trying to use up our never-ending stash piles along with a prompt for each month.  I know she always has great inspiration to share, so please check out her blog too! Here’s my AJ page with the “SMASH OUR STASH” August prompt of “LETTERS”:

Thinking of YOUR stash, what do you come up with from the prompt?  I think as crafters, we probably all have some type of lettering in our stash!  I have stamps, stickers, chipboard, wood, stencils, ephemera, etc so I knew this would be a good opportunity to pull out something.  And if that doesn’t work for you, I suppose you could take the prompt literally, and attach an actual written letter or make one up yourself to add to your AJ page.  Lots of ways to interpret a prompt which makes it easy to come up with a plan to inspire you.  So this is what I came up with.

For the background:  I started with a 6″ x 9″ Strathmore Acrylic paper with pre-punched holes at the top and stenciled some crackle paste over my Tim Holtz alpha stencil and let dry.  I then took some Distress Oxide sprays in the colors kitsch flamingo, salvaged patina and speckled egg and mixed with sprayed water to let the the colors run over the stenciled areas.  After it dried, I used the Tim Holtz Grunged stamp set and stamped more letters over the background with black archival ink.  The edges were blended with dark gray ink and then I splattered the page with gold and white paints with a fan brush.  Lastly, I took some white gold metallic wax and went over the stenciled letters.

The film strip came from the Whimsy Stamps Slmiline Film Strip die cut out from black cardstock. For the three image sections, I found some packaging with maps images on them and cut it out with the same die.  Since the packaging had a slick surface, I painted it with clear gesso so I could stamp over it.  After it dried, I stamped the three panels with the TH Grunged stamp set in the same colors of Oxide inks as the background and then stamped the travel images with black archival ink from an old Stampin’ Up! set called “Traveler”.  To finish is off, I used an old chip board letter “A” from my stash, painted it black and added some more of that white gold wax along the edges, found a TH “small talk” sticker to go over it and then I drew some lines around it and sponged it to make it look grungy.  I finished it with more ephemera I found in my stash from Tim Holtz and Stamperia… and decided to call it done.

  • Thanks so much for stopping by today!  I hope you’ve found some inspiration with my project!  Enjoy your day!

Challenges I’d like to enter my page for:

  1. Art Journal Journey – Where in the World? (travel theme)
  2. Crafting Happiness – Any type of craft
  3. Creative Artiste Anything Mixed Media
  4. Paper a la Mode – No Cards – I was inspired by grungy things
  5. Crafting From the Heart – No Cards – Anything Goes
  6. Ally’s Angels – Anything Goes

June AJ Page-Metal Train

Hello again!  I hope that you are enjoying your start to Summer or at least enjoying the month of June as we come to a close with it.  We are hoping to get some much-needed rain the next few days, but I see there has been some very strange weather happening everywhere lately.  So whatever your area, hoping it’s good for you.

It’s time for the monthly Art Journal Page collaboration with my crafty friend, Carol (from Crafty-Stamper)! We get creative trying to use up our never-ending stash piles along with a prompt for each month.  I know she will have some wonderful inspiration to share, so please check out her blog too! Here’s my AJ page with the “SMASH OUR STASH” June prompt of “METAL”:

How about you?!  Do you have lots of metal things in your stash?  I have several different things, but this time I wanted to concentrate on my large bag of metal gears along with some older things from my stash.  With the gears in mind, I decided that a steampunk theme would be something I could do.  So I pulled out my Stamperia Aviator themed papers and saw this cool steampunk train to use.

For the Background:  I used my usual 6″ x 9″ 140# Canson paper with the pre-punched holes at the top and painted it with some Periwinkle and Turquoise colored paints.  I splattered some dots over it with silver metallic paint and then went around the edges with some soft black sponged over it.  The wording strip at the top was printed on my computer and it says:  “Not all those that wonder are lost” repeated.  I also printed out the “9 3/4” from my computer and cut it out with a circle die and layered some copper metallic cardstock behind it. (If I saw a train platform with 9 3/4 on it, I’m sure I would want to take it!  Maybe I need a trip to Universal Studios!)

The train along with the “Vintage Travel” badge and compass were fussy cut out from the Stamperia papers.  I used a metal clip from my stash to combine the badge and compass together and used foam tape to attach it to the page.  I also used some foam tape to attach the cut-out train after adding a metal brad to the front wheel.

I wanted to share a closer look at the bottom of the page to explain what I did.  Using some black cardstock, I used the Lisa Horton Mechanical Rivets embossing folder over it.  I used some Finnibair metallic wax pastes to go over the entire panel to get this look.  Before attaching it to the page, I used some large metal eyelets from my stash to attach them at each corner and then I glued some extra metal gears over top of them.

You can see how I’ve attached all of the metal gears to the train here as well.  For the “steam” coming from the train, I just used a sponge and white ink.

Had some fun playing around with the metals and making faux metal as well with this one.  Hope you’ve enjoyed it too!  Thanks for dropping in today and see you soon!

Challenges I’d like to enter this AJ page in:

  1. Art Journal Journey – All About Numbers
  2. Country View – Vintage
  3. Creative Artiste – Anything Mixed Media
  4. Crafting From the Heart – Anything Goes (no cards)
  5. Simon Says Stamp Monday – Pick a Number
  6. Penny’s Paper-Crafty – Anything Goes Using Paper

July AJ Page-Leave The Trail

Happy weekend!  Where in the world did July go?!  I can’t believe we are at the end of the month already.  It’s really been a busy Summer this year and I know that Autumn is a favorite season of mine which will be busy as well, but that’s all a good thing.

It’s now that time for a monthly Art Journal page and collaboration with my crafty friend, Carol (from Crafty-Stamper), so please check out her blog for more inspiration too!  We’re trying to get creative by using up our never-ending stash piles!  So here’s my Art Journal inspiration with the “SMASH OUR STASH” July prompt of: “decorative papers/collections/kits, etc” :

OK, I don’t really know how much of a “challenge” it is to use decorative papers on anything…but I have such a HUGE stash of papers and I’m always trying to find different ways of using it up instead of always hoarding it!  The papers I’ve used on this page are exactly that…I hoarded it!  It’s just too awesome NOT to use!  I purchased this pack of Stamperia Sir Vagabond 8×8 papers when they came out and haven’t even touched it!  Now is the time!

I used my traditional 6×9 size with the holes pre-punched at the top to fit with the book I’m making.  I ran out of my usual 140# watercolor paper, so I’ve switched to another pad from my stash which is Strathmore Acrylic paper…very thick and made to use with paints. (I like the canvas texture it has.)

For the background:  I started with some old paint from my stash and brush blended the different colors.  I didn’t want them to be too bright which I thought would take away from the paper images.  After it dried, I covered the entire page with some Tim Holtz Postage Tissue Wrap.  I thought it ‘stood out’ too much, so I painted over it again using the same paint colors.

For the Journal Prompt with the papers: I cut out pieces with scissors that had interesting images I wanted to use like the circle map, the “Vintage Travel” strip, the hot air balloon with train, the “mountains” at the bottom, the circled compass, the sentiment and then I ‘ripped; a piece for the top of the page and then re-punched the holes.  The compass circle, hot air balloon/train and ripped newspaper edge was sponged around the edges with Toffee ink.

Before placing the cut paper images, I decided to add a fun textural window image.  I stamped the window with chocolate colored pigment ink and heat embossed it with clear embossing powder.

Collage Medium was used to attach all of the different paper images except the balloon/train, compass and sentiment.  I used Pitt Big Brush Markers to go around these collaged images for some shadowing.  I then used some white and chocolate paints to create splatters over the page being careful to cover up the window area.

Before attaching the sentiment strip and the compass, I used some Aged Brass Metallic Wax to go around the edges.  I also used this around my entire page and over the shutters on the window.  I attached the sentiment strip and the metal cogs with 3D Matte Gel and then used foam squares to pop up the compass and balloon/train.

 – Really fun AJ page to create and I hope that you’ve enjoyed it too!  Thanks so much for stopping in today!

Challenges:

  1. Country View – Travel
  2. Creative Artiste – Anything Goes Mixed Media
  3. Mixed Media Lovers – Anything Goes Mixed Media
  4. Arty Divas – Anything Goes
  5. NBUS – Anything Goes + Never-Before-Used-Schtuff (papers!!)
  6. Simon Says Stamp Wednesday – Anything Goes