Guest Designer for Addicted To Stamps & More – Any Occasion

Hello friends!  Hope you’re having a great week so far and have been enjoying the September month!  I look forward to the Autumn Season and all of the beautiful changes it brings!  Today, I have a fun post to share with you!

Super excited to have won a guest design spot over at the Addicted to Stamps and More Challenge blog!  Have loved playing along with the challenges over there for years!  A few years back I had been on the DT for a bit which was really fun too!

They have fun challenges every other week with a select set of 5 categories/themes that alternate for each challenge which makes it nice so that you can plan your creations according to each one!  So, the category/theme for this challenge happens to be “Any Occasion.

This turned out to be a really great category to work with because my husband came to me and said one of his friends that he used to work with broke his leg.  So he’d asked me to make an “interactive” get well card for him:
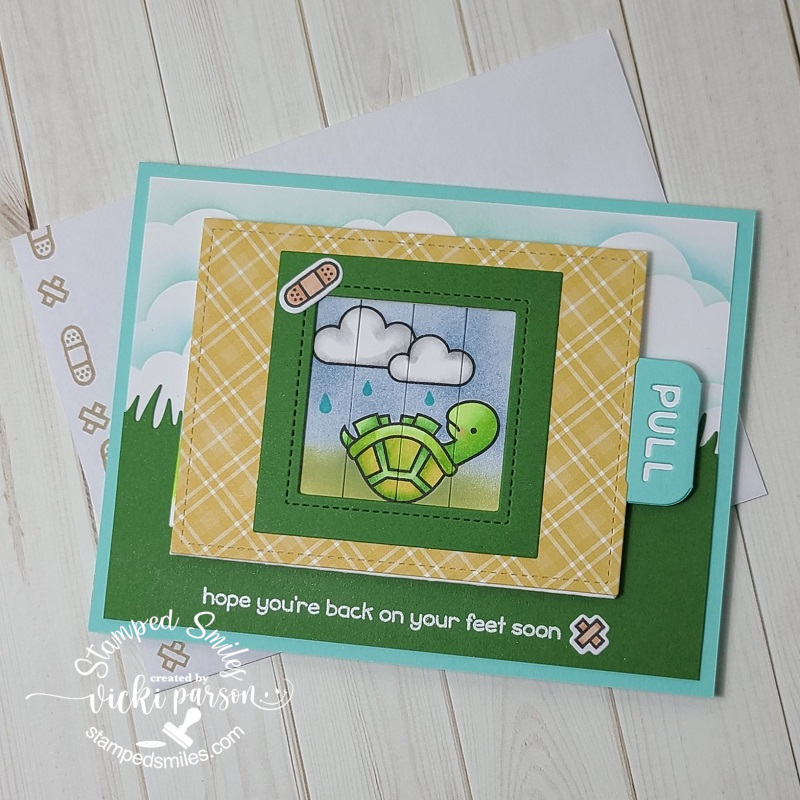
The first thing that came to mind for this was the cute Lawn Fawn stamp set “Get Well Before n Afters” along with the “Magic Picture Changer” die set.  Once you’ve made one of these picture changers, it’s not hard at all and it’s really fun to see it change.  I had made a card a couple of years ago for someone else with this set and it was a really fun card to make! So I grabbed the items and started with the scene for the background.

As you can see, there’s not much showing once you place the pull tab picture changer layer over it.  So I just sponged some clouds over the white background and die cut a grass border for the bottom section of the card.  I also white heat embossed the sentiment at the bottom of the grass section, but waited until the picture changer area was done so that I could use that for placement of the sentiment.  I also added one of the band-aids for decoration to the right of it.

I wanted a tiny scene inside of the picture changers with the cute turtle.  If you’re familiar with the stamp set, then you know there is a turtle on his back not feeling well and then there’s also a “healthy turtle” image too.  So for the “sick turtle” I sponged the sky and grass behind him and the stamped clouds by using masks I cut out from the images.  I then colored him up with Copics.
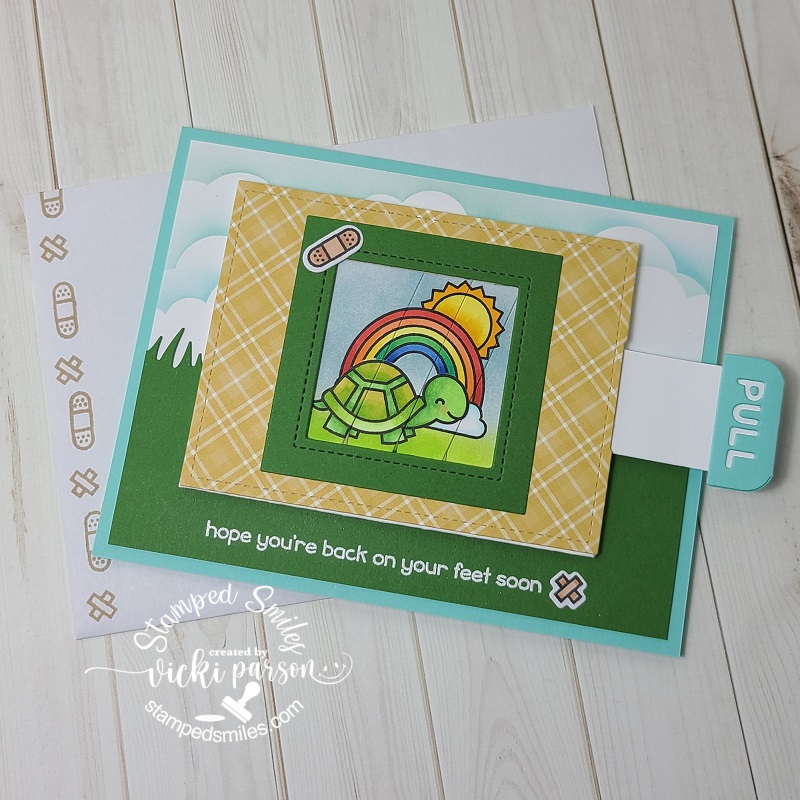
And then of course when you pull on the slider tab, the picture changes and you see the “healthy turtle” with the sun and rainbow instead of the clouds and rain.  LOL, I colored the images with Copics again and made masks for the images so that I could sponge over them for the sky and ground.

I popped up the picture changer section with foam tape over my background panel and then layered it over a top folding A2 sized card base so that there’s message inside too.  Lastly, I’ve added another band-aid image on the green frame and stamped some band-aids on the envelope for mailing too.

It’s certainly no fun to be laid up with a broken leg, so maybe this will help cheer him up!

I hope you’ve enjoyed my card today!  Please stop on over at the Addicted to Stamps and More Challenge Blog to check out the inspiration and come play along with us!

Thanks so much for stopping in!

Challenges I’d like to enter this card in:

  1.  Crafty Animals – Anything Goes featuring an animal.
  2. 2 Crafty Critter Crazies – Anything Goes featuring an animal (last challenge-closing)
  3. Colour Crazy Craft – Anything Goes with coloring (turtled colored with Copic markers)
  4. Watercooler Wednesday – All About Occasions
  5. Happy Little Stampers – Anything Goes with Dies
  6. Creative Fingers – Anything Goes

Turtley Adorable!🐢

Hello friends!  I hope you’re having a great week so far!  Really hate it when technology doesn’t cooporate and I have to figure it out, but hopefully I can soon!  Sometimes it just needs to be done!🤔

Anyway, I was wanting to post some masculine cards I made for Father’s Day earlier this week, but I’ll have to post another time as this card was already done and is needed to enter a challenge that is ending soon:

Vicki-BRMturtle

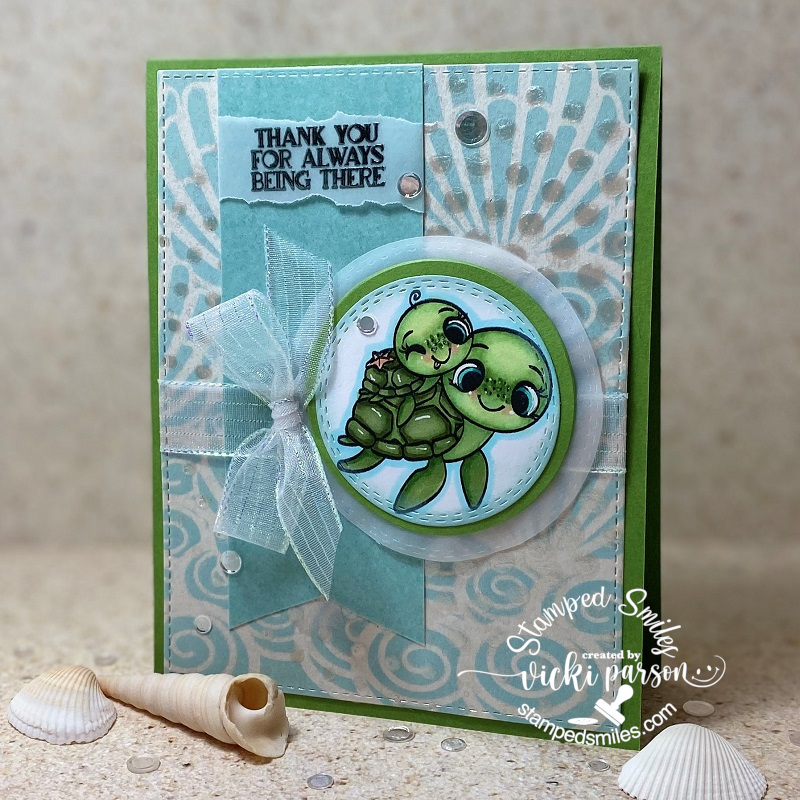
I love that wee little baby turtle riding on the back with his tongue out!  The stamp was colored up with Copic markers, cut out with a circle die, along with another circle layer of Cabbage cardstock that I’ve also used for the A2 top folding card base, and another circle layer of vellum.

I was super excited to try out the brand new Ranger Distress line color “Speckled Egg”  products!  I’ve used the Distress Oxide ink to sponge over the image onto a piece of Sidewalk cardstock that was cut out with a stitched rectangle die.  I also took the Circle Tone stencil and added some Opal Chroma Glaze over it.  You can see how pretty the shimmer is on those dots!

For the banner along the side, I took another piece of sidewalk cardstock and cut my own banner with scissors.  I took my embossing ink pad and covered the banner piece with it and then heat embossed the Speckled Egg Distress Glaze EP over it…turned out so pretty!  I heat embossed the sentiment from the same turtle stamp set over a piece of vellum and wrapped it around the banner before attaching it to the card.

Lastly, I’ve added some metallic shimmer ribbon from my stash and some pretty sparkling sequins that remind me of bubbles.  The card was designed based upon a sketch, see details below post.

Vicki-BRMturtle-close

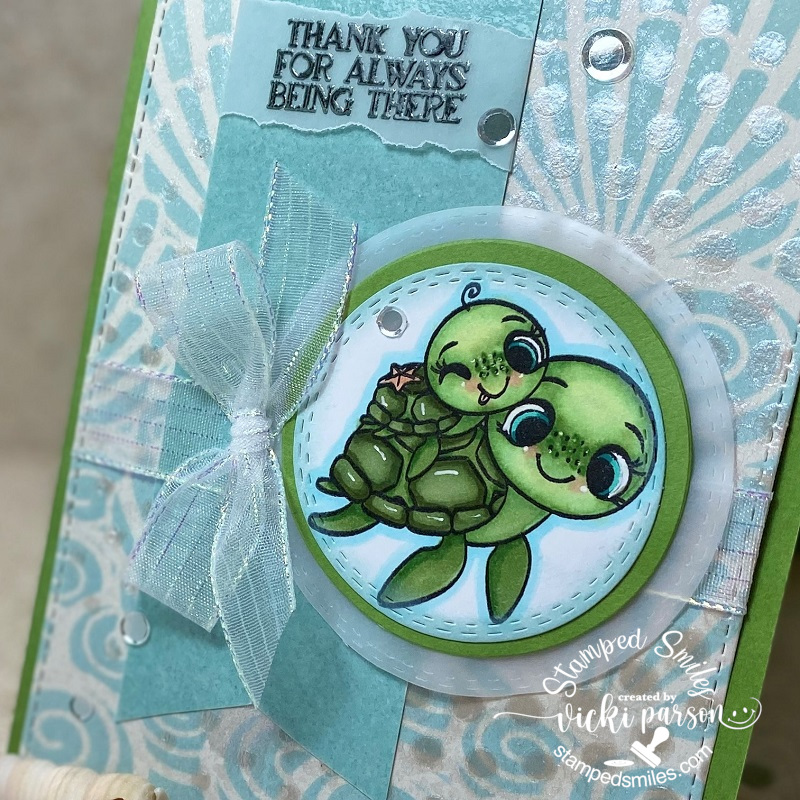
Here’s a better view of the cute image and coloring I’ve done.  I’ve added some dots with a white gel pen for their cheeks as well as their eyes and noses.  I’ve also used it for highlights on their shell.

You can also see a better view of that pretty shimmer from the Metallic Chroma Glaze that I used over a stencil.  Thought it was great for the circle theme going on.

Vicki-BRMturtle-flat

I hope you’ve enjoyed my card today and have been inspired in some way or has brought you a smile!  Thanks so much for dropping in and I’ll be seeing you again soon!

Challenges I’d like to enter this card for:

  1. Colour Crazy Craft – Anything Goes + coloring
  2. The Divas That Cut…Paper! – Summer Fun + dies
  3. Crafting Happiness – #154 Anything Goes optional: Under the Sea
  4. Lil Patch of Crafty Friends – Anything Goes
  5. Make My Monday – #125 Use Stencils
  6. The Sisterhood of Crafters – Stenciling

Guest Design Spot for The Paper Girls With Birthday Fun!

Hello friends!

I’m very excited to share my post with you today for The Paper Girls Challenge as I’ve been invited to be a guest designer for their current challenge of “BIRHTDAY“!  We all need birthday themed projects, so this is a great way to join in the fun and add to your birthday card stash too!  Hope you will join us!

I wanted to pull out some stamps that I had bought a while back and never pulled out to use yet, so this was fun!  Here’s my card:

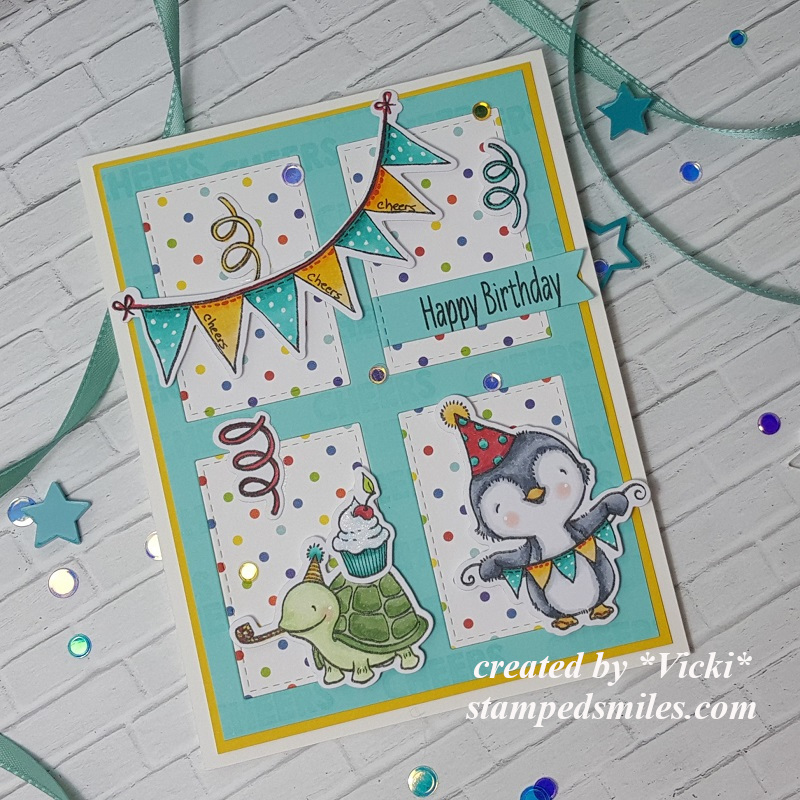
Vicki-PCGguestDT-MFTbday

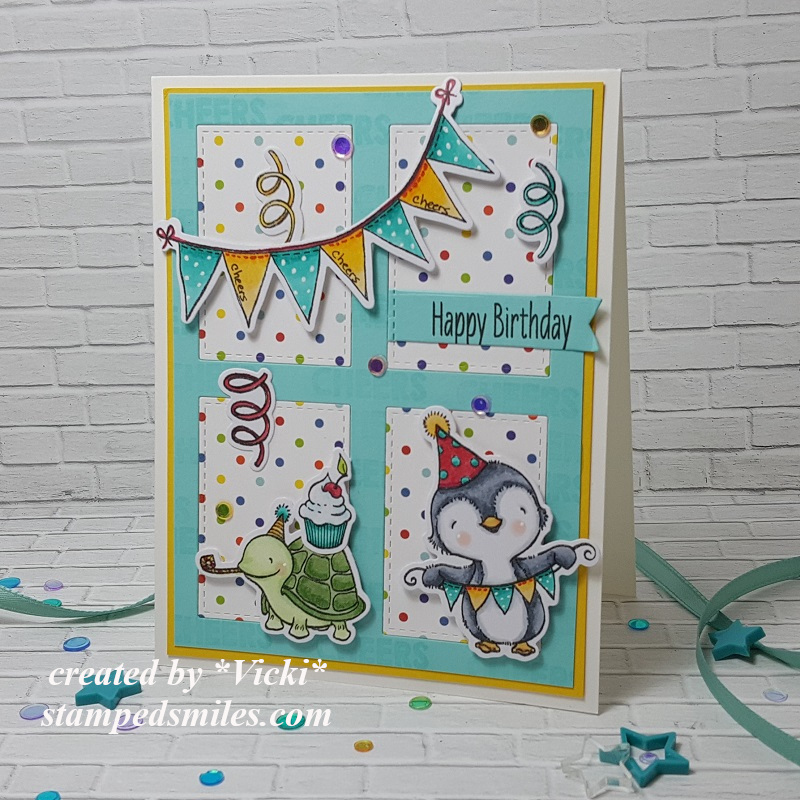
Who could resist a couple of cute party animals! LOL!  I’ve pulled out this adorable “Sending Sweet Celebration Wishes” stamp set from My Favorite Things and made a fun party scene with it!

For the card front, I’ve die cut some Summer Splash cardstock with the Gift Box Cover-Up Dienamics and then used it to also cut some older MFT pattern papers to fit inside the die cut squares.  I layered these pieces over a piece of MFT Daffodil cardstock (looks to be retired) and then mounted it over an A2 sized top folding white card base.

I’ve used the same Summer Splash cardstock to stamp the sentiment from the stamp set and used a banner die to cut it out with and used the Gift Box Cover die to cut the end of it to match with the upper right box area.

For the Gift Box Cover-Up “frame”, I took a sentiment from the MFT Penguins in Paradise and stamped the “cheers” image randomly with VersaMark ink all over it, but then decided that you couldn’t see it very well, so I added the word to the yellow banners with a black pen in my own writing.

I’ve used the coordinating die set for the Sending Sweet Celebration Wishes set to cut out the colored images and attached them to the card front.  Some I’ve popped up with foam tape and the others were glued.  I also wanted to add a little sparkle, so I’ve attached a few confetti sequins to finish it up.

Vicki-PCGguestDT-MFTbday-close

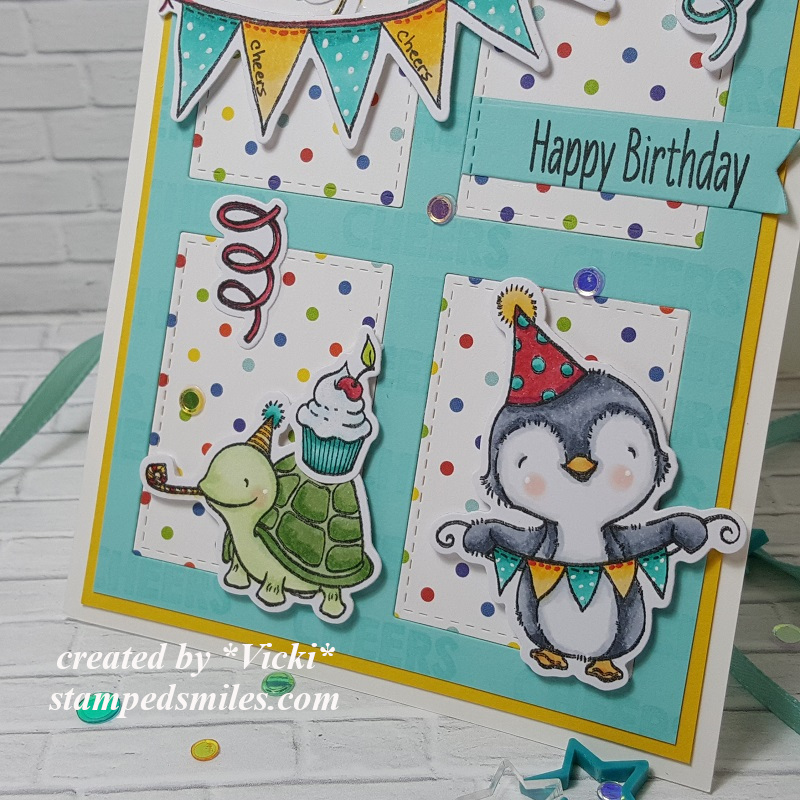
Here’s a closer look at the coloring I’ve done on these cuties.  I’ve used a white gel pen for their cheeks as well as adding some polka dots to the party banner.

You can see where I’ve used a marker to write the words on the banners and I also used it to create stitches along the top of each banner too.

I’ve also added some shimmer with a glitter pen over the cupcake frosting.

Vicki-PCGguestDT-MFTbday-flat

I hope you’ve enjoyed my birthday party animals card today and have been inspired in some way!

Thanks so much for stopping in today and I’ll be seeing you soon!!

Challenges:

  1.  MFT Birthday Project– Jan “Cheers”
  2. Crafty Calendar – Use die cuts/punches
  3. Seize the Birthday– Creatures Great & Small or Anything Goes
  4. Creative Knockouts – Birthday Wishes
  5. Crafty Animals – Anything Goes + animal(s)

In Stitches for Cute Card Thursday

Hello friends!  Wow, this week has really been flying by!  I seem to think this almost every week, but I know when the weather starts getting warm, I seem to get more busy outside and perhaps that’s why with the weather being so nice, warm and sunny.  I am enjoying it!

Today starts a brand new challenge over at Cute Card Thursday this week and the theme is “Stitching (faux or real)“.  There are all types of ways to incorporate stitching into your paper crafting and I enjoy adding it to my creations.  So here’s how I’ve added it to my card for today.  I thought this would be such a cute idea for a get well card.

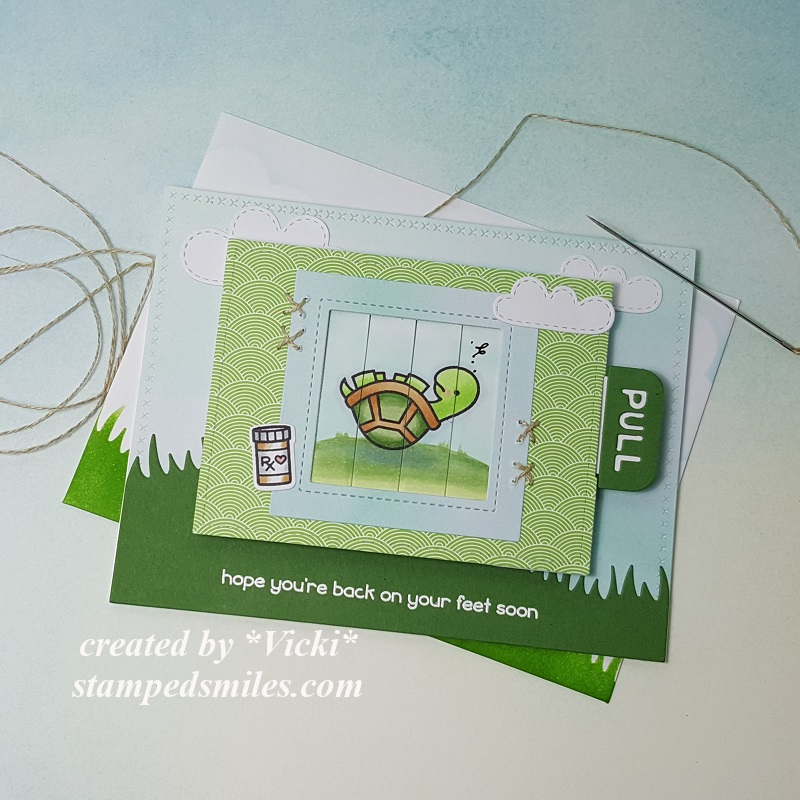
Vicki-CCT582

To make the slider for my card design, I have used the Lawn Fawn Magic Picture Changer and the Magic Picture Changer Add-On dies.  It looks pretty intimidating, but it actually wasn’t that bad to put together as the measuring and cutting is done with the die.  I’ve used the adorable Get Well Before ‘n Afters stamp set to create this and I know I’ll be making another one with the whale to make another card as I’m in need of one.  The turtles were colored with Copic markers and I’ve used them to also create the grass and sky background behind the turtle as he needed something to “ground” him and not be up in the air.  I took a water-proof pen and added a scribble above his head as he’s not happy being up-side-down!

I’ve cut the “add-on” pieces and the background of the card with the Lawn Fawn Watercolor Wishes and Really Rainbow paper packs.  But before attaching the “add-on” papers to the turtle frame, I took a needle and some linen thread and added a few cross-stitch marks around the blue frame.  I’ve also cut a few clouds from a retired LF die set and added the die cut “bottle” that I colored from the same “Get Well” stamp set.

Before I attached the turtle mechanism onto the card, I also die cut a strip of grass with the Grassy Hillside Pop-Up Add-On die in some green cardstock.  I then took one of the sentiments from the same “Get Well” stamp set and white heat embossed it at the bottom of this piece.  The turtle mechanism was popped up over the card front base with some foam tape which was all mounted to an A2 sized top folding card base.

I thought it would be fun to decorate the envelope too, so I die cut a piece of the grass again and used it as a stencil to sponge in some grass along the bottom of the envelope and then I also stenciled some clouds over it.

Vicki-CCT582-A

And here’s what the turtle looks like when you pull the tab out.  He is much happier now that he’s back on his feet again!  I think I played with this card and pulled that tab to watch that turtle get on his feet over and over! LOL!  I hope it will have the same effect on the person who receives it too!

Vicki-CCT582-close

Here’s a closer view of the coloring that I’ve done.  It was a small image and so I’ve kept the coloring pretty simple.  For the “happy” turtle I’ve made a few clouds in the sky.  To make the slider part work, you don’t want to add anything other than the coloring so that it slides smoothly.

Vicki-CCT582-flat

Here you can sort of get a better look at the coordinating envelope that I’ve made to go with the card.  Although I have made some hand stitched marks on my card, the dies themselves already have lots of cool stitch details in them when you cut it out, so I think it just helped add to the design.  This card is going to a male, so I didn’t want to create anything that was too over done.  I think this might bring a smile, what do you think?

P.S.  If you remembered my post the other day, I shared a photo of the Robin’s nest with one egg in it.  Well, since I’ve last checked, there are a couple more in there now:

3 robin eggs

Every time we go out there, the mother watches for us to leave as she wants to sit on her eggs!  This is why we can’t get a photo of her actually sitting on it.  But we will see if anything happens in a few weeks! 🙂

Thanks so much for dropping by today!  I hope you are enjoying your week and I’ll see you soon!!

Challenges:

  1.  Sweet Stampers – Animals
  2. Pammies Inky Pinkies – PIP1919 Anything Goes
  3. Crafting From the Heart – Anything Goes
  4. A Bit More Time to Craft – Anything Goes
  5. Simon Says Stamp Wednesday – Stitches
  6. Watercooler Wednesday – masculine anything goes WWC221

Turtley Impossible

Hello friends!  I really wanted to post earlier this week, but life sometimes gets in the way of all of the crafty fun that you want to do as I’m sure you know! 🙂

If you remember earlier this Summer my post about the fun stamp convention I went to in Collinsville, I shared a photo of the TONS of things I got while I was there.  I still haven’t been able to play with all of it…yet, but there are a couple of companies that I fell in love with, so I decided to place an order for some things that I wished I had gotten while I was there! LOL!

This “new to me” company called Pink & Main was a booth that I went to and bought some items from.  I had seen a video last year of something that I fell in love with and was determined to purchase that while I was there.  I started following along with them and fell in love with these sweet turtles that I’ve used on my card today:

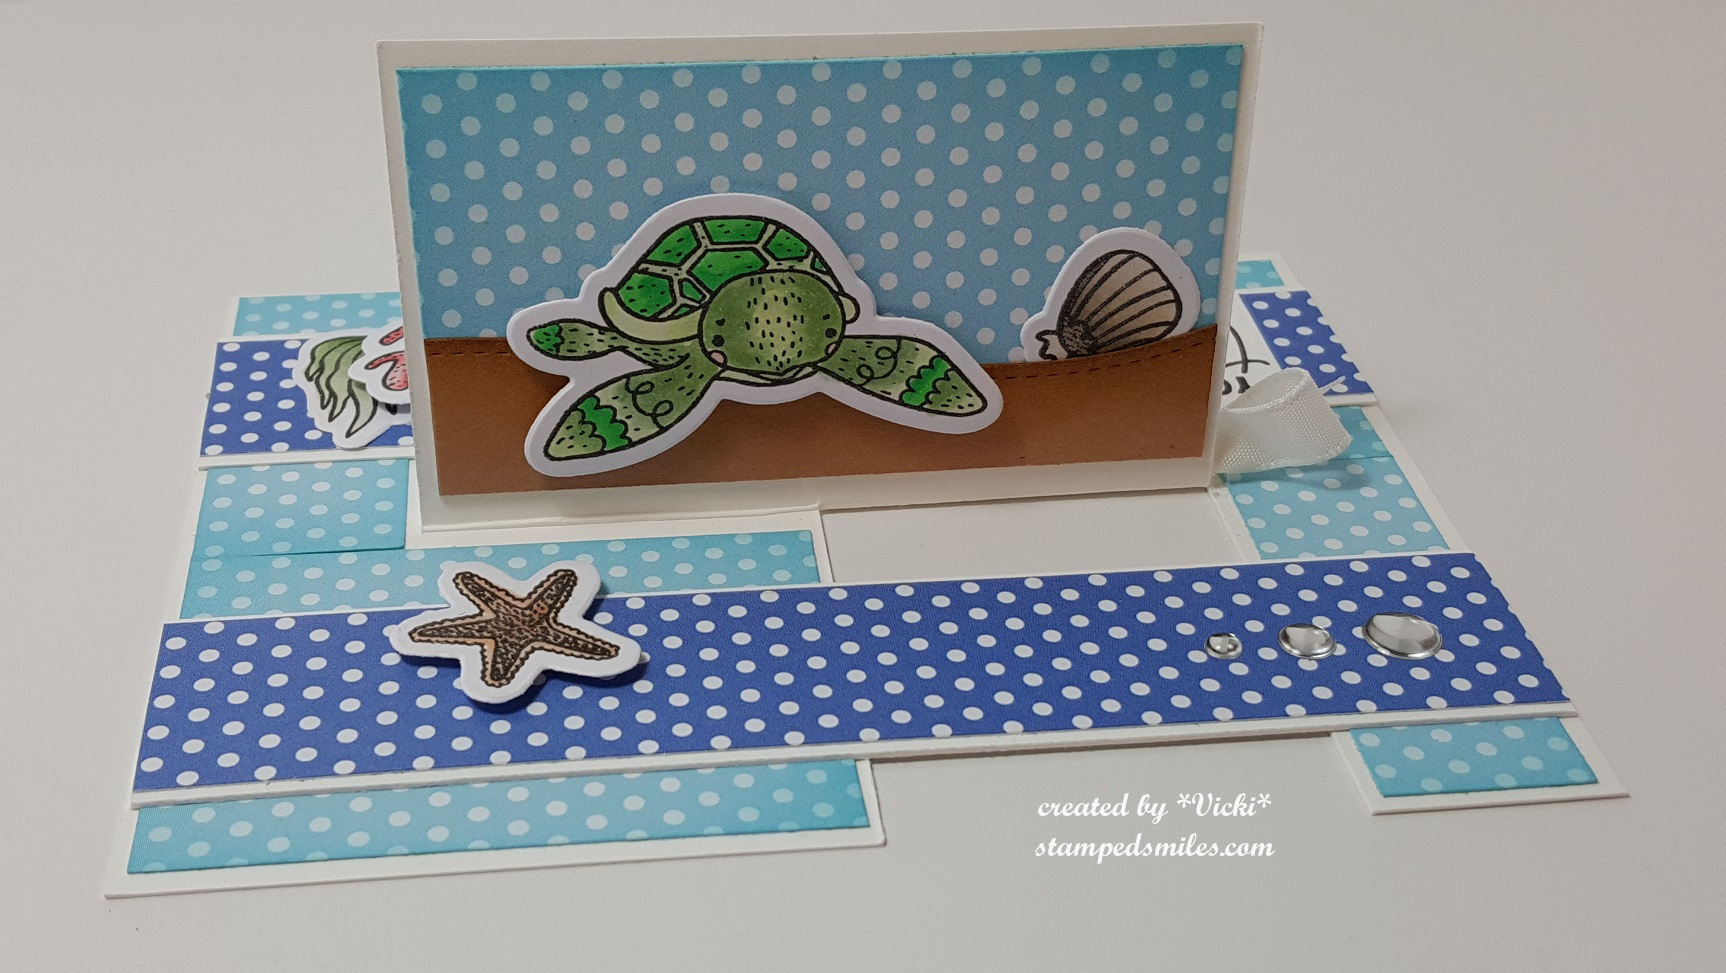
Vicki-Impossible Card-PM

Before I get to the details of this card, I wanted to explain what type of card this is.  There are many challenge blogs I like to follow because I enjoy challenging myself while paper crafting as many of us like to do.  So I came across this challenge that was asking us to make an “Impossible Card“.  (I have linked a tutorial that I found on Splitcoaststampers if you want to learn how to make one for yourself.  Just click on the card name.)  I had not seen nor heard of one of these before, so naturally I had to play along!  What I like about this card (NOT impossible at all…so easy!), is that the center panel naturally pops up like that AND you can fold it down to lay flat in a regular A2 sized envelope!  (You can create different sizes and such, but I kept mine simple.)

To decorate this card, I’ve taken the very cute Pink & Main Turtely Amazing stamp set with the coordinating dies to color with my Copic markers and cut them out.  I’ve also used the Pink & Main Sunset paper pad as well as the Waves Border Dies to decorate the background scene.  The white strips that I’ve used for stability on the card was stamped with the sentiment from the same set and then layered with the blue polka-dotted paper around it.  I added the cut elements and layered them on top of the strip.  For the main popped up panel, I’ve taken the cut out turtle and layered him among the cut wave border at the bottom.  I then took some of the Pink & Main Silver Glossy Dots to embellish the upper corner.  I also took some ribbon and added a bow just below the turtle.  For the light blue polka-dotted papers, I sponged some blue distress ink along the edges for a bit more color.

And since you can completely turn this card around, I wanted to decorate the other side as well:

Vicki-Impossible Card2-PM

For this side, I took a different turtle from the same stamp set, colored and cut him out along with the other elements to arrange on my card scene.  I took some brown card stock and cut a strip with a stitched border die and inked up one edge for a sandy beach for the turtle to sit on.  I also tucked the shell behind the border and added the star fish on the strip with foam tape.  I also added some more silver glossy dots to the strip.

There would still be room to write a personal message on the bottom portion of the card if someone wanted to.  You could also easily write something on the back somewhere on the lighter blue spots.

Super easy and fun to make which is something that I needed right now, so I’m glad I decided to give this a try!

Here are the challenges I’d like to enter this card for:

  1.   CCEE Stampers (CCEE1827) – The Impossible Card
  2. Brown Sugar – Two patterned papers on project
  3. Artistic Inspirations (204) – Anything Goes
  4. Crafty Creations (#370) – Anything Goes
  5. Crafting by Designs – Anything Goes